
Chapter 9. Setting Up an Instant Messaging Platform with Openfire
Instant Messaging in a Development Project
Today, communication by chat and instant messaging is almost ubiquitous. There is little need to introduce these technologies. However, they are often seen as purely recreational software tools, and their potential as a team communication tool is often ignored. Indeed, chat and instant messaging can be a useful complement to face-to-face meetings, telephones, and emails, without eliminating the need for any of these other communication techniques.
This is especially true when team members are scattered across different countries or continents because telephone communications are expensive, and IP telephone is not always feasible because of variable network quality.
One solution is to use one of the countless public messaging servers. There are many available, and they work well. However, this approach may be frowned upon by system administrators and/or management who do not wish to see potentially sensitive information circulating outside of the company.
The other solution is to install a private messaging server within your organization.
This is where Openfire can help. Openfire (formerly known as Wildfire) is a powerful open source Java chat and instant messaging server based on the XMPP (Jabber) protocol. It is simple to install and configure, administration is easy via a slick web console, and it offers an extremely rich range of features.
Installing Openfire
Installing Openfire is easy. Just download the installation package from the Openfire web site and decompress it in an appropriate place. Here we install it in /usr/local on a Linux server:
# tar -xzvf Openfire_3_0_0.tar.gz
# mv Openfire /usr/local
If you prefer, it also comes bundled with a JRE in the form of a Windows installer or a Linux RPM.
Openfire comes with its own embedded HSQLDB database, which you can use to get up and running quickly. Openfire also lets you use an external database, which can potentially provide better performance. Openfire should work with any JDBC-enabled database, and comes bundled with drivers, scripts, and instructions for some of the more common databases such as MySQL, Oracle, PostgreSQL, and Microsoft SQLServer.
To start up Openfire, just use the Openfire script in the bin directory, as follows:
bin/Openfire start
To shutdown the Openfire server, use the same script with the stop option instead:
bin/Openfire stop
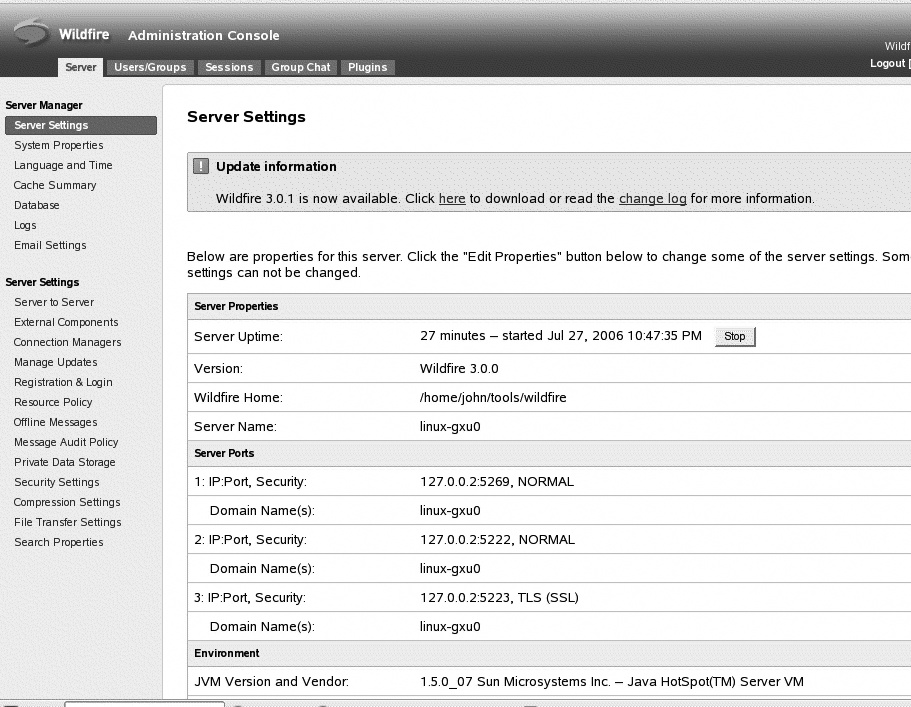
Finally, to finish your installation, open the administration web site by connecting to http://127.0.0.1:9090/. The administrator account is by default “admin,” with a password of “admin.” When you connect for the first time, you step through a series of screens in which you configure server settings such as language (there are nine to choose from), database configuration, and administrator email and password. When you’ve finished, you can connect to the Openfire Administration Console (see Figure 9-1).
Setting Up Users and Accounts on Openfire
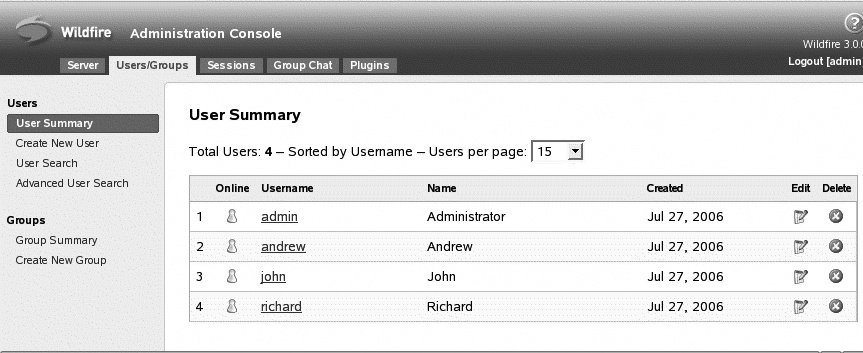
All your users will need user accounts on the Openfire server. Openfire comes with a fairly intuitive screen where you can create and manage user accounts and user groups (see Figure 9-2).
You can also configure Openfire to connect to an LDAP directory (how to do this is well-documented in the Openfire documentation), an external database (see Authenticating Users in an External Database), or even a POP3 mail server (see Authenticating Users Against a POP3 Server).
Your users will, of course, need Jabber-compatible IM/Chat client software installed on their machines. There are hundreds to choose from. Jives Software, the editor behind Openfire, produces a Java-based open source IM client called Spark. Gaim and Kopete are other well-known clients.
Authenticating Users in an External Database
You may need to authenticate against users defined in an external database. Openfire provides a set of classes to authenticate users against a database via a JDBC connection. As with most external authentication mechanisms, this is designed to provide read-only access—users and groups in the external database cannot be modified from within Openfire.
All configuration is done in the Openfire.xml configuration file, which you can find in the conf directory. You need to set up three “providers”—for users, groups, and for authentication, respectively:
 <provider>
     <user>
         <className>org.jivesoftware.Openfire.user.JDBCUserProvider</className>
     </user>
     <group>
         <className>org.jivesoftware.Openfire.group.JDBCGroupProvider</className>
     </group>
     <auth>
         <className>org.jivesoftware.Openfire.auth.JDBCAuthProvider</className>
     </auth>
 </provider>
Then, you need to describe the SQL queries Openfire will need to do to retrieve the users and groups, and to authenticate users. The jdbcProvider defines the JDBC connection to be used to access the external database:
 <jdbcProvider>
     <driver>com.mysql.jdbc.Driver</driver>
     <connectionString>jdbc:mysql://localhost/mydatabase?user=scott&password=tiger
     </connectionString>
 </jdbcProvider>
For this example, we will use an external database with three tables—user_account, group, and group_users:
CREATE TABLE user_account (
  username              VARCHAR(64)     NOT NULL,
  password              VARCHAR(32),
  name                  VARCHAR(100),
  email                 VARCHAR(100),
  PRIMARY KEY (username),
);

CREATE TABLE group (
  groupname             VARCHAR(50)     NOT NULL,
  description           VARCHAR(255),
  PRIMARY KEY (groupname)
);

CREATE TABLE group_users (
  groupname             VARCHAR(50)     NOT NULL,
  username              VARCHAR(100)    NOT NULL,
  administrator         CHAR            NOT NULL,
  PRIMARY KEY (groupName, username, administrator)
);
The jdbcAuthProvider element defines the SQL SELECT statement used to authenticate a user against the external database. You also need to specify how the password is stored—either as plain text (“plain”), or encoded as an MD5 (“md5”) or SHA-1 (“sha1”) hash code:
 <jdbcAuthProvider>
      <passwordSQL>SELECT password FROM user_account WHERE username=?<passwordSQL>
      <passwordType>plain<passwordType>
 </jdbcAuthProvider>
Finally, the jdbcGroupProvider and jdbcUserProvider elements define the various SQL queries needed to access users and groups in the database. The query names are fairly self-evident; userCountSQL counts the number of users, and allUsersSQL returns the list of primary key values for all users. The loadUserSQL query loads a user by primary key and expects to be provided with the name and email columns:
 <jdbcUserProvider>
      <loadUserSQL>SELECT name, email FROM user_account WHERE username =
      ?</loadUserSQL>
      <userCountSQL>SELECT COUNT(*) FROM user_account</userCountSQL>
      <allUsersSQL>SELECT username FROM user_account</allUsersSQL>
      <searchSQL>SELECT username FROM user_account WHERE</searchSQL>
      <usernameField>username</usernameField>
      <nameField>name</nameField>
      <emailField>email</emailField>
 </jdbcUserProvider>
The jdbcGroupProvider element is similar. Users may be administrators within a group, and two different queries (loadMembersSQL and loadAdminsSQL) need to be defined to distinguish between administrators and ordinary users:
<jdbcGroupProvider>
      <groupCountSQL>SELECT count(*) FROM user_group</groupCountSQL>
      <allGroupsSQL>SELECT groupname FROM user_group</allGroupsSQL>
      <userGroupsSQL>SELECT groupname FORM group_users WHERE username=?
      </userGroupsSQL>
      <descriptionSQL>SELECT description FROM user_group WHERE groupname=?
      </descriptionSQL>
      <loadMembersSQL>SELECT username FORM user_group WHERE groupname=?
       AND administrator='N'</loadMembersSQL>
      <loadAdminsSQL>SELECT username FORM user_group WHERE groupname=?
       AND administrator='Y'</loadAdminsSQL>
 </jdbcGroupProvider>
Once all of this is defined, just restart the server.
Authenticating Users Against a POP3 Server
If you have a large number of users, it may not be convenient to manage them all by hand in Openfire. If your user mail accounts are stored on a POP3 mail server, Openfire provides the interesting possibility to authenticate users using this server. You need to specify the POP3AuthProvider and POP3UserProvider providers in the Openfire.xml configuration file. You also need to provide some details about the POP3 server:
- <host>
The name or IP address of your POP3 mail server
- <port>
The port of the POP3 mail server (110 by default, or 995 for SSL connections)
- <domain>
The mail domain
- <authRequiresDomain>
True if your POP3 server requires a full email address when authenticating, or just a username
- <ssl>
Should an SSL connection be used? (defaults to “false”)
Here is a full example, providing POP3 authentication against a local mail server using an SSL connection:
 <provider>
     <auth>
         <className>org.jivesoftware.Openfire.auth.POP3AuthProvider</className>
     </auth>
     <user>
         <className>org.jivesoftware.Openfire.user.POP3UserProvider</className>
     </user>
 </provider>

 <pop3>
     <host>pop.mycompany.com</host>
     <domain>mycompany.com</domain>
     <authRequiresDomain>true</authRequiresDomain>
     <ssl>true</ssl>
 </pop3>
Virtual Team Meetings with the Group Chat
Group chat meetings can be particularly useful for dislocated development teams. Although they do not allow for the same types of reactions as a conference call, they require fewer resources and less planning (you don’t need to reserve a meeting room equipped with conference call equipment, for example), and they can leave a convenient written trace of what was discussed, which avoids having to write meeting minutes.
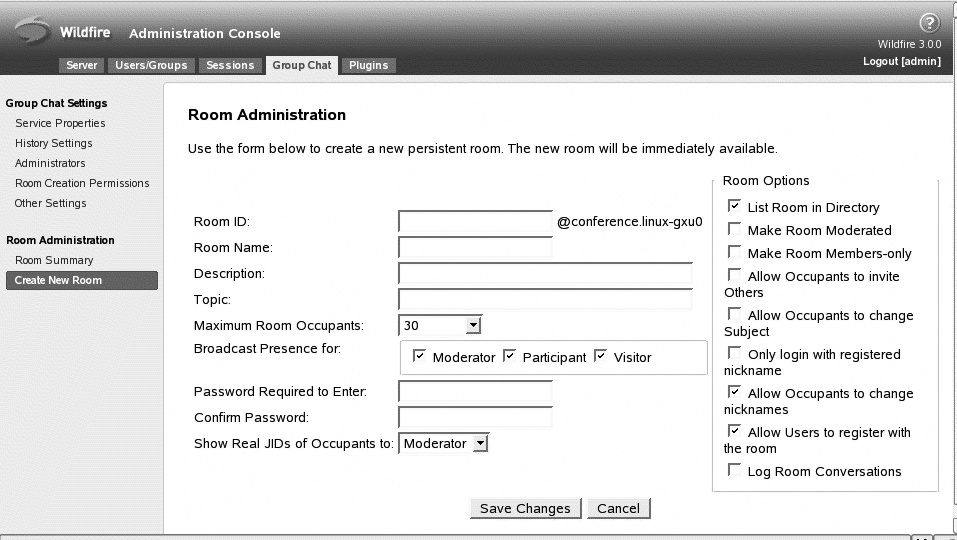
Openfire provides some rich functionality in the way of group chat meetings. You create a chat room in the “Group Chat” tab (see Figure 9-3). Openfire lets you choose from a wide range of options. You can set up a moderated room, allow the occupants to invite other users or modify some of the chat room properties, and log the room’s conversations. This last option is probably the most useful in the context of team meetings.
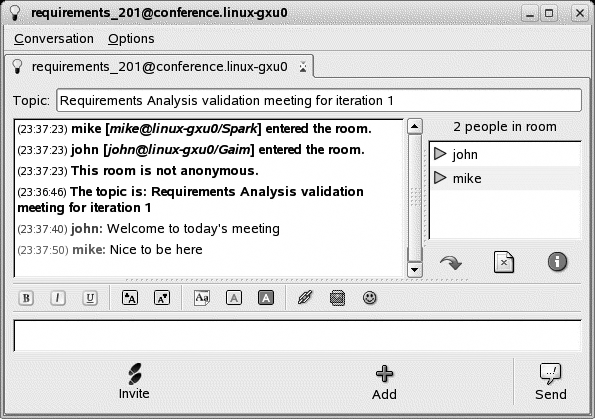
Users connect to a chat room on the Openfire server in the same way that they would for a public chat, which largely depends on the IM client they are using. In Figure 9-4 you can see a typical group chat session, viewed from the Gaim IM client.
Extended Functionality with Openfire Plug-Ins
Openfire is highly extensible, and there is a growing number of external plug-ins available, which provides extra functionality. The Broadcast plug-in, for example, allows messages to be send to all users. The User Import Export plug-in lets you import and export users in an XML format. And the User Service plug-in allows the user database to be administrated from other applications via HTTP queries.
Using Openfire with Continuum
Instant messaging technology, in general, and Jabber-based IM, in particular, can be put to imaginative uses within a Java development project. In this section, we will discuss how to integrate Openfire with a continuous integration server. You can use this approach to send IM build failure notifications to developers, for example. Compared to email or RSS notifications, instant messages can provide a faster and more dynamic way of informing developers of build failures, and contribute to shortening the development lifecycle.
First of all, you need to set up a dedicated user for your continuous integration server—this is the user who will send the messages, and shouldn’t be one of the other user accounts. Here we will work with Continuum, so we’ll call this user “continuum.” Just create this user as you would any other user from the Openfire administration console (see Setting Up Users and Accounts on Openfire).
Next, each developer should add this user to his or her list of Contacts. You will also have to open an IM client using the “continuum” account to approve the requests from users to add the “continuum” user to their contact lists.
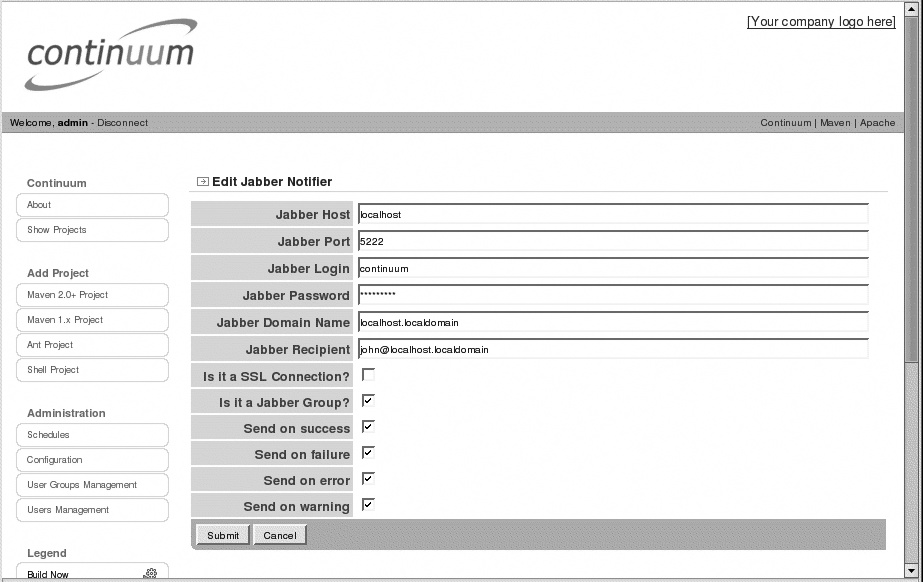
Once this is done, you are ready to configure your Continuum project. If you are using a Maven 2 project, you can configure your Jabber notifiers either from the Continuum web site, or directly within the pom.xml file. Configuring notifications in the pom.xml file is more central, though some users may prefer the web console where all the possible fields are visible. A Jabber notification in a Maven 2 pom.xml file looks like this:
  <ciManagement>
      <system>continuum</system>
      <notifiers>
        <notifier>
          <type>jabber</type>
          <configuration>
            <address>[email protected]</address>
            <from-address>continuum</from-address>
            <from-password>continuum</from-password>
            <host>localhost</host>
            <port>5222</port>
            <sslConnection>false</sslConnection>
            <isGroup>false</isGroup>
          </configuration>
          <sendOnError>true</sendOnError>
          <sendOnFailure>true</sendOnFailure>
          <sendOnSuccess>true</sendOnSuccess>
          <sendOnWarning>true</sendOnWarning>
        </notifier>
      </notifiers>
  </ciManagement>
From the web site, the process is a little more user-friendly, although the information you enter is essentially the same (see Figure 9-5).
Using Openfire with CruiseControl
CruiseControl (discussed in Chapter 6) is a highly configurable Continuous Integration tool, and provides out-of-the-box support for Jabber IM notifications via the jabber element, which you add as a child of the publishers element in your CruiseControl configuration file (see Configuring an Ant Project). A typical Jabber notification looks like this:
<publishers>
    <jabber host="localhost"
            username="cruisecontrol"
            password="secret"
            recipient="[email protected]"
            buildresultsurl="http://buildserver:8080/myproject/buildresults" />
</publishers>
Here, we use another dedicated Jabber message account, called “cruisecontrol,” just to avoid mixing up the messages. Note that, as in Continuum, notification must be done on a user-by-user basis.
Using Openfire with Luntbuild
Luntbuild (discussed in Chapter 7) has well-thought-out support for Jabber, as it does for most of the other IM protocols. Indeed, of the three tools studied here, it arguably provides the most convenient support for IM messaging notification. Information is well centralized with no unnecessary duplication of data, and everything can be set up conveniently from the web console.
First, you set up the Jabber server configuration details in the Properties tab. Luntbuild stores this information, including the server address and the user name and password, centrally. This means that you cannot use two different Jabber servers simultaneously, although this is probably not a common occurrence.
Next, you need to assign Jabber accounts to your users. You do this in the Users page, in the “Jabber account” field. Once you define Jabber accounts for your users, Luntbuild will use them for all Jabber notifications, whatever the project.
Finally, you need to set up Jabber notification for the appropriate projects. Just go to the Project page, and select the Jabber notification method. While you’re at it, don’t forget to indicate which users should be notified.
Sending Jabber Messages from a Java Application Using the Smack API
The underlying technology behind Openfire is the Jabber/XMMP protocol. Jabber is an XML-based open standard for IM and presence services, allowing people or software to exchange messages over the Internet in real time. It is a free and open alternative to proprietary IM protocols such as AIM, MSN, and Yahoo!. There are hundreds of (mostly free) Jabber clients available, as well as many servers such as Openfire, OpenIM, ejabberd, and other open source and proprietary solutions.
Jabber uses a very simple XML protocol, supporting several different types of messages—the email-like “normal” messages, chat and groupchat messages used for instant messaging, and headline messages used for ticker-tape-style information such as stock quotes or news headlines. There is also a message type dedicated to error messages. The XML structure used to transmit these messages is clear and concise. Although the general form of the messages is common to all messages, each type of message is slightly different.
Despite the name, nomal messages are not what one normally imagines an IM message to be. A normal message is designed to transmit a message to a user who is not necessarily connected, and who is not expected to respond in real time. Many IM clients actually display normal messages in exactly the same way as IM (chat) messages. A typical normal message takes the following form:
<message from="[email protected]"
         to="[email protected]"
         type="normal"
         id="message123">
  <subject>Greetings</subject>
  <body>Hi there!</body>
</message>
The form of this message is typical of all of the message types. The message is represented (appropriately enough) by the <message> element, which takes attributes such as from, to, and id, and provides routing information. The type attribute determines what sort of message is being transmitted. The actual text of the message is provided in the <body> element, which is present in all messages. Other elements, such as <subject> and <thread>, may also be included, depending on the type of message.
Chat messages are more lightweight messages used for real-time instant messaging. These are probably the most common type of messages used, and they are particularly simple. Chat messages generally don’t need a <subject> element. A typical chat message looks like this:
<message to="[email protected]"
         type="chat">
  <thread>thread01</thread>
  <body>Hi there!</body>
</message>
Another interesting type of message is the headline message. Headline messages are designed to be dispatched as one-off alerts or updates, such as ticker-tape stock quotes or news updates. Headline messages are fire-and-forget in nature—they usually don’t have a <thread>, although they occasionally can have a <subject>. Here is an example:
<message to="[email protected]"
         type="headline"
         id="message456">
  <body>Typhoon in China</body>
</message>
So, as we can see, there is nothing particularly complicated about the
Jabber/XMMP XML message structure. It is quite possible to write a Jasper client
that builds and transmits XMMP XML messages by hand. However, there is an easier
way. The Smack API is a high-level Jabber client API written in Java,
that encapsulates the XML layer beneath higher-level classes such as
Chat and GroupChat. In the
remainder of this section we will look at how to add Jabber messaging
functionality to your Java applications, and how this can be used to enhance the
build process.
The first thing you need to get started is to connect to the IM server. The
principal class you use here is the XMPPConnection class.
Establishing a connection is straightforward, as
follows:
XMPPConnection connection = new XMPPConnection("myserver.com");
connection.login("user", "password");
One useful thing to know about Jabber connections is that many IM servers, including Openfire, seem to have trouble coping when they receive a lot of connections from the same user separated by extremely short time intervals, and can produce sporadic, albeit usually non-fatal, errors. Although this may be rare in the real world, this is typically what happens when you unit test your Jabber code. To get around this, just add a small delay after you create a new connection, as shown here:
XMPPConnection connection = new XMPPConnection("myserver.com");
try {
    Thread.sleep(100);
} catch (InterruptedException e) {
    e.printStackTrace();
}
connection.login("user", "password");
Chat messages are one of the principal uses of the Jabber protocol, and the Smack API provides some convenient features to make developing chat functionalities easier. For example, sending a chat message can be done as simply as this:
connection.createChat("[email protected]").sendMessage("Hi Mike!");You can also use the Message class to manipulate
messages on a lower level. This gives you access to all the optional attributes
and elements, and lets you create some of the more exotic message types such as
headlines, as shown
here:
Message message = new Message();
message.setTo("[email protected]");
message.setSubject("International News");
message.setBody("Typhoon in China");
message.setType(Message.Type.HEADLINE);
connection.sendPacket(message);
Detecting Presence Using the Smack API
The Smack API provides several other functionalities, which can be useful if you need to read and process IM messages from your Java code.
In the Smack world, a roster is the list of the other IM users you know and
with whom you communicate. In IM client software, people in this list are often
referred to as contacts, friends, or buddies. You can use this list to identify
the users who are currently connected. To do this, you use the
getRoster() method, as shown here:
Iterator iter = connection.getRoster().getEntries();
while (iter.hasNext()) {
    RosterEntry entry = (RosterEntry) iter.next();
    System.out.println(entry.getName() + " (" + entry.getUser() + ")");
}
This might produce something like the following:
mike ([email protected]) (available)
john ([email protected]) (available)
chris ([email protected])
You can then use this list to send messages to all connected users, or to all connected users in a given domain, for example.
Receiving Messages Using the Smack API
The Smack API also provides a framework for receiving and analyzing Jabber messages. You can process incoming messages either synchronously by actively polling a queue of incoming messages, or asynchronously using a listener pattern, depending on your application’s needs. In both cases, filter classes let you limit processing to the precise subset of messages in which you are interested.
The org.jivesoftware.smack.PacketListener class lets
you set up listeners for incoming messages in order to process them
asynchronously. You can use the
org.jivesoftware.smack.filter.PacketFilter interface
and its implementation classes to build message filters. The Smack API provides
a rich set of classes that let you filter on message sender, type, thread, and
so on. You can also build up quite complex filter conditions by combining the
basic filters using the AndFilter,
OrFilter, and NotFilter
classes.
The actual listening is done with the PacketListener
interface. This interface just has one method worthy of interest: the
processPacket() method, which is called whenever a
message corresponding to the given filter is received. You put it all together
by adding the listener instance to your connection using the
addPacketListener() method.
In the following example, we use the PacketListener
interface to listen for Messages coming from the “continuum” user. Presumably,
in a real application, we would do something sensible with the messages
received; here we simply echo the message body to the standard output:
XMPPConnection connection = getConnection();
connection.login(getUsername(), getPassword());

PacketFilter filter
    = new AndFilter(new PacketTypeFilter(Message.class),
                    new FromContainsFilter("[email protected]"));

PacketListener myListener = new PacketListener() {
    public void processPacket(Packet packet) {
            if (packet instanceof Message) {
                Message msg = (Message) packet;
                // Process message
                System.out.println("Message received, loud and clear:"
                + msg.getBody());

            }
    }
};
// Register the listener.
connection.addPacketListener(myListener, filter);
Using a PacketListener method is probably the most frequently
used technique to process incoming messages. However, the Smack API also
provides an alternative way, using the PacketCollector
interface. A PacketCollector provides several methods of
accessing the incoming message queue. The nextResult()
method, shown here, blocks the application while it waits for a matching message
to arrive:
XMPPConnection connection = getConnection();
connection.login(getUsername(), getPassword());

PacketFilter filter
    = new AndFilter(new PacketTypeFilter(Message.class),
                    new FromContainsFilter("[email protected]"));

PacketCollector collector = connection.createPacketCollector(filter);
Message msg = (Message) collector.nextResult();
System.out.println("Message received:" + msg.getBody());
Alternatively, you can periodically poll the queue for new messages using the
pollResult() method.