
Chapter 22. Preemptive Error Detection with PMD[19]
PMD and Static Code Analysis
PMD is a static code analysis tool, capable of automatically detecting a wide range of potential defects and unsafe or nonoptimized code. Whereas other tools, such as Checkstyle (see Chapter 21), can verify that coding conventions and standards are respected, PMD focuses more on preemptive defect detection. It comes with a rich and highly configurable set of rules, and you can easily configure which particular rules should be used for a given project. PMD integrates well with IDEs such as Eclipse and NetBeans, and it also fits well into the build process thanks to its smooth integration with Ant and Maven.
Using PMD in Eclipse
PMD is designed to integrate well into a developer’s work environment. Plug-ins exist for the principal IDEs, and they are the most productive and convenient way for a developer to use PMD. Plug-ins allow almost real-time code verification—they raise issues whenever you save the source code.
Installing the PMD Plug-In
The easiest way to install and use PMD under Eclipse is to use the remote update site, at http://pmd.sf.net/eclipse. You do this in the usual way:
Open the Help→Software Updates→Find and Install menu.
Click Next, and choose New Remote Site.
Now enter the URL of the remote site (http://pmd.sf.net/eclipse), and an appropriate name such as “PMD.”
Make sure that you have the PMD site checked in the “Sites to include in search” window, and click Finish. Then just go through the installation screens to install the plug-in.
Once you have installed the plug-in, you need to activate PMD for your project. Open the project properties window (Project→Properties). You will now have a PMD entry (see Figure 22-1). This window allows you to configure PMD in detail for your particular project, by selecting which rules you want to apply, and specifying their relative importance. For now, just check the “Enable PMD” box and leave the default set of rules.

Detecting and Displaying Errors
To run PMD, click on the project resource and select “PMD→Check code with PMD” in the contextual menu.
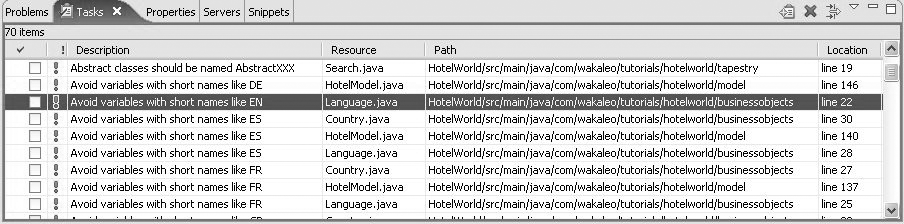
PMD rule violations are displayed as entries in the “Tasks” view (see Figure 22-2), with a priority (high, medium, or low) depending on the priority of the corresponding rule. As with any other task, clicking on the task will take you straight to the offending code. Some developers find this view convenient as a personal productivity tool: PMD issues are listed among other tasks (such as TODOs), and you can sort tasks by priority, manually reassign priorities, mark tasks as “done,” and so on.
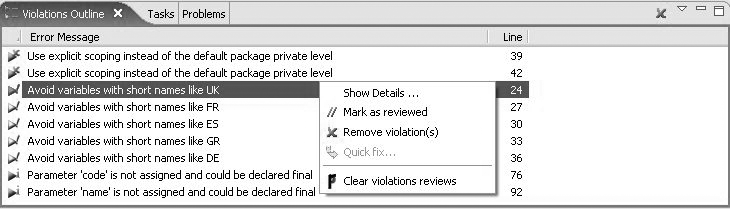
PMD also lets you visualize issues in other views that are more specifically tailored to PMD. The “Violation Outlines” view lists PMD issues by severity. To open this view, open the “Window→Show View →Other” menu, and choose the “PMD→Violations Outline” view (see Figure 22-3).
The short description of a PMD issue may not always be enough to know. You can use “Show Details” to display a (slightly) more verbose description of the rule, as well as an example of code illustrating the rule.
Once you have understood why PMD has raised the issue, you can decide how to deal with it. You may decide that the issue can be safely ignored. In this case, you can use the “Mark as reviewed” option. This will add a comment or annotation to the code indicating to PMD to ignore this issue here (see Suppressing PMD Rules). You can also fix the issue manually and remove the violation directly from the list using “Remove violation.” (Of course, if you didn’t fix it to PMD’s satisfaction, PMD will raise the issue again next time you analyze the code.)
PMD is quite smart. In some cases, it can propose fixes for the issues it raises. When this is possible, you can use the “Quick fix” menu option to correct the problem automatically.
Configuring PMD Rules in Eclipse
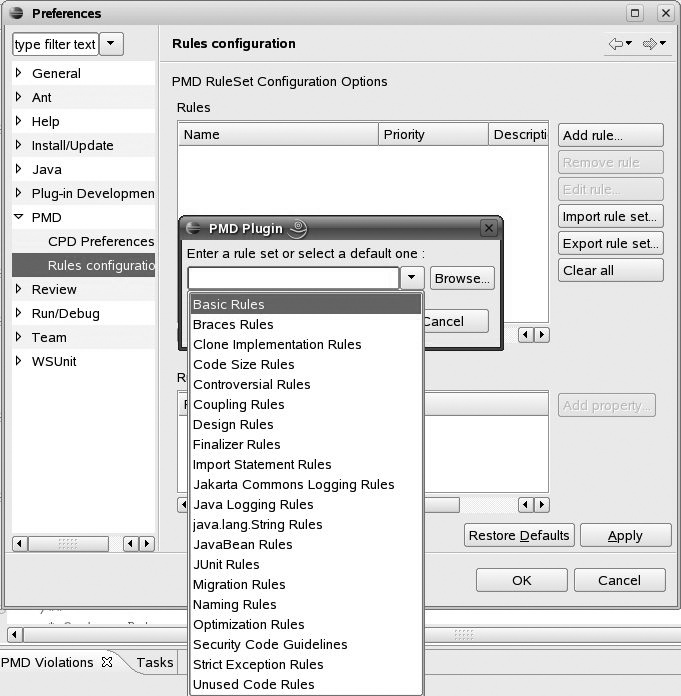
When you introduce coding standards and best practices into an organization, it is important to tailor the rules to your exact needs. This should be a team effort—get everyone who’s going to be applying the rules involved. Each PMD rule has a detailed description and examples, available both on the web site and visible in the configuration screens. Review each rule and come to a joint decision on whether and when that rule should be applied in your organization. The most convenient place to configure the PMD ruleset is from within Eclipse, in the PMD entry of the “Windows→Preferences→PMD→Rules configuration” window (see Figure 22-1). This window contains a list of all the available PMD rules. From this list, you can go through the rules, adjust rule priorities, modify any of the other rule-specific properties, and also remove any rules you don’t need. You can also build a ruleset from scratch: just delete all the current rules (“Clear All”) and then import selected individual rulesets one by one (See Figure 22-4).
When you’re happy with your new customized ruleset, you can export it in the form of an XML file (“Export Rule Set”). Other team members can now clear their existing ruleset and import the new ruleset into their environments. You can also activate or deactivate individual rules for a project in the project properties window (see Figure 11). And if you do anything really silly, you can always get back to the default ruleset using the “Restore Defaults” button.
More on the PMD Rulesets
PMD is a powerful and highly configurable tool. It delivers a rich set of more than 190 rules, and you can easily write additional ones if need be. PMD rules are divided into rulesets, each of which contains rules concerning a particular type of issue. We will run through the rulesets, and give some indication as to when each ruleset is or is not appropriate.
- Basic rules (the “basic” ruleset)
These rules verify some common, and useful, best practices, such as empty catch blocks or if statements, unnecessary temporary conversions when converting primitives to Strings, and so on.
- JSF rules (the “basic-jsf” ruleset)
This ruleset is designed to help improve the quality of JSF pages. At the time of writing, it relatively limited, containing only one rule. However, considering the current momentum of JSF, new rules will probably be added in future versions. It may be worthwhile including these rules if your project uses JSF with JSP/JSTL pages.
- JSP rules (the “basic-jsp” ruleset)
This ruleset contain some useful rules designed to help enforce quality coding in JSP pages. Examples of these rules include using tag libraries rather than scriptlets, and placing all style information in CSS files rather than with the HTML tags in the JSP page. Include this ruleset if your project uses JSP.
- Braces rules (the “braces” ruleset)
These are coding standards that check that if, else, while, and for statements use curly braces. If you also are using Checkstyle to enforce coding conventions, these rules should be unnecessary.
- Clone Implementation rules (the “clone” ruleset)
These stipulate best practices that should be applied when implementing the
clone()method: always invoke super.clone(); the class should implementCloneable; and theclone()method should throwCloneNotSupportedException. This is handy if your project needs to use theCloneableinterface.- Code size (the “codesize” ruleset)
These rules check for excessively long methods, too many parameters, excessive cyclomatic complexity (see Customizing Checkstyle: Common Rules That You Can Do Without, and Some That You Could Use), and so on, which can lead to unclear code, coding errors, and maintenance headaches. Similar rules also exist in Checkstyle.
- Controversial rules (the “controversial” ruleset)
Certain rules are subject to debate and may be considered controversial by some developers. For convenience, these rules are placed in a special ruleset, so that teams may easily examine and discuss them, and then decide which to take and which to leave. These rules check for issues such as having more than one exit point in a method, assigning null to variables, and ensuring that every class has a constructor.
- Coupling rules (the “coupling” ruleset)
It is considered good practice to avoid strong coupling between objects and packages. Strong coupling tends to make the code brittle and harder to maintain. These rules detect signs of tight coupling, such as an excessive number of imports. They also enforce loose-coupling best practices, such as exposing an interface (e.g.,
List) rather than an implementation class (e.g.,ArrayList).- Design rules (the “design” ruleset)
These rules check for potentially erroneous, inefficient, or just poorly conceived code design. For example, avoid deeply nested if...then statements; always close resources (Connection, Statement, ResultSet,...) after use; and use
equals()rather than “==” to compare objects.- Finalizer rules (the “finalizers” ruleset)
The rarely used finalize() method needs to be used with some care. These rules check for issues such as empty finalize() methods (which are useless), or explicit calls to the finalizer() method (that’s the garbage collector’s job).
- Import statements (the “imports” ruleset)
These check for duplicated or unused import statements. Checkstyle can do this quite well, too.
- JavaBean rules (the “javabeans” ruleset)
These rules help enforce the standard JavaBean conventions: JavaBeans must be serializable (all members must be transient, static, or have getters and setters); they must have a serialVersionUID field, and so on.
- JUnit rules (the “junit” ruleset)
Unit tests are a vital part of modern development processes. These rules help avoid common JUnit pitfalls and encourage testing best practices. If you are using the JUnit framework for your unit tests (as opposed to other unit testing frameworks such as TestNG), this is a good ruleset to have.
- Jakarta logging rules (the “logging-jakarta” ruleset)
These check for incorrect or dangerous use of the Jakarta Commons Logging framework.
- Java logging rules (the “logging-java” ruleset)
These verify the correct usage of the
java.util.logging.Loggerclass: the logger variable should be static, final, and unique within a class;System.out()should be avoided, as shouldprintStackTrace().- Migration rules (the “migrating” ruleset)
These rules help developers migrate code to a newer JDK. They suggest ways to modernize code, such as replacing vectors with the more recent java.util.List.
- Naming rules (the “naming” ruleset)
These rules check standard Java naming conventions, an area that is also well covered by Checkstyle. They can also pick up a few potential defects caused by naming errors, such as an equals(Object) method that doesn’t return a boolean.
- Optimization rules (the “optimizations” ruleset)
Many best practices exist to optimize performance. PMD can detect a certain number of these, such as using the final statement where appropriate on fields, parameters, or methods (which allows for better compiler optimization) and avoiding instantiating objects in loops (which is very expensive in terms of object creation).
- Strict Exception rules (the “strictexception” ruleset)
These rules are guidelines about throwing and catching exceptions. For example, you should avoid catching Throwable, as it can mask more serious runtime errors.
- String and StringBuffer rules (the “strings” ruleset)
Many simple optimization techniques involve the proper use of Strings and StringBuffers. Examples include using
StringBuffer.length()to see if a String is empty and avoiding duplicated String literals.- Sun Security Code guidelines (the “sunsecure” ruleset)
These rules come from security recommendations published by Sun, such as never expose an internal array directly—it is safer to return a copy.
- Unused code rules (the “unusedcode” ruleset)
Unused fields or methods waste space and memory, and they complicate code unnecessarily. This ruleset detects unused private fields or methods, unused local variables, and unused parameters.
Some of these rules (often the ones focused on coding standards) are also covered by Checkstyle rules. Indeed, there is some overlap between the two tools, as both products have increasingly rich toolsets. It is a good idea to remove the extra rules from one tool or the other to simplify maintenance. I tend to let Checkstyle handle coding standards and leave the coding best-practice rules to PMD.
You can easily configure which rules you want to use for your project or organization (see Configuring PMD Rules in Eclipse and Writing Your Own PMD Ruleset).
Writing Your Own PMD Ruleset
For convenience, PMD rules are divided into rulesets (see More on the PMD Rulesets). However, once you become familiar with the various rules, you may want to define a custom set of rules coming from different rulesets, in order to centralize maintenance and simplify project configuration. You can do this by writing your own PMD ruleset.
A PMD ruleset is simply an XML file that lists a set of rules that you wish to use. You can include entire rulesets, or selectively choose specific rules from within other rulesets. You can also provide extra parameters to certain rules in order to customize their behavior.
Suppose that we want to write our own company ruleset. To start off, our ruleset will contain the basic, unusedcode, string, and junit rulesets. We create a new <ruleset> XML file, containing references to these rulesets:
<?xml version="1.0" ?>
<ruleset name="CompanyRules" xmlns="http://pmd.sf.net/ruleset/1.0.0"
         xmlns:xsi="http://www.w3.org/2001/XMLSchema-instance"
         xsi:schemaLocation="http://pmd.sf.net/ruleset/1.0.0
         http://pmd.sf.net/ruleset_xml_schema.xsd"
         xsi:noNamespaceSchemaLocation="http://pmd.sf.net/ruleset_xml_schema.xsd">
  <description>CompanyRules</description>
  <rule ref="rulesets/basic.xml" />
  <rule ref="rulesets/junit.xml" />
  <rule ref="rulesets/strings.xml" />
  <rule ref="rulesets/unusedcode.xml" />
</ruleset>
In addition, we may want to include some, but not all, of the rules in the design ruleset. To do this, we add explicit references to the rules, rather than to the ruleset as a whole:
  <rule ref="rulesets/design.xml/UseSingleton" />
  <rule ref="rulesets/design.xml/SimplifyBooleanReturns" />
  <rule ref="rulesets/design.xml/EqualsNull" />
Some rules may need to be configured, to override the default property values. For example, we may want to be particularly strict on code complexity. So we will configure the McCabe Cyclometric Complexity rule (see Customizing Checkstyle: Common Rules That You Can Do Without, and Some That You Could Use) to allow at most moderately complex methods, with a cyclometric complexity of no more than 7:
  <rule ref="rulesets/codesize.xml/CyclomaticComplexity">
    <properties>
        <property name="reportLevel" value="7"/>
    </properties>
  </rule>
Earlier on, we included all the basic rules. In fact, we are particularly
worried about empty statements in for loops. We want this sort of issue to be
considered as a high-priority error, not just a warning. To do this, we
customize the EmptyStatementNotInLoop rule, and override the priority property, as follows:
  <rule ref="rulesets/basic.xml/EmptyStatementNotInLoop">
      <priority>1</priority>
  </rule>
The final version of our company ruleset looks like this:
<?xml version="1.0" ?>
<ruleset name="CompanyRules" xmlns="http://pmd.sf.net/ruleset/1.0.0"
         xmlns:xsi="http://www.w3.org/2001/XMLSchema-instance"
         xsi:schemaLocation="http://pmd.sf.net/ruleset/1.0.0
         http://pmd.sf.net/ruleset_xml_schema.xsd"
         xsi:noNamespaceSchemaLocation="http://pmd.sf.net/ruleset_xml_schema.xsd">
  <description>CompanyRules</description>
  <!-- Include all rules from these rulesets -->
  <rule ref="rulesets/basic.xml" />
  <rule ref="rulesets/junit.xml" />
  <rule ref="rulesets/strings.xml" />
  <rule ref="rulesets/unusedcode.xml" />

  <!-- Include these rules explicitly -->
  <rule ref="rulesets/design.xml/UseSingleton" />
  <rule ref="rulesets/design.xml/SimplifyBooleanReturns" />
  <rule ref="rulesets/design.xml/EqualsNull" />

  <!-- Cyclomatic complexity customization -->
  <rule ref="rulesets/codesize.xml/CyclomaticComplexity">
    <properties>
        <property name="reportLevel" value="7"/>
    </properties>
  </rule>

  <!-- Give this rule a higher priority -->
  <rule ref="rulesets/basic.xml/EmptyStatementNotInLoop">
      <priority>1</priority>
  </rule>
</ruleset>
Of course, a real company ruleset generally is a lot bigger than this, but you get the idea.
To use your new ruleset in Eclipse, you will need to open the PMD Rules Configuration screen (in “Window→Preferences”), and remove all existing rules (using the “Clear All” button). Then load your ruleset using “Import Rule Set.” When you close the window, Eclipse will rerun the PMD new checks on your project.
Generating a PMD Report in Eclipse
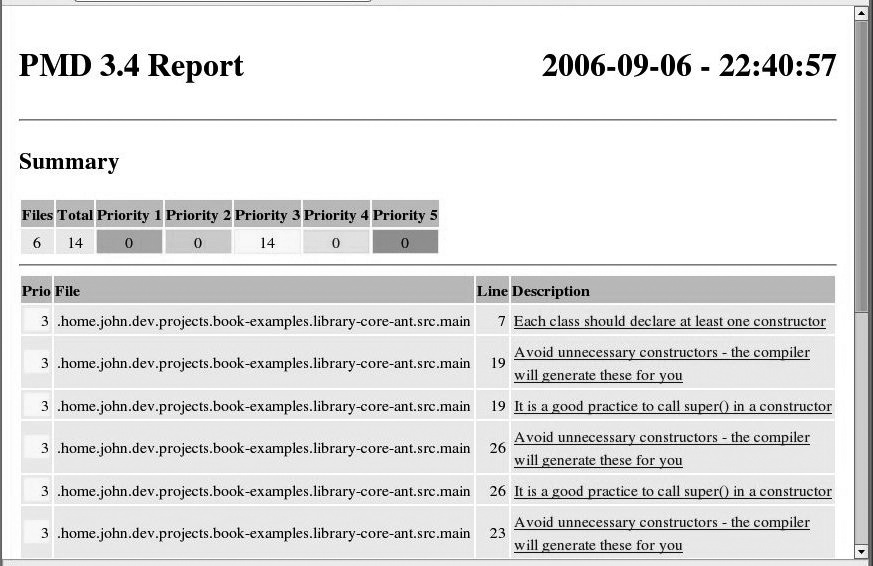
Many people are very attached to hard-copy outputs. If you are among them, you may appreciate the ability to generate PMD rule violation reports in CSV, HTML, TXT, and XML formats. Just go to the contextual menu on the project, and select “PMD→Generate Reports.” The reports will be generated in the /report directory of the current project. Figure 22-5 shows an example of an HTML report.

Suppressing PMD Rules
All rules have exceptions. You will have occasions when PMD gets it wrong, and you have a legitimate reason for not respecting one of the PMD rules. For example, consider the following code:
    /** Countries : USA */
    public static final Country USA = new Country("us","United States");
Suppose that your company standards impose a minimum of four letters for variable names. In this case, PMD will incorrectly generate an error. To get around this, you can mark a violation as “Reviewed,” which basically tells PMD that you’ve seen the issue and that it’s fine by you. Click on the error and open the contextual menu, then select “Mark as reviewed.” PMD will insert a special comment similar to the following:
    /** Countries : USA */
    // @PMD:REVIEWED:ShortVariable: by taronga on 4/13/06 7:25 AM
    public static final Country USA = new Country("us","United States");
As long as you don’t remove it, PMD will now ignore this violation for this particular case.
Another way of doing this while writing the code is to use the “NOPMD” marker, as follows:
    // These are x and y coordinates, so short variable names are OK
    int x = 0; // NOPMD
    int y = 0; // NOPMD
The marker deactivates the ShortVariable rule for the variables.
If you are using JDK 1.5, you can also use the PMD SuppressWarnings annotation.This technique is particularly useful for generated classes or legacy code. In the following class, all PMD warnings are suppressed:
   @SuppressWarnings("")
   public class Country {
       ...
   }
You may just want to suppress certain rules for a given class. In the following generated class, for example, private variables are prefixed with an underscore, which is not in line with PMD’s rules concerning JavaBeans. To get around this, just suppress a specific PMD rule:
    @SuppressWarnings("BeanMembersShouldSerialize")
    public class Country {
        private String _code;
        ...
        public String getCode(){
            return _code;
        }
    }
Sometimes, the rule may not be what you expect. In this case, for example, PMD expects a getter and setter for each nontransient and nonstatic class member variable. If a variable doesn’t have a proper getter and setter, PMD will complain by saying that the variable is not serializable, and should be either transient or static, or have standardized getters and setters. So the naming conventions for accessor members are covered by this rule.
Thankfully, you don’t have to know the nitty-gritty details of how each rule works, and which rule applies in a particular situation. From within Eclipse (using the “Violations Outline” view), you can easily display the full details of each raised issue, and mark the issue as “Reviewed” or remove the violation using the NOPMD comment.
Detecting Cut-and-Paste with CPD
Cutting and pasting code between classes is a bad habit. Areas of cut-and-pasted code increase maintenance costs unnecessarily, and indicate in the very least a good candidate for refactoring. In many cases, they are high-risk zones for potential errors.
PMD comes with a useful tool for detecting cut-and-pasted code called CPD (Cut-and-Paste Detector). You can run it from the contextual menu on the project, using the “PMD→Find Suspect Cut and Paste” menu option. Unfortunately, at the time of this writing, the results of this tool were not integrated into the IDE. The tool generates a text file called cpd-report.txt in the /report directory, which contains copy-and-paste suspects, as shown here:
=====================================================================
Found a 18 line (56 tokens) duplication in the following files:
Starting at line 69 of
    /home/taronga/Documents/articles/HotelWorld/src/main/java/com
    /wakaleo/tutorials/hotelworld
    /model/HotelModel.java
Starting at line 82 of
    /home/taronga/Documents/articles/HotelWorld/src/main/java/com
    /wakaleo/tutorials/hotelworld
    /model/HotelModel.java
        List hotelsFound = findHotelsByLanguage(language);
        Hotel hotel = null;
        for(int i = 0; i < hotels.length; i++) {
            hotel = (Hotel) hotels[i];
            if (hotel.getCity().equalsIgnoreCase(city)) {
                hotelsFound.add(hotel);
            }
        }

        return hotelsFound;
    }

    /**
     * Find hotels where a given language is spoken.
     * @param language
     * @return
     */
    public List findHotelsByLanguage(Language language) {
You can customize the minimum size of a copy-and-paste zone suspect in the workbench preferences under PMD→CPD Preferences. Just adjust the “Minimum tile size” field, and specify the minimum number of lines.
CPD is not limited to use within your IDE: you can also run CPD as a
command-line tool, as an Ant task, or from within Maven. To run CPD as an Ant
task, you first need to define a “cpd” task (using the
net.sourceforge.pmd.cpd.CPDTask class, which is
bundled with PMD). A typical usage might look like
this:
<target name="cpd">
    <taskdef name="cpd" classname="net.sourceforge.pmd.cpd.CPDTask" />
    <cpd minimumTokenCount="100" outputFile="target/cpd.txt">
        <fileset dir="src">
            <include name="**/*.java"/>
        </fileset>
    </cpd>
</target>
Using PMD in Ant
Static analysis tools such as PMD can be used in two complementary ways, both of which have their place in the software development lifecycle. Developers use PMD most effectively from within the IDE, where they can quickly and interactively detect and fix issues. Lead developers, project managers, and quality assurance people, by contrast, prefer to see PMD integrated into the Continuous Build process, producing static reports, so that they can monitor code quality and potential issues over the whole project.
PMD comes with a flexible Ant task you can use to generate PMD reports. To get this to work, you need to copy the PMD jar to your Ant lib directory. Download the latest version of PMD from the web site[*] and decompress the package in a convenient place. On my Linux machine, for example, I placed it in the /usr/local/tools directory and created a symbolic link (to make updating the library easier):
$ cd ~/tools
$ unzip pmd-bin-4.1.zip
$ ln -s pmd-4.1 pmd
Now
you need to copy the PMD library to your Ant lib directory. You also need the other libraries required by
PMD: there are two or three stored alongside the PMD library in the distributed
bundle. On my installation, the Ant lib directory is in /usr/share/ant/lib, but this will obviously change depending on
your exact environment. The easiest approach is to simply copy the whole lot
into the Ant
directory:
$ cd ~/pmd/
$ cp lib/*.jar /usr/share/ant/lib/
You can then declare the PMD task as follows:
<taskdef name="pmd" classname="net.sourceforge.pmd.ant.PMDTask"/>
A possibly more robust approach involves providing a classpath for the PMD task definition. You need to set up a classpath that points to the PMD jar files. Using this approach, you don’t need to modify the Ant configuration on each machine, and the PMD JAR files can be stored in some central location. In the following code, we assume that PMD is installed as described above:
    <property name="pmd.home" location="${user.home}/tools/pmd-4.1" />
    <path id="pmd.classpath">
        <fileset dir="${pmd.home}/lib" includes="*.jar" />
    </path>

    <taskdef name="pmd" classname="net.sourceforge.pmd.ant.PMDTask"
     classpathref="pmd.classpath"/>
    <taskdef name="cpd" classname="net.sourceforge.pmd.cpd.CPDTask"
     classpathref="pmd.classpath"/>
The PMD Ant task takes a number of parameters, the most important of which is the rulesetfiles attributes, where you specify the rulesets you want to use. You can use either the full filename (rulesets/basic.xml), or simply the name of the ruleset (“basic”).
You will need to specify the targetJdk attribute to “1.5” if you are using Java 5. You can also use the failonerror attribute to force a build failure if errors are found. This can be useful for continuous integration environments.
Finally, you need to provide a formatter and a fileset specifying the classes to be analyzed.
A simple example is shown here:
<target name="pmd">
    <pmd rulesetfiles="basic,javabeans,junit,controversial" targetJdk="1.5"
     failonerror="true">
        <formatter type="html" toFile="reports/pmd-report.html"/>
        <fileset dir="src">
            <include name="**/*.java"/>
        </fileset>
    </pmd>
</target>
You can also specify the rulesets as nested elements, as shown here:
<target name="pmd">
    <pmd targetJdk="1.5">
        <ruleset>rulesets/controversial.xml</ruleset>
        <ruleset>rulesets/company-rules.xml</ruleset>
        <formatter type="html" toFile="reports/pmd-report.html"/>
        <fileset dir="src">
            <include name="**/*.java"/>
        </fileset>
    </pmd>
</target>
This will generate a report similar to the one in Figure 22-5. This is functional but not very pretty. PMD comes with a number of XSLT stylesheets that you can use to produce something a bit more presentable. Just produce an XML output and run it through one of the XSLT provided stylesheets, as shown here (see Figure 22-6):
  <target name="pmd">
    <pmd rulesetfiles="basic,javabeans,junit,controversial" targetJdk="1.5"
     failonerror="true">
      <formatter type="xml" toFile="reports/pmd-report.xml"/>
      <fileset dir="src">
        <include name="**/*.java"/>
      </fileset>
    </pmd>

    <xslt in="reports/pmd-report.xml" style="${pmd.home}/etc/xslt/wz-pmd-report.xslt"
     out="reports/pmd-report.html" />
  </target>
Alternatively, you can try out the corley-pmd-report.xslt or the pmd-report.xslt stylesheets, or write your own.
Using PMD in Maven
Like Checkstyle (see Using Checkstyle with Maven), PMD is well integrated with Maven, which is packaged with a PMD report plug-in. This plug-in will generate both the PMD and CPD reports, with cross-references to the HTML version of the source code generated by JXR (if the JXR report has been included—see Figure 22-7).
To set up basic PMD reporting in your Maven 2 project, just add a reference to the PMD plug-in in the reporting section of your pom.xml file:
<reporting>
  <plugins>
    <plugin>
      <groupId>org.apache.maven.plugins</groupId>
      <artifactId>maven-pmd-plugin</artifactId>
    </plugin>
  </plugins>
</reporting>
You can generate the report by either generating the entire Maven site (using the mvn site command), or by invoking the PMD report directly:
$ mvn pmd:pmd
This will generate the PMD and CPD reports in the target/site directory.
You will generally need to fine-tune the plug-in configuration by adding some extra parameters to the <configuration> element. For example, if your project uses JDK 1.5, you will need to specify this with the <targetJdk> configuration element. Another useful configuration element is <failonerror>, which forces build failure whenever errors are detected:
<reporting>
  <plugins>
      <plugin>
         <groupId>org.apache.maven.plugins</groupId>
         <artifactId>maven-pmd-plugin</artifactId>
         <configuration>
            <targetJdk>1.5</targetJdk>
            <failonerror>true</failonerror>
         </configuration>
     </plugin>
  </plugins>
</reporting>
You can also specify the exact rulesets you want to use (see More on the PMD Rulesets). By default, the basic, imports, and unusedcode rulesets will be used. If you want to specify another set of rulesets, you list them in the <ruleset> element, as follows:
<reporting>
  <plugins>
      <plugin>
         <groupId>org.apache.maven.plugins</groupId>
         <artifactId>maven-pmd-plugin</artifactId>
         <configuration>
            <targetJdk>1.5</targetJdk>
            <rulesets>
               <ruleset>/rulesets/basic.xml</ruleset>
               <ruleset>/rulesets/javabeans.xml</ruleset>
               <ruleset>/rulesets/junit.xml</ruleset>
               <ruleset>/rulesets/controversial.xml</ruleset>
            </rulesets>
         </configuration>
     </plugin>
  </plugins>
</reporting>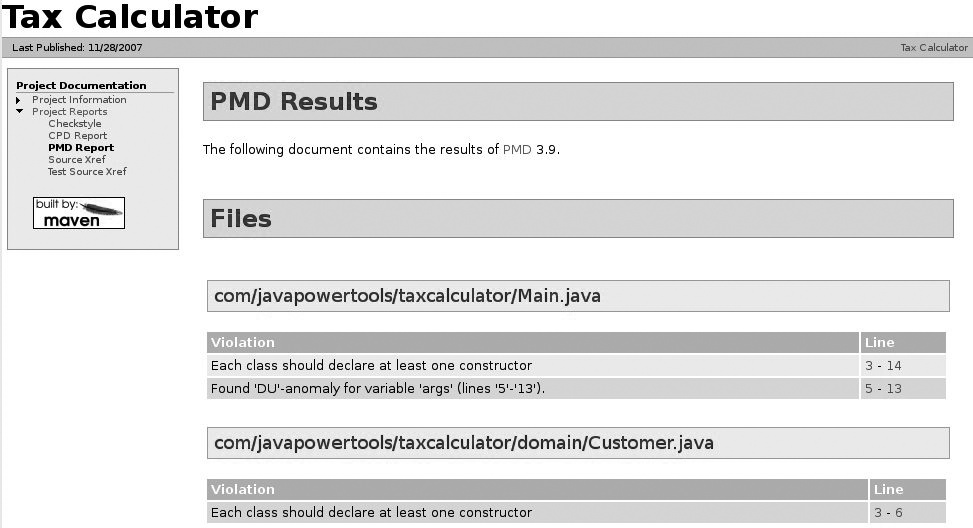
[19] Some of the material in this chapter appeared in it’s first incarnation on www.devx.com on the 20th of April 2006, in the article “PMD Squashes Code Bugs”