Chapter 3. Setting Up Version Control Using CVS
An Introduction to CVS
CVS is a venerable open source version control system first released in the 1980s, one that has a long history in the open source community. Indeed, a great number of open source projects are still hosted under CVS. CVS uses a client-server architecture, with a source code repository residing on a central server. Users connect to the server to download (or “check out,” to use CVS terminology) a copy of the project source code, modify it, and then submit (or “check in”) their changes back to the repository. Several users can work simultaneously on the same file. CVS will attempt to merge the modifications of users as they check in their changes. If it cannot do so for some reason, the user has to resolve the conflict manually. And when the time comes to make a release, users can “tag” a version to be able to retrieve it reliably later on.
For some years now, CVS has been showing its age, and it has a number of deep-seated architectural flaws and missing features that make it poorly adapted to Java development projects and the more modern agile development practices in general. For example, it is very difficult to rename or move directories, which makes refactoring cumbersome and difficult. Directory structures in CVS are very rigid—once added, it is very hard to get rid of a directory in the repository. In addition, CVS was designed at a time when most applications consisted entirely of text files, so support for other formats, such as binary files, is limited. The important notion of atomic commits (see Revision Numbers and Atomic Updates” in An Introduction to Subversion), present in virtually all other modern version control systems, is totally absent from CVS.
It should be noted that Subversion (see Chapter 4) was designed from the ground up to overcome many of the limitations of CVS, something that it has done rather successfully. Subversion is now stable, mature, and technically superior to CVS. If you are given a choice for a new project, it would be wise to consider Subversion seriously.
Nevertheless, CVS is still widely used in many organizations, on web sites, and in open source projects, and it is arguably still a tool with which you should be familiar. Thus, rather than being a detailed reference, this chapter is designed more along the lines of a survival guide for Java developers who need to use CVS.
Setting Up a CVS Repository
CVS is essentially a Unix application, although there is an
independent fork for Windows called CVSNT. You can run the CVS client virtually anywhere, but the CVS
server is most commonly seen in a Unix environment. The first step is to create
a directory in which the CVS repository will be stored. In this example, we will
place it in the /usr/local/cvs directory,
although it can go anywhere you like. For security reasons, it is also a good
idea to create a dedicated group for CVS users (say, “cvs”), and to make our new
directory belong to this group. You generally need to set up a Unix user account
on this machine for each developer that will be using the repository. To be able
to check out source code from this repository, users need read access on these
files. To be able to commit changes, users need write access.
To set up a new CVS repository, you need to run the cvs init command. A CVS repository is essentially stored as a collection of files. The cvs init command sets up the appropriate directory structure and administrative files, which are stored in a directory called CVSROOT, as shown here:
# cvs -d /usr/local/cvs init
# ls /usr/local/cvs/
CVSROOT
# ls /usr/local/cvs/CVSROOT/
checkoutlist    cvswrappers,v  notify       posttag,v    taginfo
checkoutlist,v  Emptydir       notify,v     postwatch    taginfo,v
commitinfo      history        postadmin    postwatch,v  val-tags
commitinfo,v    loginfo        postadmin,v  preproxy     verifymsg
config          loginfo,v      postproxy    preproxy,v   verifymsg,v
config,v        modules        postproxy,v  rcsinfo
cvswrappers     modules,v      posttag      rcsinfo,v
These are the raw CVS data files. Don’t mess with them directly.
Creating a New Project in CVS
When you start work on a new project, you naturally will want to put it under version control quickly. Importing an empty directory structure or a skeleton project containing only text files into CVS is fairly easy. You may have created a skeleton directory structure manually using a Maven archetype (see Creating a Project Template with Archetypes).
First, you need to tell CVS where to look for your repository by defining the
CVSROOT environment variable. This also will
make things easier for the other CVS commands. This variable points to the
default CVS repository to be used in all CVS commands. If your CVS repository
has been set up on the local machine in /usr/local/cvs, for example, you might do something like
this:
$ export CVSROOT=/usr/local/cvs
If you are accessing an organization-wide CVS server across the
network, you will probably need to access the repository using the pserver
protocol:
$ export CVSROOT=:pserver:[email protected]:2401/usr/local/cvs
We
will talk about the pserver protocol a bit
more later in this chapter.
If this repository doesn’t support anonymous access (which is usually the case with an enterprise repository, for example), you will need to login before you can go any further:
$ cvs login
If the server authorizes you to access the repository, your password will be stored locally so that you don’t need to login each time.
Next, you import the directory structure using the cvs import command. The import command takes the following form:
$ cvs import -m "Initial message"projectvendortagreleasetag
The project field refers to the directory that you want to store in CVS.
You need to provide a text message describing the import. You can either do this using the -m option or let CVS prompt you for a message by opening the default system text editor.
You don’t have to worry too much about what you put in the vendortag and releasetag fields, as they are very rarely used in practice.
Let’s look at an example. Suppose that our project is a module of an online store called “ShopCoreApi.” To import this project into CVS, just run this command from the project root directory, as illustrated here:
$ cd ~/projects/ShopCoreApi
$ cvs import -m "New Project" ShopCoreApi vendortag start
N ShopCoreApi/pom.xml
cvs import: Importing /usr/local/cvs/ShopCoreApi/src
cvs import: Importing /usr/local/cvs/ShopCoreApi/src/main
cvs import: Importing /usr/local/cvs/ShopCoreApi/src/main/java
cvs import: Importing /usr/local/cvs/ShopCoreApi/src/main/java/com
cvs import: Importing /usr/local/cvs/ShopCoreApi/src/main/java/com/acme
cvs import: Importing /usr/local/cvs/ShopCoreApi/src/main/java/com/acme/shop
N ShopCoreApi/src/main/java/com/acme/shop/App.java
cvs import: Importing /usr/local/cvs/ShopCoreApi/src/test
cvs import: Importing /usr/local/cvs/ShopCoreApi/src/test/java
cvs import: Importing /usr/local/cvs/ShopCoreApi/src/test/java/com
cvs import: Importing /usr/local/cvs/ShopCoreApi/src/test/java/com/acme
cvs import: Importing /usr/local/cvs/ShopCoreApi/src/test/java/com/acme/shop
N ShopCoreApi/src/test/java/com/acme/shop/AppTest.java

No conflicts created by this import

$ ls /usr/local/cvs/
CVSROOT  ShopCoreApi
You
supply an appropriate log message using the -m option, followed by the directory to be imported into CVS. The
following two parameters are the vendor name (for example, your company) and a
tag for the initial version. Once you are done, there will be a new directory in
the CVS repository, called ShopCoreApi, containing your
project files in a CVS
format:
$ ls /usr/local/cvs/
CVSROOT  ShopCoreApi
$ ls /usr/local/cvs/ShopCoreApi/
pom.xml,v  src
Now your project is safely stored away in CVS. You’re not quite ready to use it, though. Importing a project into CVS does not alter the original project directory, and this original directory cannot be used as a working copy. It is a good idea to back up your original directory for safe keeping, and to put it somewhere out of the way. This is to avoid confusion later on—you don’t want to accidentally update the unversioned files instead of the CVS ones. On a Unix system, for example, you could do something like this:
$ tar cfz ShopCoreApi-backup.tgz ShopCoreApi/
$ rm -Rf ShopCoreApi
Then, check out a new working copy of your project. We will look at how to do this in Checking Out a Project.
If you need to import an existing project into the repository, things can get a bit more complicated. If you are working on a project that contains only text files, the procedure described above will work fine. However, most modern software projects require a variety of different file formats. In addition to text files, you will may come across various other binary file formats such as images and JAR files. If you need to import an existing project containing binary files, you will need to do a little extra work. We will look at techniques for dealing with binary files in Working with Binary Files.
Checking Out a Project
Before you can make any changes to the repository, you need to download a local copy of the project source code to your machine. This process is referred to as “checking out” the source code. To do this, run the cvs checkout command (or its shorter version cvs co). Its simplest usable form is illustrated here:
$ cvs checkout -R ShopCoreApi
U ShopCoreApi/pom.xml
cvs checkout: Updating ShopCoreApi/src
cvs checkout: Updating ShopCoreApi/src/main
cvs checkout: Updating ShopCoreApi/src/main/java
cvs checkout: Updating ShopCoreApi/src/main/java/com
cvs checkout: Updating ShopCoreApi/src/main/java/com/acme
cvs checkout: Updating ShopCoreApi/src/main/java/com/acme/shop
U ShopCoreApi/src/main/java/com/acme/shop/App.java
cvs checkout: Updating ShopCoreApi/src/test
cvs checkout: Updating ShopCoreApi/src/test/java
cvs checkout: Updating ShopCoreApi/src/test/java/com
cvs checkout: Updating ShopCoreApi/src/test/java/com/acme
cvs checkout: Updating ShopCoreApi/src/test/java/com/acme/shop
U ShopCoreApi/src/test/java/com/acme/shop/AppTest.java
For less typing, you can also use cvs co instead.
By default, CVS will not check out any subdirectories. If you want to check out project subdirectories, as you usually will, you need to use the -R option shown above.
Like the import command described earlier, cvs checkout expects you to have correctly configured the CVSROOT environment variable. If you are working on the same machine as the CVS repository, you can simply refer to the physical directory path, as shown here:
$ export CVSROOT=/usr/local/cvs/
You can also provide the repository location on the command line using the -d option:
$ cvs -d /usr/local/cvs checkout ShopCoreApi
cvs checkout: Updating ShopCoreApi
U ShopCoreApi/pom.xml
cvs checkout: Updating ShopCoreApi/src
cvs checkout: Updating ShopCoreApi/src/config
U ShopCoreApi/src/config/hibernate.properties
cvs checkout: Updating ShopCoreApi/src/main
cvs checkout: Updating ShopCoreApi/src/main/java
...
It is more likely, however, that the CVS repository will be on another machine. CVS provides several remote access methods, the most common of which is pserver. The pserver protocol provides simple password-based access to a CVS repository hosted on a remote machine:
$ cvs -d :pserver:[email protected]:/usr/local/cvs login
The repository path is long but not particularly complicated. You specify the protocol (in this case, “pserver”), surrounded by colons. This is followed by a username and host name, separated by a “@” character, indicating the machine on which the CVS repository is hosted, along with a valid user account with access to the CVS repository. Finally, you need to provide the path of the CVS repository on this machine.
In this example, we ran the login command, which makes sure you have sufficient rights to access a repository. When accessing a remote repository, you need to run this command before running any other command. You only need to do this once. However, CVS will store your password in a file called .cvspass in your home directory. Once you’ve done this, you can run other CVS commands against this repository (using the -d option or the CVSROOT environment variable to specify the repository, of course).
Let’s look at a real-world example. At the time of this writing, the source code for the JUnit project (see Chapter 10) is stored in a CVS repository hosted by SourceForge.[3] Because this is an open source project, you are free to download the JUnit source code using the pserver protocol with an anonymous login (just press Enter for the password):
$ cvs -d :pserver:[email protected]:/cvsroot/junit login
Logging in to :pserver:[email protected]:2401/cvsroot/junit
CVS password:
$ cvs -d:pserver:[email protected]:/cvsroot/junit co -R junit
cvs checkout: Updating junit
U junit/.classpath
U junit/.cvsignore
U junit/.project
U junit/README.html
U junit/acknowledgements.txt
U junit/build.xml
...
This will download your very own copy of the JUnit source code into a
directory called junit.
Working with Your Files—Updating and Committing
In this section, we will take a guided tour of CVS in everyday life—well, the everyday life of a software developer, in any case. Typically, this will involve updating a local copy of the source code from the repository, doing some work, and, in the process, making some changes to the source code. Then, you will update the repository with the said changes. Let’s look at this process in more detail.
Before starting a day’s work on a project, you will usually need to update your local working copy. This allows you to download any modifications that other developers have committed since the last time you talked to the CVS repository. You do this by using the cvs update command. This is straightforward enough, although there are a few options that you should probably use systematically. The -R option processes subdirectories as well as the root directory, which is a must in any modern Java project. The -d option tells CVS to create any missing directories, and the -P option removes any (presumably redundant) empty directories in the directory structure. To update your project, go to the project root directory and run the cvs update command with these options:
$ cd ~/projects/ShopCoreApi
$ cvs update -RPd
cvs update: Updating .
cvs update: Updating src
cvs update: Updating src/main
cvs update: Updating src/main/java
cvs update: Updating src/main/java/com
cvs update: Updating src/main/java/com/acme
cvs update: Updating src/main/java/com/acme/shop
U src/main/java/com/acme/shop/App.java
cvs update: Updating src/main/resources
U src/main/resources/log4j.properties
cvs update: Updating src/test
cvs update: Updating src/test/java
cvs update: Updating src/test/java/com
cvs update: Updating src/test/java/com/acme
cvs update: Updating src/test/java/com/acme/shop
Any
new or modified files will be indicated by a “U.” In this case, the App.java file has been modified, and the log4j.properties file has been added.
Once you have an updated copy of the source code, you can proceed to get some work done. After a while, presumably once you’re coded a little and tested a little, you will be ready to commit your changes to the repository. By this time, someone else also may have updated the repository. To check this, run cvs update again to compare the status of your files against the repository and to download any modified files:
$ cvs update
cvs update: Updating .
cvs update: Updating src
cvs update: Updating src/main
cvs update: Updating src/main/java
cvs update: Updating src/main/java/com
cvs update: Updating src/main/java/com/acme
cvs update: Updating src/main/java/com/acme/shop
M src/main/java/com/acme/shop/App.java
cvs update: Updating src/main/resources
U src/main/resources/applicationContext.xml
M src/main/resources/log4j.properties
? src/main/resources/messages.properties
cvs update: Updating src/test
cvs update: Updating src/test/java
cvs update: Updating src/test/java/com
cvs update: Updating src/test/java/com/acme
cvs update: Updating src/test/java/com/acme/shop
This
gives you a quick rundown on the status of your files compared to those on the
server. The “M” next to App.java and
applicationContext.xml files means that you’ve modified
these files since the last check out. The “U” next to applicationContext.xml means that this file has been added or
modified in the repository since the last time you updated your local working
copy and that CVS has updated your local copy. The question mark next to
message.properties lets you know that
this is a file that is not currently under version control, and you will need to
add it to the repository. To add files to the repository, you use the cvs add
command:
$ cvs add src/main/resources/messages.properties
cvs add: scheduling file 'src/main/resources/messages.properties' for addition
cvs add: use 'cvs commit' to add this file permanently
You can also use cvs add to add a new directory to your project:
$ mkdir src/main/resources
$ cvs add src/main/resources
Directory /usr/local/cvs/ShopCoreApi/src/main/resources added to the repository
When you add a directory to CVS, however, you don’t need to commit your changes. This is because CVS keeps no record of directory structure changes, only of file changes. Indeed, CVS keeps track of the modifications on each individual file but has no notion of the changes made to your project directory structure over time. Naturally, this can cause a certain number of problems when refactoring code. For example, if you check out an older version of your project, CVS will give you the older versions of your files but with the latest directory structure.
If you need to delete a file or directory, you use the cvs rm command. Note that, by default, cvs rm will schedule the file for removal from the repository but will not actually delete it from your local directory; you are expected to do this yourself. If you want CVS to remove your local copy at the same time, use the -f option, as shown here:
$ cvs rm -f src/test/java/com/acme/shop/RedundantClass.java
cvs remove: scheduling 'src/main/java/com/acme/shop/RedundantClass.java' for removal
cvs remove: use 'cvs commit' to remove this file permanently
To remove an entire directory, you need to use the -R option:
$ cvs rm -Rf src/test/java/com/acme/shop/redundantpackage
cvs remove: scheduling 'src/main/java/com/acme/shop/redundantpackage' for removal
cvs remove: use 'cvs commit' to remove this file permanently
When you’re ready, simply commit using the cvs commit command. You need to provide a short log message (either using the -m option, or letting CVS prompt you with the system editor):
$ cvs commit -m "Made some changes"
cvs commit: Examining .
cvs commit: Examining src
cvs commit: Examining src/main
cvs commit: Examining src/main/java
cvs commit: Examining src/main/java/com
cvs commit: Examining src/main/java/com/acme
cvs commit: Examining src/main/java/com/acme/shop
cvs commit: Examining src/main/resources
cvs commit: Examining src/test
cvs commit: Examining src/test/java
cvs commit: Examining src/test/java/com
cvs commit: Examining src/test/java/com/acme
cvs commit: Examining src/test/java/com/acme/shop
/usr/local/cvs/ShopCoreApi/src/main/java/com/acme/shop/App.java,v
<--  src/main/java/com/acme/shop/App.java
new revision: delete; previous revision: 1.2
/usr/local/cvs/ShopCoreApi/src/main/resources/log4j.properties,v
<--  src/main/resources/log4j.properties
new revision: 1.2; previous revision: 1.1
/usr/local/cvs/ShopCoreApi/src/main/resources/messages.properties,v
<--  src/main/resources/messages.properties
initial revision: 1.1
As can be seen here, CVS indicates which files have been updated, along with their new revision numbers. Whenever a file is modified in CVS, it is given a new revision number. Indeed, CVS keeps track of each file individually. If two files have the same revision number (say, 1.2), it does not mean that these particular versions of the files are related in any way. This is as opposed to products such as Subversion (see Chapter 4), which deal in terms of change sets, in which a revision number refers to a snapshot of the whole project directory and its contents. If this concept seems a little fuzzy, don’t worry; it will become clearer when you read about Subversion in Chapter 4.
During the update process, CVS updates any out-of-date files that you have in your local copy with the latest and greatest versions from the repository. CVS, like Subversion and many other open source version control system, does not prevent two developers from simultaneously modifying the same file. When the changes are made in different areas of the source code, CVS will attempt to merge the modifications. If you have made any modifications in your local copy since your last update, CVS will try to merge your version with the repository version. In most cases, CVS does a good job of integrating changes make in text files (including Java source code, XML, and so on). However, it will occasionally find some changes that it can’t merge correctly. In this case, it will display an error, indicating the conflicting files with a “C”:
$ cvs update
cvs update: Updating .
RCS file: /usr/local/cvs/ShopCoreApi/pom.xml,v
retrieving revision 1.5
retrieving revision 1.6
Merging differences between 1.5 and 1.6 into pom.xml
rcsmerge: warning: conflicts during merge
cvs update: conflicts found in pom.xml
C pom.xml
cvs update: Updating src
cvs update: Updating src/main
CVS indicates conflicts in the fairly visible format shown here:
<project xmlns="http://maven.apache.org/POM/4.0.0"
  xmlns:xsi="http://www.w3.org/2001/XMLSchema-instance"
  xsi:schemaLocation="http://maven.apache.org/POM/4.0.0
  http://maven.apache.org/maven-v4_0_0.xsd">
    .
    .
    .
    <dependency>
      <groupId>org.springframework</groupId>
      <artifactId>spring</artifactId>
<<<<<<< pom.xml
      <version>2.0.5</version>
=======
      <version>2.0.6</version>
>>>>>>> 1.6
    </dependency>
  </dependencies>
</project>
In
this example, we have modified the pom.xml
file, upgrading the Spring dependency to 2.0.5. Our own take is indicated first,
between the “<<<<<<<” and the “=======.” Next comes the
equivalent code on the server, between the “=======” and the
“>>>>>>>.” Resolving conflicts simply involves manually
correcting the code and recommitting. Because it is fairly trusting, CVS doesn’t
actually care what you do to the file as long as you change it. Then, you can
commit again normally.
Resolving a Locked Repository
When you commit a file, CVS will place a lock on the file to prevent another user updating the repository at the same time. If you commit your changes at exactly the same time as another user, you might get a message along the following lines:
$ cvs commit -m "Added a log4j.properties file"
cvs commit: [04:37:15] waiting for joe's lock in /usr/local/cvs/ShopCoreApi
cvs commit: [04:37:45] waiting for joe's lock in /usr/local/cvs/ShopCoreApi
...
This is theoretically normal behavior, and the lock should be removed after a short time. Occasionally, however, CVS will maintain the lock when it is no longer needed. If the message persists, check with the user mentioned in the error message (Joe, in this case) to see if the user isn’t currently working with CVS. If he is not, you may need to tidy up the CVS repository manually. To do this, check the directory mentioned in the error message for files whose names start with “#cvs.pfl,” “#cvs.rfl,” “cvs.wfl,” or “#cvs.lock.” If they are present, this directory will be locked by CVS:
$ ls /usr/local/cvs/ShopCoreApi/
#cvs.pfl.taronga.14035  #cvs.rfl.taronga.14035  pom.xml,v  src  vs,v
If you think that this should not be the case, just remove these files. However, if your project has any subdirectories, you will need to remove similar files from those directories, too. For example, on a Unix server, you could do something along the following lines:
$ find /usr/local/cvs/ -name "#cvs.*" -exec rm {} ;Working with Keyword Substitution
CVS provides a feature that lets you replace certain special keyword strings with data provided by CVS. This is often used in file headers, to provide information about the current state and version of the file in CVS. For example your Java files might all start with a header comment block along the following lines:
/*
 * ...
 * $Author$
 * $Revision$
 * Last Modified: $Date$
 */
At each commit, CVS will replace these fields with the appropriate values:
/*
 * $Id: TaxCalculator.java 1.5 2007/10/26 23:28:42 john Exp $
 * $Author: john$
 * $Revision: 1.5$
 * Last Modified: $Date: 2007/10/26 23:28:42$
 */
There are other keywords as well. The “$Id$” keyword wraps up all of this information into one line:
/*
 * $Id: TaxCalculator.java 1.5 2007/10/26 23:28:42 john Exp $
 */
Other common keywords are $Source$, which indicates the path to the file in the version control system, and $Log$, which lists the changes made to the file. The $Log$ keyword is a good one to avoid, as it bloats your source code files with information that can easily be obtained directly from CVS, and can cause unnecessary conflicts during file merges.
Keyword substitution is frowned on in some other version control systems, for example, in Subversion. This is mainly because it duplicates information by placing data that should normally be the responsibility of the version control system in the source code files. Occasionally, however, there are valid reasons to do it. If necessary, you can configure Subversion to perform keyword substitution, in particular with the $Id$ keyword. If you are considering a migration to Subversion and use keyword substitution for some mission-critical purpose, the $Id$ keyword may be worth a look.
Keyword substitution is not a good idea with binary files, as it will almost certainly corrupt the binary files. We will look at how to deal with this issue in the next section.
Working with Binary Files
Traditionally, CVS handles binary file formats quite poorly. By default, it will assume that all of your files are text files. As a result, it will try to perform text operations on these files, such as keyword substitution and merging, which inevitably will corrupt your binary file. To avoid this, you need to tell CVS explicitly which of your files are binary.
When you add a binary file to an existing project, you can use the -kb option, as shown here:
$ cvs add -kb src/main/webapp/images/logo.png
cvs add: scheduling file 'src/main/webapp/images/logo.png' for addition
However, this is not a particularly practical solution, as you need to remember to do this individually for each binary file. In addition, the cvs import command does not provide this option. A more convenient approach is to use the “cvswrappers” file. This is a special file that lets you tell CVS which options to use for particular file types, based on their extensions.
The “cvswrappers” file lives under the CVSROOT project in the CVS repository. To modify this file, you first need to check it out using a standard cvs checkout command:
$ mkdir cvsroot
$ cd cvsroot
$ cvs co CVSROOT
cvs checkout: Updating CVSROOT
U CVSROOT/checkoutlist
U CVSROOT/commitinfo
U CVSROOT/config
U CVSROOT/cvswrappers
U CVSROOT/loginfo
U CVSROOT/modules
U CVSROOT/notify
U CVSROOT/postadmin
U CVSROOT/postproxy
U CVSROOT/posttag
U CVSROOT/postwatch
U CVSROOT/preproxy
U CVSROOT/rcsinfo
U CVSROOT/taginfo
U CVSROOT/verifymsg
Now edit the “cvswrappers” file with your favorite text editor. The file is a list of one-line entries. Each entry indicates how a particular file format should be handled in terms of keywork substitution and file merges. For binary files, the lines look something like this:
*.gif -k 'b' -m 'COPY'
This tells CVS to treat all GIF files as binary files, with no keyword substitution and no file merging (the -k option refers to keyword substitution, and the -m option tells CVS to create a new copy of the file for each new version, rather than attempting to merge the new file with the previous one). A more complete example of this file is shown here:
# This file affects handling of files based on their names.
#
# The -m option specifies whether CVS attempts to merge files.
#
# The -k option specifies keyword expansion (e.g. -kb for binary).
#
# Format of wrapper file ($CVSROOT/CVSROOT/cvswrappers or .cvswrappers)
#
#  wildcard    [option value][option value]...
#
#  where option is one of
#  -f        from cvs filter        value: path to filter
#  -t        to cvs filter          value: path to filter
#  -m        update methodology     value: MERGE or COPY
#  -k        expansion mode         value: b, o, kkv, &c
#
#  and value is a single-quote delimited value.
# For example:
#*.gif -k 'b'
*.avi   -k 'b' -m 'COPY'
*.bin   -k 'b' -m 'COPY'
*.bz    -k 'b' -m 'COPY'
*.bz2   -k 'b' -m 'COPY'
*.class   -k 'b' -m 'COPY'
*.doc   -k 'b' -m 'COPY'
*.ear   -k 'b' -m 'COPY'
*.exe   -k 'b' -m 'COPY'
*.gif   -k 'b' -m 'COPY'
*.gz    -k 'b' -m 'COPY'
*.hqx   -k 'b' -m 'COPY'
*.jar   -k 'b' -m 'COPY'
*.jpeg  -k 'b' -m 'COPY'
*.jpg   -k 'b' -m 'COPY'
*.mov   -k 'b' -m 'COPY'
*.mp3   -k 'b' -m 'COPY'
*.mpg   -k 'b' -m 'COPY'
*.pdf   -k 'b' -m 'COPY'
*.png   -k 'b' -m 'COPY'
*.ppt   -k 'b' -m 'COPY'
*.rpm   -k 'b' -m 'COPY'
*.sit   -k 'b' -m 'COPY'
*.srpm  -k 'b' -m 'COPY'
*.swf   -k 'b' -m 'COPY'
*.tar   -k 'b' -m 'COPY'
*.tbz   -k 'b' -m 'COPY'
*.tgz   -k 'b' -m 'COPY'
*.tif   -k 'b' -m 'COPY'
*.tiff  -k 'b' -m 'COPY'
*.war   -k 'b' -m 'COPY'
*.xbm   -k 'b' -m 'COPY'
*.xls   -k 'b' -m 'COPY'
*.zip   -k 'b' -m 'COPY'
Once you have added a line for every file type you need to handle, just commit your changes as you would any other CVS changes:
$ cvs commit -m "Updated cvswrappers to handle binary file types"
cvs commit: Examining .
/usr/local/cvs/CVSROOT/cvswrappers,v  <--  cvswrappers
new revision: 1.2; previous revision: 1.1
cvs commit: Rebuilding administrative file database
Now any binary files of the types listed in the “cvswrapper” file automatically will be correctly treated as binary files.
Tags in CVS
One of the core features of a version control system is to identify particular versions of your application. You may want to identify a particular test or public release, or an end-of-iteration milestone, or you may want to identify nightly builds. This allows you to return to a known stable version at any time, and it makes it easier to reproduce and fix bugs found in a particular release.
In CVS, you use tags to identify a particular version of your application. You do this by running the cvs tag command. The following command, for example, will mark the files in the current working copy as “milestone-iteration-1”:
$ cvs tag milestone-iteration-1
cvs tag: Tagging .
T pom.xml
cvs tag: Tagging src
cvs tag: Tagging src/main
cvs tag: Tagging src/main/java
cvs tag: Tagging src/main/java/com
cvs tag: Tagging src/main/java/com/acme
cvs tag: Tagging src/main/java/com/acme/shop
cvs tag: Tagging src/main/resources
T src/main/resources/applicationContext.xml
T src/main/resources/log4j.properties
T src/main/resources/messages.properties
cvs tag: Tagging src/test
cvs tag: Tagging src/test/java
cvs tag: Tagging src/test/java/com
cvs tag: Tagging src/test/java/com/acme
cvs tag: Tagging src/test/java/com/acme/shop
T src/test/java/com/acme/shop/AppTest.java
Note that the version that you are tagging here is the version currently in your working directory. This gives you a better control over what version you are actually tagging. If any files have been updated in the repository since you last updated your local copy, they won’t be included in the version that you tag.
The syntax for tag labels is fairly strict. Basically, you are not allowed to have spaces, periods, colons, commas, or any other punctuation, with the exception of hyphens (“-”) and underlines (“_”). One reason for this is to avoid confusion with revision numbers.
Another common use of tagging is to “promote” a version, putting a special label on a particular version. For example, after user acceptance testing, you might decide to label a particular release candidate as the official production release. You can do this by using the -r option to refer to the version that you wish to tag:
$ cvs tag -r version-1-0-release-candidate-3 production-release-1-0
Tags are applied individually to each file in your project, so the process can be extremely time-consuming for larger projects. I have seen builds take hours because of the tagging involved. Unfortunately, there’s not a lot you can do about this, other than to make sure that your disks are fast.
Creating Branches in CVS
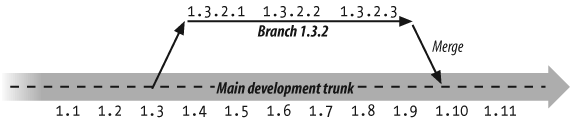
Branches are an important part of any version control system. In CVS, the main stream of development work is known as the trunk. By default, any changes that you make to the source code will go here. However, developers can create branches, where development is carried out in parallel. This is illustrated in Figure 3-1. Typical uses of branches include freezing a production release in one branch while the development team continues to work on the next release in a separate branch. Whenever a production release is made, a new branch is created at this point. If a bug is found in the production release, it can be identified and fixed and a new, stable production version can be released, without interfering with or being affected by the work on the unstable development version.
Branches are an integral part of the CVS architecture, and they are closely related to tagging (see Tags in CVS). It is relatively straightforward to create new branches and to merge changes made in one branch into another. To create a new branch from the current working copy, you simply run the cvs tag command using the -b option:
$ cvs tag -b production-release-1-0-patches
It is also a good habit to tag the main trunk when you create a branch. This makes it easier to keep tabs on when branches were made just by looking at the main trunk.
From now on, you will be working on the “production-release-1-0-patches” branch, and your changes will not affect anyone who is not working on this branch. Until further notice, all of your commits will go to this branch.
Suppose that another developer needs to work on this branch. There are two ways to do this. You can either check out an entirely new working copy for this branch, or you can switch your current working copy to this branch.
Checking out a new working copy of the branch in a new directory is a good approach if you need to work on several branches at the same time. For example, you might need to fix bugs in a production release while continuing work on the next version on a separate branch. To do this, you run cvs checkout in a new directory, specifying the branch you want with the -t option:
$ mkdir production-release-branch
$ cd production-release-branch
$ cvs co -r production-release-1-0-patches ShopCoreApi
This approach also makes it easier later, when you need to merge the modifications made in your new branch into the main development trunk.
If the switch is a long-term change, you might prefer to switch your main working directory to the new branch. You can do this by using the cvs update command with the -r option:
$cvs update -r production-release-1-0-patches
This approach is not as tidy as the first one. One disadvantage of updating your current working directory is that if you have any uncommitted changes, CVS will try to merge your code with the branched release, possibly causing conflicts. In any case, it might not correctly reflect the contents of the repository version.
Merging Changes from a Branch
Suppose that you have fixed a bug in the production release branch, and you now want to incorporate this fix in the main trunk. You do this by merging your corrections back into the main trunk. CVS basically works out what has been modified in your branch since it left the trunk, and applies these changes to the most recent revision in the main trunk.
You can do this by updating your main trunk using the -j (for “join”) option. You need an up-to-date working copy of the main development trunk. If you don’t have one on hand, you will need to check out a copy into a new directory. Otherwise, you simply go to your main trunk directory and run cvs update to make sure that you have the latest version:
$ cd ../main_trunk/ShopCoreApi
$ cvs update
Once you have an updated working copy of the main development trunk, you need to run the cvs update command again, this time with the -j option. Specify the name of the branch that you want to integrate into the trunk, as shown here:
$ cvs update -j production-release-1-0-patches
cvs update: Updating ShopCoreApi
RCS file: /usr/local/cvs/ShopCoreApi/pom.xml,
retrieving revision 1.7
retrieving revision 1.7.2.3
Merging differences between 1.7 and 1.7.2.3 into pom.xml
cvs update: Updating ShopCoreApi/src
cvs update: Updating ShopCoreApi/src/main
cvs update: Updating ShopCoreApi/src/main/java
...
When you merge, you should also tag this point in the main trunk as well. This makes it easier to merge further modifications made in your branch in the future. For example, suppose we tag our branch at the point of the merge with a significantly named tag, like “production-release-1-0-patch-1-0,” as shown here:
$ cd ../../production-release-branch
$ cvs tag production-release-1-0-patch-1-0
Then we continue to work on the production release 1.0 branch, applying the occasional bug fix. The next time that we want to integrate our changes, we only need the changes that have been made since the last merge. You can indicate that you are only interested in the changes that occured from a particular point onward by providing an additional -j parameter. The first -j parameter indicates the point from which the changes are to start and the second indicates the branch:
$ cd ../main_trunk/ShopCoreApi
$ cvs update -j production-release-1-0-patch-1-0 -j production-release-1-0-patches
Viewing Change History
It often can be useful to know what changes a file, or a project,
has undergone over time. The cvs log command lets you review
the log messages (which of course everyone has diligently completed) for a
particular file or directory, along with useful information such as who made the
modifications, when they were made, and so on. For example, we could inspect the
changes made to the log4j.properties file as
follows:
$ cvs log src/main/resources/log4j.properties
RCS file: /usr/local/cvs/ShopCoreApi/src/main/resources/log4j.properties,v
Working file: src/main/resources/log4j.properties
head: 1.2
branch:
locks: strict
access list:
symbolic names:
keyword substitution: kv
total revisions: 2;     selected revisions: 2
description:
----------------------------
revision 1.2
date: 2007-07-09 00:35:02 +1200;  author: wakaleo;  state: Exp;  lines: +4 -0;
commitid: BQCkVlCIqlpjKXos;
Made some changes
----------------------------
revision 1.1
date: 2007-07-08 23:19:41 +1200;  author: wakaleo;  state: Exp;
commitid: i5z7fsQ3cUMskXos;
Minor modifications
=============================================================================
There is a lot of information here, most of which you can safely skip over. The most useful information is contained between the lines of dashes at the end of the file.
You also can do the same operation on a directory, as shown here for the whole Java source code directory:
$ cvs log src/main/java
cvs log: Logging src/main/java
cvs log: Logging src/main/java/com
cvs log: Logging src/main/java/com/acme
cvs log: Logging src/main/java/com/acme/shop

RCS file: /usr/local/cvs/ShopCoreApi/src/main/java/com/acme/shop/Attic/App.java,v
Working file: src/main/java/com/acme/shop/App.java
head: 1.3
branch:
locks: strict
access list:
symbolic names:
        start: 1.1.1.1
        vendortag: 1.1.1
keyword substitution: kv
total revisions: 4;     selected revisions: 4
description:
----------------------------
revision 1.3
date: 2007-07-09 00:35:02 +1200;  author: wakaleo;  state: dead;  lines: +0 -0;
commitid: BQCkVlCIqlpjKXos;
Made some changes
----------------------------
revision 1.2
date: 2007-07-08 23:19:10 +1200;  author: wakaleo;  state: Exp;  lines: +0 -1;
commitid: 6mKyq0emuQLhkXos;
Minor modifications
----------------------------
revision 1.1
date: 2007-07-08 23:17:01 +1200;  author: wakaleo;  state: Exp;
commitid: 5lpTqvi8JXQxjXos;
branches:  1.1.1;
Initial revision
----------------------------
revision 1.1.1.1
date: 2007-07-08 23:17:01 +1200;  author: wakaleo;  state: Exp;  lines: +0 -0;
commitid: 5lpTqvi8JXQxjXos;
New Project
=============================================================================
On a real project, however, this may be a bit overwhelming. You might want to narrow things down a little, for example, by defining a particular revision or a range of dates. You can do this using the -r and -d options, respectively. In the best Unix tradition, these options are rich, powerful, and flexible, so I will just provide a few examples here:
Show the log messages for the changes made to the
src/main/javadirectory on July 10:$ cvs log -d '10 July 2007' src/main/java
Show the changes made to the
src/main/javadirectory between July 1 and 15:$ cvs log -d '01-jul<15-jul' src/main/java
Show log messages for the changes made to the
src/main/javadirectory since December 31, 2006 inclusive (note the “<”):$ cvs log -d '2006-12-31<' src/main/java
Show log messages for the changes made to the
src/main/javadirectory over the last month:$ cvs log -d 'last month<' src/main/java
Show the changes made in revision 1.2 of the log4j.properties file:
$ cvs log -r 1.2 src/main/resources/log4j.properties
Another useful command is cvs annotate, which provides a detailed view of the modifications made to a particular file, including who last modified each line of the file and when she made the modification. The following is a real-world example taken from the build script of the JUnit project:
$ cvs annotate junit/build.xml

Annotations for junit/build.xml
***************
1.1          (egamma   09-Jan-01): <project name="junit" default="dist" basedir=".">
1.26         (dsaff    22-Mar-07):      <tstamp />
1.29         (dsaff    02-Jul-07):
1.8          (emeade   06-Feb-02):      <property file=
                                         "${user.home}/.junit.properties" />
1.19         (dsaff    21-Nov-06):      <property name="src" value="src" />
1.19         (dsaff    21-Nov-06):      <property name="bin" value="bin" />
1.26         (dsaff    22-Mar-07):      <property name="version"
                                         value="4.4-snapshot-${DSTAMP}-${TSTAMP}" />
1.7          (emeade   06-Feb-02):      <property name="dist"
                                         value="junit${version}" />
...
Reverting Changes
In the previous section, we saw how to examine the change history for a file or directory. But what happens if you realize that a change wasn’t what you wanted? Once you realize that you have committed an incorrect version of a file, it is fairly easy to revert to a previous version. Let’s look at a concrete example. Suppose that you have just committed a new version of the messages.properties file, as shown here:
$ cvs commit -m "Added an important message"
cvs commit: Examining .
cvs commit: Examining src
...
/usr/local/cvs/ShopCoreApi/src/main/resources/messages.properties,v  <--
src/main/resources/messages.properties
new revision: 1.5; previous revision: 1.4
However, you have a doubt—was this the right version? You can use the cvs diff command to check exactly what changes were made in your last commit as shown here (the -c option gives a slightly more readable output):
$ cvs diff -c -r 1.4 -r 1.5 src/main/resources/messages.properties
Index: src/main/resources/messages.properties
===================================================================
RCS file: /usr/local/cvs/ShopCoreApi/src/main/resources/messages.properties,v
retrieving revision 1.4
retrieving revision 1.5
diff -c -r1.4 -r1.5
*** src/main/resources/messages.properties      10 Jul 2007 12:36:14 -0000      1.4
--- src/main/resources/messages.properties      10 Jul 2007 12:36:37 -0000      1.5
***************
*** 1,6 ****
  # Messages
- hello.world=Hello, World!
  my.message=Welcome to our online shop
  shopping.cart=Shopping Cart


--- 1,6 ----
  # Messages
  my.message=Welcome to our online shop
+ my.new.message=Utter rubbish!
  shopping.cart=Shopping Cart
The
cvs diff command arguably is not the most
readable way to compare to files—and generally you are better off using a
graphical tool such as the CVS plug-in for Eclipse—but it will do in a pinch.
CVS is telling us that we have removed the hello.world message and added a new message (my.new.message), which is, apparently, utter
rubbish. So, not wanting this to
appear in today’s production release, we need to revert to the previous
revision.
Now, strictly speaking, we aren’t reverting to revision 1.4. Much as we would like to erase all traces of our errors, a version control system is designed to keep track of versions, not delete them. So, we will actually be creating a new revision, revision number 1.6, which will be identical to revision 1.4.
Enough theory; let’s see how to do it. The easiest way to revert is use the cvs update command, using the -j option. The -j stands for “join,” and tells CVS that you want to merge a particular revision, either with the current version or, as here, with some other revision in the repository. The command in this case is shown here:
$ cvs update -j 1.5 -j 1.4 src/main/resources/messages.properties
RCS file: /usr/local/cvs/ShopCoreApi/src/main/resources/messages.properties,v
retrieving revision 1.5
retrieving revision 1.4
Merging differences between 1.5 and 1.4 into messages.properties
When you use two -j options in the same command, you are telling CVS to apply the difference between the first and second revisions to your current copy. Order is important, so, in this case, the difference effectively takes you back to the previous version, which is what we want.
Now you have your original version back again. Once you’ve checked that everything is as you want it, commit this reverted version to the repository using a standard cvs commit command:
$ cvs commit -m "Reverted to previous version"
cvs commit: Examining .
cvs commit: Examining src
cvs commit: Examining src/main
cvs commit: Examining src/main/java
cvs commit: Examining src/main/java/com
cvs commit: Examining src/main/java/com/acme
cvs commit: Examining src/main/java/com/acme/shop
cvs commit: Examining src/main/resources
cvs commit: Examining src/test
cvs commit: Examining src/test/java
cvs commit: Examining src/test/java/com
cvs commit: Examining src/test/java/com/acme
cvs commit: Examining src/test/java/com/acme/shop
/usr/local/cvs/ShopCoreApi/src/main/resources/messages.properties,v  <--
src/main/resources/messages.properties
new revision: 1.6; previous revision: 1.5
Now the new revision 1.6 contains a copy of the old revision 1.4.
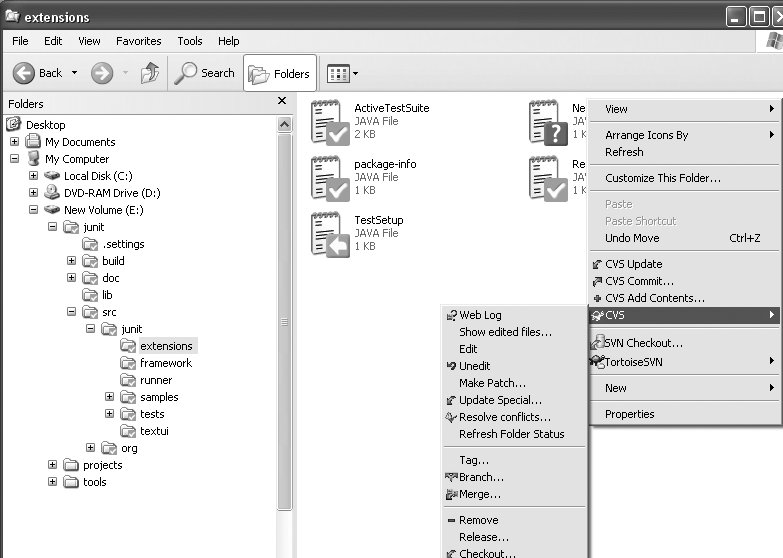
Using CVS in Windows
There are several graphical clients that you can use to manage CVS in Windows. Probably the best of these is TortoiseCVS,[*]a graphical CVS client that integrates smoothly into Windows Explorer. TortoiseCVS comes bundled with a CVS client, so users don’t need to install the CVS tool manually. Using TortoiseCVS, you can do pretty much everything you normally would do from the command line, but via a nice graphical interface. This includes checkout modules, updating folders, and committing changes, as well as more sophisticated operations such as tagging, branching, merging, and viewing the CVS logfiles (see Figure 3-2).