
Chapter 23. Preemptive Error Detection with FindBugs
FindBugs: A Specialized Bug Killer
FindBugs is another static analysis tool for Java, similar in some ways to Checkstyle (see Chapter 21) and PMD (see Chapter 22), but with a quite different focus. FindBugs is not concerned by formatting or coding standards and only marginally interested in best practices: in fact, it concentrates on detecting potential bugs and performance issues. It does a very good job of finding these, and can detect many types of common, hard-to-find bugs. Indeed, FindBugs is capable of detecting quite a different set of issues than PMD or Checkstyle with a relatively high degree of precision. As such, it can be a useful addition to your static analysis toolbox.
FindBugs was written in response to the overwhelming number of issues raised by other tools such as Checkstyle and PMD. Many of the issues raised by these tools are actually false positives and both tools need to be fine-tuned to avoid real issues being hidden by too many false positives. FindBugs tries hard to concentrate on identifying only issues that involve genuine potential coding errors.
FindBugs is the result of a research project at the University of Maryland. It
uses static code analysis to detect potential bugs using the notion of “bug
patterns.” Bug patterns are poor coding practices that are generally incorrect
and may lead to application errors. For example, in the following code, if the
address variable is null, the second line will generate a NullPointerException:
Address address = client.getAddress();
if ((address != null) || (address.getPostCode() != null)) {
    ...
}
Another example is shown here, in which the items member variable is accessed without having been
initialized:
public class ShoppingCart {
    private List items;

    public addItem(Item item) {
        items.add(item);
    }
}
Errors like these are often easy to identify simply by reading the code. However, although effective, code reviews are labor-intensive and time-consuming, and wherever possible it is easier to let the machine do the inspection for you! FindBugs is designed to do just that.
FindBugs uses the Apache BCEL library to analyze the classes in your application and detect potential bugs. FindBugs rules (or “detectors”) use a variety of inspection techniques, from examining the structure of the class right through to studying the detailed dataflow through the class. In addition to the detectors provided by FindBugs, with a bit of work, you can write your own custom-built detectors.
FindBugs comes with over 200 rules divided into different categories:
- Correctness
These issues involve code that is probably incorrect in some way, for example, code that involves an infinite recursive loop or that reads a field that is never written. Issues in this category are almost certainly bugs.
- Bad practice
According to the FindBugs team, issues in this category involve “clear violation of recommended and standard coding practice.” The bad practices that FindBugs is interested in generally have a direct correlation with potential defects, for example, code that drops exceptions or fails to close file or database resources. Some of these issues are also detected by PMD.
- Performance
These issues aim at detecting potential performance issues, such as code involving unnecessary object creation, or using string concatenation in a loop rather than using a StringBuffer.
- Multithreaded correctness
These is a special category of issues involving problems with synchronized and multithreaded code.
- Dodgy
This type of issue involves code which seems odd, or “smells bad,” in XP terminology, such as unused local variables or unchecked casts. According to the FindBugs team, less than half of these issues involve actual bugs.
FindBugs can be used in three ways; as a standalone Swing application, in Eclipse using the Eclipse plug-in, or integrated into the build process as an Ant task or Maven report. In practice, the standalone application is rarely used: developers prefer to be able to invoke FindBugs directly from within their work environment, whereas project managers and quality assurance people appreciate being able to display project-wide bug reports using the reporting features.
In the rest of this chapter, we will look at how to use FindBugs in these different contexts.
Using FindBugs in Eclipse
FindBugs comes with an Eclipse plug-in that provides excellent integration with this IDE. Using FindBugs from within Eclipse has obvious advantages for a developer: potentially dangerous bugs can be identified and fixed even before code is committed to the repository, which allows for a much tighter development cycle.
Installing the FindBugs Plug-In
The easiest way to install the FindBugs Eclipse plug-in is to use the Eclipse Update site. You do this in the usual way:
Open the Help→Software Updates→Find and Install menu.
Click Next, and choose New Remote Site.
Enter the URL of the remote site (http://findbugs.cs.umd.edu/eclipse/) and an appropriate name such as “FindBugs.”
Make sure you have the FindBugs site checked in the “Sites to include in search” window, and click Finish. Then just go through the installation screens to install the plug-in.
Alternatively, you can download it from the plug-in download site[20] and unzip the file into your Eclipse plug-in directory.
Once you have installed the plug-in, you need to activate FindBugs for your project. Open the project properties window (Project→Properties). You will now have a FindBugs entry (see Figure 23-1). This window allows you to configure FindBugs in detail for your particular project by selecting which rules you want to apply. If you check the “Run FindBugs automatically” checkbox, FindBugs will check for issues every time you modify a class.
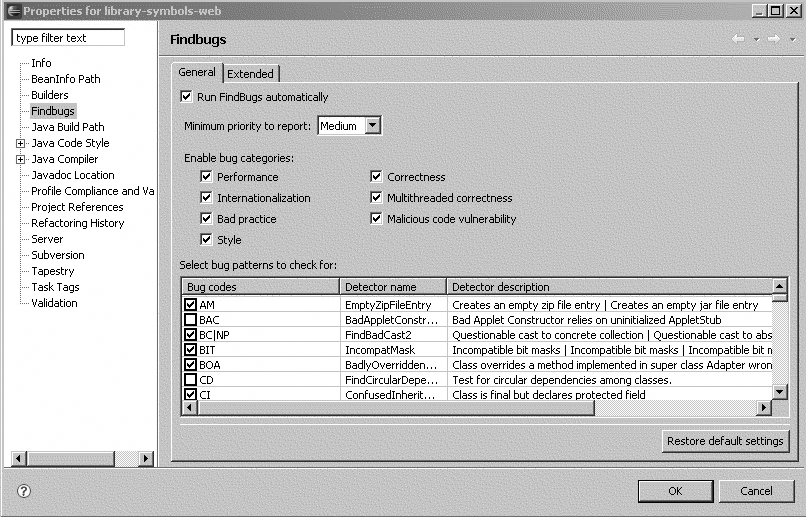
You can also filter the types of issues you want reported, either by priority or by category. For example, if you want to ignore all low priority issues, just set the minimum priority to “Medium” (this is the recommended level).
Note that some FindBugs issues are quite slow, such as FindTwoLockWait, FindNullDeref, FindOpenStream, FindInconsistentSync2, and FindSleepWithLockHeld. On larger projects, you may want to disable these rules in the development environments and leave this sort of detection to the continuous integration environment.
Detecting and Displaying Errors
The FindBugs Eclipse plug-in is a simple, lightweight tool with few bells and whistles. If you have configured FindBugs to run automatically, it will check for bugs every time you modify a class. You can also run FindBugs using the “FindBugs” entry in the contextual menu. For large projects, this can take a while.
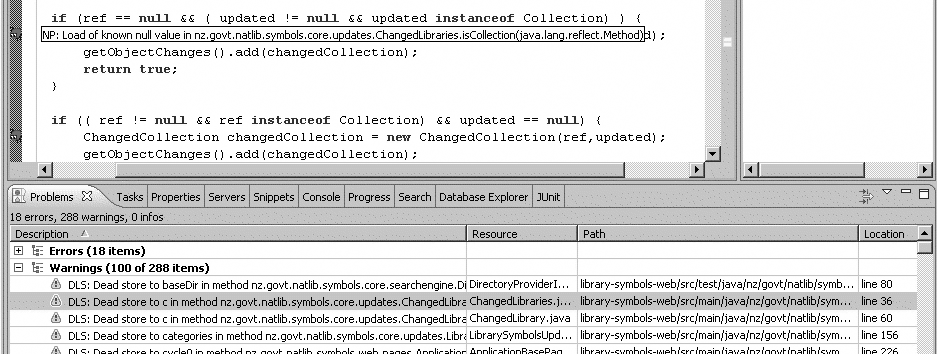
The simplest way to view the issues raised by FindBugs is in the Problems view, where they are listed with other errors and warnings (see Figure 23-2). FindBug issues are also indicated in the source code by a dedicated icon (an easily recognizable red bug). If you need more details, click on the bug icon in the margin or select the “Show Bug Details” entry in the contextual menu; this will display the “Bug Details” view, which contains a more detailed description of the issue.
One thing to remember about FindBugs is that it works on compiled bytecode, not on Java source files. So, if your project is not configured to build automatically after each modification (Project→Build Automatically), you won’t see any changes in the errors displayed by FindBugs until you recompile manually.
Selectively Suppressing Rules with FindBug Filters
Like Checkstyle (see Suppressing Checkstyle Tests), FindBugs lets you define rules indicating which rules should be used or excluded in particular cases, such as in a particular class or method. A FindBugs filter works by combining one or more filter clauses, such as Class, BugCode, Method, and Priority. Matching cases may be included or ignored, depending on how the filter file is used. In most cases, you use a filter file to ignore specific issues.
Let’s look at some examples. The following filter will match DE (method might
drop exception) and EI (method may expose internal representation) in the
com.mycompany.example.MyClass
class:
<FindBugsFilter>
     <Match>
       <Class name="com.mycompany.example.MyClass"/ >
       <BugCode name="DE, EI"/ >
     </Match>
</FindBugsFilter>
More precisely, we can go down to the method level. The following filter will
match these issues, but only in the processData()
method:
<FindBugsFilter>
     <Match>
       <Class name="com.mycompany.example.MyClass" />
       <Method name="processData" />
       <BugCode name="DE, EI" />
     </Match>
</FindBugsFilter>
Or, if there are several methods that need to match, you can use the Or clause:
<FindBugsFilter>
     <Match>
       <Class name="com.mycompany.example.MyClass" />
       <Or>
         <Method name="collectData" />
         <Method name="processData" />
       <Or/>
       <BugCode name="DE, EI" />
     </Match>
</FindBugsFilter>
You will often want to exclude certain rules for groups of classes, such as
automatically-generated classes over which you have little control. To do this,
you can use regular expressions in the class name expression. Regular
expressions in FindBugs start with a “~”. The following deactivates the ICAST
rule for all classes in the com.wakaleo.continuum.jabber package:
<FindBugsFilter>
<Match>
<Class name="~com.wakaleo.continuum.jabber.*" />
<BugCode name="ICAST" />
</Match>
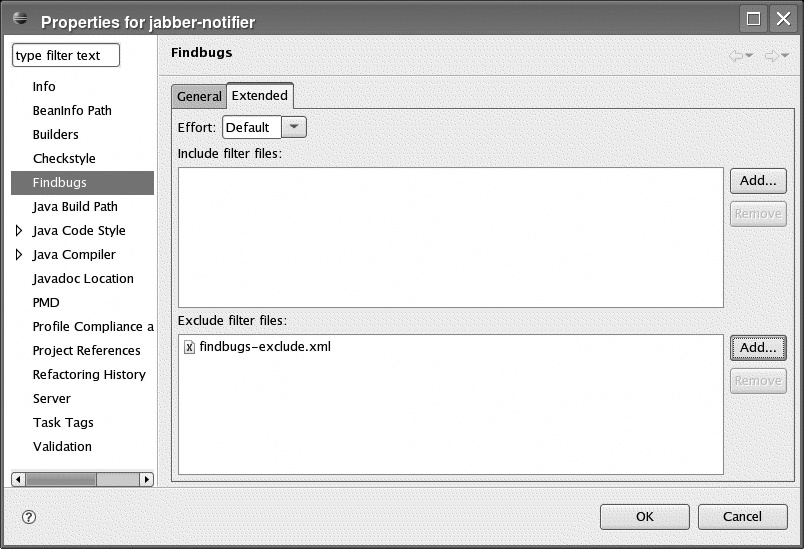
</FindBugsFilter>In Eclipse, you can use these files in the FindBugs properties page, in the “Extended” tab (see Figure 23-3). Simply add the filter files to the Include or Exclude list, as appropriate.
Using FindBugs Annotations
Another interesting way to suppress FindBugs warnings is to use annotations. To use annotations, include the FindBugs annotations.jar file in your project classpath.
One of the most useful of the FindBugs annotations is @SuppressWarnings. You can use this at several levels. For example, if you use it at the class level, it will suppress all FindBugs warnings for this class:
import edu.umd.cs.findbugs.annotations.SuppressWarnings;

@SuppressWarnings
public class JabberPublisher {
...
}
Alternatively, you can use it at a method level, which limits the scope of the suppression to the method:
import edu.umd.cs.findbugs.annotations.SuppressWarnings;

public class JabberPublisher {

    @SuppressWarnings
    void doSomething() {
        ...
    }
}
Finally, you can specify the exact rule you want to deactivate. In the
following example, we deactivate the FindDeadLocalStores rule for the
doSomething() method:
import edu.umd.cs.findbugs.annotations.SuppressWarnings;

public class JabberPublisher {

    @SuppressWarnings("DLS")
    void doSomething() {
        ...
    }
}
Other annotations let you help FindBugs detect potentially incorrect uses of
your code. For example, in the following code sample, the getClientByAccountNumber() method returns null if no matching client is found. Of course,
you should mention this in the Javadoc, but you can also use the @CheckForNull annotation to ensure that anyone
using this method checks to see if the method has returned null:
import edu.umd.cs.findbugs.annotations.CheckForNull;
...

    @CheckForNull
    void getClientByAccountNumber(String accNumber) throws HibernateException {
        ...
    }
Using FindBugs in Ant
FindBugs also integrates well into the project build lifecycle. Project managers and quality assurance staff appreciate the ability of tools such as FindBugs to monitor and report on code quality. In this section, we will look at how to use the FindBugs Ant task to run checks and generate reports using Ant.
To use FindBugs in Ant, you first need to download and install the FindBugs
tool in a convenient directory. For example, you can install it into a directory
called tools in your home directory, as shown
here:
$ cd ~/tools
$ unzip findbugs-1.3.0.zip
$ ln -s findbugs-1.3.0 findbugs
The easiest way to use the FindBugs Ant task is to copy the findbugs-ant.jar file into your Ant lib directory, as shown in this example:
$ cd ~/tools/findbugs
$ cp lib/findbugs-ant.jar /usr/share/ant/lib/
If you can’t (or don’t want to) modify your Ant installation, you can install FindBugs into a local directory and refer to this directory using a <classpath> directive, as shown here:
    <taskdef name="findbugs" classname="edu.umd.cs.findbugs.anttask.FindBugsTask" >
        <classpath>
            <fileset dir="${findbugs.home}/lib">
              <include name="**/*.jar"/>
            </fileset>
        </classpath>
    </taskdef>
In both cases, you will need to specify your FindBugs installation directory.
You typically do this by defining a property pointing to the
findbugs directory:
<property name="findbugs.home" value="${user.home}/tools/findbugs" />Now you can write your FindBugs task. The following target will generate an XML report listing the issues detected by FindBugs:
  <target name="findbugs" depends="compile">
    <findbugs home="${findbugs.home}" output="xml" failOnError="true"
     outputFile="findbugs-report.xml">
      <class location="${build.classes.dir}" />
      <auxClasspath refId="compile.classpath" />
      <sourcePath path="src" />
    </findbugs>
  </target>
There are few mandatory attributes. You need to provide the path to your FindBugs installation in the home attribute. FindBugs operates on compiled bytecode, not on Java source code, so you also need to tell FindBugs where to find the compiled classes. The class attribute specifies the directory in which FindBugs can find the compiled classes to be analyzed. You can also specify a packaged file such as a JAR or ZIP file, for example.
The auxClasspath element is not mandatory, but it often comes in handy. You use it to list your dependencies, which FindBugs needs to be able to do a complete analysis of your code. You can define it in the same way as you would a normal Ant classpath element.
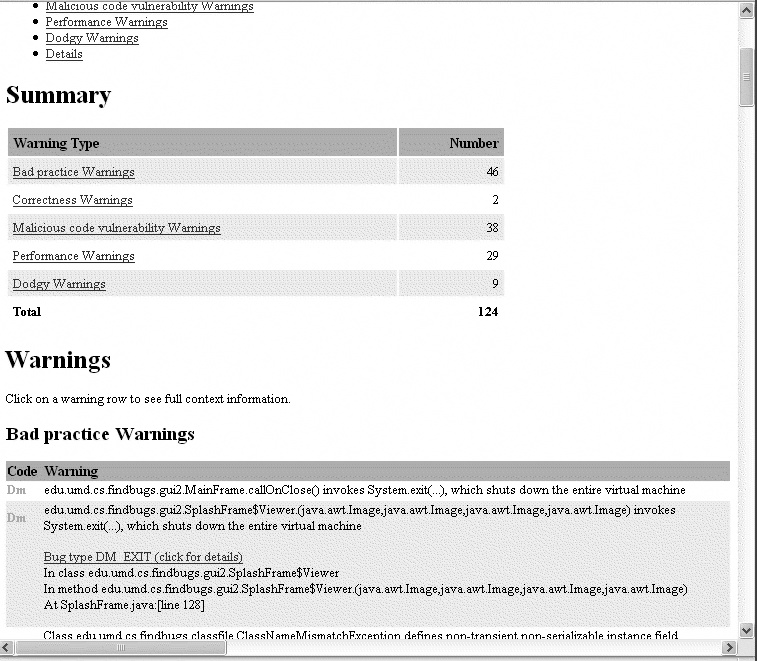
By default, the output format is “xml,” which produces a fairly laconic list of errors. The “xml:withMessages” output format will produce an XML file containing human-readable messages, which is useful if you want to use your own XSL stylesheet to generate a report. Otherwise, you can produce a more human-readable report using the “html” format. A typical report is shown in Figure 23-4.
On larger projects, FindBugs can be quite demanding in terms of memory and machine resources. If necessary, you can increase the memory available for the FindBugs analysis by using the jvmArgs option, as shown here:
    <findbugs home="${findbugs.home}" output="html" failOnError="true"
     outputFile="findbugs-report.html" jvmArgs="-Xms256m -Xmx800m">
        <class location="${build.classes.dir}" />
        <sourcePath path="src" />
    </findbugs>
The FindBugs task takes a lot of other optional parameters, such as excludeFilter and includeFilter, which let you specify filters describing which bugs to exclude or include respectively (see Selectively Suppressing Rules with FindBug Filters). It also takes reportLevel, which indicates the minimum priority of issues that will be raised, and threshold, which lets you limit the reporting to issues of at least the specified level of severity.
FindBugs uses some fairly complicated algorithms to identify potential issues, and the number and accuracy of bugs found will vary depending on how much computing power you use. You can use the effort parameter to influence FindBugs’s behavior in this regard. Setting effort to “max” will allow you to increase precision at the cost of higher memory use and slower processing, whereas setting it to “min” will reduce memory use and increase speed, at the cost of lower precision. You can adjust this parameter in the Eclipse plug-in on the extended properties page (Selectively Suppressing Rules with FindBug Filters).
Another useful parameter is omitVisitors, which lets you list rules that you do not want to be applied anywhere in the project. Here is a more complete example using some of these options:
    <findbugs home="${findbugs.home}" output="html" failOnError="true"
    outputFile="findbugs-report.html" jvmArgs="-Xms256m -Xmx800m">
        <class location="${build.classes.dir}" />
        <sourcePath path="src" />
        <reportLevel>low</reportLevel>
        <threshold>normal</threshold>
        <effort>max</effort>
        <omitVisitors>FindDeadLocalStores,UnreadFields</omitVisitors>
    </findbugs>
Using FindBugs in Maven
You can also use FindBugs to generate bug reports in your Maven build process, via the Maven 2 FindBugs report plug-in. Like many other innovative Maven tools, this plug-in is hosted by Codehaus under the Mojo project.[*] It is quite simple to use and integrates perfectly with the other reports in the Maven site.
Integrating a FindBugs report into your Maven site can be as simple as adding the following plug-in to the reports section in your pom.xml file:
<plugin>
<groupId>org.codehaus.mojo</groupId>
<artifactId>findbugs-maven-plugin</artifactId>
<configuration>
<threshold>Normal</threshold>
</configuration>
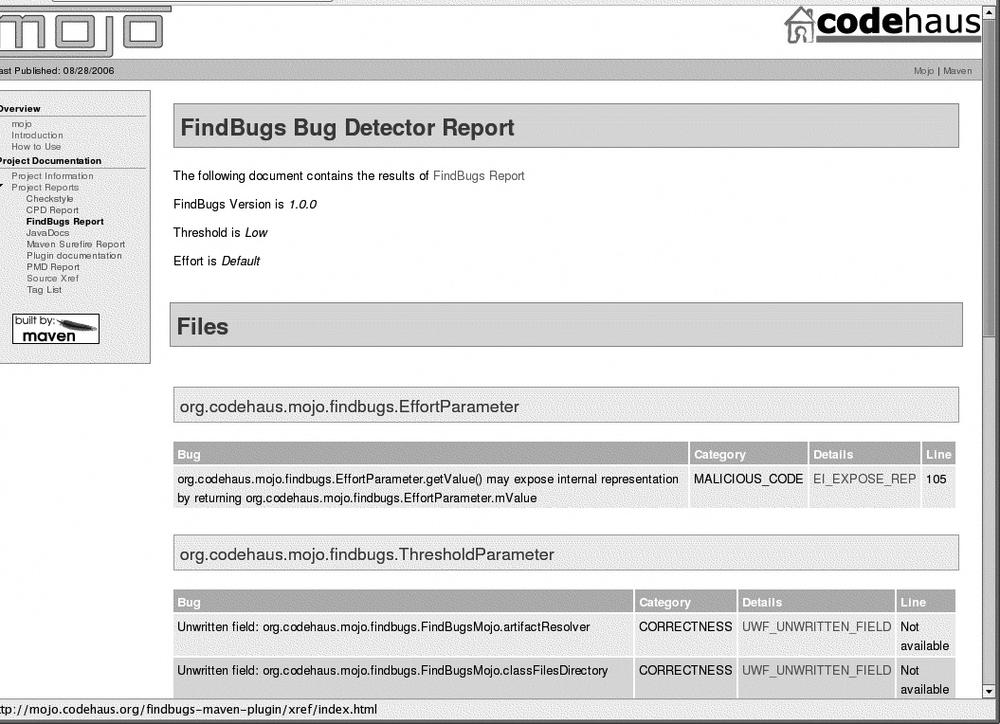
</plugin> You can create the report by generating the entire maven site, using the mvn site command. This will produce a report similar to the one in Figure 23-5.
This plug-in takes most of the optional parameters as the Ant task (see Using FindBugs in Ant), which you specify in the <configuration> section: threshold, reportLevel, excludeFilterFile and includeFilterFile, effort, and omitVisitors are all supported.
     <plugin>
       <groupId>org.codehaus.mojo</groupId>
       <artifactId>findbugs-maven-plugin</artifactId>
       <configuration>
         <threshold>Normal</threshold>
         <effort>Max</effort>
         <excludeFilterFile>findbugs-exclude.xml</excludeFilterFile>
         <omitVisitors>FindDeadLocalStores,UnreadFields</omitVisitors>
       </configuration>
     </plugin>
One notable exception is the jvmArgs parameter, which is not supported in the current version. FindBugs is a memory-hungry beast, and you will probably need to increase the available memory if your project is of any size. If you need to provide more memory for the FindBugs processing, you will need to do it at a higher level, using the MAVEN_OPTS environment variable, as shown here:
$ export MAVEN_OPTS=-Xmx512M
$ mvn site
Conclusion
FindBugs is a useful and innovative static analysis tool that concentrates on finding potential bugs rather than coding style. Issues related to coding style and best practices aim at making code more readable and easier to maintain, mostly affecting the developers working on the application, and, indirectly, the organization that is paying them. Bugs, by contrast, affect the end user.
Although there is some overlap with the rules of other static analysis tools such as Checkstyle and PMD in particular, FindBugs maintains a strong focus on only detecting potential bugs. As a result, FindBugs tends to raise fewer issues than these other tools; however, the issues raised should be taken seriously.