Detailing the Backpack and Jacket
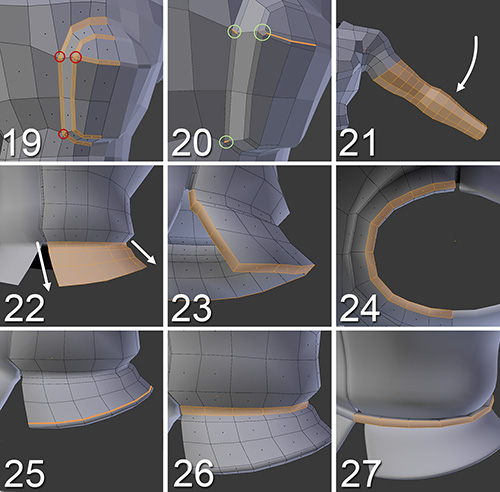
Next, we’ll add detail to Jim’s jacket and backpack. Continue with the steps shown in Figure 7.17.
19. Select the edges that comprise the corners of the backpack and bevel them (Ctrl + B). Some triangles may appear (they’re marked with red circles in the image); you’ll have to get rid of them.
20. Two of the triangles are easily solved: they are triangles with an adjacent n-gon, generated because there were more than four faces sharing the same vertex. Select the edge between one of the triangles and the n-gon and simply collapse it, so the resulting geometry will be just an edge instead of a triangle (marked with light green circles in the image).
The third triangle is a little trickier, because if you take it out, you’ll also take out some of the detail added by the bevel. In this case, just add a new loop to the side of the triangle that is facing the beveled faces and slightly move the fourth vertex created with the new loop. This way, adding a few more faces to the model, you’ll end up with a quad instead of a triangle.
21. Select all the arm’s vertices except those near the shoulder. Place the 3D cursor in the shoulder and, using the Proportional Editing tool, rotate the arm to relax it a bit. Also, select the four faces at the end of the arm (the wrist) and delete them. They won’t be visible at all and won’t be useful later on, so it’s a good idea to get them out of the way now.
Note
This step used a very nice utility of the 3D cursor that allows you to pose characters that don’t yet have a skeleton! Just place the cursor in the articulation, select the part of the body you want to move, and, with the help of the Proportional Editing tool, you’ll be able to pose your character pretty well (keep in mind, though, that you might need to adjust the vertices along the articulations after these operations).
22. Create a few extrusions to make up the shape of the flap at the bottom of the jacket.
23. With all the faces of the flap selected, press Ctrl + F to access the Face menu and use the Solidify tool to add some thickness to the flap. In the image, the thickness has been highlighted.
24. The thickness you added using Solidify in the previous step also created faces at the top of the flap that are not very useful there and can even cause some problems when subdividing the mesh, as they’re welded onto the back side of other polygons. Delete those faces now. In the image, the faces are highlighted in a view from the jacket’s interior. Also, Solidify didn’t recognize the mirror’s clipping in the back part of the jacket’s flap and it generated a few faces in its inside. Get rid of them as well.
25. Add a new loop at the bottom of the flap so that when the model is subdivided, it’s more defined there. You can merge (Alt + M) the bottom vertex of the zipper with the top vertex in the same area that the Solidify tool created, so you don’t have an empty area there.
26. Select the faces all around the waist to create a new object for the belt. Press Shift + D to duplicate, and right click to leave the duplicated faces at their original position. Now press P and pick the Selected option: this will send those duplicated faces to a new object that you’ll be able to modify.
27. Select the new object and, in Edit Mode (Tab), select the edge in the middle at the front and move it to the left until it attaches to the other side of the belt. Select all the object’s faces, extrude them (E), and right click to cancel the movement and leave the new geometry in its original position. Now, make sure the Proportional Editing tool is disabled, press Alt + S (to scale along the normals) and scale the object’s faces outward just a little to adjust the belt’s thickness.
Note
When you duplicate an object or use the Separate tool to move a set of polygons from one object to a different one, the new object will keep the original object’s modifiers.

