Finishing the Belt and Adding a Neck to the Jacket
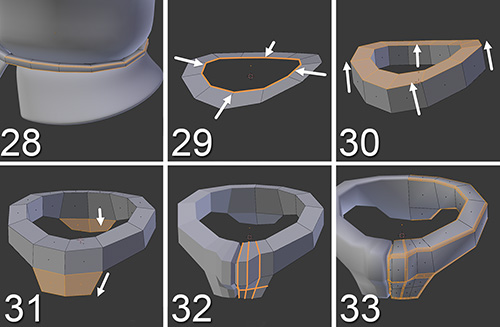
The jacket is almost finished, but we have to add a little more detail to the belt and the jacket needs a neck, so let’s see how to model these features using the steps shown in Figure 7.18.
If you want to focus only on these details, you can hide the jacket itself so it’s not in the way while you work. Just select it and press H to hide it. Press Alt + H to unhide everything again.
28. Select the top and bottom edges of the belt and bevel them so they’ll look sharper when you subdivide them.
29. Place the 3D cursor in the neck area and create a circle (even though you could create the circle inside the jacket itself, for now it may be better to create a new object so you can treat the jacket and its neck separately). Similar to what you did when you started modeling the jacket, make it with 12 vertices, delete the left-side vertices, and add a Mirror modifier to the object with the Clipping option enabled. Then, just move the vertices to form the shape of the jacket’s neck. Select all the edges of that circle and extrude them in.
30. Select all the faces and extrude them up. Now you’ll have the base shape of the jacket’s neck.
31. Temporarily unhide the jacket and the head to adjust the shape of the neck to them, and also perform the two extrusions shown in the image to add details to the neck.
32. Add a few loops to create the neck’s front shape and the zipper.
33. Once you add the Subdivision Surface modifier (which you can always apply at any time to start checking the shapes), bevel the borders of the shape so they are more defined. Also, watch the subdivided model and adjust the shapes to make them fit Jim’s head and body.

