Modeling the Boots
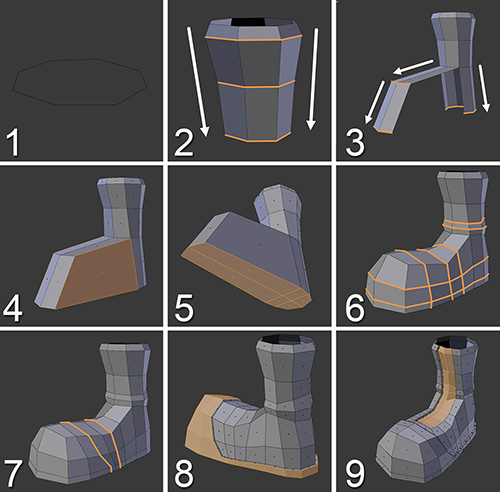
Jim needs some feet to stand on, of course. In this section, we’ll model the boots. Figure 7.20 shows the steps for doing so. At this point, you should be getting up to speed and you’re probably becoming more proficient with modeling and using Blender’s tools, so the boots should be an easy task!
1. Create an eight-sided circle at the top of the boots, as shown in the reference images. Keep in mind that you’ll need two boots: you can add a Mirror modifier to get the second boot (place the origin of the boot in the center so they’ll be aligned), or you can just manually duplicate and mirror the boot afterward.
Tip
In situations like this one, you can use a little trick to save some time: select the bottom loop (Alt + RMB) of the trousers where they meet the boots, duplicate it (Shift + D), and separate it (P) into a different object that will become the boots. This way, you’ll already have the Subdivided Surface and Mirror modifiers added to the new object.
2. Extrude (E) all the edges down to the ankle. Perform a couple of loop cuts to define the shape.
3. Select all the edges from the circle at the bottom except the two in front and extrude them down to the heel. Then select the two in front and make two extrusions to create the toe shape.
4. Create a face in the empty space at both sides of the boot.
5. Fill the sole of the boot with quads.
Tip
One of the reasons why you should work with even numbers (like eight sides for the initial circle, for example) is that usually you’ll be able to fill empty spaces with quads quite easily.
6. Add some loops to start defining the boot’s shape.
7. Perform a couple of loop cuts (Ctrl + R) to add definition in the articulation of the foot (also remember how several loops were added previously at the knee and ankle articulations), so deformations will work well later on. One of these loops will also help you create the shape of some of the details in the next step.
8. Select the area highlighted in the image (leave the sole of the boot unselected), extrude it (E), right click to cancel the movement, and scale in the normal with Alt + S. This will “draw” the boot’s details.
9. Finish the details with a few minor operations: Select the two central face loops that go from the top almost to the toe and create an inset (I) there, then extrude it in to define the area where the shoelaces would be (see Chapter 9 to learn how to paint textures). Also, when you extrude, two faces will be generated at the top of the boot with the same thickness as the extrusion and you can delete them. As a finishing touch, you can add some loops to the thickness of the seams and small features to make them much more defined when subdivided. Last but not least, adjust the shapes of the boots where they meet the trousers: some deforming may be needed and don’t hesitate to use the Proportional Editing tools for that purpose.

