Adding a Subdivision Surface Modifier to Your Scene
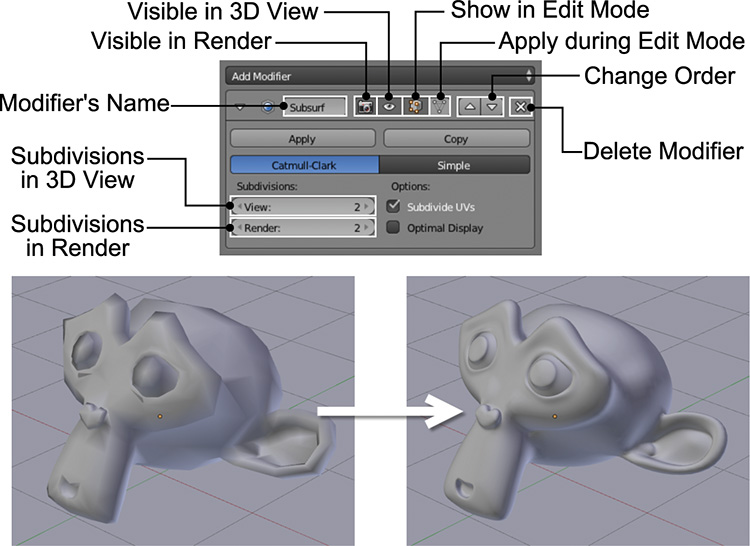
The Subdivision Surface modifier is one of the most common modifiers used in models because it allows you to increase the details and smoothness of a low-resolution model interactively. You can change the number of subdivisions at any time to display a smoother surface. The modifier basically divides each polygon and smooths the result. As a rule of thumb, when you apply this modifier, the number of faces in your model is multiplied by 4 for each subdivision you apply; therefore, be mindful of the polygon count when setting high subdivision values. You can use this modifier to smooth out your monkey-head object, as shown in Figure 3.7.
When you add a modifier, you’ll get a panel in the modifier stack with options that will be specific to the modifier you pick. These are the main options you’ll find with a Subdivision Surface modifier:
![]() In the top row of the modifier’s panel, you’ll be able to expand/collapse the modifier (clicking the little triangle to the left), name it intuitively (useful when you have a lot of modifiers added to an object), and define in which contexts this modifier should be visible. There are two buttons with arrows pointing up and down that you can use to change the order of the modifiers when you have more than one in the stack. Clicking the X button will delete the modifier.
In the top row of the modifier’s panel, you’ll be able to expand/collapse the modifier (clicking the little triangle to the left), name it intuitively (useful when you have a lot of modifiers added to an object), and define in which contexts this modifier should be visible. There are two buttons with arrows pointing up and down that you can use to change the order of the modifiers when you have more than one in the stack. Clicking the X button will delete the modifier.
![]() Next, you’ll find two buttons: Apply and Copy. Apply will transfer the effect of the modifier to the object itself. It deletes the modifier but its effect on the object is permanent. Copy just duplicates the modifier.
Next, you’ll find two buttons: Apply and Copy. Apply will transfer the effect of the modifier to the object itself. It deletes the modifier but its effect on the object is permanent. Copy just duplicates the modifier.
![]() Under the Subdivisions section, you’ll have two sliders where you can define the number of subdivisions that the modifier will perform in the 3D View and in the render. This is very useful because when you’re in the 3D View, you usually want to save resources to ensure that this view is responsive, but in a render you want a high-quality result. You can set a low number of subdivisions for the 3D View and a higher number for the render.
Under the Subdivisions section, you’ll have two sliders where you can define the number of subdivisions that the modifier will perform in the 3D View and in the render. This is very useful because when you’re in the 3D View, you usually want to save resources to ensure that this view is responsive, but in a render you want a high-quality result. You can set a low number of subdivisions for the 3D View and a higher number for the render.
Copying Modifiers to Other Objects
When you apply a modifier, it only affects the active object, which is the last selected object (even if you have 20 selected objects). If you want that modifier to be applied to every object in the selection, there are two methods to do this:
1. Press Ctrl + L to access a menu of linking options. In this menu, you’ll find an option that lets you copy modifiers or materials from the active object to the rest of the selection (so just make sure to select the one you want to copy from last).
2. Activate the Copy Attributes add-on and press Ctrl + C to access a special menu to copy attributes from the active object to the rest of the selected objects. Within those attributes, you’ll find the modifiers as well.

