Before you launch into the installation process, you should collect some basic information about your system. Generally, Red Hat’s installer will successfully probe your system and discover its configuration, but when it fails to do so, you must be prepared to supply the required information. Otherwise, you’ll be forced to terminate the installation procedure, obtain the information, and then start all over again.
Table 2-1 specifies the configuration information you need and gives you space to conveniently record the information as you gather it. If your system currently runs Windows, you can obtain much of the needed information by using Windows utilities, as explained in the next section. To obtain the remaining information, you can consult your system documentation and the documentation for any devices installed by you. If your documentation is missing or incomplete, you may need to contact your hardware vendor or manufacturer. Alternatively, you may be able to find the needed information on the manufacturer’s web site; use a search engine such as Yahoo! or AltaVista to discover the URL of the web site. Sometimes, you’ll need to examine your system’s BIOS settings or open your system’s case and examine the installed hardware; consult your system documentation to learn how to do so.
Table 2-1. Configuration Information Needed to Install Red Hat Linux
|
Device |
Information needed |
Information about your system |
|---|---|---|
|
Hard drive(s) |
The number, size, and model of each hard drive. | |
|
Which hard drive is first, second, and so on. | ||
|
Which adapter type (IDE or SCSI) is used by each drive. | ||
|
For each IDE drive, whether the BIOS is set for LBA mode. | ||
|
The number and type of each existing partition and the amount of free disk space. | ||
|
CD-ROM drive(s) |
Which adapter type (IDE, SCSI, or other) is used by each drive. | |
|
For each drive using a non-IDE, non-SCSI adapter, the make and model of the drive. | ||
|
SCSI adapter (if any) |
The make and model of the adapter. | |
|
RAM |
The amount of installed RAM. | |
|
Video adapter |
The make and model of the adapter and the amount of installed video RAM (VRAM). | |
|
Video monitor |
The make and model of the video monitor and the manufacturer’s specifications, if available, especially the horizontal and vertical sync (refresh) rates. | |
|
Mouse |
The type (serial, PS/2, or bus). | |
|
The protocol (Microsoft, Logitech, MouseMan, etc.). | ||
|
The number of buttons. | ||
|
For a serial mouse, the serial port to which it’s connected (COM1 or COM2). | ||
|
Sound adapter (if any) |
The make, chipset, and model of the adapter. | |
|
Network adapter (if any) |
The make and model of the card. | |
|
IP address |
The dotted-quad number, such as 10.1.2.7, that identifies your system to other Internet hosts. Many Internet service providers (ISPs) assign IP addresses dynamically, by using a DHCP server; in that case, you don’t need to know the IP address of your system. | |
|
Netmask |
A dotted-quad number that identifies the portion of your system’s IP address that specifies its network address. The number typically contains one or more instances of the value 255. If your ISP is using DHCP, you don’t need to know the netmask. | |
|
Gateway IP address |
The IP address of the host that routes traffic between your system and the Internet. If your ISP is using DHCP, you don’t need to know the gateway IP address. | |
|
DNS server |
The IP address of one or more Internet hosts that provide domain name services (DNS) for your system. If your ISP is using DHCP, you don’t need to know the DNS servers. | |
|
Domain name |
The domain name of your system. This generally looks like xxx.net or xxx.com, with xxx identifying your Internet service provider. If your ISP is using DHCP, you don’t need to know the domain name. | |
|
Hostname |
The hostname of your system. You can generally find the hostname prefixed to the domain name. If your ISP is using DHCP, you don’t need to know the hostname. |
If you run Windows 95/98, you can obtain much of the information needed to install Linux by using the Windows System Properties dialog box, which you can launch by using the Control Panel:
Click on the Start menu. A pop-up menu appears.
Select Settings on the pop-up menu and click on Control Panel in the submenu. The Control Panel appears.
Double-click on System. The System Properties dialog box appears. If necessary, click on the General tab, so that the dialog box resembles Figure 2-1.
The General tab of the System Properties dialog box shows the type of your system’s processor and the amount of installed RAM.
Click on the Device Manager tab. The appearance of the dialog box changes to resemble Figure 2-2.
You can double-click on an icon (or single-click on the Plus key adjacent to an icon) to obtain additional information. For example, by double-clicking on the Disk Drives icon, you can determine whether a disk drive uses an IDE or SCSI interface.
If you have a printer, you can use the Print button to print information about your system’s devices.
You can gather the following information from the Device Manager tab:
The number and type (IDE or SCSI) of your system’s hard drives
The make and model of CD-ROM drives

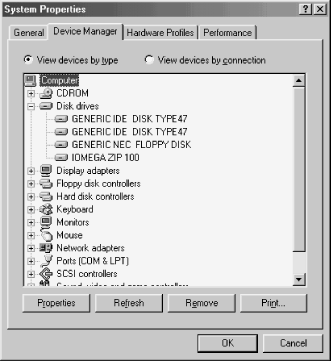
When you’ve recorded the information provided by the Device Manager tab, click Cancel to exit the System Properties dialog box.
If your computer is attached to a network, you should collect information describing your network adapter:
In the Control Panel, double-click Network to launch the Network dialog box, as shown in Figure 2-3.
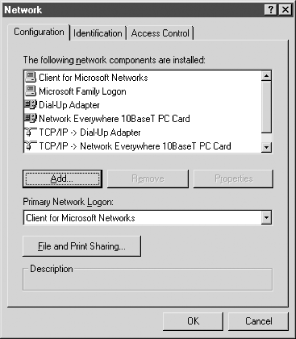
Double-click the TCP/IP entry associated with your network adapter (not the Dial-Up Adapter), launching the TCP/IP Properties dialog box, shown in Figure 2-4. If the IP Address tab is not visible, click it. This dialog box tells you the IP address and subnet mask (netmask) of your system. If the “Obtain an IP address automatically” button is selected, the IP address and subnet mask will be blank. In that case, you don’t need to be concerned about them because a DHCP server on your network supplies the network configuration automatically; Red Hat Linux can obtain its network configuration from this same server.
Click the DNS Configuration tab. This tab, shown in Figure 2-5, provides the Host (hostname), Domain (domain name), and DNS Server information you’ll need during installation. If the Disable DNS button is selected, you don’t need to be concerned about this information.
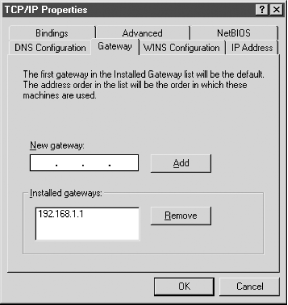
Click the Gateway tab. This tab, shown in Figure 2-6, provides the Installed Gateway (gateway IP address). If no gateways are listed, don’t be concerned. A DHCP server is likely providing this configuration information automatically.
Finally, click Cancel to close the TCP/IP Properties dialog box. Clicking Cancel again closes the Network dialog box.