
This chapter equips you to perform common system administration tasks. It explains how you can override many configuration choices made during system installation. You’ll learn how to add, delete, and modify user accounts and how to add and delete groups and change their membership. You’ll also learn how to configure swap space and how to cause Linux to automatically mount filesystems on startup. Finally, you’ll learn how to configure a printer and how to configure your system’s sound adapter.
During the installation procedure, you’re asked to specify the languages that you want to use during system operation. Thereafter, you can specify a different language, which is referred to as a locale. A locale may include the characters (glyphs) used to display text written in the associated language, a keyboard layout used to type text in the associated language, and a spelling dictionary used to check text written in the associated language.
To specify the current locale, use the Locale Chooser, which you can access by selecting Main Menu → Programs → System → Locale Chooser. Figure 9-1 shows the Setting Default Locale dialog box that appears after a short interval. To specify a locale, select it and click OK.

During the installation procedure, you chose a default desktop, either GNOME or KDE. Thereafter, you can revise your choice by using the desktop switcher.
To do so, select Main Menu → Programs → System → Desktop Switching Tool. The Desktop Switcher dialog box, as shown in Figure 9-2, appears. In addition to GNOME and KDE, the Desktop Switcher lets you specify TWM (tiny window manager), a sparsely functional but highly efficient desktop. The checkbox labeled “Change only applies to current display” lets you restrict your choice of desktop to the current desktop, as indicated in the top line of the dialog box. This facility is useful if your system has been configured to allow remote users to log in via X, a topic not covered in this book.

To specify a desktop, click the desired radio button and click OK. A dialog box appears, informing you that you must restart X for the selected desktop to appear. When you restart X, the selected desktop should appear.
Before you can access the contents of a filesystem, the filesystem must be mounted. When Linux boots, it automatically mounts one or more filesystems. However, you may need to mount other filesystems—particularly those associated with removable media such as CD-ROMs and floppies.
You can manually mount or unmount a filesystem by using the User Mount Tool. To launch the tool, select Main Menu → Programs → System → Disk Management. The User Mount Tool dialog box that appears is shown in Figure 9-3.

To mount a filesystem, click Mount; to unmount a filesystem, click Unmount. The Format button is generally disabled. When it is enabled, you can use it to format a filesystem. A filesystem must be formatted before it can be used; however, formatting a filesystem destroys all data on it. So, you should generally format a filesystem only when preparing to mount media that have not been previously used.
You can change the password associated with the current user account by using the Change Password Tool. To do so, select Main Menu → Programs → System → Change Password. A dialog box, shown in Figure 9-4, appears. Type the desired password and click OK. A second dialog box, as shown in Figure 9-5, appears. As instructed, retype the new password and click OK. A third dialog box appears, confirming that the password has been changed; click OK to dismiss it.


Tip
The system evaluates passwords and can determine if a password you specify is insecure. In such a case, it may prevent you from using the insecure password or, if you are the root user, it may merely inform you that the password is insecure. Unless your PC is physically secure and never connected to a network, you should generally choose only secure passwords.
The Date/Time Properties Tool lets you perform a variety of operations. You can:
Change the current date
Change the current time
Specify a host that provides time synchronization data via the Network Time Protocol
Specify the time zone
To launch the Date/Time Properties Tool, select Main Menu → Programs → System → Date/Time Properties. Figure 9-6 shows the tool’s user interface.

To set the current date and time, use the calendar control labeled Date and the text boxes labeled Time. Click OK to save your changes. To synchronize your system’s time to that of another system, check the box labeled Enable Network Time Protocol and specify the hostname or IP address in the text box labeled Server. Alternatively, you can select from among several preconfigured hostnames.
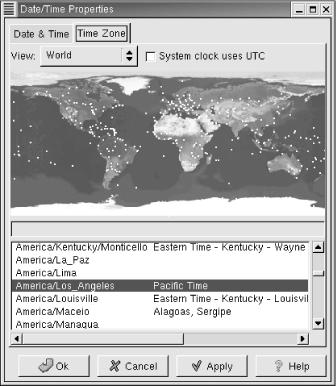
To change the time zone, click the Time Zone tab. The Time Zone pane, shown in Figure 9-7, appears. You can choose between a view of the world or any of six continents or subcontinents. Select the time zone by clicking on the map or by clicking an item in the list box. If you prefer to set your system’s clock to UTC (formerly known as Greenwich Mean Time), check the box labeled System Clock Uses UTC. However, if your system is configured to boot multiple operating systems, enabling this option may cause incorrect operation of other operating systems.
The Hardware Browser Tool lets you view your system’s hardware configuration, including CD-ROM and hard drives, network devices, and system devices. To launch the tool, select Main Menu → Programs → System → Hardware Browser. The tool spends a few seconds scanning your system’s hardware and then presents the display shown in Figure 9-8.

Click in the left pane to select the device or device category you wish to view. Information pertaining to your selection appears in the right pane.
In this section, you’ll learn how to use the User Manager Tool to perform common administrative tasks affecting users and groups. To launch the User Manager Tool, select Main Menu → Programs → System → User Manager. The Red Hat User Manager appears, as shown in Figure 9-9. The tool presents a scrollable list of user accounts (users) and displays the following information about each user account:
- User Name
The login name associated with the user account.
- Primary Group
The name of the primary user group associated with the user account. Accounts used by people rather than system processes generally have an associated primary group having the same name as the user account.
- Full Name
The name of the person or process owning the user account.
- Login Shell
The login shell assigned to the user account. Assigning /bin/false or /sbin/nologin prevents the user account from logging in.
- Home Directory
The home directory associated with the user account. When the user logs in, this directory is set as the current working directory.

When many user accounts are configured, it may be inconvenient to scroll through the list. You can use the text box labeled Filter By to display only user accounts having names matching a specified pattern. Type the pattern in the text box and click Apply Filter.
To modify a user account, click the desired account and click Properties. The User Properties dialog box, as shown in Figure 9-10, appears.
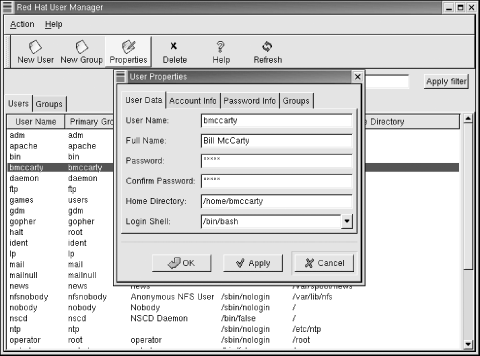
The User Data pane of the User Properties dialog box lets you view and change a variety of properties:
- User Name
The login name associated with the user account.
- Full Name
The name of the person or process owning the user account.
- Password
The password to be associated with the user account.
- Confirm Password
The password to be associated with the user account. The password is specified twice in order to reduce the risk of assigning an incorrect password due to a typing error.
- Home Directory
The home directory associated with the user account. When the user logs in, this directory is set as the current working directory.
- Login Shell
The login shell assigned to the user account. Assigning /bin/false or /sbin/nologin prevents the user account from logging in.
The Account Info pane, shown in Figure 9-11, lets you specify a date on which a user account becomes unusable. Alternatively, you can use the text box labeled User Account Is Locked to immediately disable an account.

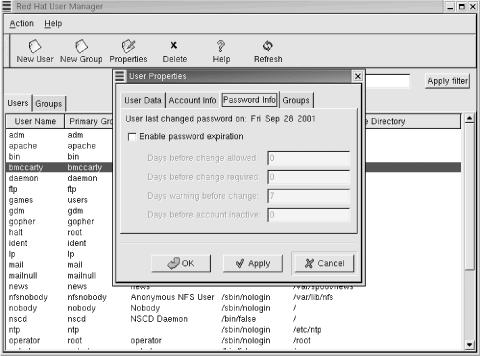
The Password Info pane, shown in Figure 9-12, lets you set password expiration options for the account. To do so, enable the checkbox labeled Enable Password Expiration. Then you can specify any of the following values:
- Days Before Change Allowed
The number of days that must elapse before the user can change the password associated with the user account.
- Days Before Change Required
After the specified number of days, the user must change the password associated with the user account.
- Days Warning Before Change
This value is used in combination with the Days Before Change Required value. The user will be given advance notice of the need to change the password associated with the user account. The notification begins the specified number of days before the change must be made.
- Days Before Account Inactive
After the specified number of days, the user account is disabled.
The Groups pane displays a series of checkboxes corresponding to user groups. To associate the user account with a group, check the box corresponding to the desired group.
To create a new user account, click New User in the Red Hat User Manager dialog box. Doing so launches the Create New User dialog box, shown in Figure 9-13. When you create a new user account, you can specify the following values:

- User Name
The name of the user account to be created.
- Full Name
The name of the user who will use the account.
- Password
The password associated with the user account.
- Confirm Password
The password to be associated with the user account.
- Login Shell
The login shell associated with the account. You should generally select /bin/bash.
- Create Home Directory
You should generally check this box, so that a home directory is created.
- Home Directory
This value is used only when Create Home Directory is enabled. The default value is generally acceptable.
- Create New Group for This User
You should generally enable this checkbox, which causes automatic creation of a primary user group having the same name as the user account. When you’ve specified the desired values, click OK to create the user account.
To delete a user account, click on the desired account and click Delete. The user account is immediately deleted; no confirmation dialog box appears. Therefore, exercise care to ensure that the correct user account is highlighted before clicking Delete.
You may recall from Chapter 4 that Linux uses groups to define a set of related user accounts that can share access to a file or directory. You probably won’t find it necessary to configure group definitions very often, particularly if you use your system as a desktop system rather than a server.
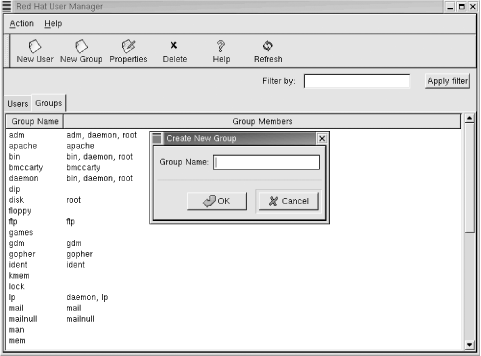
To view the configured groups, launch the User Manager tool and click the Groups tab. The Groups pane, as shown in Figure 9-14, appears. Groups are shown in a scrollable list, similar to the way user accounts are shown.

To create a new group, click the New Group icon. The Create New Group dialog box, as shown in Figure 9-15, appears. The dialog box lets you specify the name of the new group. When you’ve specified the name of the new group, click OK to create the group.
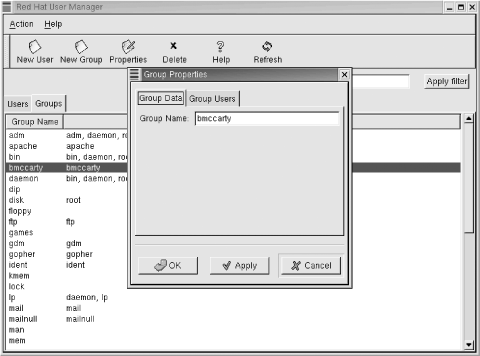
To modify a group, click on the name of the group. The Group Properties dialog box, shown in Figure 9-16, appears. The Group Data pane of the dialog box lets you revise the name of the group. The Group Users pane contains a scrollable list of users; you can associate a user account with a group by enabling the checkbox adjacent to the username or dissociate a user account from a group by disabling the checkbox adjacent to the username. When you’ve completed your changes, click OK to make them effective.
To delete a group, select the group in the Groups pane and click the Delete icon. The selected group is immediately deleted. So, before clicking Delete, be sure the proper group is highlighted.