
Linux commands share a simple, common structure. This section describes their common structure and explains how you can obtain helpful information about the commands available to you.
The general form of a shell command line is this:
command[options] [arguments]
The command determines what operation the shell
will perform and the options and
arguments—which, as indicated by the
enclosing brackets, may or may not appear—customize, or
fine-tune, the operation. Sometimes the command
specifies a program file that will be launched and run;
such a command is called an external command.
Linux generally stores these files in /bin,
/usr/bin, or
/usr/local/bin. System administration commands
are generally stored in /sbin or
/usr/sbin, which are included by default in the
path of the root user. When a command specifies a program file, the
shell passes any specified arguments to the program, which scans and
interprets them, adjusting its operation accordingly.
However, some commands are not
program files; instead they are built-in commands interpreted by the
shell itself. One important way in which shells differ is in the
built-in commands that they support. Later in this section,
you’ll learn about some of bash’s
built-in commands.
The name of a Linux command almost always consists of lowercase letters and digits. Most commands let you specify options or arguments. However, in any given case, you may not need to do so. For example, typing the w command without options and arguments causes Linux to display a list of current users.
Warning
Remember, Linux commands are case-sensitive; be sure to type each character of a command in the proper case.
Options modify the way that a command works. Many options consist of a single letter, prefixed by a dash. Often, you can specify more than one option; when you do so, you separate each option with a space or tab. For example, the -h option of the w command causes the output of the command to omit the header lines that give the time and the names of the fields:
[bill@home bill]$ w -hThe w -h command/option pair simply prints a list of users without the header lines.
Arguments specify filenames or other targets that direct the action of the command. For example, the w command lets you specify a username as an argument, which causes the command to list only logins that pertain to the specified user:
[bill@home bill]$ w billSome commands let you specify a series of arguments; you must separate each argument by typing a space or tab. For example, the following command prints a list of logins by the root user, without header lines:
[bill@home bill]$ w -h bill
When
a command includes several arguments, a command may not fit on a
single line. However, you can continue typing when you reach the end
of a line, because the shell automatically wraps your input to the
next line. If you find line wrapping disconcerting, you can type a
backslash () at the end of a line, press
Enter, and continue typing on the
next line. The backslash is the shell’s line continuation
character; the shell sees lines joined by a backslash as though they
were a single line.
Because Linux provides so many commands, and because Linux commands provide so many possible options, you can’t expect to recall all of them. To help you, Linux provides the man and apropos commands, which let you access a help database that describes commands and their options.
Each Linux command is described by a special file called a manual page. The manual pages (or manpages) are stored in a group of subdirectories comprising a help database. To access this database, you use the man command, which resembles the MS-DOS help command. For example, to get help on using the w command, type:
[bill@home bill]$ man wFigure 7-1 shows the resulting output, which the command displays one page at a time. Notice the colon prompt that appears at the bottom left of the screen. To page forward, press the Space key; to page backward, press the B key. To exit the man program, press the Q key.
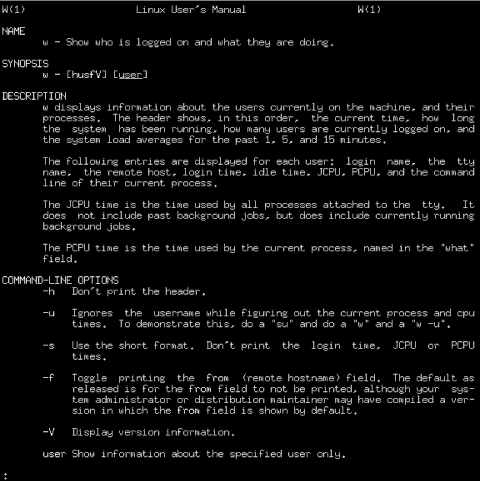
Manpages are organized according to a common format. At the beginning of a manpage, you’ll find the name of the page and the section of the database from which the page comes, shown in parentheses. For example, Figure 7-1 shows “W(1)” in the upper-left and -right corners. This means that you’re looking in section 1 of the manpage (the section pertaining to commands) for the w command. Table 7-4 describes the sections of the manual page database; most sections are primarily of interest to programmers. As a user and system administrator, you’ll be interested primarily in sections 1 and 8.
Table 7-4. Manual Page Sections
|
Section |
Description |
|---|---|
|
1 |
Executable programs and shell commands |
|
2 |
System calls (provided by the kernel) |
|
3 |
Library calls (provided by system libraries) |
|
4 |
Special files (for example, device files) |
|
5 |
File formats and conventions |
|
6 |
Games |
|
7 |
Macro packages and conventions |
|
8 |
System administration commands |
|
9 |
Nonstandard kernel routines |
|
N |
Tcl/Tk commands |
Next in the output is the name and a brief description of the command. Then there’s a synopsis of the command, which shows the options and arguments that you can specify. Brackets enclose parts of a command that you can choose to include or omit. Next is a detailed description of the operation of the command, followed by a description of its options.
As you’re learning your way around Linux, you may find it convenient to reserve a virtual console for running the man command. That way, you can enter commands in a separate virtual console, switching between consoles to refresh your recollection of the options and arguments of commands as you type them.
The man command searches the manual pages and displays detailed information about a specified command. The apropos command also searches the manual pages; however, it displays summary information about manpages that contain a specified keyword. The search is limited to the short description that appears at the beginning of each manpage. For example, typing the command:
[bill@home bill]$ apropos sambawill display a list of manpages containing the word
samba, as shown in Figure 7-2.

The apropos command is useful when you don’t recall the name of a Linux command. By typing a related keyword, you can obtain a list of commands and search the list for the command you need.
Now that you understand the fundamentals of issuing Linux commands, you’re ready to learn some commands that work with directories. Rather than simply reading this section, you should log in to your Linux system and try the commands for yourself. By doing so, you will begin to develop skill in working with shell commands.
To display the current working directory, issue the pwd command. The pwd command requires no options or arguments.
[bill@home bill]$ pwd
/root
The pwd command displays the absolute pathname of the current working directory.
To change the
working directory, issue the cd
command, specifying the pathname of the new working directory as an
argument. You can use an absolute or relative pathname. For example,
to change the working directory to the /bin
directory, type:
[bill@home bill]$ cd /bin
[bill@home /bin]#
Notice how the prompt changes to indicate that
/bin is now the working directory.
You can quickly return to your home directory by issuing the cd command without an argument:
[bill@home /bin]# cd
[bill@home bill]$
Again, notice how the prompt changes to indicate the new working directory.
If you attempt to change the working directory to a directory that doesn’t exist, Linux displays an error message:
[bill@home bill]$ cd nowhere
bash: nowhere: No such file or directoryTo display the contents of a directory, you use the ls command. The ls command provides many useful options that let you tailor its operation and output to your liking.
The simplest form of the ls command takes no options or arguments. It simply lists the contents of the working directory, including files and subdirectories (your own output will differ, reflecting the files present in your working directory):
[bill@home bill]$ ls
GNUstep                  firewall                 sniff
Xrootenv.0               linux                    ssh-1.2.26
audio.cddb               mail                     ssh-1.2.26.tar.gz
audio.wav                mirror                   support
axhome                   mirror-2.8.tar.gz        temp
conf                     nlxb318l.tar             test
corel                    openn                    test.doc
drivec.img               scan                     tulip.c
dynip_2.00.tar.gz        screen-3.7.6-0.i386.rpm  win98
Here, the output is presented in lexical (dictionary) order, as three columns of data. Notice that filenames beginning with uppercase letters appear before those beginning with lowercase letters.
A more sophisticated form of the ls command that includes the -l option displays descriptive information along with the filenames, as shown in Figure 7-3.

The first line of the output shows the amount of disk space used by the working directory and its subdirectories, measured in 1 KB blocks. Each remaining line describes a single file or directory. The columns are:
- Type
The type of file: a directory (
d), or an ordinary file (-). If your system supports color, Linux displays output lines that pertain to directories in blue and lines that pertain to files in white.- Access modes
The access mode, which determines which users can access the file or directory. You’ll learn more about access modes, links, and groups in subsequent sections of this chapter.
- Links
- Group
- Size
The size of the file or directory, in bytes.
- Modification date
The date and time when the file or directory was last modified.
- Name
If a directory contains many files, the listing will fill more than one screen. To view the output one screen at a time, use the following command:
[bill@home bill]$ ls -l | lessThis command employs the pipe redirector, sending output of the ls subcommand to the less subcommand, which presents the output one screen at a time. You can control the operation of the less command with the following keys:
Space moves you one page forward.
b moves you one page back.
q exits the program and returns you to the command prompt.
If you want to list a directory other than the working directory, you can type the name of the directory as an argument of the ls command. Linux displays the contents of the directory but does not change the working directory. Similarly, you can display information about a file by typing its name as an argument of the ls command. Moreover, the ls command accepts an indefinite number of arguments, so you can type a series of directories and filenames as arguments, separating each with one or more spaces or tabs.
When
the name of a directory or file begins with a dot
(.), the output of the ls
command does not normally include the directory or file,
because the file is hidden. To cause the output
of the ls command to include hidden
directories and files, use the -a
option. For example, to list all the files and
subdirectories in the current directory—including hidden
ones—type:
[bill@home bill]$ ls -a -lIf you prefer, you can combine the -a and -l options, typing the command like this:
[bill@home bill]$ ls -alA user’s home directory generally includes several hidden files
containing configuration information for various programs. For
example, the .profile file contains
configuration information for the Linux shell.
The ls command provides a host of additional useful options; see its manual page for details.
You can create
directories by using the mkdir
command. Just type the name of the new directory as an argument of
the command. Linux creates the directory as a subdirectory of the
working directory. For example, this command creates a subdirectory
named office:
[bill@home bill]$ mkdir officeIf you don’t want to create the new directory as a subdirectory
of the working directory, type an absolute or relative pathname as
the argument. For example, to create a directory named
/root/documents, type:
[root@desktop /root]# mkdir /root/documents
The name of a directory or file must
follow certain rules. For example, it must not contain a slash
(/) character. Directory names and filenames
usually include letters (either uppercase or lowercase), digits,
dots, and underscores ( _ ). You can use other
characters, such as spaces and hyphens, but such names present
problems, because the shell gives them special meaning. If you simply
must use a name containing special characters, enclose the name
within single quotes ('). The quotes don’t
become part of the name that is stored on the disk. This technique is
useful when accessing files on a Windows filesystem; otherwise,
you’ll have trouble working with files in directories such as
My Documents, which have pathnames containing
spaces.
Most MS-DOS filenames contain a dot, but most Linux filenames do not.
In MS-DOS, the dot separates the main part of the filename from a
part known as the extension, which denotes the type of the file. For
example, the MS-DOS file memo.txt would contain
text. Most Linux programs ignore file extensions, so Linux filenames
don’t require an extension. However, if you plan to send a file
to someone using an operating system other than Linux, you should
include an appropriate file extension, such as
.txt for a text file.
To
remove a directory, use the rmdir
command. For example, to remove unwanted, a
subdirectory of the working directory, type:
[bill@home bill]$ rmdir unwantedIf the directory you want to delete is not a subdirectory of the working directory, remove it by typing an absolute or relative pathname.
You cannot use rmdir to remove a directory that contains files or subdirectories; you must first delete the files in the directory and then remove the directory itself.
Directories contain files and other directories. You use files to store data. This section introduces you to several useful commands for working with files.
Linux files, like most Windows files, can contain text or binary information. The contents of a binary file are meaningful only to skilled programmers, but you can easily view the contents of a text file. Simply type the cat command, specifying the name of the text file as an argument. For example:
[root@desktop /root]# cat /etc/passwddisplays the contents of the /etc/passwd file,
which lists the valid system logons.
If a file is too large to be displayed on a single screen, the first part of the file will whiz past you and you’ll see only the last few lines of the file. To avoid this, you can use the less command:
[root@desktop /root]# less /etc/passwdThis command displays the contents of a file in the same way the man command displays a manual page. You can use Space and the b key to page forward and backward through the file, and the q key to exit the command.
To remove a file, type the rm command, specifying the name of the file as an argument. For example:
[bill@home bill]$ rm badfileremoves the file named badfile contained in the
working directory. If a file is located elsewhere, you can remove it
by specifying an absolute or relative pathname.
Warning
Once you remove a Linux file, its contents are lost forever. Be careful to avoid removing a file that contains needed information. Better still, be sure to have a backup copy of any important data.
The -i option causes the rm command to prompt you to verify your decision to remove a file. If you don’t trust your typing skills, you may find this option helpful. If you log in as the root user, Linux automatically supplies the -i option even if you don’t type it.
To copy a file, use the cp command, specifying the name (or path) of the file you want to copy and the name (or path) to which you want to copy it. For example:
[root@desktop /root]# cp /etc/passwd samplecopies the /etc/passwd file to a file named
sample in the working directory.
If the destination file already exists, Linux overwrites it. You must therefore be careful to avoid overwriting a file that contains needed data. Before copying a file, use the ls command to ensure that no file will be overwritten; alternatively, use the -i option of the cp command, which prompts you to verify the overwriting of an existing file. If you log in as the root user, Linux automatically supplies the -i option even if you don’t type it.
To rename a file, use the mv command, specifying the name (or path) of the file and the new name (or path). For example:
[bill@home bill]$ mv old newrenames the file named old as
new. If the destination file already exists,
Linux overwrites it, so you must be careful. Before moving a file,
use the ls command to ensure that no
file will be overwritten, or use the -i
option of the mv command,
which prompts you to verify the overwriting of an existing file. If
you log in as the root user, Linux automatically supplies the
-i option even if you don’t
type it.
The mv command can rename a directory but cannot move a directory from one device to another. To move a directory to a new device, first copy the directory and its contents and then remove the original.
If you know the name of a file but do not know what directory contains it, you can use the find command to locate the file. For example:
[bill@home bill]$ find . -name 'missing' -printattempts to find a file named missing, located
in (or beneath) the current working directory (.).
If the command finds the file, it displays its absolute pathname.
If you know only part of the filename, you can surround the part you
know with asterisks (*):
[bill@home bill]$ find / -name '*iss*' -printThis command will find any file whose name includes the characters
iss, searching every subdirectory of the root
directory (that is, the entire system).
Another command useful for finding files is locate. The locate command uses a database that is updated only daily. So it can’t find recently created files, and it shows files that may have been recently deleted. But it operates much more quickly than the find command. To use the locate command, specify as the command’s argument a string of characters, which need not be enclosed in quotes. The command lists all filenames in its database that contain the specified characters. For example, the command:
locate passlists all files containing the characters pass.
If your system includes a configured printer, you can print a file by using the lpr command. For example:
[root@desktop /root]# lpr /etc/passwdsends the file /etc/passwd to the printer. See
Chapter 9 for information on configuring a
printer.
If a file is lengthy, it may require some time to print. You can send other files to the printer while a file is printing. The lpq command lets you see what files are queued to be printed:
[root@desktop /root]# lpq
lp is ready and printing
Rank   Owner      Job  Files                  Total Size
active root       155  /etc/passwd            1030 bytes
Each waiting or active file has an assigned print job number. You can use lprm to cancel printing of a file, by specifying the print job number. For example:
[root@desktop /root]# lprm 155cancels printing of job number 155. However, only
the user who requested that a file be printed (or the root user) can
cancel printing of the file.
To save disk
space and expedite downloads, you can compress a data file. By
convention, compressed files are named ending in
.gz; however, Linux doesn’t require or
enforce this convention.
To expand a compressed file, use the gunzip command. For example, suppose the file
bigfile.gz has been compressed. Typing the
command:
[bill@home bill]$ gunzip bigfile.gzextracts the file bigfile and removes the file
bigfile.gz.
To compress a file, use the gzip
command. For example, to compress the file
bigfile, type the command:
[bill@home bill]$ gzip bigfileThe command creates the file bigfile.gz and
removes the file bigfile.
Sometimes
it’s convenient to store several files (or the contents of
several subdirectories) in a single file. This is useful, for
example, in creating a backup or archive copy of files. The Linux
tar command creates a single file
that contains data from several files. Unlike the gzip command, the tar command doesn’t disturb the original
files. To create a tarfile, as a file created by
the tar command is called, issue a
command like this:
tar -cvftarfile files-or-directories
Substitute tarfile with the name of the tarfile
you want to create and files-or-directories with
a list of files and directories, separating the list elements by one
or more spaces or tabs. You can use absolute or relative pathnames to
specify the files or directories. By convention, the name of a
tarfile ends with .tar, but Linux does not
require or enforce this convention. Some people refer to tarfiles as
tarballs, because they often contain multiple
files.
For example, to create a tarfile named
backup.tar that contains all the files in all
subdirectories of the directory /home/bill,
type:
[bill@home bill]$ tar -cvf backup.tar /home/billThe command creates the file backup.tar in the
current working directory.
You can list the contents of a tarfile by using a command that follows this pattern:
tar -tvftarfile|less
The | less causes the output to be sent to the
less command, so that you can page
through multiple pages. If the tarfile holds only a few files, you
can omit | less.
To extract the contents of a tarfile, use a command that follows this pattern:
tar -xvftarfile
This command expands the files and directories contained within the tarfile as files and subdirectories of the working directory. If a file or subdirectory already exists, it is silently overwritten.
The tar command provides a host of useful options; see its manpage for details.
It’s common to compress a tarfile. You can easily accomplish
this by specifying the options -czvf
instead of -cvf.
Compressed tarfiles are conventionally named ending with
.tgz. To expand a compressed tarfile, specify
the options -xzvf instead of
-xvf.
The tar command doesn’t use
the ZIP method of compression common in the Windows world. However,
Linux can easily work with, or even create, ZIP files. If you
specified the MS-DOS Connectivity package group during installation,
the installation program installed the zip
package, which enables you to work with ZIP files. If you
didn’t select that package group, you can install the package
manually by inserting Disc 1 of Red Hat Linux (obtain CD material online
at http://examples.oreilly.com/redhat2) into your
system’s CD-ROM drive and issuing the following commands:
su -
mount -t iso9660 /dev/cdrom /mnt/cdrom -o ro
rpm -ivh /mnt/cdrom/RedHat/RPMS/zip-*.rpm
umount /mnt/cdrom
exit
To create a ZIP file that holds compressed files or directories, issue a command like this one:
zip -rzipfile files_to_zip
where zipfile names the ZIP file that will be
created and files_to_zip specifies the files and
directories to be included in the ZIP file.
To expand an existing ZIP file, issue a command like this one:
unzipzipfile
Windows supports shortcuts, which let you refer to a file or directory (folder) by several names. Shortcuts also let you include a file in several directories or a subdirectory within multiple parent directories. In Linux, you accomplish these results by using the ln command, which links multiple names to a single file or directory. These names are called symbolic links, soft links, symlinks, or simply links.
To link a new name to an existing file or directory, type a command that follows this pattern:
ln -sold new
For example, suppose that the current working directory contains the
file william. To be able to refer to this same
file by the alternative name bill, type the
command:
[bill@home bill]$ ln -s william billThe ls command shows the result:
[bill@home bill]$ ls -l
lrwxrwxrwx   1 root     root            7 Feb 27 13:58 bill->william
-rw-r--r--   1 root     root         1030 Feb 27 13:26 william
The new file (bill) has type
l, which indicates it’s a link, rather than
a file or directory. Moreover, the ls command helpfully shows the name of the
file to which the link refers (william).
If you omit the -s option, Linux creates what’s called a hard link. A hard link must be stored on the same filesystem as the file to which it refers, a restriction that does not apply to symbolic links. The link count displayed by the ls command reflects only hard links; symbolic links are ignored. Hard links are seldom used, because soft links are more flexible.
As explained in Chapter 4, access permissions determine what operations
a user can perform on a directory or file. Table 7-5 lists the possible permissions and explains
the meaning of each. Recall from Chapter 4 that
permissions work differently for directories than for files. For
example, permission r denotes the ability to list
the contents of a directory or readthe contents
of a file. A directory or file can have more than one permission.
Only the listed permissions are granted; any other operations are
prohibited. For example, a user who had file permission
rw could reador
writethe file but could
not execute it, as indicated by the absence of the execute
permission, x. Look back to Figure 7-3 to see how the ls command displays permissions.
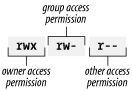
The access modes of a directory of file consist of three permissions:
The ls command lists the file access modes in the second column of its long output format, as shown in Figure 7-4. The column contains nine characters: the first three specify the access allowed the owner of the directory or file, the second three specify the access allowed users in the same group as the directory or file, and the final three specify the access allowed to other users (see Figure 7-5).

You set the access modes of a directory or file by using the chmod command, which has the following pattern:
chmodnnn directory-or-file
The argument nnn is a three-digit number,
which gives the access mode for the owner, group, and other users.
Table 7-6 shows each possible digit and the
equivalent access permission. For example, the argument
751 is equivalent to
rwxr-x--x, which gives the owner every possible
permission, gives the group read and execute permission, and gives
other users execute permission.
If you’re the owner of a file
or directory (or if you’re the root user), you can change its
ownership by using the chown
command. For example, the following command assigns
newuser as the owner of the file
hotpotato:
[bill@home bill]$ chown newuser hotpotatoThe owner of a file or directory (and the root user) can also change
the group of a file. For example, the following command assigns
newgroup as the new group of the file
hotpotato:
[bill@home bill]$ chgrp newgroup hotpotato
The group you assign to a file or
directory must have been previously established by the root user. The
valid groups appear in the file /etc/group,
which only the root user can alter. The root
user can assign each user to one or more groups. When you log on to
the system, you are assigned to one of these groups—your
login group—by default. To change to
another of your assigned groups, you can use the
newgrp command. For example, to change to the
group named secondgroup, use the following
command:
[root@desktop /root]# newgrp secondgroupIf you attempt to change to a group that does not exist or to which you have not been assigned, your command will fail. When you create a file or directory, it is automatically assigned your current group as its owning group.
In Linux, as in MS-DOS and Windows,
programs are stored in files. Often, you can launch a program by
simply typing its filename. However, this assumes that the file is
stored in one of a series of directories known as the
path. A directory included in this series is
said to be on the path. If you’ve worked
with MS-DOS, you’re familiar with the MS-DOS path, and the
Linux path works much like it.
If the file you want to launch is not stored in a directory on the path, you can simply type the absolute pathname of the file. Linux then launches the program even though it’s not on the path. If the file you want to launch is stored in the current working directory, type ./ followed by the name of the program file. Again, Linux will launch the program even though it’s not on the path.
For example, suppose the program bigdeal is stored in the directory
/home/bob, which is the current directory and
which happens to be on the path. You could launch the program with
any of these commands:
bigdeal
./bigdeal
/home/bob/bigdeal
The first command assumes that the program is on the path. The second assumes that the program resides in the current working directory. The third explicitly specifies the location of the file.
To mount a device or partition, you use the mount command, which has the following pattern:
mountoptions device directory
The mount command provides many options. However, you can generally use the mount command without any options; consult mount’s manpage to learn about the available options.
Tip
The reason you can use the mount
command without options is that the file /etc/fstab
describes your system’s devices and the type of
filesystem each is likely to contain. If you add a new device to your
system, you may need to revise the contents of /etc/fstab
or specify appropriate options when you mount the device.
You must
specify the device that you want to mount and a directory, known as
the mount point. To make it convenient to access
various devices, Linux treats a mounted device as a directory;
mounting the device associates it with the named directory. For
example, the following command is used to mount a CD-ROM:
[root@desktop /root]# mount -t iso9660 /dev/cdrom /mnt/cdrom -o roThe file /dev/cdrom is a link that points to the
actual device file associated with your system’s CD-ROM drive.
The directory /mnt/cdrom is created by the
install program; this directory is conventionally used as the
mounting point for CD-ROMs. The type of filesystem found on most
CD-ROMs is iso9660, the value of the
-t argument. The -o argument, ro, specifies that the filesystem is
read-only, that is, it can be read but not written. The file
/etc/fstab can supply most of these arguments if
they’re omitted. Generally, you can mount a CD-ROM by issuing
the abbreviated command:
mount /dev/cdromAfter the command has completed, you can access files and directories
on the CD-ROM just as you would access ordinary files and directories
on the path /mnt/cdrom. For example, to list the
top-level files and directories of the CD-ROM, simply type:
[root@desktop /root]# ls /mnt/cdromTo mount an MS-DOS floppy disk in your a: drive,
type:
[root@desktop /root]# mount -t msdos /dev/fd0 /mnt/floppyTo unmount a device, specify its mount point as an argument of the umount command. For example, to unmount a CD-ROM diskette, type:
[root@desktop /root]# umount /mnt/cdromGenerally, only the root user can unmount a
device. Moreover, a device can be unmounted only if it’s not in
use. For example, if a user’s working directory is a directory
of the device, the device cannot be unmounted.
Before you can write data on a floppy disk, you must format it. The Linux command to format a floppy disk is fdformat. Simply follow the command with an argument that specifies the floppy drive and the capacity of the floppy disk; the available arguments are listed in Table 7-7.
Table 7-7. Floppy Drive Designators
|
Designation |
Meaning |
|---|---|
|
/dev/fd0 |
3.5-inch disk in |
|
/dev/fd0H1440 |
3.5-inch disk in |
|
/dev/fd1 |
3.5-inch disk in |
|
/dev/fd1H1440 |
3.5-inch disk in |
|
/dev/fd1H2880 |
3.5-inch disk in |
For example, to format a 1.44 MB floppy disk, log in as
root and issue the command:
[root@desktop /root]# fdformat /dev/fd0H1440Once you’ve formatted the floppy disk, you can place a filesystem on it. Floppy disks containing an MS-DOS filesystem are useful for transferring data between Windows and Linux. To place an MS-DOS filesystem on a formatted floppy disk, issue the command:
[root@desktop /root]# mkdosfs /dev/fd0Once the floppy disk has been formatted and given a filesystem, you can mount it and then read and write it. Be sure you unmount the floppy disk before you remove it. Unmounting the floppy disk ensures that all pending data has been written to it; otherwise, the floppy disk may be unusable due to corrupt data.