
Once you’ve set up a LAN, you’re ready to provide services to hosts on the network. To provide printer and file sharing, Windows uses a facility known as the Server Message Block (SMB). This same facility is sometimes known as the Common Internet File System (CIFS), NetBIOS, or LanManager. Thanks to Andrew Tridgell and others, Linux systems provide support for SMB via a package known as Samba. Like SMB, Samba lets you:
Authorize users to access Samba resources
Share printers and files among Windows, OS/2, Netware, and Unix systems
Establish a simple name server for identifying systems on your LAN
Back up PC files to a Linux system and restore them
Samba has proven its reliability and high performance in many organizations. According to the online survey at http://www.samba.org/pub/samba/survey/ssstats.html, Bank of America is using Samba in a configuration that includes about 15,000 clients, and Hewlett-Packard is using Samba in a configuration that includes about 7,000 clients.
If you’ve never installed and configured a network server, Samba is a good place to begin; its installation and configuration are generally simple and straightforward.
The Samba server
includes the nmbd and smbd
programs (which run as daemons), several utility programs, manpages
and other documentation, and three configuration files:
/etc/samba/smbusers,
/etc/samba/smb.conf, and
/etc/samba/lmhosts. The
smbusers file associates several user accounts
that are special to Samba with Linux user accounts; for example, it
associates the Samba user IDs, administrator and
admin, with root.
Generally, you don’t need to change
smbusers. Likewise, you don’t generally
need to revise lmhosts. You’ll learn how
to configure the smb.conf file shortly.
The simplest way to install Samba is to select it during system installation. However, if you failed to do so, you can install Samba by using GnoRPM to install the following packages:
sambasamba-clientsamba-commonsamba-swat
The
/etc/samba/smb.conf file lets you specify a
variety of options that control Samba’s operation. You can edit
the file by using your favorite text editor; however, the Samba Web
Administration Tool (SWAT) lets you view and change options using
your web browser, which is generally much easier than using a text
editor. The SWAT tool verifies the values of parameters you enter and
provides online help.
To use SWAT, you must first configure xinetd to
launch SWAT when you request it. To do so, issue the commands:
chkconfig xinetd onchkconfig swat on
Then signal the xinetd process that you’ve
modified one of its configuration files, by issuing the following
command:
service xinetd reloadTo access SWAT, point your browser to port 901; for example, you can use the URL http://localhost:901.
Note
You can configure SWAT to accept connections from remote hosts. To do so, delete the line:
only_from = 127.0.0.1
from the /etc/xinted.d SWAT file. That deletion is not recommended, except perhaps for accessing SWAT from your LAN. Accessing SWAT remotely requires that your system’s root password be sent over the network via HTTP, which cannot encrypt data. A cracker using a packet sniffer may discover the password and compromise your system. A packet sniffer is a program that lets its operator view packets sent across a network. If the packets are unencrypted or only weakly encrypted, the operator may be able to obtain user IDs, passwords, and other information contained in the packets.
Your web browser will prompt you for a user account and password;
specify root as the user account and give the
appropriate password. Figure 11-10 shows
SWAT’s main menu, accessed by using the
system’s IP address in place of its hostname.

To configure your Samba server, click the following toolbar icons:
- Home
Return to the main menu (shown in Figure 11-10). The main menu also provides convenient access to Samba documentation via the links in the body of the page.
- Globals
Configure global Samba variables.
- Shares
Configure file shares.
- Printers
Configure shared printers.
- Status
View the status of the Samba server.
- View
View Samba’s configuration file,
/etc/samba/smb.conf.- Password
Add and delete users and change user passwords.
To configure global options, click the Globals button on the toolbar. Figure 11-11 shows the Global Variables page, and Table 11-1 describes the most important options. You can access additional options by clicking Advanced View. To change an option, select or type the desired value. When you’ve changed all the options you want to change, click Commit Changes, and the changes take effect.

Tip
Samba’s main configuration file,
/etc/samba/smb.conf, is overwritten by SWAT. The
specifications contained in the file are retained and shown as
initial values; however, any comments in the file are deleted.
Table 11-1. Samba’s Global Variables
You probably won’t need to make many changes to Samba’s
global variables. Setting the workgroup and
netbios name is sufficient for most users. If your
system has more than one network adapter card, you’ll also need
to set the interfaces variable. If your network
includes Windows 98/NT/2000 clients, you’ll need to set
encrypt
passwords.
Warning
If your system is attached to a cable modem or other interface that
makes it available to other network users, you should specify
security options that prevent unauthorized users from accessing your
files or printer. For example, use the hosts allow
option to restrict the hosts allowed to access your Samba server.
To establish and maintain file shares, use the Shares button on the toolbar. Figure 11-12 shows the Share Parameters page.
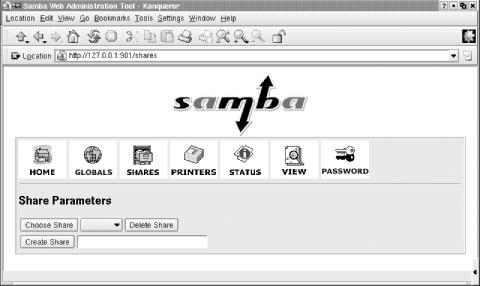
Red Hat Linux configures a default share, homes,
which lets Linux users access their Linux /home
directory as a Samba share. You can create a new share by
typing its name and clicking Create Share. To delete a share, choose
the share name from the drop-down list and click Delete Share. To
work with an existing share, choose it from the drop-down list and
click Choose Share. When you click Choose Share, the page shown in
Figure 11-13 appears. This page lets you view and
change a variety of share options. Table 11-2
describes the available share options. You can access additional
options by clicking Advanced View. As with the global options, you
may not need to change many share options. Likely candidates for
change are the comment, path,
and
read only options.

Table 11-2. Samba File Share Options
You configure printer share parameters in much the same way you configure shares. Begin by clicking the Printers toolbar button. You can use the page shown in Figure 11-14 to create a new printer share, delete a printer share, or modify an existing printer share.
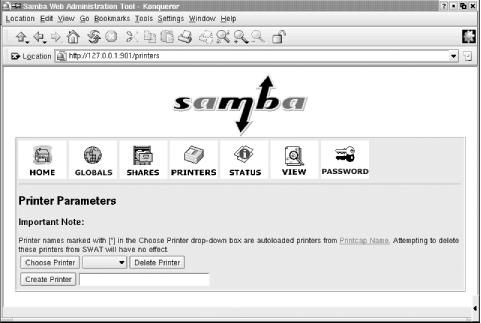
If you select a printer from the drop-down list and click Choose
Printer, the page shown in Figure 11-15 appears.
Table 11-3 describes the available print share
options. You can access additional options by clicking Advanced View.
As with the global options and file share options, you may not need
to change many printer share options. The comment
option is the most likely to be changed.

Table 11-3. Samba Print Share Options
The Status button on SWAT’s toolbar lets you view the status of the Samba server. The page shown in Figure 11-16 shows the following information about the status of your Samba server:
The interval at which the page is refreshed, given in seconds
The version of Samba and the status of the server daemons (
smbdandnmbd)Any active connections
Any active file and printer shares
Any open files
Using the controls on the page, you can refresh the contents, set the auto refresh interval (in seconds), start and stop either daemon, and kill an active connection.

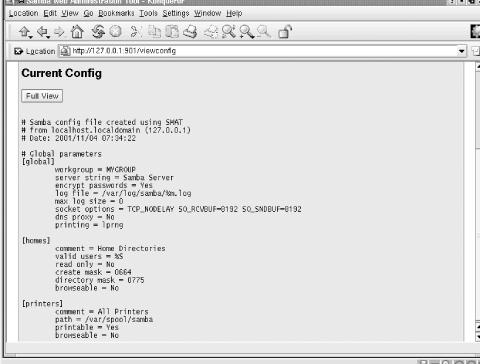
The
View button on SWAT’s toolbar lets you view the Samba
server’s main configuration file, /etc/samba/smb.conf
(shown in Figure 11-17). By default, the
page shows only the basic configuration options; clicking Full View
causes SWAT to display every configuration option.
You can specify user accounts authorized to access Samba resources by clicking SWAT’s Password toolbar button and accessing the page shown in Figure 11-18.
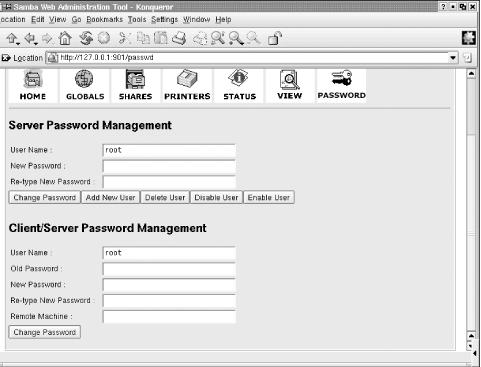
This page lets you:
Change the password associated with a user account (by clicking the Change Password button)
Authorize a user account to access Samba (by clicking the Add New User button)
Delete a user account (by clicking the Delete User button)
Disable or enable a user account (by clicking the Disable User or Enable User buttons, respectively)
The user accounts that you specify on the Server Password Management page are those that your Samba server recognizes as authorized to access its resources.
The bottom part of the page, titled Client/Server Password Management, lets you change the password associated with a user account on a remote system running Samba or SMB. Changing a password by using Client/Server Password Management is often more convenient than logging in to the remote host and using its password change facility.
After
you’ve configured Samba, start the smb
service by issuing the command:
service samba startThis command starts both the SMB and NMB (NetBIOS name server), services associated with Samba.
You can view the status of the smb service by
issuing the command:
service samba statusIf the service is running, the command should report the process IDs
of Samba’s snmd and
nmbd processes.
To stop Samba, issue the command:
service samba stopIf you’ve reconfigured Samba, you can restart the
smb service with this command:
service samba restartIf you want Samba to start automatically when you boot your system, issue this command:
chkconfig --level 345 smb onAlternatively, you can use Neat to specify that the
smb service should start automatically.
To verify that Samba is working, use the Server Password Management screen to authorize a Linux user account to access Samba. For this purpose, choose a Linux user account that has the same username and password as an account on a Windows client. Log in to the Windows client using that username and password and use the Windows Explorer’s Network Neighborhood to locate and use the Samba share. You’ll find more information on using Samba shares in the next section.
If you can’t access the share, consider the following likely reasons:
You specified the wrong username or password.
The username and password are not the same on the Samba and Windows hosts.
You haven’t authorized the user to access Samba.
Networking isn’t properly configured on the Samba or Windows host.
If
you’re unable to find the problem, consult the documentation
that accompanies Samba. In particular, peruse the file
DIAGNOSIS.txt, which resides in the
/usr/share/doc/samba-*/docs/textdocs directory
or its equivalent on your system. This file includes a step-by-step
procedure for verifying the operation of your Samba server. When a
step fails, you can consult the file to determine the likely causes
and how to go about fixing the problem. Chances are, you’ll be
able to administer Samba without outside help, but if not,
you’ll find the participants in the
comp.protocols.smb newsgroup to be helpful.
Another resource is O’Reilly’s Using
Samba, by Robert Eckstein, David Collier-Brown, and Peter
Kelly. Since the book was published under the Open Publication
License (OPL), Using Samba is also available
online in electronic form at http://www.oreilly.com/catalog/samba/.
Like any network server, Samba provides a wealth of options and
facilities. If you thoroughly explore these facilities, you’re
likely to break your server. To avoid problems, you should keep a
backup copy of your /etc/samba/smb.conf file.
Doing so can be as easy as issuing the following command after Samba
is up and running:
cp /etc/samba/smb.conf /etc/samba/smb.conf.bakThen, if your server ceases to work, you can restore your old configuration by issuing the command:
cp /etc/samba/smb.conf.bak /etc/samba/smb.confYou’ll also need to restart your system (or at least the Samba daemons).