
The Secure Shell (SSH) lets you connect to a system from another system via TCP/IP and obtain a shell prompt, from which you can issue commands and view output in a secure fashion. If you are not familiar with SSH but are familiar with Telnet, SSH works similarly. SSH differs from Telnet in that conversations between SSH and its clients are sent in encrypted form so hackers cannot easily discover private information, including user account names and passwords.
The SSH client lets you remotely log in to systems that provide an SSH server. It’s likely that the installation procedure installed the SSH client for your use. To check whether it’s installed, issue the command:
rpm -q openssh
If
openssh is installed, the command reports its
version number; otherwise, the command reports that
openssh is not installed.
You can manually install the SSH client by using GnoRPM to install the following packages:
opensshopenssh-clientsopenssh-askpassopenssh-askpass-gnome
To install the SSH server, use GnoRPM to install the
openssh-server package.
Once installed, the SSH server should start automatically. To check the status of the SSH server, issue the command:
service sshd statusThe command’s output should report that the server is running. If not, you can manually start the server by issuing this command:
service sshd startIf you want to stop the SSH server, issue this command:
service sshd stopTo verify that the SSH server is properly running, you can access it via a client on the local system by issuing the following command:
ssh localhostThe client will attempt to log you onto the local system using your current user account and will prompt you for your password. If you supply the correct password, you should see a shell prompt, indicating that the client and server are functioning correctly. Type exit and press Enter to exit SSH.
To log on to a remote system, simply specify the hostname or IP
address of the remote system in place of
localhost. If you want to log in to a user
account other than one named identically to the account you’re
using on the local system, issue the command:
sshuserid@host
where host is the hostname or IP address of the
remote host and userid is the name of the user
account you want to use. For example:
# ssh [email protected]You can use the SSH client’s scp command to transfer files to or from a remote system running an SSH server. To transfer a file to a remote system, issue a command such as this one:
scpfileuserid@host:path
where file is the path of the file to be
transferred, host is the hostname or IP address
of the remote host, path is the directory to
which the file should be transferred, and userid
is your user account on the remote system. You can specify multiple
files to be transferred if you like. For example:
# scp rhbook_rev.txt [email protected]:bmcarty/filesYou can use shell metacharacters to specify a set of files to be transferred. You can also specify the -r flag, which specifies that scp should recursively copy a directory rather than a file or set of files. For example, the following command copies an entire directory to the remote system:
scp -r Desktop [email protected]:bmcarty/filesTo transfer files from a remote system, issue a command based on this pattern:
scpuserid@host:filepath
where host is the hostname or IP address of the
remote system, file is the path of the file to
be transferred, path is the destination path of
the file, and userid is your user account on the
remote system. For example:
# scp [email protected]:/outgoing/word98temp.doc /home/bmcarty/filesThis command would log in the user bmcarty to
ftp.ora.com/outgoing, retrieve
the word98temp.doc file, and place it in his
/home/bmcarty/files directory.
SSH also provides the sftp command, which lets you transfer files in much the same way the ftp command does. The command has the following form:
sftpuser@host
The command will prompt for the password associated with the
specified user account. For example, to transfer files to and from
the host ora.com, you could issue the following
command:
sftp [email protected]After establishing a connection to the specified host, the sftp command presents a prompt that lets you enter commands similar to those supported by the ftp command. Use the help command to learn more about the supported commands.
To log on to your Linux system from a
remote system via SSH, you must install an SSH client on the remote
system. A suitable client for Windows is Simon Tatham’s
PuTTY, available at http://www.chiark.greenend.org.uk/~sgtatham/putty.
Simply download PuTTY to any convenient
directory (the windows directory is a good
choice). The program doesn’t have a setup script; you can run
it by selecting Start → Run and typing putty; if the directory in which
PuTTY resides is not on the execution path, you
must type the drive, path, and filename. Alternatively, you can
create a shortcut that spares you the trouble. Figure 12-7 shows PuTTY’s main
screen.
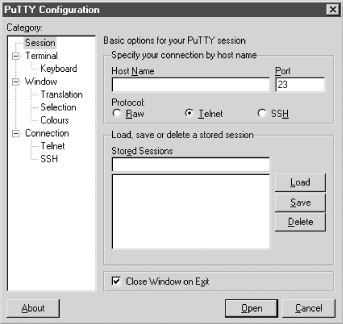
To use PuTTY to connect to a host, specify the
following information:
- Hostname
The hostname or IP address of the SSH server.
- Protocol
You should select SSH. This causes
PuTTYto automatically select port 22, the default SSH port. If the SSH server listens on a different port, specify the nonstandard port by using the Port text box.
Click Open to make the connection to the specified host.
The left pane of PuTTY’s screen provides
access to several configuration options, such as:
Key mappings
Character translations
Selection, copy, and paste options
Screen colors
Like most Telnet or FTP clients, PuTTY lets you
save configurations so you can quickly connect to often-used hosts.
Use the Load, Save, and Delete buttons to manage your list of hosts
and associated configurations.
SSH lets you establish a network
connection that you can use as a Virtual Private
Network
(VPN), so called because
traffic flowing over the connection is encrypted and therefore secure
from eavesdroppers. This facility is known as protocol
tunneling because the data that flows via the connection
need not use the standard TCP/IP protocol; for example, the data
might be encoded using Novell’s IPX protocol.
Configuring and troubleshooting a VPN is not a task for a Linux
newbie. However, if your Linux skills are growing and you desire a
challenge, see Arpad Magosanyi’s VPN
HOWTO, available at http://www.linuxdoc.org/HOWTO/mini/VPN.html.
Also see Virtual Private Networks, by Charlie
Scott, Paul Wolfe, and Mike Erwin (O’Reilly & Associates,
Inc.).