Chapter 11
Creating a Powerful Experience
IN THIS CHAPTER
![]() Adding, editing, and removing experiences
Adding, editing, and removing experiences
![]() Showcasing your career trajectory
Showcasing your career trajectory
![]() Optimizing your experiences for LinkedIn search
Optimizing your experiences for LinkedIn search
![]() Highlighting your accomplishments
Highlighting your accomplishments
A powerful experience on your LinkedIn profile is different from a powerful experience on your resume. People are checking you out on LinkedIn to learn more about you. A powerful experience provides just enough information to compel your reader to want to learn more. For that reason, don’t simply copy and paste your resume experiences into your LinkedIn profile. Instead, tell a story about your experience. In a conversational voice, explain to your reader your roles and responsibilities. Highlight a few accomplishments. Give readers something elevated from what they’d find on your resume.
 Unlike your resume, your LinkedIn profile is public, and pretty much anyone can see it. It’s important to be careful when crafting your profile’s experience sections. The information you include must not be confidential or potentially damaging to anyone; it also must be completely true.
If readers are so moved by what they see on your LinkedIn profile and they request your resume, the worst thing in the world is for your resume to look exactly like what they just saw on LinkedIn. You’ve left them wanting more only to give them a duplicate of what they already know.
In this chapter, I discuss the perfect structure of a job experience description. I show you how to add a new experience to your LinkedIn profile and how to make sure the company logo appears on your profile. You find out how to optimize your job titles to increase your chances of being found. You also find out how to make your accomplishments stand out and wow your reader.
Adding a New Experience
Whether you are starting from scratch or updating your profile with your current position, it’s important to know how to add a new experience to your LinkedIn profile. You don’t need to worry about adding experiences in chronological order; LinkedIn automatically lists your positions by date, with the most recent on top, receding in time as you scroll down.
Here’s how to add a new experience to your profile:
- Open your LinkedIn profile.
- Click the Add Profile Section drop-down menu located in your intro card.
Click the plus ( + ) icon next to Work Experience to open the Add Experience window.
If you don’t see Work Experience listed, you may have to click Background to expand the window first.
 If you have already added experiences, you can also scroll down to the Experience section and click the pencil (edit) icon to edit a previously added experience or click the plus ( + ) icon next to the Experience section to add a new experience entry.
- In the Title field, type your job title.
- In the Employment type drop-down menu, select from Full-time, Part-time, Self-Employed, Freelance, Contract, Internship, or Apprenticeship.
- Enter the name of the company where you worked:
In the Company Name text box, begin typing the company name.
As you type the name of the company, a drop-down list appears showing all the companies that have LinkedIn company pages in LinkedIn’s vast company page network.
If the company appears in the drop-down list, select it from the list to link the company to the LinkedIn company page.
If several companies have the same name, choose the correct company by confirming the accompanying logo to the left of the name.
- If the company is not listed, keep typing to add it.
In the Location field, type the major city closest to where you worked.
As you type, a drop-down list of locations appears. Choose the location from the list. If the suggested locations are inaccurate, type in the city and state.
- In the Start Date and End Date fields, enter the dates you worked:
- Click Choose to choose the month you started followed by a field for the year.
- Enter an end date. If you are currently working at this company, choose Current.
In the Description field, briefly summarize the company where you worked, describe your role and responsibilities, and list a few high-level accomplishments.
You can choose to update your industry to match the company’s industry, and you can choose to update your headline to your job title. However, I caution against updating your headline this way (see the sidebar, “Stopping LinkedIn from Overwriting Your Headline” for more information).
Click the Save button.
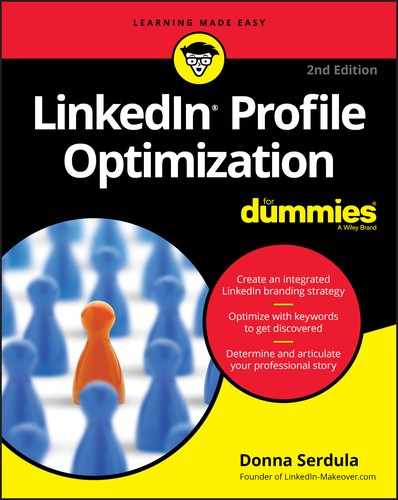
Your new experience is added to your LinkedIn profile’s Experience section.
Figure 11-1 illustrates a completed experience.
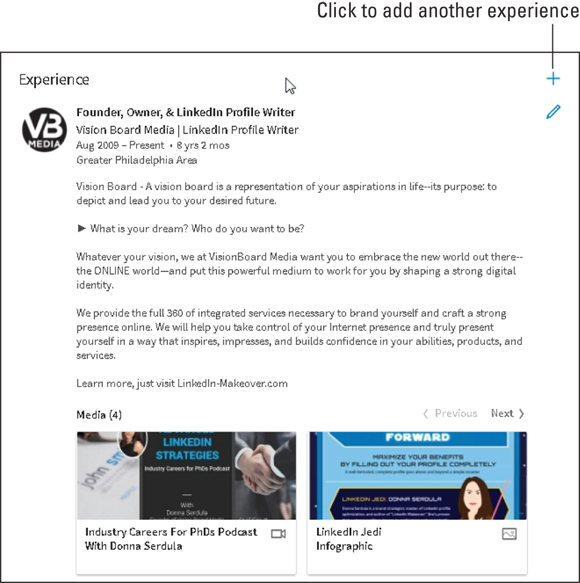
FIGURE 11-1: A completed experience.
Making the start and end dates match your resume
One of the biggest blunders I see on LinkedIn profiles are discrepancies between people’s LinkedIn profile and their resume’s start and end dates. If you are searching for a job, it’s absolutely imperative that the information on your resume match your LinkedIn profile. Rather than create a one-to-one copy of your resume on your profile, instead, have your profile complement the information on your resume.
As you add new experiences on your LinkedIn profile, make sure the start and end dates match your resume. When there is a discrepancy between dates, the person reading may wonder if you are simply not a stickler for details or possibly lying. If you can’t get the dates right, what else are you fudging?
Using month and year or just year
People often ask if they should use the month and year or just the year for their experiences start and end dates. If you are on LinkedIn with the goal of job search, I highly recommend adding both the month and the year. When a job seeker omits the month, it may send a red flag to recruiters, hiring managers, and human resources professionals. By using just a year, such as 2012, someone might think you started with a month or less left in the year. Most people omit months because they are trying to hide a gap. The best thing to do is own up to a gap and explain it in the job description section of your profile.
When people use LinkedIn for reputation management or to be seen as thought leaders and job search is the furthest thing from their mind, they may omit months if they so choose. When providing a simple trajectory of where and when, it’s not important to get caught up in the exact month one’s tenure began.
If you do choose to omit months, omit the months from all experiences. It looks sloppy and inconsistent when some experiences have a month and year and others only have years.
Getting the company logo to appear
Scrolling through a LinkedIn profile, it’s hard not to notice the company logos sitting to the left of the experiences. These logos add flair and credibility to your profile. Most people assume that the way to get a logo next to their experience is to upload it. Truth is, LinkedIn adds the logo from the company’s LinkedIn page. What this means is if the company hasn’t created a LinkedIn page or didn’t upload its logo to its LinkedIn page, there is no way to add a logo next to your experience. So, if long ago you worked for a now defunct company, there is a very good chance you won’t be able to add a logo. If you work for a company that doesn’t embrace social media and it doesn’t have a LinkedIn page, you too are out of luck.
The good news is, it is easy to get a company logo to appear next to your experience as long as the company has a LinkedIn company page created and a logo uploaded. Here’s how:
- Open your LinkedIn profile.
- Scroll through your profile until you see the experience you want to edit in the Experience section.
Click the pencil (edit) icon to enter edit mode.
The Edit Experience window appears.
Click in the Company field and type the name of the company where you worked.
A drop-down list appears with companies that match the letters you type.
When you see your company name appear, click the name from the drop-down list to choose it.
By selecting the company from the drop-down list, you are allowing LinkedIn to dynamically link your profile to the LinkedIn company page. As long as the company page has a logo uploaded, it shows on your profile next to the experience.
As shown in Figure 11-2, by typing the name of your company into the Company field, a drop-down list appears. Selecting the name that LinkedIn provides creates a link that enables the company logo to display on your LinkedIn profile.
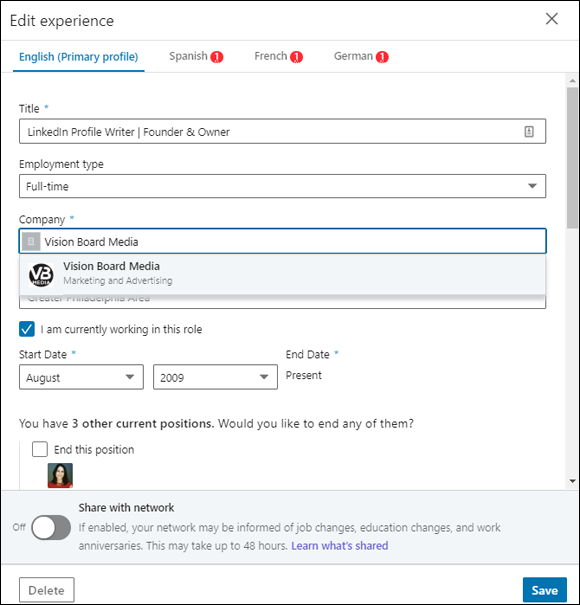
FIGURE 11-2: Getting a company logo to show on your LinkedIn profile.
Linking to your company’s LinkedIn page
By linking the company name to the company’s LinkedIn page, you are creating a link from your profile to the company page. When a person clicks the logo or the company name from within your profile, the company’s LinkedIn page opens. When you create this link from your current experience to the company page, LinkedIn recognizes and associates you as a current employee of the company. A section of the company page shows viewers which employees the company is connected to. If you are connected to the viewer of the company page, your profile picture may be displayed.
The How You’re Connected section of the company page is a wonderful way to find inside connections at companies you are interested in. The true power of LinkedIn is that it makes invisible connections visible. Because LinkedIn keeps track of your network and your network’s network, you are able to see deeper into relationships and find inside connections that may help you.
When viewing a LinkedIn company page, it’s easy to see how you are connected to people within that company (see Figure 11-3). By choosing the Company Name from the drop-down list, LinkedIn is able to link people back to the company page as employees. That’s how when viewing a company page, you see who works there and how you are connected to them.
FIGURE 11-3: The company page shows how you are connected to a company’s employees.
There is a work-around when you can’t add a company logo. A client of mine worked at MTV China. When we went to add MTV China, only the mother company, Viacom, was available. It was important for my client to showcase his global experience and that meant displaying MTV China’s logo. Because the logo wasn’t available, only Viacom’s, we simply added Viacom to the Company Name field and edited the display name to state MTV China. Then, within the experience we added the MTV logo to the experience. This logo didn’t show to the right of the experience but right below the experience’s description. It wasn’t exactly what he wanted, but it was better than nothing.
Creating a LinkedIn Page
If you are a business owner, you can create a LinkedIn page for your company. LinkedIn pages allow you to tell your company’s story, mission, and goals. It offers a centralized place where LinkedIn users can stay up to date on your company news, products, services, business opportunities, and job openings.
Not only does a LinkedIn page provide you with a presence on LinkedIn, but also it allows your employees the ability to link to your LinkedIn page on their personal LinkedIn profiles. Linking to your company’s LinkedIn page means employees are able to show allegiance to your company, and by doing so, your company logo appears on their LinkedIn Profile pages, giving your company more visibility. This logo is a live link that allows readers to quickly and easily connect to your LinkedIn page where they can learn all about your company. When people visit your company’s LinkedIn page, they will not only see company information and recent news, but also a dynamic listing of current employees that highlights connections to their LinkedIn networks.
A LinkedIn page also allows you to broadcast posts from your company rather than you as an individual. When people follow your LinkedIn page, they receive these status updates on their LinkedIn feeds.
By broadcasting posts, you are engaging and interacting with people (potential customers, business partners, and employees) interested in learning more about your company. Followers of your LinkedIn page are also providing marketing opportunities by having your logo on their LinkedIn profiles.
Ultimately, a LinkedIn page is a digital outpost that provides insight and credibility to others looking to learn more.
To create a company page, follow these steps:
- Open your LinkedIn profile.
- Click the Work icon in the top-right corner of the LinkedIn toolbar.
- Click Create a Company Page.
Select the Page type you’d like to create from the following options:
- Small business
- Medium to large business
- Showcase page
- Educational institution
Most business owners creating a LinkedIn Page will choose Small business or Medium to large business.A new page opens called Page Identity, as shown in Figure 11-4.
- Enter the name of your company.
- Choose the slug for the public URL for your page.
- Enter the direct link to your business’s website.
Select your company’s industry from the drop-down menu.
You can only choose one industry from the list.
- Choose the size of you company from the drop-down menu.
Select the Company Type: public company, self-employed, etc.
Now it’s time to choose your logo.
Click choose file to upload your company’s logo.
This is a perfect square so you may need to tweak your logo if it’s rectangular to get it to fit. The recommended size is 300 x 300 pixels. You can choose either JPG or PNG.
Add a tagline that briefly describes what your company does.
Review Chapter 7 if you need help.
- Check the verification box to confirm you have the right to act on behalf of that company or school in the creation of the page.
Click Create Page.
Once your page is created, you can go back in and add more details to display on your page, such as description, phone number, locations, and more.

FIGURE 11-4: Creating a company’s LinkedIn page.
Less Is More — Stop Disqualifying Yourself
I often see people filling their LinkedIn profiles to the brim with unending job descriptions and accomplishments. I never advocate an empty profile, but I do believe less is more. When you provide too much information, you may come across as desperate. Contrary to popular opinion, your LinkedIn profile does not qualify you for a position, but it may disqualify you. Saying too much may lower your chances of getting called in for an interview. The goal of your LinkedIn profile is to illicit action from your target audience.
As you write your job descriptions for each experience, write with the goal of getting people interested, whetting their appetite so they want to learn more. Don’t give everything away upfront. You want to have enough information left in your back pocket for future conversations.
Recruiters typically tell people that they should have their full resume reiterated on LinkedIn as well as attach a PDF copy of their resume. The reason recruiters suggest this is because it makes their own lives easier. They don’t need to reach out to you; everything they need to dismiss you is right there for them. Remember, your profile is public — recruiters as well as your colleagues, clients, and friends can see everything you have listed. Recruiters are professionals and they can ascertain if you are the right candidate for a position without having every little bit of detail on your profile. Make them pick up the phone and call you to get more information. Have them request your resume and you decide if the position is one where you throw your hat in the ring and submit your resume. Remember, you are empowered and you have value. You don’t need to give away the farm.
Optimizing your job title with keywords
The Title field of an experience contains your job title, right? Well, right and wrong. Although most LinkedIn users complete this field with their job titles, they are missing an opportunity to optimize their profile for search and branding purposes.
The job title is one of those high impact search engine optimization (SEO) fields within LinkedIn. (I discuss SEO in even more detail in Chapter 2.) When a person searches LinkedIn for keywords, LinkedIn returns profiles that match these keywords. When those keywords appear in the job title, that profile turns up higher in search results than a profile that just states that keyword in another less sensitive area of the LinkedIn profile.
In addition, the Title field is at the top of the experience and in a larger font size, so the field pops out at people scrolling through your profile. Truly catch their eye by including more than just your job title.
What do you want to add in addition to your job title? That’s easy, keywords!
A common mistake people make is using abbreviations in their job title. If you are a job seeker, you may choose to play it safe, and so if your title can be abbreviated, enter it both ways. You don’t want to list yourself as VP and miss out on appearing in search results because a recruiter searched on Vice President. For example:
VP / Vice President of Marketing
Many companies use different job titles for similar jobs. Some companies prefer using nebulous job titles, while others use job titles that are non-descriptive of the role or responsibilities. Although you never want to lie, it is acceptable to add a more common job title with more description to make it easier for your reader to understand. By using a more common job title, you also improve your chances of getting found by recruiters looking for specific job titles.
I’ve stated it before and I must state it again: Do not exaggerate or lie when it comes to your job title. Instead aim for more description to assist your reader. For example, look at the differences in these job titles:
BEFORE: | Customer Development Team Member |
AFTER: | Customer Development Team Member ► Customer Service Representative ♦ Client Assistance Specialist |
BEFORE: | Lead Generation Specialist |
AFTER: | Lead Generation Specialist ► Cold Caller ♦ Telemarketer ♦ Business Development ♦ Prospecting |
In the first example, the “Before” title did not adequately describe the job seeker’s function. “Customer Development Team Member” might be the official job title, but this is not a common job title used across Corporate America. By adding additional, lateral job titles that are more common, the person is now not only describing exactly his or her role but also making it easier to get found.
In the second example, the job title, “Lead Generation Specialist” is descriptive, but by including a few additional keywords, this person is making sure he or she matches different search terms a recruiter or hiring manager might use instead, such as cold caller, telemarketer, business development, or prospecting.
Making your job title pop with symbols
Reading through the job title examples shown throughout this chapter, you may have noticed that they all contained symbols that separate the job title from the keywords and separate keywords from each other. Symbols are a great way to catch the eye and provide flair to your job title.
You can’t format your LinkedIn profile natively within LinkedIn. Bold, italic, and underlined text is not allowed. You can’t even include a bulleted list. There isn’t even a bulleted list option. Even though LinkedIn doesn’t provide you with the ability to format text, you can add pizazz by using Unicode symbols.
Where do you find these symbols? In addition to the numbers, letters, and punctuation marks that you see on your keyboard, there are additional characters you can use. These extra characters can be added to your profile bypassing your keyboard.
Because directions to get to these symbols vary depending upon your operating system, the easiest way to add symbols to your LinkedIn profile is to visit my LinkedIn profile to find a list of symbols you can use. Here are the steps to do so:
- Open your web browser and go to
www.LinkedIn.com/in/todonna. Once at my profile, scroll through until you get to the Experience section and expand my most current experience at Vision Board Media.
I curated a list of different symbols you can use on your LinkedIn profile.
When you find a symbol you like, highlight it, copy it, and then paste it into your profile.
Copy and paste by using the right-click menu or by pressing Ctrl+C (Windows) or Cmd+C (Mac) to copy and Ctrl+V (Windows) or Cmd+V (Mac) to paste.
In addition to using symbols in your job title and as a bulleted list, you can also use symbols for emphasis. For instance, add symbols around your call to action or use them to break up paragraphs.
Whatever you do, don't go crazy. Using too many symbols makes your profile look silly and juvenile. As they say in the fashion world, less is more. Choose one or two different types of symbols and use them sparingly throughout your profile. Symbols should spotlight your content, not detract from it.
Describing your roles and responsibilities
Now that you have an optimized job title, it’s time to dive into your role and responsibilities at your company. This section is where you provide an overview of the scope of your position. Do not use resume speak or silly corporate jargon. Instead, write in a first person, conversational manner.
Here are some sentence starters:
- In 20XX, I was brought on board to …
- I was handpicked for this position to …
- In this role, I …
- As the XXX, I specialized in …
- My role within the organization was to …
- During this time, I …
- I am most proud to have …
- My responsibilities included …
- It was during my tenure at XXX, that I …
- I was hired to …
- As the XXX, I was tasked with …
By describing your position in just a few sentences, you create context for your reader. Through this description you are painting a picture for your readers and they begin to formulate an idea of who you are and your capabilities. It’s okay to pull out your resume and take a look at what you have listed, but you don’t want to do a direct copy and paste. Instead, speak directly to your reader and describe your role within the company.
Here are some questions to help you uncover your role and responsibilities:
- What are your top four to five general job functions?
- What is expected of you? What are the specific tasks or duties you perform? What are the activities or obligations you are assigned and held accountable for?
- Do you manage a budget? How much?
- Do you have direct reports? How many? What is their level and areas of accountability? Think in terms of projects, processes, operations, and applications.
- Are you responsible for managing a specific territory, region, or location?
- Do you have P&L responsibility?
- What is your value? What do you contribute?
- Were you hired to meet a particular challenge for the company?
Crafting an impactful achievement
With your roles and responsibilities described, now it’s time to showcase the times you went above and beyond. Achievements describe projects and actions you performed that were exceptional and positively impacted your colleagues, clients, and ultimately, the overall business. This seems so simple, but most people have a hard time telling the difference between an achievement and a responsibility. Responsibilities describe your day-to-day actions. These are those duties that are minimally required of you to keep your job. Achievements describe not just the task but the results of the task.
If you have an up-to-date, professionally written resume, take a look at the achievements that are highlighted. Think in terms of your target audience. Which achievements are the most important to him or her? If you have 15 achievements listed under one position on your resume, you do not want to list all 15 achievements on your LinkedIn profile. First, you don’t want to give away the farm to every single viewer of your LinkedIn profile. Second, you want to spotlight only the achievements your target audience finds most interesting and impressive. Aim for three to five achievements per experience. By showcasing only the top achievements, you are whetting your readers’ appetites and providing them with a reason to reach out to learn more about you. When you overload your readers with too much information, nothing is left to deliver later.
Most employees are so busy getting their jobs done that they don’t stop and think about what they accomplished. In fact, most are so busy with work and with their lives and family that they don’t even remember half of what they’ve accomplished. You always hear about how you should have a to-do list and that once items are finished, you should cross them off. But that promotes forgetting what was done. I say celebrate your accomplishments and don’t cross them off! Move them to another list of your successes. Not only does this help you feel better about yourself and what you’ve done, it’s helpful when it’s time to update your resume and LinkedIn profile.
In the meantime, here’s a list of questions to help spur your memory and get you thinking about what you’ve accomplished:
- What processes or procedure did you suggest, design, or implement? What were the results?
- Did you help increase sales? How and by what percentages or monetary amount?
- What specific projects, techniques, processes, operations, or applications that were instrumental in increasing revenues, company growth, or increased productivity did you develop or were involved in?
- Did you save your company money? How much and under what circumstances?
- Thinking in terms of your day-to-day tasks, when and how did you deliver results ahead of deadline, under budget, or above expectations?
- Were you appointed to any teams? Why and what did you provide to the team?
- What special projects have you worked on? Why were you chosen and what were the results?
- Have you done anything to foster or improve customer or employee or strategic relationships with the company?
- Have you done anything to improve communications, either internally or externally?
- Did you recruit new customers for the business?
- Did you recruit new employees for the business?
- Were you chosen to train, mentor, or guide others?
- Were you rewarded with any additional responsibility?
Once you have chosen your top achievements, you want them to stand out. Because LinkedIn doesn’t allow any formatting such as bolding or italicizing text, you need to do something different. Remember those symbols that you used to separate the keywords from your job title in the Title field? Copy one of those symbols again and paste it into your Description field. You are now going to use these symbols to create a bulleted list of accomplishments.
Make sure you hit the spacebar between the symbol and the first letter of the accomplishment. Also, you want to hit the Enter or Return key on your keyboard twice between accomplishments. This creates an empty line between accomplishments. Whitespace is important and helps make your profile visually attractive and easier to read.
If you really want to differentiate your accomplishments, you can use a LinkedIn text formatter like the one on my website (www.linkedin-makeover.com/linkedin-text-formatter) to set the word “Accomplishments” in bold. Paste it right above your bulleted list and you’ll have people calling you to find out how you did it.
Summarizing the company with a boilerplate description
In the previous edition of this book, I instructed people to start with a brief boilerplate description of the company to build credibility and provide the reader with important company information. Things have changed since that first edition. Namely, LinkedIn now collapses the job description, and if people want to read more, they need to click the See More link to see the full content. Because LinkedIn now truncates your Experience sections, you want to make sure you hook readers up front and grab them with compelling information about your role and accomplishments. The old method of starting with a company description doesn’t provide enough of a hook, so if you work at a company that is not very well known, it’s best to add a company description toward the end of the experience description.
By providing a brief boilerplate description of the company, you are continuing to build credibility and potentially answering that one question in some people’s minds, “Now what is this company she works for?” Everyone knows Apple, but not everyone knows Applebaum Associates. The best boilerplate language describes the company in the simplest and easiest-to-understand terms. It should be so clear that a child can understand what the company does.
Effective company boilerplate language may contain the following items:
- Annual revenue
- Headquarters location
- Industry
- Number of employees
- Number of locations
- Private company or publicly traded
- Products and/or services
Don’t wrack your brain trying to come up with this company boilerplate description on your own. Most likely this description exists elsewhere. You just need to find it, copy it, paste it, and then tweak it a little.
Let’s find your company’s boilerplate description:
In any search engine, type the name of your company into the search field followed by the word is.
For example, “Applebaum Associates is” or “Vision Board Media, LLC is.”
On the results page, you should see a short description of the company:
Applebaum Associates is a Philadelphia, PA based accounting company that provides tax preparation services for thousands of small businesses located in the Delaware Valley area. Founded in 2011, Applebaum Associates has three offices and employees over 250 professionals. Applebaum Associates is often cited as a Great Place to Work by Philadelphia Magazine.
This brief description is nearly perfect and you haven’t even opened up the company’s website. Sometimes a search engine fails to bring up an adequate description, in which case you have to dig a little further and visit the company website’s About page to find a company summary. You can also visit the company’s LinkedIn company page to find a brief company description.
- Copy and paste the company summary into the experience’s Description at the end.
- Tweak the company summary so it reads succinctly and incorporates just enough information to give your target audience the information it needs to know.
It’s simple to add a company boilerplate description to the experience’s Description field. Just a few sentences provide the context a reader needs to understand more about the company and the work you did there.
By providing a brief company description, your readers now understand the context around where you work and it is easier for them to understand your roles and responsibilities as well as your accomplishments.
So, what if you do work for Apple? Should you add a description that states:
Apple is a manufacturer of mobile devices and personal computers. With worldwide annual revenue over $233 billion, Apple employs over 80,000 people with offices and store locations all over the world.
Absolutely not! It’s silly to describe Apple. Instead of providing known information, focus on the unknown by describing the department or division of Apple in which you work. Instead, mention the size of your department, the number of employees, what the division/department specializes in, and how it affects the overall business. Here’s an example:
The Life Insurance division of Insurance, Inc., employs over 3,500 professionals and is responsible for 25% of Insurance, Inc.’s total revenues.
Giving your reader a call to action
Your experience is just about perfect. You have a description of your roles and responsibilities, a listing of your greatest accomplishments, and a company boilerplate summary. What’s left? Just one thing: a clear call to action!
Remember how I said you want to whet your readers’ appetites and leave them wanting more? You now need to give them a reason to reach out to you:
For a detailed list of accomplishments, please request my resume.
By adding this sentence, you are letting your readers know that you have other accomplishments than just what you listed. You are also letting them know you are open to talking. In fact, if you are interested in job opportunities, you may want to also provide your contact information as well. People outside your first-degree network can view your profile, but if they aren’t directly connected to you, they can’t see your contact information in the Contact Information section of your profile nor can they easily message you. By providing your contact information, you are making it easy for that recruiter, hiring manager, or human resources professional to reach out to you.
If you aren’t looking for a job, but rather are using LinkedIn for sales and prospecting, you might state:
To learn more about Applebaum Associates and how we help our clients do more, be more, earn more, check us out online at
www.ApplebaumAssoc.com.
Editing an Existing Experience
When optimizing your profile, it's not always necessary to add new experiences. Usually you just need to edit older experiences you have previously entered. In this situation, rather than deleting and adding new, you simply want to edit the experience and update it. Perhaps you want to optimize your job title or add an end date or include additional, new accomplishments.
To edit a previously created experience, follow these steps:
- Open your LinkedIn profile.
- Scroll through your profile until you see the experience you want to edit in the Experience section.
Click the pencil (edit) icon to enter edit mode, as shown in Figure 11-5.
The Edit Experience window appears.
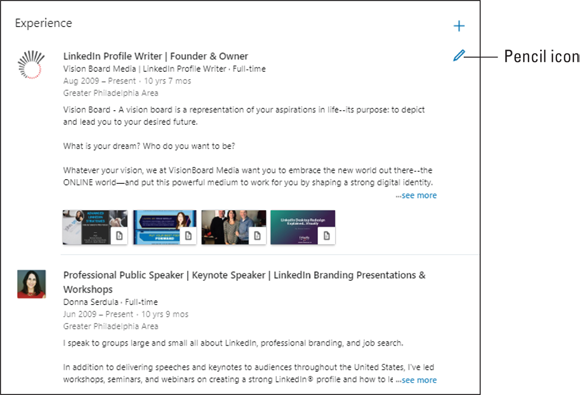
FIGURE 11-5: Click the pencil icon to edit an experience.
- Make the edits to the experience by clicking your mouse and typing your new content.
- When you are ready to save your work, click the Save button at the bottom of the edited experience to save your work and go back to your profile page.
Reordering Concurrent Experiences
I often get asked if it’s possible to reorder experiences. The short answer is no. LinkedIn sticks with a straight chronological structure with the most current position at top and older positions cascading toward the bottom of the profile.
However, there is one exception to this rule: concurrent, current experiences. If you hold two current experiences at the same time, you can choose the order in which to list them on your profile. Here’s how:
- Open your LinkedIn profile.
- Scroll through your profile to the Experience section and hover your mouse pointer over the current position you’d like to rearrange.
Click and hold the Reorder icon (four horizontal lines) to the right of your position name and drag it into the desired position.
When you reorder experiences, the top-most experience leads in the Current line in the top section of your profile.
Removing an Experience
Sometimes you want to delete an experience. Perhaps you have a duplicate experience you need to delete or a job didn’t work out and you don’t want to highlight an extremely short stint. Or maybe you added a promotion as a separate experience but now want to consolidate all promotions into one main experience. In these situations, you need to remove the experience. Here’s how to do it:
- Open your LinkedIn profile.
- Scroll to the Experience section.
Click the pencil (edit) icon next to the experience you want to delete to enter edit mode.
The Edit Experience window appears.
Click Delete.
When you select this button, a dialog box appears asking you if you are sure you want to remove this position.
To permanently delete the experience, click Delete.
If you change your mind, click No Thanks.
Examples of Great Experiences
It’s easy to describe how to do something, but it’s not always so easy to actually take the instructions and do it. I’ll try to get your creative juices flowing by providing some examples of optimized experiences. As you read each of these examples, take notice of the profile’s goals, how each profile is written for the target audience, and how each incorporates keywords.
Salesperson looking for a new opportunity
- Company Name: Corporate Leasing, Inc.
- Title: Senior Business Development Executive ► Account Management ♦ Social Selling ♦ Prospecting
- Dates: November 2007–July 2015 (7 years 9 months) Greater Philadelphia Area
- Description: I was initially hired as an Account Executive at Corporate Leasing but in less than 6 months I was promoted to a Senior Business Development Executive. As a Sr. Business Development Executive, my primary job is to identify and close new business opportunities, collaborate with enterprise clients, and support existing clients.
- Although I am thoroughly comfortable cold calling, I have found social media to be an amazing channel for prospecting. Utilizing Facebook and LinkedIn, I am able to forge online relationships that yield sales. Social Selling combined with traditional prospecting has allowed me to grow my territory by 200% over a three-year period.
Select major accomplishments include:
► Named Top Regional Performer for the last 2 years.
► My sales pipeline averaged 10MM. The typical deal size was 75K+.
► Closed the largest account in company history totaling over $1.5M over 3-year period
► Consistently attained 100%+ of quota.
- Corporate Leasing is one of the largest equipment finance companies in New Jersey. Providing commercial financing products and services focused on small and mid-size businesses, over 100,000 businesses have used our financing services.
- If you are interested in learning more about my involvement in these areas, please feel free to connect with me on LinkedIn.
Salesperson looking for more prospects
- Company Name: Corporate Leasing, Inc.
- Title: Senior Business Development Executive ► Equipment Finance ♦ Commercial Financing ♦ Product Leasing
- Dates: November 2007–July 2015 (7 years 9 months) Greater Philadelphia Area
- Description: In 2007, I came on board Corporate Leasing after having spent years focused on sales and marketing for small businesses. Corporate Leasing provides financing to businesses so they can acquire new equipment and technology while preserving capital. One of the largest leasing companies in New Jersey, Corporate Leasing is committed to helping small business grow.
- As the Senior Business Development Executive for Corporate Leasing, I am responsible for providing small businesses in New Jersey with financial options that allow them to acquire the equipment and technology they need.
- I love keeping in touch with my clients through social media and love providing learning opportunities for them as they grow their businesses.
- If you would like to learn more about our company and services, please visit our website at
CorporateLeasingInc.com.
Human resources professional using LinkedIn for reputation management
- Company Name: Technology Startup, Inc.
- Title: Senior Human Resources Manager ► Mergers & Acquisitions ♦ Retention ♦ Employee Relations ♦ Performance Management
- Dates: 2015–2016
- Description: In my role as Senior Human Resources Manager, I help support the successful integration of talent from newly acquired companies by focusing on successful onboarding and increasing employee satisfaction. In addition, I recruit top talent and specialize in employee development.
- Accomplishments include:
- ✓ Managed the successful integration of over 100 newly merged employees by creating and delivering workshops and communication tools to educate this new staff of their role in our corporate culture. Attrition from the merger dropped by 75%.
- ✓ Introduced online tools and social media to the existing traditional tools of employment agencies and job fairs to recruit talent and successfully filled more than 250 positions in a record setting 3-month time frame.
- ✓ Created and managed a new employee referral program, which resulted in higher employee referrals and new hires.
- For detailed list of accomplishments, please request my resume.
- Technology Startup, Inc., is growing by leaps and bounds. Founded in 2015, Technology Startup, Inc., provides the products and services that shape Startup growth.
Adding Multimedia to Make Your Profile POP!
LinkedIn allows you to add work samples to your profile. You can add rich media to your Experience and Education sections. Adding multimedia is a great way to further your professional brand on LinkedIn and truly make your profile eye-catching. Types of multimedia samples you can add include:
- Documents
- Images
- Presentations
You can also link to:
- Images
- Online videos
- Rich media (such as foursquare check-ins, polls, Kickstarter campaigns, Tumblr, and so on)
The areas of your profile that allow multimedia work samples are:
- Education
- Individual job experiences
- About section
Determining what to highlight with multimedia files
Adding multimedia to your profile is a great way to showcase your work and provide your audience with proof of your abilities. Certainly when you are in a creative field, adding work samples is pretty easy. It’s your best portfolio pieces that you upload to your About section and individual Experiences. But what if you aren’t in a creative field?
Think in terms of your goals and target audience. If you are on LinkedIn to be seen as a thought leader and expert, upload that podcast interview or link to that video interview on YouTube. Scan that newspaper article in which you were quoted.
Looking to be seen as a leader? Upload a picture of you and your department at a team building event.
Using LinkedIn for prospecting and sales? Upload that presentation slide show or video demo you created.
On LinkedIn for job search? Showcase your work by uploading a white paper or a dashboard report (minus any confidential or proprietary information) showing your past successes.
Make sure that what you choose makes sense to your reader. It’s best to include a title and descriptions for each multimedia file or link you attach to your profile.
Once you decide what to upload, here’s how to do it:
- Open your profile on LinkedIn.
- Scroll to either your Experience section or Education section where you want the multimedia work sample to reside.
Get into Edit mode by clicking the pencil (edit) icon next to that section.
You can choose to either Upload or Link to your media depending on the type of media you want to embed on your profile, as shown in Figure 11-6.
- To add a link to external media, click the Link button and paste the URL into the blank URL field and click the Save button.
If you prefer to upload media that resides on your hard drive, click the Upload button.
An open dialog box appears. Locate the file on your hard drive and click the Open button.
- Enter a title and description, as shown in Figure 11-7.
- Click Apply then click Save.

FIGURE 11-6: Adding multimedia files.
Resisting the urge to upload your resume
You may run into “experts” who insist you upload a copy of your resume to your LinkedIn profile. I don’t agree. You want your LinkedIn profile to be the hook that gets people to request your resume. That way, you have control and can determine who gets to have access it. Your resume contains your complete career trajectory and you don’t want just anyone able to download it.
Recruiters love it when a resume is attached to your profile — this way they can read it without ever contacting you and they can immediately dismiss you without ever talking to you. You want recruiters and hiring managers and human resources people to contact you so that you can show them you are a real person — you can ask questions and make a great impression while engaging in human contact.
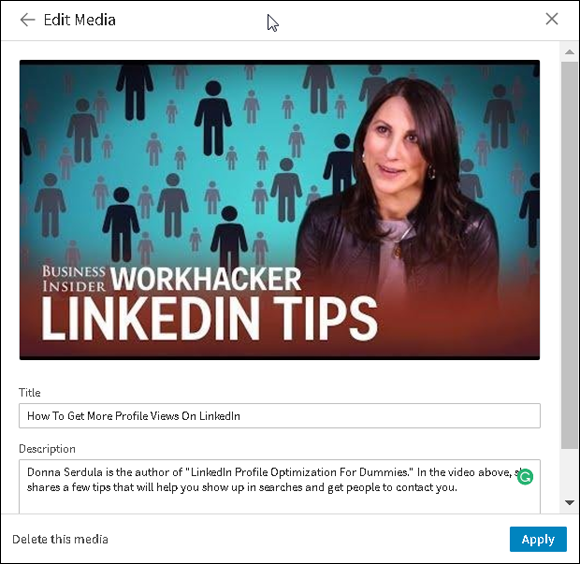
FIGURE 11-7: Adding a description to a work sample media file.
However, if you decide to upload your resume to your LinkedIn profile, consider removing your home address and any confidential information you aren’t comfortable sharing with the whole wide world. Your employer may not be too keen on you publicly sharing how you singlehandedly saved it from bankruptcy twice in the past six months.
Although I don’t recommend uploading your resume to your profile, you may feel otherwise. If you are clear on the reasons not to and still think it makes sense to do, here’s how:
- Open your LinkedIn profile.
- Move your mouse pointer over the section to which you want to add your resume and click the pencil (edit) icon.
Under Media, click the Upload button.
An Open dialog box appears.
Locate and select your resume file from your hard drive and click Open.
A picture of your content displays, and sometimes LinkedIn automatically fills in the Title and Description fields with information from the file. Regardless, update the Title and Description fields to something that makes sense for your reader.
- Click Save.
With your Experience section optimized and brimming with impressive results, it’s now time to turn to the About section of your LinkedIn profile. In the next chapter, I show you how to craft a LinkedIn About section that acts as a digital introduction and striking first impression.