Chapter 3
Understanding Endorsements and Recommendations
IN THIS CHAPTER
![]() Showcasing your skill sets and strengths
Showcasing your skill sets and strengths
![]() Leveraging your skills for SEO purposes
Leveraging your skills for SEO purposes
![]() Hiding and removing endorsements
Hiding and removing endorsements
![]() Soliciting recommendations and recommending others
Soliciting recommendations and recommending others
The Skills & Endorsements section is a much-maligned area of the LinkedIn profile. Whenever I speak to groups about LinkedIn, there is always someone in the crowd who jumps up and asks, “What is the point of Skills & Endorsements?” The crowd goes wild, and I am left defending this poor section of the profile.
As I show you in this chapter, the bad reputation of the Skills & Endorsements section is not deserved. This section is simply a place to list your skills and strengths and allow your connections to publicly validate them with an endorsement.
In this chapter, you look at how to take the keywords you discovered in Chapter 2 and turn them into skills in the Skills & Endorsements section where your connections can endorse them. I show you how easy it is to add and rearrange those skills to expertly showcase your skill sets and strengths. I also show you how to obtain endorsements, how to hide or remove an endorsement you don’t necessarily want, and how to endorse others.
Lastly, I take you through the ins and outs of asking for and providing recommendations. I even let you in on my secret to getting tons of glowing recommendations that crank up your credibility and results on LinkedIn.
Showcasing Your Skills
The skills and strengths you list in the Skills & Endorsements section of your LinkedIn profile are the keywords you discover in Chapter 2. Think of LinkedIn Skills as your expertise boiled down to just single words. LinkedIn Skills aren’t just there to describe you; they are listed for your first-degree connections to validate and endorse. The Skills section is shown in Figure 3-1.

FIGURE 3-1: The Skills & Endorsements section.
The following keywords are examples of excellent skills and strengths in the Skills & Endorsements section:
- Change Management
- Strategic Planning
- Conflict Resolution
- Customer Service
- Entrepreneur
- Employee Relations
Keywords that don’t translate so well as skills include:
- Problem-solver
- Dynamic
- Professional
- Engaging
- Interesting
- Friendly
 The excellent keywords are excellent because they are specific and could appear on a job description. Skills should reflect your expertise, competencies, specialties, or abilities that you possess. Problem-solver, dynamic, interesting, and friendly aren’t great keywords to list. While they are all positive terms, these terms could describe anyone in any industry. The key is to be specific; your listed skills should describe you and your unique abilities and strengths.
Adding skills
To showcase your strengths and get endorsed for your expertise you must add skills to your profile. LinkedIn allows you to add up to 50 skills. If you completed Chapter 2 and have a list of your keywords, get that list out now. If not, no worries!
If you are a job seeker, simply locate a job description of your current position and review it to see the keywords that describe your abilities. If your resume was professionally written, you may have a section that lists your strengths, core competencies, and skill sets. For sales professionals using LinkedIn to prospect, visit your company’s website. Scan through the pages for words used to describe your service offering or products. Those of you who are interested in reputation management and branding, think in terms of your strengths and expertise.
To add your skills to your LinkedIn profile, follow these steps:
Open your LinkedIn profile.
If you already have skills listed on your profile page, go to Step 3. If you don’t have any skills listed yet, continue to Step 2.
- Click the “Add new profile section” to expand it.
- Under Skills, click the down arrow to add Skills to your profile.
Click the plus ( + ) icon to add a new skill.
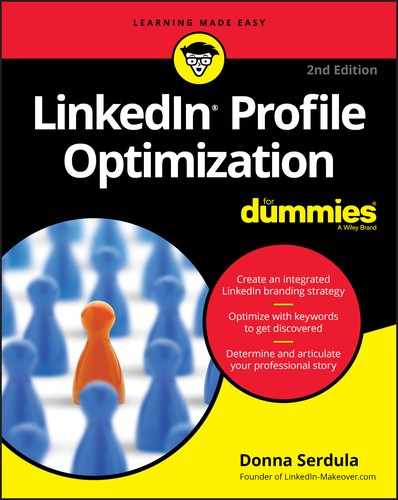
An empty Add Skills box appears, as shown in Figure 3-2.
Type the name of a skill in the “Skill” text box or choose it from the drop-down list that appears after you type a few letters.
If your skill doesn’t appear, completely type in the skill name in the field. There is an 80-character limit for each skill.
Click Add.
The skill is added to your Skills list.
- Click Save.
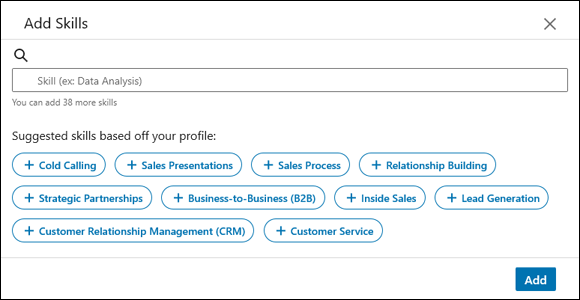
FIGURE 3-2: Where to add your skills.
You can add up to 50 skills to your profile. Don’t focus on trying to list 50 skills. It’s quality versus quantity here. Concentrate on 15 to 20 core skills. When you focus on adding 50 skills, you end up adding some skills of lesser importance. Because LinkedIn allows others to endorse you, you may find some of these lower skills are endorsed and elevated on your profile. If you do get up to 50, that’s great, but don’t kill yourself trying.
Grouping skills by category
As you add skills to your profile, LinkedIn groups your skills into the following categories:
- Top Skills
- Industry Knowledge
- Tools & Technologies
- Interpersonal Skills
- Languages
- Other Skills
When a skill is added that LinkedIn doesn’t know, or the skill simply doesn’t fit within the other categories, LinkedIn puts it under Other Skills.
You must have more than three skills listed on your profile for LinkedIn to group them into categories. The skills you add will be grouped by LinkedIn automatically. If there is a skill you would like to see grouped differently, unfortunately there’s nothing you can do.
As you add skills, consider LinkedIn’s categories. Try to add skills that fit the different buckets, and don’t add too many skills under just one bucket.
Pinning your top skills
LinkedIn doesn’t want to overwhelm readers of your profile with too much content and information. It controls what is visible by collapsing sections and asking viewers to click if they want to see more. Although you can list up to 50 skills on your LinkedIn profile, LinkedIn only shows the top three skills. If viewers want to view more, they must click Show More to expand the section.
However, LinkedIn enables you to choose which skills you’d like to showcase. You can pin the skills you consider your top skills so that they show on your profile without users needing to click Show More. Here’s how:
- Open your LinkedIn profile.
- Scroll down to Skills & Endorsements.
Click the pencil (edit) icon, as shown in Figure 3-3.
A list of your skills appears.
- Click the pin icon to unpin the top skills.
- Scroll through the list of skills and click the pin icon next to three skills that you want visible to viewers of your profile.
- When you have finished pinning your top skills, click the Save button.
One of my biggest pet peeves when viewing profiles is seeing a high-level individual with top skills of MS Word, Team Building, and Problem Solving. Although these are fine skills, they aren’t career-defining. It’s imperative you choose three skills that truly showcase your abilities. These skills should immediately convey to the person reading your profile who you are and what you do best. In addition, the skills should be future-oriented. Don’t choose skills you currently utilize but don’t love. Choose skills that align with the position you are striving to land.

FIGURE 3-3: Click the pencil icon to go into edit mode.
Rearranging skills
Skills are listed in the order in which they are added. Once you start getting endorsements, skills with the most endorsements are listed first. However, you can rearrange the order of endorsed skills by drag and drop. Here’s how:
- Open your LinkedIn profile.
- Scroll down to Skills & Endorsements.
- Click the pencil (edit) icon (shown earlier in Figure 3-3).
- Click the reorder icon that looks like four horizontal lines.
Drag and drop the skills where you want them to appear in the list, as shown in Figure 3-4.
When moving skills, make sure you keep your mouse button pressed on the skill you wish to move, drag your mouse to the top or bottom of the list, and then release. You can only rearrange skills within categories.
- When you have finished organizing your skills, click the Save button.

FIGURE 3-4: Drag and drop skills to arrange them in your desired order.
Showing Recruiters What You Know
It’s one thing to say you know a skill; it’s another to prove it. LinkedIn provides a Skill Assessments feature that enables you to demonstrate your knowledge of the skills you added to the Skills & Endorsements section of your profile. Skills Assessments are made up of multiple-choice quizzes that you can take to earn a badge for your skills. Following are the three categories of quizzes and a few of the topics available:
- Tech Skills: Angular, AutoCAD, AWS, Bash, C, C#, C++, CSS, GIT, Hadoop, HTML, Java, JavaScript, jQuery, JSON, Maven, MongoDB, NodeJs, Objective-C, PHP, Python, R, React.js, Ruby, Ruby on Rails, Scala, Swift, WordPress, XML
- General Skills: Adobe Acrobat, MS Excel, MS Outlook, MS PowerPoint, MS Project, MS SharePoint, MS Visio, MS Word, QuickBooks
- Other Skills: Maya, Revit
LinkedIn is developing more quizzes all the time, so you may find that more are available than what is listed here. Here’s how to access the Skills Assessment quizzes:
- Open your LinkedIn profile.
- Scroll down to the Skills & Endorsements section.
Click the Take Skill Quiz button, as shown in Figure 3-5.
If you don’t see this button, LinkedIn may still be developing quizzes for the skills you have listed.

FIGURE 3-5: Click the Take Skill Quiz button to prove your knowledge.
The Skills Assessment feature is a great way to stand out from the crowd to recruiters and hiring managers. By taking quizzes to showcase your proficiency, you are showing you are relevant, proactive, and care about your professional development. LinkedIn has stated that by earning badges for your profile, you are helping to uncover more relevant content or opportunities on LinkedIn. Based on the skills you have proven you know, LinkedIn can better customize your LinkedIn feed and potentially jobs, LinkedIn Learning courses, and people suggestions.
The good news is, you don’t have to worry about not getting an A. As long you score in the 70th percentile or above, you will pass the quiz and awarded a badge. The badges are only good for 12 months, though. After that they expire.
 What happens if you don’t pass? Take a deep breath, it happens! Don’t get upset. No one will know you failed — nothing is added or removed from you profile. You have three months to study and get your head in the game. After three months, you can take the quiz again. Here’s the thing: You must do better the next time because you can only repeat an assessment once.
Obtaining Endorsements
Once you have skills listed on your profile, LinkedIn allows people to endorse you for those skills. By allowing others to endorse you, the Skills & Endorsements section provides credibility and validity that isn’t available anywhere else. Sure, you can list your core competencies on your resume, but it’s only on your LinkedIn profile where your first-degree connections can endorse you and prove that you really do possess that skill. The more endorsements you have for a skill on your LinkedIn profile, the more credible you appear.
As I explain in Chapter 2, LinkedIn search is driven by keywords, and LinkedIn wants its search results to be relevant and valuable to the person searching. By allowing connections to validate skills through endorsements, it allows LinkedIn a way to determine search result listings via a manner that is independent of the owner of the profile. At one time, LinkedIn’s search results rankings were based solely on keyword density. As long as you stated your keyword more than anyone else did in their profiles, your profile showed up first. Clearly, this was an easy way to hack and skew the search results in your favor. By providing the ability to endorse others and basing search results on an area that is outside the control of a user, results ranking is harder to hack, thereby creating a better search result.
There is no maximum limit to endorsements (although you are limited by the number of first-degree connections within your network); however, LinkedIn only shows up to 99. After 99, LinkedIn displays 99+. To display the total number of endorsers of a particular skill, just click the 99+ icon to see the full number and a list of endorsers.
Most people confuse endorsements and recommendations. I like to call endorsements “Recommendations Lite.” Endorsements occur with a single click of the mouse. Recommendations on the other hand are a written testimonial from a connection and require much more energy and thought.
When torn between providing a person with a recommendation or an endorsement, determine how much time you have allotted and what you want to convey. If you only have a few seconds, endorsements work just fine. If you want to say more than just one word and truly convey a message about the person, a recommendation is in order.
Hiding an endorsement
Did someone disreputable endorse you for a skill? Hide that endorsement so it doesn’t show on your profile. Here’s how:
- Open your LinkedIn profile.
Scroll down to the Skills & Endorsements section and click Show More.
A full list of your skills and endorsements expands. You may have to scroll to see all of your skills.
Click a skill to see all the people who have endorsed you for that skill.
A pop-up window appears with a listing of all the people who have endorsed you. In Figure 3-6 you can see all of the connections who endorsed me for Marketing Strategy.
- Toggle the switch to the right of the connection whose endorsement you want to hide.
- Click the X in the upper-right corner to exit.

FIGURE 3-6: Hiding an endorsement is as easy as switching it off.
Opting out of endorsements
Although I highly recommend embracing endorsements, there are some jobs in which endorsements are frowned upon. Financial advisors, for example, often prefer to opt out of LinkedIn’s endorsement feature for compliance and regulation reasons.
If you wish to opt out of receiving endorsements, follow these steps:
- Open your LinkedIn profile.
- Scroll down to Skills & Endorsements and click the pencil (edit) icon.
Click Adjust Endorsement Settings at the bottom of the screen.
The Endorsements screen appears where you can manage how you receive and give endorsements, as shown in Figure 3-7.
Toggle “I Want to be Endorsed” from Yes to No.
After selecting No, LinkedIn indicates that it will show your skills but not your endorsements. You can also opt out of having endorsements of your skills suggested to your connections. And you can also out of having your connections’ skills suggested to you for endorsement.
- Click the X in the upper-right corner to save your changes and exit.

FIGURE 3-7: Opt out of endorsements completely.
Endorsing a connection
Most people focus on getting endorsements, but it’s just as important to give endorsements. Endorsements are a great way to remind connections that you recognize their strengths. By endorsing connections, you are showing acknowledgement and respect for their areas of expertise. Think of endorsements as a “thumbs up” from a business acquaintance. It’s an easy way to say, “Hey, I remember you and respect your skill set.”
When giving endorsements, read through the person’s entire list of skills and endorse those skills that you are able to authentically validate from personal experience with that person.
Here’s how to endorse a connection’s skills:
- Visit the LinkedIn profile of the person you want to endorse.
- Scroll down to the Skills & Endorsement section.
- Click Show More to expand the Skills & Endorsement section to see all of his or her skills.
Hover over the skill you want to endorse and click the plus ( + ) sign that appears to the right of it.
A pop-up window opens.
Select how good the person is at the skill and how you know about that skill.
You can choose from Good, Very Good, and Highly Skilled. You can also note whether you managed or reported to the person. This information is not shared with person you are endorsing.
Click the Submit button.
You can endorse numerous skills; just keep clicking the plus ( + ) signs.
You are only able to endorse first-degree connections. When you visit a profile of a second-degree, third-degree, or Out of Network profile, you see their skills and endorsements, but the plus ( + ) sign to endorse does not appear.
 Endorse your first-degree connections honestly and genuinely. No one wants to be endorsed by someone who is only guessing at their skills. When you make a thoughtful endorsement of a connection you admire, that person is more likely to return the favor in kind.
There may be times you receive endorsements from people within your network that you don’t know all that well or at all. This is especially true when you are an open networker and connect with people regardless of whether you know them or not. These first-degree connections that you don’t know so well may endorse you because they know of your work and wish to promote positivity in the world. They also may hope that you operate with a quid quo pro mentality and want you to endorse them right back. Do not feel strong-armed! Endorse people because you appreciate their work, not because you feel guilt.
When viewing a first-degree connections’ profiles, every now and then LinkedIn may provide you the ability to endorse them for skills they have listed (see Figure 3-8). This prompt is a great way to keep in touch with connections and show your appreciation for their strengths.

FIGURE 3-8: Endorsing a connection during a visit to her LinkedIn profile.
Removing an endorsement
Did you endorse someone only to learn that you would prefer to disassociate from them? Remove your endorsement from his or her profile by performing a few easy steps:
- Visit the LinkedIn profile of the person you endorsed.
- Scroll down to the Skills & Endorsements section.
- Hover your cursor over the check mark next to the skill you already endorsed.
- Click the check mark to remove your endorsement.
Don’t worry; the recipient is not notified of the removal.
Soliciting endorsements
Are you not receiving endorsements from your connections? Sometimes all it takes is a nudge. Rather than sit and stare at your lonely Skills & Endorsements section, get proactive and send your connections an email. Send a simple LinkedIn message to a few of your close connections and ask them to endorse you. Remember, the squeaky wheel gets the oil!
Following are two sample messages to send to connections with whom you recently finished a project or whom you’ve recently endorsed. The first is an example of requesting an endorsement after finishing up a project or other work with a client:
- If you were happy with my work I performed at Widgets, Inc., would you be so kind as to endorse me on LinkedIn?
- It’s just a simple click of a button. The skills and expertise I would like to be endorsed for are Project Management, Leadership Team Building, and SEO.
- All you need to do is visit my profile and scroll down to the Skills & Endorsements section located at the bottom of my profile.
- Here’s the link to my profile:
www.linkedin.com/in/todonna.
The next is an example of requesting an endorsement using the power of quid pro quo:
- I just endorsed you for Project Management and Leadership Strategy on your LinkedIn profile.
- If you’re comfortable with it, would you do the same for me?
- There’s 50 skills to choose from. All you need to do is visit my profile:
www.linkedin.com/in/todonna.
When your connections do endorse you, make sure you reach out and thank them. Call them on the phone or send them a message via LinkedIn. Use LinkedIn as an excuse to get in touch. This is a great way to continue to network and forge strong relationships.
In addition to endorsements, there’s another longer-form way for connections to add their two cents about you: recommendations. Keep reading to find out more about this type of testimonial.
The Importance of Recommendations
Recommendations are testimonials that appear on your profile, showing your reader you are trusted and admired within your network. Recommendations are given by first-degree connections and provide citation to your value and abilities and make your profile more credible.
If you are a job seeker, recommendations from your current or past employer and colleagues sets you apart from other job applicants. When your goal is branding or reputation management, a strong list of recommendations from VIPs and leaders boasting your finer points provides evidence to your reader that you truly are a high performing, impressive professional. If you are promoting your business, products, or services, having recommendations from your current clients touting your strengths impresses your prospects.
You may be thinking, “What’s the merit in a LinkedIn recommendation when every recommendation on LinkedIn is glowing?”
The power behind LinkedIn recommendations is it’s easy to find out how significant or insignificant the person is who wrote your recommendation by simply clicking on the person’s name and visiting his or her LinkedIn profile to learn more. It is not what the recommendation says that’s so important, it’s who wrote it. The short recommendation from someone in a high place is significantly better than the glowing recommendation from a colleague or vendor.
Identifying people to recommend you
The best kind of recommendation comes from employers, VIPs, or customers. These are people with a lot of things on their plates. The fact they took time and wrote you a recommendation speaks volumes and proves that you truly did something important. Recommendations by colleagues and people in lateral or lower positions are useful, but not nearly as powerful. The quid pro quo recommendation, given out of duty, impresses no one. Check out Figure 3-9 to see the types of people you should ask for a recommendation.
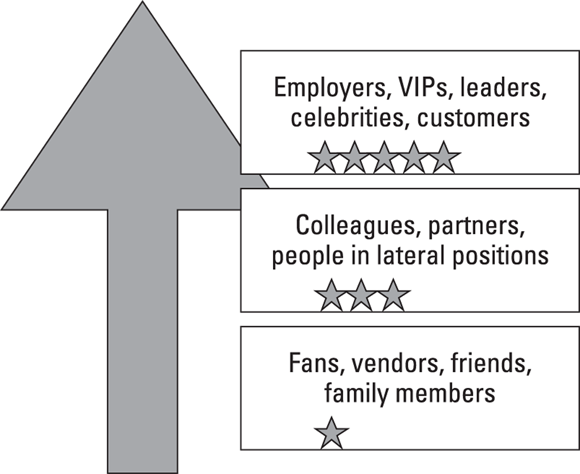
FIGURE 3-9: Order of recommenders by importance.
Here are some questions to help you identify the right people to ask for a recommendation:
- Who have you helped?
- Who have you impressed?
- Who have you inspired?
- Who have you provided value to?
- Who has recently thanked you?
If you have a large list and don’t want to send a recommendation request to each and every one, here’s how to narrow the list:
- Who is on LinkedIn?
- Who has a large LinkedIn network?
- Who is active on LinkedIn?
- Who shares your target audience?
When a person writes a recommendation for you, that recommendation is also listed on that person’s profile. By making sure the person has a large network and shares your target audience means more eyes on the recommendation, which might translate to additional opportunity for you.
You can only request recommendations from people who are on LinkedIn and connected to you. However, if you want to add a recommendation from a person who is not on LinkedIn or from someone who has passed on to the great beyond, you can scan the recommendation and add it to the experience as a multimedia file. Directions on adding multimedia files are found in Chapter 12.
If you were unable to come up with a list, what are you waiting for? Go out and start impressing people, help others, and start participating in random acts of kindness.
Asking for a recommendation
Now that you have a list of people to ask for a recommendation, don’t let shyness get in your way. People love helping other people and you may discover that most people are honored that you asked them to recommend you.
The best and most successful approach when asking for a recommendation is not to simply request a recommendation, but provide the person with a recommendation already written for them.
People often balk when I suggest providing a pre-written recommendation. The truth is, rather than being insulted, more often than not the other person is going to be overjoyed. The vast majority of people out there don’t have the time or ability to write you a strong recommendation. Because this person is doing you a favor, it’s important to do them a favor by making it as easy for them as possible to help you. And as you struggle to come up with the words for your own recommendation, imagine how difficult it would be for the other person!
The other reason I suggest writing the recommendation yourself is to ensure the recommendation is written with all the points you want covered. Just because you think your leadership ability and unwavering commitment to customer service is what sets you apart, the person writing your recommendation may instead focus on something else entirely.
In addition, by writing the recommendation yourself, you can infuse the recommendation with keywords that help optimize your profile’s searchability. All those keywords can be infused into recommendations to make your profile rank even better. (Refer to Chapter 2 to find out even more about how to get found on LinkedIn.)
If my arguments to write the recommendation yourself failed to persuade you, at the very least provide the person with some criteria as to what you’d like stated in the recommendation. Consider including language similar to this:
- Dear Dave,
- I have enjoyed working with you. Would you be open to providing me a recommendation of my work that I can include on my LinkedIn profile?
- When you write the recommendation, I would love it if you’d mention my strength in social selling and how I often acted as a trusted advisor to my clients. Perhaps you can even mention how I saved the Wiener deal using my extensive knowledge of widgets and ended up renewing them for an extra two years, which resulted in a $2M uptick in revenue?
Thanks so much! I appreciate it!
—Hal
When requesting a recommendation, it’s important that you request the recommendation from within LinkedIn’s interface. Whatever you do, don’t send the request for a recommendation via an outside email address. Emailing the request makes it difficult for your contact to figure out how to provide the recommendation. By sending the request from LinkedIn’s recommendation page, your contacts can easily click the link that LinkedIn provides, making it easy for them to give you a recommendation.
Here’s how to request a recommendation from within LinkedIn:
In the LinkedIn search bar, type the name of the person you want to recommend and click the search button.
A list of profiles matching the name appears.
- Open the profile of the person you want to recommend by clicking the search result.
- Click the More… button located in the intro section.
Select Request a Recommendation.
A dialog box appears, asking, “How do you know [this person]?” as shown in Figure 3-10.
Choose your relationship to the person.
You have numerous options. Read through the list carefully and choose the relationship that most closely echoes yours. Unfortunately, there is no “other” option, so you must determine the best fit. Luckily, the other person has a chance to make changes, so if he or she doesn’t feel you used the proper relationship option, he or she can change it for you.
Choose your position at the time from the drop-down list.
The drop-down list contains a listing of your experiences as listed on your LinkedIn profile.
- Click the Next button.
Provide a personalized message to send with your recommendation request.
LinkedIn provides a simple, pre-written message: “Hi, can you write me a recommendation?” As I have stated, it is best to add the recommendation for the person or at the very least, guidelines to what you want covered in the recommendation.
- Click the Send button when you are ready to send your request.

FIGURE 3-10: LinkedIn’s recommendation request form.
Your request for a recommendation is sent as a LinkedIn message. Depending on your LinkedIn settings, you may also receive a notification alert via email.
Ditching the default request text
When requesting a recommendation from a connection, LinkedIn provides a pre-written request for you to send. Rather than use LinkedIn’s default text, personalize the message instead. Try something like this:
- Dear Fran,
It’s been a pleasure working with you and accomplishing so much together. It would be an honor to include a recommendation from you on my LinkedIn profile. I know how busy you are so I took the liberty of writing the recommendation for you. Please feel free to make any edits, and if you would prefer to write your own recommendation, please do so. Thank you in advance and I hope we can do lunch together soon.
<insert pre-written recommendation>
—Ollie
Once the recommendation request is sent, rather than wait for the other person to respond, I highly suggest reaching out to the person directly to let them know that you requested a recommendation. Give them a call and walk them through the steps of providing the recommendation. Let them know how appreciative you are of the help they are providing.
Accepting a recommendation
One of the perks of writing the recommendation for the other person is how quick the recommendation is usually accepted and posted. My clients who accepted this advice have reported back that most people, when provided with a pre-written recommendation, post it almost immediately. You’ll know when the person responds because LinkedIn sends an email notification. In addition to the email, you also get a LinkedIn message from the person giving the recommendation. This message contains a preview of the recommendation and a link to manage your recommendations. Here’s how to accept it:
Go to your messaging screen by clicking the Messaging icon on LinkedIn’s main navigation bar.
In your list of messages on the left is the recommendation the person wrote for you along with a link to review it.
Click the Review Recommendation link.
A dialog box that shows a preview of the recommendation appears.
- You can choose to either Dismiss, Ask For a Revision, or Add to Profile.
- If you need to request a change, click Ask for a revision.
Type the reason you are requesting a change.
To make it as easy for the person as possible, you may want to copy his or her previous recommendation, make the change yourself, and paste the recommendation into the messaging section.
Click Send.
It may seem insulting and wrong to request a replacement, but it’s an important thing to do. You don’t want to publish a recommendation filled with typos. That would defeat the purpose of the recommendation.
- If the recommendation looks great, click Add to Profile.
Reordering recommendations
Recommendations are listed in the order they were received on your LinkedIn profile. The two most current recommendations sit at the top visible to your reader, and a link to see more leads to the complete list of recommendations you have received. I’ve heard from people who stopped accepting recommendations because they want a specific recommendation to remain at the top of their profiles and they don’t want another lesser recommendation to take the top spot.
At one time, you could indeed reorder recommendations so a prized recommendation could remain in the top visible position. Unfortunately, with the latest interface change, you can no longer reorder recommendations.
Because it is no longer possible to reorder recommendations, please do not let that stop you from getting recommendations. Yes, a fantastic recommendation will be replaced by another on your profile, but all recommendations are visible when a person clicks “See more.” Besides, you never know when an even better recommendation will be received that blows that old prized recommendation out of the water!
Removing recommendations
Careers change, people change, and sometimes, a recommendation you accepted a long time ago may not be a recommendation you want on your profile today. Although it’s not possible to delete recommendations, you can prevent them from showing on your profile. Here’s how:
- Open your LinkedIn profile.
Scroll down and click the pencil (edit) icon next to the Recommendations section.
The Manage recommendations window appears.
- Change the toggle to Hide for a recommendation you wish to remove, as shown in Figure 3-11.
- Click Save.
FIGURE 3-11: Removing a recommendation from your profile.
Recommendations that have been hidden can be found in the Manage Recommendations section. Just click the Hidden recommendations link at the bottom of the page. If you hide a recommendation, don’t worry: The other person is not notified that the recommendation was removed.
Recommending others
Everyone knows it’s important to get recommendations, but it’s also just as important to give recommendations to other people. Think about it. You want to brand yourself as a leader and executive. Leaders and executives don’t just get recommendations, they give them!
Most people only provide recommendations when asked. Instead, give recommendations out of the goodness of your heart. Make it a part of your professional life. Once a month, look back and determine who did good by you. Who inspired and impressed you? Without anyone asking, send a glowing recommendation. You might be surprised by the good things that happen when all that karma comes back to you.
In addition to good karma, writing recommendations for others is a great way to promote yourself. Within the recommendation, introduce yourself and explain what you do. Not only does this give the recommendation context and credibility, but also it serves to get the word out about you.
Here’s an example of a self-promoting recommendation:
As a Financial Advisor, I work with many small business owners, helping them reach their financial planning goals. I frequently refer Jill Schwettie to my clients that need a small business advisor. The feedback my clients provide me regarding Jill is always very positive. Jill’s marketing advice has been instrumental in helping me expand my business. When you are ready to take your business to the next level, reach out to Jill.
People who read this recommendation may find themselves not only impressed with the person recommended, but also curious about the person providing the recommendation. Remember, the power of LinkedIn recommendations is the ability to click to learn more about the person providing the recommendation, and when you provide a well-written recommendation, a person may click on your profile to learn more about you, the recommender.
Here’s how to give a recommendation:
In the LinkedIn search bar, type the name of the person you want to recommend and click the search button.
A list of profiles matching the name appears.
- Open the profile of the person you want to recommend by clicking the search result.
Click the More… button located in the intro section and select Recommend, as shown in Figure 3-12.
A dialog box appears that walks you through the recommendation process, as shown in Figure 3-13. The first thing you must do is state how you know the person and the person’s position at the time.
In the How do you know the person’s Relationship field, choose your relationship to the person.
You have numerous options. Read through the list carefully and choose the relationship that most closely echoes yours.
In the Position at the Time field, click the drop-down list to choose the position of the person you are recommending.
The drop-down list contains a listing of the person’s experiences as listed on his or her LinkedIn profile.
- Click the Next button.
In the next dialog box that appears, write the recommendation for the person.
Be careful not to include any notes to the person you don’t want others to see, and don’t make any typos!
Click the Send button when you are ready to send your recommendation.
LinkedIn displays a banner at the bottom of the page that lets you know the recommendation was sent successfully.
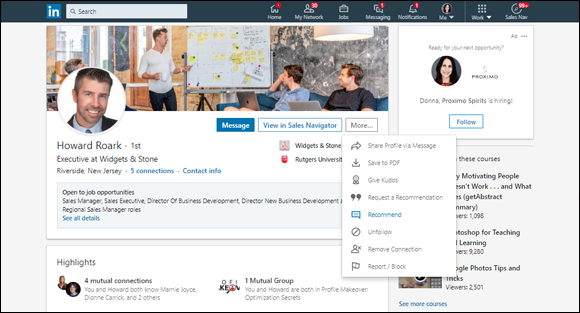
FIGURE 3-12: Providing a recommendation.
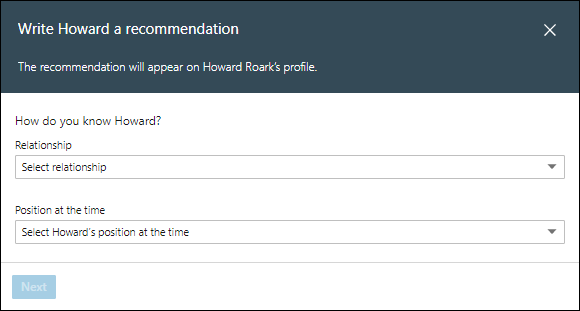
FIGURE 3-13: Filling out the recommendation form.
Some experts out there may tell you that you can have too many recommendations on your LinkedIn profile. I subscribe to the old adage that you can never be too nice, too rich, or have too many recommendations on your profile. As long as the recommendations are genuine, authentic, come from people within your network, and align you with your career future, you truly can’t have too many.
I have over 100 recommendations on my profile. I regularly go through and cull the weaker recommendations. I also make sure that the person who is recommending me is a person who is respectable and professional. Otherwise, I remove the recommendation. The ultimate advice I can give you is to accept and show genuine recommendations from good people and never be afraid to remove a recommendation.
In the next chapter, I show you how to jump in and start building your profile. Don’t worry, the very first thing I cover in Chapter 4 is how to turn off profile updates so your entire network isn’t alerted to the massive changes about to take place!