Chapter 16
Unveiling and Marketing Your Powerful Profile
IN THIS CHAPTER
![]() Adding the finishing touches to your profile
Adding the finishing touches to your profile
![]() Making sure your profile is optimized and complete
Making sure your profile is optimized and complete
![]() Upgrading to a premium LinkedIn account
Upgrading to a premium LinkedIn account
![]() Improving your profile’s chances of success
Improving your profile’s chances of success
Your LinkedIn profile is nearly finished! You added a professional headshot and your headline is compelling. The About section is no longer a copy-and-paste of your resume. Instead, it’s a digital introduction and an impressive first impression. Your career trajectory is clearly defined in the Experience section of your profile. Your experiences don’t dwell on job description, but instead host impactful accomplishments that differentiate you from others in your industry. You also learned how to position yourself as a thought leader through carefully curated posts and lovingly crafted articles.
You might have thought you were finished, but now it’s time to put the final touches on your profile. In this chapter, I review the profile sections with you to make sure everything is optimized, clear, and aligns with your brand and goals. I also show you how to market your profile so others see the work you put into it. Additionally, I give you tips and tricks to increase views to your profile so you are more apt to collide with opportunity. Lastly, I walk you through the differences between the free and paid versions of LinkedIn.
Viewing Your Profile from the Mobile App
You just spent a lot of time working on your profile. Most people do the bulk of their editing on their desktop or laptop computers. It’s easy and far more comfortable than swiping with your finger on a smartphone. Once your profile is finished, make sure you check it out on the mobile app, though. Unicode symbols and emojis don’t always display the same way on different devices. I remember a client of mine who insisted he wanted check marks in his headline but balked when he saw that they displayed in red and rather cartoon-like on his iPhone.
Here’s how to check out your profile using the mobile app:
Install LinkedIn’s mobile app if you don’t already have it.
You can download and install the app from your respective device’s app store. Make sure you add an icon to your phone’s home screen. This is an app that can help you in your career. Maybe replace the Instagram or Facebook icon with LinkedIn?
- Open the LinkedIn app and sign in to your LinkedIn account.
- Click the View Profile icon.
Click View Profile.
Your profile displays.
Scroll through your profile, making sure everything translated from the desktop version to the mobile app.
Specifically, you are looking for any text formatting like symbols or Unicode or lines you added to separate text. Also, keep your eye out for grammar mistakes and typos. Often these errors slip past your eyes until you look at the same content in a different environment, and then they pop right out!
Viewing Your Profile as an Outsider
When you log in to LinkedIn and click to view your profile, you are always in edit mode. The profile you see is not what other LinkedIn members see when they view your profile when they are logged in to LinkedIn. The good news is that it doesn’t look too much different. To see your profile as others do, just imagine that the profile pencil icons are gone and the Dashboard is missing.
But what does it look like to people not logged in to LinkedIn? View your public profile to see your profile as the world outside of LinkedIn sees you. It’s important you perform this step because you get to decide what people outside LinkedIn see as well as what the Googlebot will index and show in Google results. You can choose to show everything or just a slim outline. It’s up to you. By now, you should know that I am a proponent of showing everything! But it’s really up to you and determined by your goal for LinkedIn.
To view the public version of your LinkedIn profile, follow these steps:
- Open your LinkedIn profile.
Click “Edit public profile & URL” located in the right sidebar, as shown in Figure 16-1.
You see a preview of your profile as a person not logged in to LinkedIn would see it, as shown in Figure 16-2.
- In the Edit Visibility section on the right, scroll down and make sure your visibility settings are aligned to your LinkedIn goals.
- Toggle the sections on or off depending on what you want people to see.
- Click the Back to LinkedIn.com link that appears in the top-right corner of your screen to return to edit mode.

FIGURE 16-1: Viewing the public version of your profile.

FIGURE 16-2: How people not logged in to LinkedIn see your profile.
 If you really want to experience how people outside of LinkedIn see your profile, log out of LinkedIn and visit your profile from your profile URL. Check out Chapter 4 for more information.
Getting Google to Index Your Profile
I often hear from clients who went through our service and had their LinkedIn profile totally transformed. Then they use Google to search for their names and the search results Google produces for their LinkedIn profiles look like their old profiles. Clicking it and visiting the profile produces the new profile, but the search result listing is still reading the old one. Patience you must have, my young Padawan! The Googlebot is constantly indexing and reindexing; it just takes time. LinkedIn states: “We can’t control how quickly search engines make updates after you make changes to your public profile. Some search engines can take several weeks to remove old profiles or show new information” (www.linkedin.com/help/linkedin/answer).
Don’t want to wait the several weeks it might take? How do you speed up this process? First, make sure you have enabled a public profile. No public profile, no Google search result listing. If you have a website, add a link to your LinkedIn profile. (Check out the sidebar, “Add a profile badge to your website” to find out how.) If you have a Twitter account or another social media account that Google indexes, try posting a link to your LinkedIn profile URL. Ultimately you want to find an online property that gets indexed regularly and feed it a link to your profile so that your profile is indexed sooner rather than later.
Your LinkedIn Profile Checklist
Now that you can view your profile as your target audience, let’s make sure you didn’t miss any sections or make any mistakes. Your public profile is your online reputation and digital face to the world. Your profile must be perfect, as this is how people see and judge you. Make sure all the sections are customized completely. As you go through, check off each completed section.
Profile picture
Does your profile picture cast you as a professional? Do you look warm, friendly, and well-adjusted? Is the background neutral and not distracting?
Background photo
Did you upload a background photo that illustrates your brand, subtly suggesting who you are and what you do to your profile reader?
Name
Is your name spelled correctly? Is it consistent with your business card, resume, other social media channels, and letterhead? Remember: There shouldn’t be any symbols or characters other than letters in this field; don’t be obnoxious! Review Chapter 5 for more tips.
Headline
Is your headline intriguing? Does it contain your top keywords? Will the people reading it see a benefit to them? Does it compel a person to open your profile to learn more about you? Not sure, go back to Chapter 7 to revisit my LinkedIn Headline Generator.
Location and industry
Is your location correct? Is your industry accurate?
Customized public profile URL
Did you customize the link to your public URL? Does the customized URL contain your name? We handle this together in Chapter 4 and I talk about marketing your URL later in this chapter.
Contact information
Did you include your phone number, email, and IM? Did you add links to your websites and Twitter? Remember, opportunity can’t knock if it doesn’t know which door to knock on! Check out Chapter 5 for a refresher.
About section
Is your About section engaging and easy to read? Does it introduce you to your reader? Does it provide a clear call to action? When you read it, do you feel a sense of pride? Accomplishment? Is it an authentic professional manifesto? Chapter 12 is where I cover the finer points of creating an optimized About section. I also provide a slew of examples.
One current (hopefully) and at least two past experiences
Are your experience titles packed with keywords? Do the descriptions explain what you accomplished along with your performance highlights? Check out Chapters 10 and 11 to refresh yourself on what makes a glowing trajectory.
Education
Did you list your education? I cover this in Chapter 13.
Licenses & Certifications
LinkedIn gave licenses and certifications its own section. If you got ’em, list ’em!
Volunteer Experience
You hear how Millennials are a mission-driven generation? Well, they are our future. It’s not just about taking, it’s about giving back. Here’s where you detail how you give back. Not giving back just yet? It’s never too late to get started.
Skills & Endorsements
Did you add your core competencies, strengths, skill sets, and abilities? I cover the Skills & Endorsements section in Chapter 3. Remember, when people are searching for someone like you, they are using keywords as their search query. Make sure those keywords are in your profile, and adding them as skills is the easiest way to get them into your profile.
Recommendations
Do you have glowing recommendations on your profile from people in high places? Have you given recommendations to other professionals? I talk about this in Chapter 3.
Accomplishments
Did you add your honors and awards, organizations, languages, projects, publications, patents, test scores, and/or courses? Are you showcasing yourself as a well-rounded professional? I delve down deep in Chapter 13 to ferret out your accomplishments.
Connections
Do you have at least 50 first-degree connections? If you need help, I go into detail later in this chapter on how to grow your network. I discuss the structure of your network in Chapter 2.
Following influencers, companies, groups, and schools
Are you following at least five influencers, companies, and schools that interest you? Did you join up to 100 LinkedIn Groups that contain not only your target audience but also large amounts of members? In Chapter 14, I cover following influencers and schools and companies to beef up your Interests section.
If you are proud of what you lovingly crafted, do me a favor — send me a link to your LinkedIn profile and let me know you used this book to assist you. You can message me on LinkedIn (www.linkedin.com/in/todonna). I have an Open Profile so anyone can reach out to me despite not being directly connected. You can also email me at [email protected]. I can’t wait to see it!
Now that your profile looks amazing and impressive, the next thing I want to show you is how to benchmark the success of your profile and some marketing tips to make sure your profile really performs well.
Benchmarking Your Profile’s Success
You’ve put a lot of time into improving your profile. Now you want to see if the effort was worthwhile and is bringing enhanced results. The thing is, to determine success, you need to know where you started. Fortunately, LinkedIn provides some statistics that show you how well your profile is performing.
Sitting directly under your About section is your profile’s Dashboard, as shown in Figure 16-3. This dashboard provides three important stats:
- Number of people who have viewed your profile within a 90-day period
- Number of views your latest post has received
- Number of appearances in weekly search
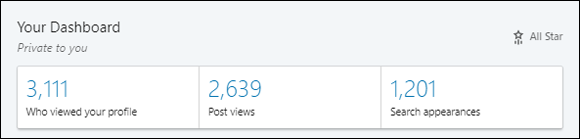
FIGURE 16-3: The Dashboard is where you see your profile’s stats.
Clicking the number of people who have viewed your profile takes you to the Who Viewed Your Profile screen. This screen is different depending upon whether you pay for LinkedIn or use the freemium version, as shown in Figure 16-4.
The free version only provides the number of people who have viewed your profile in the past 90 days and the percentage change since the previous week. The premium version provides a chart that spans 90 days and allows you to see the ebbs and flows of views to your profile over time.
The free version allows you to see the last five people who viewed your profile. The premium version allows you to see all viewers from the past 90 days.
Clicking the Search Appearances link on your Dashboard gives you greater insight into your weekly search stats. The free and premium page is almost the same and allows you to see where your searchers work, what your searchers do (their job titles), and for premium users, the keywords searchers used to find your profile. Unfortunately, the weekly search stats aren’t saved, so it’s not possible to track how well you do over the long haul directly on LinkedIn.

FIGURE 16-4: Free and premium stats.
Missing from both the free and paid versions is the ability to track the growth of your network. To truly benchmark your success, you must look past the week and 90 days. For that reason, I suggest going old school — yes, track your progress with a good ol’ pen and paper.
Here’s how to track your progress with a benchmarking worksheet:
Create a benchmarking worksheet on a blank sheet of paper or download a printable PDF version from my website at
www.LinkedIn-Makeover.com/tools/benchmark_workbook.If you are creating your own, divide your paper into a grid that has seven columns and several rows.
Label each column with the following:
- Date
- Profile Views
- Percentage Change
- Search Appearances
- Network Total
- Followers
- Following
Your homemade benchmarking worksheet should look similar to the worksheet shown in Figure 16-5.
On your Profile, scroll to the Dashboard and click Who's Viewed My Profile.
This page displays your profile stats. Record the number of viewers over 90 days.
- Write down the number of people who have viewed your profile and the percentage change in column 2.
- Go back to your dashboard and record the number of Search Appearances in column 4.
Now go back to LinkedIn and visit My Network on LinkedIn’s main navigation bar and click Connections.
At the top of this page is the total number of first-degree connections.
- Write the number of first-degree connections in the First-Degree Network column of your worksheet.
- Click “People I Follow” to get the number of people following you and the number of people you follow, and record these numbers in the last two columns of your spreadsheet.
- Record these stats weekly or with as much regularity as you can into your benchmarking worksheet for the next 180 days.

FIGURE 16-5: Benchmarking worksheet.
If you are one of those big data people and you really want to track your usage of LinkedIn, I found a great app that I use and recommend. It’s called Shield (https://shieldapp.ai). There are a couple of different levels, but pricing is between $10 and $30 per month. It allows you to track how your posts perform, the number of profile visits, your network growth, and more. If you are really serious about LinkedIn and not just dabbling, this app is a must.
The more you use LinkedIn, the better your profile performs. You should see the number of views grow as your network and activity level grow.
Marketing Your Profile
Your profile is a gleaming example of your brand and professionalism. You want your entire network and the whole wide world to look at this amazing profile of you. Now it’s time to start marketing it!
I am often reminded of that iconic line from the movie, Field of Dreams: “If you build it, they will come!” Unfortunately, that’s not always true in the world of social media. Yes, you optimized your profile with keywords so your profile will be easier to find, but there is no promise that people are searching for a person like you every day of the week. To consistently get views to your profile, you need to consistently market your profile.
Alerting your connections of your updated profile
“The squeaky wheel gets the oil.” That’s an old saying I heard often growing up. This adage holds true in the social media realm as well. If you want people to check out your new and improved profile, you need to speak up and direct them to it. In the following sections, I outline how to alert your network and drive traffic to your profile.
Notify your network
Remember when you toggled off “Share job changes, education changes, and work anniversaries from profile” so that LinkedIn would not alert your network? It’s time to turn on the notification. Once it’s back on and you make a job change, LinkedIn notifies people to check out your profile. This is perfect if you are adding a new position you want people to know about. If not, skip to the next section.
Follow these steps to issue a broadcast update:
- Click the Me icon in the upper-right corner of LinkedIn.com.
- Click Settings & Privacy.
- Click the Privacy tab.
- Scroll to “Share job changes, education changes, and work anniversaries from profile” and click Change.
- Toggle the switch from No to Yes, as shown in Figure 16-6.
- Click the Back to LinkedIn.com link that appears in the upper-right corner to return to your profile.
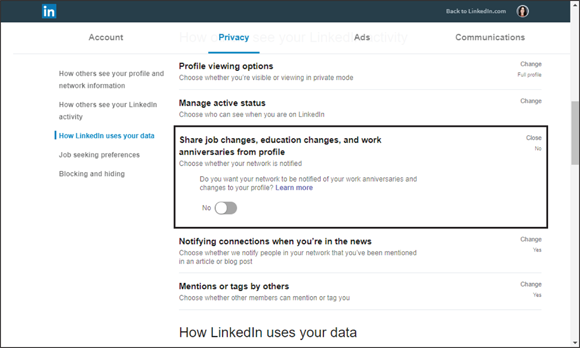
FIGURE 16-6: Toggle to Yes to share profile changes.
What you post depends on what’s happening in your life. You can end your current experience and add a new experience. You can add a graduation date to your education. With “Share job changes, education changes, and work anniversaries from profile” turned on in Settings & Privacy, you can enable the notification for broadcast. When you do so, LinkedIn generates a notification that is shared with your connections.
 It may take up to 48 hours for notifications to process. Be patient! If after 48 hours, it appears as if nothing has happened, contact LinkedIn Tech Support.
By adding a new current job position, for example, an update goes out to your connections announcing the new position and providing a way to “Say Congrats” to you in a LinkedIn message.
You may find yourself swimming in congratulation messages. Be ready to respond to every single one of them! Create a thoughtful message in Notepad or Word or some other word-processing program. Then copy and paste it, over and over again, tweaking it to customize it for each person.
Every September, LinkedIn likes to remind everyone of my birthday. I am inundated with “Happy Birthday” notices. When my connections first started doing this, I didn’t take it very seriously and ignored most of the messages. But one year it hit me that I was missing an important opening for communication and engagement. So, I created a page on my website that contained a bunch of free LinkedIn resources and apps. I then recorded a video message responding to the “Happy Birthday” message: “Thank you so much for wishing me a happy birthday! Because you took time out of your day to be nice and thoughtful, I compiled a bunch of LinkedIn resources to say thank you!” Then I shared the link to the page on my website with all the people who wished me a happy birthday and the response was amazing! People were touched and thankful for the guides and apps. A few converted to customers, others became fans, and some became friends.
Send out a post on the LinkedIn feed
If you don’t have a job or education change to spark a notification from LinkedIn, you can create a post to alert people of the big changes you made to your LinkedIn profile.
Here’s how to send out a post. Lather, rinse, and repeat as often as you like!
- Open your LinkedIn profile.
- Highlight your LinkedIn profile URL that appears in browser address bar and copy it by pressing Ctrl+C (Windows) or Cmd+C (Mac).
- Click Home on LinkedIn’s navigation menu to go to the LinkedIn home page.
- At the top of LinkedIn’s home page, click Start a Post text box.
Type your post in the text field and then paste your LinkedIn profile URL by clicking Ctrl+V (Windows) or Cmd+V (Mac), as shown in Figure 16-7.
You may want to use something like this:
I just updated my LinkedIn profile, check it out:
http://www.LinkedIn.com/in/todonna#LinkedInMakeover #PersonalBranding #ImageMatters
FIGURE 16-7: Creating a status update.
Or
I used LinkedIn Profile Optimization For Dummies by @DonnaSerdula to update my LinkedIn profile, check it out! #ForDummies #ProfessionalBranding #LinkedInTips
Or
The last few years have seen big changes in my career and goals. My LinkedIn profile now reflects these changes. Catch up here: LinkedIn.com/in/todonna #personalbranding #linkedinmakeover #professionaldevelopment
Check out Chapter 15 for a refresher on hashtags and tips for creating posts.
- Click the drop-down list beside you name and profile picture to choose your audience: Anyone, Anyone + Twitter, Connections Only, Group Members, or Advanced Settings where you can turn off comments.
- Click the Post button.
I know you may feel tempted to ask others for their input on your newly optimized LinkedIn profile but I caution you to resist! In the immortal lyrics of Taylor Swift, “People throw rocks at things that shine.” I see it all the time. When you ask people for their feedback, they feel a need to tell you something critical. Don’t open that door. Just let people know that you updated your profile and let them respond with “Congrats!” (Oh, and remember, people who say, “It looks like you are trying too hard!” are the type who don’t try at all.)
Message people individually
Are there people within your network who would love to see your updated profile? Why not reach out to them directly? Messaging people individually takes time, but it’s a great way to reconnect and get a real response.
 Free LinkedIn members can only message people who are direct connections.
Here’s how to message people individually on LinkedIn:
- Go to
LinkedIn.com. In the search bar at the top of the page, type the name of the first-degree connection you want to message.
LinkedIn suggests people.
- Click the person's name to open his or her profile.
Click the Message button at the top of that person's profile.
LinkedIn’s messaging pane opens, as shown in Figure 16-8. You can add additional recipients by typing their names in the top field.
Type your message in the text field.
Some message examples:
Hey Howard! It’s been months since we last chatted, but I wanted to let you know I took your advice and optimized my profile. Check it out when you have a minute.
Or:
Hi Howard! I’ve always loved your LinkedIn profile. I finally got off my duff and optimized my own. I’d love for you to take a look at it. Hope we can grab coffee soon!
- Depending on your messaging settings, you either press Enter/Return on your keyboard, or press the Send button to dispatch your message.

FIGURE 16-8: Messaging connections.
Adding your profile to other social media sites
Most people don’t have a personal website, and so LinkedIn becomes their online outpost. If this is true for you, use the other social media websites you frequent as a way to get the word out on your LinkedIn profile.
Instagram, Pinterest, Facebook, Twitter, and other sites all have a website field within the bio section where you can add your LinkedIn profile URL. Check out Figure 16-9 to see how I have my LinkedIn profile URL listed on my Twitter bio.

FIGURE 16-9: Add your LinkedIn profile URL to other social media channels.
You can also send out a Facebook status update or tweet the link to your LinkedIn profile so followers on other channels are alerted and can check it out.
LinkedIn profile plagiarism
Oh no! You spent time and effort on your LinkedIn profile. You dove deep inside of yourself and crafted something that truly reflects your core operating principles. Your profile is your mission and reflects your passions. It’s your heart and soul. And someone copied it directly from your profile and pasted it into theirs! It happens and it sucks. There’s something about writing found online that makes people think it’s ripe for the picking.
So what do you do if someone plagiarizes your LinkedIn profile? The best course of action is to reach out to the person who did it. I am a proponent of direct confrontation. Pick up the phone and call them. I find that a phone call is the most successful and provides an immediate result. Be calm, be nice, be firm. “Hey, I just checked out your LinkedIn profile, it looked very familiar to me.” Let that person respond. You may find that he or she thought it was the most awesome thing in the world and imitation is the sincerest form of flattery. “Look, I put a lot of time into my profile and I really would appreciate if you don’t copy it, capiche?” I know this is hard for most people, so if a direct conversation is repellant, send an email or LinkedIn message.
Here’s what I write to people I find plagiarizing profiles we write for clients (tweaked so it is coming from you). Feel free to plagiarize it:
- Dear So and So,
- I visited your profile and have some advice for your LinkedIn strategy.
- Your LinkedIn narrative should be a chronicle of YOUR journey and YOUR development. The pieces that you lifted verbatim from my profile are stolen properties that reflect my work.
- If you want to stand apart, you should be real and authentic and put some time and focus into your profile.
- Please remove my summary and replace with your own writing.
- Hugs and Kisses!
Give them a few days to absorb your words. If the person doesn’t comply, then it’s time to sic the LinkedIn police on them. Visit that person’s profile, click More, and choose Report/Block. Hey, you played nice; it’s a shame they weren’t raised better.
Getting views to your LinkedIn profile
LinkedIn is one of the few social networking sites where you can remain quite passive and still experience amazing success. Imagine getting on Facebook or Twitter and doing absolutely nothing — nothing would happen. But on LinkedIn, simply by having an optimized profile infused with your keywords, people find you. Your profile’s content shapes how people perceive you and compels them to reach out. This is one of the great benefits to LinkedIn, but for some people, they want more.
There are over 500 million users on LinkedIn. It’s a veritable ocean of people. In order to drive traffic to your profile, get noticed, and find opportunity, you have to splash around. Your LinkedIn activity is a direct contributor to profile traffic and LinkedIn success. In the following sections, I outline a bunch of LinkedIn activities to perform that will increase traffic to your LinkedIn profile page.
View other profiles
LinkedIn is one of the few networks that enables you to see who has checked out your profile. Most people on LinkedIn love looking at the Who’s Viewed Your Profile page. Not only do they love looking at who checked out their profile, they also want to learn more about the people with such awesome taste who checked them out! And so, in turn, they click to read their visitor’s profile. If you want to drive traffic to your page, view other people’s profiles! After you visit a person’s profile, more often than not, that person will visit your profile to check you out, too.
However, in order for this to work, you must have your profile set to Visible and not to Anonymous.
Here’s how to make sure your profile is visible:
- Go to
LinkedIn.com. - Hover your mouse pointer over your profile picture in the upper-right corner of your screen and Settings & Privacy.
- Click Privacy from the top portion of the screen that appears.
Click Profile Viewing Options.
This is where you choose whether you’re visible to other LinkedIn users or viewing in private mode.
- Click the top option that shows your name and headline (see Figure 16-10).
- Click the Close link in the upper-right corner of the option to save your setting.
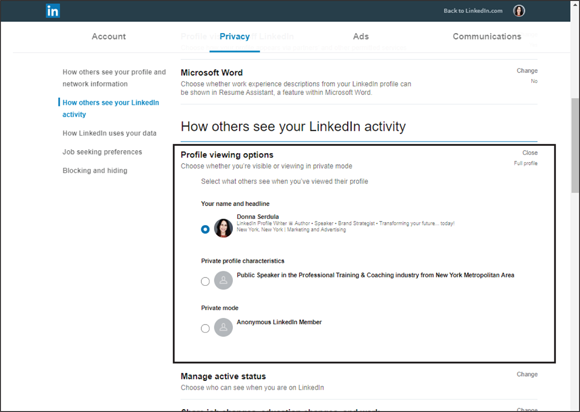
FIGURE 16-10: Choose to be visible on LinkedIn!
By choosing Private mode, not only are you choosing to remain anonymous, but also you are disabling your profile stats so you can’t see who has viewed your profile. And when you switch to Private mode, your viewer history is deleted. Premium members can choose Private mode and still see the list of people who viewed their profiles (with the exception of viewers in Private mode). LinkedIn’s good when you pay!
It feels weird to let people see that you browsed their profile. Believe me, I know! When I first joined LinkedIn, I kept my profile in Private mode. Eventually, the desire to see who was checking out my profile became so great that I begrudgingly turned my profile from anonymous to full visibility. As I watched my visitor list grow and views to my profile increase, I realized there was nothing to feel weird about. Viewing a profile shows that you are interested in the other person; it doesn’t mean you are a stalker. People appreciate that you are doing your due diligence and research to learn more about them.
I always check out people’s profiles prior to calling them. I want them to see my visit on their profile views page and know that I care enough to learn more about them. I want them to know that I dig deep, I do my research, and I am coming into the call prepared.
It also provides the person with a link to learn more about you. Try it out after the initial feeling of discomfort passes; you’ll be glad you did it.
Post status updates
Keep in touch with your network by sharing posts. As these status updates go out, people will click on your profile to check up and see what you are doing.
Here are some ideas of items to share as a status update:
- Did you read an interesting article?
- Did you finish an amazing project?
- Are you attending a unique event?
- Did you hear a great piece of advice?
- Are you reading a life-changing book?
These are all things to share on LinkedIn!
One of my favorite tools is the LinkedIn Bookmarklet icon. The Bookmarklet is a little button you drag onto your browser’s bookmark tool bar. As you surf the web and find an interesting website or article, simply click the Bookmarklet icon to easily share the information on LinkedIn.
Follow these steps to install LinkedIn’s Bookmarklet icon:
- Go to
https://www.linkedin-makeover.com/tools/linkedin-bookmarklet. Drag the Share on LinkedIn button to your browser's bookmark bar.
If your browser doesn’t have a bookmark bar, go to your browser’s settings and turn it on.
While on an interesting website or reading an article that you would like to share on LinkedIn, click the Share on LinkedIn Bookmarklet button on your browser’s bookmark bar.
A LinkedIn window pops up. This window contains the link to the item you want to share along with a brief description and thumbnail image.
Choose to share this as a status update on your LinkedIn newsfeed, post it to specific LinkedIn Groups, or send it via LinkedIn InMail to specific first-degree connections.
- To post the link as an update, click to place a check mark next to Share an Update.
In the text field, type your opinion, input, or reason for sharing.
Although it’s easy not to add your own spin, I highly recommend taking a few moments to share your thoughts.
Click the Share With drop-down menu and select whether you want to share this update with the public or with just your connections.
If you have a Twitter account connected to your LinkedIn profile, click the Twitter icon to also share this update on your Twitter feed.
- Click the Share button.
In addition to using the Bookmarklet icon to share web pages and online articles as posts, you can also share as group discussions or direct messages with connections. Placing the check mark by clicking in the Post to Groups box enables you to then choose which group or groups you want to post to. Conversely, click in the Send to Individuals box to send the link via LinkedIn’s messaging. It’s important when posting to a group or to an individual connection to provide context. If you were posting to a group, you might state, “Do you agree?” “What do you think?” or something that helps the reader respond and create conversation. When sending the link as a message, let the person know why you are sending the link and what result he or she can expect.
In her book, The Perpetual Paycheck: 5 Secrets to Getting a Job, Keeping a Job, and Earning Income for Life in the Loyalty-Free Workplace, author Lori Rassas wrote that she likes to send little gifts she calls TOYs to her connections as a way of strengthening the professional relationship. TOY is short for thinking of you. Sharing an article is totally free, but it’s a great way to show you were thinking of someone.
Posting status updates is a great way to stay in front of your connections. Make it a part of your professional life. Rather than decide to post an update once a month, once a week, or once a day, resolve to stay connected by sharing the items, events, and happenings that move you. When you read a great article, share it. When you sign up for an event, share it. When you have that Aha! moment, share it. Once you decide that you are on LinkedIn to educate, add value, and inspire people, that’s when you start having fun and when opportunities start hurtling toward you.
Blog with the LinkedIn Publishing Platform
Publishing long-form posts gets you in front of large numbers of people quickly as LinkedIn notifies your network of your blog. When you create noteworthy content, it is shared way beyond just your network of connections. As the post catches on, people read it and want to learn more about you, the author. Profile views go up and opportunities appear. Get step-by-step directions on creating a long-form post in Chapter 15 of this book.
Participate in LinkedIn Groups
Believe me, I know it’s not easy to find the time to participate in LinkedIn Groups, but when you consider the results of group participation, you may decide it’s worth the time investment. Not only do you expand your network by joining groups, but also you meet people, engage in healthy discourse, develop professionally, and drive views to your LinkedIn profile.
By commenting on discussions and creating engaging discussions that compel people to comment, you are showcasing yourself as an interesting individual and expert. I am not suggesting that you market yourself low and wide in a slimy manner. Instead, use the discussions to help and inspire people. When you give your time, advice, and expertise, people take notice of you, which then makes them open your profile to learn more about you. Chapter 14 is where I discuss Group participation in detail.
Recommend people
When you recommend people on LinkedIn, those recommendations display on their profiles as a link back to your profile, right next to your profile picture. The more recommendations you give, the more links you have on LinkedIn pointing back to your profile.
Those profiles attract readers, and many times those readers look at the recommendations received. It’s not unusual for people to click the profile link to learn more about the recommender. I cover recommendations in Chapter 3.
Always recommend people out of the goodness of your heart. Recommend people you know and who have impressed you. It’s important to use recommendations and endorsements genuinely and authentically.
Endorse people
Endorsements also provide links back to your profile from other profiles. Go out and endorse people for their real skill sets. Not only will they be touched by your generosity, but also your name is now listed next to their Skills & Endorsements section on their profiles. With each link, there’s a better than good chance other people will see the endorsement and click to read more about you.
Believe it or not, we are almost finished with this book! I have one more thing to share with you and that is the advantages of becoming a premium member.
To Pay or Not Pay for LinkedIn
Whenever I speak to groups about the importance of LinkedIn and having a LinkedIn profile, the number one question I get is, “Should I pay for LinkedIn, or is the free version good enough?”
LinkedIn’s free version works well for most people; however, if you plan to use LinkedIn for more than just casual networking, upgrading makes sense.
LinkedIn has restrictions in place on the free account to limit heavy recruiting and prospecting. The commercial use limit is based upon the number of searches you do during a month’s time. When you exceed what LinkedIn considers typical usage, you are no longer able to search nor will LinkedIn suggest profiles for you to view until the counter resets the next month.
Unfortunately, LinkedIn hasn’t publicly stated the number of searches it considers commercial use versus typical. The number 100 has been bandied around by super users as the maximum search limit for typical use. Here’s the thing: If you are a heavy LinkedIn user, you very well may hit the maximum search limit. When this happens, decide if it makes sense to wait for the month to roll over and the search counter resets, or upgrade.
I remember when I hit the commercial use limit — it was only one week into the month. I realized it would be impossible for me to wait three weeks to search again and so that afternoon, I upgraded to Sales Navigator. Ultimately, if you are using LinkedIn to make money, LinkedIn would like you to pay to use its service; it’s only fair.
Features of paid accounts
LinkedIn has four types of premium accounts:
- Premium Career
- Premium Business
- Sales Navigator
- Recruiter
All four types of premium accounts have features in common. In the following sections, I outline the features that exist within all premium accounts.
Open Profile
Free members can only message people they are directly connected to (a.k.a. first-degree connections). This is a pretty big limitation. Premium members can turn on Open Profile to allow anyone on LinkedIn to contact them directly for free, even if they are not connected.
Premium badge
Premium account holders can add a premium badge to their profiles and search result listings so people can see that they are paying members and take LinkedIn and networking seriously. The premium badge appears in the upper-right corner of the person’s profile, to the right of his or her name. The badge looks like a gold “In” square. The premium badge is shown in Figure 16-11.
Who’s viewed your profile
LinkedIn is one of the few social media sites that enables you to see who has viewed your profile. Free members only see the last five profile visitors, whereas premium members get to see everyone who’s viewed their profiles within the past 90 days. Premium members also see additional insights such as the keywords searched that brought them to their profiles and any patterns that may be evident.

FIGURE 16-11: How the premium badge displays.
If you are a free member and your profile is set to anonymous, you are unable to see who viewed your profile. Basically, LinkedIn goes by the “If you show me yours, I’ll show you mine” rule. When you are a paying member, you can be anonymous and still see who viewed your profile unless the viewer is set to anonymous. Anonymous is always anonymous.
InMail
Free members can only communicate directly with first-degree connections. As a paying member, you can use InMail to send a message to LinkedIn users you are not directly connected to. The number of InMails per month differs based on the premium account you have.
Search alerts
Free members have the opportunity to save three searches. Paying members get more saved searches, each plan providing its own number. Great for prospecting, recruiting, or even job search, LinkedIn automatically performs your saved search weekly or monthly and sends you all new search results.
Unique features of premium accounts
In addition to the features all premium accounts offer, LinkedIn provides even more features unique to each type of premium account. In the following sections, I provide a rundown of the added features per subscription type.
Premium Career
A great selling point for subscribing to the Premium Career account is the Featured Applicant and Applicant Insights functionality. As a Featured Applicant, your search results listing puts you at the top of recruiters’ applicant lists. Applicant Insights shows you how well you measure up to other current applicants on job postings. You get to see how many other people have applied to the job posting; the other applicants’ experience, education levels, and top skills; and how well your profile ranks with other applicants.
Premium Business
The Premium Business account provides unlimited profile search so you never hit the commercial use search limit. You also get company page insights that point to the overall health of the organization you are interested in by showing you employee count, employee distribution by function, new hires, notable alumni, and total job openings.
On the advanced search page, Premium Business account owners see additional filters marked with the gold LinkedIn premium badge that are only available to paying members. These filters enable you to further drill down to your perfect target by searching within group members, years of experience, job functions, seniority levels, company size, and more.
Sales Navigator
When you subscribe to the Sales Navigator premium account you get a totally different LinkedIn interface that is focused entirely on sales, lead generation, prospecting, and account management. You can see how this different interface looks in Figure 16-12.
Sales Navigator allows you to save your leads’ profiles, which LinkedIn uses to extrapolate and recommend other potential leads for you. You can also build lead lists using premium search filters. Sales Navigator also allows you to drill deep into your target accounts via Account Details Pages that keep you updated on the latest news and information LinkedIn has on those accounts. In addition, Sales Navigator enables you to filter through the noise of your network to see just what’s going on with your leads, prospects, and customers via their status updates and news.
This premium account also provides unlimited profile search so you don’t hit the commercial use search limit.
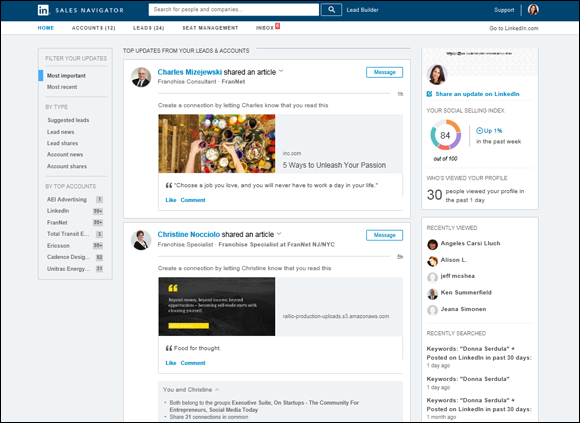
FIGURE 16-12: Sales Navigator has a different look than LinkedIn.com.
If you plan on upgrading to Sales Navigator, check out Sales Navigator For Dummies (Wiley) by Perry Van Beek. I can vouch for this book because I was the Technical Editor!
Recruiter Lite
LinkedIn has a number of recruiter packages available, but the most popular is Recruiter Lite. Just like Sales Navigator, the Recruiter Lite premium account has a different LinkedIn interface. Recruiter Lite offers unique functionality such as the ability to organize candidates in folders with an area on each profile to take notes and set follow-up reminders.
The Recruiter Lite premium account also allows for unlimited profile searches of your extended network. Recruiter Lite also provides smart search capability that provided additional premium filters and search suggestions to help you find the perfect candidates.
Choosing the best plan for you
By segmenting its plans based upon goal, LinkedIn makes it easy to identify the premium account that works best for you. My recommendation is to use the free version of LinkedIn until you begin to feel constrained. You will know that it’s time to upgrade when you start hitting the commercial search limit, or you long to view more than just five of your last profile visitors. Once you realize it’s time to pay for LinkedIn, all you need to do is click the Try Premium Free for 1 Month button in the upper-right corner of any LinkedIn page. I often hear from clients who tell me that once they started paying for LinkedIn, they began to take it more seriously. Sometimes you need to get some skin in the game to truly commit.
Ultimately, you may find that it feels good to support a company that lets you network in your pajamas!
And that concludes this guide for LinkedIn profile optimization! It’s been a fun ride, and although it’s the end of the guide, you still have the Part of Tens where I give you even more tips and tricks for better leveraging LinkedIn. Also, be sure to reach out to me with a link to your newly optimized LinkedIn profile. I love when For Dummies readers reach out with success stories. Also, check out my website’s Free Resources section. I have several tools and guides I developed that I provide totally free. Just click Free Resources on www.linkedin-makeover.com.