Chapter 12 Managing Mobile Devices
This chapter covers the following subjects:
![]() Mobile Device Policies: Local Security Policy presents a subset of Group Policy with settings designed to enhance the security of a local Windows 10 computer. This section shows you how to configure policies affecting users logging on to the computer, as well as auditing of actions that users might perform on the computer and several other security-related settings. Remote Wipe is an important security tool for ensuring that when mobile devices are lost or stolen, the device can be reset and personal information cleared. In this section you learn about the state of Remote Wipe for Windows devices.
Mobile Device Policies: Local Security Policy presents a subset of Group Policy with settings designed to enhance the security of a local Windows 10 computer. This section shows you how to configure policies affecting users logging on to the computer, as well as auditing of actions that users might perform on the computer and several other security-related settings. Remote Wipe is an important security tool for ensuring that when mobile devices are lost or stolen, the device can be reset and personal information cleared. In this section you learn about the state of Remote Wipe for Windows devices.
![]() Managing Data Synchronization: When your users need to work from anywhere, it can present challenges, especially in organizations where work product is typically managed on server file shares for sharing, security, and backup. Working with these documents offline and on the road is easier with Work Folders, which allows users to keep a local copy of shared folders on their laptop or mobile device and sync them back to the share when they reconnect. In this section you learn about Work Folders and how to manage synchronization across occasionally connected devices.
Managing Data Synchronization: When your users need to work from anywhere, it can present challenges, especially in organizations where work product is typically managed on server file shares for sharing, security, and backup. Working with these documents offline and on the road is easier with Work Folders, which allows users to keep a local copy of shared folders on their laptop or mobile device and sync them back to the share when they reconnect. In this section you learn about Work Folders and how to manage synchronization across occasionally connected devices.
![]() Managing Broadband Connectivity: Road warriors need connectivity wherever they go, without relying on insecure coffee shop Wi-Fi or unreliable hotel connections, so they often rely on broadband devices for their mobile device network. In this section you learn about how to maximize your investment in metered broadband connections and the Windows features that can help you manage broadband connectivity.
Managing Broadband Connectivity: Road warriors need connectivity wherever they go, without relying on insecure coffee shop Wi-Fi or unreliable hotel connections, so they often rely on broadband devices for their mobile device network. In this section you learn about how to maximize your investment in metered broadband connections and the Windows features that can help you manage broadband connectivity.
This chapter covers the following objectives for the 70-697 exam:

Support mobile devices: Support mobile device policies including security policies, remote access, and remote wipe; support mobile access and data synchronization including Work Folders and Sync Center; support broadband connectivity including broadband tethering and metered networks; support Mobile Device Management by using Microsoft Intune, including Windows Phone, iOS, and Android.
New to Windows 10 are several useful mobile computing features, such as the capability to obtain a geographic location based on data collected by a GPS sensor and the capability to remotely wipe information stored on a lost or stolen computer. Microsoft has continued and enhanced features introduced with older Windows versions, such as offline file access, improved power management, and presentation settings. This chapter introduces you to these portable computer features.
“Do I Know This Already?” Quiz
The “Do I Know This Already?” quiz allows you to assess whether you should read this entire chapter or simply jump to the “Exam Preparation Tasks” section for review. If you are in doubt, read the entire chapter. Table 12-1 outlines the major headings in this chapter and the corresponding “Do I Know This Already?” quiz questions. You can find the answers in Appendix A, “Answers to the ‘Do I Know This Already?’ Quizzes.”
Table 12-1 “Do I Know This Already?” Foundation Topics Section-to-Question Mapping
Foundation Topics Section |
Questions Covered in This Section |
Mobile Device Policies |
1–5 |
Managing Data Synchronization |
6–7 |
Managing Broadband Connectivity |
8–9 |
Caution
The goal of self-assessment is to gauge your mastery of the topics in this chapter. If you do not know the answer to a question or are only partially sure of the answer, you should mark that question as wrong for purposes of the self-assessment. Giving yourself credit for an answer you correctly guess skews your self-assessment results and might provide you with a false sense of security.
1. What password policy actually weakens password security and is therefore not recommended for use by Microsoft?
a. Enforce Password History
b. Minimum Password Age
c. Maximum Password Age
d. Complexity Requirements
e. Store Passwords Using Reversible Encryption
2. You want to ensure that users cannot cycle rapidly through a series of passwords and then reuse their old password immediately. Which password policy should you enable to prevent this action from occurring?
a. Enforce Password History
b. Minimum Password Age
c. Maximum Password Age
d. Password Must Meet Complexity Requirements
e. Store Passwords Using Reversible Encryption
3. You want to ensure that if someone tries to guess a password on a Windows device that the account will be locked out. Which security policy would you use? (Each correct answer presents part of the solution. Choose two.)
a. Enforce Password History
b. Minimum Password Age
c. Account Lockout Duration
d. Complexity Requirements
e. Account Lockout Threshold
4. One day after logging on to your Windows 10 computer, which you have shared with several others in your department, you notice that the time zone has been changed to an improper setting. You would like to discover who is making improper modifications to your computer’s settings. Which of the following audit policies should you enable?
a. Account Management
b. Policy Change
c. Privilege Use
d. System Events
5. A user has returned from a trip and has let you know that his Windows mobile device was lost during the trip, and he is now convinced he won’t find it. You need to disable the device and assign a new one to the user. Your organization has a comprehensive set of management tools for mobile devices. What can you use to wipe corporate data from the device? (Each correct answer presents an entire solution. Choose two.)
a. Offline File Sync
b. Broadband Tethering Remote Wipe
c. Microsoft Intune Remote Wipe
d. Exchange ActiveSync
e. A clean cloth
6. You have decided to implement Work Folders to allow your company’s road warriors to work offline and on the road. They will need devices that can sync with the server, which you will be making accessible from the Internet. What kind of device will the users need?
a. Windows 10 laptops
b. Windows 10 Mobile phones
c. iOS tablets
d. Android devices
e. Any of these
7. Which of the following is true of Work Folders? (Select all that apply.)
a. Users can sync files using Window, iOS, or Android devices.
b. Users can share files with other members of their workgroup.
c. It is supported using any Windows Server 2008 or later.
d. It keeps Work Folders in sync over the Internet or local network whenever the device is connected.
e. It requires IIS, File and Storage Services, a valid CA certificate, and a DNS entry on the server side.
8. How is a broadband connection defined when discussing Windows network connections?
a. Any high-speed Internet connection
b. Any wired connection
c. Any wireless connection
d. Any metered connection
e. LTE networks
9. You will be tethering your Windows 10 laptop to your mobile phone while you are on a trip to a remote Alabama location where Wi-Fi is not available. You are nearing your monthly limit of data on your phone, however, and would like to ensure that Windows does not use too much bandwidth while you are connecting. What can you do to limit Windows use of your data plan?
a. Disable your device’s security policies.
b. Set your connection as a metered connection.
c. Turn off File Synchronization.
d. Turn off your email.
Foundation Topics
Mobile Device Policies
The proliferation of mobile devices and their use in an enterprise requires careful planning and consideration. Proprietary and sensitive data must be kept secure even as employees travel with their devices, accessing and modifying data from diverse locations and frequent public spaces where devices can be lost or stolen.
In previous chapters, you learned about some technologies available for protecting data on workstations and mobile devices, such as encryption and techniques for securing the network. In this section you learn about policies you can apply to your organization’s mobile devices to help keep data secure and to enforce organizational requirements. Group policies can help secure domain-joined devices, and many of these policies can be set locally on Windows 10 devices.
Security Policies
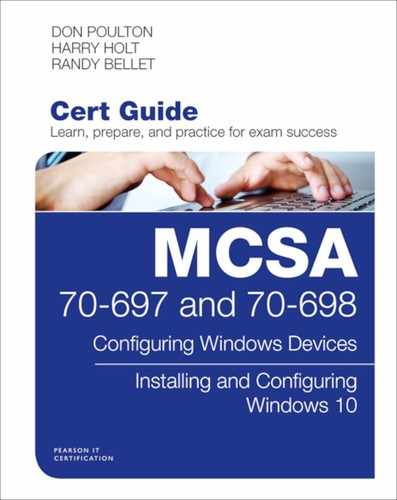
You can access the Local Security Policy snap-in through Administrative Tools under Control Panel’s System and Security category or by typing local security into the Search bar or Cortana and then clicking Local Security Policy. The policies defined in this utility affect all users on the computer, unless the policies allow you to configure them on a per-user or per-group basis. Figure 12-1 shows this snap-in.
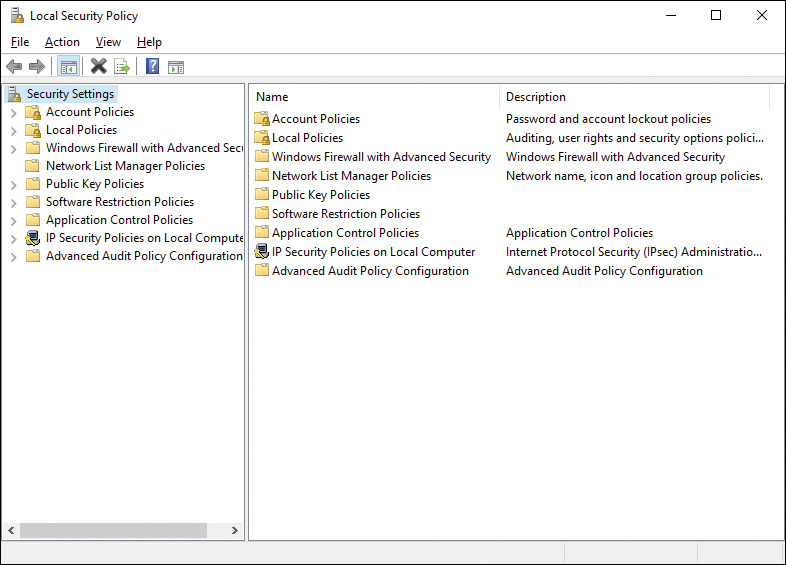
Figure 12-1 Configuring Numerous Local Security Policy Settings with the Local Security Policy Snap-in in Windows 10
The Local Security Policy snap-in enables you to configure a large range of security-related policy settings, as summarized in the following list:

![]() Account Policies: Includes password policies and account lockout policies. We discuss account policies later in this section.
Account Policies: Includes password policies and account lockout policies. We discuss account policies later in this section.
![]() Local Policies: Includes audit policies, user rights assignment, and security options. We discuss these policies later in this chapter.
Local Policies: Includes audit policies, user rights assignment, and security options. We discuss these policies later in this chapter.
![]() Windows Firewall with Advanced Security: Enables you to configure properties of Windows Firewall for domain, private, and public profiles. You can specify inbound and outbound connection rules as well as monitoring settings.
Windows Firewall with Advanced Security: Enables you to configure properties of Windows Firewall for domain, private, and public profiles. You can specify inbound and outbound connection rules as well as monitoring settings.
![]() Network List Manager Policies: Enables you to control the networks that computers can access and their location types, such as public and private (which automatically specifies the appropriate firewall settings according to location type). You can also specify which networks a user is allowed to connect to.
Network List Manager Policies: Enables you to control the networks that computers can access and their location types, such as public and private (which automatically specifies the appropriate firewall settings according to location type). You can also specify which networks a user is allowed to connect to.
![]() Public Key Policies: Enables you to configure public key infrastructure (PKI) settings. Included are policies governing the use of Encrypting File System (EFS), Data Protection, and BitLocker Drive Encryption.
Public Key Policies: Enables you to configure public key infrastructure (PKI) settings. Included are policies governing the use of Encrypting File System (EFS), Data Protection, and BitLocker Drive Encryption.
![]() Software Restriction Policies: Enables you to specify which software programs users can run on network computers, which programs users on multiuser computers can run, and the execution of email attachments. You can also specify whether software restriction policies apply to certain groups such as administrators.
Software Restriction Policies: Enables you to specify which software programs users can run on network computers, which programs users on multiuser computers can run, and the execution of email attachments. You can also specify whether software restriction policies apply to certain groups such as administrators.
![]() Application Control Policies: These are a set of software control policies first introduced with Windows 7 that include the AppLocker feature. AppLocker provides new enhancements that enable you to specify exactly what users are permitted to run on their desktops according to unique file identities.
Application Control Policies: These are a set of software control policies first introduced with Windows 7 that include the AppLocker feature. AppLocker provides new enhancements that enable you to specify exactly what users are permitted to run on their desktops according to unique file identities.
![]() IP Security Policies on Local Computer: Controls the implementation of IP Security (IPsec) as used by the computer for encrypting communications over the network.
IP Security Policies on Local Computer: Controls the implementation of IP Security (IPsec) as used by the computer for encrypting communications over the network.
![]() Advanced Audit Policy Configuration: First introduced in Windows 7, this node contains 62 new policy settings that enable you to select explicitly the actions that you want to monitor and exclude actions that are of less concern.
Advanced Audit Policy Configuration: First introduced in Windows 7, this node contains 62 new policy settings that enable you to select explicitly the actions that you want to monitor and exclude actions that are of less concern.
Note
Be aware that in an Active Directory Domain Services (AD DS) domain environment, all these policies can be configured at the site, domain, or organizational unit (OU) level, and that any policies configured at these levels override conflicting local policies. If a local policy does not apply as configured, consult your domain administrator for assistance.
Configuring Account Policies
The Windows 10 Local Security Policy tool includes the Account Policies node, which contains settings related to user accounts, including the password policy and account lockout policy.
Password Policies
You can configure password policy settings that help to protect users of Windows 10 client computers. The options available in Windows 10 are similar to those found in previous Windows versions. Password policies are generally intended to make passwords more difficult for intruders to discover. Figure 12-2 shows the available password policies and their default settings.
Figure 12-2 Windows 10 Providing Default Values for the Available Password Policies
The following password policy settings are available:
![]() Enforce Password History: Determines the number of passwords remembered by Windows for each user. Values range from 0 to 24. A user cannot reuse a password retained in the history list. A value of 0 means that no password history is retained, and a user can reuse passwords at will.
Enforce Password History: Determines the number of passwords remembered by Windows for each user. Values range from 0 to 24. A user cannot reuse a password retained in the history list. A value of 0 means that no password history is retained, and a user can reuse passwords at will.
![]() Maximum Password Age: Determines the number of days that a user can use a password before being required to specify a new one. Values range from 0 to 999. A value of 0 means that a user is never required to change his password. The default is 42 days.
Maximum Password Age: Determines the number of days that a user can use a password before being required to specify a new one. Values range from 0 to 999. A value of 0 means that a user is never required to change his password. The default is 42 days.
![]() Minimum Password Age: Determines the minimum number of days a password must be used before it can be changed. Values range from 0 to 998 days and must be less than the maximum password age. The default value of 0 allows the user to immediately change a new password. This value allows a user to cycle through an entire history list of passwords in a short time; in other words, a user can repeatedly change a password in order to reuse his old password. This obviously defeats the purpose of enforcing password history, so you should configure this value to be at least one day.
Minimum Password Age: Determines the minimum number of days a password must be used before it can be changed. Values range from 0 to 998 days and must be less than the maximum password age. The default value of 0 allows the user to immediately change a new password. This value allows a user to cycle through an entire history list of passwords in a short time; in other words, a user can repeatedly change a password in order to reuse his old password. This obviously defeats the purpose of enforcing password history, so you should configure this value to be at least one day.
![]() Minimum Password Length: Determines the minimum number of characters that can make up a password. Values range from 0 to 14. A value of 0 permits a blank password. Use a setting of 10 or higher for increased security.
Minimum Password Length: Determines the minimum number of characters that can make up a password. Values range from 0 to 14. A value of 0 permits a blank password. Use a setting of 10 or higher for increased security.
![]() Password Must Meet Complexity Requirements: Stipulates that a password must meet complexity criteria, as follows: The password cannot contain the user account name or full name or parts of the name that exceed two consecutive characters. It must contain at least three of the following four items:
Password Must Meet Complexity Requirements: Stipulates that a password must meet complexity criteria, as follows: The password cannot contain the user account name or full name or parts of the name that exceed two consecutive characters. It must contain at least three of the following four items:
![]() English lowercase letters
English lowercase letters
![]() English uppercase letters
English uppercase letters
![]() Numerals
Numerals
![]() Nonalphanumeric characters such as $ ; [ ] { } ! .
Nonalphanumeric characters such as $ ; [ ] { } ! .
![]() Store Passwords Using Reversible Encryption: Determines the level of encryption used by Windows 10 for storing passwords. Enabling this option reduces security because it stores passwords in a format that is essentially the same as plain text. This option is disabled by default. You should enable this policy only if needed for clients who cannot use normal encryption, such as those using Challenge Handshake Authentication Protocol (CHAP) authentication or Internet Information Services (IIS) Digest Authentication.
Store Passwords Using Reversible Encryption: Determines the level of encryption used by Windows 10 for storing passwords. Enabling this option reduces security because it stores passwords in a format that is essentially the same as plain text. This option is disabled by default. You should enable this policy only if needed for clients who cannot use normal encryption, such as those using Challenge Handshake Authentication Protocol (CHAP) authentication or Internet Information Services (IIS) Digest Authentication.
To configure these policies, expand the Account PoliciesPassword Policy node of the Security Settings tool as shown in Figure 12-2. Right-click the desired policy and choose Properties. Then configure the appropriate value and click OK. Each policy setting also has an Explain tab that provides additional information on the policy setting and its purpose.
Account Lockout
A cracked user account password jeopardizes the security of the entire network. The account lockout policy is designed to lock an account out of the computer if a user (or intruder attempting to crack the network) enters an incorrect password a specified number of times, thereby limiting the effectiveness of dictionary-based password crackers. The account lockout policy contains the following settings:
![]() Account Lockout Duration: Specifies the number of minutes that an account remains locked out. Every account except for the default Administrator account can be locked out in this manner. You can set this value from 0 to 99999 minutes (or about 69.4 days). A value of 0 means that accounts that have exceeded the specified number of failed logon attempts are locked out indefinitely until an administrator unlocks the account.
Account Lockout Duration: Specifies the number of minutes that an account remains locked out. Every account except for the default Administrator account can be locked out in this manner. You can set this value from 0 to 99999 minutes (or about 69.4 days). A value of 0 means that accounts that have exceeded the specified number of failed logon attempts are locked out indefinitely until an administrator unlocks the account.
![]() Account Lockout Threshold: Specifies the number of failed logon attempts that can occur before the account is locked out. You can set this value from 0 to 999 failed attempts. A value of 0 means that the account will never be locked out. Best practices recommend that you should never configure a setting of 0 here.
Account Lockout Threshold: Specifies the number of failed logon attempts that can occur before the account is locked out. You can set this value from 0 to 999 failed attempts. A value of 0 means that the account will never be locked out. Best practices recommend that you should never configure a setting of 0 here.
![]() Reset Account Lockout Counter After: Specifies the number of minutes to wait after which the account lockout counter is reset to 0. You can set this value from 1 to 99999.
Reset Account Lockout Counter After: Specifies the number of minutes to wait after which the account lockout counter is reset to 0. You can set this value from 1 to 99999.
When you configure this policy, Windows sets default values for the account lockout settings. To configure an account lockout policy, right-click Account Lockout Threshold, choose Properties, and then specify a value of your choice. As shown in Figure 12-3, Windows suggests default values for the other two policy settings. Click OK to define the policy settings and set these defaults. If you want to change the other settings, right-click the appropriate settings, choose Properties, and then enter the desired value.
Figure 12-3 Windows Suggests Defaults for the Other Two Lockout Policy Settings
Unlocking an Account
When a user account is locked out because of too many incorrect attempts at entering a password, it is simple for an administrator or a user who is delegated the task to unlock it. Right-click the user account in the Local Users and Groups node of the Computer Management snap-in and choose Properties. On the General tab of the user’s Properties dialog box, clear the Account Is Locked Out check box and then click OK or Apply.
Note
You cannot lock a user account out by selecting this check box; it is provided for unlocking the account only. An account is locked out only by the user entering an incorrect password the specified number of times.
Configuring Local Policies
The Local Policies subnode of Security Settings enables you to configure audit policies, user rights assignment, and security options.
Audit Policies
You have the capability to audit user access to files, folders, and printers by configuring the Audit policy for the local computer. If you need to audit computers that are members of a domain, you can configure the Group Policy in the OU that contains these computers. Otherwise, you can configure the Audit Policy node, which is under Local Policies, as shown in Figure 12-4.

Figure 12-4 Enabling Auditing in the Local Policies Section of the Local Security Policy Console
Using the audit policy settings, you can identify undesirable activities on the computer. For example, if you had a computer whose local user and group configuration was inexplicably changed, you can enable the Audit Account Management policy and select Success to determine who made these changes. Figure 12-5 depicts this policy configuration.
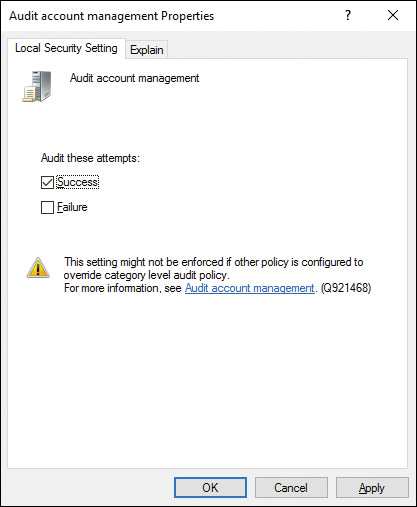
Figure 12-5 Enabling Auditing to Trigger an Event Log Entry When an Action Has Completed Successfully, or Has Failed, or Both
Windows 10 enables you to audit the following types of events:
![]() Account logon: Logon by a domain user account at a domain controller. You should track both success and failure.
Account logon: Logon by a domain user account at a domain controller. You should track both success and failure.
![]() Account management: Creation, modification, or deletion of computer, user, or group accounts. Also included are enabling and disabling of accounts and changing or resetting passwords. You should track both success and failure.
Account management: Creation, modification, or deletion of computer, user, or group accounts. Also included are enabling and disabling of accounts and changing or resetting passwords. You should track both success and failure.
![]() Directory service access: Access to an AD DS object as specified by the object’s SACL. This category includes the four subcategories mentioned earlier in this section; enabling directory service access from the Group Policy Management Editor enables all four subcategories. Enable this category for failures (if you record success, a large number of events will be logged).
Directory service access: Access to an AD DS object as specified by the object’s SACL. This category includes the four subcategories mentioned earlier in this section; enabling directory service access from the Group Policy Management Editor enables all four subcategories. Enable this category for failures (if you record success, a large number of events will be logged).
![]() Logon events: Logon or logoff by a user at a member server or client computer. You should track both success and failure (success logging can record an unauthorized access that succeeded).
Logon events: Logon or logoff by a user at a member server or client computer. You should track both success and failure (success logging can record an unauthorized access that succeeded).
![]() Object access: Access by a user to an object such as a file, folder, or printer. You need to configure auditing in each object’s SACL to track access to that object. Track success and failure to access important resources on your network.
Object access: Access by a user to an object such as a file, folder, or printer. You need to configure auditing in each object’s SACL to track access to that object. Track success and failure to access important resources on your network.
![]() Policy change: Modification of policies including user rights assignment, trust, and audit policies. This category is not normally needed unless unusual events are occurring.
Policy change: Modification of policies including user rights assignment, trust, and audit policies. This category is not normally needed unless unusual events are occurring.
![]() Privilege use: Use of a user right, such as changing the system time. Track failure events for this category.
Privilege use: Use of a user right, such as changing the system time. Track failure events for this category.
![]() Process tracking: Actions performed by an application. This category is primarily for application developers and does not need to be enabled in most cases.
Process tracking: Actions performed by an application. This category is primarily for application developers and does not need to be enabled in most cases.
![]() System events: Events taking place on a computer, such as an improper shutdown or a disk with very little free space remaining. Track success and failure events.
System events: Events taking place on a computer, such as an improper shutdown or a disk with very little free space remaining. Track success and failure events.
Group Policy or Local Security Policy enables you to configure success or failure for these types of actions. In other words, you can choose to record successful actions, failed attempts at performing these actions, or both. For example, if you are concerned about intruders that might be attempting to access your network, you can log failed logon events. You can also track successful logon events, which is useful in case the intruders succeed in accessing your network. For purposes of auditing files, folders, or printers, you need to enable object access auditing.
There is an additional policy that is more applicable to domain controllers than it is for Windows 10 client computers—that is, the Audit Account Logon Events. This, although similar to Audit Logon Events, will trigger an event log entry only when a user logs on to a computer but has been authenticated by another computer. You might want to use this and the Audit Logon Event policies together on your domain controllers to get an idea of how your AD DS site configuration is affecting your logon traffic, but it will not give you much to go on for a Windows 10 computer that is not part of a domain.
Note
For more information on auditing and new features in Windows 10 and Windows Server 2016, refer to “Security Auditing” at https://technet.microsoft.com/itpro/windows/whats-new/whats-new-windows-10-version-1507-and-1511#security-auditing.
Security Options
The Security Options subnode within the Local Policies node includes a large set of policy options, as shown in Figure 12-6, that are important in controlling security aspects of the local computer. The list that follows describes several of the more important options that you should be familiar with.
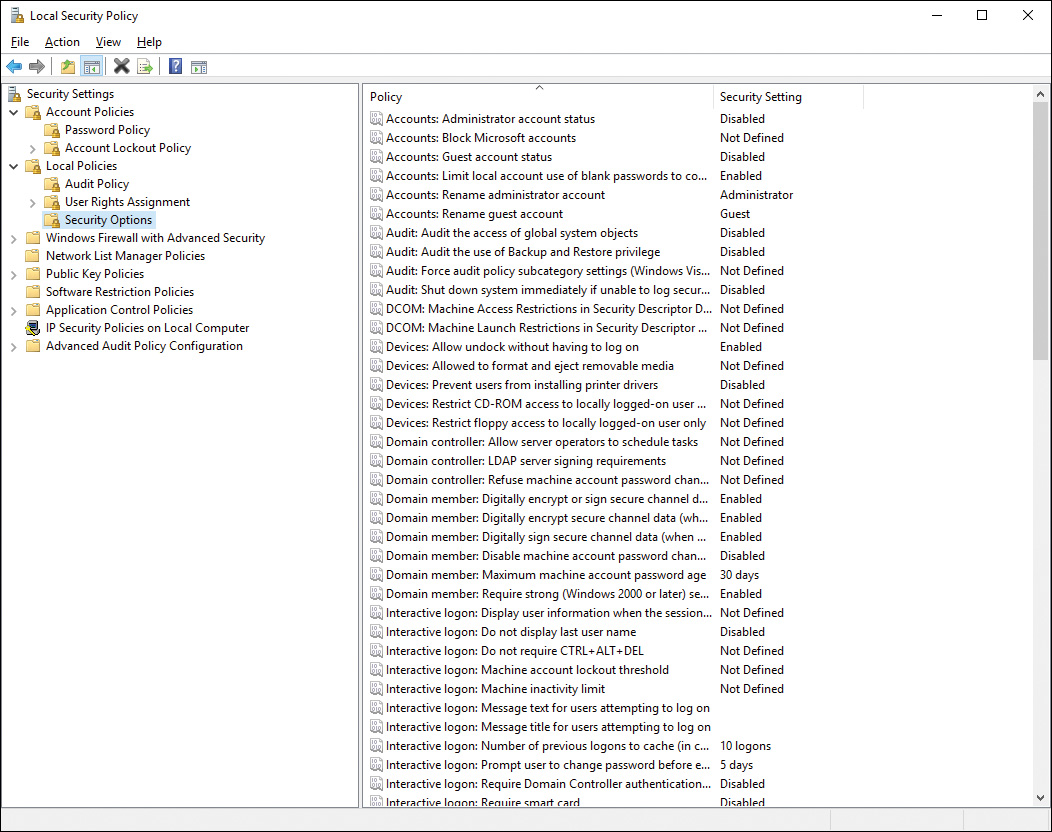
Figure 12-6 Security Options Subnode Containing a Comprehensive Set of Policy Settings That Help Enhance the Security of a Windows 10 Computer
![]() Accounts: Block Microsoft Accounts: Introduced in Windows 8, you can prevent users from adding Microsoft accounts. By selecting Users Can’t Add Microsoft Accounts, you can prevent users from adding Microsoft accounts, switching local accounts to a Microsoft account, or connect a domain account to a Microsoft account. By selecting Users Can’t Add or Log On with Microsoft Accounts, you can prevent existing Microsoft account users from logging on. Be aware that this option might make it impossible for an existing administrator to log on if the administrator is using a Microsoft account. Microsoft recommends that you keep this policy disabled or not configured.
Accounts: Block Microsoft Accounts: Introduced in Windows 8, you can prevent users from adding Microsoft accounts. By selecting Users Can’t Add Microsoft Accounts, you can prevent users from adding Microsoft accounts, switching local accounts to a Microsoft account, or connect a domain account to a Microsoft account. By selecting Users Can’t Add or Log On with Microsoft Accounts, you can prevent existing Microsoft account users from logging on. Be aware that this option might make it impossible for an existing administrator to log on if the administrator is using a Microsoft account. Microsoft recommends that you keep this policy disabled or not configured.
![]() Accounts: Rename Administrator Account: This option renames the default administrator account to a value you specify. Intruders cannot simply look for “Administrator” when attempting to crack your network.
Accounts: Rename Administrator Account: This option renames the default administrator account to a value you specify. Intruders cannot simply look for “Administrator” when attempting to crack your network.
![]() Interactive Logon: Do Not Display Last User Name: Enable this option to prevent the username of the last logged-on user from appearing in the logon dialog box, thus preventing another individual from seeing a username. This can also help to reduce lockouts.
Interactive Logon: Do Not Display Last User Name: Enable this option to prevent the username of the last logged-on user from appearing in the logon dialog box, thus preventing another individual from seeing a username. This can also help to reduce lockouts.
![]() Interactive Logon: Do Not Require CTRL+ALT+DEL: When enabled, a user is not required to press Ctrl+Alt+Delete to obtain the logon dialog box. Disable this policy in a secure environment to require the use of this key combination. Its use prevents rogue programs such as Trojan horses from capturing usernames and passwords.
Interactive Logon: Do Not Require CTRL+ALT+DEL: When enabled, a user is not required to press Ctrl+Alt+Delete to obtain the logon dialog box. Disable this policy in a secure environment to require the use of this key combination. Its use prevents rogue programs such as Trojan horses from capturing usernames and passwords.
![]() Interactive Logon: Require Windows Hello for Business or Smart Card: When enabled, users must employ a smart card to log on to the computer.
Interactive Logon: Require Windows Hello for Business or Smart Card: When enabled, users must employ a smart card to log on to the computer.
![]() User Account Control: Several policy settings determine the behavior of the UAC prompt for administrative and nonadministrative users, including behavior by applications that are located in secure locations on the computer, such as %ProgramFiles% or %Windir%. We discuss UAC in the next section.
User Account Control: Several policy settings determine the behavior of the UAC prompt for administrative and nonadministrative users, including behavior by applications that are located in secure locations on the computer, such as %ProgramFiles% or %Windir%. We discuss UAC in the next section.
Note
For more information on the policy settings in the Security Options subnode, refer to “Security Options” at https://technet.microsoft.com/en-us/itpro/windows/keep-secure/security-options.
Configuring Remote Wipe
An issue with mobile devices is that their portability and convenience also make them easily lost or stolen. A lost computer in the wrong hands means not just the loss of the device, but possibly the loss of much more valuable information that the device contains. Not only could the computer contain sensitive and confidential information, it will typically also contain credentials, cached network information, and login accounts to a variety of cloud-based and business resources.
Remote Business Data Removal can remove or make corporate data inaccessible on the remote computer. It wipes only data that came from company resources, while leaving the user’s personal content alone. This capability makes it easier for enterprises to allow knowledgeable workers to use their own devices for business tasks and still maintain control over company resources.
When it becomes clear that a mobile device is lost and will not be recovered in a timely manner, the safest course of action would be to ensure that the entire device is reset to factory settings and wiped clean of any personal or business information it may contain.
Microsoft’s Exchange ActiveSync system, used for mobile phones and now available for Windows 10 and Windows 10 Mobile, has had support for remote wiping a device since its release. When used on mobile phones, including Windows 10 Mobile phones, it clears all data on the device. Administrators can perform a remote wipe on a managed device from the Exchange Administration Center (EAC), and users can even issue wipe commands themselves from the Outlook Web App user interface.
When used on Windows 10 Mobile and Windows 10, however, ActiveSync’s remote wipe features does not delete all the data on the computer—only email, contacts, and calendar information stored in the Mail application.
A more comprehensive remote wipe capability is available using Microsoft Intune. You learn about Microsoft Intune, including configuration options for remote wipe, in Chapter 13, “Microsoft Intune.”
Managing Data Synchronization
In today’s modern workforce, employees often need to work from anywhere on any device. At the same time, it is becoming increasingly important that organizational data is strictly managed, both to protect secure assets and to comply with complex regulatory requirements and business policies. These competing trends are difficult to reconcile without complexity and pain for users.
Assume that an organization requires all documents that are considered records or work products to be managed exclusively on domain-managed file shares. Servers are kept in a secure data center; file shares are encrypted and backed up on a regular basis. User access is carefully managed through provisioning of users and ACLs, all access is monitored through security logs, and audit reports are carefully checked for compliance with HIPAA, Sarbanes-Oxley, and other regulations by auditing firms.
But now Fred in the Marketing department is headed out to a conference on the other side of the country. His presentation is not finished, and he needs some accounting documents and reference material from the server, as well as the presentation he has been working on, all maintained on the file share server. He has several hours of travel through airports and on shuttles to work on his files, but that means making a copy of the files on his laptop. If he finishes the work and emails the documents to himself, there are now at least three versions: the originals from the file share, the versions he emailed to himself, and the versions that he updated at the last minute before his meeting. In addition, he just ran afoul of company policy by sending internal accounting information through insecure email.
Plenty of other scenarios are possible, typically involving the need to centrally manage data and to allow users to work offline or on the road. Recall from Chapter 11, “Configuring and Securing Mobile Devices,” that Windows 10 now has the capability to synchronize offline folders with file shares. Starting with Windows Server 2012 R2, you can also now support Work Folders, another technique to allow users to access company data offline in a secure manner, while automatically supporting synchronization and centralized management. Work Folders is supported in Windows 10, but also using mobile devices, including Android and iOS.
Work Folders
When you use Work Folders to store files, you’re able to access the files from all your devices, even when offline. Work Folders is supported in Windows 7 and later, and you can use the Work Folders app to access files on an iOS or Android device.
Work Folders is supported as a role on Windows Server, version 2012 R2 and later. The role requires the IIS Hostable Core feature as well as File and Storage Services. Typically you use file shares with Work Folders, but it is not required; you can use any available storage area as a Work Folder. After the role is installed on Windows Server, you set up a sync share using the New Sync Share Wizard, as shown in Figure 12-7. When you create the sync share, you can configure access permissions and even set device security, such as encryption or requiring Lock screen passwords for devices.
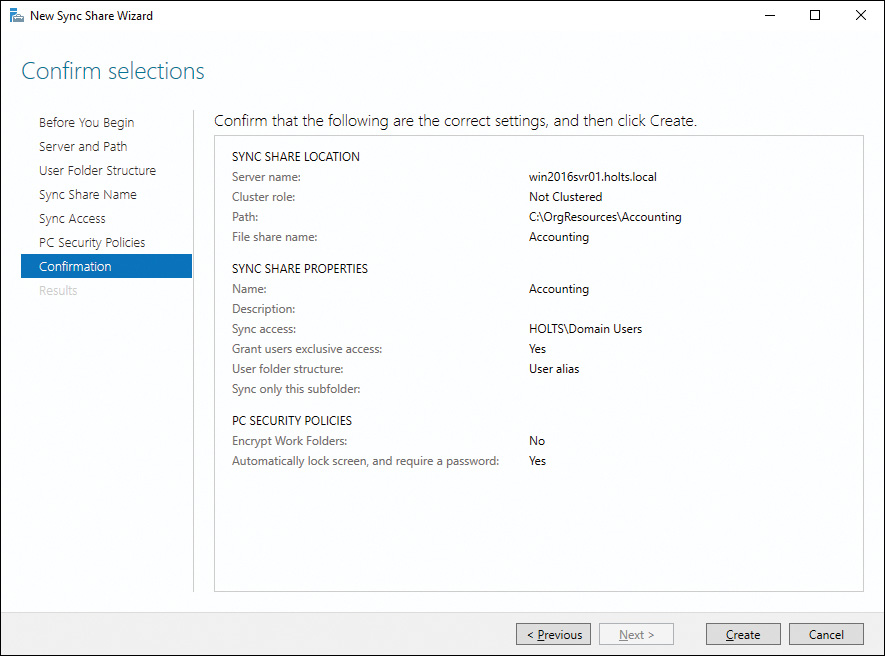
Figure 12-7 Setting Up Work Folders on Windows Server
You should be aware of the following software and infrastructure requirements for using Work Folders:
![]() A server running Windows Server 2012 R2 or later.
A server running Windows Server 2012 R2 or later.
![]() A volume with an NTFS formatted file system for file storage.
A volume with an NTFS formatted file system for file storage.
![]() An SSL certificate for the server. It must include as Alternative Subject Names the URLs for the server or servers where Work Folders are hosted, and it must have the common name workfolders.domainname (where domainname is the name of your private or public domain). The SSL certificate must be applied to the IIS hosted core instance running on the Work Folders server.
An SSL certificate for the server. It must include as Alternative Subject Names the URLs for the server or servers where Work Folders are hosted, and it must have the common name workfolders.domainname (where domainname is the name of your private or public domain). The SSL certificate must be applied to the IIS hosted core instance running on the Work Folders server.
![]() A DNS name configured for workfolders.domainname, pointing to all servers where Work Folders are hosted.
A DNS name configured for workfolders.domainname, pointing to all servers where Work Folders are hosted.
![]() Providing Internet access to Work Folders requires infrastructure supporting Internet hosting, including a certificate from a public CA, a server accessible from the Internet, and a public domain name and DNS.
Providing Internet access to Work Folders requires infrastructure supporting Internet hosting, including a certificate from a public CA, a server accessible from the Internet, and a public domain name and DNS.
![]() Clients must be running Windows 7 or later, Android version 4.4 or later, or iOS version 8 or later. Windows 7 must be the Professional, Enterprise, or Ultimate edition, and must be joined to the domain.
Clients must be running Windows 7 or later, Android version 4.4 or later, or iOS version 8 or later. Windows 7 must be the Professional, Enterprise, or Ultimate edition, and must be joined to the domain.
Use the following procedure to set up Work Folders on a Windows 10 computer:
Step 1. From the Search bar or Cortana, type Work Folders and then click Work Folders. You can also find it from Control Panel under System and Security.
Step 2. Click the Set Up Work Folders link.
Step 3. Enter your organizational email address. You can also enter the URL for the Work Folders by clicking the Enter a Work Folders URL Instead link.
Step 4. When authenticated, the Confirm Work Folders location page is displayed, as shown in Figure 12-8. You can change the Work Folders location at this point, but you will not be able to change it later.
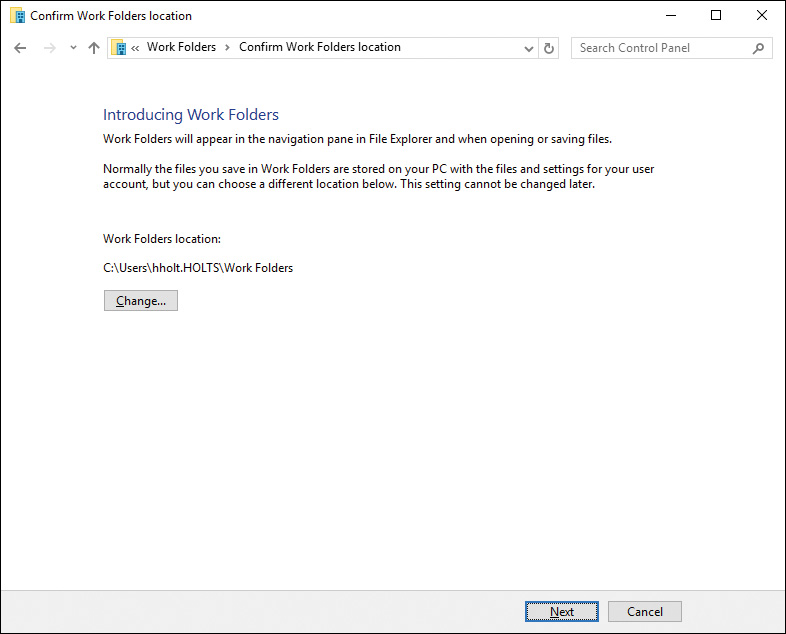
Figure 12-8 Confirming the Local Storage Location for Work Folders
Step 5. If you have set security policies, on the server, a warning is displayed. You must check the Accept These Policies on My PC check box to proceed. Check the box if necessary, and then click the Set Up Work Folders button.
Step 6. After the wizard completes, it will start synching your local Work Folders location with the Work Folders storage location on the server.
Your Work Folders location begins synching with the server right away. You can set up Office apps to use Work Folders. To do that, use the Add a Place option from the File Open menu, and select Work Folders. This makes it convenient for opening and saving files in Work, Excel, and other Office apps.
With Work Folders configured, the Control Panel app provides information on your server storage and the synchronization status, as shown in Figure 12-9. From this interface you can check for any file errors or issues synching your files, and the most recent sync date and time. You can also use the Sync Now link to immediately synchronize your files.
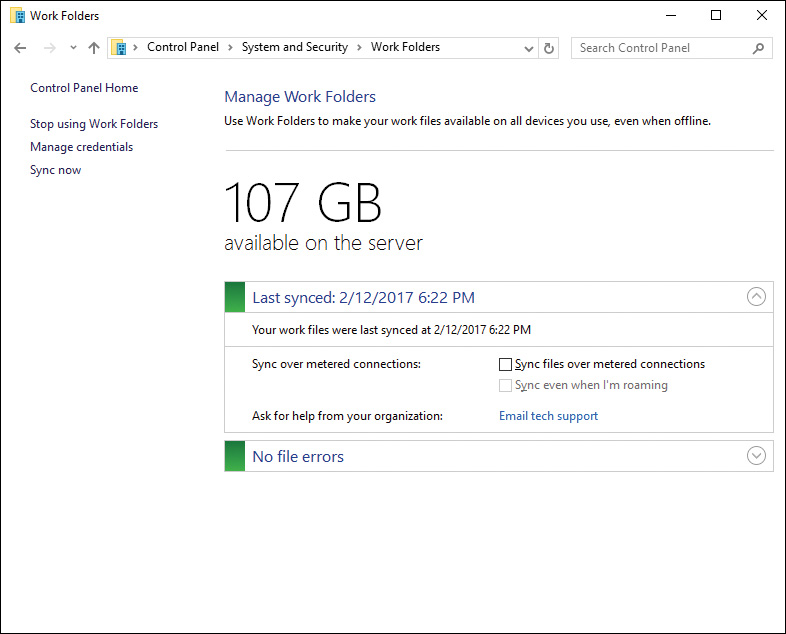
Figure 12-9 Work Folders Status Page
If Work Folders are configured to require encryption, the files in the Work Folders location will be encrypted. You can tell if the files are encrypted because the filenames will be green in File Explorer when viewing the folder. If the policy has not been set, you can encrypt the files in your Work Folders manually.
Note
You should be aware that Work Folders is a remote access and synchronization solution, not a collaboration tool. Each user you configure to use Work Folders has his or her own private workspace on the server and can sync files with multiple devices. However, you cannot create a Work Folders location that is shared by multiple users.
Managing Broadband Connectivity
From Chapter 6, “Windows 10 Networking,” you should have a good understanding of setting up and managing Internet connections, TCP/IP connectivity and troubleshooting, managing Wi-Fi connectivity, and other network connection technologies in Windows 10. The term broadband is generally used for almost any type of Internet connection with speeds better than dial-up; however, we use broadband in this context to describe any over-the-air networking connection, such as cellular, satellite, or other wide-area data service. Broadband is used interchangeably with metered connection because these types of networks almost universally are limited, and charges are based on usage, typically in the amount of data transferred.
Smartphones and most mobile devices support the use of broadband data connections typically referred to as 3G, 4G, 4G LTE, EDGE, or something similar. These are broadband networks, for the purposes of this discussion. Windows 10 supports broadband connections in every edition, but it will be encountered most frequently on Windows 10 Mobile devices. Many Microsoft Surface devices offer built-in broadband connections, enabled by a subscription from a local mobile phone provider. For instance, the Surface 3 offers 4G LTE using a data plan from AT&T or T-Mobile.
Metered Networks
Windows 10 includes many features for working with and managing broadband connections and can automatically detect when you are connected to broadband, switch to Wi-Fi when it is available, and limit the use of a broadband connection to save money on charges. You learned about some of these features in previous chapters.
For instance, in Chapter 1, “Introducing Windows 10,” you learned about the toggle that prevents Windows from downloading drivers and updates when you are using a metered connection. In Chapter 6, “Windows 10 Networking,” you learned how to set a network connection’s properties to manually tell Windows that the connection is a metered connection, and in the discussion about preferred wireless networks, you learned how Windows prioritizes when to use a broadband connection or not. You also learned in Chapter 11, “Configuring and Securing Mobile Devices,” how to set offline file policies to configure whether offline file synchronization would occur if the device is connected to a broadband network.
Broadband Tethering
Windows 10 devices, including laptops and many hybrid devices, do not actually have broadband connections available to them. There are a couple of ways to add broadband to any device. Many providers offer devices that you connect through a USB port and connect your device to their mobile broadband network. But the most popular way is to use a mobile phone’s tethering feature to connect your device to the phone’s mobile network. This is also known as a mobile hotspot, and most modern phones have this feature, but it typically needs to be enabled by your mobile provider.
A hotspot is very easy to set up and use. Figure 12-10 shows a hotspot setup page for an Android phone. After the hotspot is configured and enabled, you connect to it like any other Wi-Fi connection. When you do so, you should be sure to configure the connection as a metered connection, as described in Chapter 6. Windows has no way to know that the network connection on the other end (the actual Internet network) is actually a broadband connection.

Figure 12-10 Configuring Tethering on an Android Smartphone
To connect to the broadband hotspot, or tether your Windows 10 device to it, click the Network icon from Action Center. As shown in Figure 12-11, the new hotspot connection is available as a wireless network. Click the Connect button and type in the password you configured on the phone when prompted.
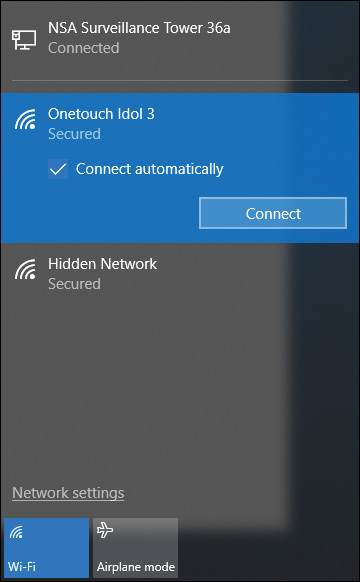
Figure 12-11 Connecting to Your Mobile Phone Hotspot as You Would Any Other Wi-Fi Connection
You can view further details of your tethered connection by clicking All Settings from the Action Center, selecting Network and Internet, and then clicking the Wi-Fi menu. Your current connection should show up as Connected and Secured. Click the network icon to view additional details, as shown in Figure 12-12. From this page, you can also change the toggle for Set as a Metered Connection to On, so that Windows knows this is a broadband connection and will limit its Internet usage while you are using that connection.
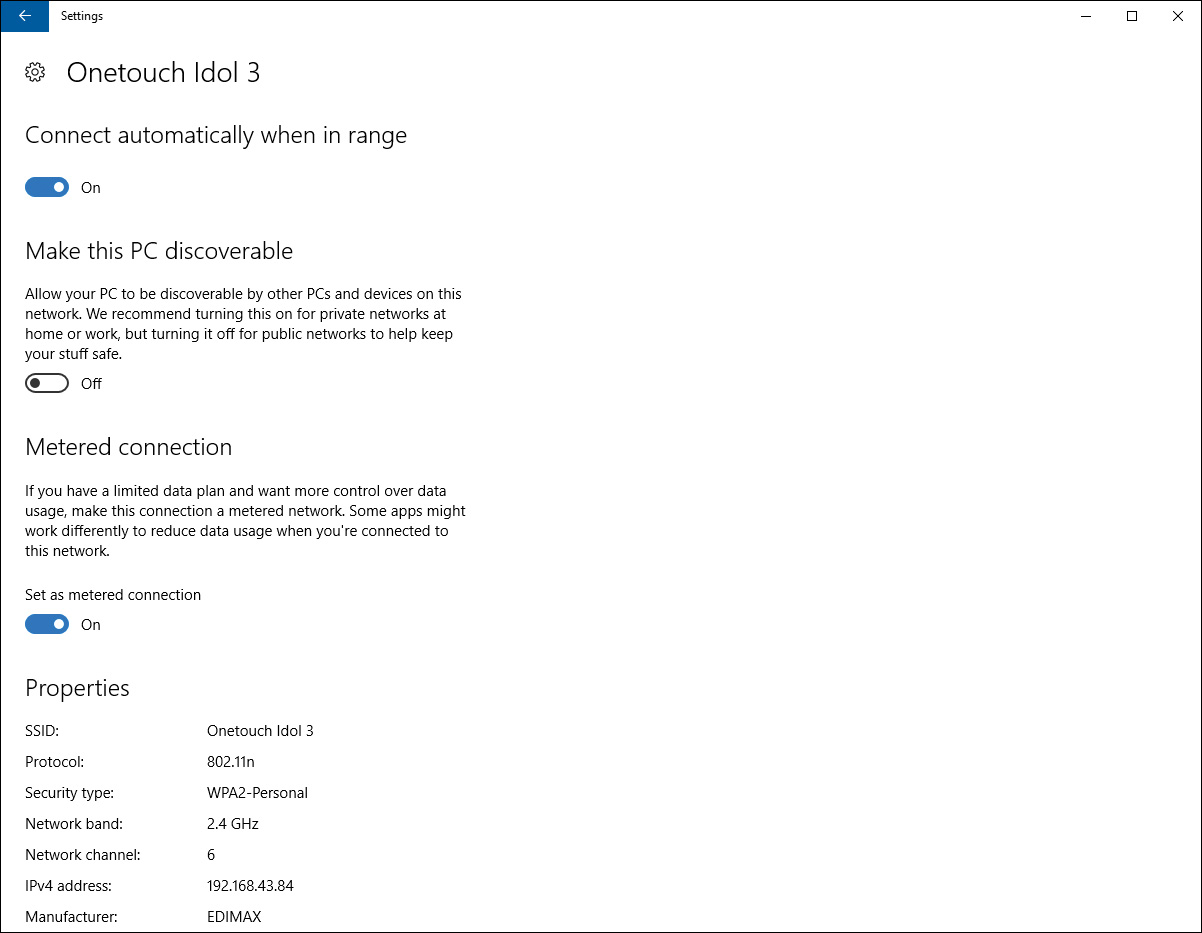
Figure 12-12 Details for an Android-Based Broadband Hotspot Connection
Ensuring that Windows knows you are using a metered connection has the following effect:
![]() Disables automatic downloading of Windows updates.
Disables automatic downloading of Windows updates.
![]() Disables automatic downloading of app updates.
Disables automatic downloading of app updates.
![]() Disables peer-to-peer uploading of updates.
Disables peer-to-peer uploading of updates.
![]() Tiles may not update.
Tiles may not update.
![]() Store apps behave differently, typically turning off background data updates.
Store apps behave differently, typically turning off background data updates.
Exam Preparation Tasks
Review All the Key Topics
Review the most important topics in the chapter, noted with the Key Topics icon in the outer margin of the page. Table 12-2 lists a reference of these key topics and the page numbers on which each is found.
Table 12-2 Key Topics for Chapter 12
Key Topic Element |
Description |
Page Number |
List |
Security policy settings |
|
Shows available password policies |
||
List |
Describes available auditing policies |
|
Paragraph |
Remote Wipe functions |
|
Configuring Work Folders on Windows Server |
||
Step List |
Enabling Work Folders on Windows 10 |
|
Setting up broadband tethering |
Complete the Tables and Lists from Memory
Print a copy of Appendix B, “Memory Tables” (found on the book’s website), or at least the section for this chapter, and complete the tables and lists from memory. Appendix C, “Memory Tables Answer Key,” also on the website, includes completed tables and lists to check your work.
Definitions of Key Terms
Define the following key terms from this chapter and check your answers in the glossary:
account lockout policy
Admin Approval mode
broadband
Local Security Policy
metered connection
password policy
Remote Wipe
Work Folders