Chapter 13 Microsoft Intune
This chapter covers the following subjects:
![]() Microsoft Intune Administration: In this section you are introduced to some of the administration features in the Microsoft Intune portal. You need to know how to create users and groups, as well as groups for the devices you manage. This section also covers device enrollment and management, remote computer management, and the connector site system role.
Microsoft Intune Administration: In this section you are introduced to some of the administration features in the Microsoft Intune portal. You need to know how to create users and groups, as well as groups for the devices you manage. This section also covers device enrollment and management, remote computer management, and the connector site system role.
![]() Microsoft Intune Monitoring: When you are using Intune to manage your organization’s Windows 10 devices, you need to understand how to monitor those devices and manage the policies for them.
Microsoft Intune Monitoring: When you are using Intune to manage your organization’s Windows 10 devices, you need to understand how to monitor those devices and manage the policies for them.
![]() Deploying Software Updates: You can use Microsoft Intune to deploy software updates for the devices you are managing. In this section you learn about using reports to identify updates, configuring deadlines for update installations, and even how to deploy updates for third-party applications.
Deploying Software Updates: You can use Microsoft Intune to deploy software updates for the devices you are managing. In this section you learn about using reports to identify updates, configuring deadlines for update installations, and even how to deploy updates for third-party applications.
This chapter covers the following objectives for the 70-697 exam:

Deploy software updates by using Microsoft Intune: Use reports and In-Console Monitoring to identify required updates, approve or decline updates, configure automatic approval settings, configure deadlines for update installations, deploy third-party updates.
Manage devices with Microsoft Intune: Provision user accounts, enroll devices, view and manage all managed devices, configure the Microsoft Intune subscriptions, configure the Microsoft Intune connector site system role, manage user and computer groups, configure monitoring and alerts, manage policies, manage remote computers.
In recent years, more and more businesses have been moving applications, platforms, and software to the “cloud.” This provides many advantages for organizations. Instead of managing a data center with expensive hardware and monitoring backups and storage, using cloud applications allows them to leverage economies of scale and purchase only the amount of storage and back-office processing power they need. Microsoft’s cloud offerings include Microsoft Intune, a unique Software-as-a-Service (SaaS) application used by businesses to manage their Windows devices, including security, applications, updates, and more.
Intune helps companies minimize the complexity of managing a large base of mobile devices and a geographically dispersed workforce by using the cloud to manage devices wherever they are, helping to keep corporate information secure. Intune works with not only Windows Mobile devices, but also Android and iOS devices. It provides a self-service portal for users to enroll their devices and install company software. Administrators and support technicians can use Intune to deploy certificates, VPN configurations, and email profiles onto enrolled devices. They can also use the portal to keep those devices locked down and encrypted, and even fully erase the data on devices when they are lost or stolen.
Organizations can also use Intune to manage desktops and laptops in the organization using the same management console used for mobile devices. Intune can manage Windows PCs as well as UNIX/Linux servers and any version of Windows from XP to Windows 10. Intune can monitor devices and help protect them against malware infections and software vulnerabilities by keeping patches up-to-date. Administrators can maintain an inventory of all of the organization’s computers and enforce system policies, deliver software, and generate reports of any issues on devices detected by the Intune device monitoring features.
In this chapter you learn about Intune, many of its features, and how to manage devices and collect vital information about organization assets using the Intune portal interfaces. You also learn how to deploy software, manage policies and security settings, and organize and administer devices with Intune.
“Do I Know This Already?” Quiz
The “Do I Know This Already?” quiz allows you to assess whether you should read this entire chapter or simply jump to the “Exam Preparation Tasks” section for review. If you are in doubt, read the entire chapter. Table 13-1 outlines the major headings in this chapter and the corresponding “Do I Know This Already?” quiz questions. You can find the answers in Appendix A, “Answers to the ‘Do I Know This Already?’ Quizzes.”
Table 13-1 “Do I Know This Already?” Foundation Topics Section-to-Question Mapping
Foundation Topics Section |
Questions Covered in This Section |
Microsoft Intune Administration |
1–8 |
Microsoft Intune Monitoring |
9–11 |
Deployment Software Updates |
12–13 |
Caution
The goal of self-assessment is to gauge your mastery of the topics in this chapter. If you do not know the answer to a question or are only partially sure of the answer, you should mark that question as wrong for purposes of the self-assessment. Giving yourself credit for an answer you correctly guess skews your self-assessment results and might provide you with a false sense of security.
1. To utilize Microsoft Intune for managing computers and devices, what other Microsoft cloud product will you need to use?
a. Office 365 and TeamViewer
b. TeamViewer and the Microsoft System Center Configuration Manager (SCCM)
c. Office 365 and Azure AD
d. Azure AD and TeamViewer
e. Azure AD, TeamViewer, SCCM, and Office 365
2. What is the purpose of the roles you assign to users in the Office 365 portal?
a. Users need to be in the correct role to enroll devices.
b. The role will determine the type of device a user is assigned.
c. Users are assigned roles to have administrative rights in the Office 365 portal.
d. Roles are assigned in Azure AD, not Office 365.
3. You have added several users to your account using the Office 365 portal, but no users are showing up in the Intune console Groups menu. What went wrong?
a. Users will show up in Intune only when they enroll a device or when you link a user to a device.
b. You forgot to add an Intune license.
c. Your users were not added to the correct group.
d. Users were created without an email address.
e. You need to copy the users to Intune.
4. You have added an APNs certificate to your Intune console. What type of devices does this enable you to enroll?
a. Windows computers
b. Windows phones
c. Android devices
d. iOS and Mac devices
e. Any mobile device
5. What types of devices can you enroll with Microsoft Intune?
a. Windows 10 and Windows 10 mobile
b. Any Windows device
c. Windows and Apple devices
d. Windows, Android, iOS, and Mac devices
e. Android, Windows Mobile, and iOS devices
6. A user has lost his mobile phone, and reports that he will not be able to find the device. The device is managed in the organizational Microsoft Intune portal. What should you do?
a. Use Exchange ActiveSync to clear the device.
b. Use Intune to wipe the device.
c. Delete the device from Intune.
d. Reset the passcode on the device.
e. Lock the device from Intune.
7. Where are user groups for Microsoft Intune managed?
a. At the Intune portal
b. In your on-premises Active Directory
c. In Office 365 portal
d. In Azure AD portal
e. In TeamViewer
8. What do you need to enable users of managed Windows 10 computers to request remote assistance from the Microsoft Intune Center?
a. A full Office 365 license
b. A TeamViewer account
c. Remote Desktop connections in the Intune Console
d. All of these answers are correct.
9. What are the available severity levels for Intune alerts?
a. Critical and Warning
b. Critical, Informational, and Enabled
c. Critical, Warning, and Informational
d. Critical, Error, Warning
e. Critical, Disastrous, Warning, Informational
10. Device enrollment policies are used for what types of devices?
a. Windows and Windows Mobile
b. iOS and Mac
c. Android and iOS
d. All of these answers are correct.
11. You want to make sure that all devices managed in Intune use screen locks and time out to the screen lock after 15 minutes. What types of policies should you configure?
a. Configuration policies
b. Device compliance policies
c. Conditional access policies
d. Corporate device enrollment policies
e. Resource access policies
12. You can use Microsoft Intune to manage what types of updates?
a. Windows 8.1 and later updates
b. Microsoft updates
c. Third-party updates
d. Microsoft and third-party updates
13. To help plan the budget for hardware upgrades next year, you would like to find out the number of Windows computers you have with older CPUs. What type of report would you run from Intune to help you get this information?
a. Update reports
b. Mobile device inventory reports
c. Detected software reports
d. Computer inventory reports
e. Device history reports
Foundation Topics
Microsoft Intune Administration
You have learned a few of the features of Microsoft Intune in previous chapters. Recall, for instance, the methods available for sideloading apps using Microsoft Intune, from Chapter 5, “Installing and Managing Software.”
In this chapter, you get a more comprehensive view of Microsoft Intune and its capabilities. For the 70-697 exam, you need to be familiar with Microsoft Intune administration and management of users and devices. This section covers provisioning and management of user accounts and devices, configuring the Intune connector site system role, and some tasks for managing remote computers.
User Accounts, Device Enrollment, and Device Management
Microsoft Intune is a member of Microsoft’s cloud service offerings and is integrated with Office 365 and Azure AD. One of the more recent innovations introduced to Intune is integration of groups with Azure AD, so Intune no longer has independent groups; it uses Azure AD groups instead. This provides a number of advantages. You can use the same group experience across all of Enterprise Mobility (Microsoft Intune), Security, and Azure AD apps. Azure AD groups support Intune deployments to users and devices.
Managing accounts and devices requires the use of at least two Microsoft administration portals, and typically a third if you plan to utilize user groups in Intune:
![]() The Office 365 Admin center, at https://portal.office.com.
The Office 365 Admin center, at https://portal.office.com.
![]() The Intune administration console, at https://manage.microsoft.com.
The Intune administration console, at https://manage.microsoft.com.
![]() The Intune dashboard and group management section of Azure at https://portal.azure.com.
The Intune dashboard and group management section of Azure at https://portal.azure.com.
The Intune administration console is used for most of the management, including setting up and managing policies, devices, apps, and so on. You use the Office 365 Admin center to add and manage users and accounts. The Office 365 Admin center has links at the bottom of the left menu for navigating to Intune and Azure AD portals. User groups are now fully integrated with Azure AD.
User Accounts
Adding users for Intune starts at the Office 365 Admin center, where user accounts are created before they can be used for Intune. The main page, shown in Figure 13-1, includes a Users section and an Add a User link. Click the Add a User link to display the page shown in Figure 13-2.

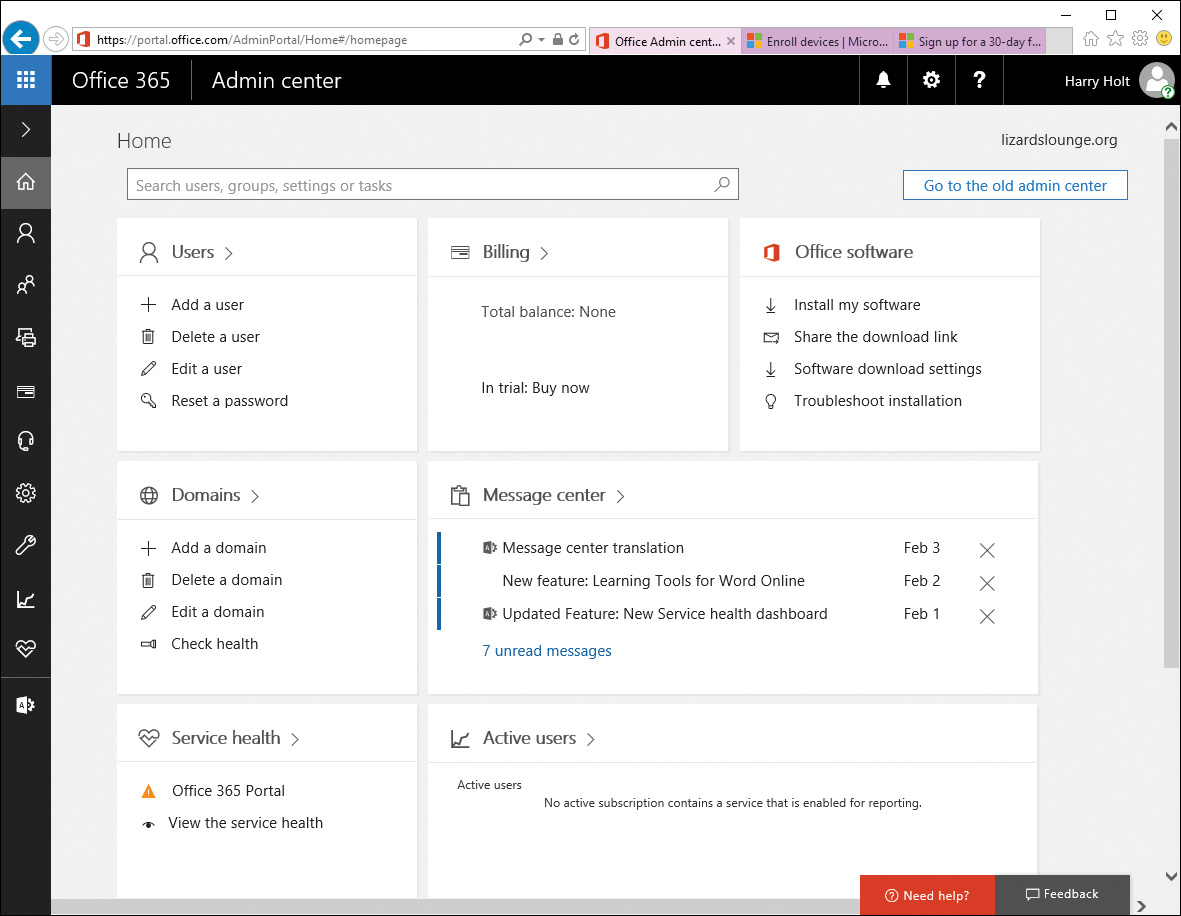
Figure 13-1 Using Office365 Admin Center to Add Users for Intune
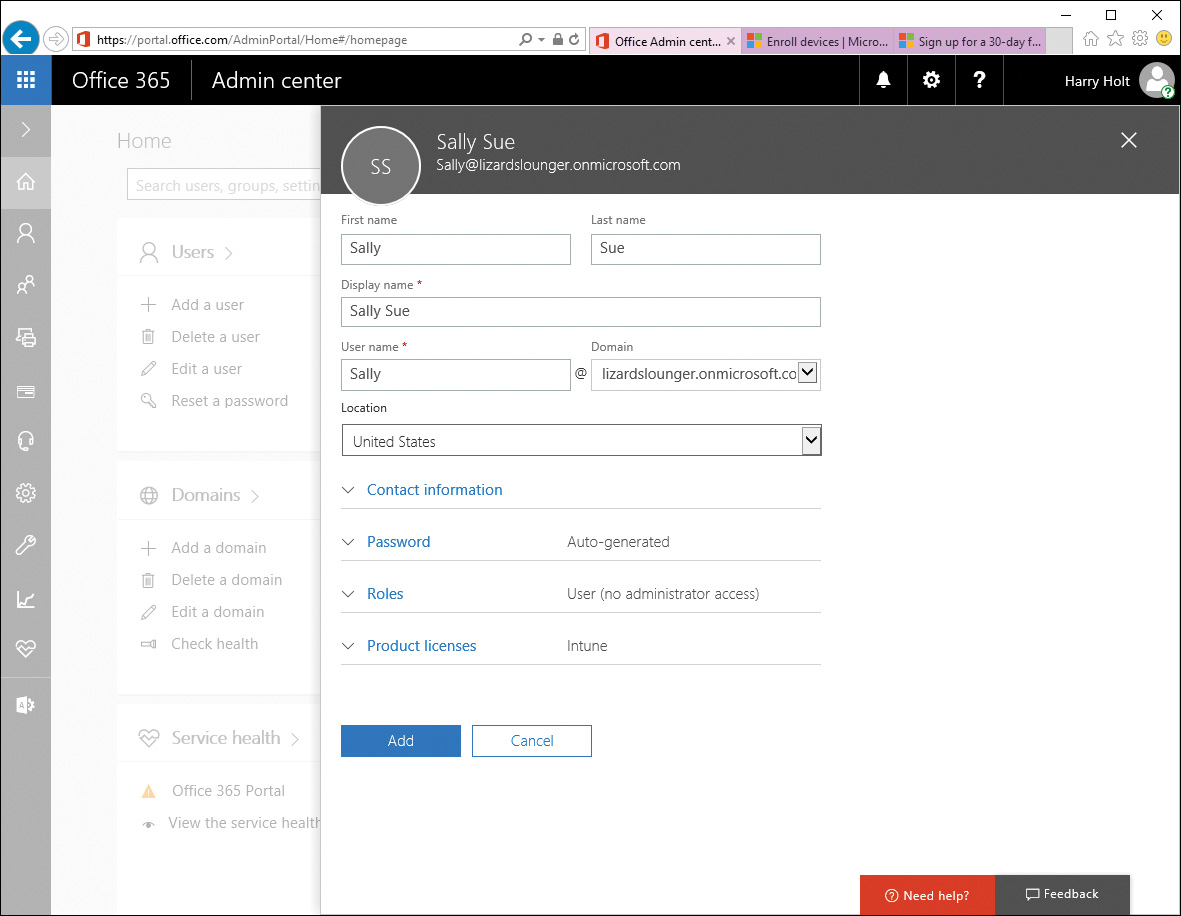
Figure 13-2 Adding a User in the Office 365 Admin Center
As shown in Figure 13-2, the username is part of your company’s domain. When you click the Create button, you can choose to send the temporary Intune password to the user’s organizational email account, or select another email address. You can expand the links for other details to make any changes you want before creating the account, such as Contact information, the initial password for the user, and any roles. By default the user will have only basic access to Office 365, but if you want the user to have administrative access to the Office 365 portal, you can assign a different role. You are also setting the user’s product licenses, which you can change by clicking the Product Licenses link. If you do not have an Office 365 subscription, this defaults to the Intune license, which will be the only one available. Users will need to be assigned an Intune license to enroll their devices.
If you have many users to add, you can create a CSV file to import a list of users. From the Office 365 Admin center, select Users, click the More link, and then select Import Multiple Users. This displays the page shown in Figure 13-3. You can download a template for the CSV file from the links provided, either with headers only, or with headers and some sample user information to get you started with the required format.

Figure 13-3 Importing Multiple Users into the Office 365 Console Using CSV Files
You manage your users from this interface as well. Clicking the Users link from Figure 13-1 displays the list of users you have provisioned. From that page you can perform tasks such as deleting a user, resetting a password, or changing the user’s role or contact information.
From the Office 365 portal, you can navigate to the Intune portal by clicking the Admin Centers menu and selecting the Intune link, which opens the Microsoft Intune portal and displays the Dashboard page, as shown in Figure 13-4.
Figure 13-4 Microsoft Intune Dashboard
The Intune Dashboard is the top-level management interface for the Intune portal. Notice from Figure 13-4 that a menu is presented on the left side for various Intune functions. Microsoft is busy making a lot of updates to its cloud-based portal applications based on user feedback, so the UI can change frequently. Currently many of the features are available by clicking one of the dashboard tiles. For instance, clicking the APPS tile will navigate to the Apps Management menu, which we first encountered in Chapter 5. The portal will also update your location in the menu. Clicking one of the major menu items will take you to an overview for that menu and display a submenu for navigating various features and functions.
To view the Intune users, click the GROUPS menu and then select Users. Intune displays a page similar to Figure 13-5. The users you added using the Office 365 portal do not initially show up on this list. Instead, you will see only users who have enrolled their devices or users you have manually linked to an enrolled device.

Figure 13-5 Microsoft Intune Users Menu
Because the main management interface for users is over in the Office 365 portal, user administration tasks are available for users in the Intune portal. You can view users’ properties and group memberships. As mentioned earlier, you do not manage groups in the Intune portal—instead, you manage them in Azure. The one thing you can manage through Intune is the links between users and devices. Users can have multiple devices, but each device can be linked to only one user. In Figure 13-5, you can see at the bottom of the page that John Q. Public is linked to two devices: an iPad device and a computer.
Note
Microsoft frequently reviews feedback from users of its portal and cloud products, and often makes changes to the user interface and navigation features, as well as integrating functionality to improve the user experience. For the 70-697 exam, you will not be expected to know all the menus and locations of functionality in these portals. Instead, you should focus on understanding the features available and how they can help you manage devices and improve the security of your organization. To check up on the latest changes to Microsoft Intune, see “What’s New in Microsoft Intune” at https://docs.microsoft.com/en-us/intune/whats-new/whats-new-in-microsoft-intune.
Enrolling Devices
You can manage both mobile devices and Windows PCs with Microsoft Intune, and Intune can perform the role of the Mobile Device Management (MDM) authority for your organization. Before enrolling devices, ensure that Intune is set as the MDM authority.
To set the MDM authority, or ensure that Microsoft Intune is set as your authority, log in to the Intune console, select the Admin menu, and then select Mobile Device Management. You should see the page shown in Figure 13-6, with the Mobile Device Management Authority setting showing the Set to Microsoft Intune checked. If not, you can choose Set MDM Authority from the Tasks list, and confirm that you want to set Intune as the authority.

Figure 13-6 Microsoft Intune Can Be Set as Your Mobile Device Management (MDM) Authority
You can enroll an Android device using the Intune Company Portal app, which is available on Google Play. Users can install the app and then log in with the Office 365 account name and password you set up in the Office 365 Admin portal.
The Company Portal app will be given the following privileges on the Android device:
![]() Erase All Data
Erase All Data
![]() Change the Screen-Unlock Password
Change the Screen-Unlock Password
![]() Set Password Rules
Set Password Rules
![]() Monitor Screen-Unlock Attempts
Monitor Screen-Unlock Attempts
![]() Lock the Screen
Lock the Screen
![]() Set Lock-Screen Password Expiration
Set Lock-Screen Password Expiration
![]() Set Storage Encryption
Set Storage Encryption
![]() Disable Cameras
Disable Cameras
![]() Disable Some Screen Lock Features
Disable Some Screen Lock Features
Enrolling an Apple iOS or Mac device requires a few additional steps, because it will require setting up Intune with an Apple Push Notification Service (APNs) certificate, signed by Apple, to enable iOS or Mac enrollment. Use the following steps to enable enrollment for iOS devices:
Step 1. From the Microsoft Intune portal, select Admin, and then expand Mobile Device Management, click iOS and Mac OS X, and select Upload an APNs Certificate.
Step 2. From the menu shown in Figure 13-7, click Download the APNs Certificate Request.

Figure 13-7 Managing APNs Certificates Using the Intune Administration Menu
Step 3. Save the CSR file to your local machine.
Step 4. Go to the Apple Push Certificates Portal at https://idmsa.apple.com/IDMSWebAuth/ and log in using your company’s Apple ID.
Step 5. Select the Create a Certificate button.
Step 6. From the upload screen, browse for the CSR file you saved in Step 3.
Step 7. On the next screen, select Download to download the signed certificate, and save it to your local machine.
Step 8. Return to the Microsoft Intune portal, and click the Upload the APNs Certificate button.
Step 9. Browse to the .PEM file you downloaded from Apple in Step 7 and enter your Apple ID; then click Upload.
After completing these steps and installing your APNs certificate, you are ready to enroll iOS and Mac OS X devices in Intune. You should see a screen similar to Figure 13-8.
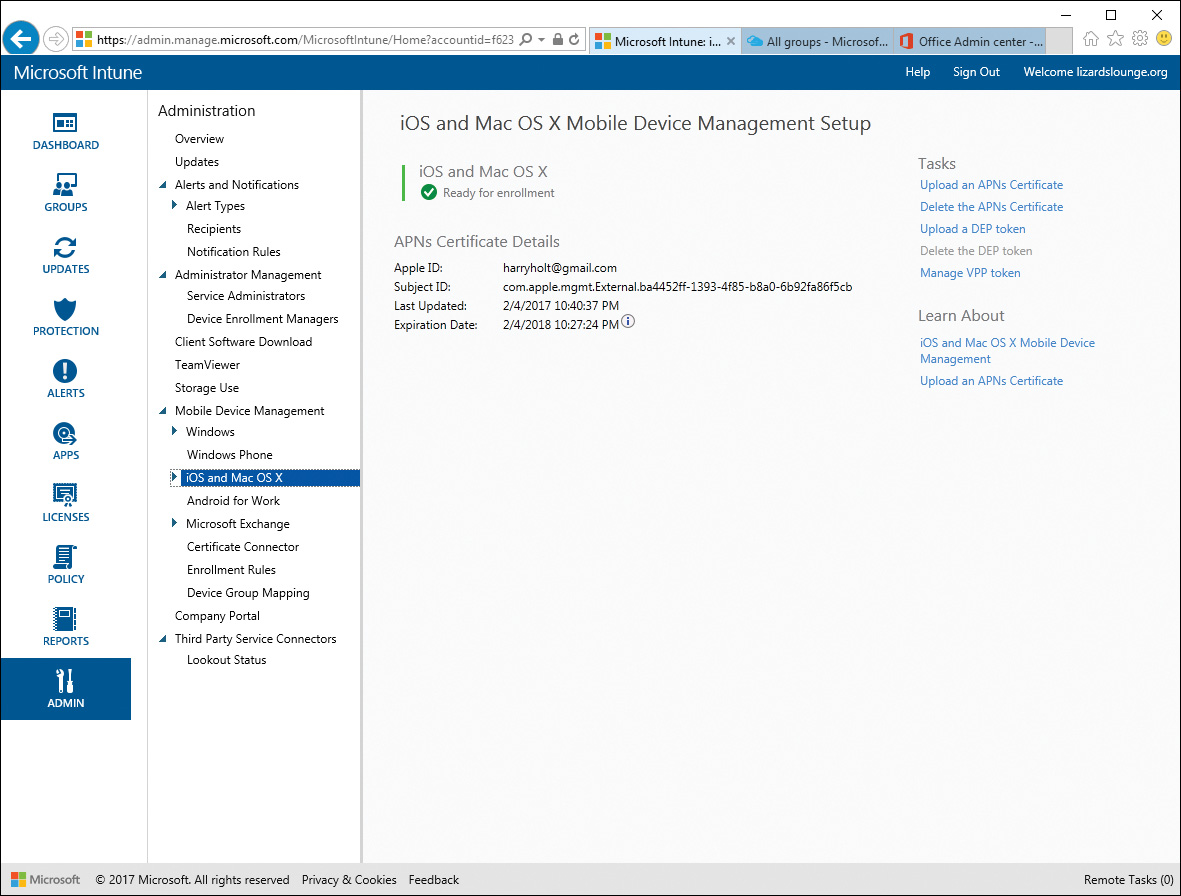
Figure 13-8 After Installing an APNs Certificate in Intune, You Are Ready to Enroll iOS Devices
To enroll an iOS device, you use the Microsoft Intune Company Portal app from the Apple store. Install the app on the iOS device and then log in. The process for enrolling the device is similar to the Android process. The main difference is that you will be required to accept the APNs certificate and install it as part of the Management Profile on the device trust store, as shown in Figure 13-9.
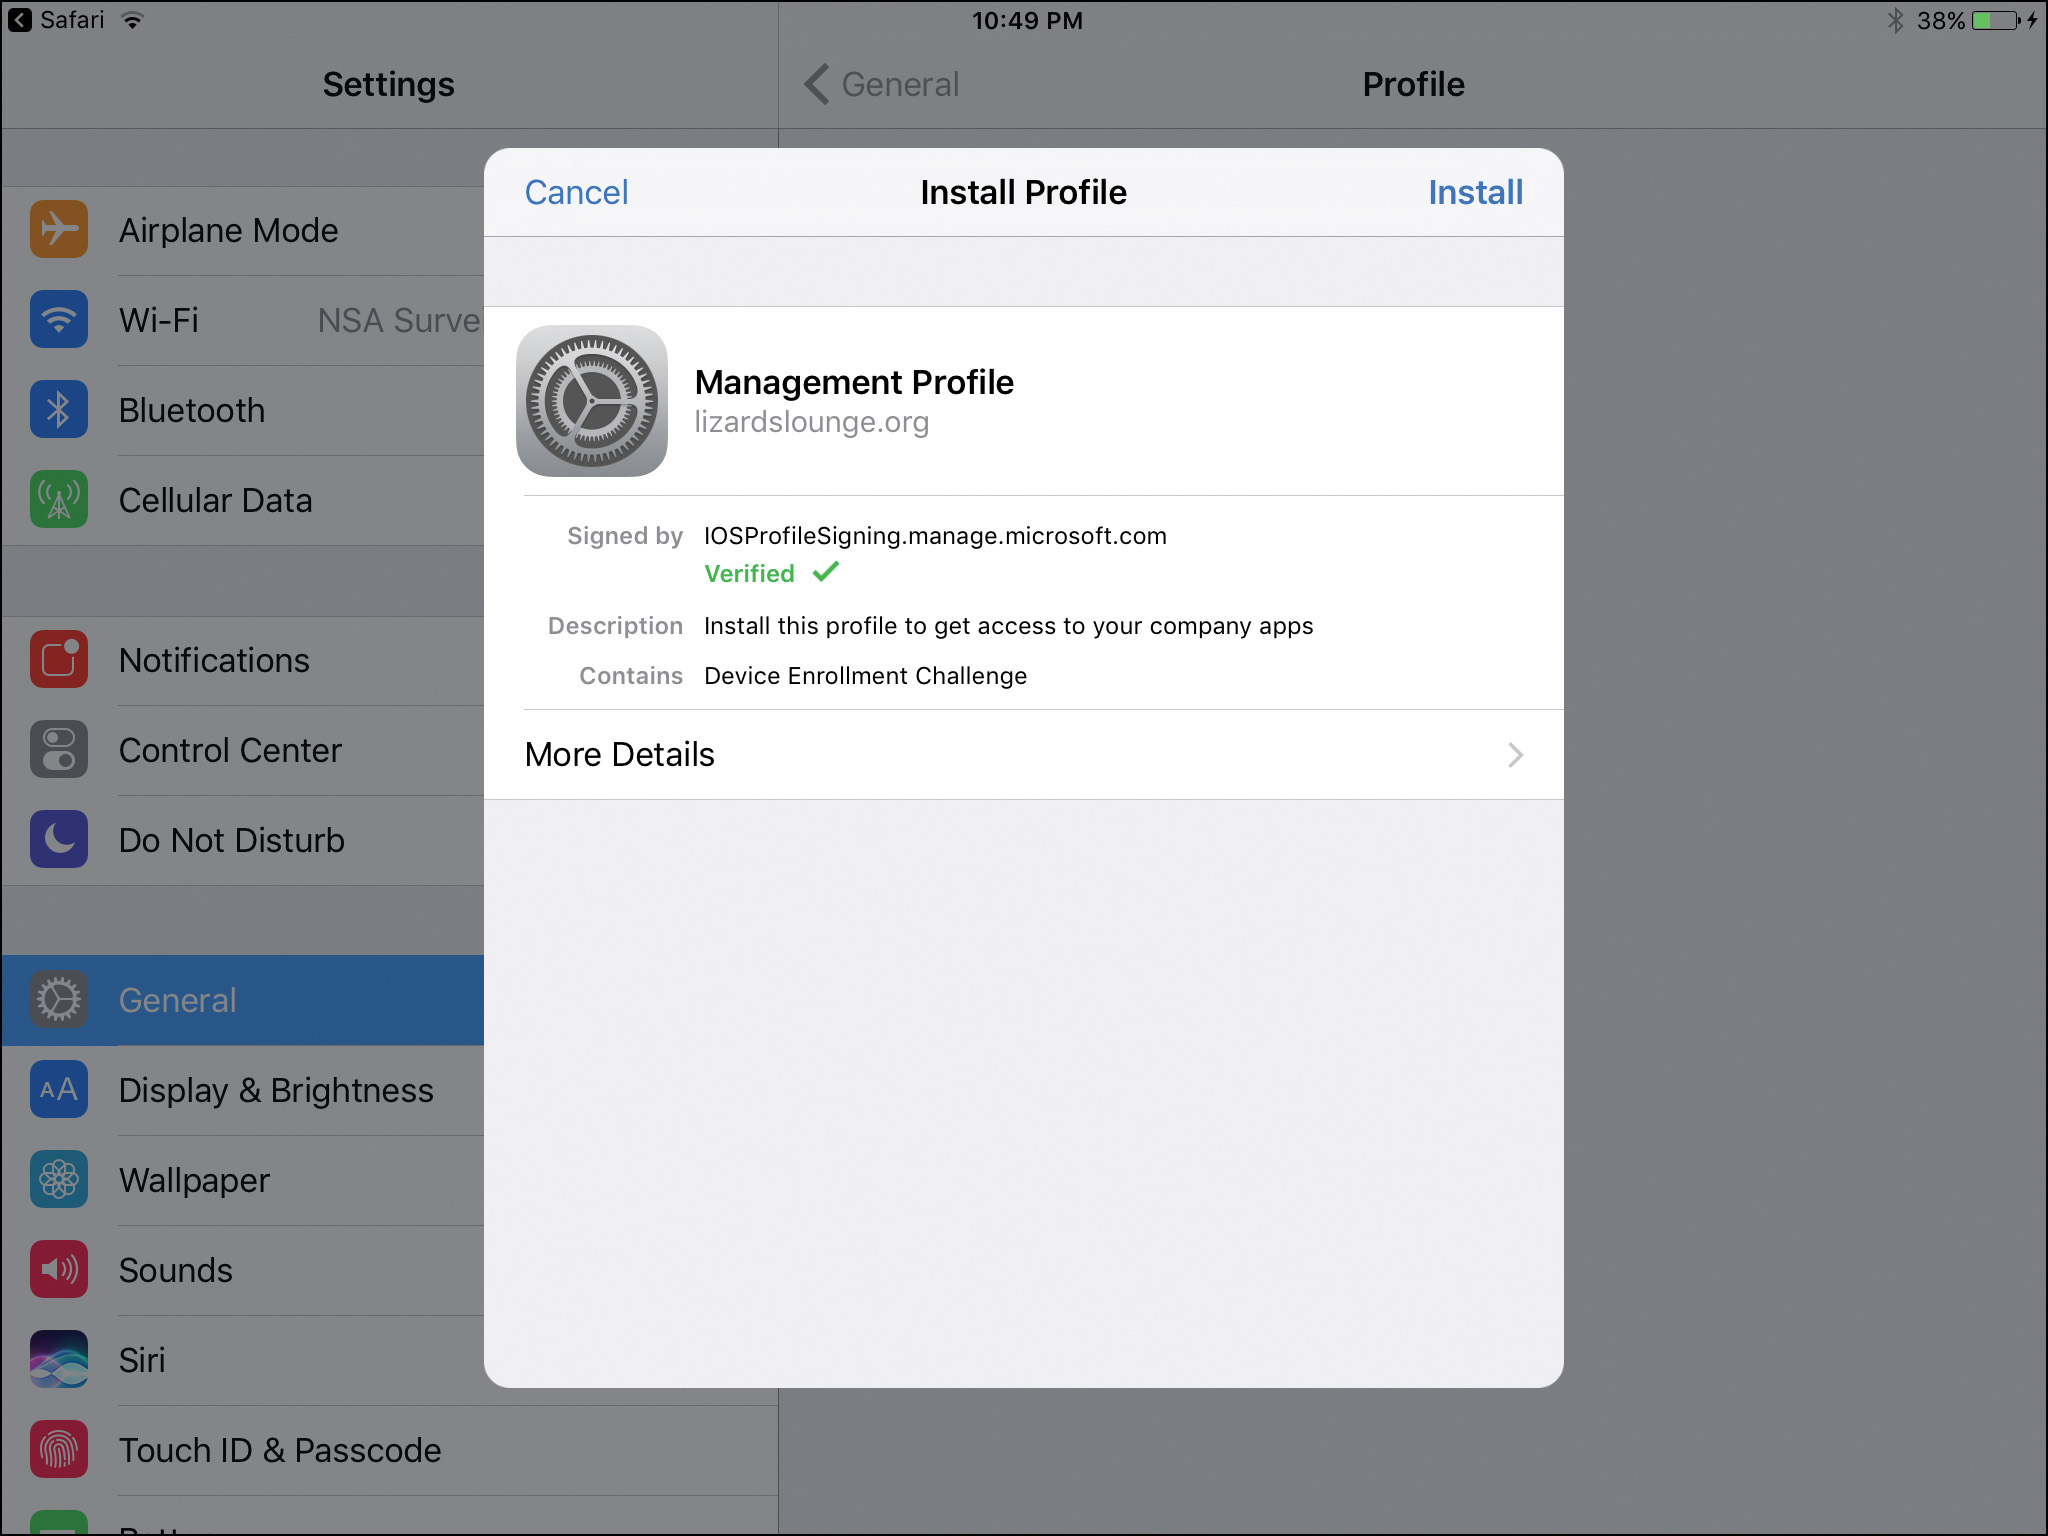
Figure 13-9 Installing the Intune Organizational Management Profile on an iOS Device
You can also enroll Windows computers and devices to Microsoft Intune. Just like mobile devices, users must be set up in Office 365 portal and assigned an Intune license before they can enroll a computer. The first step is to download the client software for Microsoft Intune. You can then deploy it to client computers. This can be done manually on each computer, or you can deploy the software using Group Policy or custom scripts.
Use the following procedure to manually enroll a Windows 10 computer with your organization’s Intune management portal.
Step 1. Log in to the computer using the organizational account credentials or a local account with rights to install new software.
Step 2. Extract the .ZIP file to the local computer. The file includes the setup executable and an ACCOUNTCERT file. Be sure not to rename or remove the ACCOUNTCERT file. It should be in the same directory as the setup executable.
Step 3. The computer will be automatically enrolled.
After the client software is installed, you should see the device show up in the Intune portal.
Note that there are two ways to enroll a Windows 10 computer. The preceding procedure installs the Intune client, and the computer will be enrolled as a “Computer” device. You can also enroll the device using the Windows settings, and the device will be enrolled as a “Device” instead of as a “Computer.” This is useful only if you are not using on-premises Active Directory. Use this procedure to enroll the computer as a device:
Step 1. Access the Action Center and select All Settings.
Step 2. From the Settings page, select Accounts.
Step 3. Select the Access Work or School option, and then click Connect.
Step 4. Enter the email for your Intune user account and then click Next. The Microsoft Intune sign-in page is displayed.
Step 5. Enter the credentials for your Intune or Office 365 user account, and then click Sign In.
Step 6. When the You’re All Set! page is displayed, click Close.
Enrolling as a device is more appropriate for users who want to use their personal devices while gaining access to organizational resources such as email, SharePoint, or Office 365. This is also the preferred method for organizations that are using Microsoft cloud-based solutions for infrastructure management. If you have an investment in on-premises Active Directory, Exchange, the Microsoft System Center Configuration Manager (SCCM), and other tools, you should use the Intune client software if you want to manage devices with Intune.
Viewing and Managing Devices
You can view all enrolled devices from the Microsoft Intune portal. To view devices, click the Groups menu, and then select All Devices. The list of devices will be displayed, as shown in Figure 13-10.

Figure 13-10 Viewing the Enrolled Devices in Microsoft Intune
This is the interface for managing all your enrolled devices. Many attributes are displayed for each device, such as the name of the device as configured locally, the type of device, the operating system, and other basic information. You can view more details by selecting the device and clicking the View Properties menu. The properties available will depend on the type of device. For Windows 10 computers, the following categories of properties will be available on a tabbed menu, similar to Figure 13-11.
![]() General: Basic information about the device and status, such as updates, endpoint protection status, the user linked to the device, and the date and time when the last update was applied. This tab also provides links to retire or wipe the device and to link the device to a user.
General: Basic information about the device and status, such as updates, endpoint protection status, the user linked to the device, and the date and time when the last update was applied. This tab also provides links to retire or wipe the device and to link the device to a user.
![]() Updates: Windows updates for the computer. From this menu you can approve updates, check installed or failed updates, and do other tasks related to applying updates to the device.
Updates: Windows updates for the computer. From this menu you can approve updates, check installed or failed updates, and do other tasks related to applying updates to the device.
![]() Malware: Lists any malware that has been detected on the device.
Malware: Lists any malware that has been detected on the device.
![]() Alerts: View any device-related alerts that may need administrator attention.
Alerts: View any device-related alerts that may need administrator attention.
![]() Hardware: Displays detailed hardware information about the device, including any attached network interfaces, printers, and peripherals.
Hardware: Displays detailed hardware information about the device, including any attached network interfaces, printers, and peripherals.
![]() Software: Lists all software installed on the computer and the current version. The list will include Windows operating system components and any Windows Store apps.
Software: Lists all software installed on the computer and the current version. The list will include Windows operating system components and any Windows Store apps.
![]() Policy: Displays the list of Intune policies that have been applied to the device.
Policy: Displays the list of Intune policies that have been applied to the device.

Figure 13-11 Computer Properties Page for Devices in Microsoft Intune
If a device has been lost or stolen, or you simply want to stop managing the device from Intune for any reason, you can use the Retire/Wipe link to close out the device. Clicking the link displays the dialog shown in Figure 13-12. Select whether you want to clear out only company data or completely wipe everything from the device and restore it to factory settings; then click the Yes button. If the device is turned on and connected to the Internet, it will take less than 15 minutes to start wiping the device.

Figure 13-12 Confirm the Type of Remote Wipe for a Mobile Device
There are also a few additional tasks you can perform on selected devices using the Remote Tasks drop-down menu. The following tasks are available. Some tasks are available only for computer device types, whereas others are available for mobile device types.
![]() Run a Full Malware Scan (Computer): Runs the installed malware scanner on the computer, performing a full scan. On Windows 10 computers, Windows Defender will run a full scan.
Run a Full Malware Scan (Computer): Runs the installed malware scanner on the computer, performing a full scan. On Windows 10 computers, Windows Defender will run a full scan.
![]() Run a Quick Malware Scan (Computer): Tells the computer to run a quick malware scan using the installed antimalware software. On Windows 10 computers, Windows Defender will run a quick scan.
Run a Quick Malware Scan (Computer): Tells the computer to run a quick malware scan using the installed antimalware software. On Windows 10 computers, Windows Defender will run a quick scan.
![]() Restart Computer (Computer): Performs a soft reboot of the operating system.
Restart Computer (Computer): Performs a soft reboot of the operating system.
![]() Update Malware Definitions (Computer): Causes the computer to check the Internet for any new malware definitions and install any new ones available.
Update Malware Definitions (Computer): Causes the computer to check the Internet for any new malware definitions and install any new ones available.
![]() Refresh Policies (Computer): Causes the computer to check for any policy updates and apply them immediately.
Refresh Policies (Computer): Causes the computer to check for any policy updates and apply them immediately.
![]() Refresh Inventory (Computer): Tells the Intune client on the device to refresh the inventory of hardware and software and report back to the Intune portal.
Refresh Inventory (Computer): Tells the Intune client on the device to refresh the inventory of hardware and software and report back to the Intune portal.
![]() Remote Lock (Mobile): Causes the device to enable the screen lock immediately.
Remote Lock (Mobile): Causes the device to enable the screen lock immediately.
![]() Passcode Reset (Mobile): Resets the passcode used to unlock the device screen. This works differently depending on the device. On an iOS device, the passcode is removed and must be added back to the device. On Android, a new temporary passcode is set, and the user will need to change it.
Passcode Reset (Mobile): Resets the passcode used to unlock the device screen. This works differently depending on the device. On an iOS device, the passcode is removed and must be added back to the device. On Android, a new temporary passcode is set, and the user will need to change it.
The Microsoft Intune Connector Site System Role
You can use a hybrid solution for managing your mobile devices. Large organizations that are currently using SCCM may want to leverage the management capabilities of the current infrastructure and be able to remotely manage all their mobile devices using an Intune subscription.
By integrating SCCM functions with the Intune management portal, administrators can configure a “single pane of glass” management interface. That is, they will have a single administration UI for managing all the organization’s devices, even while some functionality is supported by SCCM and others by Intune. Centralizing administration views in this way can go a long way to simplifying and streamlining administration tasks.
Organizations that currently are not using SCCM for device management should avoid the hybrid model and leverage the Intune standalone instead. Several new features are coming to Intune, and should be available by the publication date of this text. These features make using a hybrid model with SCCM unnecessary and redundant:
![]() Programmatic access (API), including an SDK and PowerShell management options.
Programmatic access (API), including an SDK and PowerShell management options.
![]() Custom reporting.
Custom reporting.
![]() Role-based Access Control.
Role-based Access Control.
![]() Scalable support for more than 50,000 mobile devices.
Scalable support for more than 50,000 mobile devices.
![]() Manage both traditional PC clients and Intune-managed devices from the same console.
Manage both traditional PC clients and Intune-managed devices from the same console.
As you will see, configuring a hybrid MDM solution is an involved process that requires careful planning and execution. The details of these tasks are out of scope of this text and not needed for the 70-697 exam. Instead, you should only be concerned with knowing what technologies are involved in configuring the connector and the purpose for using a hybrid solution, as described in the list that follows:
Step 1. Create an MDM Collection: This is a collection of users you create in SCCM to specify all the users that can enroll devices.
Step 2. Configure Domain Name Requirements: Users must be able to enroll using a publicly resolvable email address or UPN. If your company does not have a public domain name, you must create an alternate login ID for your users in Azure AD.
Step 3. Configure the Intune Subscription: In SCCM, you must configure your Intune subscription information. This includes specifying the user collection you created in Step 1, and specifying a site code and company contact, and other information. You will use your Intune subscription credentials, which will be managed by SCCM.
Step 4. Create the Service Connection Point: You first install the service connection point site system role using the normal process for installing server roles. After it is installed, you use SCCM to create a Site System Server using the available wizard. This will be the back-end communication channel between your on-premises SCCM installation and the Microsoft Intune management site.
Step 5. Enable Platform Enrollment: Configure the device enrollment types. You can set up iOS, Windows, and Android enrollment. Just like with Intune standalone, you will need to configure an Apple APNs certificate for iOS enrollment. Windows enrollment requires the creation of DNS records to point to the SCCM enrollment server.
Step 6. Verify MDM Configuration: After all these configuration tasks are complete, check the logs for any issues and start enrolling devices.
After you have configured SCCM and Intune as a hybrid MDM, you will not be able to manage devices from the Intune website anymore. The single pane of glass management interface has become the only interface available. If you want to disconnect SCCM and start using Intune standalone, you need to contact Microsoft support to help you with that transition, so it’s very important to plan your road map for device management in advance.
Note
For more information about configuring SCCM and hybrid MDM, see “Setup Hybrid Mobile Device Management (MDM) with System Center Configuration Manager and Microsoft Intune” at https://docs.microsoft.com/en-us/sccm/mdm/deploy-use/setup-hybrid-mdm.
Manage User and Computer Groups
Devices are organized and managed using device groups. Do not confuse device groups with user groups, which are managed in Microsoft Azure AD. Device groups are managed in Intune, including some built-in groups. By default, all devices are members of the All Devices group. Also, Windows computers will automatically be added to the All Computers group, and any iOS, Android, or Windows Mobile device will be added to the All Mobile Devices group.
You can add your own custom groups for managing devices, based on your own criteria, and newly enrolled devices will be added to these groups based on the criteria you define. The type of criteria you can use includes the device type (computer or mobile), an organization unit from your directory, or the Active Directory domain that the device is joined to. From the menu previously shown in Figure 13-10, you can select several devices and then click the Create Group from Selection link to create a custom group. Instead of using general criteria for the devices added, you will be adding specific devices to the group. If you want to add other devices later, you will need to edit the group and add those devices to the list.
To create a user group, click the Users option from the Groups menu, and then click the Create User Groups link from the menu. This will redirect you to the Azure portal where user groups are managed, as shown in Figure 13-13. Click the Add button at the top to create a new group. Each group will have a Name, an optional Description, and a Membership Type, which can be either Assigned or Dynamic. The Membership Type determines how members are added to the group. For a Dynamic group, you create a rule based on the Azure AD attributes of your users. For instance, you could assign members automatically if they are members of a certain department, have a specific job title, or other criteria. If you create a group with an Assigned Membership Type, you will be manually adding and removing members to the group.

Figure 13-13 Managing User Groups in the Azure AD Portal
You can view the group membership of a user in Intune. Select Users from the Groups menu, and select a user from the list. The user details at the bottom of the page include a Group Membership section that lists the groups that the user belongs to. Clicking the link for any of the groups listed will direct you to the group in the Azure portal.
Note
This section describes user and computer groups as they work in Intune and Azure AD currently. However, Microsoft is in the process of migrating all groups, including device groups, to Azure, so this information will change after the migration occurs. For more information, see https://docs.microsoft.com/en-us/intune/deploy-use/categorize-devices-with-device-group-mapping-in-microsoft-intune.
Manage Remote Computers
You learned earlier in the chapter how to enroll Windows 10 computers for Microsoft Intune. You can enroll any Windows computer with Intune that uses Microsoft Vista or later, and manage those computers from the Intune console. The computer must be running a supported edition, using Professional or higher. You cannot enroll Home or Basic editions. These computers will show up in your Intune console as Computer device types, and will automatically be added to the All Computers group.
After you have installed the Intune client as described earlier, and the computer is successfully enrolled, a new icon will show up in the system tray. Click the icon and select Microsoft Intune Center to display the page shown in Figure 13-14. These are options for users on an enrolled Windows computer. They can download any applications you have made available on the Intune portal, check for updates, use their installed antimalware tool, or send a request for Remote Assistance to the organization’s administrators.

Figure 13-14 Microsoft Intune Center on Windows Computers with the Intune Client Installed
In Figure 13-14, you may notice the message Remote Assistance Is Not Supported on This Version of Windows. To use Remote Assistance through the Intune Center, you need to sign up for a TeamViewer account and connect your TeamViewer subscription account to Intune.
To enable TeamViewer, navigate to the Admin menu of the Microsoft Intune portal, click TeamViewer from the menu, and then select the Enable link. After your TeamViewer account is enabled, users will have a Request Remote Assistance link in their Intune Center console. When they click the link, the support technicians monitoring the TeamViewer console will get a notification that a user is requesting assistance and can then connect to a remote desktop session to render assistance. Configuring and using TeamViewer for desktop support are far outside the scope of this text, but you should know what it is used for and how to enable the connector in Intune.
Microsoft Intune Monitoring
Devices and computers that are managed by Intune return detailed information about their hardware properties, updates, and other information. You can configure Intune to provide monitoring information and trigger alerts for events that you want to be notified about.
Configure Monitoring and Alerts
Alerts are used to keep you in touch with what’s happening in Microsoft Intune and the devices and computers that are enrolled. Alerts are generated based on alert types, which are preconfigured rules built in to Intune. You can configure the State and Severity for each alert. State is whether the alert type is enabled or disabled. There are three levels of Severity that you can set:
![]() Critical: Indicates a serious issue that requires investigation as soon as possible.
Critical: Indicates a serious issue that requires investigation as soon as possible.
![]() Warning: Indicates an issue that is not serious but might become serious without attention or intervention.
Warning: Indicates an issue that is not serious but might become serious without attention or intervention.
![]() Informational: Indicates information that is not critical.
Informational: Indicates information that is not critical.
Some alert types might have some additional configuration properties, such as a percentage of devices affected before the alert is triggered. You manage alerts from the Intune Alerts menu. From the Overview page, you can view a summary of any alerts that have been triggered. Alerts are categories for you in a hierarchy, with All Alerts at the top. Other major categories include Endpoint Protection, Monitoring, Notices, Policy, Remote Assistance, System, and Updates.
To configure alert types, access the Overview page from the Alerts menu and select Configure Alert Type Settings. Intune displays a page similar to Figure 13-15. To modify alert type settings, select the alert type from the list. You can enable or disable the alert from the menu at the top, or choose the Configure link to configure settings for the alert to change the state or select the severity you want for the alert.

Figure 13-15 Alerts Types in Microsoft Intune
Some alerts also allow you to select a display threshold. This setting allows you to configure a percentage of devices so that the alert type is triggered only after the threshold has been reached. Other alerts may have additional settings that you can configure. For instance, the Available Megabytes of Memory alert, shown in Figure 13-16, can be set with a Frequency and Threshold. The frequency tells Intune how often to check the available memory, in seconds, and the threshold is the amount of available memory below which an alert would be triggered.
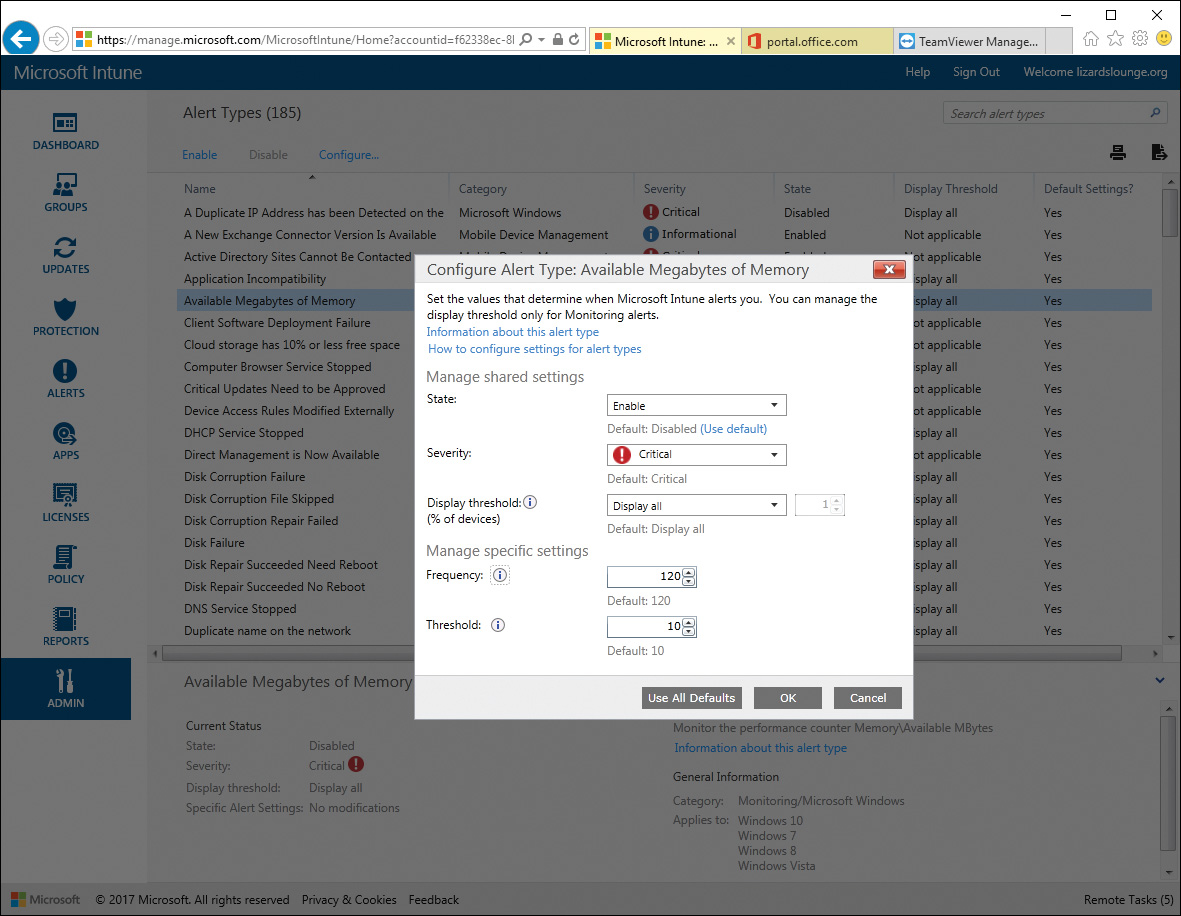
Figure 13-16 Some Alert Types in Microsoft Intune Have Additional Attributes That Can Be Configured
You can also configure Microsoft Intune to send email notifications when an alert is triggered. You first need to set up recipients for alerts. To configure emails for alerts, use the following procedure:
Step 1. Select the Admin menu and then click Recipients.
Step 2. Click the Add Link to add a recipient. You must enter the email in the Email Address field and the Confirm Email Address field, and then click OK. Add as many recipients as needed using this procedure.
Step 3. Select the Notification Rules option from the Admin menu.
Step 4. Select the type of alert rule to configure from the list, shown in Figure 13-17. You can use the All Alerts rule to set recipients for all alert types.
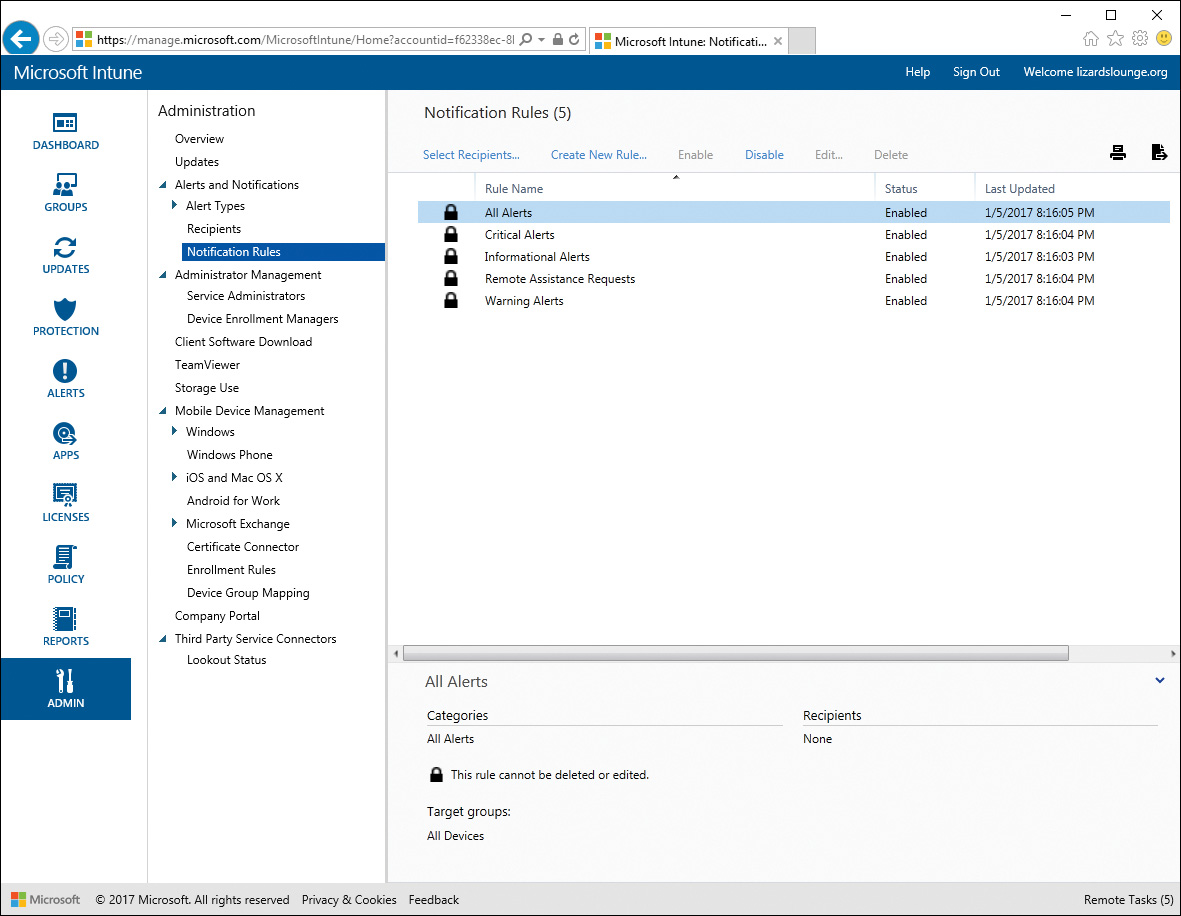
Figure 13-17 Notification Rules in Microsoft Intune
Step 5. Click the Select Recipients link from the top to display the list of email recipients you configured in Step 2.
Step 6. Check the box next to the email address of the recipients you want to receive notifications, and then click OK.
Step 7. For more detailed control of who should get an email notification for more specific alert types, use the Create New Rule link to set up your own rule. You can select from any of the categories of alert types.
An email will be sent to all the email addresses you selected.
Managing Policies
Microsoft Intune allows you to use policies, which are groups of settings that control features on devices and computers. You create policies using built-in templates with specific settings. You can deploy policies to device groups or user groups.
Policies fall into a few broad categories:
![]() Configuration policies: Use configuration policies to manage security settings and features on enrolled devices.
Configuration policies: Use configuration policies to manage security settings and features on enrolled devices.
![]() Device compliance policies: If you use conditional access policies, you can use compliance policies to set the rules and settings for defining device compliance before allowing the device to access organizational resources. Even if you do not use conditional access, you can use compliance policies to monitor devices and mediate any issues.
Device compliance policies: If you use conditional access policies, you can use compliance policies to set the rules and settings for defining device compliance before allowing the device to access organizational resources. Even if you do not use conditional access, you can use compliance policies to monitor devices and mediate any issues.
![]() Conditional access policies: These policies secure email and other organizational resources based on the conditions you set.
Conditional access policies: These policies secure email and other organizational resources based on the conditions you set.
![]() Corporate device enrollment policies: These policies are used for setting up iOS and Mac device management. You learned about setting up APNs for iOS and Mac device enrollment earlier in this chapter.
Corporate device enrollment policies: These policies are used for setting up iOS and Mac device management. You learned about setting up APNs for iOS and Mac device enrollment earlier in this chapter.
![]() Resource access policies: These policies work together to help users get access to files and other organizational resources.
Resource access policies: These policies work together to help users get access to files and other organizational resources.
If you use Group Policy in your organization, and you have Windows PCs joined to your domain using Group Policy objects, some of the Intune policies may control the same settings and features. When conflicts occur, the domain-level Group Policy will always take precedence over Intune policy, unless the PC cannot contact a domain controller for some reason, in which case the Intune policy will be applied.
Conditional access policies can be set to allow access to Dynamics CRM Online, Exchange, SharePoint Online, or Skype for Business Online. You need an online subscription to the specific service to use these policies. For Exchange, either you need a subscription to Exchange Online, or you must configure a connection between Microsoft Intune and your Exchange server.
Configuration policy templates fall under several categories. Follow this procedure to create a configuration policy:
Step 1. In the Microsoft Intune administration policy, select Configuration Policies from the Policy menu, and then click the Add link.
Step 2. Select the policy you want to configure, and whether to use the recommended settings or custom settings. For some policies, only the custom settings are available. Click Create Policy.
Step 3. Enter a name and, optionally, a description for the policy.
Step 4. Configure the required settings and then click Save Policy.
Step 5. In the dialog box that appears, choose Yes to deploy the policy immediately, or No to create the policy without deploying. You can deploy the policy later.
After you have created the policy, you can deploy it by selecting the policy and choosing the Manage Deployment link, displaying the dialog box shown in Figure 13-18. You can select from your configured user groups or device groups. A mix of groups is allowed, so you can choose groups from one category or both.

Figure 13-18 Managing Policy Deployment
When a policy is deployed, Intune begins to try notifying the device that it should check in with Intune for policy updates. If the device does not check in, Intune makes three more attempts to contact the device. The device gets its policy updates on the next check-in with Intune.
Note
For details about the Microsoft Intune configuration policies that you can set and the devices they apply to, see the “Microsoft Intune Configuration Policy Reference” at https://docs.microsoft.com/en-us/intune/deploy-use/microsoft-intune-policy-reference.
To configure compliance policies, select Compliance Policies from the menu, click the Add link, and then give your compliance policy a name. You can toggle various settings off and on for the compliance settings you want to enforce. Some of the important compliance policies that you can set are listed in Table 13-2.
Table 13-2 Microsoft Intune Compliance Property Settings
Category |
Setting |
Description |
System Security |
Require a password to unlock mobile devices |
Set to yes or no. |
System Security |
Allow simple passwords |
Set to yes or no. |
System Security |
Minimum password length |
Can be set between 4 and 14. |
System Security |
Required password type |
Set to alphanumeric or numeric. |
System Security |
Minutes of inactivity before a password is required |
Causes the screen to lock after the time you set. Set to 1 minute, 5 minutes, 15 minutes, or 1 hour. |
System Security |
Encryption |
Requires encryption to be enabled on the device. Applies to Windows Phone, Android, and Samsung KNOX. |
Device Health |
Require devices to be reported as healthy |
Applies to Windows 10 Desktop and Mobile. |
Device Health |
Require that devices prevent installation of apps from unknown sources |
Applies to Android only. |
Device Health |
Device must not be jailbroken or rooted |
Applies to iOS and Android. |
Device Properties |
Minimum Windows Version |
Specify a minimum Windows version. |
Device Properties |
Minimum Windows Phone or Windows 10 Mobile version |
Specify a minimum version for Windows Phone or Windows 10 Mobile devices. |
Deploying Software Updates
You can use Microsoft Intune to manage updates for the Windows computers enrolled with Microsoft Intune. Using Intune for managing updates is similar to using an on-premises Windows Server Update Services (WSUS) server to manage updates for your Windows PCs.
After you have at least one device enrolled as a Computer device type in Intune, updates will be available in the Intune portal. Selecting the Updates menu item will display a large list of updates available, as shown in Figure 13-19. Updates are available for Windows versions back to Windows XP and are categorized in groups, such as Critical Updates, Security Updates, Service Packs, and so on.

Figure 13-19 Windows Updates for Deployment in Microsoft Intune
You can modify the updates you see in the Intune console so that you see updates only for the products you care about. For instance, if you do not have any Windows XP computers to manage, and only use one version of Office across all of your computers, you can hide those updates that do not apply to you. You can accomplish this from the Updates section of the Admin menu. You can select from the product categories, such as Windows, Works, Office, developer tools, and others. You can also select which updates to see based on the update classification, which includes security updates, tools, service packs, and other classifications.
From this section you can also set up what are called Automatic Approval Rules for your updates. Click the New button in the Automatic Approval Rules section to create a rule. For the rule, you select the product categories, update classifications, and the user and device deployments groups for your rule. Any updates that show up in Intune that apply to the rule you configure will automatically be approved for deployment to your computers.
For instance, you might want to make sure that any critical updates are not held up waiting for your approval, so you can create a rule that all Windows updates classified as critical will automatically be approved for your All Computers group. These updates will then be approved and deployed as soon as they are available.
Updates that do not fall into the automatic approval rules you set will need to be manually approved before they are deployed to your Windows devices. You can make those decisions by viewing the properties of the update, testing it on your reference computers, and approving the update for deployment when you decide it’s ready for production. From the Updates menu, shown in Figure 13-19, select any update and then click the Properties link to view the details of the update. This will display details of the update, the operating system or software it applies, and includes links to the KB article for the update and whether the update has been superseded by any subsequent updates. The Properties page also includes links to approve or decline the update.
From the Updates section of Intune, you can use the Filters drop-down at the top of the list to see just the updates you care about. For instance, select New Updates to Approve to see the updates that are waiting for your approval. You can also view updates by classification using the menu selections on the left.
Use the following steps to approve an update:
Step 1. Select the Approve link either from the list or the Properties page for the update.
Step 2. Select the user groups and device groups where you want the update to be deployed. You can select any combination of user and device groups. Click the Next button.
Step 3. In the Approval Setting page, select the approval type. The options are Required Install or Available Install.
Step 4. Choose the deadline for the update. The options are None (the update will be installed on a normal Windows update scheduler), As Soon as Possible, One Week, Two Weeks, One Month, or Custom. The Custom option allows you to select a specific date and time by which the update must be installed.
Step 5. Click Finish to complete the approval process.
Updates that have deadlines and require restarts will cause a forced restart at the time of the deadline, regardless of when the update was actually installed. This is the same behavior as the update deadline used in WSUS.
Third-Party Updates
You can include third-party updates and manage them in Microsoft Intune just like you do Windows updates. From the Updates menu, select the Overview section and click the Add Updates button. This launches the Microsoft Intune Software Publisher app, as shown in Figure 13-20. If the software is not installed on your computer, it will be downloaded and installed.
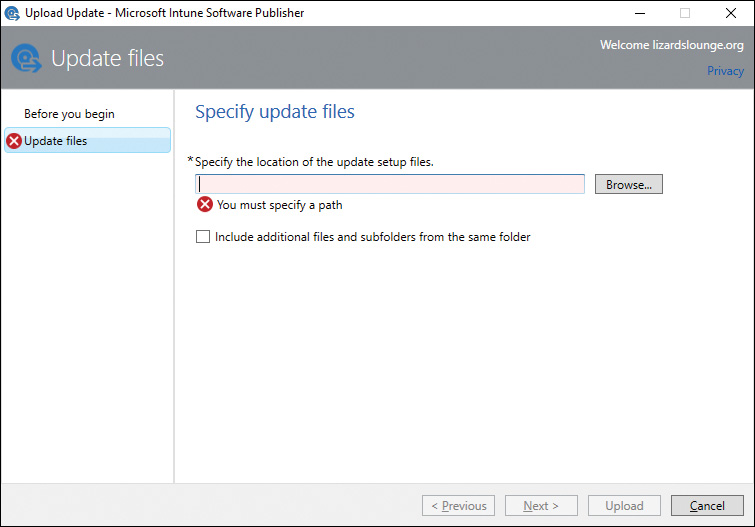
Figure 13-20 Using the Microsoft Intune Software Publisher
Use the following procedure to upload your update file:
Step 1. Click the Browse button to locate the update, and then click the Upload button. You can upload an MSI, MSP, or EXE file. Click Next.
Step 2. Enter the publisher name, the app name, the classification, and a description. The classification can be Critical, Security, Update Rollups, or Service Packs. Click Next.
Step 3. On the Requirements page, select the architecture (32-bit or 64-bit), and the operating system. Only Windows operating systems are supported. Choose Any if the update applies to any Windows version. Click Next.
Step 4. Choose from either default detection rules or add your own detection rule. You can add a rule based on whether a specific file exists, a Registry key, or an MSI product code. Click Next.
Step 5. On the Prerequisites page, you can specify any other software that your update is dependent on. It can be other software managed in Intune, or you can specify a rule. The rules offer the same options as the detection rules in Step 4. If your update has no dependencies, select None. Click Next.
Step 6. The next page gives you an option to provide command-line arguments for your update installer. Enter any arguments needed or select No. Click Next.
Step 7. The next page allows you to select return codes to determine whether the update was successful. Enter any return codes you want Intune to evaluate during the installation, or select No and then click Next.
Step 8. On the summary page, review your selections and then click Upload to send the update to Intune.
Your update will quickly appear in the Updates section of the Intune console. You can then perform approvals or use a rule to automatically deploy the update, just like the Microsoft updates.
Reports and In-console Monitoring
You have learned how to view properties of your devices, set up alerts and notifications, and check on the health of your enrolled devices.
You can also use the console to check alerts. Any triggered alerts will show up in the Alerts menu of the Intune console. Alerts are categorized by the types of alerts, such as Endpoint Protection, Notices, Policy, and Updates, among others. So if you are not receiving emails for alerts, you can still check the console for any alerts that have been triggered and take action.
Another tool for managing your devices is to use reports. You can use reports to get information about software, hardware, and licenses in your organization, and help you decide your resource needs and plan your budgets for future expenditures. Reports fall into several categories, as described in Table 13-3.
Table 13-3 Microsoft Intune Reports
Report Type |
Description |
Update Reports |
Shows the software updates that have been deployed to computers and any that failed, are pending, or needed. |
Detected Software Reports |
Shows software installed on your computers. |
Computer Inventory Reports |
Information about all your managed computers. |
Mobile Device Inventory Reports |
Information about the mobile devices you are managing in Intune. |
License Purchase Reports |
Shows the software titles for all licensed software, based on their licensing agreements. |
License Installation Reports |
Compares installed software on computers with your license agreement coverage, based on the software agreements in the Microsoft Volume Licensing Service Center (VLSC). It also shows software products managed outside of the VLSC. |
Terms and Conditions Reports |
Shows information about users with apps installed from your lists of compliant and noncompliant apps. |
Certificate Compliance Reports |
Shows which certificates have been issued to users and devices. |
Device History Reports |
A historical log of retire, wipe, and delete actions in Intune. |
Heath Attestation Reports |
Shows the health of mobile devices. |
Mac OS X Hardware Report |
Shows hardware details for all enrolled Mac OS X devices. |
Mac OS X Software Report |
Shows software that is installed on all Mac OS X devices. |
Create a report in Intune from the Reports menu of the console. Choose the report type you want, select the criteria for the report, and then click the View Report button. The report will be displayed in a new browser window. You can sort the report by any column by clicking on the column header.
Exam Preparation Tasks
Review All the Key Topics
Review the most important topics in the chapter, noted with the Key Topics icon in the outer margin of the page. Table 13-4 lists a reference of these key topics and the page numbers on which each is found.
Table 13-4 Key Topics for Chapter 13
Key Topic Element |
Description |
Page Number |
Adding users for Intune using the Office 365 portal |
||
Step List |
Enabling enrollment for iOS and Mac devices |
|
Enrolling an iOS device with Microsoft Intune |
||
Step List |
Enrolling a Windows computer with Microsoft Intune |
|
Viewing device properties in the Intune portal |
||
Step List |
Configuring the Microsoft Intune connector site system role |
|
Managing user groups in Azure AD |
||
The Microsoft Intune Center |
||
Microsoft Intune alert types |
||
Step List |
Creating Intune configuration policies |
|
Important Microsoft Intune compliance properties |
||
Step List |
Approving updates in Intune |
|
Step List |
Uploading third-party updates for management by Intune |
Complete the Tables and Lists from Memory
Print a copy of Appendix B, “Memory Tables” (found on the book’s website), or at least the section for this chapter, and complete the tables and lists from memory. Appendix C, “Memory Tables Answer Key,” also on the website, includes completed tables and lists to check your work.
Definitions of Key Terms
Define the following key terms from this chapter, and check your answers in the glossary.
APNs
Azure
device enrollment
hybrid
MDM
Microsoft Intune
Office 365
single pane of glass
SCCM
WSUS