Chapter 10 Windows Hyper-V
This chapter covers the following subjects:
![]() Introduction to Virtualization: In Chapter 2, “Implementing Windows,” you learned about virtual hard disks (VHDs) and native boot VHDs and how to install Windows 10 on them. In this section, VHDs are covered in more detail; you learn about the new VHDX format optimized for Hyper-V and how to create, configure, and use VHDs in the virtual environment.
Introduction to Virtualization: In Chapter 2, “Implementing Windows,” you learned about virtual hard disks (VHDs) and native boot VHDs and how to install Windows 10 on them. In this section, VHDs are covered in more detail; you learn about the new VHDX format optimized for Hyper-V and how to create, configure, and use VHDs in the virtual environment.
![]() Creating and Configuring Virtual Machines: Hyper-V is Microsoft’s virtualization technology used in Windows Server 2008 and later and is now available for Windows 10. This section introduces Client Hyper-V, the virtualization technology used in Windows 10, how to deploy VHDs and virtual machines in Client Hyper-V, and how to configure virtual machines.
Creating and Configuring Virtual Machines: Hyper-V is Microsoft’s virtualization technology used in Windows Server 2008 and later and is now available for Windows 10. This section introduces Client Hyper-V, the virtualization technology used in Windows 10, how to deploy VHDs and virtual machines in Client Hyper-V, and how to configure virtual machines.
![]() Creating and Managing Virtual Machine Checkpoints: One of the benefits of working with virtual machines is the capability to run experiments with them using a safety net to fully restore the previous state. In Hyper-V, you can create checkpoints for your virtual machine for any point in time that you want to preserve. If something goes wrong, or if you just want to start over, you can return virtual machines to any checkpoint and resume working from there.
Creating and Managing Virtual Machine Checkpoints: One of the benefits of working with virtual machines is the capability to run experiments with them using a safety net to fully restore the previous state. In Hyper-V, you can create checkpoints for your virtual machine for any point in time that you want to preserve. If something goes wrong, or if you just want to start over, you can return virtual machines to any checkpoint and resume working from there.
![]() Creating and Configuring Virtual Switches: When using Hyper-V, you work not only with virtual machines and hard disks, but also virtual networks. Virtual networks utilize software representations of network switches, and this section discusses the types of virtual switches used with Hyper-V, how to create and configure them, and how the virtual networks interact with the host computer and the outside world.
Creating and Configuring Virtual Switches: When using Hyper-V, you work not only with virtual machines and hard disks, but also virtual networks. Virtual networks utilize software representations of network switches, and this section discusses the types of virtual switches used with Hyper-V, how to create and configure them, and how the virtual networks interact with the host computer and the outside world.
This chapter covers the following objectives for the 70-697 exam:

Configure Hyper-V: Create and configure virtual machines, including integration services; create and manage checkpoints; create and configure virtual switches; create and configure virtual disks; move a virtual machine’s storage.
Virtualization is a technique for carving up physical computer resources into multiple pseudo machines, allowing multiple operating systems to run on a single hardware platform. The virtual machine appears to be a complete physical computer to the operating system running inside it. A special underlying operating system known as a hypervisor is responsible for controlling access to the physical hardware and presenting the virtualized resources to the operating system guests.
This is not new technology. IBM came out with the first system capable of virtualization in 1972 with the release of VM/CMS for its mainframe systems. Microcomputers, using smaller, cheaper commodity hardware, slowly started replacing mainframes in the datacenter, and as the Intel and AMD platforms became more powerful, eventually virtualization was introduced in these platforms as well. Initially, virtualization for large servers and datacenters was a way to make use of all of the idle cycles on the servers, which became even more efficient when manufacturers began producing microprocessors with multiple cores on a single chip. For companies with requirements for lots of servers to run their businesses, virtualization was a way to save money on hardware, power, and rack space by running more servers on fewer machines.
Microsoft introduced the final production version of its virtualization product, now called Hyper-V, in June of 2008. Hyper-V is now available without additional license fees for all versions of Windows Server 2008 and later.
Client Hyper-V is now built in to Windows 10 and is the same virtualization technology as previously used in Windows Server 2008 and later. This allows you to run more than one operating system at the same time on the same workstation computer. Guest operating systems run in a virtual machine (VM), and you can quickly switch between the Windows 10 host operating system and any VM.
For the 70-697 exam, you are expected to understand some basics of how virtualization works, know the hardware and operating system requirements for running Client Hyper-V, and have the skills to install the Hyper-V hypervisor in Windows 10. You should also know how to create and manage virtual hard disks (VHDs), deploy virtual machines using VHDs, and how to configure and manage virtual switches, which are virtual representations of physical hardware that run right inside the host machine’s virtualized environment.
“Do I Know This Already?” Quiz
The “Do I Know This Already?” quiz allows you to assess whether you should read this entire chapter or simply jump to the “Exam Preparation Tasks” section for review. If you are in doubt, read the entire chapter. Table 10-1 outlines the major headings in this chapter and the corresponding “Do I Know This Already?” quiz questions. You can find the answers in Appendix A, “Answers to the ‘Do I Know This Already?’ Quizzes.”
Table 10-1 “Do I Know This Already?” Foundation Topics Section-to-Question Mapping
Foundation Topics Section |
Questions Covered in This Section |
Introduction to Virtualization |
1–3 |
Creating and Configuring Virtual Machines |
4–8 |
Creating and Managing Virtual Machine Checkpoints |
9 |
Creating and Configuring Virtual Switches |
10–11 |
Caution
The goal of self-assessment is to gauge your mastery of the topics in this chapter. If you do not know the answer to a question or are only partially sure of the answer, you should mark that question as wrong for purposes of the self-assessment. Giving yourself credit for an answer you correctly guess skews your self-assessment results and might provide you with a false sense of security.
1. Virtual hard disks are used for deploying Windows operating systems in a number of ways, including in a Hyper-V virtual environment. What type of VHD is optimized for use in Hyper-V?
a. Native-boot VHDs
b. VHDX-formatted VHDs
c. Hyper-VHDs
d. VHDs in .AVHD format
2. The new VHD format optimized for Hyper-V supports which of the following features? (Select all that apply.)
a. Storage capacity up to 2 TB
b. Metadata logging to prevent file system corruption
c. Larger block sizes for dynamic and differencing disks
d. User-defined custom metadata
3. Which of the following tools can be used to create a virtual hard disk? (Select all that apply.)
a. DiskPart
b. Hyper-V Manager
c. BCDEdit
d. Disk Management
4. You are a desktop support technician for a large corporation, and one of the developers in your organization has asked you to install Hyper-V on a corporate workstation for use in testing some new application software. You have obtained the detailed order slip for that computer and realize that you will not be able to install Hyper-V on it. Which item did you discover on the order specifications that led to that conclusion?
a. Dell computer with Intel Core i-7 processor
b. Windows 10 Enterprise 32-bit
c. 6 GB system RAM
d. 250 GB internal IDE hard drive
e. BIOS version 2012.23a with VT and XD enabled
5. You are a desktop support technician for a large corporation, and one of the developers in your organization has asked you to install Hyper-V on a corporate workstation for use in testing some new application software. The developer ordered a new workstation that meets all the necessary requirements and now you need to install the Hyper-V software. How do you obtain the necessary installation files?
a. The software is already available on the computer.
b. Download from the Microsoft website.
c. Obtain a disk from your Enterprise License administrator.
d. Order it from your software reseller.
6. You are modifying the configuration of a virtual machine in Client Hyper-V from the Hyper-V Manager. The computer has 12 GB of system RAM. What is the maximum amount of RAM you can select in the virtual machine’s configuration settings?
a. 12 GB
b. 10 GB
c. 120 GB
d. 1 TB
7. You have a test computer with several Hyper-V virtual machines configured. One of the VMs is hosting an application that you want to test in various operating systems and configurations, so you have several VMs to use for testing access to the application. You have now run into problems when several of the VMs are running, and the host processors are running high utilization, that cause the application host to perform too slowly to test properly. What should you do to ensure that the VM hosting the application can respond properly?
a. Enable Dynamic Memory.
b. Increase the Memory weight of the application VM.
c. Assign a higher relative weight to the application VM’s processor.
d. Add more processors to the test VMs.
8. You are running Client Hyper-V on a large workstation equipped with 16 GB of system RAM and two processors with four cores each. If you are running four virtual machines on this computer, what is the maximum number of virtual processors you can assign to each one?
a. 2 virtual processors
b. 4 virtual processors
c. 8 virtual processors
d. 16 virtual processors
9. You are performing testing on a Client Hyper-V virtual machine and have created checkpoints every day for the past 5 days. You select the first checkpoint from the list in the Hyper-V Manager and delete the first checkpoint. What happens to the virtual machine?
a. All changes since the first checkpoint are lost.
b. The VM is reverted to before the first checkpoint.
c. Changes made since the checkpoint are merged into the running state.
d. The virtual machine is restarted and the checkpoint changes are lost.
10. You are creating virtual switches for use with your virtual machines and would like to ensure that they can access the Internet and Windows Update. What type of virtual switch would you create for these VMs?
a. Internal virtual switch
b. External virtual switch
c. Public virtual switch
d. Private virtual switch
11. You have used the Hyper-V Manager to create a new internal virtual switch, and have connected all of your VMs to the new switch, but the VMs’ network configurations are still using private autoconfiguration addresses, and you cannot ping any of the VMs from the host. What should you do to allow the host to communicate with the VMs?
a. Manually configure the IP settings of the host and VMs.
b. Use connection sharing on the Hyper-V host.
c. Use an external virtual switch instead.
d. Turn off the firewall.
Foundation Topics
Introduction to Virtualization
In Chapter 2, “Implementing Windows,” we covered how to use a virtual hard disk (VHD) in Windows 10 and how to install Windows 10 on an existing VHD. Some of this material will be a review of the “Using a VHD” section of Chapter 2 and will then go further in depth into the types of VHDs, and how they are created, managed, and deployed in Hyper-V.
Recall from Chapter 2 that the VHD was used to create a new bootable Windows 10 installation, which was then added to the computer’s boot menu. The technique was a convenient way to create a Windows 10 image that could then be copied to other computers and booted from the boot menu. It makes deploying Windows 10 to multiple machines very convenient, but VHDs are useful in many other ways, especially when combined with Hyper-V.
A VHD can be used not just for Windows 10 or Windows 7; it could alternatively contain Windows XP, a Linux or UNIX distribution, or a custom, bootable appliance. With Hyper-V, it is not necessary to add this image to the boot menu and restart the computer. Instead, the alternative OS can run in a virtual machine as a guest while the Windows 10 operating system is running as a host. Hyper-V is the same technology Microsoft uses to host virtual machines in the Azure cloud. You can even migrate virtual machines from your on-premises data center to Azure.
Note
You can explore virtual machine hosting on Azure at https://azure.microsoft.com/en-us/services/virtual-machines.
Creating and Configuring VHDs
Before creating and running operating system guests under Client Hyper-V, it is necessary to create a virtual disk for the guest OS to use. Client Hyper-V can run guests installed on VHD files, or the new VHDX format, designed specifically for virtual machines running under Hyper-V.
The new VHDX format provides several advantages over the VHD format, but note that VHDX formatted disks cannot be used as native-boot VHDs—only guests running in Hyper-V or Client Hyper-V can make use of VHDX files. The VHDX format supports the following features:
![]() Support for storage capacity up to 64 TB (compared to 2 TB for VHD format).
Support for storage capacity up to 64 TB (compared to 2 TB for VHD format).
![]() Support for VHDX metadata logging, to protect against file system corruption during power failures and improper shutdown.
Support for VHDX metadata logging, to protect against file system corruption during power failures and improper shutdown.
![]() Improved alignment for greater efficiency on large sector disks.
Improved alignment for greater efficiency on large sector disks.
![]() Large block sizes for dynamic and differencing disks.
Large block sizes for dynamic and differencing disks.
![]() Support for 4 KB logical sector VHDs.
Support for 4 KB logical sector VHDs.
![]() Support for user-editable custom metadata for the VHDX file.
Support for user-editable custom metadata for the VHDX file.
![]() Support for smaller file sizes using trim, when using trim-compatible hardware.
Support for smaller file sizes using trim, when using trim-compatible hardware.
In Chapter 2, we created a VHD using the Disk Management snap-in. We also used BCDEdit to manage the boot configuration for a native boot VHD. This is probably the most common method of creating a VHD in Windows 10, but there are other tools and procedures you should understand and know how to use. You should review Table 2-10 and be familiar with the available tools.
You can also create a VHD using the Hyper-V Manager in Windows 10. This utility can be run on any Windows 10 machine, even if the computer cannot support the Hyper-V platform. Installing and using the Hyper-V Manager are covered in the next section.
In this section we cover the process for creating a VHD using the DiskPart command-line tool. It is included with Windows as part of the default installation, and no further installation is needed to start using it.
Using DiskPart to Create a VHD
The DiskPart utility enables you to create a VHD from the command line. You can script this action to create multiple VHDs if necessary. The DiskPart command-line tool is also available in Windows 8, 7, Vista, and Windows Server editions 2008 and later. It is used to manage storage objects, including disks, partitions, and volumes by using scripts or directly from the command prompt.
Using DiskPart requires that you use commands to focus on an object using DiskPart commands to list and select a particular storage object, then use commands that act on that object. In the list that follows, the create commands act to focus on the objects created, and subsequent DiskPart commands will act on that object.
Note
For more information on the DiskPart utility, syntax, and commands, see the topic “DiskPart Commands” at https://technet.microsoft.com/en-us/library/cc770877(v=ws.11).aspx.

Step 1. Open a command prompt by clicking the Search bar or Cortana, typing cmd into the Search box, right-clicking the Command Prompt link, and then selecting the Run as Administrator option from the pop-up menu. You can also right-click Start and choose Command Prompt (Admin) from the menu that appears. Click Yes in the User Account Control prompt that appears.
Step 2. Type diskpart into the administrator command prompt window. You receive the DISKPART> command prompt.
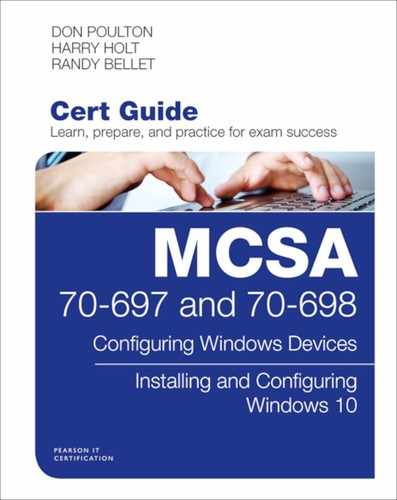
Step 3. To create a dynamic VHD of 20 GB using the VHDX format and named win01.vhdx, type create vdisk file=“c:win01.vhdx” maximum=20000 type=expandable. The format is taken from the extension used (VHD or VHDX).
Step 4. When you are informed that DiskPart has successfully created the file, type attach vdisk.
Step 5. When DiskPart informs you that the disk was attached, type list disk to show that the disk is present and online. This command also provides the disk number that you must enter in the next step of the procedure.
Step 6. To create a partition on the VHD, type select disk n, press Enter, type create partition primary, and then press Enter again. In this command, n is the disk number you obtained from the previous step.
Step 7. To perform a quick format on the partition using the NTFS file system, type format fs=ntfs quick.
Step 8. To assign the drive letter F: to the new partition, type assign letter=F.
Step 9. To mark the partition as active, type active.
These steps complete the creation of a VHD on drive F: that is suitable for installing a virtual copy of Windows. Figure 10-1 shows how these steps appear at the console. Table 10-2 outlines the parameters of the vdisk command that are most useful for creating and working with VHDs.
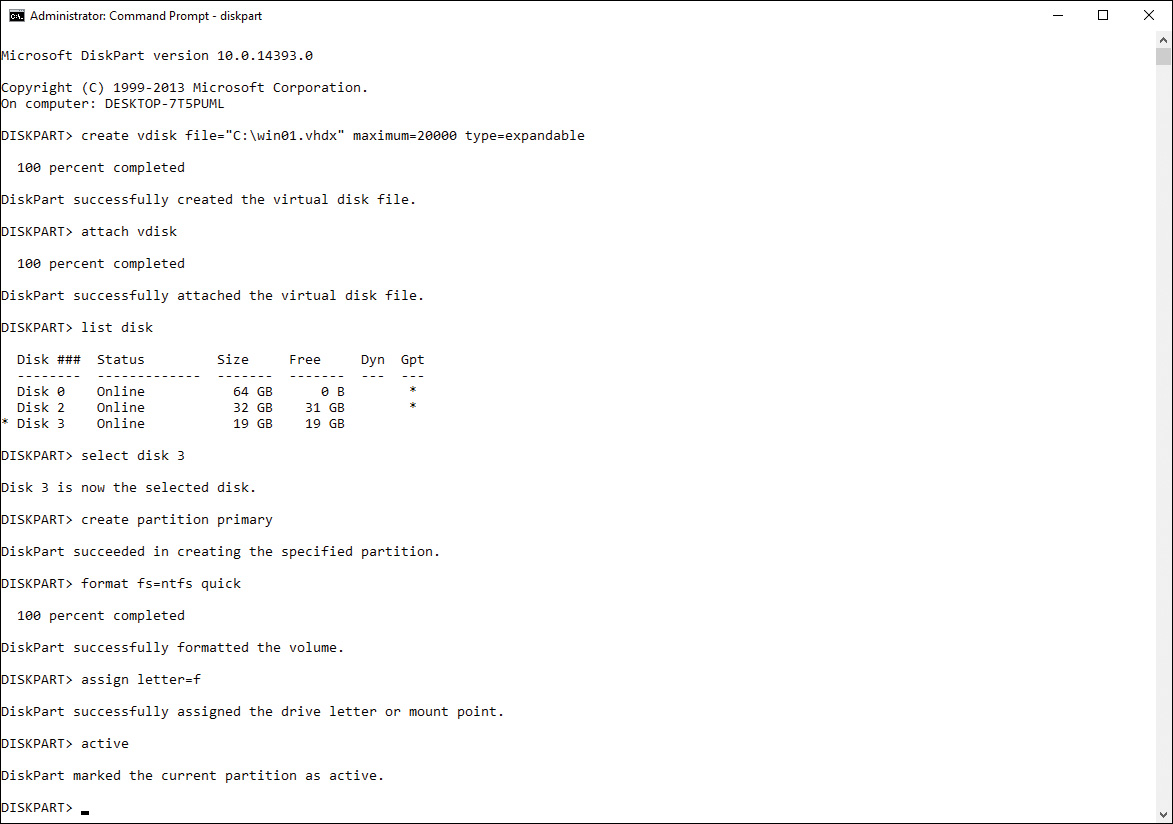
Figure 10-1 Using DiskPart to Create, Format, and Assign a VHD
Refer to Table 10-2 for some common DiskPart command parameters and how they are used.
Table 10-2 DiskPart Commands Used in Creating VHDs
Command |
Purpose |
create vdisk file=“filename” maximum= type= |
Creates a VHD with name of filename, maximum size stated in MB, and type = fixed, expandable, or differencing. The extension used for the filename determines whether the format used is VHD or VHDX. |
attach |
Attaches (mounts) the VHD. |
list disk |
Shows all disks (physical and virtual) attached to the system, together with their size and identifying number. |
Select disk= |
Selects the VHD so that it can be partitioned and formatted, where n is the number of the disk as shown by the list disk command. |
create partition primary |
Creates a primary partition on the VHD, using the maximum available space. If you want to use only a portion of the VHD, include the keyword size=nnnn, where nnnn is the partition size in MB. |
format fs=filesystem |
Formats the partition using the file system filesystem (which can be fat, fat32, exFAT, ReFS, UDF, or ntfs). Add the keyword quick to perform a quick format. |
assign letter= |
Assigns a drive letter to the partition. |
active |
Marks the selected partition as active. |
Mounting VHDs
The act of creating a VHD in the previous section also mounts the VHD automatically, so that it is accessible to the physical machine as a distinct drive with its own drive letter. It is also possible to create a VHD on one computer, make copies of it, and use these copies on other computers. To do so, you must mount the VHD on each new computer. Simply put, this is the virtual analogy of opening the computer, installing and connecting a new hard disk, closing the computer back up, and rebooting it. You can perform these tasks using Disk Management. Figure 10-2 shows the results of the preceding DiskPart commands in the Disk Management console.

Figure 10-2 View of a VHD from Disk Management, Mounted and Assigned to Drive F
You can also dismount a VHD from either of these two utilities. In Disk Management, right-click the VHD in the Details pane and choose Detach VHD. In DiskPart, select the VHD and then type detach vdisk.
Tip
You can even mount a VHD located on another computer across the network, provided you have proper access permissions to its location. In Disk Management, click Browse, click Network, and browse to the proper network location. In DiskPart, type the Universal Naming Convention (UNC) path to the shared location for “path” in Step 3 of the preceding procedure.
Tip
You can use Windows Deployment Services (WDS) to deploy the VHD image to large numbers of computers. WDS in Windows Server 2012 and later versions include the capability to add VHD image files to its image catalog, making them available to target computers using PXE boot.
Creating and Configuring Virtual Machines
After you create a VHD in Windows 10, you can create a VM guest using the VHD as the VM’s drive. You can then load and run the VM in Client Hyper-V on your Windows 10 Pro or Windows 10 Enterprise workstation.
This is the easiest method for supporting a VM, but note that a VHD is not strictly a requirement. Virtual machines can also be run using actual disks, passed directly to the virtual machine. It is also possible to run a VM from a VHD on a remote file server.
To support Client Hyper-V, you need to be aware of the following requirements:
![]() A 64-bit version of Windows 10 Pro, Enterprise, or Education. Client Hyper-V will not run on Windows 10 Home or any 32-bit edition.
A 64-bit version of Windows 10 Pro, Enterprise, or Education. Client Hyper-V will not run on Windows 10 Home or any 32-bit edition.
![]() A CPU that supports Second Level Address Translation (SLAT). All current versions of AMD 64-bit processors support SLAT, as do many 64-bit processors from Intel. Some budget and mobile editions of Intel processors do not support SLAT.
A CPU that supports Second Level Address Translation (SLAT). All current versions of AMD 64-bit processors support SLAT, as do many 64-bit processors from Intel. Some budget and mobile editions of Intel processors do not support SLAT.
![]() A BIOS with virtualization support, either VT for Intel platforms or AMD-V for AMD-based systems.
A BIOS with virtualization support, either VT for Intel platforms or AMD-V for AMD-based systems.
![]() Hardware Data Execution Prevention (DEP). This is called Execute Disable, or XD, on Intel processors and No Execute, or NX, on AMD processors. The option must be enabled in the BIOS.
Hardware Data Execution Prevention (DEP). This is called Execute Disable, or XD, on Intel processors and No Execute, or NX, on AMD processors. The option must be enabled in the BIOS.
![]() At least 4 GB of system RAM.
At least 4 GB of system RAM.
The number of VMs you can run and the performance of each will depend on the amount of RAM you have available. You can create VMs that use up to 1 TB of RAM, and each VM will require some overhead memory, in addition to the memory required by the host operating system and the hypervisor.
Note
For more details on hardware and software requirements for Client Hyper-V, see the Microsoft TechNet article “Windows 10 Hyper-V System Requirements” at https://docs.microsoft.com/en-us/virtualization/hyper-v-on-windows/reference/hyper-v-requirements.
Enabling Client Hyper-V in Windows 10
Windows 10 Pro and higher editions come with Client Hyper-V available out of the box, but it must be installed using the Windows Features installer from the Control Panel’s Programs snap-in. The feature installer provides a convenient way to make sure that your Windows 10 computer can support the Hyper-V hypervisor, because it can detect many of the requirements and disable the option if any requirements are missing.
Use the following steps to enable Hyper-V:
Step 1. Right-click the Start button and select Control Panel from the menu.
Step 2. In the Control Panel window, select Programs.
Step 3. From the list of Programs and Features functions, click Turn Windows Features On or Off.
Step 4. Expand the Hyper-V folder, displaying the selections Hyper-V Management Tools and Hyper-V Platform.
Note
If Client Hyper-V is not supported due to any missing requirements, the Hyper-V Platform option will be disabled. Hover your pointer over the disabled option and Windows will display a tool tip to explain why you cannot install the Hyper-V Platform. In Figure 10-3, Hyper-V Platform is disabled because the processor does not have the required virtualization capabilities.
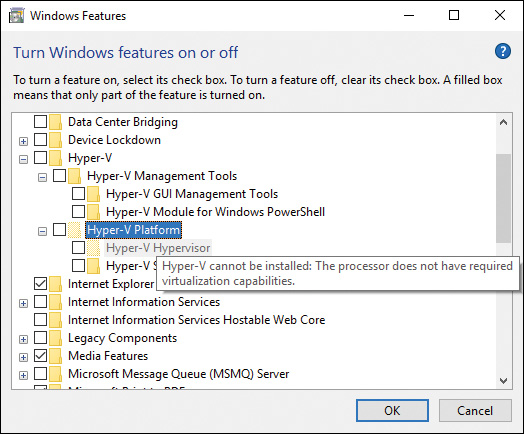
Figure 10-3 Hyper-V Cannot Be Installed Because the Processor Does Not Support the Necessary Virtualization Features
Step 1. Select all Hyper-V options to include Management Tools and the Hyper-V Platform.
Step 2. Click OK to install the Hyper-V features. Windows will take a few minutes to perform the installation and then request a reboot to complete the changes.
Step 3. Click Reboot Now to complete the installation.
After Windows has restarted, Hyper-V will be installed and ready to use.
Creating a Hyper-V Virtual Machine
There are many scenarios that make the use of virtual machines in a client environment a compelling solution for efficient use of resources and time. Server virtualization provides many advantages for making the best use of costly hardware resources. Client Hyper-V offers some of the same efficiencies, but that is less of a consideration than other use cases. The following are several advantages of using Client Hyper-V:
![]() Maintaining multiple test environments for developers and system engineers.
Maintaining multiple test environments for developers and system engineers.
![]() Running older versions of Windows for applications that will not run on current versions.
Running older versions of Windows for applications that will not run on current versions.
![]() Building a test lab infrastructure on a computer or laptop. Workstations or server VMs tested in the virtual lab can be migrated to a virtualized production environment.
Building a test lab infrastructure on a computer or laptop. Workstations or server VMs tested in the virtual lab can be migrated to a virtualized production environment.
![]() Developers or QA professionals can test applications or changes on multiple operating systems, using a single Client Hyper-V computer.
Developers or QA professionals can test applications or changes on multiple operating systems, using a single Client Hyper-V computer.
![]() Export a VM from the production environment to a Client Hyper-V test machine. From there troubleshooting can be performed, fixes applied and tested, and the system restarted multiple times without impacting the current production systems.
Export a VM from the production environment to a Client Hyper-V test machine. From there troubleshooting can be performed, fixes applied and tested, and the system restarted multiple times without impacting the current production systems.
![]() Use VM checkpoints while a machine is running to test invasive changes. You can test changes and revert to the point-in-time before the checkpoint if things go wrong, or apply the checkpoint back to the running VM if the testing is successful.
Use VM checkpoints while a machine is running to test invasive changes. You can test changes and revert to the point-in-time before the checkpoint if things go wrong, or apply the checkpoint back to the running VM if the testing is successful.
![]() With a workstation with a fast processor and enough RAM, an entire working environment can be deployed as VMs on Client Hyper-V, to include all networking configurations and virtual switches. It can be used for testing, software development, or even demonstration of a proof-of-concept.
With a workstation with a fast processor and enough RAM, an entire working environment can be deployed as VMs on Client Hyper-V, to include all networking configurations and virtual switches. It can be used for testing, software development, or even demonstration of a proof-of-concept.
Designing a virtual environment for some of these scenarios may require some planning. Or it can serve as a proof-of-concept environment as a preliminary step to planning an environment. Because you are not deploying expensive hardware, all your changes can be easily reversed, changed, or simply deleted. A virtual environment provides the freedom to experiment with options without much risk. The changes you make and systems you design can be documented as you go, and planning can be performed when technical challenges are overcome. Deciding when to take a checkpoint of a VM or a set of VMs may be the most difficult planning decision to make during the testing. The only disruption any of your changes cause will be to a single workstation.
Note that one of the scenarios in the preceding list was based on a use case for running older applications that do not work in current versions of Windows. This may be a rare scenario, but it does happen. Applications can become obsolete and unsupported but are still required for business needs that cannot easily be replaced. In Windows Vista and Windows 7, this type of issue was addressed with Windows XP Mode, which allowed users to run a virtualized version of Windows XP on top of their Windows Vista or Windows 7 computer. In Windows 10, this trimmed-down virtualization feature has been replaced with Hyper-V.
Using the Hyper-V Manager
After you install Hyper-V and the Hyper-V management tools, the Hyper-V Manager is ready to run. You can start the Hyper-V Manager from the Start menu, or click the Search bar or Cortana and type hyper into the Search box. The link for the Hyper-V Manager will appear in the list. Click it to start the management interface. When you click the host computer name, it will look similar to Figure 10-4.
Figure 10-4 The Hyper-V Manager Screen Before Any Virtual Machines Are Added
The Hyper-V Manager is a central location for managing your Hyper-V virtual hosts and the VMs running on those hosts. Similar to other Microsoft Management Console snap-ins, you can connect to other computers and servers running the Hyper-V Platform and perform the same tasks on those hosts and VMs.
The manager interface is composed of three sections. The left navigation pane shows the Hyper-V host machines and allows you to focus on a specific host and add new ones to the inventory.
The central pane displays the VMs for the current host, an area to display Checkpoints for a selected VM, and finally a Details list for displaying configuration specifics of the VM you are working with. When a running VM is selected, the Details section displays a miniature image of the virtual console and tabs for checking the current Memory and Networking usage.
The right pane is the Actions section, where you can perform activities, such as creating new virtual machines, manage the host configuration settings, manage VHDs and SAN storage locations, and other functions. Each of these actions is also available from the right-click context menu of each hostname in the Navigation pane.
Creating Virtual Machines
You can create a new VM in Hyper-V Manager by following a simple wizard-like interface. The following steps create a basic virtual machine ready to run:
Step 1. In Hyper-V Manager’s Actions pane, click New and select Virtual Machine from the pop-up menu. The New Virtual Machine Wizard screen is displayed.
Step 2. Read the information on the Before You Begin page and then click the Next button.
Step 3. When the Specify Name and Location screen is displayed (see Figure 10-5), enter a descriptive name for the new VM in the box provided. Optionally, you can change the folder location for the VM. This location only refers to the configuration files for the VM itself, not the virtual disk that the VM guest will use for storage. Click the Next button to proceed.

Figure 10-5 Creating a New Virtual Machine
Step 4. On the Specify Generation page shown in Figure 10-6, you can select whether to create a Generation 1 or Generation 2 virtual machine. Generation 1 is selected by default, and this format will be the most compatible version of VM to use, in case you want to run the machine on a Windows 8.1 or Windows Server 2012 Hyper-V host. Note that if you are creating a 32-bit guest, you must use Generation 1. Select Generation 1, and then click the Next button.
Step 5. On the Assign Memory screen shown in Figure 10-7, decide how much memory the VM will use. The minimum is 32 MB and the maximum depends on the amount of RAM available on the physical host. The default is 1024 MB of RAM. When you have assigned the memory you want the VM to use, click the Next button.

Figure 10-6 Creating a Generation 1 or Generation 2 Virtual Machine
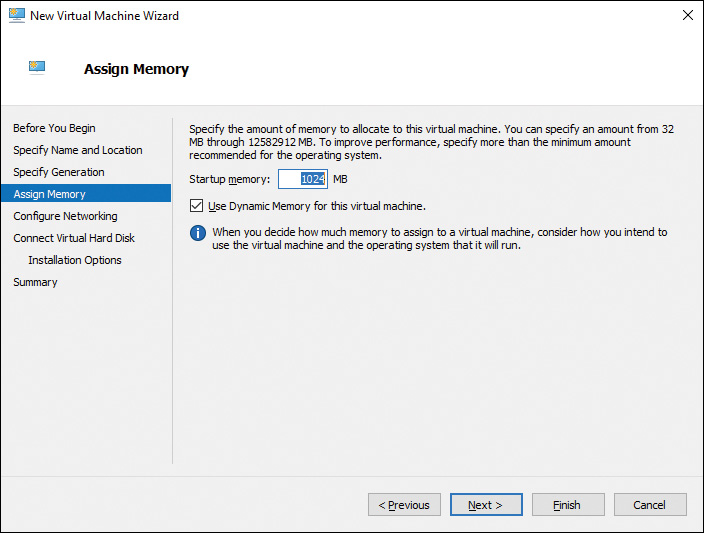
Figure 10-7 Assigning Memory for a New Virtual Machine
Step 6. On the Configure Networking screen, you assign the VM to use a specific Virtual Switch. If none has been configured on the Hyper-V host, the only available selection will be Not Connected. Click the Next button to proceed.
Step 7. The Connect Virtual Hard Disk page allows you to configure the virtual hard disk that will be used by the VM. You can create a new dynamic VHDX disk from the Connect Virtual Hard Disk screen, or you can use an existing one. The previous section covered creating a VHDX using DiskPart, and in Figure 10-8 this disk is assigned to the new VM. Then click Next.

Figure 10-8 Assigning an Existing VHD to a New Virtual Machine
Step 8. The Completing the New Virtual Machine Wizard page shown in Figure 10-9 displays a description of your selections. When you click the Finish button, the wizard will create the new VM.
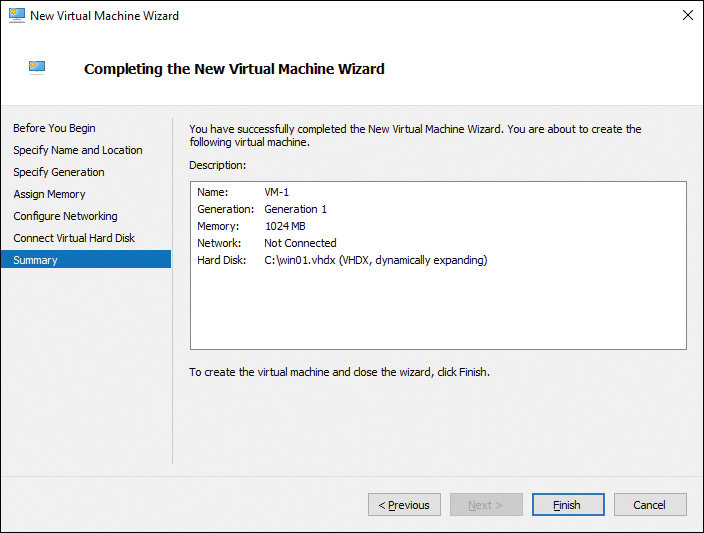
Figure 10-9 Ready to Create a New Virtual Machine with 1024 MB RAM and No Networking
The VM created with this method is a pretty basic machine. Unless you use a VHD with an existing Windows image, there will be no operating system. If the VM is not connected to a virtual switch, it has no networking. There are many ways to make the VM useful, which we cover in the following sections; however, first we should look at the many VM configuration options that were not available from the wizard.
Configuring Virtual Machines
When you first create a VM, it is added to the Hyper-V Manager turned off. Some settings can be changed only while the VM is powered off. To configure the settings for a powered-off VM, select it from the list, and then click the Settings action for the machine. The Settings page shown in Figure 10-10 is displayed.
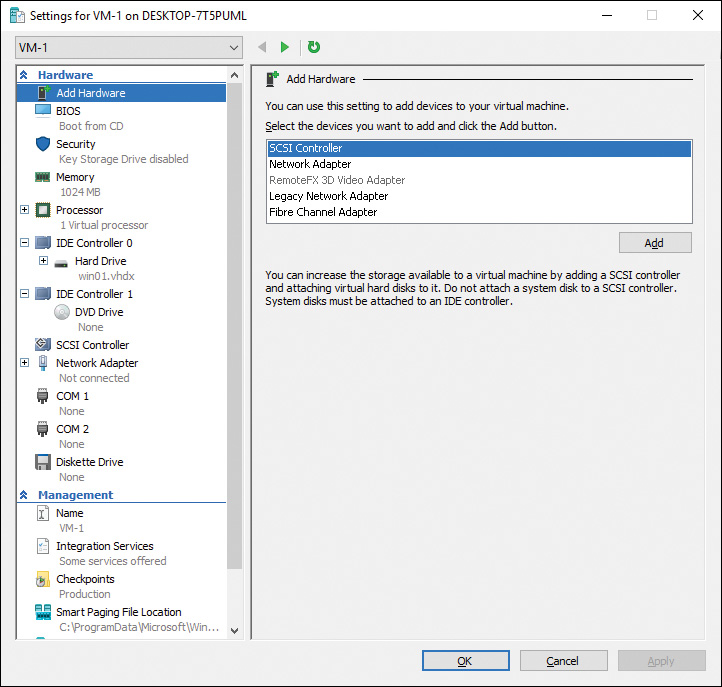
Figure 10-10 Configuring Virtual Machine Settings
The virtual machine settings include many of the same items you would consider when purchasing a physical computer, but in a virtual machine they either make use of existing hardware on the host machine or are simply carved out of thin air using software emulation. For instance, if you want to increase the amount of memory or disk space, the resources used by the VM would consume some memory or disk space on the host or storage attached to the host. On the other hand, you can also simulate items such as SCSI controllers, network adapters, COM ports, and other hardware inside the hypervisor, even if these items do not exist on the host computer.
The VM settings include the following configurable items, which are grouped as VM Hardware settings and Management settings:
![]() Add Hardware: Add new hardware to the virtual machine. The items available include the following:
Add Hardware: Add new hardware to the virtual machine. The items available include the following:
![]() SCSI Controller: One controller is created for the virtual machine by default, but you can add additional controllers here. This allows you to simulate complex RAID configurations using VHDs that could all reside on a single disk drive.
SCSI Controller: One controller is created for the virtual machine by default, but you can add additional controllers here. This allows you to simulate complex RAID configurations using VHDs that could all reside on a single disk drive.
![]() Network Adapter: Add a virtual network interface card to the VM. To enable a connection for the network adapter, a virtual switch must be available in the Hyper-V host environment.
Network Adapter: Add a virtual network interface card to the VM. To enable a connection for the network adapter, a virtual switch must be available in the Hyper-V host environment.
![]() RemoteFX 3D Video Adapter: Add a graphics adapter for rich 3D graphical experience for the guest. This requires a DirectX 10-compatible graphics adapter on the host.
RemoteFX 3D Video Adapter: Add a graphics adapter for rich 3D graphical experience for the guest. This requires a DirectX 10-compatible graphics adapter on the host.
![]() Legacy Network Adapter: The legacy adapter is available for performing network-based installation of the guest operating system, or when integration services are not available on the guest. Guest VM integration services are covered later in this section. They are not available on Generation 2 guests.
Legacy Network Adapter: The legacy adapter is available for performing network-based installation of the guest operating system, or when integration services are not available on the guest. Guest VM integration services are covered later in this section. They are not available on Generation 2 guests.
![]() Fibre Channel Adapter: This adapter is used for connecting the guest to an existing physical Fibre Channel storage. It acts as a pass-through adapter so that a VM can access physical storage over Fibre Channel.
Fibre Channel Adapter: This adapter is used for connecting the guest to an existing physical Fibre Channel storage. It acts as a pass-through adapter so that a VM can access physical storage over Fibre Channel.
![]() BIOS or Firmware: Some basic BIOS settings are available; most important is the capability to select the startup order for boot devices. This is convenient for installation of operating systems on the VM. Generation 2 guests will have Firmware, Generation 1 will have BIOS.
BIOS or Firmware: Some basic BIOS settings are available; most important is the capability to select the startup order for boot devices. This is convenient for installation of operating systems on the VM. Generation 2 guests will have Firmware, Generation 1 will have BIOS.
![]() Memory: The amount of memory available to a VM will affect performance more than any other setting. The latest version of Hyper-V (included with Windows 10) includes support for Dynamic Memory. You should understand how these settings are used. Dynamic Memory is examined in detail in Table 10-3.
Memory: The amount of memory available to a VM will affect performance more than any other setting. The latest version of Hyper-V (included with Windows 10) includes support for Dynamic Memory. You should understand how these settings are used. Dynamic Memory is examined in detail in Table 10-3.
![]() Processor: Specify the number of virtual processors assigned to the VM. From this page you can also reserve or limit a percentage of resources the VM should use. Refer to Table 10-4 for details on the Processor configuration settings and how they are used.
Processor: Specify the number of virtual processors assigned to the VM. From this page you can also reserve or limit a percentage of resources the VM should use. Refer to Table 10-4 for details on the Processor configuration settings and how they are used.
![]() IDE Controller: By default, the New Virtual Machine Wizard will add two IDE Controllers (0 and 1) to a Generation 1 VM, and assign the first VHD to IDE Controller 0. Generation 2 VMs will not have IDE controllers, so the first hard drive will be assigned to a SCSI controller.
IDE Controller: By default, the New Virtual Machine Wizard will add two IDE Controllers (0 and 1) to a Generation 1 VM, and assign the first VHD to IDE Controller 0. Generation 2 VMs will not have IDE controllers, so the first hard drive will be assigned to a SCSI controller.
![]() New Hard Drive: When you add a new hard drive to the VM’s IDE Controller, it can be either VHDs or attached to a physical hard disk available on the host computer. If you want to add a physical hard disk, it must be offline in the host before you can add it. That drive will be unavailable to the host operating system.
New Hard Drive: When you add a new hard drive to the VM’s IDE Controller, it can be either VHDs or attached to a physical hard disk available on the host computer. If you want to add a physical hard disk, it must be offline in the host before you can add it. That drive will be unavailable to the host operating system.
![]() New DVD Drive: If you want to add a DVD drive to the VM, it must be added to the IDE Controller. The guest SCSI controller does not support DVD drives. Similar to adding an IDE hard disk, the DVD drive can be either a physical drive from the host or a DVD image file in ISO format (an .ISO file).
New DVD Drive: If you want to add a DVD drive to the VM, it must be added to the IDE Controller. The guest SCSI controller does not support DVD drives. Similar to adding an IDE hard disk, the DVD drive can be either a physical drive from the host or a DVD image file in ISO format (an .ISO file).
![]() SCSI Controller: This is a virtual SCSI controller that the VM operating system will treat as an actual SCSI controller. You can add VHDs and physical disks to the VM’s SCSI controller. Physical disks that you add to this simulated controller do not need to be attached to a physical SCSI device—they can be IDE disks or even USB disk drives.
SCSI Controller: This is a virtual SCSI controller that the VM operating system will treat as an actual SCSI controller. You can add VHDs and physical disks to the VM’s SCSI controller. Physical disks that you add to this simulated controller do not need to be attached to a physical SCSI device—they can be IDE disks or even USB disk drives.
![]() Network Adapter: You can modify a number of settings for the VM’s network adapter, including changing the virtual switch it is using. This is analogous to moving the network cable from one switch to another on a physical computer. The section “Creating and Configuring Virtual Switches” covers more details about the network adapter configuration.
Network Adapter: You can modify a number of settings for the VM’s network adapter, including changing the virtual switch it is using. This is analogous to moving the network cable from one switch to another on a physical computer. The section “Creating and Configuring Virtual Switches” covers more details about the network adapter configuration.
![]() COM 1 and COM 2 (Generation 1 only): You can attach the virtual COM ports to named pipes on the local host or a remote computer to simulate serial communications on the VM.
COM 1 and COM 2 (Generation 1 only): You can attach the virtual COM ports to named pipes on the local host or a remote computer to simulate serial communications on the VM.
![]() Diskette Drive (Generation 1 only): Allows you to attach a simulated floppy disk drive to the VM. You cannot use a physical device for the VM; it must be a virtual floppy disk (.vfd) file.
Diskette Drive (Generation 1 only): Allows you to attach a simulated floppy disk drive to the VM. You cannot use a physical device for the VM; it must be a virtual floppy disk (.vfd) file.
![]() Name: Set the descriptive name for this VM used by Hyper-V. This section also allows you to add descriptions and notes for the VM, which is convenient for keeping track of how you are using the VM.
Name: Set the descriptive name for this VM used by Hyper-V. This section also allows you to add descriptions and notes for the VM, which is convenient for keeping track of how you are using the VM.
![]() Integration Services: Configure which hypervisor services will be available for the VM.
Integration Services: Configure which hypervisor services will be available for the VM.
![]() Checkpoints File Location: Specify where on the host Hyper-V should store checkpoint images for the VM, and whether you want to use Production checkpoints or Standard checkpoints.
Checkpoints File Location: Specify where on the host Hyper-V should store checkpoint images for the VM, and whether you want to use Production checkpoints or Standard checkpoints.
![]() Smart Paging File Location: Smart Paging allows the hypervisor to deal with excessive demands of memory from virtual machines, typically during startup. In this setting you can specify the folder Hyper-V should use to store the Smart Paging files for this VM.
Smart Paging File Location: Smart Paging allows the hypervisor to deal with excessive demands of memory from virtual machines, typically during startup. In this setting you can specify the folder Hyper-V should use to store the Smart Paging files for this VM.
![]() Automatic Start Action: Tell Hyper-V whether to automatically start this VM when the hypervisor is started. If you enable automatic start, you can also specify a number of seconds to delay the startup.
Automatic Start Action: Tell Hyper-V whether to automatically start this VM when the hypervisor is started. If you enable automatic start, you can also specify a number of seconds to delay the startup.
![]() Automatic Stop Action: Configure how Hyper-V will manage the VM state when the host is shut down. By default, Hyper-V will save the current state of the VM.
Automatic Stop Action: Configure how Hyper-V will manage the VM state when the host is shut down. By default, Hyper-V will save the current state of the VM.
Caution
If you select Turn Off the Virtual Machine for the VM’s Automatic Stop Action, be aware that this is like immediately pulling the power on a physical machine. If the operating system is loaded and running when this happens, it can cause file system corruption, loss of data, and, potentially, disk errors that prevent the operating system from loading the next time the VM is started.
When configuring your Hyper-V virtual environment, you should be aware of the memory and processor settings available for the VMs. This will help manage the physical resources, and balance the requirements for the virtual machines between each other and the resources needed by the host operating system itself.
Table 10-3 Virtual Machine Dynamic Memory
Option |
Description |
Startup RAM |
Startup RAM tells the hypervisor how much memory to assign the VM when it first loads. If Dynamic Memory is not enabled, this setting will specify the total amount of memory the VM will use at all times. |
Enable Dynamic Memory |
When Dynamic Memory is enabled, Hyper-V will adjust the amount of RAM assigned to the VM based on the demand from the guest operating system. |
Minimum RAM |
The minimum amount of memory to assign to the VM. If there is not enough physical memory on the host to satisfy this requirement, the VM will not load. |
Maximum RAM |
The maximum amount of memory that can be assigned to the VM by the hypervisor. The actual amount assigned will not exceed the amount of physical memory available on the host, regardless of this setting. In Windows 10 Hyper-V, a VM can be assigned as much as 1 TB of RAM, but the amount is also limited by the amount of physical memory in the host and the amount of RAM the guest operating system is capable of addressing. |
Memory buffer |
Hyper-V will use this setting to provide an amount of memory above the demands of the VM’s operating system. Performance counters are used to determine the memory the VM is requesting for use. The buffer percentage will be used to add some amount to that demand when allocating memory. For instance if the operating system is requesting 1000 MB for its use, and the buffer is 20%, the hypervisor will assign 1200 MB of RAM to the VM. |
Memory weight |
The weighting set here, from Low to High, is used when there are multiple VMs running under the hypervisor requesting memory. Adjust this setting so that VMs that have a higher priority for performance are provided a higher weight. VMs with a lower rating will perform slower when there is a high demand for memory resources on the hypervisor as a whole. |
The processor options that can be specified or used for a VM depend heavily on the physical processor characteristics available on the host machine. You should understand the basics of how these settings are used by Hyper-V.
Table 10-4 Virtual Machine Processor Configuration Options
Option |
Description |
Number of virtual processors |
Set the number of processors the guest OS will see when it starts. You can assign as many processors as the number of cores in the host computer. |
Resource control |
Resource control is important when there are a number of VMs running at the same time on a single host. Note that these settings are specific to the number of virtual processors assigned. Reserve a percentage of the resources available to the VM to ensure that the VM always has that amount of processor available to use. Set a limit to ensure the VM never uses more resources on the processor(s) than that percentage amount. Finally, you can assign a relative weight for this VM. The weight is an arbitrary number, and is relevant only when compared to the weight of other VMs running on the host. |
Processor compatibility |
Generally, Hyper-V will maximize performance by using all the features and instruction sets available on the physical processor. If you are planning a VM architecture that may be deployed to a server environment or other hosts, you can select the compatibility setting to ensure that the virtual machines can be migrated to hosts with different types of processors. Hyper-V will use a basic set of features and instructions available on all supported processor architectures. |
NUMA configuration |
Nonuniform memory architecture, or NUMA, is a memory allocation technology that groups memory locations and processors into nodes, to avoid performance issues caused by multiple processors attempting to access the same memory location, or accessing memory in a location slower to access for the processor that requests it. The physical NUMA configuration can have an effect on VM performance, and in some high-performance applications it may be useful to simulate a NUMA topology different than the physical host. For best performance on the VMs, use the physical topology. |
Deploying Virtual Machines
The Hyper-V virtual machine created using the steps in the previous section can be configured, started, and run, but if you used a new VHDX, or the one created using DiskPart in the first section, it does not have an operating system.
From the Hyper-V Manager, you can access a virtual console for any VM either by right-clicking the VM and selecting Connect, or by double-clicking the icon in the Summary tab at the bottom of the central pane. Click the Start icon or select Start from the Action menu, and the result will be similar to the illustration in Figure 10-11.
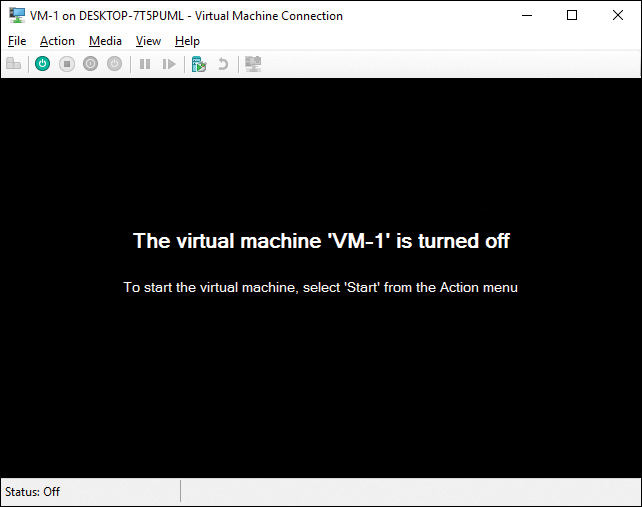
Figure 10-11 New Virtual Machine Started Up with an Empty Virtual Hard Disk
The obvious fix for this is to insert a boot DVD and install a new operating system. You cannot add a DVD drive to the VM while it is running, so you need to turn it off to add it. Recall that you can use an .ISO file as a DVD drive, and you can change the BIOS setting to boot from the DVD drive first. You can attach an image or DVD by using the DVD Drive option from the Media menu, as shown in Figure 10-12. Use the Capture option to use the host’s DVD drive or use Insert Disk to use an .ISO file.
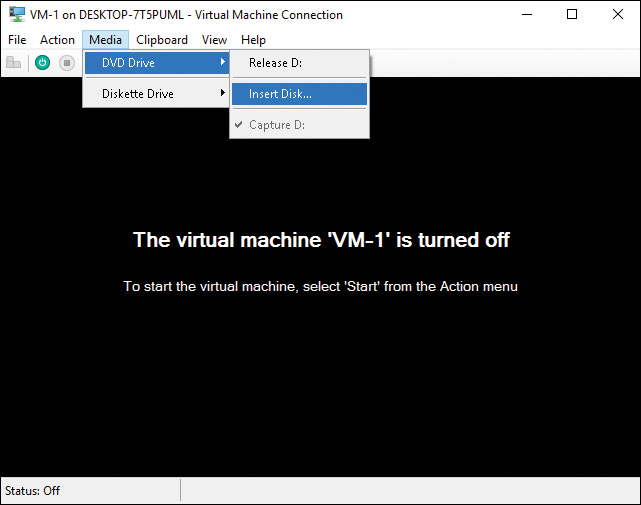
Figure 10-12 Adding a DVD Drive from an .ISO Image File
From there, you can connect to the console, start the VM by clicking the Start button on the console window’s toolbar, and install Windows using the procedures described in Chapter 2. After the operating system is loaded, you can use it as you would a physical machine, either through the Hyper-V console connection or if the networking is configured using Remote Desktop Services.
Recall from Chapter 2 that you can streamline deploying Windows 10 to multiple computers by creating a VHD with an existing, configured Windows 10 image, which can be used on many machines. You can use the same technique to deploy multiple virtual machines using preconfigured VHD images.
The procedure for this is the same as the steps laid out earlier; the only change is copying the VHD with the image to a location accessible to the Hyper-V service on the host you want to use, then pointing to that file. Refer to Step 6 and Figure 10-8 presented previously in the “Creating Virtual Machines” procedure.
Integration Services
To take full advantage of Hyper-V enhancements for your virtual machines, you should use the Integration Services, available in the Settings menu for the guest VM, in the Management section. You can selectively turn these services on or off, as shown in Figure 10-13. The following options are available for most hosts:
![]() Operating system shutdown allows you to shut down the guest from the Hyper-V Manager
Operating system shutdown allows you to shut down the guest from the Hyper-V Manager
![]() Time synchronization with the Host’s time
Time synchronization with the Host’s time
![]() Data Exchange
Data Exchange
![]() Heartbeat
Heartbeat
![]() Backup (volume shadow copy)
Backup (volume shadow copy)
![]() Guest services
Guest services

Figure 10-13 Windows Hyper-V Integration Services for Each Guest VM
You can check the version of Integration Services available on the guest by using the following command:
REG QUERY "HKLMSoftwareMicrosoftVirtual MachineAuto" /v
IntegrationServicesVersion
You need to open an administrative command prompt in the guest operating system to run this command.
Each of the Integration Services runs as a Windows service on the guest. You can check to see which Integration Services are running using the Services MMC on the guest machine, as shown in Figure 10-14. You can stop and start the Integration Services from the console by selecting the service and clicking the Start or Stop icons on the menu bar.

Figure 10-14 Windows Hyper-V Integration Services Running on the Guest OS
Note
The Integration Services for Windows guests are updated through Windows Update. If you have guests that are not connected to the Internet or cannot connect to Windows Update, you can download the updates from Microsoft’s download center at https://support.microsoft.com/en-us/help/3071740/hyper-v-integration-components-update-for-windows-virtual-machines-that-are-running-on-a-windows-10-based-host.
Converting a Physical Machine
In some cases, you may need to convert a physical machine to a Hyper-V virtual machine. This may be needed in several scenarios, such as the following:
![]() To test some invasive changes on a production computer—for instance, an operating system upgrade, major application change, or other risky modification. You can reduce the risk by first testing the changes in a virtual copy of the system.
To test some invasive changes on a production computer—for instance, an operating system upgrade, major application change, or other risky modification. You can reduce the risk by first testing the changes in a virtual copy of the system.
![]() To support an older PC with unsupported applications when rolling out a hardware or operating system upgrade. For instance, a business requirement may necessitate the use of an out-of-date application that will not run under Windows 10. Rather than leaving the users of this application on old hardware running unsupported Windows XP, the system can be converted to a VM and run under Hyper-V when the users need to use the application.
To support an older PC with unsupported applications when rolling out a hardware or operating system upgrade. For instance, a business requirement may necessitate the use of an out-of-date application that will not run under Windows 10. Rather than leaving the users of this application on old hardware running unsupported Windows XP, the system can be converted to a VM and run under Hyper-V when the users need to use the application.
![]() To convert a set of physical computers to a virtual environment. This scenario takes a lot of careful planning, but because of the savings available using virtual hosts, it may be worth exploring this option when planning for hardware upgrades or replacements.
To convert a set of physical computers to a virtual environment. This scenario takes a lot of careful planning, but because of the savings available using virtual hosts, it may be worth exploring this option when planning for hardware upgrades or replacements.
Note
Techniques and procedures for converting physical machines to VMs is beyond the scope of this text and the 70-697 exam. There are several methods for converting physical machines, including Microsoft’s Virtual Machine Manager and the Sysinternal’s Disk2VHD tool. For more information, see “Virtual Machine Manager” at https://technet.microsoft.com/en-us/library/gg610610(v=sc.12).aspx and “Disk2vhd” at https://technet.microsoft.com/en-nz/sysinternals/ee656415(en-us).aspx.
Creating and Managing Virtual Machine Checkpoints
A virtual machine checkpoint works exactly as it sounds. It saves a point-in-time state of the virtual machine. Checkpoints save not only the state of the hard disk files, but the state of the running machine and hardware configuration as well, by creating a copy of the machine’s memory at the time the checkpoint is taken.
Using Virtual Machine Checkpoints
With Windows 10 and Windows Server 2016, you have the choice of using either Production checkpoints, which is the default, or the standard checkpoints. Production checkpoints utilize backup technology in the guest, instead saving state in the hypervisor. For Windows virtual machines, the Volume Shadow Copy Service (VSS) is used. For Linux virtual machines, the file system buffers are flushed to create a checkpoint that’s consistent with the file system. This prevents issues with applications inside the guest when you revert the guest to a saved checkpoint.
Note
For more details on the differences between standard and production checkpoints, see “Choose Between Standard or Production Checkpoints in Hyper-V” at https://technet.microsoft.com/windows-server-docs/compute/hyper-v/manage/choose-between-standard-or-production-checkpoints-in-hyper-v.
Checkpoints work well for testing various software changes or applications that can significantly modify the computer. If things go wrong, you can quickly and easily return the machine to its previous state. It is handy in a production environment as well, if virtual machines are being used. Potentially risky operations like applying software updates or service packs can be rolled out after taking a snapshot of the machine. If testing shows issues with the update, you can quickly restore the machine to its previous state until the issue can be resolved.
A VM checkpoint is stored as an .AVHD or .AVHDX file, in the location specified in the virtual machine’s settings. It is important not to keep snapshots around for an extended period of time, because they can grow large very quickly. Perform the changes that you planned, and apply or revert the snapshot when you are satisfied.
Caution
Do not expand a virtual hard disk used by a virtual machine while the VM has snapshots associated with it. It will make the snapshots unusable, the hard disk will be reverted to the previous state, and you will be unable to apply the snapshot changes.
There are several ways to create a checkpoint from the Hyper-V Manager interface:
![]() Right-click the VM and select Checkpoint from the pop-up menu.
Right-click the VM and select Checkpoint from the pop-up menu.
![]() With the VM selected in the Virtual Machines list box, select Checkpoint from the Actions menu in the right pane.
With the VM selected in the Virtual Machines list box, select Checkpoint from the Actions menu in the right pane.
![]() When connected to the virtual machine connection, click the Checkpoint button from the toolbar.
When connected to the virtual machine connection, click the Checkpoint button from the toolbar.
![]() Select Checkpoint from the Action menu of the Virtual Machine Connection screen.
Select Checkpoint from the Action menu of the Virtual Machine Connection screen.
When you create a checkpoint, it will be listed in the Checkpoints section of the Hyper-V Manager whenever the VM is selected in the list, as shown in Figure 10-15. Each checkpoint will appear in a hierarchy from the original state to the currently running state, and the VM can be reverted to any version in the list. Each checkpoint lists the date and time it was taken, and the current state of the VM is simply listed as Now.
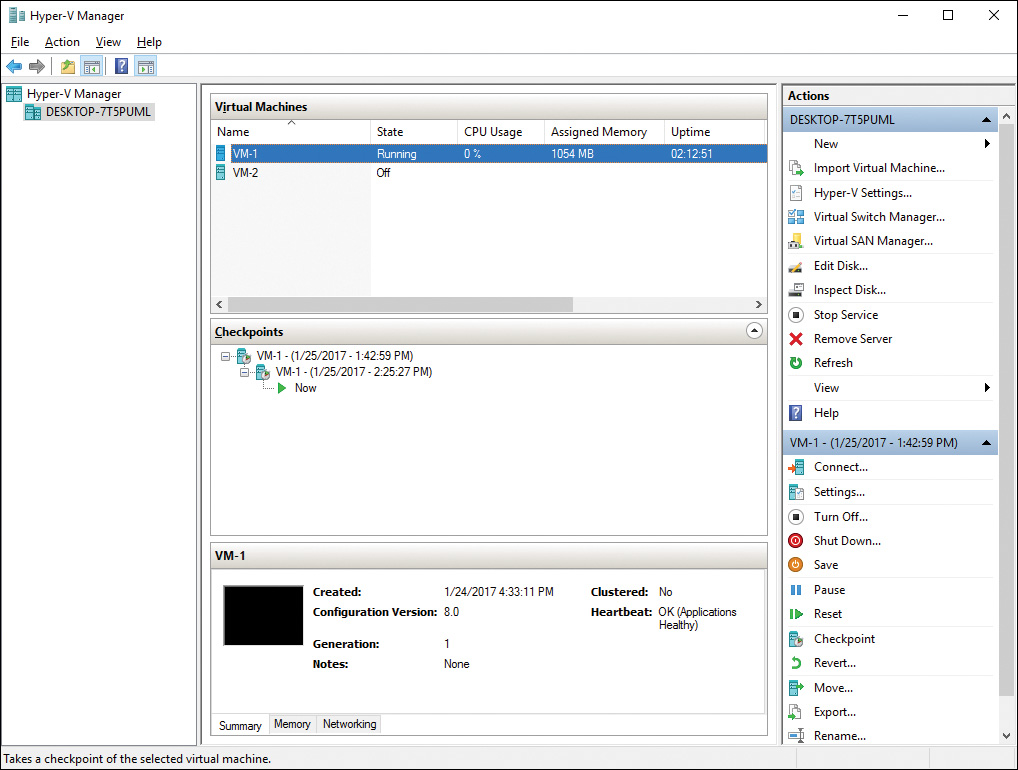
Figure 10-15 Virtual Machine Checkpoints Are Displayed in a Hierarchy with the Oldest Version at the Top
The hypervisor will take a few seconds to a few minutes to create the checkpoint, depending on the state of the computer, amount of memory in use, size of the disk drives, and so on. While the checkpoint is created, the status column will display the current progress.
Working with checkpoints is a little counterintuitive. That is because when you select Delete Checkpoint from the context or Actions menu, the checkpoint is actually merged into the VM’s current state. In other words, to delete the checkpoint means that you want to keep all the changes made to the VM and abandon the old, saved state. When you delete a checkpoint, the VM’s status changes to Merge in Progress and displays the percentage complete as the changes are merged.
Alternatively, if you select a checkpoint and choose the Apply action, your changes since the checkpoint was created are removed, and the state of the running VM is reverted to the state of the checkpoint. Subsequent checkpoints, if any, remain available, so it is possible to return the state of the machine to the point-in-time of any of those checkpoints.
To illustrate, note in Figure 10-16 that the VM’s current state (indicated by the Now icon in the list) is after the second checkpoint, but all the changes made in the last two checkpoints are not included. You can roll the VM state forward to one of the other checkpoints taken. Note that if you do this, any changes you make to the VM since applying the current checkpoint will be lost.

Figure 10-16 Virtual Machine Checkpoints and Current State of the Virtual Machine
Another way to abandon the changes made since the checkpoint was created is to right-click the virtual machine and select the Revert option. You are prompted to confirm that you want to revert the virtual machine to the previous state. Again, in this case you are deleting all the changes made to the VM since the checkpoint was created.
If you have created several checkpoints and want to merge all your changes, you can select the first checkpoint and apply the Delete Checkpoint Subtree action. This will merge all the changes at and below the checkpoint you select, and merge all the changes into the current state of the VM.
Creating and Configuring Virtual Switches
In the previous sections you learned about virtual hard disks and virtual machines. These are both very useful for testing, experimenting, running legacy applications, and other tasks. This section introduces virtual switches, which are needed if any of the Hyper-V virtual machines need to communicate with each other, your host machine, or the outside world.
Client Hyper-V’s virtual machine connection is useful for interacting directly with the virtual machines, similar to using a physical monitor. This is the only way to utilize the VMs unless they are connected to a virtual switch. There are three basic types of virtual switches that you can create in the Client Hyper-V environment:
![]() External: Create a virtual switch merged with the host network adapter. The VMs will have full access to the host computer network.
External: Create a virtual switch merged with the host network adapter. The VMs will have full access to the host computer network.
![]() Internal: Create a virtual switch with connectivity for the VMs and the host computer. The VMs will be unable to access the host computer network, but the host and VMs can communicate with each other.
Internal: Create a virtual switch with connectivity for the VMs and the host computer. The VMs will be unable to access the host computer network, but the host and VMs can communicate with each other.
![]() Private: A virtual switch created using a private network will be completely isolated from the physical network and the host computer. Only the VMs can connect to the private virtual switch.
Private: A virtual switch created using a private network will be completely isolated from the physical network and the host computer. Only the VMs can connect to the private virtual switch.
To enable basic networking for your Client Hyper-V guests and allow them to use the network just like the Windows 10 host, you would typically add an external virtual switch and connect the VMs to it. Note that this process will modify the host’s network configuration. This allows the guests to connect through the existing physical NIC in the host, although in a roundabout way.
We discuss the mechanics of how the different virtual switches work later in this section. First we cover the basic steps for creating a virtual switch:
Step 1. From the Hyper-V Manager’s Actions menu, select Virtual Switch Manager. The Virtual Switch Manager screen is displayed.
Step 2. From the left pane, select New Virtual Network Switch.
Step 3. In the right pane, a list box is displayed. Select the type of virtual switch you want, and then click the Create Virtual Switch button.
Step 4. On the next screen, as shown in Figure 10-17, you enter the properties for the new switch. The following properties are available:
![]() Name: Choose a descriptive name for your virtual switch. You may want to include the type of switch (External, Internal, or Private) as part of the name to quickly identify your switches.
Name: Choose a descriptive name for your virtual switch. You may want to include the type of switch (External, Internal, or Private) as part of the name to quickly identify your switches.
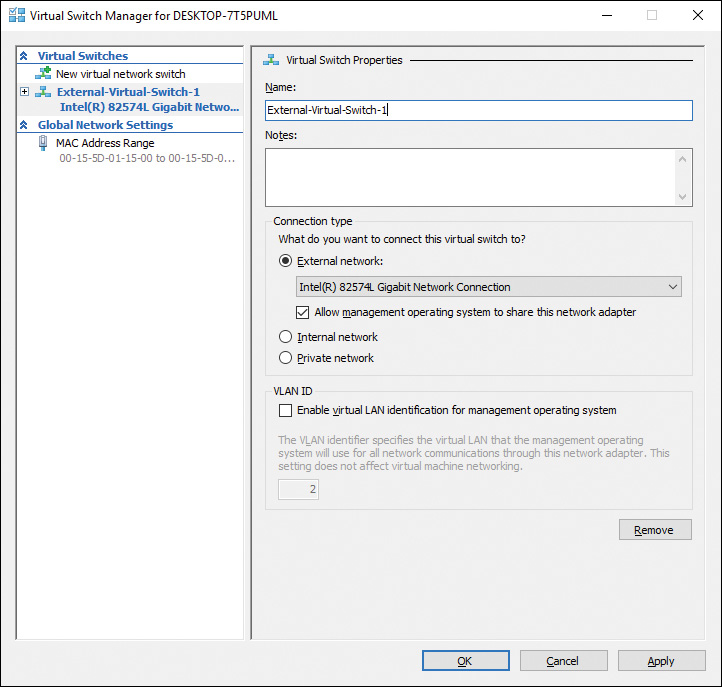
Figure 10-17 Creating a New Virtual Switch Using the Hyper-V Virtual Switch Manager
![]() Notes (Optional): A free text description of the switch.
Notes (Optional): A free text description of the switch.
![]() Connection Type: Choose the type of connection you want, as described previously. The type you selected on the previous screen is filled in for you, but you can change your selection here. Note that if you select External network, you also need to select the host computer’s physical connection. That physical network will be connected to your external virtual switch.
Connection Type: Choose the type of connection you want, as described previously. The type you selected on the previous screen is filled in for you, but you can change your selection here. Note that if you select External network, you also need to select the host computer’s physical connection. That physical network will be connected to your external virtual switch.
![]() VLAN ID: If you want to use VLAN identification numbers, check the box here and choose a unique ID to associate with the VLAN. Typically you will not use this in a Client Hyper-V environment; it is used to create separate virtual LANs within a large virtual environment and “tag” all packets with the ID for more efficient routing and network filtering.
VLAN ID: If you want to use VLAN identification numbers, check the box here and choose a unique ID to associate with the VLAN. Typically you will not use this in a Client Hyper-V environment; it is used to create separate virtual LANs within a large virtual environment and “tag” all packets with the ID for more efficient routing and network filtering.
Note
For more information on VLAN IDs and tagging, refer to the “Understanding Hyper-V VLANs” in the “Virtual Networking Survival Guide” at https://blogs.msdn.microsoft.com/adamfazio/2008/11/14/understanding-hyper-v-vlans/.
Step 5. Click OK to create the new virtual switch. Hyper-V will display a dialog box while it applies your changes.
Using an External Virtual Switch
Before adding switches to Hyper-V, examine the network configuration for the host. When Hyper-V services are installed, Windows adds the Hyper-V Extensible Virtual Switch protocol adapter to the network. As shown in Figure 10-18, the adapter is initially not bound to any of the host’s NIC connections when there are no Hyper-V external virtual switches.
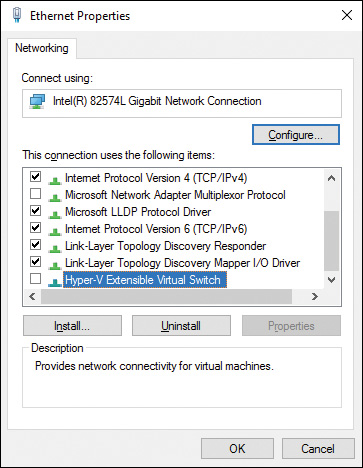
Figure 10-18 Ethernet Properties and the Hyper-V Extensible Virtual Switch
Note that there is one physical NIC in the computer connected to the physical switch using an Ethernet cable. When you create an external virtual switch, Hyper-V will create a virtual switch, but it will also create a new virtual NIC for your host.
Note the network depicted in Figure 10-19. This is how Hyper-V configures your host computer when it creates an external virtual switch. The physical NIC no longer communicates directly with the applications on your host. Instead, all traffic from the external network that flows through the host’s network adapter is routed first to the virtual switch. From there it is routed either to one of the guest computers or to the new virtual NIC used by all network applications on the host.

Figure 10-19 Network Routing in a Hyper-V Host Using an External Virtual Switch
Using Internal Virtual Switches
As described earlier, the Hyper-V internal virtual switch is a connection for your guest VMs that cannot access the host’s physical network, but can communicate with the host OS. This provides better security for your VMs and avoids the routing modifications to the host network depicted in Figure 10-19. However, because the VMs cannot access the external network, they will not have access to the same network services that the host enjoys, such as DHCP automatic network addressing and DNS for hostname lookup.
We discussed configuring network settings in detail in Chapter 6, “Windows 10 Networking,” and Chapter 7, “Windows 10 Security.” Refer to those chapters for specifics on configuring your virtual network. Virtual networking uses the same concepts.
For your host to communicate with your VMs, Hyper-V creates a new Ethernet adapter connected to the new internal virtual switch, as shown in Figure 10-20. You can modify the settings for this adapter based on the network configuration of your VMs. By default, the new adapter, and the VM networks that you attach to it, will use Autoconfiguration IPv4 addresses and will be able to communicate over the network.
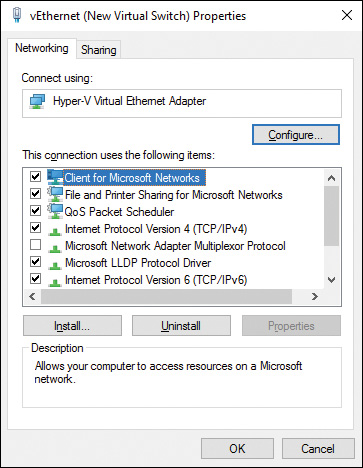
Figure 10-20 Creating a Virtual Ethernet Adapter for the Hyper-V Host to Use When Communicating with Hosted VMs
Using Private Virtual Switches
A private virtual switch works exactly like an internal virtual switch, but without the connection to the host computer. When Hyper-V creates a private virtual switch, it does not create the virtual Ethernet adapter illustrated in Figure 10-20.
Private virtual networks are useful for test environments, especially if you want to simulate an existing environment including the network configurations. You can copy the hosts as they are, and create multiple private virtual switches to match the physical switches in the environment you are simulating.
Connecting Virtual Machines
After you have created at least one virtual switch, you can connect your virtual machines to them. This is similar to connecting a network cable from a physical computer to a physical hub or switch. The VM operating system will detect the connection and attempt to set up the network configuration.
We covered modifying virtual machine settings in the previous section. To connect a VM to a switch, select the VM from the list in Hyper-V Manager, invoke the Settings function, and select the Network Adapter, as shown in Figure 10-21.
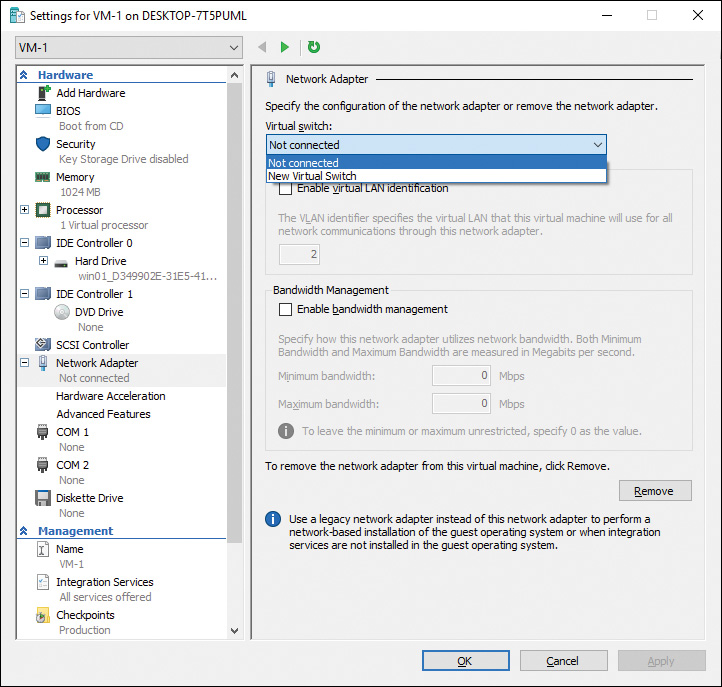
Figure 10-21 Virtual Machine Network Adapter Configuration
The following Network Adapter configuration settings are available:
![]() Virtual Switch: Select the previously created virtual switch you want to connect. If you have named your switches according to type, they will be easier to identify from the list.
Virtual Switch: Select the previously created virtual switch you want to connect. If you have named your switches according to type, they will be easier to identify from the list.
![]() VLAN ID: If VLAN identifiers are needed for your network, you can enable VLAN IDs and enter the IDs here.
VLAN ID: If VLAN identifiers are needed for your network, you can enable VLAN IDs and enter the IDs here.
![]() Bandwidth Management: If you want to limit or reserve the amount of total network resources the VM can use, select the Enable Bandwidth Management check box. To limit the bandwidth for the VM, enter the Megabits per second (Mbps) in the Maximum Bandwidth box. Alternatively, you may want to ensure that the VM always has some amount of network bandwidth available. If so, enter an amount in the Minimum Bandwidth box, and Hyper-V will reserve that much bandwidth to the VM, regardless of the network demands from other VMs.
Bandwidth Management: If you want to limit or reserve the amount of total network resources the VM can use, select the Enable Bandwidth Management check box. To limit the bandwidth for the VM, enter the Megabits per second (Mbps) in the Maximum Bandwidth box. Alternatively, you may want to ensure that the VM always has some amount of network bandwidth available. If so, enter an amount in the Minimum Bandwidth box, and Hyper-V will reserve that much bandwidth to the VM, regardless of the network demands from other VMs.
Exam Preparation Tasks
Review All the Key Topics
Review the most important topics in the chapter, noted with the Key Topics icon in the outer margin of the page. Table 10-5 lists a reference of these key topics and the page numbers on which each is found.
Table 10-5 Key Topics for Chapter 10
Key Topic Element |
Description |
Page Number |
Step List |
Using DiskPart to create a VHD |
|
Using DiskPart to create, format, and assign a VHD |
||
List |
Client Hyper-V hardware and software requirements |
|
The Hyper-V Manager |
||
Creating a new virtual machine |
||
List |
Virtual machine hardware and management settings |
|
Virtual Machine Dynamic Memory |
||
Virtual Machine Processor configuration options |
||
Hyper-V Integration Services |
||
Managing virtual machine checkpoints |
||
Virtual machine checkpoints and current state of the virtual machine |
||
List |
Types of virtual switches in Client Hyper-V |
|
Step List |
Creating a virtual switch using Hyper-V Manager |
|
Network routing in a Hyper-V host using an external virtual switch |
Complete the Tables and Lists from Memory
Print a copy of Appendix B, “Memory Tables,” (found on the book’s website), or at least the section for this chapter, and complete the tables and lists from memory. Appendix C, “Memory Tables Answer Key,” also on the website, includes completed tables and lists to check your work.
Definitions of Key Terms
Define the following key terms from this chapter, and check your answers in the glossary.
Client Hyper-V
DEP
DiskPart
Fibre Channel
guest
hypervisor
integration services
ISO
NIC
NUMA
SLAT
Smart Paging
checkpoint
VFD
VHD
VHDX
virtual switch
virtual machine
virtualization
VLAN
VT
WDS
Windows XP Mode