Chapter 15 Configuring Remote Access
This chapter covers the following subjects:
![]() Configuring Remote Authentication: To secure sensitive and valuable organizational resources, it is vital that users connecting from remote locations using the Internet or dial-up connections are positively authenticated. In this section you learn about processes and technologies available for securely authenticating the users requesting access to your network and computers.
Configuring Remote Authentication: To secure sensitive and valuable organizational resources, it is vital that users connecting from remote locations using the Internet or dial-up connections are positively authenticated. In this section you learn about processes and technologies available for securely authenticating the users requesting access to your network and computers.
![]() Configuring Remote Desktop Settings: This section describes new and improved methods of connecting to and managing computers remotely. You learn about time-saving management options that enable you to perform a large range of management tasks on remotely located computers directly from your Windows 10 computer.
Configuring Remote Desktop Settings: This section describes new and improved methods of connecting to and managing computers remotely. You learn about time-saving management options that enable you to perform a large range of management tasks on remotely located computers directly from your Windows 10 computer.
![]() Configuring VPN Authentication and Settings: In this section you learn about how to set up dial-up and VPN connections for access to organization resources from the Internet and other remote locations.
Configuring VPN Authentication and Settings: In this section you learn about how to set up dial-up and VPN connections for access to organization resources from the Internet and other remote locations.
![]() Configuring Remote Management: Microsoft now includes many tools that administrators can use for remotely managing Windows computers and servers. In this section you learn how to identify the appropriate tools for remote management, and how to use administrative tools, such as MMC console applets, PowerShell remoting, and Remote Assistance, to manage and administer computers and settings remotely.
Configuring Remote Management: Microsoft now includes many tools that administrators can use for remotely managing Windows computers and servers. In this section you learn how to identify the appropriate tools for remote management, and how to use administrative tools, such as MMC console applets, PowerShell remoting, and Remote Assistance, to manage and administer computers and settings remotely.
This chapter covers the following objectives for the 70-697 and 70-698 exam:


Configure remote connections: Configure remote authentication; configure Remote Desktop settings; configure VPN connections and authentication; enable VPN reconnect; configure broadband tethering; configure app-triggered VPN, traffic filters, and lockdown VPN; configure DirectAccess.
Configure remote management: Choose the appropriate remote management tools; configure remote management settings; modify settings remotely by using the Microsoft Management Console (MMC) or Windows PowerShell; configure Remote Assistance, including Easy Connect; configure Remote Desktop; configure Remote PowerShell.
Chapter 7, “Windows 10 Security,” introduced you to the various tools and technologies available in Windows 10 for ensuring that only authenticated users gain access to computers and the resources they contain. In this chapter, we continue the discussion of computer management by looking at the methods available for accessing and managing computers across the network, and in particular the methodologies used for managing computers in remote locations. We take a look at accessing and managing computers through a virtual private network (VPN), using new technologies such as Remote Desktop Gateway and DirectAccess, and the authentication techniques you need to be aware of.
You also learn about technology that enables you to manage computers from afar and make connections to these computers from diverse locations. You will see that you can be in a distant location, such as home or hotel, and perform almost anything that you could do directly from the computer console. When that emergency occurs late at night, you can diagnose many problems and perform fixes without the need to travel to the office.
“Do I Know This Already?” Quiz
The “Do I Know This Already?” quiz allows you to assess whether you should read this entire chapter or simply jump to the “Exam Preparation Tasks” section for review. If you are in doubt, read the entire chapter. Table 15-1 outlines the major headings in this chapter and the corresponding “Do I Know This Already?” quiz questions. You can find the answers in Appendix A, “Answers to the ‘Do I Know This Already?’ Quizzes.”
Table 15-1 “Do I Know This Already?” Foundation Topics Section-to-Question Mapping
Foundation Topics Section |
Questions Covered in This Section |
Configuring Remote Authentication |
1–3 |
Configuring Remote Desktop Settings |
4–6 |
Configuring VPN Authentication and Settings |
7–11 |
Configuring Remote Management |
12–14 |
Caution
The goal of self-assessment is to gauge your mastery of the topics in this chapter. If you do not know the answer to a question or are only partially sure of the answer, you should mark that question as wrong for purposes of the self-assessment. Giving yourself credit for an answer you correctly guess skews your self-assessment results and might provide you with a false sense of security.
1. Which of the following remote access authentication protocols should you avoid because it sends credentials in unencrypted form?
a. PAP
b. CHAP
c. EAP-TTLS
d. MS-CHAPv2
2. Which of the following remote authentication protocols uses a secure tunnel and can be used with 802.1X authentication as well as RADIUS servers?
a. CHAP
b. PAP
c. Smart cards
d. EAP-TTLS
3. Which of the following is a valid remote access network authentication protocol used by Windows 10 and other recent Windows versions?
a. Charon
b. Styx
c. Nix
d. Kerberos
e. Hydra
4. You are working from home on your Windows 10 Pro computer and need to access your work computer, which is also running Windows 10 Pro by means of your cable Internet connection. What tool should you use to make this connection?
a. Hyper-V
b. Remote Assistance
c. Remote Desktop
d. Virtual private network
5. Yesterday evening, you worked on an important project from home on your wife’s home computer, which runs Windows 10 Home. Your children interrupted you, and you forgot to upload your work to your work computer. The work computer runs Windows 7 Professional. Needing the upgraded project files, you attempt to connect to your home computer but are unable to do so. What do you need to do to make this connection?
a. Download the Remote Desktop Connection Software application from Microsoft and install it on your home computer.
b. Upgrade your work computer to Windows 10 Pro or Enterprise.
c. Upgrade your home computer to Windows 10 Pro.
d. Use Remote Assistance to make the connection.
6. Which of the following remote access protocols does not provide data encryption on its own?
a. PPTP
b. L2TP
c. SSTP
d. IKEv2
7. You have created a VPN connection but now need to enable the use of File and Printer Sharing for Microsoft Networks so that you can print a report on the office network that your manager needs to have by 8:00 tomorrow morning. You right-click the connection and choose View Connection Properties. Which tab contains the option that you must configure?
a. General
b. Options
c. Security
d. Networking
e. Sharing
8. You are downloading a large file to your laptop at the airport Wi-Fi connection while waiting for your flight to be called. You are concerned that you might need to interrupt the download and want to be able to resume the download at your destination hotel room, so you have enabled VPN Reconnect. What protocol does this feature use?
a. PPTP
b. L2TP/IPsec
c. SSTP
d. IKEv2
9. You have set up a new Windows Server 2016 computer on which you want to enable users to connect remotely for Remote Desktop sessions. What role will you be configuring?
a. VPN Reconnect
b. DirectAccess
c. Remote Desktop Services
d. Internet Connection Sharing
10. You have decided to configure a DirectAccess server for your mobile workforce to use when they need files from the servers, access to the network printers, and other needs. You are ready to start rolling out a pilot and need to order the laptops for the mobile staff. What is the best client operating system to use?
a. Windows 10 Mobile
b. Windows 10 Home
c. Windows 10 Pro
d. Windows 10 Enterprise
11. Which of the following are valid commands that you can enter at a PowerShell interface? (Choose all that apply.)
a. Get-process
b. Value-output
c. Select-object
d. Format-data
e. Folder-create
12. You are helping a worker in your organization with a configuration issue and decided to run some PowerShell cmdlets you have to check some items on the remote computer. When you run the command, specifying the remote computer name, the command fails to connect to the remote computer and dies with the error WinRMOperationTimeout. What is the most likely cause of failure?
a. You do not have administrative access to the remote computer.
b. The remote computer is not in the PowerShell list of TrustedComputers.
c. PowerShell Remoting is not enabled.
d. The command syntax was incorrect.
13. You want to be able to use all the tools in the Computer Management administrative tool to manage a remote computer. Which of the following firewall application settings do you need to enable? (Select all that apply.)
a. Remote Event Log
b. Remote Scheduled Tasks Management
c. Windows Firewall with Advanced Security
d. Remote Service Management
14. You are working from home on your Windows 10 computer and experience a problem that you cannot fix. You want to contact a user on another Windows 10 computer that you believe can help you correct your problem. What tool should you use?
a. Hyper-V
b. Remote Assistance
c. Remote Desktop
d. Virtual Private Network
Foundation Topics
Configuring Remote Authentication
Microsoft has built several remote management tools into Windows 10 and Windows Server 2016 that allow you to connect to computers located across the hall or across the continent. You can use these tools to save precious minutes out of a busy day, or an entire trip lasting days, to manage and troubleshoot resources located on these computers. Users in other locations can connect to your computer, and you can offer suggestions or train them in procedures that correct problems or make their day’s work go more smoothly.
Whenever you connect a computer or network to the public Internet, it becomes a target for a vast array of criminals and nefarious actors hoping to exploit resources that do not belong to them. Authenticating over a remote connection is necessary for a wide range of functionality, but it is also a potential attack vector for malicious activity. It is important that users and administrators, as well as business process services, are able to use remote connections for access to resources; however, those connections must be secure, authentication must be robust, and unauthorized access must be detected and stopped.
Remote Authentication Planning
The methods of authentication used for remote workers and administrators depend entirely on the infrastructure of the network, the services available, the type of remote access required, and the sensitivity of the data being exposed over the remote connection. This chapter covers some details on configuring different types of remote connections, include Remote Desktop, Remote Management, VPNs, and broadband connections. You should be aware of the authentication types, and variations, used for these different types of services.
You should also be familiar with the authentication methods previously discussed in Chapter 7, “Windows 10 Security,” which can also come into play when managing remote authentication, and often are configured through Group Policies to enforce more stringent requirements on top of the specific protocol connections. For instance, in a domain environment, you can require dual-factor authentication for all connections, or only for remote connections. Or you may require that any computers connecting to your network remotely have their own certificate previously issued by the domain CA, and disallow any connections that do not present recognized certificates.
Throughout this text, including this chapter and others, you learn about various types of remote connection technologies and ways of authenticating users and computers. It would be impractical to list every combination available for use in a Windows environment, and especially in a mixed computing environment with Windows servers and workstations playing various roles. Table 15-2 lists some of the connection types and the most common authentication technologies that can play a role. Details of each are found throughout the text, referenced in the last column.
Table 15-2 Remote Connection Types and Common Remote Authentication Technologies
Connection Type |
Authentication Technologies |
Chapter References |
Remote Desktop |
Network Level Authentication, smart cards, certificates, NTLM, Kerberos |
|
VPN |
Smart cards, machine certificate, CHAP, EAP, PEAP, PAP, PSK |
Chapter 6, Chapter 15 (see Table 15-3) |
Remote Management |
Kerberos, NTLM, certificates |
Be sure that you can distinguish between connection security and remote authentication. Table 15-2 lists authentication methods, including certificates—it should be noted that certificates play a part in authentication as well as connection security. (Certificates can be used both to authenticate the certificate owner as well as negotiate end-to-end encryption between trusted certificate owners.)
Remote Access Authentication Protocols
Authentication is the first perimeter of defense that a network administrator can define in a remote access system. The process of authenticating a user is meant to verify and validate a user’s identification. If the user provides invalid input, the authentication process should deny the user access to the network. An ill-defined authentication system, or lack of one altogether, can open the door to mischief and disruption because the two most common methods for remote access are publicly available: the Internet and the public services telephone network.
Remote authentication protocols fall into two main categories, Extensible Authentication Protocol (EAP) methods and non-EAP methods. Non-EAP methods are not considered secure, and Microsoft recommends those with TLS-based confidentiality such as PEAP or EAP-TTLS. Table 15-3 discusses the authentication protocols supported in Windows 10 and Windows Server 2016.

Table 15-3 Authentication Protocols for Remote Access
Acronym |
Name |
Usage |
Security |
CHAP |
Challenge Handshake Authentication Protocol |
Client requests access. Server sends a challenge to client. Client responds using MD5 hash value. Values must match for authentication. |
Non-EAP. One-way authentication. Server authenticates client. |
MS-CHAPv2 |
Microsoft Challenge Handshake Authentication Protocol version 2 |
Requires both the client and the server to be Microsoft Windows based. Does not work with LAN Manager. Client requests access, server challenges, client responds with an MD5 hash value and piggybacks a challenge to server. If a match is found, server responds with a success packet granting access to client, which includes an MD5 hash response to the client’s challenge. Client logs on if the server’s response matches what client expects. Note that the older MS-CHAP authentication protocol is no longer supported as of Windows 7. |
Non-EAP. Mutual (two-way) authentication. |
EAP-TTLS |
Extensible Authentication Protocol Tunneled Transport Layer Security |
Developed for PPP and can be used with IEEE 802.1X. Is capable of heading other authentication protocols, so improves interoperability between RAS systems, RADIUS servers, and RAS clients. First supported natively in Windows 8.1 and Windows Server 2012. |
EAP method. Provides additional authentication types based on plug-in modules, enables enhanced interoperability and efficiency of authentication process. |
PEAP |
Protected Extensible Authentication Protocol with Transport Layer Security |
A highly secure password-based authentication protocol combination that utilizes certificate-based authentication. |
EAP method. Uses certificate-based encryption. |
PAP |
Password Authentication Protocol |
Client submits a clear-text user identification and password to server. Server compares to information in its user database. If a match, client is authenticated. |
Non-EAP. Clear-text, one-way authentication. Least secure method. |
Smart cards |
Certificates |
User must have knowledge of PIN and possession of smart card. Client swipes card, which submits smart card certificate, and inputs PIN. Results are reviewed by server, which responds with its own certificate. If both client and server match, access is granted. Otherwise, error that credentials cannot be verified. |
Certificate-based, two-way authentication. |
Note
When using certificate authentication, the client computer must have a way of validating the server’s certificate. To ensure absolutely that this validation will work, you can import the server’s certificate into the client’s Trusted Publishers list. If there is no way for a client to validate the server’s certificate, an error displays stating that the server is not a trusted resource.
NTLM and Kerberos Authentication
As noted in Table 15-2, Kerberos and NTLM authentication are used in many scenarios. These are the default authentication technologies used to authenticate a user, using a username and password, to a Windows computer. Kerberos is available only in Active Directory domains, and NTLM is generally always used between computers that are not domain joined.
NTLM authentication includes several discrete authentication protocols—namely, LAN Manager, NTLM version 1 (NTLMv1), and NTLM version 2 (NTLMv2). When NTLM is used, the resource computer either contacts a domain authentication service for the user’s account or looks up the user in the local account database. NTLM credentials consist of a domain name or server name, a username, and information that can be used to confirm the user’s password (typically a password hash). Older LAN Manager and NTLMv1 protocols are more vulnerable than newer protocols used in recent versions of Windows.
Kerberos authentication works with an AD domain by the use of tickets issued by domain controllers based on the credentials passed from a client. The ticket is then used to authenticate the user to other domain-managed computers and resources. In this way, both the computer requesting authentication and the computer granting access first check in with the server to confirm authentication.
Kerberos provides several advantages over NTLM authentication:
![]() Always includes server authentication
Always includes server authentication
![]() Stronger cryptography
Stronger cryptography
![]() Faster performance on repeated connections, using a single ticket
Faster performance on repeated connections, using a single ticket
![]() Can fall back to NTLM authentication when Kerberos authentication is not available
Can fall back to NTLM authentication when Kerberos authentication is not available
Generally, the use of Kerberos or NTLM will be decided by the Windows security providers available, the domain controllers when they are available, and the policies put in place at the domain level.
Keep in mind that when using remote connections, especially when directly connecting to Remote Desktop computers over the Internet or an untrusted network, Kerberos cannot be used, because there will be no connection between the remote computer and the domain controllers on the remote network. So in those scenarios NTLM authentication will be used.
Note
For more information about NTLM Authentication, refer to “NTLM Overview” at https://technet.microsoft.com/en-us/windows-server-docs/security/kerberos/ntlm-overview and the links provided in that document. You can learn more about Kerberos authentication by referring to “Kerberos Authentication Overview” at https://technet.microsoft.com/en-us/windows-server-docs/security/kerberos/kerberos-authentication-overview.
Remote Authentication Group Policies
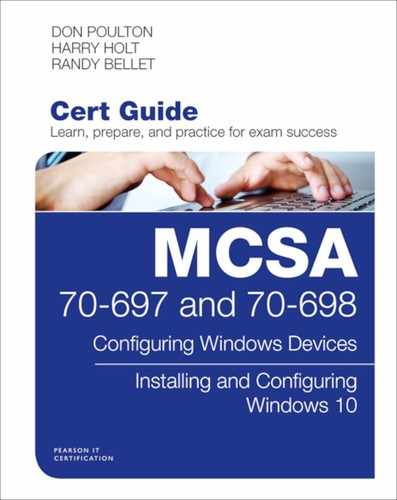
Several Group Policies can be utilized to control remote authentication protocols in Windows 10. You will find these policies in the Local Group Policy Editor under Computer ConfigurationWindows SettingsSecurity SettingsLocal PoliciesSecurity Options, as shown in Figure 15-1. The following are several of the more important policy settings that you should be familiar with:
![]() Network Security: Configure Encryption Types Allowed for Kerberos: This setting allows you to specify which encryption types can be used for domain-based Kerberos authentication. By default, all supported encryption types are allowed.
Network Security: Configure Encryption Types Allowed for Kerberos: This setting allows you to specify which encryption types can be used for domain-based Kerberos authentication. By default, all supported encryption types are allowed.
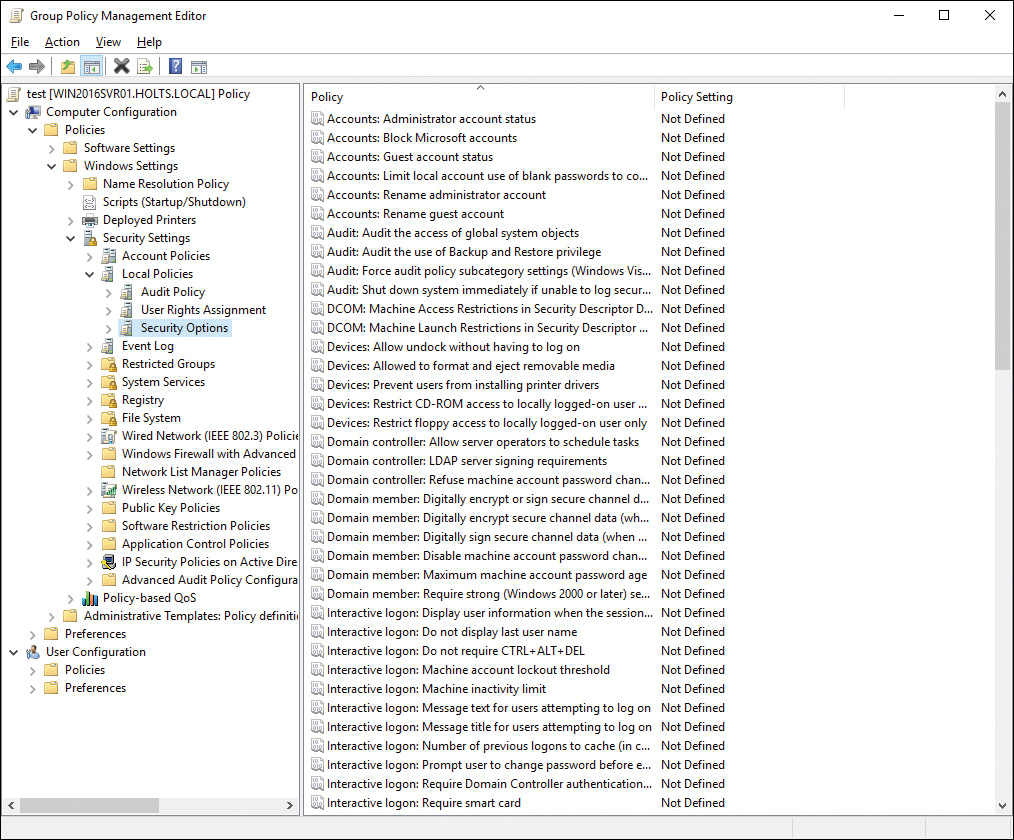
Figure 15-1 Network Security Group Policy Settings in Windows 10
![]() Network Security: Minimum Session Security for NTLM SSP Based (Including Secure RPC) Clients: This setting ensures that NTLM authentication can occur only over strong (128-bit) encryption. This is the recommended setting and is the default policy for Windows 7, Windows 8, Windows 8.1, Windows 10, Windows Server 2008 R2, and Windows Server 2012/R2/2016.
Network Security: Minimum Session Security for NTLM SSP Based (Including Secure RPC) Clients: This setting ensures that NTLM authentication can occur only over strong (128-bit) encryption. This is the recommended setting and is the default policy for Windows 7, Windows 8, Windows 8.1, Windows 10, Windows Server 2008 R2, and Windows Server 2012/R2/2016.
![]() Network Security: Restrict NTLM: Audit Incoming NTLM Traffic: If enabled, the server logs events for NTLM pass-through authentication requests that would be blocked when the Network Security: Restrict NTLM: Incoming NTLM Traffic policy is set to Deny All Domain Accounts. Events are logged to the Operational log under the Applications and Services Log/Microsoft/Windows/NTLM.
Network Security: Restrict NTLM: Audit Incoming NTLM Traffic: If enabled, the server logs events for NTLM pass-through authentication requests that would be blocked when the Network Security: Restrict NTLM: Incoming NTLM Traffic policy is set to Deny All Domain Accounts. Events are logged to the Operational log under the Applications and Services Log/Microsoft/Windows/NTLM.
![]() Network Security: Restrict NTLM: Incoming NTLM Traffic: You can block NTLM authentication for all accounts or for domain accounts. Note that blocking NTLM authentication on a computer that is not domain joined will disable authentication entirely, because only domain accounts can use Kerberos authentication.
Network Security: Restrict NTLM: Incoming NTLM Traffic: You can block NTLM authentication for all accounts or for domain accounts. Note that blocking NTLM authentication on a computer that is not domain joined will disable authentication entirely, because only domain accounts can use Kerberos authentication.
Configuring Remote Desktop Settings
Windows 10 continues to improve upon the Remote Desktop and Remote Assistance tools first introduced with Windows XP and upgraded with each iteration of the Windows operating system. The Remote Server Administration Tools (RSAT) for Windows 10 download enables you to manage roles and features installed on servers running Windows Server 2003 or later from your Windows 10 desktop. Also offered are the new Windows Remote Management service and (introduced with Vista) the Windows PowerShell command-line interface.
Caution
Only limited management of servers running older versions of Windows Server is possible when using RSAT for Windows 10. In the original and R2 versions of Windows Server 2008, you can perform most administrative actions, but you cannot install or remove server roles or features. Support for Windows Server 2003 is generally limited to most Active Directory and network management tools.
For more information on server components that can be managed using RSAT in Windows 10, refer to “Description of Remote Server Administration Tools for Windows 10” at https://support.microsoft.com/en-us/help/2693643/remote-server-administration-tools-rsat-for-windows-operating-systems.
Windows 10 incorporates the Remote Desktop Protocol (RDP), which was originally introduced with Terminal Services and included with Windows XP Professional. The protocol allows any user to use the Remote Desktop application to run a remote control session on a Windows Terminal Server or a Windows computer that has been configured to provide Remote Desktop services. RDP is also used when a Remote Assistance session is conducted, as described in the previous section.
When Windows 10 is configured to be a Remote Desktop host, there is a restriction for usage that does not apply to a Terminal Services computer. This restriction is that only one user can ever execute an interactive session on the computer at any one time. So if you run a Remote Desktop session, and a user is already logged on to the Remote Desktop server, that user will be logged off (at your request) for your own session to run. However, that user’s session will be saved so that he can resume it later.
Establishing a Remote Desktop Connection with Another Computer
Any version of Windows 10 can be a Remote Desktop client; however, only the Pro, Education, or Enterprise edition of Windows 10 can be a Remote Desktop host (server). You can run a Remote Desktop session with another computer running Windows 10 or any older Windows version back to Windows XP. Use the following instructions to make a Remote Desktop connection:
Step 1. In the Search bar or Cortana, type remote into the Search field, and then select Remote Desktop Connection from the program list. This opens the Remote Desktop Connection dialog box, as shown in Figure 15-2.
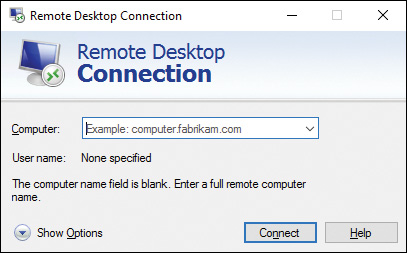
Figure 15-2 Remote Desktop Connection Dialog Requiring You to Know the Name and/or IP Address of the Target Computer
The Computer list shows only Windows Terminal Servers. Windows 10 computers do not advertise the Remote Desktop service, so you are required to know the full name or IP address of the computer, unless you have connected to it before. The Remote Desktop client will save a list of the 10 most recent connections.
Step 2. Type the name or IP address of the Windows XP, Vista, Windows 7, Windows 8.1, or Windows 10 computer and click Connect. You should see a message box informing you that you are connecting, followed by a remote session with a logon screen prompting you for a user ID and password.
Step 3. Click the Show Options button. The General tab for the connection’s Properties dialog box opens. You can save the current logon settings or open a file containing previously saved settings, as well as change the computer name in this dialog box.
Step 4. Click the Display tab. If your session is running slowly, you can increase performance by reducing the number of colors and size of the screen.
Step 5. Click the Local Resources tab. You can choose whether to map sounds, disk drives, printers, clipboard, and serial ports. You can also select how the key combination Alt+Tab works when executing that key combination while in the remote session. By clicking the More button, you can choose to use smart cards and specified ports on this computer to be used within the remote session.
Step 6. Click the Programs tab. If you would like to configure a connection that starts a single application, rather than all the applications, you can type the command line in this screen so that it executes automatically.
Step 7. Click the Experience tab. This tab enables you to enable or disable various display behaviors shown in Figure 15-3 to enhance the computer’s performance according to the connection speed as selected from the drop-down list provided.

Figure 15-3 Experience Tab of the Remote Desktop Connection Dialog Box Enabling You to Select the Performance Options Applicable to the Remote Session
Step 8. Click the Advanced tab. You can choose from three options that describe the behavior if authentication fails: Warn Me (the default), Connect and Don’t Warn Me, or Do Not Connect. You can also configure Remote Desktop Gateway settings that apply for connections to remote computers located behind firewalls.
Step 9. Click the Hide Options button to return to the original logon screen. Type the information for your username and password, and click OK to start the session.
Step 10. If someone else is already logged on to the computer, you will be asked whether you should log off the existing user. Click Yes. The session begins.
Note
A Universal Windows Platform (UWP) app version of Remote Desktop is also available for Windows 10. This is a free app that you can download by accessing the Windows Store. After you’ve downloaded and installed this app, you can connect to a remote computer by accessing the app from the Start menu, selecting the Add button, choosing Desktop, and typing the name or IP address of the desired computer in the PC Name text box provided. Save the connection and you can click it to connect. To connect to other computers on your corporate network without setting up a VPN, add a Gateway Server in the app settings.
Configuring the Server Side of Remote Desktop
The Server Side of the Remote Desktop connection refers to the computer to which you are making the connection. Before you can use Remote Desktop, you must enable the computer to which you want to connect to receive Remote Desktop connections. This computer must be running the Pro, Education, or Enterprise edition of Windows 10. You can do this from the Remote tab of the System Properties dialog box, as follows:
Step 1. Access the Remote tab of the System Properties dialog box. To do so, right-click the Start menu, select System, and then click the Remote Settings link. This displays the dialog box shown in Figure 15-4.

Figure 15-4 Remote Tab of the System Properties Dialog Box Used to Enable Remote Connections
Step 2. Select the Allow Remote Connections to This Computer option.
Step 3. You receive a message box warning you that users cannot connect if the computer is in Sleep or Hibernation mode. If you want to change this behavior, select the Power Options link provided. When finished, click OK.
Step 4. If desired, select the check box labeled Allow Connections Only from Computers Running Remote Desktop with Network Level Authentication (Recommended). This option enables users with computers running Remote Desktop with Network Level Authentication to connect to your computer. This is the most secure option if people connecting to your computer are running Windows 7, 8.1, or 10. If you do not select this option, users with any version of Remote Desktop can connect to your computer, regardless of Windows version in use.
You also need to specify the users that are entitled to make a remote connection to your computer. By default, members of the Administrators and Remote Desktop Users groups are allowed to connect to your computer. To add a nonadministrative user to the Remote Desktop Users group, click the Select Users button in the Remote tab previously shown in Figure 15-4. This opens the Remote Desktop Users dialog box shown in Figure 15-5. Click Add, and in the Select Users dialog box that appears, type the name of the user to be granted access, and then click OK. The Select Users dialog box also enables you to add users from an Active Directory Domain Services (AD DS) domain if your computer is a domain member.
Figure 15-5 Remote Desktop Users Dialog Box Enabling You to Grant Remote Desktop Access to Nonadministrative Users
Selecting a Nondefault Port
You can configure the listening port, from the default TCP 3389, to another port of your choice. When you do so, only the people who specify the port can connect and then run a remote session. In Windows 10, you are able to adjust the port only by editing the Registry:
Step 1. Open the Registry Editor, supply your UAC credentials, and navigate to the HKEY_LOCAL_MACHINESystemCurrentControlSetControlTerminalServerWinStationsRDP-Tcp key.
Step 2. Select the PortNumber value, click the Edit menu, and then select Modify.
Step 3. Click Decimal and type in the new port number.
Step 4. Click OK and close the Registry Editor.
On the client computer, you then make a connection by opening the Remote Desktop Connection dialog box as previously described and shown in Figure 15-2. In the Computer text box, type the name or IP address of the Remote Desktop host computer, concatenated with a colon and the port number. For example, if you edited the Registry of the host computer named NANC511 with an IP address of 192.168.0.8 and changed the port number to 4233, then you would type either NANC511:4233 or 192.168.0.8:4233 into the Computer text box of the Remote Desktop Connection dialog box.
Keep in mind that a Remote Desktop connection functions across any TCP/IP link, whether dial-up, local, or otherwise. When you configure a host computer, be sure to add users to the Remote Desktop users group and to create an exception for Remote Desktop traffic for the Windows Firewall. You should also create the exception on the client computer. Refer to Chapter 16, “Configuring and Maintaining Network Security,” for information on configuring Windows Firewall.
Configuring VPN Authentication and Settings
Connectivity is the most valuable capability in a computer. By connecting to other computers, a computer can access other information, applications, and peripheral equipment. Businesses have long since discovered that their employees will work longer hours and greatly increase their productivity when they are able to connect to the company’s network from remote sites. For this reason, they provide Remote Access Service (RAS) servers with VPN servers and Internet connections, and may offer dial-up networking with modems when needed. When connecting to a corporate network using VPN (or dialing up with a modem), the user can open files and folders, use applications, print to printers, and pretty much use the network just as if he or she were connected to the network through its network adapter.
When you configure a VPN connection in Windows 10, it will typically negotiate protocols with the server automatically. You can configure which protocols to use manually. Organizations need to protect the entire connection for remote users on VPN connections, including routing information for the internal network. The encryption, therefore, is performed at the network level between the two endpoints, namely the Windows 10 client and the device or server at the other end.
The following are standard protocols used to create a VPN connection:
![]() Point-to-Point (PPP) VPN Protocol: The oldest of the protocols, it uses Microsoft Point-to-Point Encryption (MPPE) to secure the connection data. It uses 128-bit keys and is considered to have weaker security than others.
Point-to-Point (PPP) VPN Protocol: The oldest of the protocols, it uses Microsoft Point-to-Point Encryption (MPPE) to secure the connection data. It uses 128-bit keys and is considered to have weaker security than others.
![]() Point-to-Point Tunneling Protocol (PPTP): A protocol used to transmit private network data across a public network in a secure fashion. PPTP supports multiple networking protocols and creates a secure VPN connection.
Point-to-Point Tunneling Protocol (PPTP): A protocol used to transmit private network data across a public network in a secure fashion. PPTP supports multiple networking protocols and creates a secure VPN connection.
![]() Layer 2 Tunneling Protocol (L2TP): Similar to PPTP, it improves security by including support for IPsec. Used with IP Security (IPsec), it creates a secure VPN connection encrypted with either 3DES or AES, which can use up to 256 bit keys.
Layer 2 Tunneling Protocol (L2TP): Similar to PPTP, it improves security by including support for IPsec. Used with IP Security (IPsec), it creates a secure VPN connection encrypted with either 3DES or AES, which can use up to 256 bit keys.
![]() Secure Socket Tunneling Protocol (SSTP): A newer tunneling protocol that uses Secure Hypertext Transfer Protocol (HTTPS) over TCP port 443 and is able to transmit traffic across firewalls and proxy servers that might block PPTP and L2TP traffic. SSTP uses Secure Sockets Layer (SSL) for transport-level security that includes enhanced key negotiation, encryption, and integrity checking.
Secure Socket Tunneling Protocol (SSTP): A newer tunneling protocol that uses Secure Hypertext Transfer Protocol (HTTPS) over TCP port 443 and is able to transmit traffic across firewalls and proxy servers that might block PPTP and L2TP traffic. SSTP uses Secure Sockets Layer (SSL) for transport-level security that includes enhanced key negotiation, encryption, and integrity checking.
![]() Internet Key Exchange Version 2 (IKEv2): A tunneling protocol that uses IPsec Tunnel Mode over UDP port 500. This combination of protocols also supports strong authentication and encryption methods.
Internet Key Exchange Version 2 (IKEv2): A tunneling protocol that uses IPsec Tunnel Mode over UDP port 500. This combination of protocols also supports strong authentication and encryption methods.
Understanding Remote Access
When you set up a new connection or network in Windows 10, the Connect to a Workplace option allows you to set up dial-up networking connections using a modem or any other type of connection—between two different computers, between a computer and a private network, between a computer and the Internet, and from a computer through the Internet to a private network using a tunneling protocol. You can share both dial-up connections and connections configured as VPN connections using Internet Connection Sharing (ICS). All these functions and features offer different ways of connecting computers across large geographical distances.
When a computer connects to a remote access server, it performs functions nearly identical to logging on locally while connected to the network. The major difference is the method of data transport at the physical level, because the data is likely to travel across a rather slow telephone line for dial-up and some Internet connections. Another difference between a local network user and a remote access user is the way that the user’s identification is authenticated. If using Remote Authentication Dial-In User Service (RADIUS), the RADIUS server takes on the task of authenticating users and passing along their data to the directory service(s) in which the users’ accounts are listed.
Don’t confuse remote access with remote control. Remote access is the capability to connect across a dial-up or VPN link, and from that point forward, to be able to gain access to and use network files, folders, printers, and other resources identically to the way a user could do on a local network computer. Remote control, on the other hand, is the capability to connect to a computer remotely, and then, through the use of features such as Remote Desktop or Remote Assistance discussed earlier in this chapter, control the computer as if you were at the console.
Establishing VPN Connections and Authentication
We’ve already touched on VPN connections. The way a VPN works is rather interesting. The private network is connected to the Internet. One method for establishing a VPN or DirectAccess services is for an administrator to set up a VPN server or appliance that sits between the private network and the Internet (also known as dual-homed). When a remote computer connects to the Internet, whether via dial-up or other means, the remote computer can connect to the VPN server by using TCP/IP. Then the tunneling protocols encapsulate the data inside the TCP/IP packets that are sent to the VPN server. After the data is received at the VPN server, it strips off the encapsulating headers and footers and then transmits the packets to the appropriate network servers and resources.
The tunneling protocols, although similar and all supported by Windows 10 and Windows Server 2016, act somewhat differently. PPTP incorporates security for encryption and authentication in the protocol by using Microsoft Point-to-Point Encryption (MPPE). SSTP encrypts data by encapsulating PPP traffic over the Secure Sockets Layer (SSL) channel of the HTTPS protocol. IKEv2 encapsulates datagrams by using IPsec ESP or AH headers. L2TP does not provide encryption on its own. Instead, you must use IPsec to secure the data.
To establish the VPN client connection on Windows 10, use the following procedure. To follow along with this exercise and to test it, you should have a client computer and a VPN server that can both connect to the Internet. These two computers should not be connected in any other way than through the Internet.
Step 1. Open the Network and Sharing Center by searching for it in the Search bar or Cortana under Settings, or by right-clicking the network icon in the Notification area and selecting Open Network and Sharing Center.
Step 2. Click Set Up a New Connection or Network.
Step 3. The Set Up a Connection or Network page shown in Figure 15-6 offers several connection options. Select Connect to a Workplace and then click Next.
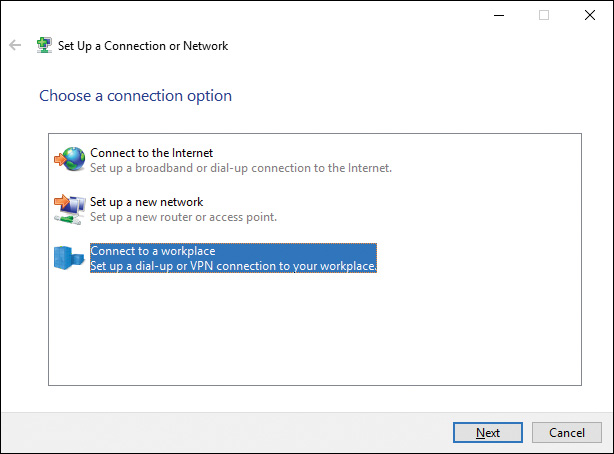
Figure 15-6 Set Up a Connection or Network Dialog Box Enabling You to Connect to Several Types of Networks
Step 4. You are given the option for selecting a dial-up or a VPN connection. Click Use My Internet Connection (VPN).
Step 5. On the Connect to a Workplace page (see Figure 15-7), type the name of the organization and the Internet address (FQDN, IPv4 address, or IPv6 address). You can select to use a smart card if it is required, and if you check the Remember My Credentials box, your authentication information for the connection will be saved by Credential Manager. The Allow Other People to Use This Connection check box will configure the connection for use with Internet Connection Sharing (ICS). When you have finished with the options, click Create.
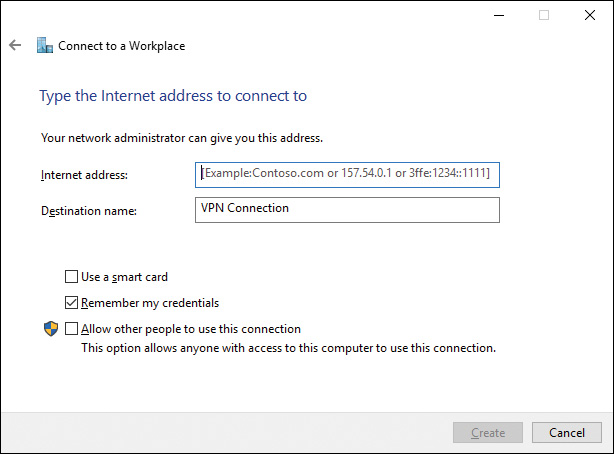
Figure 15-7 Internet Address and Destination Name of the Network You Want to Access
Step 6. Windows displays the Networks Settings pane after it creates the connection. Click the new connection and then click the Connect button that appears to start the connection.
Step 7. On the Network Authentication prompt, type the username and password you will use to access the network. If this is a domain-based network, type the domain name with the username in the box, as depicted in Figure 15-8. Click OK to connect.
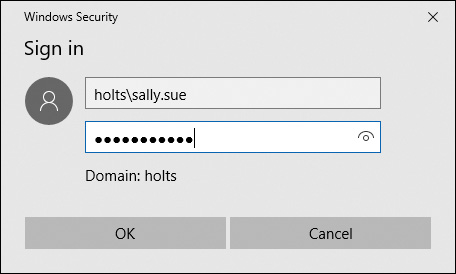
Figure 15-8 Entering Authentication Credentials for Connecting to the VPN
Step 8. To connect later to your connection, access the Action Center, click Start > Settings, and then select Network & Internet. The network status page is displayed by default, showing your current connection. To connect to your VPN connection, click the VPN menu option and then click the VPN connection to use, which displays the connection options as shown in Figure 15-9. Click the Connect button to connect to the network.
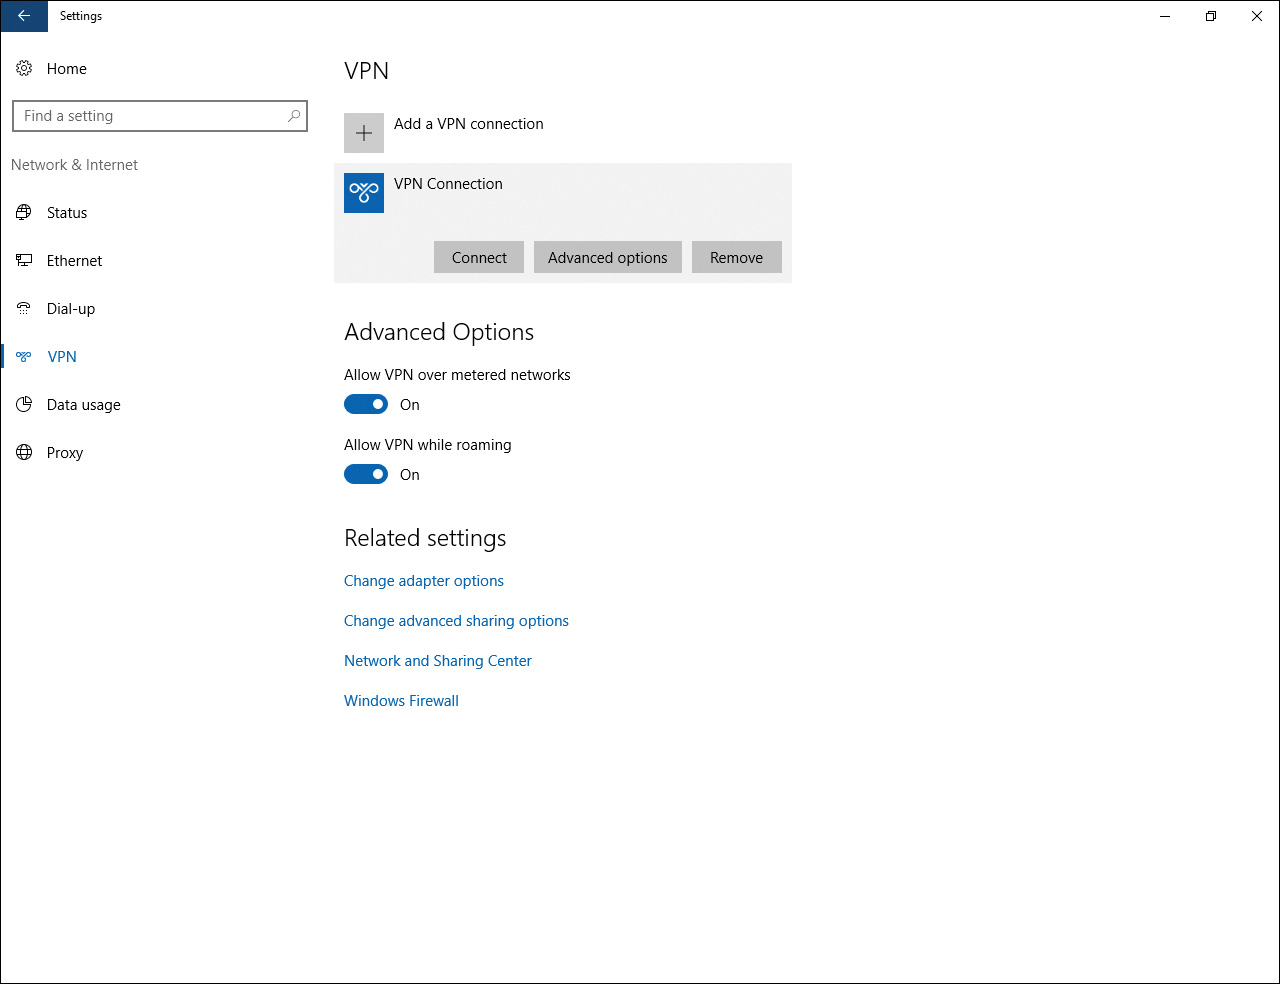
Figure 15-9 Connecting to a VPN Connection from the Network Settings Page
After you have set up a VPN connection, you can modify its properties if required. From the Network Connections Control Panel applet, right-click the connection and choose Properties. The connection’s Properties dialog box consists of the following tabs, each with different types of configurations:
![]() General: This tab enables you to specify the hostname or IP address of the destination, and the need to connect to a public network such as the Internet before attempting to set up the VPN connection.
General: This tab enables you to specify the hostname or IP address of the destination, and the need to connect to a public network such as the Internet before attempting to set up the VPN connection.
![]() Options: This tab provides access to disable credential saving and a setting to determine how long to allow an idle connection before closing the network (or hanging up). The PPP Settings button enables you to use Link Control Protocol (LCP) extensions and software compression, or to negotiate multilink (use of multiple dial-up lines for increased transmission speed) for single-link connections.
Options: This tab provides access to disable credential saving and a setting to determine how long to allow an idle connection before closing the network (or hanging up). The PPP Settings button enables you to use Link Control Protocol (LCP) extensions and software compression, or to negotiate multilink (use of multiple dial-up lines for increased transmission speed) for single-link connections.
![]() Security: As you can guess, the Security tab lets you select the type of VPN (automatic, PPTP, L2TP/IPsec, SSTP, or IKEv2), the authentication protocols to use, including EAP (for smart cards, certificates already on this computer, or trusted root certification authorities), CHAP, MS-CHAPv2, PAP, and so on. You can also configure encryption to be optional, required, or required at maximum strength.
Security: As you can guess, the Security tab lets you select the type of VPN (automatic, PPTP, L2TP/IPsec, SSTP, or IKEv2), the authentication protocols to use, including EAP (for smart cards, certificates already on this computer, or trusted root certification authorities), CHAP, MS-CHAPv2, PAP, and so on. You can also configure encryption to be optional, required, or required at maximum strength.
![]() Networking: This tab enables you to specify the use of TCP/IPv4 and TCP/IPv6, as well as File and Printer Sharing for Microsoft Networks, and the Client for Microsoft Networks. Click Install to install additional features, including network clients, services, and protocols. To install these features, you should have an installation disc.
Networking: This tab enables you to specify the use of TCP/IPv4 and TCP/IPv6, as well as File and Printer Sharing for Microsoft Networks, and the Client for Microsoft Networks. Click Install to install additional features, including network clients, services, and protocols. To install these features, you should have an installation disc.
![]() Sharing: This tab lets you configure ICS to share the connection with other computers on your local network. You can also select options to establish dial-up connections when other computers attempt to access the Internet, or allow other users on the network to control or disable a shared connection. Click Settings to configure ICS.
Sharing: This tab lets you configure ICS to share the connection with other computers on your local network. You can also select options to establish dial-up connections when other computers attempt to access the Internet, or allow other users on the network to control or disable a shared connection. Click Settings to configure ICS.
VPN Connection Security
As already mentioned, any of PPTP, L2TP, SSTP, or IKEv2 enable you to set up a tunneled connection from a remote location across the Internet to servers in your office network and access shared resources as though you were located on the network itself. Recall that PPTP, SSTP, and IKEv2 include built-in security for encryption and authentication, whereas L2TP does not. You must use IPsec to secure data being sent across an L2TP connection.
An issue that you should be aware of concerns the encryption levels used by client and server computers when establishing a VPN connection. If these encryption levels fail to match, you might receive an error code 741 accompanied by the message stating The Local Computer Does Not Support the Required Encryption Type or an error code 742 with the message The Remote Server Does Not Support the Required Encryption Type. This problem occurs if the server is using an encryption level different from that of your mobile computer. Older servers might be using Rivest Cipher 4 (RC4) encryption at a level of either 40 bits or 56 bits. By default, Windows Vista and later clients, including Windows 10, use 128-bit encryption. You can try modifying the encryption level on the client to resolve this:
Step 1. From the Network and Sharing Center, click Change Adapter Settings to access the Network Connections dialog box.
Step 2. Right-click the desired VPN connection and select Properties.
Step 3. On the Security tab of the VPN Connection Properties dialog box shown in Figure 15-10, select Maximum Strength Encryption (Disconnect if Server Declines) and then click OK.
Step 4. Attempt your connection again.
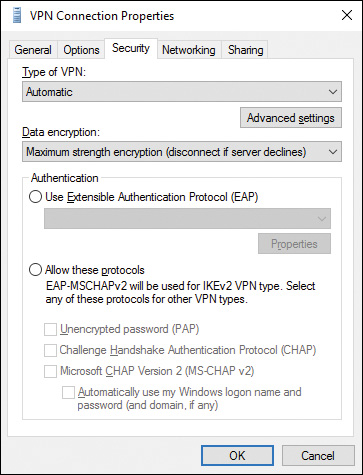
Figure 15-10 Security Tab of the Connection’s Properties Dialog Box Enabling You to Specify the Level of Encryption Used in a VPN Connection
Enabling VPN Reconnect
First introduced in Windows 7 is the VPN Reconnect feature, which utilizes IKEv2 technology to automatically reestablish a VPN connection when a user has temporarily lost her Internet connection. This avoids the need to manually reconnect to the VPN and possibly having to restart a download. VPN Reconnect can reestablish a connection as long as eight hours after the connection was lost. A user could be connected to an airport Wi-Fi connection when his flight is called for boarding; when he lands at his destination, he can reconnect and finish his download.
Use the following procedure to set up VPN Reconnect:
Step 1. Access the Security tab of the connection’s Properties dialog box as previously shown in Figure 15-10.
Step 2. Click the Advanced Settings button.
Step 3. In the Advanced Properties dialog box shown in Figure 15-11, click the IKEv2 tab and ensure that Mobility is selected, and then select a value (30 minutes by default) in the Network Outage Time dialog box.
Step 4. Click OK, and click OK again to close the connection’s Properties dialog box.
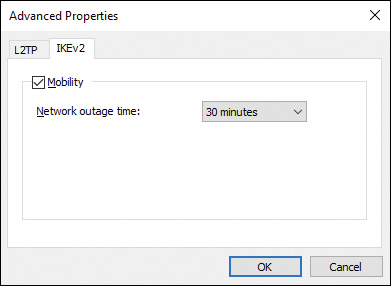
Figure 15-11 Choosing a Reconnection Time of Up to Eight Hours from the Advanced Properties Dialog Box
App-Triggered VPN, Traffic Filters, and Lockdown VPN
You have seen how to set up and configure VPN connections on Windows 10 computers and devices. The interfaces you used work with the underlying Windows VPN platform. Many users of enterprise VPN solutions may also use third-party VPN clients that administrators distribute to their users or preconfigure on their devices. For the 70-698 exam, and in order to support VPNs as a technology professional, you need to be familiar with VPN technologies and the features and functions available on Windows 10 for managing VPN connections and ensuring security.
Windows 10 includes a built-in VPN plug-in for managing VPN connections, which you learned about previously in this chapter for setting up a VPN connection. It also includes a UWP VPN plug-in platform, which you have seen at work previously in Figure 15-8 and Figure 15-9. These plug-ins are built on top of the Windows VPN platform. In this section you learn more about the VPN platform clients and some additional features that you can configure.
Table 15-4 summarizes some of the general aspects and capabilities of VPN technologies used on Windows 10. The built-in plug-in and the UWP VPN plug-in platform are both built on top of the Windows VPN platform.
Table 15-4 VPN Platforms for Windows 10 Computers
Characteristics |
Built-in Plug-in |
UWP VPN Plug-in Platform |
Third-Party Win32 App |
Description |
Uses desktop Windows and control panel applets for management and configuration. |
Based on UWP APIs. Third parties can create app-containerized plug-ins. |
Win32 NDIS kernel. |
Protocols |
Native protocols: L2TP, PPTP, SSTP, IKEv2. |
Native protocols: L2TP, PPTP, IKEv2. |
May use native protocols or third-party or proprietary protocols. |
Platform |
Windows 10 desktop or laptop computer. |
Available on all Windows 10 devices. |
Only for desktop. |
Features |
All Windows 10 VPN features. |
All Windows 10 VPN features. |
Does not take advantage of new VPN features. |
App-Triggered VPN
There are a number of new features in Windows 10 to auto-trigger VPN. With auto-triggered VPN, users do not have to manually connect when VPN is needed to access organizational resources. There are three types of auto-trigger rules:
![]() App trigger: You can configure VPN profiles in Windows 10 to connect to VPN automatically whenever one of the apps you specify is launched. Desktop or UWP apps can be configured to automatically trigger a VPN connection.
App trigger: You can configure VPN profiles in Windows 10 to connect to VPN automatically whenever one of the apps you specify is launched. Desktop or UWP apps can be configured to automatically trigger a VPN connection.
![]() Name-based trigger: You can configure a name-based rule so that if a request for a resource using a specific domain name is detected, it triggers a VPN connection.
Name-based trigger: You can configure a name-based rule so that if a request for a resource using a specific domain name is detected, it triggers a VPN connection.
![]() Always on: If you configure a VPN connection as Always On, the VPN profile will make a connection based on any of three events: user sign-in, a network change, or the device screen is turned on or activated.
Always on: If you configure a VPN connection as Always On, the VPN profile will make a connection based on any of three events: user sign-in, a network change, or the device screen is turned on or activated.
For any of these trigger types, you can also configure the trusted network detection feature, which will tell the VPN profile not to connect if the device is already on a trusted network. Using the combination of a VPN trigger and trusted network detection, users can use their device in the office connected to the private trusted network and travel to other locations with Internet access, and always have access to secured private organizational resources using secure communications automatically.
You can configure VPN profiles for devices in your organization using a number of tools, including System Center Configuration Manager (SCCM), Microsoft Intune, and other enterprise management tools. Use the following procedure to configure app-triggered VPN in Microsoft Intune:
Step 1. From the Policy menu in the Microsoft Intune portal, select Configuration Policies, and then click Add.
Step 2. Expand the Windows section, select the VPN Profile (Windows 10 Desktop and Mobile and later) template, and then click Create Policy.
Step 3. Enter a Name for the policy, a VPN Connection Name, a Connection Type, and add a server for the connection, as shown in Figure 15-12. The VPN connection also requires an Authentication method, and, depending on the connection type you select, may also require some XML code for EAP.

Figure 15-12 Configuring a VPN Policy in Microsoft Intune
Step 4. In the Associated Apps section, click the Add button, and then select the app type (Desktop or Universal), and enter the app identifier, as shown in Figure 15-13. Click OK.
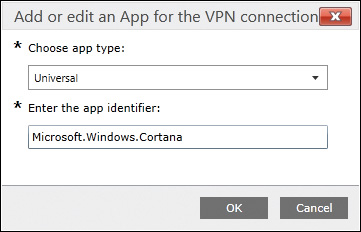
Figure 15-13 Adding an App Filter in a Microsoft Intune VPN Policy
Step 5. Repeat Step 4 for all the apps you want to trigger the VPN connection.
Step 6. When you are satisfied with the VPN policy settings, click the Save Policy button.
The app identifier you use when configuring an app-triggered VPN, as shown previously in Figure 15-13, is a property that uniquely identifies an app. For Windows UWP apps, you use the Package Full Name. Desktop apps can be identified using the Product ID or GUID.
Note
You learned about Microsoft Intune and Mobile Device Management (MDM) in Chapter 13, “Microsoft Intune.” Review the section “Managing Policies” for details about Intune policies and how to create and deploy policies for your managed devices.
Note
If you need to use EAP XML for a VPN connection, refer to the article “EAP Configuration” at https://msdn.microsoft.com/en-us/windows/hardware/commercialize/customize/mdm/eap-configuration for a technique for automatically generating the XML file required.
Traffic Filters
Windows 10 provides the capability to add traffic filters to any native Windows VPN profile. Filters allow you to control what types of traffic are allowed over the VPN. There are two types of traffic filter rules:
![]() App-based rules: You can specify a list of applications so that only traffic originating from those apps is allowed over the VPN interface.
App-based rules: You can specify a list of applications so that only traffic originating from those apps is allowed over the VPN interface.
![]() Traffic-based rules: You can use rules based on ports, IP addresses, and protocols to specify that only traffic matching the rules is allowed over the VPN interface.
Traffic-based rules: You can use rules based on ports, IP addresses, and protocols to specify that only traffic matching the rules is allowed over the VPN interface.
You can combine many sets of rules, both app-based and traffic-based, to specify the types of traffic allowed. For instance, you can specify that your in-house accounting application must be allowed through the VPN, and access only port 3850, and that all other apps on a device can use only port 443.
You can create traffic filters for a VPN connection using the VPN policy in Microsoft Intune. The Corporate Boundaries section of the VPN policy allows you to configure rules that specify the type of network traffic. See Figure 15-14 for the dialog you would use to add a traffic filter rule to the profile.
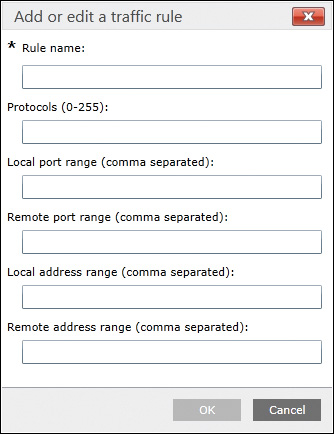
Figure 15-14 Configuring Traffic Filters in a Microsoft Intune VPN Policy
LockDown VPN
The LockDown VPN feature in Windows 10 allows you to enforce a VPN profile on a device that allows network traffic only over the VPN interface. Users of the device would not be able to connect to the Internet or any other local network without connecting to the VPN connection you specify. LockDown VPN has the following characteristics:
![]() The device tries to keep the VPN always connected.
The device tries to keep the VPN always connected.
![]() Users of the device cannot disconnect the VPN.
Users of the device cannot disconnect the VPN.
![]() Users of the device cannot delete or modify the VPN profile.
Users of the device cannot delete or modify the VPN profile.
![]() The VPN LockDown profile uses forced tunnel connection.
The VPN LockDown profile uses forced tunnel connection.
![]() If the device cannot connect to the VPN, all network traffic is blocked.
If the device cannot connect to the VPN, all network traffic is blocked.
![]() You can create only a single VPN LockDown profile on a device.
You can create only a single VPN LockDown profile on a device.
![]() The VPN LockDown profile is limited to using only the IKEv2 connection type.
The VPN LockDown profile is limited to using only the IKEv2 connection type.
You can only configure the LockDown VPN feature using an MDM solution, such as Microsoft Intune, by deploying a ProfileXML configuration profile. There is no way to configure this type of VPN profile using PowerShell or Group Policy.
Configuring DirectAccess
Microsoft has introduced some new technologies to enable remote access requirements that make it easier to configure and manage for administrators and the mobile workforce. Microsoft introduced DirectAccess and Remote Desktop Gateway (RD Gateway) for Windows Server 2008 R2. The RD Gateway component of RDS enables employees on the public Internet to securely access Windows desktops and applications that are hosted in a Microsoft Azure cloud service. You will not need to know the details of server-side configuration of these technologies for the 70-698 exam, but you should be familiar with the features of RDS and DirectAccess, how they work, and when they should be used in an organization.
Remote Desktop Services (RDS)
Remote Desktop Services (RDS) is a platform for building virtualization services for customers, including delivering individualized application, secure mobile, and remote desktop access, and enabling users to run applications and the desktop from the cloud.
RDS can be deployed on-premises with Windows Server 2016, or by using Microsoft Azure for cloud deployments. RDS can be used to set up session-based virtualization or virtual desktop infrastructure (VDI), or both. You can publish desktops to provide users with a full desktop experience with applications installed and managed centrally in an enterprise environment. Using RemoteApps, you can specify individual applications hosted on the virtualized machines, while users use their own desktops to run the applications as if they were locally installed.
DirectAccess
DirectAccess, first introduced as a feature with Windows 7 and Windows Server 2008 R2, enables users to directly connect to corporate networks from any Internet connection. When enabled, a user can access network resources as though he were actually at the office. DirectAccess uses IPv6 over IPsec to create a seamless, bidirectional, secured tunnel between the user’s computer and the office network, without the need for a virtual private network (VPN) connection.
The benefits of DirectAccess include the following:
![]() Improved mobile workforce productivity: Users have the same connectivity to network resources whether they are in or out of the office. Users can be connected through any Internet connection, such as a client’s office, a home, a hotel, an airport Wi-Fi connection, and so on.
Improved mobile workforce productivity: Users have the same connectivity to network resources whether they are in or out of the office. Users can be connected through any Internet connection, such as a client’s office, a home, a hotel, an airport Wi-Fi connection, and so on.
![]() Improved management of remote users: You can apply Group Policy updates and software updates to remote computers whenever they are connected by means of DirectAccess.
Improved management of remote users: You can apply Group Policy updates and software updates to remote computers whenever they are connected by means of DirectAccess.
![]() Improved network security: DirectAccess uses IPv6 over IPsec to enable encrypted communications and secured authentication of the computer to the corporate network even before the user has logged on. IPv6 also provides globally routable IP addresses for remote access clients. Encryption is provided using Data Encryption Standard (DES), which uses a 56-bit key, and Triple DES (3DES), which uses three 56-bit keys.
Improved network security: DirectAccess uses IPv6 over IPsec to enable encrypted communications and secured authentication of the computer to the corporate network even before the user has logged on. IPv6 also provides globally routable IP addresses for remote access clients. Encryption is provided using Data Encryption Standard (DES), which uses a 56-bit key, and Triple DES (3DES), which uses three 56-bit keys.
![]() Access control capabilities: You can choose to allow only specific applications or subnets of the corporate network or to allow unlimited network access by DirectAccess users.
Access control capabilities: You can choose to allow only specific applications or subnets of the corporate network or to allow unlimited network access by DirectAccess users.
![]() Simplified network traffic: Unnecessary traffic on the corporate network is reduced because DirectAccess separates its traffic from other Internet traffic. You can specify that DirectAccess clients send all traffic through the Direct-Access server.
Simplified network traffic: Unnecessary traffic on the corporate network is reduced because DirectAccess separates its traffic from other Internet traffic. You can specify that DirectAccess clients send all traffic through the Direct-Access server.
Windows Server 2008 R2 and later includes the required server functionality to operate DirectAccess. Optionally, you can also include Microsoft Forefront Unified Access Gateway (UAG). This option provides enhanced security within and outside the corporate network, enabling DirectAccess for IPv4-only applications and resources on the network. Security is improved on the DirectAccess server, and built-in wizards and tools simplify deployment and reduce configuration errors.
Windows 10 DirectAccess client computers must be running Windows Enterprise edition; it is not available in Windows 10 Home or Windows 10 Pro. DirectAccess can be deployed using either basic or advanced deployments. In the basic deployment scenario, a single DirectAccess server is used, with no need for infrastructure settings such as a certificate authority or Active Directory security groups. You should be aware of the following prerequisites for deploying a basic DirectAccess server:
![]() The server must be running Windows Server 2008 R2 or later.
The server must be running Windows Server 2008 R2 or later.
![]() Windows firewall must be enabled on all profiles.
Windows firewall must be enabled on all profiles.
![]() Basic deployment of DirectAccess is supported only when all client computers are running Windows 10, Windows 8, or Windows 8.1.
Basic deployment of DirectAccess is supported only when all client computers are running Windows 10, Windows 8, or Windows 8.1.
![]() ISATAP is not supported. You must use native IPv6.
ISATAP is not supported. You must use native IPv6.
![]() Two-factory authentication is not supported; domain credentials are required for authentication.
Two-factory authentication is not supported; domain credentials are required for authentication.
![]() DirectAccess will be deployed to all mobile computers in the current domain.
DirectAccess will be deployed to all mobile computers in the current domain.
![]() The DirectAccess server is the Network Location Server.
The DirectAccess server is the Network Location Server.
![]() Changing policies outside of the DirectAccess management console or PowerShell is not supported.
Changing policies outside of the DirectAccess management console or PowerShell is not supported.
Note
For more details on deploying DirectAccess using the basic deployment method, access the article “Install and Configure Basic DirectAccess” at https://technet.microsoft.com/windows-server-docs/networking/remote-access/directaccess/single-server-wizard/install-and-configure-basic-directaccess and follow the references for the steps involved.
Deploying DirectAccess with advanced settings has more infrastructure requirements, but provides greater flexibility in how DirectAccess is configured and managed in a large enterprise. The requirements for deploying DirectAccess using the advanced scenario include the following:
![]() Public key infrastructure (PKI) must be deployed in the domain.
Public key infrastructure (PKI) must be deployed in the domain.
![]() Windows firewall must be enabled on all profiles.
Windows firewall must be enabled on all profiles.
![]() Windows Server 2008 R2 or later must be used.
Windows Server 2008 R2 or later must be used.
![]() DirectAccess clients must be running either Windows Server 2008 R2 or later, Windows 7 Enterprise or Ultimate, Windows 8 or 8.1 Enterprise, Windows 10 Enterprise LTSB, or Windows 10 Enterprise.
DirectAccess clients must be running either Windows Server 2008 R2 or later, Windows 7 Enterprise or Ultimate, Windows 8 or 8.1 Enterprise, Windows 10 Enterprise LTSB, or Windows 10 Enterprise.
![]() Changing policies by using a feature other than the DirectAccess management console or Windows PowerShell is not supported.
Changing policies by using a feature other than the DirectAccess management console or Windows PowerShell is not supported.
![]() Separating NAT64/DNS64 and IPHTTPS server roles on another server is not supported. These roles must be run on the DirectAccess server.
Separating NAT64/DNS64 and IPHTTPS server roles on another server is not supported. These roles must be run on the DirectAccess server.
Note
For more details on deploying DirectAccess using the advanced deployment method, access the article “Deploy a Single DirectAccess Server with Advanced Settings” at https://technet.microsoft.com/en-us/windows-server-docs/networking/remote-access/directaccess/single-server-advanced/deploy-a-single-directaccess-server-with-advanced-settings.
After your infrastructure and servers have been configured for DirectAccess, including the Group Policy Objects for DirectAccess clients, the clients will have Direct-Access capability after they have updated Group Policy settings. To update them right away, run the gpupdate /force command-line command from an administrative command prompt.
Configuring Remote Management
Performing administration and management tasks on a number of Windows servers and Windows 10 clients can be a challenge even in a small organization. As the number of computers grows, the task can become daunting without the capability to remotely manage computers from a central location.
Microsoft has provided a number of network technologies and tools to assist administrators in the many management and support tasks needed to keep their systems secure and performing correctly. In this section you learn some principles to guide you in selecting the right tools for the job in your organization. You also learn about the remote management command-line tools that you can use to automate administration tasks across a set of computers, saving you a significant amount of time. You need to know how to configure these tools ahead of time so that you can perform any management tasks from a central location.
In this section you also learn about Remote Assistance, and how users can request help when needed. Instead of traveling to their location, Remote Assistance enables you to help them from a remote location.
Choosing the Right Tools
The capability to remotely manage computers and servers is vital in large enterprises. If you must physically visit a computer to perform routine administrative tasks, you will either need a large staff of technicians or you will get so far behind that you can end up with security vulnerabilities. Microsoft continues to expand and improve the capabilities of remote management tools with each iteration of Windows, and with Windows 10, remote management capabilities are continuing to improve.
You learned about the Remote Server Administration Tools (RSAT) in Chapter 4, “Managing Windows in an Enterprise,” and how to install the tools on a Windows 10 computer to manage servers, domains, Group Policies, and other remote management tasks. You also learned in Chapter 13, “Microsoft Intune,” about using cloud services such as Microsoft Intune and Office 365 to remotely manage devices and computers.
In this chapter you were introduced to Remote Desktop configuration and how to use Remote Desktop to connect to remote computers. Remote Desktop allows you to log on to any computer in your enterprise that includes a full GUI desktop, and perform any administration task.
In this section you learn about some additional tools that allow you to not only remotely administer servers and computers, but to perform administration tasks on groups of computers all at once, and tools that enable you to write scripts to automate routine administration and management tasks using the command line.
Table 15-5 lists some of the remote management tools available in Windows 10 or Windows Server 2016.
Table 15-5 Remote Management Tools
Tool Name |
Description |
Command Line or GUI |
Remote Desktop |
Connect to a computer remotely and log in to the GUI as if you are in front of the computer console. Cannot be used on Windows Server Core. |
GUI |
MMC |
Microsoft Management Console (MMC) has many snap-ins that can connect to remote computers for managing settings. |
GUI |
WinRM |
Windows Remote Management (WinRM) is a platform for remote management. It enables the use of WinRS, event forwarding for MMC Event Viewer, and Windows PowerShell remoting. |
Command line platform |
WinRS |
WinRS, or Windows Remote Shell, allows you to manage and execute programs remotely. Requires WinRM enabled on the remote computer. |
Command line |
PowerShell Remoting |
PowerShell remoting features allow you to remotely run PowerShell commands. Require WinRM enabled on the remote computer. |
Command line |
The tool to use depends entirely on the administration scenario. If you need to check the Windows Event log for many computers, you can use the MMC and Event Viewer to collect logs from many computers into a single view on your local computer. Performing complex configuration tasks or troubleshooting an issue on one or a few computers is probably best handled using Remote Desktop or Remote Assistance.
You should consider using Group Policy Objects for many configuration tasks when you need to modify or enforce a specific configuration on a group of computers. When using a GPO is not practical or the settings you want are not available, using a command-line tool or script enabled by WinRM may be the best choice. WinRM and PowerShell Remoting will also be your tool of choice for administration of remote Windows Server Core installations. Because Windows Server Core does not include a desktop GUI, you will not be able to use Remote Desktop. If you plan on significant use of command-line tools for remote management, be aware that WinRM must be enabled on each computer.
Windows Remote Management (WinRM)
Microsoft has provided Windows Remote Management (WinRM) to assist you in managing hardware on a network that includes machines that run a diverse mix of operating systems. WinRM is the Microsoft implementation of the WS-Management Protocol, which was developed by an independent group of manufacturers as a public standard for remote computer management. You can use WinRM to monitor and manage remote computers.
WinRM is a series of command-line tools that operate from an administrative command prompt. Use the following procedure to set up the Remote Management Service:
Step 1. Right-click Start and choose Command Prompt (Admin).
Step 2. Accept the UAC prompt, type winrm quickconfig, and then press Enter.
Step 3. You receive the output shown in Figure 15-15. Type y twice as shown in the figure to enable the granting of remote administrative rights to local users, create a WinRM listener on HTTP, and enable a firewall exception that allows WinRM packets to pass.

Figure 15-15 Enabling WinRM from an Administrative Command Prompt or an Administrative Windows PowerShell Session
You can also configure WinRM by means of Group Policy. This enables you to enable WinRM for all computers in the same AD DS site, domain, or organizational unit (OU). Access the Computer ConfigurationAdministrative TemplatesWindows ComponentsWindows Remote Management node. This node contains two subnodes: WinRM Client and WinRM Service. The WinRM Client policies deal with permitted authentication methods and available trusted hosts, whereas the WinRM Service policies deal with how the service listens on the network for requests, as well as client authentication methods that it will accept and whether unencrypted messages are permitted. You can also enable or disable an HTTP listener. For more information on the available policies in each of these subnodes, double-click any policy and consult the Help text provided. If you use Group Policy, remember to enable rules for Windows Firewall. You need to enable two inbound rules: the Windows Remote Management service rule and the Network List Manager Policies rule. You can learn about details of working with Windows Firewall in Chapter 16, “Configuring and Maintaining Network Security.”
After you’ve set up WinRM, you are able to use either of two tools included in the Remote Management Service: Windows Remote Shell and Windows PowerShell. We take a quick look at each of these tools in turn. See the next section for use of Windows PowerShell.
Note
For more information about Windows Remote Management, refer to “About Windows Remote Management” at http://msdn.microsoft.com/en-us/library/aa384291(VS.85).aspx.
Using Windows Remote Shell
Windows Remote Shell (WinRS) enables you to execute command-line utilities or scripts against a remote computer. For example, you can run the ipconfig command on a remote computer named Server1 by typing the following command:
winrs -r:Server1 ipconfig
You can specify the NetBIOS name of a computer located on the local subnet or the fully qualified domain name (FQDN) of a computer on a remote network. You can also specify user credentials under which the WinRS command will be executed, by using the following command:
Winrs -r:Server1 -u:user_name -p:password command
In this command, user_name is the username in whose context you want to run the command, password is the password associated with this username, and command is the command to be run. You can use this syntax to remotely execute any command that you can normally run locally using the cmd.exe command prompt. If you don’t specify the password, Windows Remote Shell prompts you for the password. You can also use http:// or https:// against the computer name in the -r parameter to specify an HTTP or Secure HTTP connection to a remote computer specified by its URL or IP address.
Note
For more information on using WinRS, open a command prompt and type winrs /?. You can also reference the “winrs” article at https://technet.microsoft.com/en-us/windows-server-docs/management/windows-commands/winrs.
Using Windows PowerShell and MMCs for Remote Management
Windows PowerShell, currently in version 5.1 for Windows 10, is a task-based command-line scripting interface that enables you to perform a large number of tasks and is particularly useful for remote management. PowerShell includes the Integrated Scripting Environment (ISE), which assists you in the task of writing, testing, and executing scripts. You can control and automate the administration of remote Windows computers and their applications. Installed by default in Windows 7 and later, as well as Windows Server version 2008 R2 and later, PowerShell also enables you to perform automated troubleshooting of remote computers. You can even read from and write to the Registry as though its hives were regular drives; for example, HKLM for HKEY_LOCAL_MACHINE and HKCU for HKEY_CURRENT_USER.
Note
You can also use PowerShell 5.0 on computers running Windows 7 (with Service Pack 1)/Server 2008 R2 with Service Pack 1/2012 or newer. Any scripts you write using PowerShell 5.0 can then be run on computers using any of these operating systems. To install PowerShell 5.0, download the Windows Management Framework 5.0, which includes PowerShell, PowerShell Desired State Configuration (DSC), WMI, WinRM, and other tools.
PowerShell and PowerShell ISE
Windows PowerShell borrows from the functionality of the object-oriented Microsoft .NET programming model. Objects used by this mode have well-defined properties and methods; for example, a file object has properties such as its size, modification date and time, and so on. All commands issued to PowerShell are in the form of a command-let, or cmdlet, which is an expression of the form verb-object: for example, Get-process. You can run a cmdlet on its own or build these tools into complex scripts that enable you to perform almost unlimited tasks against any computer on the network. The following are several verbs used in many cmdlets:
![]() Get: Retrieves data
Get: Retrieves data
![]() Set: Modifies or establishes output data
Set: Modifies or establishes output data
![]() Format: Formats data
Format: Formats data
![]() Select: Selects specific properties of an object or set of objects. Also finds text in strings, files, or XML documents
Select: Selects specific properties of an object or set of objects. Also finds text in strings, files, or XML documents
![]() Out: Outputs data to a specific location
Out: Outputs data to a specific location
You can start a PowerShell session from the command line by typing powershell, or from the PowerShell ISE in the Start menu, or by searching for powershell in the Search bar or Cortana. Starting PowerShell ISE from the Start menu icon will start a PowerShell command session with helpful tools for writing and testing scripts, similar to that shown in Figure 15-16.

Figure 15-16 Executing a Large Number of Cmdlets from a PowerShell Session
Help functions are provided for all available cmdlets, but you must run the Update-Help command as an administrator to download the help files and install them for use on the PowerShell command line. After you have the help files loaded, you can type help verb-*, where verb is an available PowerShell verb, including (but not restricted to) those mentioned in the previous paragraph.
You can also get help on PowerShell objects by typing help *-object, where object is a PowerShell object. See the next paragraph for an example of obtaining help for the content object.
A new feature in PowerShell 3.0 and later is the -Online option of the help command. This is useful if the help files are not installed, or when you do not want to install the help files on the local computer. The Get-Help -Online feature opens the online version of the help topic directly in the default web browser. For instance, running the PowerShell command Get-Help Get-Process -Online will display the help in Edge, as shown in Figure 15-17.
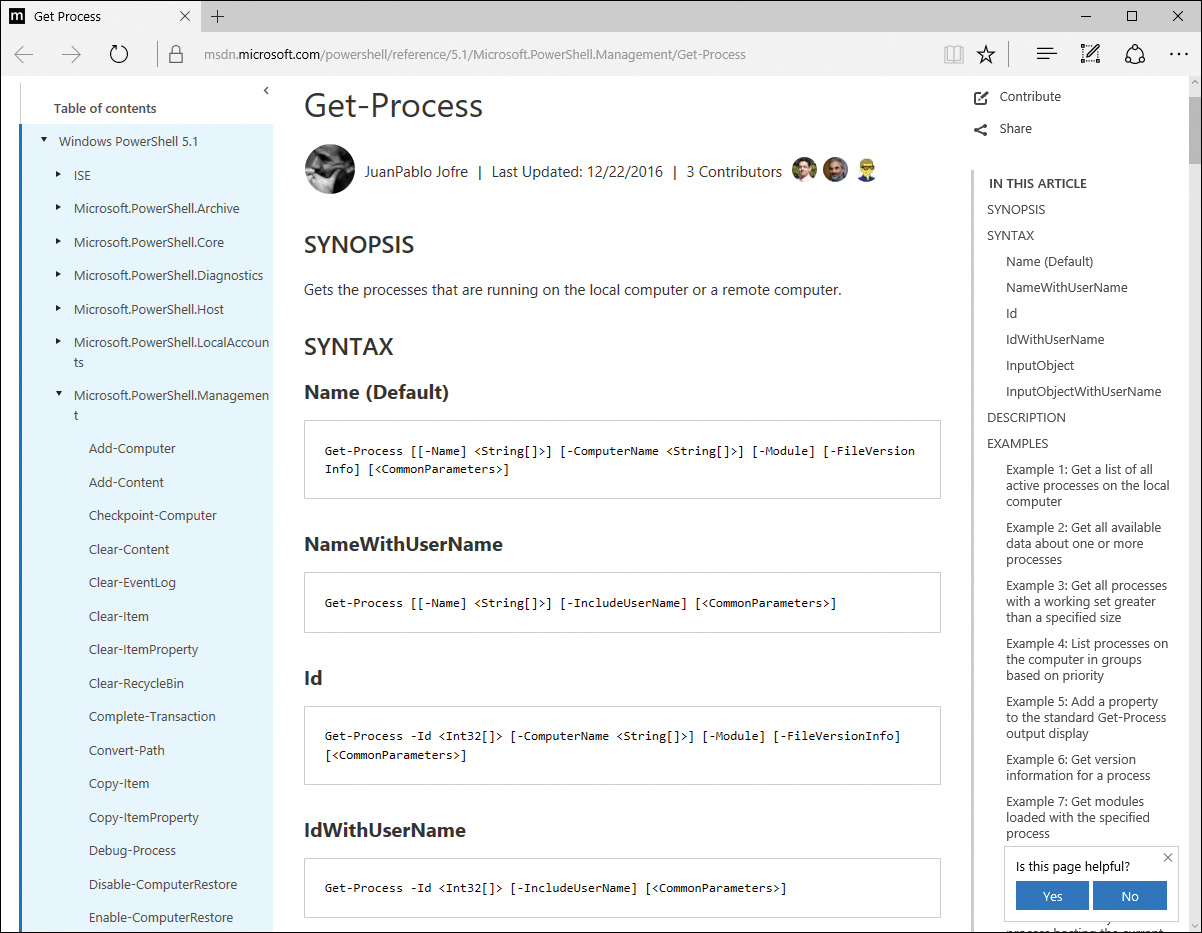
Figure 15-17 Viewing Online Help for PowerShell Cmdlets
When you write a cmdlet, you can populate the HelpUri property of your cmdlet class so that others that use the script can obtain help information from the Internet or the local intranet on the organization’s servers.
PowerShell 3.0 and later includes the PowerShell Integrated Scripting Environment (ISE), which is a PowerShell graphical user interface (GUI) that enables you to run commands and write, edit, run, test, and debug scripts in the same window. Access this tool from either the Administrative Tools menu or the PowerShell ISE link when searching for powershell in the Search bar or Cortana. PowerShell ISE also includes debugging, multiline editing capabilities, selective execution, and many other components that aid you in writing and debugging complex scripts. An example of PowerShell ISE is shown previously in Figure 15-16.
The PowerShell ISE also includes the Intellisense feature to help you put together PowerShell commands. Start typing in the ISE prompt, and whenever you type a dash (–), the ISE will pop up a list of possible commands, or parameters. You can also take advantage of Intellisense to help you complete commands by typing a few characters and then pressing the Tab key. Intellisense will try to guess the command you want and fill in the rest. If more than one command matches the first few characters you type, Intellisense will assume that you want the first command alphabetically.
To run a PowerShell command against a remote computer, use the following command:
Icm computername {powershell-cmd}
In this command, Icm is a short-hand alias for the Invoke-Command cmdlet, computername is the name of the computer you are running the command against, and {powershell-cmd} is the command being run.
PowerShell Remoting
You can use PowerShell to automate management tasks on any computer in your network or with connectivity. PowerShell Remoting works with WinRM to enable scripting support for remote management tasks.
You can enable PowerShell Remoting on any Windows computer with PowerShell 3.0 or later installed using the Enable-PSRemoting command from an Administrative PowerShell command prompt. Because PowerShell Remoting relies on WinRM, the cmdlet will also perform the WinRM autoconfiguration tasks and enable other features required. The cmdlet performs all the following setup tasks:
![]() Starts the WS-Management service and sets the startup type to Automatic
Starts the WS-Management service and sets the startup type to Automatic
![]() Creates a listener to accept remote requests for PowerShell Remoting commands
Creates a listener to accept remote requests for PowerShell Remoting commands
![]() Enables firewall exceptions for WS-Management
Enables firewall exceptions for WS-Management
![]() Registers and enables the PowerShell session configurations
Registers and enables the PowerShell session configurations
![]() Modifies the security descriptor for all session configurations to enable remote access
Modifies the security descriptor for all session configurations to enable remote access
![]() Restarts the WS-Management service
Restarts the WS-Management service
After configuring PowerShell Remoting, you can use PowerShell Remoting commands to manage remote computers in a trusted domain. If you want to manage remote computers in other domains, or computers that are not domain joined, you will also need to add the remote computer to the list of trusted hosts. To do so, you use the winrm command. For example, to add a remote computer named Win10Pro01 to the list of trusted hosts on the local computer, open an administrative command prompt and type the following:
winrm set winrm/config/client @{TrustedHosts="Win10Pro01"}
You can then use PowerShell Remoting commands on Win10Pro01. You need to repeat the command for any remote computers that are not part of the local domain.
This is a very powerful remote management tool. For instance, suppose you want to check the free disk space on a remote computer. You can query the status of any WMI object using the PowerShell Get-WMIObject cmdlet. You can use the following command to get free space on all the logical disks:
Invoke-Command {Get-WMIObject win32_logicaldisk}
The output, as shown in Figure 15-18, displays the disks available on the remote computer, the total size, and the free space. You could write a PowerShell command script to read a list of remote computers, run the command on each one, and create a file you can check each week to check for potential storage issues on all the computers you manage.
You can perform this type of query on any WMI object, and there are many related to hardware devices, operating system parameters, Windows objects, and Registry settings. You can get a complete list using Get-WMIObject -List. As you can see, using PowerShell with its Remoting capabilities provides a wealth of administration tooling for managing Windows computers.
There are also many PowerShell cmdlets that you can run on remote computers even if they have not been configured for WinRM. The Get-WmiObject cmdlet described earlier is one example of these types of commands. Other examples include Restart-Computer, Test-Connection, and Get-EventLog.

Figure 15-18 Query Information About Logical Disks on Remote Computers Using PowerShell Remoting
Note
For more information on all aspects of Windows PowerShell, start with the “Windows PowerShell Reference” at https://msdn.microsoft.com/en-us/library/ms714469(v=vs.85).aspx, and the resource links available from there. For more details on PowerShell Remoting, refer to the article “Running Remote Commands” at https://msdn.microsoft.com/en-us/powershell/scripting/core-powershell/running-remote-commands.
Using MMC Snap-ins for Remote Management
Microsoft’s Windows Remote Management framework is also used to enable many of the Microsoft Management Console snap-ins to work remotely for many administrative tasks. For instance, the Computer Management snap-in works well for managing Windows services, for scheduling tasks, and for performing Disk Management tasks on any remote computer where WinRM has been enabled.
Recall from the previous section that enabling WinRM, using either PowerShell or the WinRM quickconfig command, will enable the firewall rules for WinRS and PowerShell Remoting. Many of the MMC snap-ins use different protocols and ports and need their own firewall rules before they will work remotely. The rules for these tools need to be enabled using the following procedure:
Step 1. Right-click the Start button and select Control Panel.
Step 2. In the Search Control Panel box, type firewall, and then click Allow an App or Feature Through Windows Firewall.
Step 3. Click the Change Settings button.
Step 4. Make sure the check box is selected next to the apps with the following names, as desired for the remote management tasks you want to enable:
![]() Performance Logs and Alerts: Allows viewing performance information from the Performance Monitor snap-in.
Performance Logs and Alerts: Allows viewing performance information from the Performance Monitor snap-in.
![]() Remote Event Log Management: Allows viewing and managing Windows logs using the Event Viewer snap-in.
Remote Event Log Management: Allows viewing and managing Windows logs using the Event Viewer snap-in.
![]() Remote Scheduled Tasks Management: Allows viewing, managing, and running scheduled tasks using the Scheduled Tasks snap-in.
Remote Scheduled Tasks Management: Allows viewing, managing, and running scheduled tasks using the Scheduled Tasks snap-in.
![]() Remote Service Management: Allows viewing, starting, stopping, and changing startup configuration of Windows services using the Services snap-in.
Remote Service Management: Allows viewing, starting, stopping, and changing startup configuration of Windows services using the Services snap-in.
![]() Remote Volume Management: Allows using the Disk Management snap-in to manage disks and volumes on remote computers.
Remote Volume Management: Allows using the Disk Management snap-in to manage disks and volumes on remote computers.
![]() Windows Firewall Remote Management: Allows the use of the Windows Firewall with Advanced Security snap-in to manage firewall rules and settings.
Windows Firewall Remote Management: Allows the use of the Windows Firewall with Advanced Security snap-in to manage firewall rules and settings.
Step 5. Click the OK button to save your settings.
The computer is now ready to allow MMC snap-ins to connect from remote computers. To connect to a remote computer from a network-enabled MMC snap-in, right-click the snap-in name in the left pane, and then select Connect to Another Computer. In the resulting dialog box, type the name of the remote computer into the Another Computer box, and then click OK.
Some snap-ins, such as the Event Viewer, allow you to specify an account name to use when authenticating to the remote computer, as shown in Figure 15-19. This may be needed in a workgroup environment or when connecting to a computer joined to a different domain.
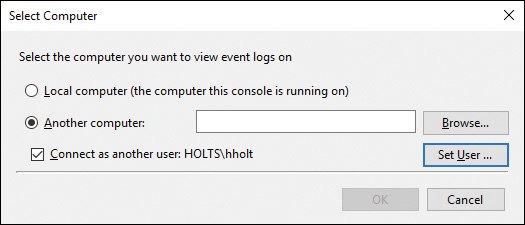
Figure 15-19 Connecting to a Remote Computer from the Event Viewer MMC Snap-in
Remote Assistance
First introduced with Windows XP, Remote Assistance allows a user running a Windows 10 computer on a network to request assistance online; it also allows for an expert to offer assistance remotely. Regardless of how the session is initiated, the result is that the expert can remotely view the user’s console and provide assistance to the user by taking control of the session, or the expert can view the session and give specific directions on how to fix the problem the user is experiencing. Beginning with Windows 7, Remote Assistance includes the Easy Connect option, which uses the Peer Name Resolution Protocol (PNRP) to send the Remote Assistance invitation across the Internet. Easy Connect provides a password that you must provide separately to the other individual (for example, by making a phone call).
The requirements for Remote Assistance are that both computers must be configured to use it. If using an AD DS domain, Group Policy for Remote Assistance must also allow the user to accept Remote Assistance offers and must list from which experts the users can accept offers. An Active Directory network also requires both users to be members of the same or trusted domains.
Windows Firewall can affect whether a user can receive Remote Assistance offers or use Remote Desktop. To configure Windows Firewall to use either or both of these features, follow these steps:
Step 1. Use any of the methods previously described in Chapter 16, “Configuring and Maintaining Network Security,” to open Windows Firewall.
Step 2. In the Windows Firewall applet, select Allow an App or Feature Through Windows Firewall from the task list on the left side of the applet.
Step 3. On the Allow Apps to Communicate Through Windows Firewall dialog box shown in Figure 15-20, click Change Settings and then select the Remote Assistance and Remote Desktop check boxes under the Private and/or Domain columns.

Figure 15-20 Allowing Remote Assistance and Remote Desktop to Communicate Through Windows Firewall
Step 4. Click OK to close the applet.
Caution
Select only these options under the Public column if you need to accept requests from individuals on public networks; deselect these options after you’ve completed the action. If you have made changes to the port number of any service, you need to use Windows Firewall with Advanced Security to enable a firewall rule allowing that port to pass. You learn how to do this in Chapter 16.
Use the following steps to configure Windows 10 to accept Remote Assistance Offers:
Step 1. Right-click Start and choose System. You can also open the Search bar or Cortana, type system into the Search box, and then select System from the list of settings that appears. This opens the Control Panel System applet.
Step 2. Click the Remote Settings link. If you receive a User Account Control (UAC) prompt, click Yes to proceed.
Step 3. Select the Remote tab of the System Properties dialog box, as shown in Figure 15-21.
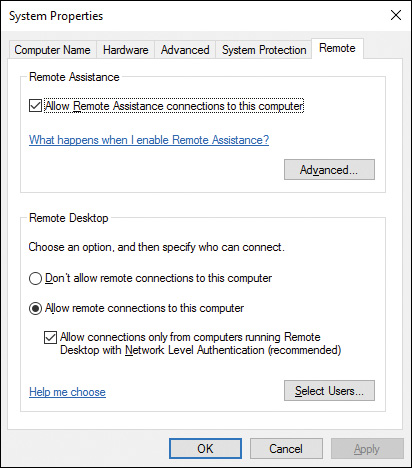
Figure 15-21 Remote Tab of the System Properties Dialog Box Enabling You to Configure Remote Assistance and Remote Desktop Settings
Step 4. Select the Allow Remote Assistance Connections to This Computer option in the Remote Assistance section.
Step 5. Click the Advanced button to display the Remote Assistance Settings dialog box shown in Figure 15-22 and select the Allow This Computer to be Controlled Remotely check box.
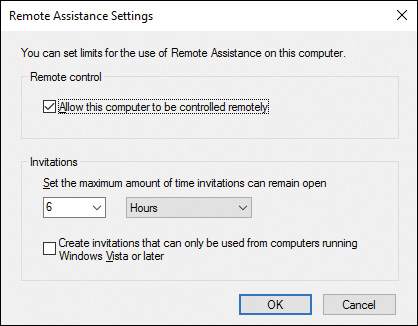
Figure 15-22 Configuring Remote Assistance Settings
Step 6. If you want to allow connections only from computers running Windows Vista or later, or Windows Server 2008 R2 or later, select the check box labeled Create Invitations That Can Only Be Used from Computers Running Windows Vista or Later.
Use the following steps to send a Remote Assistance invitation to receive help from an expert user:
Step 1. Access the System and Security category of Control Panel and select Launch Remote Assistance in the System section.
Step 2. This action displays the Windows Remote Assistance dialog box shown in Figure 15-23, which enables you to either ask for help or help someone else. To ask for help, click Invite Someone You Trust to Help You.
Step 3. Select one of the three options on the following page, shown in Figure 15-24:
![]() Save This Invitation as a File: Creates an invitation file in the Microsoft Remote Control Incident (MsRcIncident) format. You can use this method with Web-based email programs by sending it as an attachment.
Save This Invitation as a File: Creates an invitation file in the Microsoft Remote Control Incident (MsRcIncident) format. You can use this method with Web-based email programs by sending it as an attachment.
![]() Use Email to Send an Invitation: Available only if you have configured an email account in the Mail app or installed another email client.
Use Email to Send an Invitation: Available only if you have configured an email account in the Mail app or installed another email client.
![]() Use Easy Connect: Uses the Peer Name Resolution Protocol to send the invitation across the Internet. The other person must also be using a Windows 7, 8.1, or 10 computer.
Use Easy Connect: Uses the Peer Name Resolution Protocol to send the invitation across the Internet. The other person must also be using a Windows 7, 8.1, or 10 computer.

Figure 15-23 Windows Remote Assistance Enabling You to Either Ask for Help or Help Someone Else
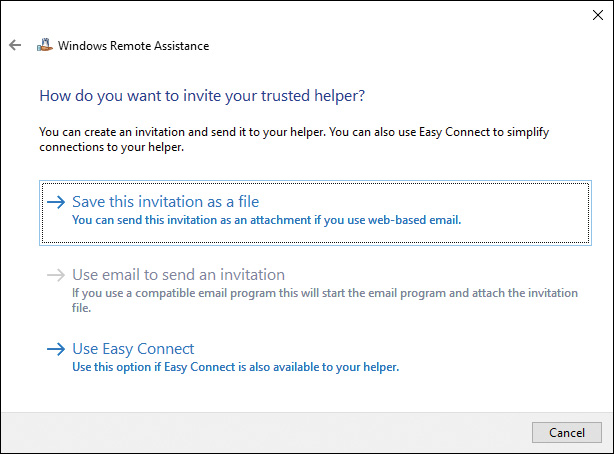
Figure 15-24 Remote Assistance Allows You to Send Invitations Three Ways
Step 4. The next step depends on the option you’ve selected from Figure 15-24:
![]() If you save the invitation as a file, you are prompted for a name and location to save the file.
If you save the invitation as a file, you are prompted for a name and location to save the file.
![]() If you use email, your email program opens and provides a prepared message including an invitation attachment. Supply the email address of the expert who will be helping, and then send the message.
If you use email, your email program opens and provides a prepared message including an invitation attachment. Supply the email address of the expert who will be helping, and then send the message.
![]() If you use Easy Connect, you receive a password that you need to provide to the expert by another means, such as by phone. You can also click Chat to start an online chat session. See the next section for more information on Easy Connect.
If you use Easy Connect, you receive a password that you need to provide to the expert by another means, such as by phone. You can also click Chat to start an online chat session. See the next section for more information on Easy Connect.
Depending on from whom you are requesting information and how you are requesting it, you should make a selection that will best reach the expert user. Whichever method you select for use, you can password-protect the session; the Easy Connect option has already done that for you. If you have created an invitation for assistance and want to cancel it before it expires, you can use the View Invitation Status option and cancel the invitation.
After the expert receives the email or the invitation file, he can open Remote Assistance on his computer and select the Help Someone Who Has Invited You option previously shown in Figure 15-23. He can then open the invitation file that the other person has sent and begin offering assistance to the user. He sees a Remote Assistance Expert console that provides a real-time view of the user’s session. This is called a shadow session. If remote control has been enabled, the expert can click the Take Control button, notifying the user that the expert is asking to share control of the keyboard and mouse. The user can prevent a remote control session by pressing the Esc key, pressing Ctrl+C, or clicking the Stop Control button in the chat window.
Note
For more information about using Remote Assistance, including a detailed step-by-step procedure, refer to “User Remote Assistance to Let Someone Fix Your PC” at https://support.microsoft.com/en-us/instantanswers/018e0e28-050c-0f1b-1562-b15aaad6ab7d/use-remote-assistance-to-let-someone-fix-your-pc.
Tip
You can ask a user who is experiencing problems to make a recording of the steps she has taken. To do so, ask her to type psr into the Search bar or Cortana in Windows 10 or the Start Menu Search text box in Windows Vista or 7. Then select Steps Recorder or psr.exe. This opens the Steps Recorder. She can click Start Record, perform the steps that are creating the problem, and then click Stop Record when she’s finished. At that time she can click Add Comment and then save the recording as a zip file that she can attach to the Remote Assistance request email message.
Configuring and Using Easy Connect
As already introduced, Easy Connect provides a simple way to create a Remote Assistance session between two computers running Windows 7 or later without the need for sending an invitation file. The user receives a password that she needs to provide to the expert by another means such as by phone.
After the user has selected the Use Easy Connect option, the expert receives a Remote Assistance dialog box asking him to type the password that Remote Assistance provided to the other person. Using the supplied password, the expert can initiate the session, and the user’s computer validates the password and invitation before the user is prompted to start the session.
The following are several problems that might be encountered when attempting to use Easy Connect:
![]() The user’s computer is running an older Windows version: For Easy Connect to be available, both computers must be running Windows 7 or later.
The user’s computer is running an older Windows version: For Easy Connect to be available, both computers must be running Windows 7 or later.
![]() Limited access to the Internet: If access to the Internet is limited on either computer, Easy Connect is disabled. Some corporate networks might limit Internet access.
Limited access to the Internet: If access to the Internet is limited on either computer, Easy Connect is disabled. Some corporate networks might limit Internet access.
![]() A router in the network doesn’t support Easy Connect: Easy Connect uses the Peer Name Resolution Protocol (PNRP) when transferring the assistance request over the Internet. Microsoft provides a utility for determining whether routers are configured for PNRP. You should install PNRP on any router running a version of Windows Server, or enable PNRP on the router being used.
A router in the network doesn’t support Easy Connect: Easy Connect uses the Peer Name Resolution Protocol (PNRP) when transferring the assistance request over the Internet. Microsoft provides a utility for determining whether routers are configured for PNRP. You should install PNRP on any router running a version of Windows Server, or enable PNRP on the router being used.
Exam Preparation Tasks
Review All the Key Topics
Review the most important topics in the chapter, noted with the Key Topics icon in the outer margin of the page. Table 15-6 lists a reference of these key topics and the page numbers on which each is found.
Table 15-6 Key Topics for Chapter 15
Key Topic Element |
Description |
Page Number |
Authentication protocols for Remote Access |
||
List |
Remote Authentication Group Policies |
|
Step List |
Outlines the procedure used for creating a Remote Desktop connection |
|
List |
Connection protocols for VPN connections |
|
Creating a VPN connection |
||
Step List |
Configuring VPN Reconnect |
|
Step List |
Configuring app-triggered VPN connections using Microsoft Intune |
|
Configuring traffic filters using Microsoft Intune VPN policies |
||
List |
The services and settings configured when enabling PSRemoting |
|
Configuring Remote Assistance |
||
Step List |
Requesting help using Remote Assistance |
Complete the Tables and Lists from Memory
Print a copy of Appendix B, “Memory Tables” (found on the book’s website), or at least the section for this chapter, and complete the tables and lists from memory. Appendix C, “Memory Tables Answer Key,” also on the website, includes completed tables and lists to check your work.
Definitions of Key Terms
Define the following key terms from this chapter, and check your answers in the glossary.
Challenge Handshake Authentication Protocol (CHAP)
Easy Connect
EAP-TTLS
Internet Key Exchange version 2 (IKEv2)
Layer 2 Tunneling Protocol (L2TP)
Microsoft Challenge Handshake Authentication Protocol version 2 (MS-CHAPv2)
Password Authentication Protocol (PAP)
Point-to-Point Protocol (PPP)
Point-to-Point Tunneling Protocol (PPTP)
Protected Extensible Authentication Protocol-Transport Layer Security (PEAP-TLS)
Remote Assistance
Remote Desktop
Remote Desktop Gateway (RD Gateway)
Secure Socket Tunneling Protocol (SSTP)
virtual private network (VPN)
Windows PowerShell