Chapter 11 Configuring and Securing Mobile Devices
This chapter covers the following subjects:
![]() Configuring Offline Files and Sync Center: The Offline Files feature enables users to work with files stored on a network share when they are disconnected from that share. You can specify how files are synchronized with the copies on the offline computer and how to deal with synchronization conflicts.
Configuring Offline Files and Sync Center: The Offline Files feature enables users to work with files stored on a network share when they are disconnected from that share. You can specify how files are synchronized with the copies on the offline computer and how to deal with synchronization conflicts.
![]() Configuring Power Policies: Microsoft provides several options for configuring power management on Windows 10 computers. This section introduces you to these options as well as configuring Group Policy for power management settings.
Configuring Power Policies: Microsoft provides several options for configuring power management on Windows 10 computers. This section introduces you to these options as well as configuring Group Policy for power management settings.
![]() Configuring Windows To Go: Microsoft provides the capability to install a completely functional version of Windows 10 together with applications and settings on a supported USB drive. You can use this drive to boot a computer with supported hardware into the USB copy of Windows 10, bypassing the operating system installed on the computer you’re using.
Configuring Windows To Go: Microsoft provides the capability to install a completely functional version of Windows 10 together with applications and settings on a supported USB drive. You can use this drive to boot a computer with supported hardware into the USB copy of Windows 10, bypassing the operating system installed on the computer you’re using.
![]() Configuring Wi-Fi Direct: Wi-Fi Direct is a new technology that enables users on portable computers to create ad hoc wireless connections with devices such as smartphones and TVs and share data with these devices without the need for an access point.
Configuring Wi-Fi Direct: Wi-Fi Direct is a new technology that enables users on portable computers to create ad hoc wireless connections with devices such as smartphones and TVs and share data with these devices without the need for an access point.
This chapter covers the following objectives for the 70-697 exam:

Configure mobility options: Configure offline file policies, configure power policies, configure Windows To Go, configure sync options, configure Wi-Fi settings, configure Wi-Fi Direct, files, powercfg, Sync Center.
Mobile computing has entered the mainstream of everyday business activity, with portable devices of all kinds, including laptops, tablets, and smartphones presenting an unprecedented level of computing power. You can do almost as much on a notebook or laptop computer or tablet as on a desktop, with the added convenience of portability to any workplace, client, hotel, or home situation as the demand requires. People are buying ultra-portable Surface devices and other hybrid computers that not only act as tablets but can be a fully functional replacement for laptops, with the capability to switch between those roles seamlessly.
Along with the convenience of portability comes the risk of exposing valuable data to unauthorized access as a result of loss or theft of the computer. Microsoft has enhanced the BitLocker full drive encryption feature and added the new BitLocker To Go portable drive encryption feature.
Windows 10 includes many useful mobile computing features, such as the capability to obtain a geographic location based on data collected by a GPS sensor, storage of startup keys, and the capability to remotely wipe information stored on a lost or stolen computer. Microsoft has continued and enhanced features introduced with older Windows versions, including the Windows Mobility Center, offline file access, improved power management, and presentation settings. This chapter introduces you to these portable computer features.
“Do I Know This Already?” Quiz
The “Do I Know This Already?” quiz allows you to assess whether you should read this entire chapter or simply jump to the “Exam Preparation Tasks” section for review. If you are in doubt, read the entire chapter. Table 11-1 outlines the major headings in this chapter and the corresponding “Do I Know This Already?” quiz questions. You can find the answers in Appendix A, “Answers to the ‘Do I Know This Already?’ Quizzes.”
Table 11-1 “Do I Know This Already?” Foundation Topics Section-to-Question Mapping
Foundation Topics Section |
Questions Covered in This Section |
Configuring Offline Files and Sync Center |
1–5 |
Configuring Power Policies |
6–9 |
Configuring Windows To Go |
10–11 |
Configuring Wi-Fi Direct |
12 |
Caution
The goal of self-assessment is to gauge your mastery of the topics in this chapter. If you do not know the answer to a question or are only partially sure of the answer, you should mark that question as wrong for purposes of the self-assessment. Giving yourself credit for an answer you correctly guess skews your self-assessment results and might provide you with a false sense of security.
1. You have configured the Offline Files option on your Windows 10 computer and want to ensure that all available files on a network share are automatically cached to your computer. Which option should you enable?
a. Open Sync Center
b. Disk Usage
c. Sync Selected Offline Files
d. Always Available Offline
2. You are configuring server options for offline files and want to ensure that users can always run cached files locally, so that performance as experienced by the users is always optimized. Which settings should you configure? (Each answer represents part of the solution. Choose two.)
a. Only the files and programs that users specify will be available offline.
b. No files or programs from the shared folder are available offline.
c. All files and programs that users open from the shared folder are automatically available offline.
d. Optimize for performance.
3. You want to enable client computers to temporarily cache all files obtained across a slow WAN link. What Group Policy setting should you enable?
a. Configure Background Sync
b. Enable Transparent Caching
c. Administratively Assigned Offline Files
d. Configure Slow-Link Mode
4. Which offline file policy determines whether offline files are synchronized in the background when extra charges on cell phone or broadband networks could be incurred?
a. Enable Transparent Caching
b. Configure Slow-Link Mode
c. Enable File Synchronization on Costed Networks
d. Remove Work Offline Command
5. Which offline file policy controls caching of offline files across slow links so you can specify a network latency value above which network files are temporarily cached?
a. Enable Transparent Caching
b. Configure Slow-Link Mode
c. Enable File Synchronization on Costed Networks
d. Remove Work Offline Command
6. Windows 10 uses which mode, which automatically saves your work and configuration information in RAM and turns off the computer’s monitor, hard disk, and other system components?
a. Sleep
b. Standby
c. Hibernate
d. Suspended
7. Which Windows 10 power plan turns off the display after 2 minutes and sleeps after 10 minutes when on battery power?
a. Balanced
b. Power Saver
c. High performance
d. Energy Star Qualified
8. You want to reduce the processor power being used so that you can watch a movie on your laptop computer while on a long flight without running out of battery power. What setting should you configure? (Choose two; each is a complete solution to this problem.)
a. Balanced power plan
b. Power Saver power plan
c. Processor power management advanced setting
d. Sleep advanced setting
e. Multimedia advanced setting
9. Which of the following tasks can you configure directly from the battery meter on a Windows 10 portable computer? (Choose all that apply.)
a. Choose a power plan.
b. Use presentation mode.
c. Adjust screen brightness.
d. Specify hard disk settings.
e. Open the Power Settings page.
10. Which of the following best describes Windows To Go?
a. A portable computer on which Windows 10 is installed and booted with user credentials obtained from a USB device.
b. A copy of Windows 10 located on a network drive that you access from any computer using a USB device that contains user credentials and a path to the network drive.
c. A copy of Windows Mobile imaged onto a USB device that enables a user to boot any computer with compatible hardware into the operating system on the USB device.
d. A copy of Windows 10 imaged onto a USB device that enables a user to boot any computer with compatible hardware into the operating system on the USB device.
11. Windows To Go works on which editions of Windows 10?
a. Windows 10 Pro and Enterprise
b. Windows 10 Enterprise and Education
c. All except Windows Mobile
d. Windows To Go can run any edition
12. You are planning to implement Wi-Fi Direct on your wireless network. Which of the following are advantages that you will gain from the Wi-Fi implementation? (Choose all that apply.)
a. Computers will be able to connect seamlessly with any wireless devices without the need for additional hardware.
b. You can create an ad hoc connection among five computers running any version of Windows 10.
c. Computers can connect concurrently to the Internet and to devices such as smartphones.
d. You can stream media between devices over a high bandwidth connection.
e. Windows 10 UWP apps can communicate over Wi-Fi Direct without the need for additional setup and configuration.
f. Devices requiring IP address assignment can automatically receive an IP address from a DHCP server or from a built-in DHCP allocator in Windows 10.
Foundation Topics
Configuring Offline Files and Sync Center
The Offline Files feature in Windows 10 enables a user to access and work with files and folders stored on a network share when the user is disconnected from that share. For example, such a situation could occur when the user is working from a laptop, tablet, or smartphone on the road or at home. This feature ensures that users are always working with the most recent version of their files.
When you enable Offline Files, the feature makes anything you have cached from the network available to you. It also preserves the normal view of network drives, and so on, as well as shared folder and NTFS permissions. When you reconnect to the network, the feature automatically synchronizes any changes with the versions on the network. Also, changes made to your files while online are saved to both the network share and your local cache. Windows 10 includes the Always Offline feature, which keeps the computer operating in Offline mode even when the server is available. This mode can enhance the performance of the computer because it always retrieves data from the local hard disk rather than going across the network to the server (which can limit performance if the network or server happens to be slow).
Offline files are stored on the local computer in a special area of the hard drive called a cache. More specifically, this is located at %systemroot%CSC, where CSC stands for client-side caching. By default, this cache takes up 10 percent of the disk volume space.
You need to configure both the client computer and the server to use the Offline Files feature. Keep in mind that, in this sense, the “server” refers to any computer that holds a shared folder available to users of other computers. This may be a computer running Windows 7 Professional, Enterprise, or Ultimate, Windows 8.1 Pro or higher, or Windows 10 Pro or higher, as well as a server running Windows Server 2008 R2, Windows Server 2012/R2, or Windows Server 2016. It could even be a computer running an older version of Windows, although these versions are no longer supported.
Note
For more information on new features of Offline Files in Windows 10 and Windows Server 2016, refer to “Folder Redirection, Offline Files, and Roaming User Profiles Overview” at https://technet.microsoft.com/en-us/library/hh848267(v=ws.11).aspx.
Client Computer Configuration
By default, the Offline Files feature is not enabled on the client computer. The following procedure shows you how to enable offline files and configure the available client options:

Step 1. Click Start, then scroll the program list that appears and select Windows System, and choose Control Panel.
Step 2. In the Control Panel search box, type sync, and then click the Sync Center link.
Step 3. From the Sync Center applet, click the Manage Offline Files link.
Step 4. The Offline Files dialog box appears. By default, Offline Files are disabled, and the dialog informs you that Offline Files is currently disabled. You will see an Enable Offline Files command button. Click this button to enable Offline Files. You may be asked to restart your computer. If so, after restarting, you will be able to access the available options shown in Figure 11-1.
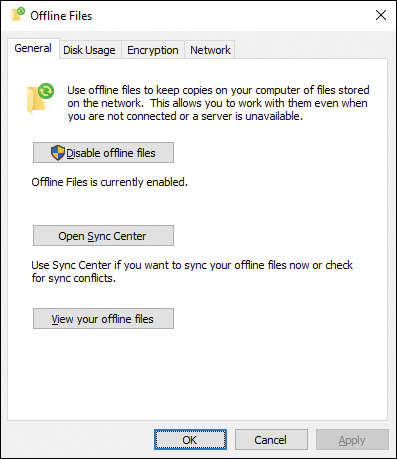
Figure 11-1 Configuring Offline Files at the Client Computer from the Offline Files Dialog Box
Step 5. From the General tab, select the following options as required:
![]() Disable Offline Files: Select this command button if you do not want to use Offline Files. You must restart your computer to disable Offline Files. If Offline Files is disabled, this command button enables you to enable Offline Files.
Disable Offline Files: Select this command button if you do not want to use Offline Files. You must restart your computer to disable Offline Files. If Offline Files is disabled, this command button enables you to enable Offline Files.
![]() Open Sync Center: Opens the Sync Center.
Open Sync Center: Opens the Sync Center.
![]() View Your Offline Files: Opens a File Explorer window displaying the contents of the Offline Files folder.
View Your Offline Files: Opens a File Explorer window displaying the contents of the Offline Files folder.
Step 6. Select the Disk Usage tab to configure the amount of disk space currently used for storing offline files. Click Change Limits to modify this setting. Click Delete Temporary Files to delete locally stored files.
Step 7. Select the Encryption tab, and then click Encrypt to encrypt offline files. This feature uses the Encrypting File System (EFS) to encrypt offline files, keeping them secure from unauthorized users. By default, offline files are not encrypted.
Step 8. Select the Network tab to check for slow network connections. You can specify the number of minutes (5 by default) at which Windows 8.1 checks for a slow connection.
Step 9. When finished, click OK or Apply.
Sync Center
When you have enabled your computer for Offline Files, copies of files and folders you access across the network are stored automatically in your cache area according to the server configuration parameters in effect. These parameters are discussed in the next section.
You can also automatically cache all available files from a network share to which you have connected. Right-click the shared folder icon and choose Always Available Offline, as shown in Figure 11-2. This automatically caches all available files without your having to open them first. You can also synchronize your cached files manually when you are connected to the network share. To do so, right-click the shared folder icon and choose Sync > Sync Selected Offline Files.
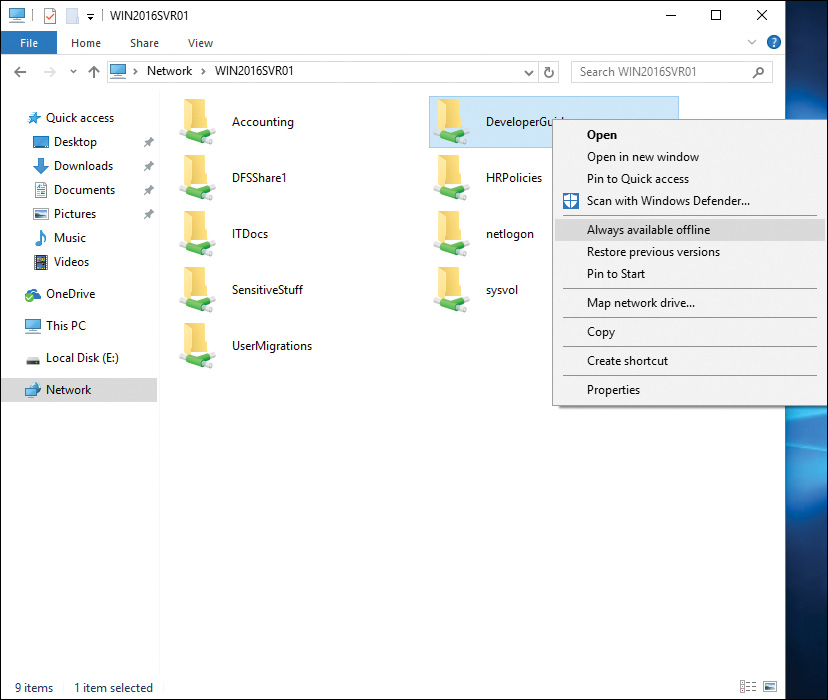
Figure 11-2 Caching Files from a Network Share
The Sync Center was first included in Windows Vista; it enables you to manage cached offline files and folders after you have configured them as described in the previous sections. The Sync Center enables you to perform the following actions:
![]() View sync partnerships: View the devices and places you are syncing with.
View sync partnerships: View the devices and places you are syncing with.
![]() View sync conflicts: If different users have performed conflicting edits on a file (such as a Word document), the Sync Center informs you and enables you to save multiple copies of the edited file for later analysis.
View sync conflicts: If different users have performed conflicting edits on a file (such as a Word document), the Sync Center informs you and enables you to save multiple copies of the edited file for later analysis.
![]() View sync results: You can check the status of sync with any of your offline files or partnerships.
View sync results: You can check the status of sync with any of your offline files or partnerships.
![]() Set up new sync partnerships: Sync Center establishes sync partnerships for all shared folders that you have cached locally. You can configure these partnerships to specify how and when the folders are synced.
Set up new sync partnerships: Sync Center establishes sync partnerships for all shared folders that you have cached locally. You can configure these partnerships to specify how and when the folders are synced.
![]() Manage offline files: Displays the Offline Files dialog box, shown previously in Figure 11-1.
Manage offline files: Displays the Offline Files dialog box, shown previously in Figure 11-1.
Use the following procedure to view sync partnerships and synchronize files:
Step 1. Use one of the following methods to open the Sync Center:
![]() From the Search bar or Cortana text box, type sync center and click Sync Center in the list.
From the Search bar or Cortana text box, type sync center and click Sync Center in the list.
![]() From the Offline Files dialog box previously shown in Figure 11-1, click Open Sync Center.
From the Offline Files dialog box previously shown in Figure 11-1, click Open Sync Center.
Step 2. In the task list on the left side of the Sync Center, click View Sync Partnerships to display configured partnerships.
Step 3. To set up a new sync partnership, click Set Up New Sync Partnerships.
Step 4. To synchronize a specific network share, right-click its partnership and then click Sync Offline Files.
Sync Center also enables you to schedule synchronization activities to take place at any of the following actions:
![]() At a specified time and synchronization interval
At a specified time and synchronization interval
![]() When you log on to your computer
When you log on to your computer
![]() When your computer has been idle for a specified number of minutes (15 minutes by default)
When your computer has been idle for a specified number of minutes (15 minutes by default)
![]() When you lock or unlock Windows
When you lock or unlock Windows
Use the following steps to create a schedule:
Step 1. In Sync Center, select View Sync Partnerships, double-click the Offline Files folder, and then select the required synchronization partnership. From the menu, select Schedule.
Step 2. In the Offline Files Sync Schedule dialog box that appears, select the items to be synched on this schedule and then click Next.
Step 3. To specify a time for the sync to begin, select At a Scheduled Time. To initiate synchronization when an event occurs, select When an Event Occurs and then select the desired action or actions. Available events include When I Log On to My Computer, My Computer Is Idle for a Specified Number of Minutes, I Lock Windows, and I Unlock Windows.
Step 4. If you select At a Scheduled Time, Sync Center automatically provides the current date and time as a start time and a one-day repeat interval (see Figure 11-3). Accept these or specify a different date, time, and interval as required, and then click Next.

Figure 11-3 Specifying the Date, Time, and Synchronization Interval for Your Sync Schedule
Step 5. Specify a descriptive name for the scheduled synchronization and then click Save Schedule.
After you have created a synchronization schedule, the Offline Files Sync Schedule dialog box provides additional options for viewing or editing an existing sync schedule or deleting the schedule.
If different users modify a synchronized file while working on different computers, a synchronization conflict occurs. Sync Center informs you when conflicts have occurred. To view information about sync conflicts, click View Sync Conflicts in the Tasks pane. Sync Center informs you about the file or files that are in conflict.
To resolve a conflict, select it and click Resolve. Sync Center enables you to keep either or both versions by using an altered filename, thereby allowing you to compare them and resolve differences at a later time.
Server Configuration
To enable the caching of files stored on a shared folder, you need to configure the shared folder on the server and specify the type of caching available. The following procedure shows you how to perform these tasks on a Windows 10 computer.
Step 1. Right-click the shared folder and choose Properties.
Step 2. On the Sharing tab of the folder’s Properties dialog box, click Advanced Sharing. If you receive a UAC prompt, click Yes.
Step 3. On the Advanced Sharing dialog box, click Caching to open the Offline Settings dialog box shown in Figure 11-4.

Figure 11-4 Offline Settings Dialog Box Providing Several Options for Enabling Offline Caching in Windows 10
Step 4. Select from the following options and then click OK:
![]() Only the Files and Programs That Users Specify Are Available Offline: Requires that a user connecting to the share specifically indicate the files to be made available for caching. This is the default setting.
Only the Files and Programs That Users Specify Are Available Offline: Requires that a user connecting to the share specifically indicate the files to be made available for caching. This is the default setting.
![]() No Files or Programs from the Shared Folder Are Available Offline: Effectively disables the Offline Files feature.
No Files or Programs from the Shared Folder Are Available Offline: Effectively disables the Offline Files feature.
![]() All Files and Programs That Users Open from the Shared Folder Are Automatically Available Offline: Makes every file in the share available for caching by a remote user. When a user opens a file from the share, the file is downloaded to the client’s cache and replaces any older versions of the file.
All Files and Programs That Users Open from the Shared Folder Are Automatically Available Offline: Makes every file in the share available for caching by a remote user. When a user opens a file from the share, the file is downloaded to the client’s cache and replaces any older versions of the file.
![]() Optimize for Performance: Enables expanded caching of shared programs so that users can run them locally, thereby improving performance. Available only if you have selected the All Files and Programs That Users Open from the Shared Folder Are Automatically Available Offline option.
Optimize for Performance: Enables expanded caching of shared programs so that users can run them locally, thereby improving performance. Available only if you have selected the All Files and Programs That Users Open from the Shared Folder Are Automatically Available Offline option.
Step 5. Click OK to close the Advanced Sharing dialog box and then click Close to close the Properties dialog box for the shared folder.
Offline File Policies
Group Policy makes available a series of policy settings. In Local Group Policy Editor or Group Policy Management Editor, navigate to Computer ConfigurationAdministrative TemplatesNetworkOffline Files to display the policy settings shown in Figure 11-5. Note that some of the policy settings available here are applicable to computers running older Windows versions only and are provided for backward-compatibility purposes. Table 11-2 describes the more important policy settings relevant to Windows 10 and Windows Server 2016 computers that you should be aware of.
Table 11-2 Offline File Policies
Policy |
Description |
Specify Administratively Assigned Offline Files |
Specifies network files and folders that are always available offline. Type the Universal Naming Convention (UNC) path to the required files. |
Configure Background Sync |
Enables you to control synchronization of files across slow links. You can configure sync interval and variance parameters, as well as blackout periods when sync should not occur. |
Limit Disk Space Used by Offline Files |
When enabled, limits the amount of disk space in MB used to store offline files. |
Allow or Disallow Use of the Offline Files Feature |
Determines whether users can enable Offline Files. When enabled, Offline Files is enabled and users cannot disable it; when disabled, Offline Files is disabled and users cannot enable it. |
Encrypt the Offline Files Cache |
When enabled, all files in the Offline Files cache are encrypted. |
Enable File Screens |
Enables you to block file types according to extension from being created in folders that are available offline. Specify the extensions to be excluded, separated by semicolons—for example, *.jpg; *.mp3. |
Enable Transparent Caching |
Controls caching of offline files across slow links. You can specify a network latency value above which network files are temporarily cached. More about this policy in the next section. |
Configure Slow-Link Mode |
Controls background synchronization across slow links and determines how network file requests are handled across slow links. |
Enable File Synchronization on Costed Networks |
Determines whether offline files are synchronized in the background when extra charges on cell phone or broadband networks could be incurred. |
Remove Work Offline Command |
Prevents users from manually changing whether Offline Files is in online mode or offline mode, by removing the Work Offline command from File Explorer. |
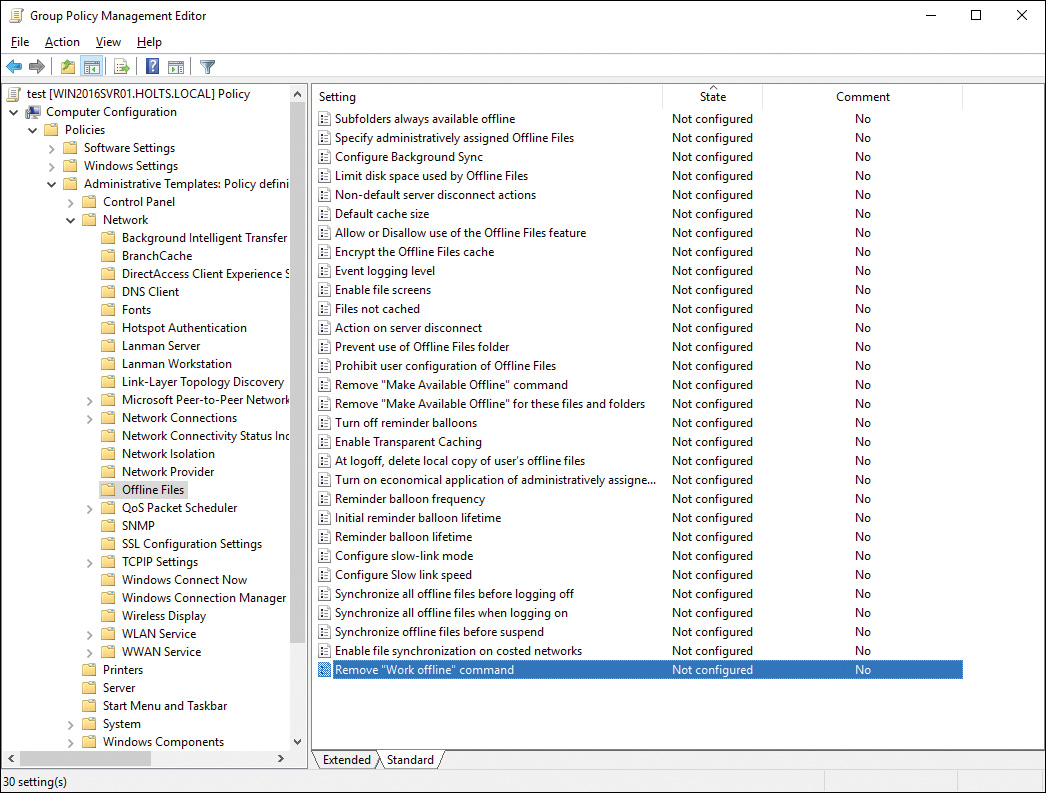
Figure 11-5 Configuring a Large Number of Policy Settings Related to the Use of Offline Files
Using the Always Offline Mode
The Always Offline mode enables faster access to cached files and redirected folders in an Active Directory Domain Services (AD DS) environment. Enabling this mode reduces bandwidth usage because users are always working offline, even when connected to the network.
Use the following steps to enable the Always Offline mode:
Step 1. At a server running Windows Server 2016 (or Windows Server 2012), or a computer running the Remote Server Administration Tools, access the Group Policy Management Editor and open a Group Policy Object (GPO) focused on the desired domain, site, or organizational unit (OU).
Step 2. Navigate to the Computer ConfigurationPoliciesAdministrative TemplatesNetworkOffline Files node.
Step 3. Right-click the Configure Slow-Link Mode policy and choose Edit to display the Configure Slow-Link Mode dialog box shown in Figure 11-6.
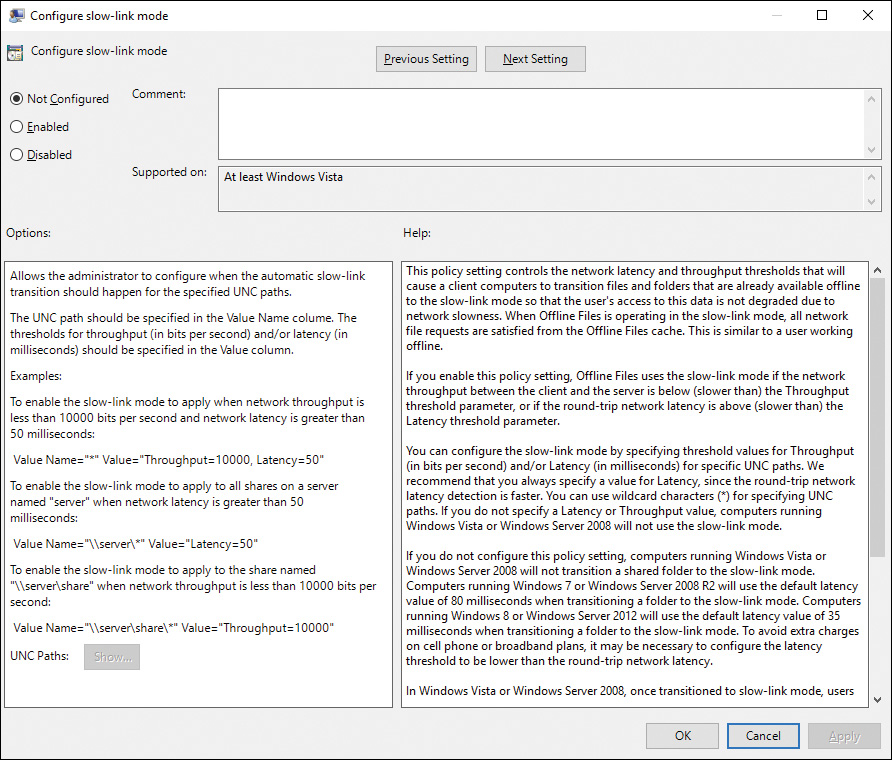
Figure 11-6 Configuring Slow-Link Mode
Step 4. Select Enabled.
Step 5. Scroll the Options section of this dialog box to click Show at the bottom of this section.
Step 6. From the Show Contents dialog box, specify the file share for which the Always Offline mode should be enabled, as shown for \win2016svr01HRPolicies in Figure 11-7.
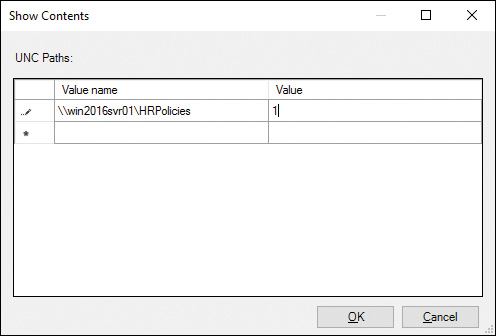
Figure 11-7 Specifying a Shared Folder That Should Always Be Available Offline
Step 7. In the Value column, specify a latency value in milliseconds (as shown for 1 millisecond in Figure 11-7) and then click OK.
Step 8. Click OK to close the Configure Slow-Link Mode dialog box.
Note
For more information on the Always Offline mode, refer to “Enable the Always Offline Mode to Provide Faster Access to Files” at https://technet.microsoft.com/en-us/library/hh968298(v=ws.11).aspx.
Configuring Transparent Caching of Offline Files
Introduced with Windows 7 and available in Windows 10 is the concept of transparent file caching, which enables client computers to temporarily cache files obtained across a slow WAN link more aggressively, thereby reducing the number of times the client might have to retrieve the file across the slow link. Use of transparent caching also serves to reduce bandwidth consumption across the WAN link. Prior to Windows 7, client computers always retrieved such a file across the slow link.
The first time a user accesses a file across the WAN, Windows retrieves it from the remote computer; this file is then cached to the local computer. Subsequently, the local computer checks with the remote server to ensure that the file has not changed and then accesses it from the local cache if its copy is up-to-date. Note that this type of file caching is temporary; clients cannot access these files when they go offline.
You can configure the Enable Transparent Caching policy shown in Figure 11-8 so that clients can perform transparent caching. Enable this policy and set the network latency value, which is the number of milliseconds beyond which the client will temporarily cache files obtained across the WAN.

Figure 11-8 Enabling the Enable Transparent Caching Policy Setting So That Clients Can Temporarily Cache Files Obtained Across a Slow WAN Link
Configuring Power Policies
The Hardware and Sound category of Control Panel contains two applets of particular interest to mobile users. Open the Control Panel and select Hardware and Sound to display these options, which include the Power Options applet that enables you to configure power use for specific conditions, including connecting your computer to an AC outlet or running it on battery power.
Configuring Power Options
The chief issue with system performance for mobile users is that of managing power consumption on mobile computers when running on battery power. Microsoft provides the Control Panel Power Options applet for configuring several power management options that enable you to configure energy-saving schemes appropriate to your hardware.
Note
Although designed with mobile users in mind, the power options discussed in this section are available to all users of Windows 10. Users of desktop computers can utilize these options to decrease electricity consumption in these days of ever-increasing electric utility bills.
Windows 10 uses Sleep mode, which replaces the Standby mode used in Windows versions prior to Vista, and offers the following advantages compared to shutting down your computer:
![]() Windows automatically saves your work and configuration information in RAM and turns off the computer’s monitor, hard disk, and other system components. Should your battery run low, Windows saves your work to the hard disk and turns off your mobile computer.
Windows automatically saves your work and configuration information in RAM and turns off the computer’s monitor, hard disk, and other system components. Should your battery run low, Windows saves your work to the hard disk and turns off your mobile computer.
![]() Entering the sleep state is rapid: it takes only a few seconds.
Entering the sleep state is rapid: it takes only a few seconds.
![]() When you wake your computer, Windows restores your work session rapidly. You don’t need to wait for your computer to boot and restore your desktop after logging on.
When you wake your computer, Windows restores your work session rapidly. You don’t need to wait for your computer to boot and restore your desktop after logging on.
You can access the Power Options applet from the Hardware and Sound section or the System and Security section of Control Panel. You can also access this applet by accessing the Search bar or Cortana and typing power options. This opens the dialog box shown in Figure 11-9, from which you can configure the options described in the following section.

Figure 11-9 Power Options Applet Providing Several Options for Configuring Power Management
Power Plans
Microsoft has supplied three preconfigured power plans that help to strike a balance between usability and power conservation:
![]() The High-Performance power plan optimizes the computer for performance at the expense of battery life and is suitable for individuals who run graphics-intensive or multimedia applications frequently.
The High-Performance power plan optimizes the computer for performance at the expense of battery life and is suitable for individuals who run graphics-intensive or multimedia applications frequently.
![]() The Power Saver plan optimizes battery life by slowing the processor down and is suitable for those who use the computer primarily for purposes such as email, Web browsing, and word processing.
The Power Saver plan optimizes battery life by slowing the processor down and is suitable for those who use the computer primarily for purposes such as email, Web browsing, and word processing.
![]() The Balanced plan strikes a balance between these extremes.
The Balanced plan strikes a balance between these extremes.
You can edit one of these power schemes or create a new one if the preconfigured power schemes do not fulfill your needs. Table 11-3 compares the three preconfigured power plans.
Table 11-3 Windows 10 Power Plans
Power Plan |
When on Battery Power |
When Plugged into AC Outlet |
Balanced |
Turns off display after 5 minutes Sleeps after 10 minutes |
Turns off display after 10 minutes Sleeps after 20 minutes |
Power Saver |
Turns off display after 2 minutes Sleeps after 10 minutes |
Turns off display after 5 minutes Sleeps after 15 minutes |
High Performance |
Turns off display after 10 minutes Does not sleep |
Turns off display after 15 minutes Does not sleep |
Note
Some computers might label the Balanced power plan as Energy Star Qualified.
Caution
Do not use Sleep mode when on a commercial airplane. Airline regulations forbid the use of electronic devices during takeoff and landing. Because a computer can wake to perform a scheduled task or other action, you should turn off your computer completely at these times.
Additional Power Plan Options
Windows 10 enables you to perform additional power management actions that you can use to tailor your computer’s power scheme to your needs. When you first access these pages, settings will be read-only. Click the Change Settings That Are Currently Unavailable link, and respond to any UAC prompts displayed, to change the options.
Selecting the Change Plan Settings link next to any of the top three options on the task list in the Power Options applet previously shown in Figure 11-9 brings up the System Settings screen for that power plan, shown in Figure 11-10. This enables you to perform the following actions:
![]() Turn Off the Display: You can choose how much idle time to allow before turning off the computer’s display.
Turn Off the Display: You can choose how much idle time to allow before turning off the computer’s display.
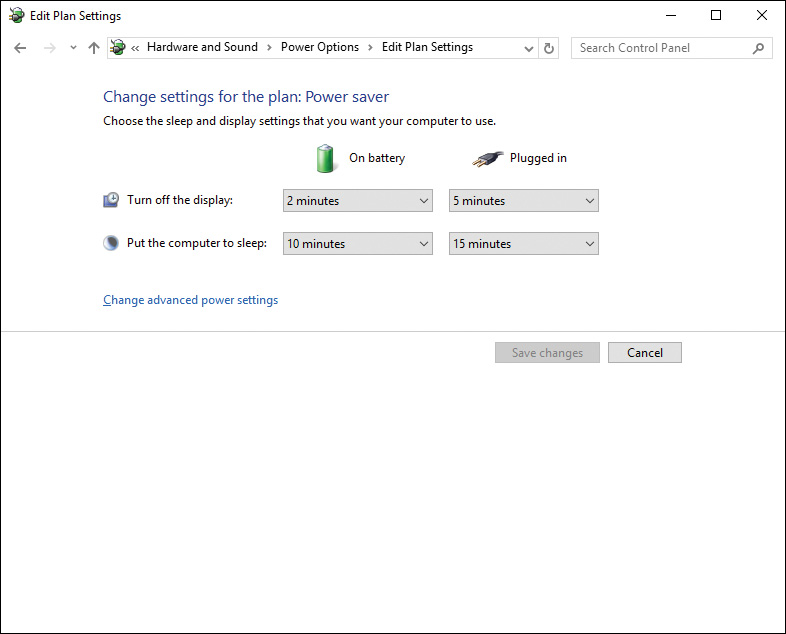
Figure 11-10 Define Power Buttons and Turn On Password Protection Dialog Box Enabling You to Define Power Lid Actions, Configure Password Protection, and Enable Several Shutdown Settings
![]() Put the Computer to Sleep: Decide how long you want the computer to remain idle before going into Sleep mode.
Put the Computer to Sleep: Decide how long you want the computer to remain idle before going into Sleep mode.
![]() Change Advanced Power Settings: Clicking this link displays all the discrete power options for devices and subsystems shown in Figure 11-11. The Advanced power settings are discussed next.
Change Advanced Power Settings: Clicking this link displays all the discrete power options for devices and subsystems shown in Figure 11-11. The Advanced power settings are discussed next.
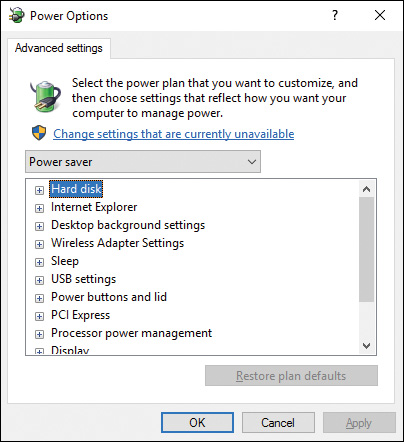
Figure 11-11 Advanced Settings of Power Options Allowing You to Set Discrete Options for Your Power Plan
Advanced settings allow you to modify any of the existing power plans or create your own custom power plan.
Advanced Power Settings
Click Change Advanced Power Settings to bring up the dialog box shown in Figure 11-11 for the following additional options, each of which you can define separately for operation on battery power or when plugged in:
![]() Hard Disk: You can specify the number of minutes of inactivity after which the hard disk is turned off.
Hard Disk: You can specify the number of minutes of inactivity after which the hard disk is turned off.
![]() Internet Explorer: You can configure the JavaScript Timer frequency for either maximum performance (the default when plugged in) or maximum power savings (the default when operating on battery power).
Internet Explorer: You can configure the JavaScript Timer frequency for either maximum performance (the default when plugged in) or maximum power savings (the default when operating on battery power).
![]() Desktop Background Settings: You can choose whether to make the background slide show available, or to pause it.
Desktop Background Settings: You can choose whether to make the background slide show available, or to pause it.
![]() Wireless Adapter Settings: You can specify a maximum performance, or low, medium, or maximum power saving for the adapter. The more power saving you specify, the poorer the signal throughput might become.
Wireless Adapter Settings: You can specify a maximum performance, or low, medium, or maximum power saving for the adapter. The more power saving you specify, the poorer the signal throughput might become.
![]() Sleep: You can specify the number of minutes after which your computer enters Sleep mode. You can also enable wake timers, enabling the PC to be brought out of sleep at a specific time, usually for running backups or other scheduled tasks. You enable all wake timers or Important Wake Timers Only, which includes things like reboots after a Windows update that requires one.
Sleep: You can specify the number of minutes after which your computer enters Sleep mode. You can also enable wake timers, enabling the PC to be brought out of sleep at a specific time, usually for running backups or other scheduled tasks. You enable all wake timers or Important Wake Timers Only, which includes things like reboots after a Windows update that requires one.
![]() USB Settings: You can enable USB Selective Suspend Setting, which enables Windows to turn off the USB root hub when not in use.
USB Settings: You can enable USB Selective Suspend Setting, which enables Windows to turn off the USB root hub when not in use.
![]() Power Buttons and Lid: You can define the action that occurs when you close the lid or press the Power or Sleep buttons. You can also define the action (sleep, shut down, or turn off the display) that occurs when you select the Power Off button from the Start menu.
Power Buttons and Lid: You can define the action that occurs when you close the lid or press the Power or Sleep buttons. You can also define the action (sleep, shut down, or turn off the display) that occurs when you select the Power Off button from the Start menu.
![]() PCI Express: You can define the level of power savings for link state power management, which controls the power management state for devices connected to the PCI Express bus if present in the computer.
PCI Express: You can define the level of power savings for link state power management, which controls the power management state for devices connected to the PCI Express bus if present in the computer.
![]() Processor Power Management: You can control the minimum and maximum power status of the processor, also known as throttling the processor. Reducing the processor power levels saves battery power at the expense of lengthening the time required to respond to keyboard and mouse actions. Also available is the System Cooling Policy, which covers the amount of power the fan requires. Active state increases the fan speed before slowing the processor, whereas setting the state to Passive slows the processor before increasing the fan speed.
Processor Power Management: You can control the minimum and maximum power status of the processor, also known as throttling the processor. Reducing the processor power levels saves battery power at the expense of lengthening the time required to respond to keyboard and mouse actions. Also available is the System Cooling Policy, which covers the amount of power the fan requires. Active state increases the fan speed before slowing the processor, whereas setting the state to Passive slows the processor before increasing the fan speed.
![]() Display: You can control the display brightness and the length of time before it is turned off. You can also enable adaptive display, which increases the waiting time before turning off the display if you wake the computer frequently.
Display: You can control the display brightness and the length of time before it is turned off. You can also enable adaptive display, which increases the waiting time before turning off the display if you wake the computer frequently.
![]() Multimedia Settings: You can control whether the computer enters Sleep mode when sharing multimedia with other users. When you set this option to Prevent Idling to Sleep, the computer will not go to sleep if media is being shared with other computers or devices. You can also define what to do when playing video. The options are to Optimize Video Quality, Optimize Power Savings, or to use a Balanced setting.
Multimedia Settings: You can control whether the computer enters Sleep mode when sharing multimedia with other users. When you set this option to Prevent Idling to Sleep, the computer will not go to sleep if media is being shared with other computers or devices. You can also define what to do when playing video. The options are to Optimize Video Quality, Optimize Power Savings, or to use a Balanced setting.
![]() Battery: You can specify actions to take place when the battery power reaches a low or critical level, as well as the battery level at which these events occur. By default, low battery level is at 10 percent and produces a notification but takes no action. The critical level is at 5 percent; it notifies you and puts the computer into hibernation when running on battery power.
Battery: You can specify actions to take place when the battery power reaches a low or critical level, as well as the battery level at which these events occur. By default, low battery level is at 10 percent and produces a notification but takes no action. The critical level is at 5 percent; it notifies you and puts the computer into hibernation when running on battery power.
Tip
Configure power plans to turn off components after a period of inactivity. If you set up a power plan to turn off components separately after an interval of nonuse, the computer progressively moves toward Sleep mode. This should happen if a user is away from his laptop for 20 or 30 minutes. At the same time, a user doing presentations should not have her computer go into Sleep mode. Remember that the user can enable presentation settings so that this and other actions do not occur.
You can customize a power plan to suit your needs if required. Use these steps to create a custom power plan:
Step 1. From the left pane of the Power Options window previously shown in Figure 11-9, click Create a Power Plan.
Step 2. On the Create a Power Plan dialog box that appears, select the default plan (Balanced, Power Saver, or High Performance) that is closest to your desired plan.
Step 3. Provide a descriptive name for the plan and then click Next.
Step 4. On the Change settings window, select the time interval after which the display is turned off and put to sleep, select the display brightness, and then click Create.
Step 5. You are returned to the main Power Options window. If you want to configure additional settings for the plan you just created, click Change Advanced Power Settings to display the dialog box previously shown in Figure 11-11.
Battery Meter
Windows 10 uses the battery meter to help you keep track of remaining battery life. This is represented by a battery icon in the Notification area, which also contains a Plug icon when the mobile device is plugged into AC power. Hover your mouse over this icon to view the percentage of battery power left. To view the battery meter in full, as shown in Figure 11-12, click the Battery icon.
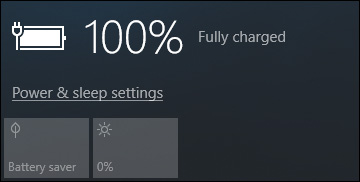
Figure 11-12 Battery Meter Informing You of the Current Battery Charge Level
From the battery meter, you can also change these settings:
![]() Battery Saver: Turns on Battery Saver mode (can be activated when on battery power).
Battery Saver: Turns on Battery Saver mode (can be activated when on battery power).
![]() Adjust Screen Brightness: Lowers the screen brightness to save power.
Adjust Screen Brightness: Lowers the screen brightness to save power.
![]() Power and Sleep Settings: Opens the Battery Settings page shown in Figure 11-13. This page changes the settings for the current power plan settings from the applet shown previously in Figure 11-10. You can click the Additional Power Settings link to display the Power Options applet from Figure 11-9.
Power and Sleep Settings: Opens the Battery Settings page shown in Figure 11-13. This page changes the settings for the current power plan settings from the applet shown previously in Figure 11-10. You can click the Additional Power Settings link to display the Power Options applet from Figure 11-9.
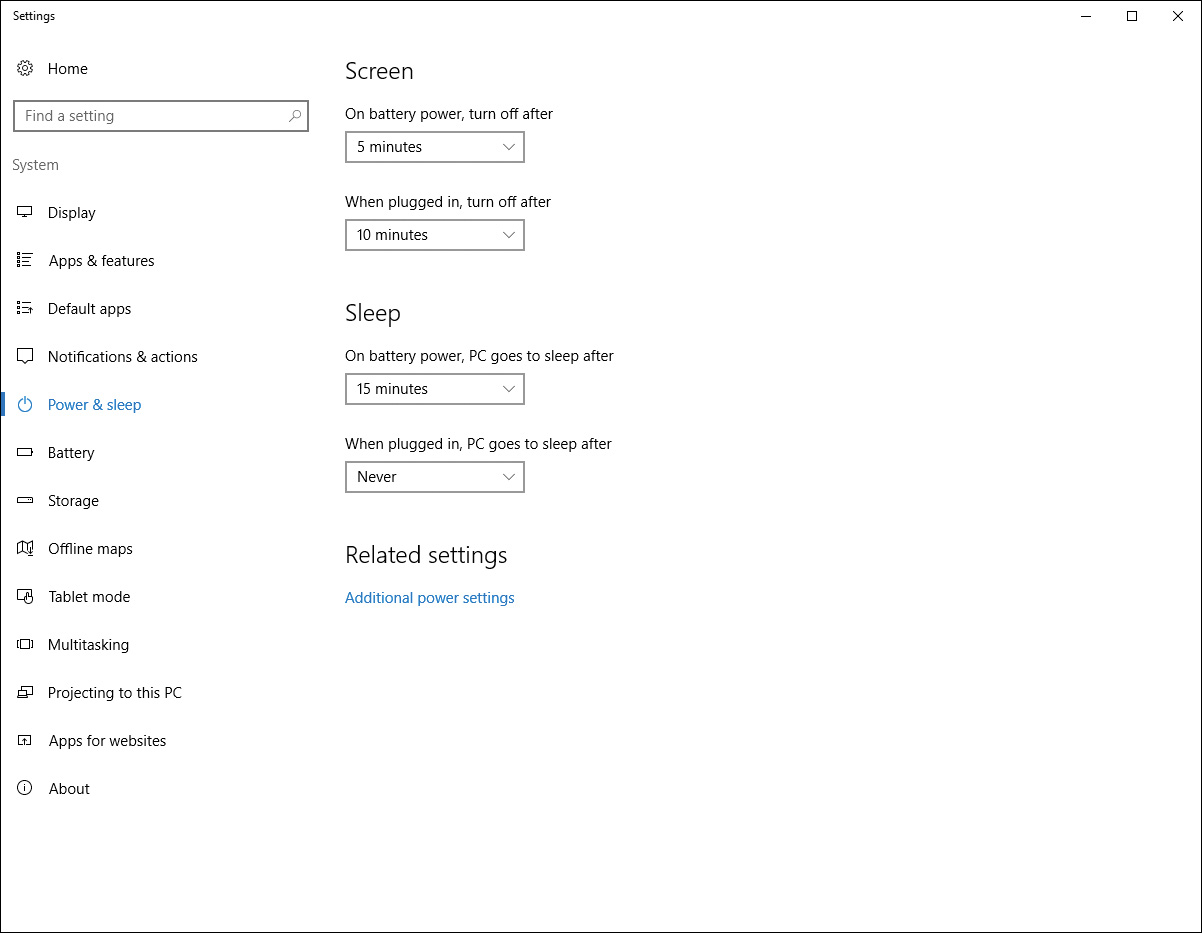
Figure 11-13 Battery Settings Page Enabling You to Modify the Default Screen and Sleep Settings.
Battery Saver is a new feature in Windows 10 designed to improve how long Windows can run on battery power. When Battery Saver is turned on, several background processes are suspended, such as noncritical Windows updates, Mail, and Offline Folder synching. Certain apps are stopped from running in the background (this is configurable; see the following list), some notifications are turned off, and by default the screen is dimmed.
You can adjust some of the behavior for Battery Saver in Settings by accessing the Action Center, selecting All Settings, clicking on System, and then selecting the Battery menu. This brings up the Battery Settings page shown in Figure 11-14. At the top of the page, the Overview displays the current charging status of your battery. The list that follows describes the available options from this page.

Figure 11-14 Battery Settings Page Allowing You to Adjust the Behavior of Battery Saver
![]() Battery Usage by App: Clicking this link displays a list of apps on your computer that have been consuming battery power and the percentage of battery power used by each. This can help you identify which apps are using the most power. You can select an app and click the Details button to get more information. For apps designed for Windows 10, you can limit the app’s background activity, as shown in Figure 11-15.
Battery Usage by App: Clicking this link displays a list of apps on your computer that have been consuming battery power and the percentage of battery power used by each. This can help you identify which apps are using the most power. You can select an app and click the Details button to get more information. For apps designed for Windows 10, you can limit the app’s background activity, as shown in Figure 11-15.

Figure 11-15 Customizing How Battery Saver Controls the Background Behavior of Each Windows App
![]() Always Allowed in Background: The app will always run in the background even when Battery Saver is turned on.
Always Allowed in Background: The app will always run in the background even when Battery Saver is turned on.
![]() Managed by Windows: The app will stop running in the background when Battery Saver mode is on, and will be temporarily turned off if there is a high battery drain and the app has not been used recently.
Managed by Windows: The app will stop running in the background when Battery Saver mode is on, and will be temporarily turned off if there is a high battery drain and the app has not been used recently.
![]() Never Allowed in Background: The app will stop running in the background when Battery Saver is activated.
Never Allowed in Background: The app will stop running in the background when Battery Saver is activated.
![]() Battery Saver: With the check box selected, Battery Saver will automatically turn on when the battery drains to a specific level; 20% is the default. You can use the slider to adjust the battery level at which you want Battery Saver to be activated.
Battery Saver: With the check box selected, Battery Saver will automatically turn on when the battery drains to a specific level; 20% is the default. You can use the slider to adjust the battery level at which you want Battery Saver to be activated.
![]() Battery Saver Status Until Next Charge: This toggle turns on Battery Saver until the next time you plug in your device.
Battery Saver Status Until Next Charge: This toggle turns on Battery Saver until the next time you plug in your device.
![]() Lowering the Screen Brightness While in Battery Saver: Lowering the screen brightness will significantly save battery power, but if you do not want the screen dimmed while Battery Saver is on, you can uncheck this box.
Lowering the Screen Brightness While in Battery Saver: Lowering the screen brightness will significantly save battery power, but if you do not want the screen dimmed while Battery Saver is on, you can uncheck this box.
![]() Battery Saving Tips: Opens the default browser to display the Microsoft Support page for tips on saving battery charge.
Battery Saving Tips: Opens the default browser to display the Microsoft Support page for tips on saving battery charge.
When the power drops below 10 percent, you receive a warning message informing you to either plug in your computer or shut it down and change the battery; the battery meter and icon display a red X icon. Some computers can sound an audible notification. You should plug your computer into a power outlet when this message appears.
Note
For more details on Battery Saver and how it works, see “Battery Saver” at https://msdn.microsoft.com/en-us/windows/hardware/commercialize/design/component-guidelines/battery-saver.
Power Management and Group Policy
Windows 10 includes the capability for configuring power management settings in Group Policy. When you configure policies for power management, a nonadministrative user cannot modify the power settings.
Use the following procedure to use Group Policy to configure power management settings:
Step 1. Open Group Policy Management Console (GPMC) either through the Start menu or by searching for gpedit.msc. You can edit a GPO for the domain or use the GPMC on the local computer.
Step 2. Navigate to the Computer ConfigurationAdministrative TemplatesSystemPower Management node. You receive the policy settings shown in Figure 11-16.
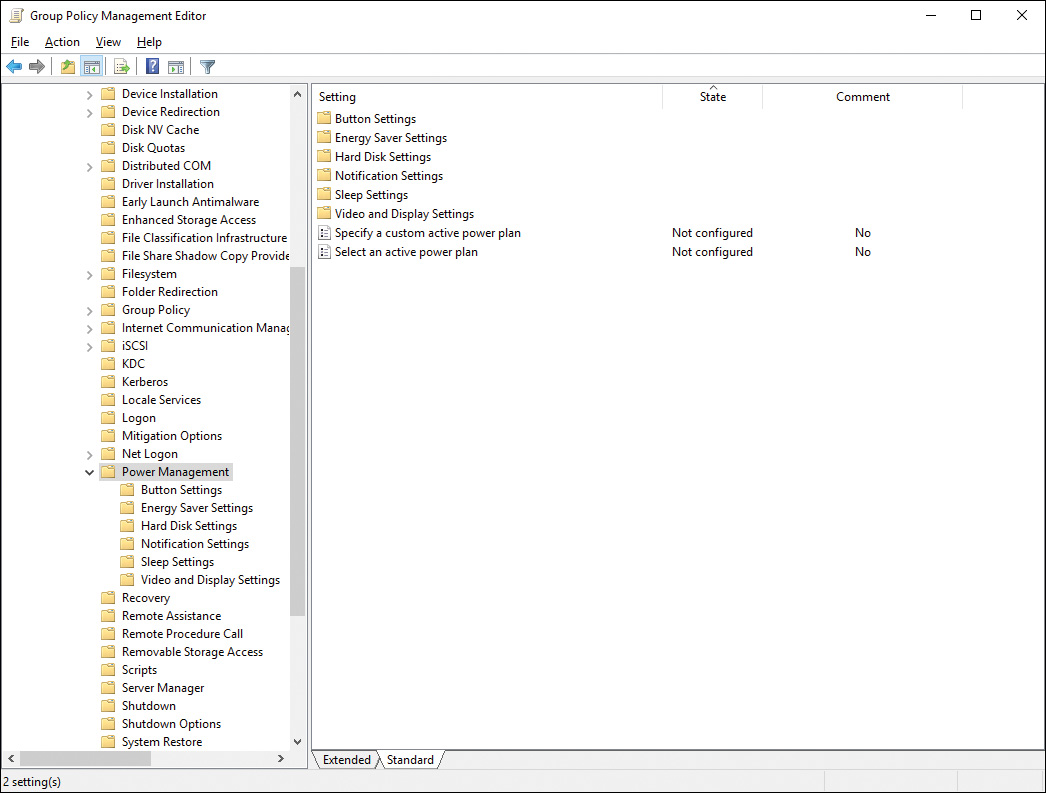
Figure 11-16 Group Policy Enabling You to Configure a Large Range of Power Management Settings
Step 3. Configure the following groups of settings as required:
![]() Button Settings: Enables you to define the actions that occur when the Power button, Sleep button, or Start menu power button is pressed or the lid closed. You can define these separately for battery and AC power conditions.
Button Settings: Enables you to define the actions that occur when the Power button, Sleep button, or Start menu power button is pressed or the lid closed. You can define these separately for battery and AC power conditions.
![]() Hard Disk Settings: Enables you to specify when the hard disk will be turned off when the computer is plugged in and when the computer is running on battery.
Hard Disk Settings: Enables you to specify when the hard disk will be turned off when the computer is plugged in and when the computer is running on battery.
![]() Notification Settings: Enables you to define the battery levels at which low and critical alarm notifications take place and the actions that will occur.
Notification Settings: Enables you to define the battery levels at which low and critical alarm notifications take place and the actions that will occur.
![]() Sleep Settings: Includes settings for controlling when and how the computer enters Sleep mode and when and how it reawakens.
Sleep Settings: Includes settings for controlling when and how the computer enters Sleep mode and when and how it reawakens.
![]() Video and Display Settings: Enables you to specify how long the computer must be inactive before the display is turned off and whether the time interval is adjusted according to the user’s keyboard and mouse usage.
Video and Display Settings: Enables you to specify how long the computer must be inactive before the display is turned off and whether the time interval is adjusted according to the user’s keyboard and mouse usage.
![]() Energy Saver Settings: Enables you to select either an active power plan or specify a custom power plan to be active on all computers controlled by the Group Policy Object.
Energy Saver Settings: Enables you to select either an active power plan or specify a custom power plan to be active on all computers controlled by the Group Policy Object.
Step 4. When finished, close the GPMC.
Configuring Windows To Go
Windows To Go enables you to create a workspace on a USB device that you can boot on any computer that meets the Windows 7 or later hardware certification requirements. Using Windows To Go, technicians can prepare standardized corporate Windows 10 images from which users can access their desktop on any machine in alternative work locations, such as home, hotel, or client computer location. All necessary files, applications, and the Windows 10 operating system are hosted on a portable USB drive, such as a thumb drive or portable hard drive.
Windows To Go can also be useful for staff or consultants that use their own non-domain-joined computers or laptops, tablets, or similar devices. You can provide them with a Windows To Go workspace to use in your environment. In this way you can enforce organizational network and domain policies without needing to provision a separate physical computer.
When you first insert a Windows To Go drive to a given host computer, Windows To Go detects all hardware on the computer and installs any required drivers. On subsequent boots of Windows To Go on the same computer, Windows To Go identifies the host computer and automatically enables all required drivers.
Windows To Go operates in much the same manner as any other Windows 10 installations, with the following exceptions:
![]() Internal disks are offline: Internal hard disks on the host computer are offline by default when the computer is booted into a Windows To Go workspace. This is to ensure that data security on the host computer is not compromised in any way.
Internal disks are offline: Internal hard disks on the host computer are offline by default when the computer is booted into a Windows To Go workspace. This is to ensure that data security on the host computer is not compromised in any way.
![]() Trusted Platform Module (TPM) is not used: If BitLocker Drive Encryption is used, a preboot password is used for security rather than the TPM, because the TPM is linked to a specific computer and Windows To Go drives can move among different computers. You learned about BitLocker in Chapter 8, “Windows 10 Data Security.”
Trusted Platform Module (TPM) is not used: If BitLocker Drive Encryption is used, a preboot password is used for security rather than the TPM, because the TPM is linked to a specific computer and Windows To Go drives can move among different computers. You learned about BitLocker in Chapter 8, “Windows 10 Data Security.”
![]() Hibernation is disabled by default: This is to ensure complete portability of Windows To Go workspaces between computers. However, you can reenable hibernation using Group Policy.
Hibernation is disabled by default: This is to ensure complete portability of Windows To Go workspaces between computers. However, you can reenable hibernation using Group Policy.
![]() Windows Recovery Environment isn’t available: If you need to recover your Windows To Go workspace, simply re-image it with a new Windows image.
Windows Recovery Environment isn’t available: If you need to recover your Windows To Go workspace, simply re-image it with a new Windows image.
![]() Refreshing or resetting: Refreshing or resetting Windows is not supported for a Windows To Go workspace.
Refreshing or resetting: Refreshing or resetting Windows is not supported for a Windows To Go workspace.
![]() Windows Store is disabled by default: This is because apps licensed from Windows Store are linked to specific hardware. It is possible to enable the store if Windows To Go workspaces won’t be roaming among multiple host machines.
Windows Store is disabled by default: This is because apps licensed from Windows Store are linked to specific hardware. It is possible to enable the store if Windows To Go workspaces won’t be roaming among multiple host machines.
Preparing USB Drives for Windows To Go
Windows To Go requires specific types of USB drives. Most commodity flash drives cannot support Windows To Go; however, Microsoft has provided a Windows 10 certification program for hardware manufacturers that want to support the Windows To Go workspace functionality. These devices have been specially optimized for Windows To Go and meet several specific requirements for running a full version of Windows 10.
Drives certified for Windows To Go have certain specific characteristics:
![]() The drive must be a USB 3.0 drive and have read/write performance specifications that will support the demands of the Windows 10 operating system, including the thousands of random access I/O operations per second required.
The drive must be a USB 3.0 drive and have read/write performance specifications that will support the demands of the Windows 10 operating system, including the thousands of random access I/O operations per second required.
![]() The drive is tuned to ensure it will boot and run on any computer that has been certified for use with Windows 7 and later.
The drive is tuned to ensure it will boot and run on any computer that has been certified for use with Windows 7 and later.
![]() The drive has been manufactured to quality standards that ensure endurance under the typical demand for Windows To Go. This includes a manufacturer warranty for operation and reliability under normal use with a Windows To Go workspace.
The drive has been manufactured to quality standards that ensure endurance under the typical demand for Windows To Go. This includes a manufacturer warranty for operation and reliability under normal use with a Windows To Go workspace.
Note
You can find information about the USB drives Microsoft has certified for use with Windows To Go at https://technet.microsoft.com/en-us/itpro/windows/plan/windows-to-go-overview#wtg-hardware.
Provisioning a Windows To Go Workspace
To create the Windows To Go workspace, you will need an installation image file for your environment (a .WIM file) or a Windows 10 Enterprise or Education installation image file (.ISO) in DVD format. Typically, the .WIM file will be stored on a network share that you can access from your Windows 10 Enterprise or Education computer. The .ISO file with the Windows 10 installation needs to be downloaded to your local computer. You learned about creating and managing Windows images in Chapter 2, “Implementing Windows.”
If you are using an .ISO file for the Windows 10 installation image, copy the .ISO file to your computer’s Downloads folder, and then open the Downloads folder, right-click the Windows 10 installation image .ISO file, and then select Mount. Windows will mount the ISO file as a new drive letter and open the drive in Explorer.
You are then ready to create a Windows To Go workspace:
Step 1. Open Control Panel by right-clicking the Start button and selecting Control Panel, or by any other method.
Step 2. In the Control Panel Search box, type windows to go and then click the Windows To Go Control Panel link to open the Windows To Go provisioning tool, as shown in Figure 11-17.
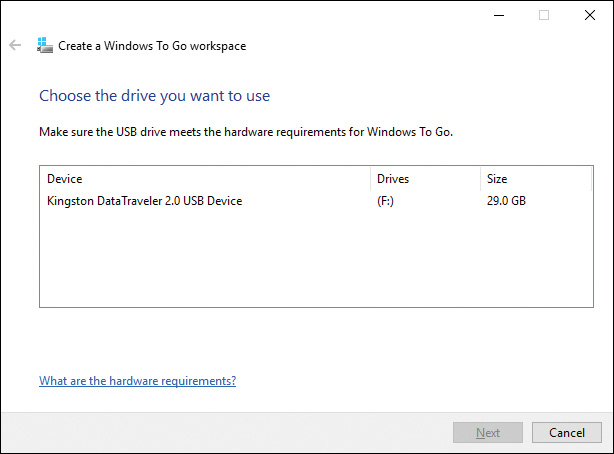
Figure 11-17 Windows To Go Provisioning Tool Will Search the Computer for Compatible USB Drives to Install the Windows To Go Workspace
Step 3. Select your USB drive from the list. If your drive is not compatible with Windows To Go, Windows will not allow you to install Windows To Go on it. Also, if the drive is a slower device, Windows may present a warning. After selecting the USB device to use, click Next to proceed.
Step 4. Windows searches for installation images to use. If the image file you want is not listed, click the Search Options button and select the folder where your .WIM file is located. If you mounted an .ISO image, select the drive where the image was mounted. When you have found the image you want to use, select it from the list and click Next.
Step 5. Windows To Go provides an option to encrypt the workspace using BitLocker. Encrypting your portable drive is recommended because they are small and can be easily lost. Encrypting the drive will ensure that no one will be able to load your workspace or open your files if the drive is lost or stolen.
To encrypt the drive with BitLocker, select the check box Use BitLocker with My Windows To Go Workspace, type your password into the boxes supplied, and click Next.
If you do not want to use BitLocker, click the Skip button.
Step 6. The last dialog box is displayed, describing the drive that will be used to create the Windows To Go workspace. When you are ready, click Create.
Step 7. The provisioning tool will take some time to create your Windows To Go workspace on your USB drive.
Step 8. After the workspace is installed, Windows asks you to Choose a Boot Option. This will change the computer’s firmware to automatically boot from any plugged-in USB device. If you will be using this computer to boot Windows To Go, select Yes to allow Windows to change this setting. You can then either select Save and Restart to boot Windows To Go or select Save and Close if you want to continue working.
Caution
When Windows creates the Windows To Go workspace on your USB drive, it completely reformats and deletes all contents on the drive. Be sure that you select the correct drive and that any files on the drive are removed or backed up.
Note
For more information on using Windows To Go, refer to “Windows To Go: Feature Overview” at https://technet.microsoft.com/en-us/itpro/windows/plan/windows-to-go-overview and “Deploy Windows To Go in Your Organization” at https://technet.microsoft.com/en-us/itpro/windows/deploy/deploy-windows-to-go.
Using Windows To Go on a Host Computer
The Windows To Go USB drive will work on any desktop computer or laptop or tablet that is certified to run Windows 7 or later. It might be necessary to access the computer’s BIOS or firmware settings to enable the computer to boot from a removable device.
For instance, on many Dell computers you can press the F12 button when the computer first posts to access the boot menu, and then select the boot drive or device. This technique provides a one-time option for booting the computer from an alternative device. If you will be using the computer frequently, it will be more convenient to change the BIOS settings so that the computer will attempt to boot from a USB device whenever one is available. Typically, the BIOS will allow you to set a boot order, so the computer checks each device in turn until it finds a bootable partition. If the first hard disk is set as the first boot device, it will never find the USB device to run the Windows To Go workspace.
The first time you load the Windows To Go workspace by booting a computer from the USB drive, Windows will take some time finding and loading device drivers and display Getting Devices Ready as it loads. If you used the Windows installation .ISO to create the workspace, Windows then walks you through a few setup tasks, just like it would for a new computer.
Step 1. Windows displays a dialog box displaying the EULA ID. You must check the I Accept the License Terms check box and click Next to proceed.
Step 2. The next screen asks you to pick a color and a PC name to personalize your Windows To Go workspace. You must enter a name in the box provided. Click Next to continue.
Step 3. At this point, Windows displays the Settings dialog, where you have an opportunity to customize a number of settings, such as for security, location, updates, and more. This is the same Settings customization screen displayed during the Attended Installation in the first section of this chapter. You may want to adjust some of these settings for your Windows To Go workspace, which you can do by selecting the Customize option. If not, select Use Express Settings to proceed.
Step 4. Windows To Go then asks you to Sign In to Your PC. You have the same options as you normally do for a Windows 10 workstation, using a Microsoft account or a Local account.
Step 5. After a few minutes, your new Windows To Go workspace is ready to use.
Like all Windows operating systems starting with Windows XP, Your Windows To Go workspace requires activation, so it needs to be connected to a corporate network that supports volume activation. This can be implemented using either Key Management Service or Active Directory–based volume activation. KMS activation is good for 180 days, so mobile workers using Windows To Go can stay offline for an extended period of time. They will need to renew the activation within the 180-day period (by connecting to the corporate network), or the workspace activation will lose validity.
You can carry your Windows To Go USB drive from computer to computer and boot to a familiar environment everywhere you go. This is very convenient for workers who travel from place to place, where equipment is already available, and it can save costs over supplying each mobile worker with a separate laptop or tablet computer.
Configuring Wi-Fi Direct
Wi-Fi Direct is a new industry standard connectivity technology in Windows 10 that enables data and content sharing between devices and PCs on a peer-to-peer network without the need for separate Wi-Fi access points. It supplants the older ad hoc mode of wireless networking between two portable computers. In Windows 10, for example, you can sync data between a smartphone and a portable computer while sitting at the airport waiting for your flight to be called. Wi-Fi Direct supports the latest security technologies, including Wi-Fi Protected Access 2 (WPA2) security, which is enabled by default, minimizing the risk of data being intercepted by unauthorized users or devices. No infrastructure devices such as wireless routers are needed for the connection.
The following are several properties of Wi-Fi Direct in Windows 10:
![]() Wi-Fi Direct is integrated into the Wi-Fi stack and is enabled by default. You can connect to any device that supports Wi-Fi Direct.
Wi-Fi Direct is integrated into the Wi-Fi stack and is enabled by default. You can connect to any device that supports Wi-Fi Direct.
![]() Wi-Fi Direct builds on existing Wi-Fi hardware. You can enable Wi-Fi Direct without the need for added hardware components, such as chipsets or antennas. Microsoft has worked with hardware manufacturers to ensure compatibility and support.
Wi-Fi Direct builds on existing Wi-Fi hardware. You can enable Wi-Fi Direct without the need for added hardware components, such as chipsets or antennas. Microsoft has worked with hardware manufacturers to ensure compatibility and support.
![]() Wi-Fi Direct permits concurrent connection to the Internet and to devices such as smartphones. The chipset can be used for multiple simultaneous connections.
Wi-Fi Direct permits concurrent connection to the Internet and to devices such as smartphones. The chipset can be used for multiple simultaneous connections.
![]() Wi-Fi Direct is optimized for power savings. It is turned on by demand and turns off when not in use.
Wi-Fi Direct is optimized for power savings. It is turned on by demand and turns off when not in use.
![]() It is simple to set up devices for direct streaming of media between devices over a high-bandwidth connection—for example, sharing of high-definition video between computers and TVs, including video as you download it from the Internet.
It is simple to set up devices for direct streaming of media between devices over a high-bandwidth connection—for example, sharing of high-definition video between computers and TVs, including video as you download it from the Internet.
![]() Windows UWP apps can communicate over Wi-Fi Direct without the need for additional setup. The apps can talk to each other by leveraging proximity application programming interface (API).
Windows UWP apps can communicate over Wi-Fi Direct without the need for additional setup. The apps can talk to each other by leveraging proximity application programming interface (API).
Windows automatically detects and installs devices after Wi-Fi Direct pairing occurs; consequently, installation and configuration of Wi-Fi Direct devices is simple, as the following procedure shows:
Step 1. From the Control Panel Devices and Printers applet, select Add a Device.
Step 2. Select the Wi-Fi Direct device from the list, and then click Next.
Step 3. If the device comes with a PIN, enter the PIN when requested.
Step 4. Windows installs any required drivers, and the device is ready for use.
Windows UWP apps can communicate between devices using Wi-Fi Direct. Proximity sensors on newer PCs and devices can detect each other when the devices are placed near to each other, and the computers can communicate with each other and share information when both computers are running the same app; users need only open the app on each computer with a simple tap on touch-sensitive screens or a click of the mouse. Developers can create additional apps that automatically connect with each other when in close proximity; such a connection is managed by Windows, and the developer does not need to manage Wi-Fi Direct semantics.
Wi-Fi Direct works in Windows by means of a simple three-step sequence:
1. Finding the device: This happens automatically when you click Add a Device as already explained. Extended attributes included with devices (known as the container ID) help identify the device.
2. Pairing with the device: In other words, Windows is creating a relationship to the device. This takes place after the user has selected the device. Extended attributes help to provide an improved experience during the pairing process and enable the user to remain in control. These attributes include a container ID, which represents the physical device, and a vertical device ID, which represents logical devices within the physical device.
3. Connecting to the device: The device remains connected only when actually in use. When the user resumes use of the device, an on-demand reconnection is initiated by Windows. This provides advantages, such as optimizing battery life on the device. Further, Wi-Fi Direct enables multiple devices to connect to Windows concurrently; however, only two computers can participate in a single Wi-Fi Direct session. Devices requiring IP address assignment can automatically receive an IP address from a DHCP server. A built-in lightweight DHCP allocator in Windows 10 can assign IP addresses in the range 192.168.173.0/24 to devices needing them.
Note
Wi-Fi Direct is an industry standard supported by many venders as well as Microsoft. For more information about Wi-Fi Direct, start with the Wi-Fi alliance documentation at https://www.wi-fi.org/discover-wi-fi/wi-fi-direct.
Exam Preparation Tasks
Review All the Key Topics
Review the most important topics in the chapter, noted with the Key Topics icon in the outer margin of the page. Table 11-4 lists a reference of these key topics and the page numbers on which each is found.
Table 11-4 Key Topics for Chapter 11
Key Topic Element |
Description |
Page Number |
Step List |
Enabling offline files and configuring the available client options |
|
Offline File Policies |
||
Windows 10 Power Plans |
||
The Advanced settings of Power Options allows you to set discrete options for your power plan |
||
Group Policy enables you to configure a large range of power management settings |
||
List |
Exceptions to Windows To Go operation |
|
List |
Characteristics of drives certified for Windows To Go |
|
Step List |
Creating a Windows To Go workspace |
Complete Tables and Lists from Memory
Print a copy of Appendix B, “Memory Tables” (found on the book’s website), or at least the section for this chapter, and complete the tables and lists from memory. Appendix C, “Memory Tables Answer Key,” also on the website, includes completed tables and lists to check your work.
Definitions of Key Terms
Define the following key terms from this chapter and check your answers in the glossary.
battery meter
cache
hibernation
offline files
power plans
remote wipe
Sleep mode
Sync Center
synchronization conflicts
synchronizing files
Wi-Fi Direct
Wi-Fi triangulation
Windows To Go