
Chapter 16 Configuring and Maintaining Network Security
This chapter covers the following subjects:
![]() Configuring Windows Firewall: This section introduces you to the Windows Firewall Control Panel applet and shows you how to create exceptions that allow specified programs or ports to communicate through the firewall. It then continues with the Windows Firewall with Advanced Security Microsoft Management Console snap-in, and shows you how to create and modify the various types of rules available with this tool.
Configuring Windows Firewall: This section introduces you to the Windows Firewall Control Panel applet and shows you how to create exceptions that allow specified programs or ports to communicate through the firewall. It then continues with the Windows Firewall with Advanced Security Microsoft Management Console snap-in, and shows you how to create and modify the various types of rules available with this tool.
![]() Configuring IPsec Security Rules: This section continues from the previous one, showing you how to create connection rules for Windows Firewall that allow connections only for specific users or computers on the network.
Configuring IPsec Security Rules: This section continues from the previous one, showing you how to create connection rules for Windows Firewall that allow connections only for specific users or computers on the network.
![]() Configuring Network Discovery: In this section you learn about Network Discovery, network profiles, and how to configure discovery for a Windows 10 computer. The capability of Windows 10 to connect to Wi-Fi networks comes with security risks. This section looks at technologies used to ensure that private information remains private even when it is transmitted over the air where it can be picked up by anyone.
Configuring Network Discovery: In this section you learn about Network Discovery, network profiles, and how to configure discovery for a Windows 10 computer. The capability of Windows 10 to connect to Wi-Fi networks comes with security risks. This section looks at technologies used to ensure that private information remains private even when it is transmitted over the air where it can be picked up by anyone.
This chapter covers the following objectives for the 70-697 and 70-698 exams:

Configure networking: Configure and support IPv4 and IPv6 network settings; configure name resolution; connect to a network; configure network locations; configure network discovery; configure Wi-Fi settings; configure Wi-Fi Direct; troubleshoot network issues; configure VPN, such as app-triggered VPN, traffic filters, and lockdown VPN; configure IPsec; configure Direct Access.
Configure and maintain network security: Configure Windows Firewall, configure Windows Firewall with Advanced Security, configure connection security rules (IPsec), configure authenticated exceptions, configure network discovery.

Configure networking: Configure Windows Firewall, configure Windows Firewall with Advanced Security.
In Chapter 6, “Windows 10 Networking,” you learned how to set up and maintain wireless networks. The explosion of wireless networks, with many hotels and restaurants offering free Wi-Fi connections, has made it easy for cybercriminals to go about the business of intercepting and stealing information for financial gain, political purposes, and many other nefarious endeavors. In fact, the year 2013 started out with a report that the Japanese Ministry of Agriculture, Forestry, and Fishery was hacked with the theft of more than 3,000 documents, including some of their negotiating strategies. Late in 2013, the Target department store chain was hacked, with the compromise of as many as 40 million customers in the United States and Canada. More recently, the Democratic National Committee and campaign managers were hacked and their emails released on the Internet, leading the government to conclude that Russia interfered with the 2016 national election. Anyone who works with or supports a modern computer network must be able to ensure that the network maintains an adequate level of security, so Microsoft expects you to know basic security practices as a component of the 70-697 and 70-698 exams.
“Do I Know This Already?” Quiz
The “Do I Know This Already?” quiz allows you to assess whether you should read this entire chapter or simply jump to the “Exam Preparation Tasks” section for review. If you are in doubt, read the entire chapter. Table 16-1 outlines the major headings in this chapter and the corresponding “Do I Know This Already?” quiz questions. You can find the answers in Appendix A, “Answers to the ‘Do I Know This Already?’ Quizzes.”
Table 16-1 “Do I Know This Already?” Foundation Topics Section-to-Question Mapping
Foundation Topics Section |
Questions Covered in This Section |
Configuring Windows Firewall |
1–5 |
Configuring IPsec Security Rules |
6–7 |
Configuring Network Discovery |
8–10 |
Caution
The goal of self-assessment is to gauge your mastery of the topics in this chapter. If you do not know the answer to a question or are only partially sure of the answer, you should mark that question as wrong for purposes of the self-assessment. Giving yourself credit for an answer you correctly guess skews your self-assessment results and might provide you with a false sense of security.
1. You want to configure Windows Firewall settings on your notebook computer so that others are unable to access anything on your computer. Which type of network location should you enable?
a. Work
b. Home
c. Public
d. Private
2. Which of the following actions can you perform from the Windows Firewall Control Panel applet on your Windows 10 computer? (Choose three.)
a. Specify ports that are allowed to communicate across the Windows Firewall.
b. Specify programs that are allowed to communicate across the Windows Firewall.
c. Set the firewall to block all incoming connections, including those in the list of allowed programs.
d. Configure logging settings for programs that are blocked by the firewall.
e. Specify a series of firewall settings according to the type of network to which you are connected.
3. You open the Windows Firewall with Advanced Security snap-in and notice that a large number of firewall rules have already been preconfigured. Which of the following rule setting types does not include any preconfigured firewall rules?
a. Inbound rules
b. Outbound rules
c. Connection security rules
d. Monitoring rules
4. You want to configure Windows Firewall so that Windows Media Player can receive data only from connections that have been authenticated by IPsec. What setting should you configure?
a. Run the New Inbound Rule Wizard, specify the path to Windows Media Player on the program page, and then specify the Allow the Connection if It Is Secure option.
b. Run the New Outbound Rule Wizard, specify the path to Windows Media Player on the program page, and then specify the Allow the Connection if It Is Secure option.
c. Run the New Connection Security Rule Wizard, specify the path to Windows Media Player on the program page, and then specify the Allow the Connection if It Is Secure option.
d. Merely select Windows Media Player from the Allowed Programs and Features list in the Windows Firewall Control Panel applet.
5. You have configured a new inbound rule that limits connections by a specific application on your computer to only those connections that have been authenticated using IPsec. The next day when you start your application, you realize that you should have configured this rule as an outbound rule. What should you do to correct this error with the least amount of effort?
a. Access the Scope tab of the Properties dialog box for your rule and change the scope from Inbound to Outbound.
b. Access the Advanced tab of the Properties dialog box for your rule and change the interface type from Inbound to Outbound.
c. Select the rule from the list of inbound rules in the Details pane of Windows Firewall with Advanced Security and drag the rule to the Outbound Rules node in the console tree.
d. You must deactivate or delete the inbound rule you configured and then use the New Outbound Rule Wizard to set up a new rule that is specific to your application.
6. You want Windows Firewall with Advanced Security to display a notification when a program is blocked from receiving inbound connections. What should you do?
a. Right-click Windows Firewall with Advanced Security at the top of the console tree and choose Properties. From the tab corresponding to the required profile, click Customize under Settings. Then ensure that the Display a Notification drop-down list is set to Yes.
b. Right-click the Inbound Rules node in the console tree and choose Properties. From the tab corresponding to the required profile, click Customize under Settings. Then ensure that the Display a Notification drop-down list is set to Yes.
c. Right-click the Monitoring node in the console tree and choose Properties. From the tab corresponding to the required profile, click Customize under Settings. Then ensure that the Display a Notification drop-down list is set to Yes.
d. Right-click the Firewall subnode below the Monitoring node in the console tree and choose Properties. From the tab corresponding to the required profile, click Customize under Settings. Then ensure that the Display a Notification drop-down list is set to Yes.
7. You are configuring a firewall rule to allow only the Accounting group to connect to network shares on a computer. What Action in General settings should you select before specifying the group in the Remote Users setting?
a. Allow the connection
b. Allow the connection if it is secure
c. Block the connection
d. Block edge traversal
8. In which Network Profiles can you turn off Network Discovery? (Select all that apply.)
a. Private
b. Guest or Public
c. Domain
d. All Networks
9. You are configuring Network Discovery, turning it on for a network. You have also configured Network Discovery to perform automatic setup of network-connected devices. Which network profile are you configuring?
a. Private
b. Guest or Public
c. Domain
d. All Networks
10. You are offsite with a coworker and want to collaborate by creating an ad-hoc network to connect your individual Windows 10 laptops to each other. Which wireless security type will be used when the two computers establish a connection?
a. WEP
b. WPA-Enterprise
c. WPA2-Enterprise
d. WPA-Personal
e. WPA2-Personal
Foundation Topics
Configuring Windows Firewall
Originally called the Internet Connection Firewall (ICF) in Windows XP prior to SP2, Windows Firewall is a personal firewall, stopping undesirable traffic from being accepted by the computer. Using a firewall can avoid security breaches as well as viruses that utilize port-based TCP or UDP traffic to enter the computer’s operating system. For computers that use broadband Internet connections with dedicated IP addresses, the Windows Firewall can help avoid attacks aimed at disrupting a home computer. When you take your laptop to a Wi-Fi–enabled public location, such as an airport, hotel, or restaurant, the firewall protects you from individuals who might be probing the network to see what they can steal or infect. Even people with dial-up Internet connections can benefit from added protection. The Windows Firewall is enabled by default when you install Windows 10, as it was in all Windows operating systems since Vista.
Windows Firewall is a stateful host-based firewall that you can configure to allow or block specific network traffic. It includes a packet filter that uses an access control list (ACL) specifying parameters (such as IP address, port number, and protocol) that are allowed to pass through. When a user communicates with an external computer, the stateful firewall remembers this conversation and allows the appropriate reply packets to reach the user. Packets from an outside computer that attempts to communicate with a computer on which a stateful firewall is running are dropped unless the ACL contains rules permitting them.
Windows Vista introduced considerable improvements to its original implementation in Windows XP SP2, including outbound traffic protection, support for IP Security (IPsec) and IP version 6 (IPv6), improved configuration of exceptions, and support for command-line configuration. Microsoft has improved Windows Firewall even further in more recent versions of Windows. The following are some of the important recent features. Of particular note are the new PowerShell cmdlets introduced for Windows 10 and Windows Server 2016.
![]() Support for Internet Key Exchange version 2 (IKEv2) for IPsec transport mode: Additional scenarios have been supported, including IPsec end-to-end transport mode connections. Included is expanded support for interoperability with other operating systems using IKEv2 for end-to-end security and the support for Suite B requirements described in Request for Comment (RFC) 4869.
Support for Internet Key Exchange version 2 (IKEv2) for IPsec transport mode: Additional scenarios have been supported, including IPsec end-to-end transport mode connections. Included is expanded support for interoperability with other operating systems using IKEv2 for end-to-end security and the support for Suite B requirements described in Request for Comment (RFC) 4869.
![]() Windows Store app network isolation: You can fine-tune network access in Windows Firewall to provide added control of Windows Store apps. You can enforce network boundaries that allow compromised apps to access only networks to which they have been explicitly granted. Doing so significantly reduces the scope of their impact on other networks, the system, and the network. You can also isolate apps and protect them from malicious access across the network.
Windows Store app network isolation: You can fine-tune network access in Windows Firewall to provide added control of Windows Store apps. You can enforce network boundaries that allow compromised apps to access only networks to which they have been explicitly granted. Doing so significantly reduces the scope of their impact on other networks, the system, and the network. You can also isolate apps and protect them from malicious access across the network.
![]() New Windows PowerShell cmdlets for Windows Firewall: You can use PowerShell for configuration and management of Windows Firewall, IPsec, and related features. Full configuration capabilities are now available.
New Windows PowerShell cmdlets for Windows Firewall: You can use PowerShell for configuration and management of Windows Firewall, IPsec, and related features. Full configuration capabilities are now available.
You can perform basic configuration of Windows Firewall from a Control Panel applet. You can also perform more advanced configuration of Windows Firewall, including the use of security policies from a Microsoft Management Console (MMC) snap-in. We look at each of these in turn.
Basic Windows Firewall Configuration
The Windows Firewall Control Panel applet, found in the System and Security category and shown in Figure 16-1, enables you to set up firewall rules for each of the network types: Private, Guest or Public, and Domain.
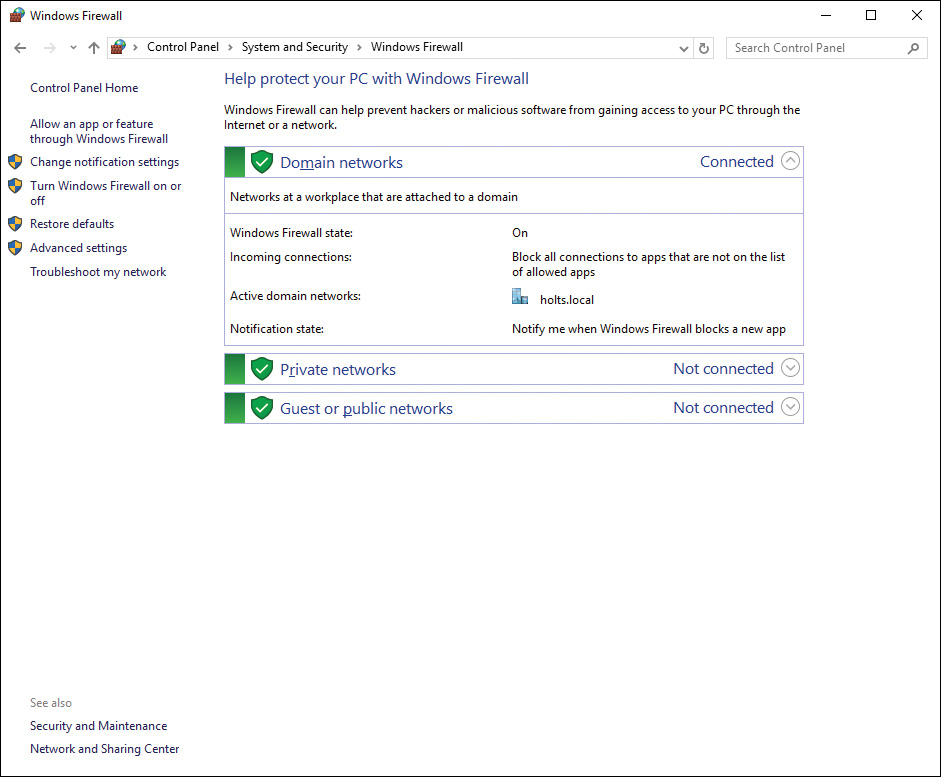
Figure 16-1 Configuring Basic Firewall Settings for Different Network Locations from the Windows Firewall Control Panel Applet
Note
If your computer is joined to an Active Directory Domain Services (AD DS) domain, you will see the Domain Networks location as shown in Figure 16-1. If your computer is not joined to a domain, you will not see this network. Settings in this location can be configured through exclusively using domain-based Group Policy so that users cannot modify firewall settings locally.
You can enable or disable the Windows Firewall separately for each connection. In doing so, you are able to use Windows Firewall to protect a computer connected to the Internet via one adapter, and not use Windows Firewall for the adapter connected to the private network. Use the following instructions to perform basic firewall configuration:

Step 1. Open the Windows Firewall applet by using any of the following methods:
![]() Right-click Start and choose Control Panel. Then click System and Security > Windows Firewall.
Right-click Start and choose Control Panel. Then click System and Security > Windows Firewall.
![]() In the Search bar or Cortana, type firewall into the Search field. From the list of programs displayed, click Windows Firewall.
In the Search bar or Cortana, type firewall into the Search field. From the list of programs displayed, click Windows Firewall.
![]() Open the Network and Sharing Center and select Windows Firewall from the list in the bottom-left corner.
Open the Network and Sharing Center and select Windows Firewall from the list in the bottom-left corner.
Step 2. From the left pane, select Turn Windows Firewall On or Off. If you receive a User Account Control (UAC) prompt, click Continue. This displays the Customize Settings for Each Type of Network dialog box, shown in Figure 16-2.
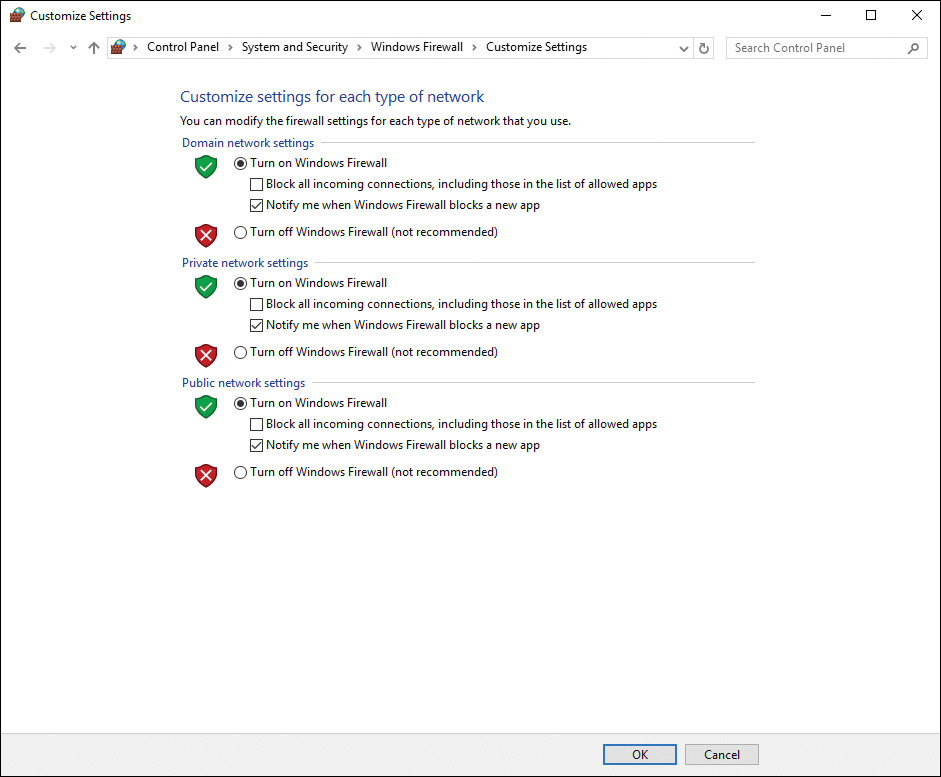
Figure 16-2 Customize Settings for Each Type of Network Dialog Box Enabling You to Turn the Firewall On or Off and to Block Incoming Connections
Step 3. If you are connected to a corporate network with a comprehensive hardware firewall, select Turn Off Windows Firewall (Not Recommended) under the Private Network Location Settings section. If you connect at any time to an insecure network, such as an airport or restaurant Wi-Fi hotspot, select the Block All Incoming Connections, Including Those in the List of Allowed Programs option under Public Network Settings. This option disables all exceptions you’ve configured on the Exceptions tab.
Warning
Don’t disable the firewall unless absolutely necessary, even on the Private Network Settings section. Never select the Turn Off Windows Firewall option in Figure 16-2 unless you’re absolutely certain that your network is well protected with a good firewall. The only exception should be temporarily to troubleshoot a connectivity problem. After you’ve solved the problem, be sure to reenable the firewall immediately.
Step 4. To configure program exceptions, return to the Windows Firewall applet and click Allow an App or Feature Through Windows Firewall.
Step 5. From the list shown in Figure 16-3, select the programs or ports you want to have access to your computer on either of the Private or Public profiles. Table 16-2 describes the more important items in this list. Clear the check boxes next to any programs or ports to be denied access, or select the check boxes next to programs or ports to be granted access.
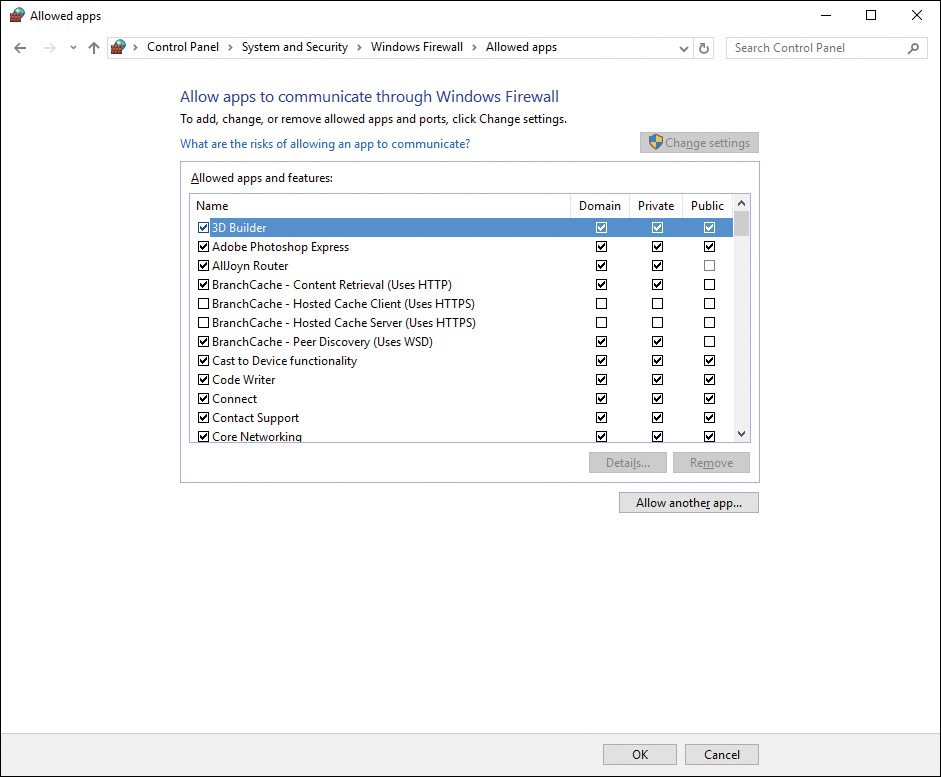
Figure 16-3 Allow Apps to Communicate Through Windows Firewall Dialog Box Enabling You to Specify Which Programs Are Allowed to Communicate Through the Firewall
Table 16-2 Key Windows Firewall Configurable Exceptions
Exception |
Description |
Enabled by Default? |
Core Networking Network Discovery |
Each option works with the other to enable your computer to connect to other network computers or the Internet |
Yes; network discovery for home or work only |
Distributed Transaction Coordinator |
Coordinates the update of transaction-protected resources such as databases, message queues, and file systems |
No |
File and Printer Sharing |
Enables your computer to share resources such as files and printers with other computers on your network |
Yes |
HomeGroup |
Allows communication to other computers in the homegroup |
Yes, for Private only when joined to a homegroup |
iSCSI Service |
Used for connecting to iSCSI target servers and devices |
No |
Key Management Service |
Used for machine counting and license compliance in enterprise environments |
No |
MSN Money MSN News MSN Sports MSN Weather Mail and Calendar Microsoft Edge, People, Photos, and Messaging |
Allows these default Windows apps to communicate on the Internet; others might also be listed, including some games |
Yes |
Media Center Extenders |
Allows Media Center Extenders to communicate with a computer running Windows Media Center |
No |
Netlogon Service |
Maintains a secure channel between domain clients and a domain controller for authenticating users and services |
Only on a computer joined to an Active Directory domain |
Network Discovery |
Allows computers to locate other resources on the local network |
Yes, for Private only |
Performance Logs and Alerts |
Allows remote management of the Performance Logs and Alerts service |
No |
Remote Assistance |
Enables an expert user to connect to the desktop of a user requiring assistance in a Windows Feature |
Yes, for Private only |
Remote Desktop |
Enables a user to connect with and work on a remote computer |
No |
Remote (item) Management |
Enables an administrator to manage items on a remote computer, including event logs, scheduled tasks, services, and disk volumes |
No for all these tasks |
Routing and Remote Access (RRAS) |
Enables remote users to connect to a server to access the corporate network (used on RRAS server computers only) |
No |
Store and Store Purchase App |
Enables access to the App Store, and, separately, access to purchase apps from the Store |
Yes |
Windows Remote Management |
Enables you to manage a remote Windows computer |
No |
Step 6. To add a program not shown in the list, click Allow Another App. From the Add an App dialog box shown in Figure 16-4, select the program to be added and then click Add. If necessary, click Browse to locate the desired program. You can also click Network Types to choose which network type is allowed by the selected program.

Figure 16-4 Add an App Dialog Box Enabling You to Allow Specific Programs Access Through the Windows Firewall
Step 7. Use the Allow Apps to Communicate Through Windows Firewall dialog box (refer to Figure 16-3) to view the properties of any program or port on the list; select it, and click Details.
Step 8. To remove a program from the list, select it and click Remove. You can do this only for programs you have added using Step 6.
Step 9. If you need to restore default settings, return to the Windows Firewall applet previously shown in Figure 16-1 and click Restore Defaults. Then confirm your intention in the Restore Default Settings dialog box that appears.
Step 10. If you are experiencing networking problems, click Troubleshoot My Network to access the network troubleshooter, which automatically attempts to detect and correct any network issues.
Step 11. When you are finished, click OK.
Tip
When allowing additional programs to communicate through the Windows Firewall, by default these programs are allowed to communicate through the private network profile only (or the domain profile for domain-joined computers). You should retain this default unless you need a program to communicate through the Internet from a public location. From the Public column of the dialog box shown in Figure 16-3, you should select the boxes next to any connections that link to the Internet. You should clear the boxes next to any connections to a private network.
Configuring Windows Firewall with Advanced Security
First introduced in Windows Vista and enhanced in more modern versions of Windows, the Windows Firewall with Advanced Security snap-in enables you to perform a comprehensive set of configuration actions. You can configure rules that affect inbound and outbound communication, and you can configure connection security rules and the monitoring of firewall actions. Inbound rules help prevent actions such as unknown access or configuration of your computer, installation of undesired software, and so on. Outbound rules help prevent utilities on your computer from performing certain actions, such as accessing network resources or software without your knowledge. They can also help prevent other users of your computer from downloading software or inappropriate files without your knowledge.
Use any of the following methods to access the Windows Firewall with Advanced Security snap-in:
![]() Access the Search bar or Cortana, type security into the Search field of the Start menu, and then select Windows Firewall with Advanced Security from the Apps list.
Access the Search bar or Cortana, type security into the Search field of the Start menu, and then select Windows Firewall with Advanced Security from the Apps list.
![]() From the task list on the left side of the Windows Firewall applet (refer to Figure 16-1), select Advanced Settings.
From the task list on the left side of the Windows Firewall applet (refer to Figure 16-1), select Advanced Settings.
![]() If you have enabled the Administrative Tools option from the Start menu as described in Chapter 4, “Managing Windows in an Enterprise,” click the Windows Firewall with Advanced Security tile on the Start menu.
If you have enabled the Administrative Tools option from the Start menu as described in Chapter 4, “Managing Windows in an Enterprise,” click the Windows Firewall with Advanced Security tile on the Start menu.
After accepting the UAC prompt (if you receive one), you see the snap-in shown in Figure 16-5.
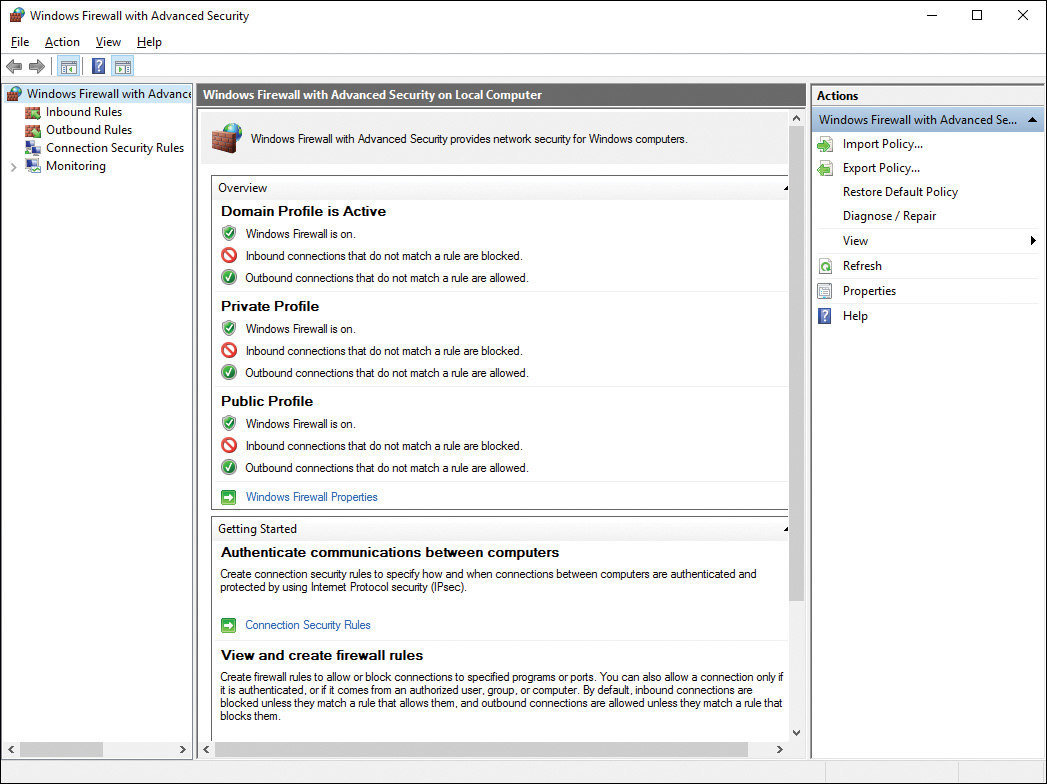
Figure 16-5 Windows Firewall with Advanced Security Snap-in Enabling You to Perform Advanced Configuration Options
When the snap-in first opens, it displays a summary of configured firewall settings. From the left pane, you can configure any of the following types of properties:
![]() Inbound Rules: Displays a series of defined inbound rules. Enabled rules are shown with a green check mark icon. If no icon is visible, the rule is not enabled. To enable a rule, right-click it and select Enable Rule; to disable an enabled rule, right-click it and select Disable Rule. You can also create a new rule by right-clicking Inbound Rules and selecting New Rule. We discuss creation of new rules later in this section.
Inbound Rules: Displays a series of defined inbound rules. Enabled rules are shown with a green check mark icon. If no icon is visible, the rule is not enabled. To enable a rule, right-click it and select Enable Rule; to disable an enabled rule, right-click it and select Disable Rule. You can also create a new rule by right-clicking Inbound Rules and selecting New Rule. We discuss creation of new rules later in this section.
![]() Outbound Rules: Displays a series of defined outbound rules, also with a green check mark icon for enabled rules. You can enable or disable rules and create new rules in the same manner as with inbound rules.
Outbound Rules: Displays a series of defined outbound rules, also with a green check mark icon for enabled rules. You can enable or disable rules and create new rules in the same manner as with inbound rules.
![]() Connection Security Rules: By default, this branch does not contain any rules. Right-click it and choose New Rule to create rules that are used to determine limits applied to connections with remote computers.
Connection Security Rules: By default, this branch does not contain any rules. Right-click it and choose New Rule to create rules that are used to determine limits applied to connections with remote computers.
![]() Monitoring: Displays a summary of enabled firewall settings and provides links to active rules and security associations. This includes a domain profile for computers that are members of an AD DS domain. The following three links are available from the bottom of the Details pane:
Monitoring: Displays a summary of enabled firewall settings and provides links to active rules and security associations. This includes a domain profile for computers that are members of an AD DS domain. The following three links are available from the bottom of the Details pane:
![]() View Active Firewall Rules: Displays enabled inbound and outbound rules.
View Active Firewall Rules: Displays enabled inbound and outbound rules.
![]() View Active Connection Security Rules: Displays enabled connection security rules that you have created.
View Active Connection Security Rules: Displays enabled connection security rules that you have created.
![]() View Security Associations: Displays IPsec main mode and quick mode associations.
View Security Associations: Displays IPsec main mode and quick mode associations.
Configuring Multiple Firewall Profiles
A profile is simply a means of grouping firewall rules so that they apply to the affected computers dependent on where the computer is connected. The Windows Firewall with Advanced Security snap-in enables you to define different firewall behavior for each of the following three profiles:
![]() Domain Profile: Specifies firewall settings for use when connected directly to an AD DS domain. If the network is protected from unauthorized external access, you can specify additional exceptions that facilitate communication across the LAN to network servers and client computers.
Domain Profile: Specifies firewall settings for use when connected directly to an AD DS domain. If the network is protected from unauthorized external access, you can specify additional exceptions that facilitate communication across the LAN to network servers and client computers.
![]() Private Profile: Specifies firewall settings for use when connected to a private network location, such as a home or small office. You can open up connections to network computers and lock down external communications as required.
Private Profile: Specifies firewall settings for use when connected to a private network location, such as a home or small office. You can open up connections to network computers and lock down external communications as required.
![]() Public Profile: Specifies firewall settings for use when connected to an insecure public network, such as a Wi-Fi access point at a hotel, restaurant, airport, or other location where unknown individuals might attempt to connect to your computer. By default, network discovery and file and printer sharing are turned off, inbound connections are blocked, and outbound connections are allowed.
Public Profile: Specifies firewall settings for use when connected to an insecure public network, such as a Wi-Fi access point at a hotel, restaurant, airport, or other location where unknown individuals might attempt to connect to your computer. By default, network discovery and file and printer sharing are turned off, inbound connections are blocked, and outbound connections are allowed.
To configure settings for these profiles from the Windows Firewall with Advanced Security snap-in, right-click Windows Firewall with Advanced Security at the top-left corner and choose Properties. This opens the dialog box shown in Figure 16-6.
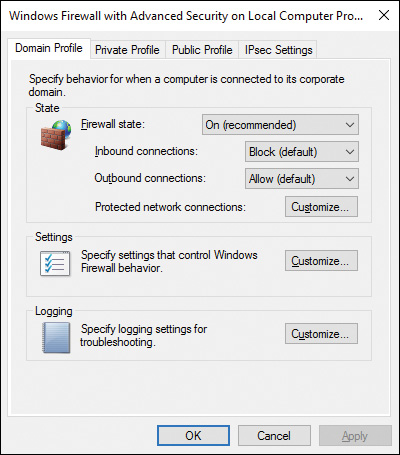
Figure 16-6 Windows Firewall with Advanced Security on Local Computer Properties Dialog Box Enabling You to Configure Profiles Specific for Domain, Private, and Public Networks
You can configure the following properties for each of the three profiles individually from this dialog box:
![]() State: Enables you to turn the firewall on or off for the selected profile and block or allow inbound and outbound connections. For inbound connections, you can either block connections with the configured exceptions or block all connections. Click Customize to specify which connections you want Windows Firewall to help protect.
State: Enables you to turn the firewall on or off for the selected profile and block or allow inbound and outbound connections. For inbound connections, you can either block connections with the configured exceptions or block all connections. Click Customize to specify which connections you want Windows Firewall to help protect.
![]() Settings: Enables you to customize firewall settings for the selected profile. Click Customize to specify whether to display notifications to users when programs are blocked from receiving inbound connections or allow unicast responses. You can also view but not modify how rules created by local administrators are merged with Group Policy-based rules.
Settings: Enables you to customize firewall settings for the selected profile. Click Customize to specify whether to display notifications to users when programs are blocked from receiving inbound connections or allow unicast responses. You can also view but not modify how rules created by local administrators are merged with Group Policy-based rules.
![]() Logging: Enables you to configure logging settings. Click Customize to specify the location and size of the log file and whether dropped packets or successful connections are logged (see Figure 16-7).
Logging: Enables you to configure logging settings. Click Customize to specify the location and size of the log file and whether dropped packets or successful connections are logged (see Figure 16-7).
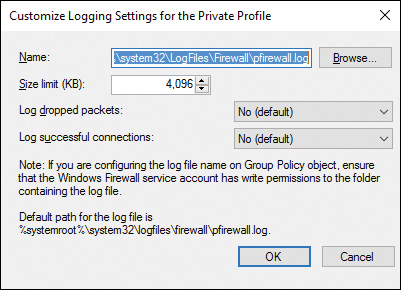
Figure 16-7 Customizing Logging Settings for Each of the Windows Firewall Profiles
In addition, you can configure IPsec settings from the IPsec Settings tab (refer to Figure 16-6), including defaults and exemptions. IPsec authentication rules enable you to configure bypass rules for specific computers that enable these computers to bypass other Windows Firewall rules. Doing so enables you to block certain types of traffic while enabling authenticated computers to receive these types of traffic. Configuring IPsec settings is covered later in the “Configuring IPsec Security Rules” section of this chapter.
Configuring New Firewall Rules
By clicking New Rule under Inbound Rules or Outbound Rules in the Windows Firewall with Advanced Security snap-in (refer to Figure 16-5), you can create rules that determine programs or ports that are allowed to pass through the firewall. Use the following procedure to create a new rule:
Step 1. Right-click the desired rule type in the Windows Firewall with Advanced Security snap-in and choose New Rule. This starts the New (Inbound or Outbound) Rule Wizard, as shown in Figure 16-8. (We chose a new inbound rule, so our example shows the New Inbound Rule Wizard.)
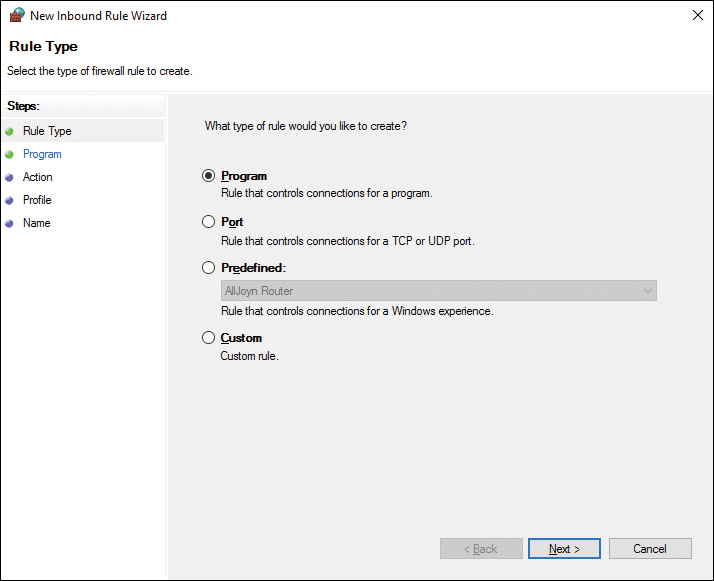
Figure 16-8 New (Inbound or Outbound) Rule Wizard Starts with a Rule Type Page Enabling You to Define the Type of Rule You Want to Create
Step 2. Select the type of rule you want to create:
![]() Program: Enables you to define a rule that includes all programs or a specified program path.
Program: Enables you to define a rule that includes all programs or a specified program path.
![]() Port: Enables you to define rules for specific remote ports using either the TCP or UDP protocol.
Port: Enables you to define rules for specific remote ports using either the TCP or UDP protocol.
![]() Predefined: Enables you to select from a large quantity of predefined rules covering the same exceptions described previously in Table 16-2 and shown in Figure 16-3. Select the desired exception from the drop-down list.
Predefined: Enables you to select from a large quantity of predefined rules covering the same exceptions described previously in Table 16-2 and shown in Figure 16-3. Select the desired exception from the drop-down list.
![]() Custom: Enables you to create rules that apply to combinations of programs and ports. This option combines settings provided by the other rule-type options.
Custom: Enables you to create rules that apply to combinations of programs and ports. This option combines settings provided by the other rule-type options.
Step 3. After you’ve selected your rule type, click Next.
Step 4. The content of the next page of the wizard varies according to which option you’ve selected. On this page, define the program path, port number and protocol, or predefined rule that you want to create, and then click Next.
Step 5. On the Action page, specify the action to be taken when a connection matches the specified conditions, as shown in Figure 16-9.

Figure 16-9 Action Page Enabling You to Specify the Required Action Type
Step 6. If you choose the Allow the Connection if It Is Secure option, click Customize to display the dialog box shown in Figure 16-10. From this dialog box, select the required option as explained on the dialog box and click OK. If you desire that encryption be enforced in addition to authentication and integrity protection, select the Require the Connections to Be Encrypted option and also select the provided check box if you want to allow unencrypted data to be sent while encryption is being negotiated.
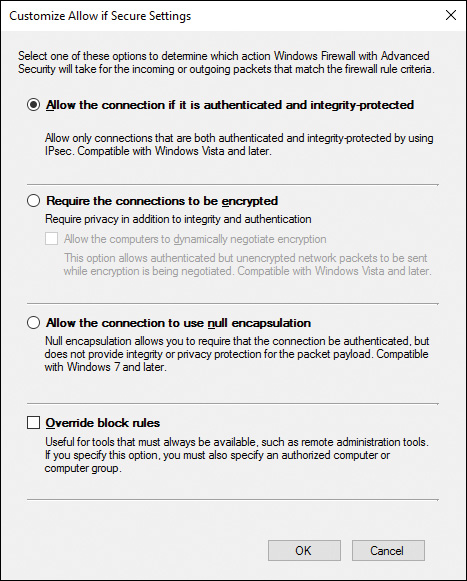
Figure 16-10 Customize Allow if Secure Settings Dialog Box Enabling You to Select Additional Actions to Be Taken for Packets That Match the Rule Conditions Being Configured
Step 7. Click Next to display the Users page, shown in Figure 16-11. This page enables you to limit the users that are allowed to connect using this rule. By default, all users are authorized to connect. To limit authorized users, select the check box labeled Only Allow Connections from These Users and click Add to display the Select Users or Groups dialog box, which enables you to select one or more users to be allowed access. To prevent users that are otherwise authorized to use the connection, select the check box labeled Skip This Rule for Connections from These Users and click Add to display the Select Users or Groups dialog box and specify the desired users. The latter option is useful if you want to prevent access by a specific user while allowing access by other users of the group to which the first user belongs.
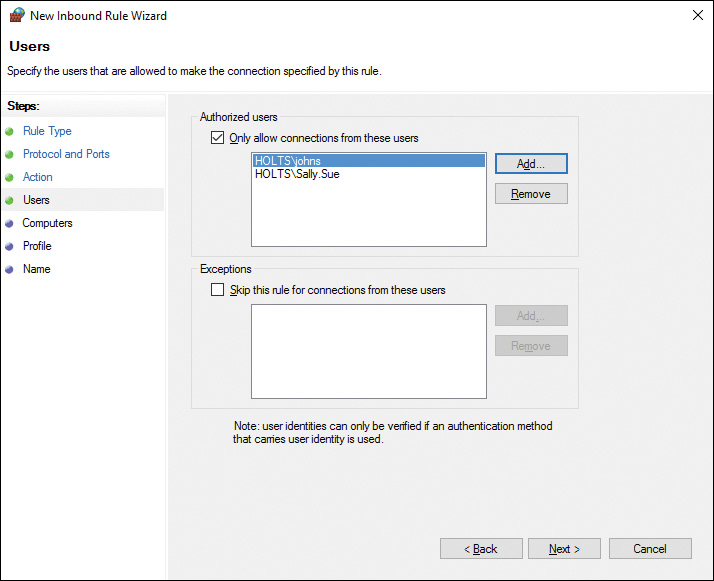
Figure 16-11 Specifying Users Who Are Allowed to Create the Connection Specified by the Rule
Step 8. Click Next to display the Computers page. Options on this page are similar to those for users in Figure 16-11 and enable you to limit the computers that are allowed to use the rule you’re creating.
Step 9. Click Next to display the Profile page. On this page, select the profiles (Domain, Private, and Public) to which the rule is to be applied. Then click Next.
Step 10. On the Name page, specify a name and optional description for your new rule. Click Finish to create the rule, which will then appear in the Details pane of the Windows Firewall with Advanced Security snap-in.
Configuring IPsec Security Rules
IPsec is a set of industry standard cryptography protection protocols and services. IPsec can be used to protect any TCP/IP protocol, with the exception of Address Resolution Protocol (ARP).
Windows Firewall with Advanced Security supports IPsec, which allows you to require authentication from any device. When authentication is required, devices that are unable to be authenticated will be blocked from communicating with your secured computer or device. You can also require encryption on any network connection to ensure transport security.
The connection security rules in Windows Firewall with Advanced Security are configured using a set of conditions and actions that are applied to network connection attempts that match the condition. The action applied can be to allow, block, or require the connection to be protected using IPsec.
Configuring New Connection Security Rules (IPsec)
Creating a new connection security rule is similar to that for inbound or outbound rules as discussed in the previous section, but the options are slightly different. From the Windows Firewall with Advanced Security dialog box previously shown in Figure 16-5, right-click Connection Security Rules and choose New Rule to display the New Connection Security Rule Wizard, as shown in Figure 16-12.

Figure 16-12 New Connection Security Rule Wizard Enabling You to Create Five Types of Connection Security Rules
Connection security rules manage authentication of two machines on the network and the encryption of network traffic sent between them using IPsec. Security is also achieved with the use of key exchange and data integrity checks. As shown in Figure 16-12, you can create the following types of connection security rules:
![]() Isolation: Enables you to limit connections according to authentication criteria that you define. For example, you can use this rule to isolate domain-based computers from external computers, such as those located across the Internet. You can request or require authentication and specify the authentication method that must be used.
Isolation: Enables you to limit connections according to authentication criteria that you define. For example, you can use this rule to isolate domain-based computers from external computers, such as those located across the Internet. You can request or require authentication and specify the authentication method that must be used.
![]() Authentication Exemption: Enables specified computers, such as DHCP and DNS servers, to be exempted from the need for authentication. You can specify computers by IP address ranges or subnets, or you can include a predefined set of computers.
Authentication Exemption: Enables specified computers, such as DHCP and DNS servers, to be exempted from the need for authentication. You can specify computers by IP address ranges or subnets, or you can include a predefined set of computers.
![]() Server-to-Server: Enables you to create a secured connection between computers in two endpoints that are defined according to IP address ranges.
Server-to-Server: Enables you to create a secured connection between computers in two endpoints that are defined according to IP address ranges.
![]() Tunnel: Enables you to secure communications between two computers by means of IPsec tunnel mode. This encapsulates network packets that are routed between the tunnel endpoints. You can choose from several types of tunnels; you can also exempt IPsec-protected computers from the defined tunnel.
Tunnel: Enables you to secure communications between two computers by means of IPsec tunnel mode. This encapsulates network packets that are routed between the tunnel endpoints. You can choose from several types of tunnels; you can also exempt IPsec-protected computers from the defined tunnel.
![]() Custom: Enables you to create a rule that requires special settings not covered explicitly in the other options. All wizard pages except those used to create only tunnel rules are available.
Custom: Enables you to create a rule that requires special settings not covered explicitly in the other options. All wizard pages except those used to create only tunnel rules are available.
Modifying Rule Properties
You can modify any Windows Firewall rule from its Properties dialog box, accessed by right-clicking the rule in the Details pane of the Windows Firewall with Advanced Security snap-in and choosing Properties. From the dialog box shown in Figure 16-13, you can configure the following properties:
![]() General tab: Enables you to edit the name and description of the rule or change the action.
General tab: Enables you to edit the name and description of the rule or change the action.
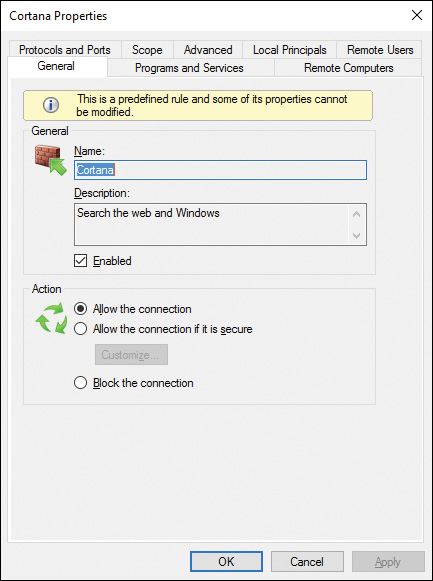
Figure 16-13 Properties Dialog Box for a Firewall Rule Enabling You to Modify Rules Criteria for Rules You Have Created or Default Rules Supplied in Windows Firewall with Advanced Security
![]() Programs and Services tab: Enables you to define which programs and services are affected by the rule.
Programs and Services tab: Enables you to define which programs and services are affected by the rule.
![]() Remote Computers tab: Enables you to specify which computers are authorized to allow connections according to the rule, or enables you to specify computers for which the rule will be skipped.
Remote Computers tab: Enables you to specify which computers are authorized to allow connections according to the rule, or enables you to specify computers for which the rule will be skipped.
![]() Protocols and Ports tab: Enables you to specify the protocol type and the local and remote ports covered by the rule.
Protocols and Ports tab: Enables you to specify the protocol type and the local and remote ports covered by the rule.
![]() Scope tab: Enables you to specify the local and remote IP addresses of connections covered by the rule. You can specify Any Address or select a subnet or IP address range.
Scope tab: Enables you to specify the local and remote IP addresses of connections covered by the rule. You can specify Any Address or select a subnet or IP address range.
![]() Advanced tab: Enables you to specify the profiles (domain, private, or public) to which the rule applies. You can also specify the interface types (local area network, remote access, and/or wireless) and whether edge traversal (traffic routed through a NAT device) is allowed or blocked.
Advanced tab: Enables you to specify the profiles (domain, private, or public) to which the rule applies. You can also specify the interface types (local area network, remote access, and/or wireless) and whether edge traversal (traffic routed through a NAT device) is allowed or blocked.
![]() Local Principals tab: Enables you to specify which local users or groups are authorized to allow connections according to the rule, or enables you to specify users or groups for which the rule will be skipped.
Local Principals tab: Enables you to specify which local users or groups are authorized to allow connections according to the rule, or enables you to specify users or groups for which the rule will be skipped.
![]() Remote Users tab: Similar to the Local Principals tab, except it works with users or groups at remote computers.
Remote Users tab: Similar to the Local Principals tab, except it works with users or groups at remote computers.
Note
For additional information on all aspects of using the Windows Firewall with Advanced Security snap-in, refer to “Windows Firewall with Advanced Security” at https://technet.microsoft.com/en-us/itpro/windows/keep-secure/windows-firewall-with-advanced-security and the links and references in the article. For details on planning security in your organization using Windows Firewall with Advanced Security rules and IPsec encryption, start with “Windows Firewall with Advanced Security Design Guide” at https://technet.microsoft.com/en-us/itpro/windows/keep-secure/windows-firewall-with-advanced-security-design-guide.
Configuring Notifications
You can configure Windows Firewall with Advanced Security to display notifications when a program is blocked from receiving inbound connections according to the default behavior of Windows Firewall. When you have selected this option and no existing block or allow rule applies to this program, a user is notified when a program is blocked from receiving inbound connections.
To configure this option, right-click Windows Firewall with Advanced Security at the top of the left pane in the Windows Firewall with Advanced Security snap-in, and then choose Properties. This opens the dialog box previously shown in Figure 16-6. Select the tab that corresponds to the profile you want to configure, and then click the Customize command button in the Settings section. From the Customize Settings for the (selected) Profile dialog box shown in Figure 16-14, select Yes under Display a Notification and then click OK twice.
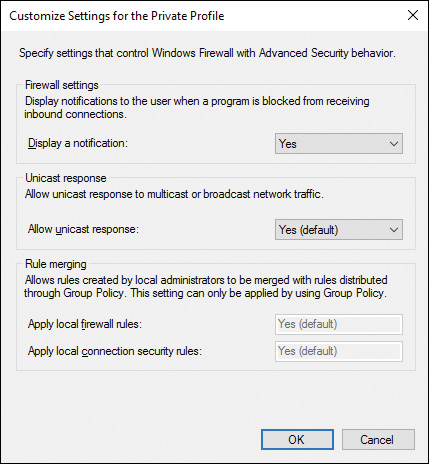
Figure 16-14 Configuring Windows Firewall to Display Notifications
Group Policy and Windows Firewall
Group Policy in Windows Firewall enables you to configure similar policies to those configured with the Windows Firewall with Advanced Security snap-in. Use the following procedure to configure Group Policy for Windows Firewall:
Step 1. From the Search bar or Cortana, type gpedit.msc, and then click gpedit.msc in the Programs list. If you receive a UAC prompt, click Continue.
Step 2. Navigate to the Computer ConfigurationWindows SettingsSecurity SettingsWindows Firewall with Advanced SecurityWindows Firewall with Advanced Security node. The right pane displays the Windows Firewall with Advanced Security settings, as shown in Figure 16-15.

Figure 16-15 Using Group Policy to Configure Windows Firewall with Advanced Security Options
Step 3. Scroll the Details pane to select links for inbound rules, outbound rules, and connection security rules. These links open subnodes in the console tree.
Step 4. Unlike the Group Policy with Windows Firewall snap-in, no default rules are present. To add rules, right-click in the Details pane and select New Rule. This starts the New Rule Wizard, which enables you to create rules using the same options already discussed in this section.
After you have added firewall rules in Group Policy, you can filter the view according to profile (domain, private, or public) or by state (enabled or disabled).
Tip
A Group Policy feature first introduced in Windows Vista enables you to configure common policy settings for all user accounts on a computer used by more than one user. This includes Windows Firewall as discussed here, as well as UAC and all other policy settings. In addition, you can configure separate policies for administrators or nonadministrators. If necessary, you can even configure local group policies on a per-user basis.
Configuring Authenticated Exceptions
Windows Firewall with Advanced Security enables you to configure exceptions for users and computers accessing your computer through firewall rules that are included by default or created by an administrator. Use the following procedure to configure authenticated exceptions:
Step 1. From the Windows Firewall with Advanced Security snap-in, select the inbound or outbound rule you want to configure.
Step 2. Double-click the rule to display the Properties dialog for the selected rule.
Step 3. Select the Configuration tab from the rule properties. You can create authenticated exceptions for Remote Users, Remote Computers, or Local Principals. Local Users are defined using the Local Principals tab. Select the appropriate tab.
Note
Note that you cannot set an exception for Remote Users on an inbound rule. The reason for this should be fairly obvious: Because the outbound rules are only for network connections initiated on the local computer, a remote user would never apply. You can set exceptions for a remote computer because a local user might initiate a connection to that remote computer. Inbound rules do not have a Remote Users tab on their Properties dialog.
Step 4. To create an exception for a remote computer or remote user account, the Action for the rule must be set to Allow the Connection if It Is Secure. Windows enforces this restriction so that a rule does not request authentication credentials if they would be transferred over an unsecure network connection. If you attempt to do so, you will encounter an error, such as displayed in Figure 16-16.

Figure 16-16 Windows Will Not Allow Authentication Exceptions for a Rule Over an Unsecure Connection
Step 5. For authenticated users, select the check box labeled Only Allow Connections from These Users. After the box is checked, the Add button is enabled. The tab for Remote Computers is similar, but the check box refers to computers instead of users.
Step 6. Click the Add button and specify the user or group accounts in the Select Users or Groups dialog box. When you are finished selecting user and group objects, click OK to add them to the Authorized Users list, as shown in Figure 16-17. If you are working with the Remote Computers tab, the process is the same, but you can select only from Groups and Built-in Security Principals.
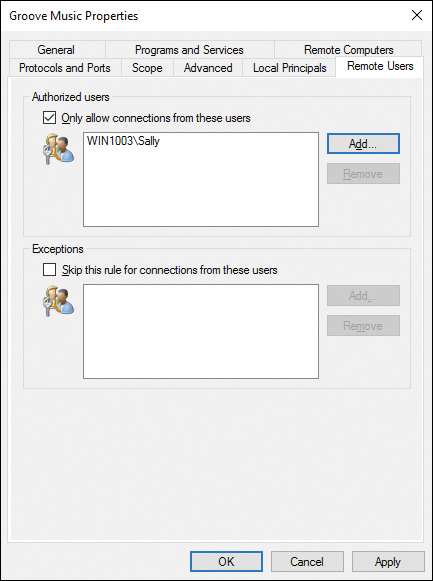
Figure 16-17 Selecting Authenticated Users Allowed to Use a Network Connection
Step 7. The Exceptions section is used to exclude any Authorized users or computers that may be selected from a group. For example, if you include the group Human Resources in the Authorized users list, all members of the group will be allowed to use the connection; however, you want to exclude the Human Resources receptionist, which is also a member of the group. You would check the Skip This Rule for Connections from These Users box, and add the receptionist to the Exceptions list.
Configuring Network Discovery
Network Discovery was introduced in Windows Vista to improve the security of the operating system by enabling better control over how Windows computers communicate and find each other over a network. Network Discovery is enabled by default on Windows 10 when it is connected to a private network and turned off when it detects that it is connected to a public or unidentified network. You can configure settings for each network profile that is created.
Windows Vista and Windows 7 included three types of network profiles called Public, Home, and Work. This was a little confusing for users, as the Home and Work profiles essentially worked the same. Network discovery was enabled for both and turned off for the Public network. Beginning with Windows 8, an improved profile model was introduced by creating a separate profile for each network you use. Windows 10 now describes your network as a Private network or a Public or Guest network. Domain-joined computers will use the Domain network when they are connected to the domain network.
In Windows 10, Network Discovery is configured from the Advanced Sharing options of the Network and Sharing Center. Access the Advanced Sharing Settings by clicking the Change Advanced Sharing Options link in the Network and Sharing Center, as illustrated in Figure 6-13 in Chapter 6, “Windows 10 Networking.” Typically a Windows 10 computer starts with three network profiles, called Private, Guest or Public, and All Networks, as shown in Figure 16-18.
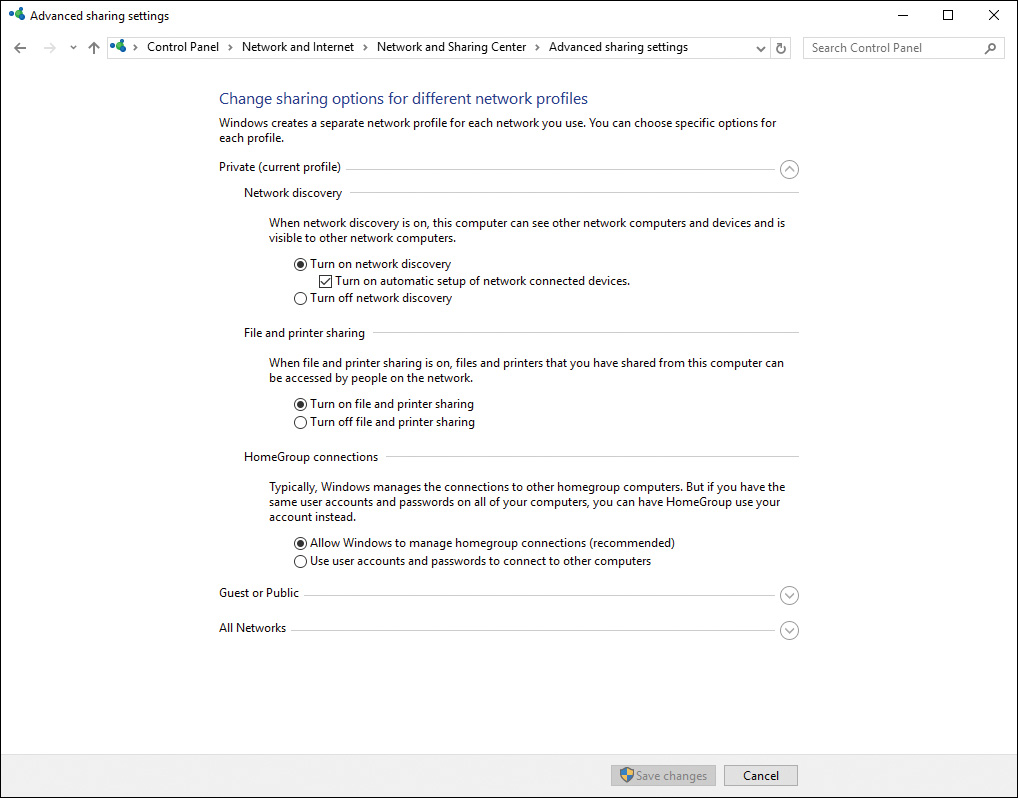
Figure 16-18 Typical Network Profiles in the Advanced Sharing Settings Dialog Box
If you join the Windows 10 computer to an Active Directory domain, a Domain profile is added, as shown in Figure 16-19.
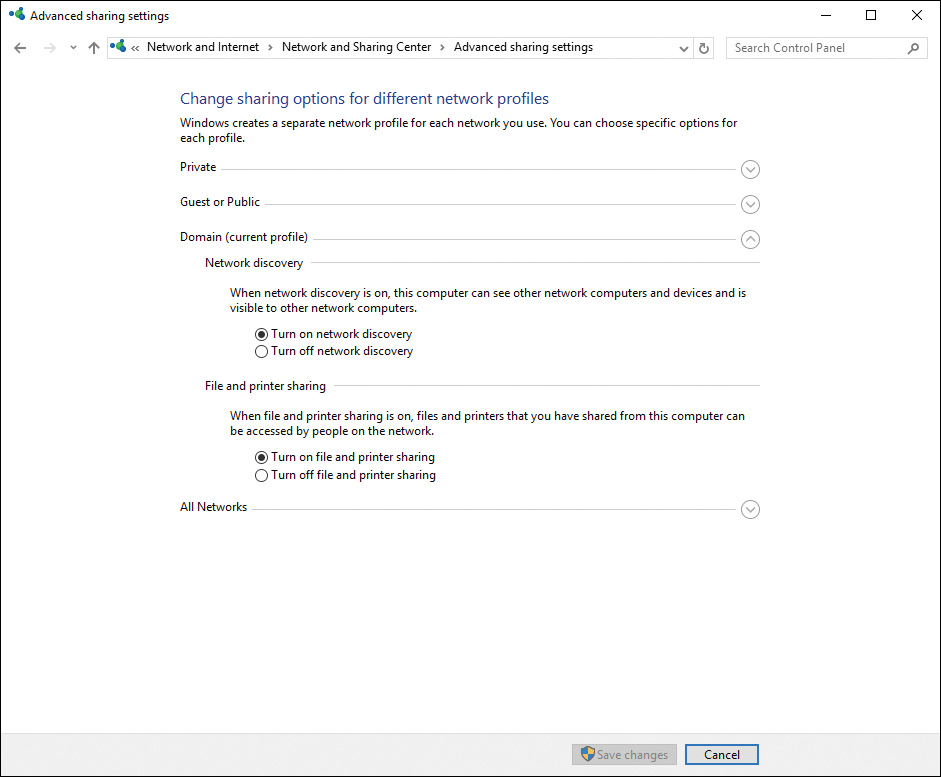
Figure 16-19 All Network Settings on a Domain-Joined Windows 10 Computer
The configuration options differ slightly for each profile type created by Windows. The individual options were covered in Chapter 6. Table 16-3 lists the options for each type of network profile.
Table 16-3 Network Discovery and Sharing Options for Windows 10 Network Profiles
Network Profile |
Sharing Option |
Description |
Private |
Network discovery |
Can be turned on or off. When turned on, can also configure whether to turn on automatic setup of network-connected devices. |
Private |
File and printer sharing |
Can be turned on or off. |
Private |
HomeGroup connections |
Options: Allow Windows to manage homegroup connections. Use user accounts and passwords to connect to other computers. |
Guest or Public |
Network discovery |
Can be turned on or off. Automatic setup of network-connected devices is not available. |
Guest or Public |
File and printer sharing |
Can be turned on or off. |
Domain |
Network discovery |
Can be turned on or off. Automatic setup of network-connected devices is not available. |
Domain |
File and printer sharing |
Can be turned on or off. |
All Networks |
Public folder sharing |
Can be turned on or off. This setting applies to all profiles. |
All Networks |
Media streaming |
Media streaming options available for music, pictures, and videos. This setting applies to all profiles. |
All Networks |
File sharing connections |
Select between strong (128-bit) encryption and weaker (40- or 56-bit) encryption. Strong encryption is recommended but may not work for some devices or older computers. This setting applies to all profiles. |
All Networks |
Password protected sharing |
Can be turned on or off. This setting applies to all profiles. Not available on domain-joined computers. If the computer is joined to a domain, password protected sharing is always enabled. |
Managing Wireless Security
Wireless connectivity creates a tempting attack vector for criminals looking for access to valuable private information. Wireless networks are ubiquitous today, and corporations are rolling out wireless infrastructure in their offices to provide convenience for employees and save costs. It is important to ensure not only that the information moving through the network is secure, but that unauthorized outside entities stay off your network and cannot access any resources for their own purposes.
Windows 10 supports the complete range of wireless security protocols, supported in Windows 7 and Windows 8.1, from Wired Equivalent Privacy (WEP) to Wi-Fi Protected Access (WPA2), Protected Extensible Authentication Protocol (PEAP), and its combination with Microsoft Challenge Handshake Authentication Protocol version 2 (MS-CHAPv2) and Extensible Authentication Protocol Transport Layer Security (EAP-TLS). WPA is no longer available as a connection type using the GUI Wi-Fi configuration dialogs starting with Windows 8.1. If your router supports only WPA, you can still configure Windows 10 to use it using the netsh command-line utility.
Windows 10 will use WPA2-Personal for maximum security when communicating by means of an ad hoc wireless network (direct communication with another wireless computer without use of an access point). This helps to protect against common vulnerabilities associated with such unprotected networks. Table 6-7 in Chapter 6 lists the types of wireless security available in Windows 10 and the encryption (of each) that can be used. Refer to that table for details.
Note
WPA2-Enterprise security provides the highest level of wireless networking authentication security. It requires authentication in two phases: first, an open system authentication and, second, authentication using EAP. It is suitable for domain-based authentication and on networks using a Remote Authentication Dial-In User Service (RADIUS) authentication server. In environments without the RADIUS server, you should use WPA2-Personal security
The WPA and WPA2 protocols can use either TKIP or AES for encryption. These are strong encryption protocols, and AES is considered especially secure. WPA2 still supports TKIP but uses AES by default instead of TKIP.
Warning
Microsoft, and most network security professionals, recommend against using WEP. Because of the limitations of WEP’s encryption, a hacker can capture enough frames in a fairly short amount of time to determine the shared keys or shared secret key used between access point and stations, and decrypt the packets. WPA and WPA2 are more secure and not as vulnerable to sniffing and intrusion.
When Windows 10 connects to a new wireless network, it prompts you to decide whether you want to turn on sharing for that network. Selecting No, Don’t Turn On Sharing or Connect to Devices tells Windows to configure the connection as a Public network. As covered in the previous section, Network Discovery will be disabled by default on Public networks so that your computer will not advertise its presence to other computers on the network.
You can examine the connection properties, including the security and encryption types, for any wireless network your computer is connected to. To do so, right-click the Start button and select Network Connections. When the window is displayed, right-click the wireless network connection and select Status, and then click Wireless Properties. Select the Security tab to view the security settings.
The result will be similar to Figure 16-20. If you know the Security types available on the network, you can change the current setting from the Security Type drop-down. Similarly, if you want to select a different encryption type, choose from the options available in the Encryption Type drop-down. When you click the OK button, Windows temporarily disconnects from the access point and attempts to reconnect using the settings you selected. In Windows 10, only AES is available for WPA2.
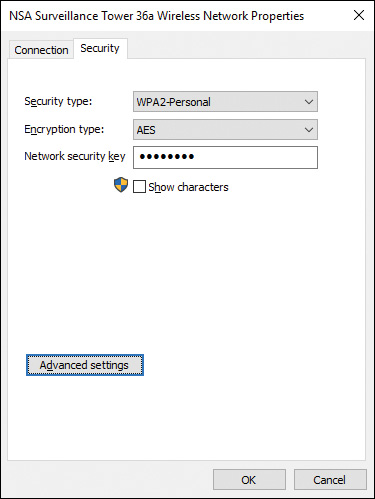
Figure 16-20 Configuring Security Settings for a Wireless Network Connection
Exam Preparation Tasks
Review All the Key Topics
Review the most important topics in the chapter, noted with the Key Topics icon in the outer margin of the page. Table 16-4 lists a reference of these key topics and the page numbers on which each is found.
Table 16-4 Key Topics for Chapter 16
Key Topic Element |
Description |
Page Number |
Step List |
Shows how to perform basic Windows Firewall configuration |
|
Customizing Windows Firewall settings for each network type |
||
Allowing apps to communicate through Windows Firewall |
||
List |
Describes available Windows Firewall with Advanced Security rule types |
|
List |
Describes types of available Windows Firewall with Advanced Security profiles |
|
Creating new firewall rules of different types |
||
Shows different types of firewall connection security rules |
||
Step List |
Shows how to configure authenticated exceptions |
|
Selecting authenticated users allowed to use a network connection |
||
Network discovery settings and sharing options for Windows 10 network profiles |
||
Configuring security settings for a wireless network connection |
Complete the Tables and Lists from Memory
There are no memory tables in this chapter.
Definitions of Key Terms
Define the following key terms from this chapter, and check your answers in the glossary.
AES
authenticated exceptions
firewall profile
firewall rule
Internet Protocol Security (IPsec)
network discovery
TKIP
WEP
WPA-2
Windows Firewall
Windows Firewall with Advanced Security