Chapter 14 Configuring File and Folder Access
This chapter covers the following subjects:
![]() Configuring Data Encryption Using Encrypting File System (EFS): This section shows you how to secure data on your Windows 10 computer by using encryption to prevent others from viewing specific files or folders. You also learn how to back up your EFS keys and configure recovery agents in case your keys are lost.
Configuring Data Encryption Using Encrypting File System (EFS): This section shows you how to secure data on your Windows 10 computer by using encryption to prevent others from viewing specific files or folders. You also learn how to back up your EFS keys and configure recovery agents in case your keys are lost.
![]() Configuring Disk Quotas: This section shows you how to specify quotas that limit the amount of disk space used by users storing files on your Windows 10 computer.
Configuring Disk Quotas: This section shows you how to specify quotas that limit the amount of disk space used by users storing files on your Windows 10 computer.
![]() Configuring File Access Auditing: Auditing lets you record actions that take place on your computer, including attempts to access files, folders, and printers. This section shows you how to use Group Policy to set up a policy that effectively tracks these types of activities.
Configuring File Access Auditing: Auditing lets you record actions that take place on your computer, including attempts to access files, folders, and printers. This section shows you how to use Group Policy to set up a policy that effectively tracks these types of activities.
![]() Configuring Shared Resources: This section shows you how to configure your computer to share resources such as folders and printers, and how to set up a standard set of permissions that control access to these resources from computers on the network. We also discuss how to configure and manage printer settings including Location Aware Printing technology, which enables you to automatically associate configured printers with the network where the printer is available.
Configuring Shared Resources: This section shows you how to configure your computer to share resources such as folders and printers, and how to set up a standard set of permissions that control access to these resources from computers on the network. We also discuss how to configure and manage printer settings including Location Aware Printing technology, which enables you to automatically associate configured printers with the network where the printer is available.
This chapter covers the following objectives for the 70-697 and 70-698 exams:

Configure file and folder access: Encrypt files and folders by using EFS, configure disk quotas, configure file access auditing, configure authentication and authorization.

Configure shared resources:
![]() Configure shared folder permissions, configure HomeGroup settings, configure libraries, configure shared printers, configure OneDrive.
Configure shared folder permissions, configure HomeGroup settings, configure libraries, configure shared printers, configure OneDrive.
![]() Configure file and printer sharing and HomeGroup connections; configure folder shares, public folders, and OneDrive; configure file system permissions; configure OneDrive usage; troubleshoot data access and usage.
Configure file and printer sharing and HomeGroup connections; configure folder shares, public folders, and OneDrive; configure file system permissions; configure OneDrive usage; troubleshoot data access and usage.
From the earliest version of Windows NT right up to the present, Windows has had a system of access permissions in place that determine who has access to what and what they can do to it. You learned about how to use NTFS security permissions to specify who has access to files and folders and what they can do with them in Chapter 7, “Windows 10 Security.” More recent versions of Windows have enabled users to protect data even further with encryption methods that can help to prevent those who might have circumvented other access controls from viewing or modifying confidential information. Windows can also track the usage of disk space by individuals using the computer and place a disk quota on the maximum amount of storage a particular user can access. Included also is a system of auditing access attempts to files and folders so that individuals in charge of security are able to track all types of access on the network and take appropriate measures to protect sensitive information. This chapter looks at these and other methods of sharing and protecting resources on computers and their networks.
One of the major reasons for connecting computers in a network is to share resources such as folders, files, and printers. Resources can exist on computers that are not connected to a network; and these resources may need to be secured, protected, and accessed by different users as well. Windows 10 comes with a host of tools designed to secure and manage resources wherever they may be found. Nowadays, resources can even exist remotely on the cloud; Windows 10 includes the OneDrive feature that enables you to share images, documents, and so on among computers, smartphones, and other devices in different physical locations. Microsoft expects you to be knowledgeable about all these features when taking the 70-697 and 70-698 exam.
In a modern workplace, workers require access to information created by others in the company and work they produce must be made available to their coworkers and superiors. Therefore, such resources must be shared so that others can access them. But lots of confidential information is also out there, and it must be protected from access by those who are not entitled to view it. At home, family members need to share things such as photos, videos, and music. But parents have sensitive information, such as family finances, that must be protected as well.
“Do I Know This Already?” Quiz
The “Do I Know This Already?” quiz allows you to assess whether you should read this entire chapter or simply jump to the “Exam Preparation Tasks” section for review. If you are in doubt, read the entire chapter. Table 14-1 outlines the major headings in this chapter and the corresponding “Do I Know This Already?” quiz questions. You can find the answers in Appendix A, “Answers to the ‘Do I Know This Already?’ Quizzes.”
Table 14-1 “Do I Know This Already?” Foundation Topics Section-to-Question Mapping
Foundation Topics Section |
Questions Covered in This Section |
Configuring Data Encryption Using EFS |
1–2 |
Configuring Disk Quotas |
3 |
Configuring File Access Auditing |
4 |
Configuring Shared Resources |
5–10 |
Caution
The goal of self-assessment is to gauge your mastery of the topics in this chapter. If you do not know the answer to a question or are only partially sure of the answer, you should mark that question as wrong for purposes of the self-assessment. Giving yourself credit for an answer you correctly guess skews your self-assessment results and might provide you with a false sense of security.
1. You want to encrypt the Confidential folder. This folder is located on the D: volume, which is formatted with the FAT32 file system. You access the folder’s Properties dialog box and click the Advanced button. But the option to encrypt the folder is not available. What do you need to do to encrypt this folder? (Each correct answer presents a complete solution to the problem. Choose two.)
a. Format the D:volume with the NTFS file system.
b. Use the Convert.exe utility to convert the D: volume with the NTFS file system.
c. Move the Confidential folder to the C: volume, which is formatted with the NTFS file system.
d. Decompress the Confidential folder.
2. You are the desktop support specialist for your company. A user named Peter has left the company, and you have deleted his user account. Later you realize that he had encrypted his Work folder on his Windows 10 computer, and you must regain access to this folder. What should you do?
a. Log on to Peter’s computer with your user account and decrypt the file.
b. Log on to Peter’s computer with the default administrator account and decrypt the file.
c. Re-create Peter’s user account, log on with this account, and decrypt the file.
d. You cannot access this folder; it is permanently lost.
3. Your company has hired several college students for the summer as interns. They will be storing files on the D: drive of a Windows 10 computer. You have created user accounts for each student and added these accounts to a group named Interns. You want to ensure that these students do not store a large amount of data on the D: drive, so you decide to limit each user to 500 MB space on the D: drive. What should you do? (Each correct answer presents part of the solution. Choose two.)
a. Ensure that the D: drive is formatted with the NTFS file system.
b. Ensure that the D: drive is formatted with the FAT32 file system.
c. In the Add New Quota Entry dialog box, select the Do Not Limit Disk Usage option and specify the 500 MB limit and the Interns group.
d. In the Add New Quota Entry dialog box, select the Limit Disk Space To option and specify the 500 MB limit and the Interns group.
e. In the Add New Quota Entry dialog box, create a separate disk quota for each user in the Interns group that specifies the Do Not Limit Disk Usage option and the 500 MB limit.
f. In the Add New Quota Entry dialog box, create a separate disk quota for each user in the Interns group that specifies the Limit Disk Space To option and the 500 MB limit.
4. You are responsible for maintaining data security on a Windows 10 Pro computer used by your boss. He has stored a large number of documents containing sensitive corporate information that only a limited number of individuals are permitted to access. He would like to know when others attempt to access this information. To this extent, you have enabled object access auditing on his computer.
A couple of weeks later, your boss informs you that he has noticed a couple of files have been altered in an inappropriate fashion. He has checked the Security log on his computer, but no information is available to suggest who is accessing these files, so he asks you to rectify this problem. What should you do?
a. You also need to enable auditing of logon events in the Local Security Policy snap-in on your boss’s computer.
b. You also need to access File Explorer on your boss’s computer. From this location, ensure that the appropriate auditing entries have been enabled for the folder in which the sensitive documents are located.
c. You need to ask your boss to check events recorded in the System log of his computer.
d. You should move the folder containing the sensitive documents to a server located in a secured room, and on which auditing has been enabled.
5. You want users at other computers on your network to be able to access folders located in the libraries of your Windows 10 computer without the need to perform additional sharing tasks, so you open the Advanced Sharing Settings dialog box. Which option should you enable?
a. File and Printer Sharing
b. Public Folder Sharing
c. Password Protected Sharing
d. Media Streaming
6. Which of the following are true about hidden administrative shares? (Choose three.)
a. These shares are suffixed with the $ symbol and are visible in any Explorer window.
b. These shares are suffixed with the $ symbol and are visible only in the Shares node of the Computer Management snap-in.
c. These shares are suffixed with the $ symbol and can be accessed from the Network and Sharing Center.
d. You can access these shares by entering the UNC path to the share in the Run command.
e. These shares are created by default when Windows 8.1 is first installed, and they cannot be removed.
7. Which of the following are valid permissions you can set for shared folders? (Choose three.)
a. Full Control
b. Modify
c. Change
d. Read and Execute
e. Read
8. Which of the following is not true about file libraries in Windows 10?
a. Libraries are virtual folders that are actually pointers to the Documents, Pictures, Music, and Videos folder locations on the computer.
b. Each library consists of a user-specific folder and a public folder.
c. You can add additional folders to any library at any time in Windows 8.1.
d. You are limited to the four default libraries; it is not possible to designate additional libraries in Windows 10.
9. You have shared your printer so that others can access it on the network. You want Kristin, who works at another computer on the network to be able to pause, resume, restart, and cancel all documents, but you do not want her to be able to modify printer properties or permissions. What printer permission should you grant her user account?
a. Print
b. Manage This Printer
c. Manage Documents
d. Full Control
10. Your laptop now automatically uses the Richardson office printer when you are visiting the Richardson office and the color laser printer near your office when you are at headquarters. Recently, the color printer was moved to another floor and a newer printer installed in its place. You have installed the new printer drivers and tested it, but whenever you return to headquarters, it prints to the printer that is now on another floor. What is the best way to fix this issue?
a. Delete the original color printer.
b. Turn off location-aware printing.
c. Use the Printer Troubleshooting tool
d. Select the newer printer specifically for a print job. It will then become your default printer and Windows will use it each time you print after that.
Foundation Topics
Configuring Data Encryption Using Encrypting File System (EFS)
You often hear news reports that mention thefts of laptop computers containing valuable data. In one such case, a computer stolen from a doctor’s car in Toronto contained the records of thousands of patients, exposing them to misuse and potential identity theft. The computer was protected with a password but the data was not encrypted. Windows 10 includes the following two systems of data encryption, designed to protect data not only on your laptop when you are in a place such as an airport or hotel where a thief can grab it when you’re momentarily distracted, but also at any other place where an unauthorized individual might attempt to either connect to it across the network or physically access it:
![]() First introduced with Windows Vista, BitLocker Drive Encryption encrypts a computer’s entire system partition. You learned about BitLocker and BitLocker To Go in Chapter 8, “Windows 10 Data Security.”
First introduced with Windows Vista, BitLocker Drive Encryption encrypts a computer’s entire system partition. You learned about BitLocker and BitLocker To Go in Chapter 8, “Windows 10 Data Security.”
![]() First introduced with Windows 2000 and refined with each successive iteration of Windows, the Encrypting File System (EFS) can be used to encrypt files and folders on any partition that is formatted with the NTFS file system. We discuss EFS in this section.
First introduced with Windows 2000 and refined with each successive iteration of Windows, the Encrypting File System (EFS) can be used to encrypt files and folders on any partition that is formatted with the NTFS file system. We discuss EFS in this section.
EFS enables users to encrypt files and folders on any partition that is formatted with the NTFS file system. The encryption attribute on a file or folder can be toggled the same as any other file attribute. When you set the encryption attribute on a folder, all its contents—whether subfolders or files—are also encrypted.
The encryption attribute, when assigned to a folder, affects files the same way that the compression attribute does when a file is moved or copied. Files that are copied into the encrypted folder become encrypted. Files that are moved into the encrypted folder retain their former encryption attribute, whether or not they were encrypted. When you move or copy a file to a file system that does not support EFS, such as FAT16 or FAT32, the file is automatically decrypted.
Tip
Remember that the file system must be set to NTFS if you want to use EFS, and no file can be both encrypted and compressed at the same time. On the exam, you may be presented with a scenario where a user is unable to use EFS or file compression on a FAT32 volume. The correct answer to such a problem is to convert the file system to NTFS, as described later in the section “Preparing a Disk for EFS.”
Encrypting File System Basics
EFS uses a form of public key cryptography, which utilizes a public and private key pair. The public key or digital certificate is freely available to anyone, whereas the private key is retained and guarded by the user to which the key pair is issued. The public key is used to encrypt data, and the private key decrypts the data that was encrypted with the corresponding public key. The key pair is created at the first time a user encrypts a file or folder using EFS. When another user attempts to open the file, that user is unable to do so. Therefore, EFS is suitable for data that a user wants to maintain as private, but not for files that are shared.
Windows 10 has the capability to encrypt files directly on any NTFS volume. This ensures that no other user can use the encrypted data. Encryption and decryption of a file or folder are performed in the object’s Properties dialog box. Administrators should be aware of the rules to put into practice to manage EFS on a network:
![]() Only use NTFS as the file system for all workstation and server volumes.
Only use NTFS as the file system for all workstation and server volumes.
![]() Keep a copy of each user’s certificate and private key on a USB flash drive or other removable media.
Keep a copy of each user’s certificate and private key on a USB flash drive or other removable media.
![]() Remove the user’s private key from the computer except when the user is actually using it.
Remove the user’s private key from the computer except when the user is actually using it.
![]() When users routinely save documents only to their Documents folder, make certain their documents are encrypted by having each user encrypt his or her own Documents folder.
When users routinely save documents only to their Documents folder, make certain their documents are encrypted by having each user encrypt his or her own Documents folder.
![]() Use two recovery agent user accounts that are reserved solely for that purpose for each Active Directory Domain Services (AD DS) organizational unit (OU) if computers participate in a domain. Assign the recovery agent certificates to these accounts.
Use two recovery agent user accounts that are reserved solely for that purpose for each Active Directory Domain Services (AD DS) organizational unit (OU) if computers participate in a domain. Assign the recovery agent certificates to these accounts.
![]() Archive all recovery agent user account information, recovery certificates, and private keys, even if obsolete.
Archive all recovery agent user account information, recovery certificates, and private keys, even if obsolete.
![]() When planning a network installation, keep in mind that EFS does take up additional processing overhead; plan to incorporate additional CPU processing power in your plans.
When planning a network installation, keep in mind that EFS does take up additional processing overhead; plan to incorporate additional CPU processing power in your plans.
A unique encryption key is assigned to each encrypted file. You can share an encrypted file with other users in Windows 10, but you are restricted from sharing an entire encrypted folder with multiple users or sharing a single file with a security group. This is related to the way that EFS uses certificates, which are applicable individually to users, and how EFS uses encryption keys, which are applicable individually to files. Windows 10 continues the capability introduced with Windows Vista to store keys on smart cards. If you are using smart cards for user logon, EFS automatically locates the encryption key without issuing further prompts. EFS also provides wizards that assist users in creating and selecting smart card keys.
You can use different types of certificates with EFS: third-party–issued certificates, certificates issued by certificate authorities (CAs)—including those on your own network—and self-signed certificates. If you have developed a security system on your network that utilizes mutual authentication based on certificates issued by your own CA, you can extend the system to EFS to further secure encrypted files. For more information on using certificates with EFS, refer to the Windows 10 Help and Support Center.
Note
For more information on the technology behind EFS, refer to “How EFS Works” at https://technet.microsoft.com/en-us/library/cc962103.aspx.
Preparing a Disk for EFS
Unlike versions of Windows prior to Vista, the system and boot partition in Windows 10 must be formatted with NTFS before you can install Windows 10, as you learned in Chapter 9, “Managing User Data.” However, a data partition can be formatted with the FAT or FAT32 file systems. But you must ensure that such a partition is formatted with NTFS before you can encrypt data using EFS. If it is not, you can convert the hard disk format from FAT to NTFS or format the partition as NTFS. There are two ways to go about this:
![]() Use the command-line Convert.exe utility to change an existing FAT16 or FAT32 partition that contains data to NTFS without losing the data.
Use the command-line Convert.exe utility to change an existing FAT16 or FAT32 partition that contains data to NTFS without losing the data.
![]() Use the graphical Disk Management utility to format a new partition, or an empty FAT partition, to NTFS. If the volume contains data, you will lose it. (You can also use the command-line Format.exe utility to format a partition as NTFS.)
Use the graphical Disk Management utility to format a new partition, or an empty FAT partition, to NTFS. If the volume contains data, you will lose it. (You can also use the command-line Format.exe utility to format a partition as NTFS.)
The Convert.exe utility is simple to use and typically problem-free, although you should make certain to back up the data on the partition before you convert it as a precaution. Perform the following steps to use this utility:
Step 1. Log on to the computer as an administrator. Know which drive letter represents the partition that you plan to convert, because only the partition that contains the encrypted files needs to be formatted with NTFS. For example, if users store all their data on drive D: and want to encrypt those files, you convert drive D: to NTFS.
Step 2. From the taskbar Search text box, ensure that Apps is selected, type cmd into the Search box, and press Enter.
Step 3. The command prompt window opens. At the prompt, type convert d: /fs:ntfs.
Step 4. The conversion process begins. If you are running the Convert.exe utility from the same drive letter prompt as the partition you are converting, or a file is open on the partition, you are prompted with a message that states Convert Cannot Gain Exclusive Access to D:, So It Cannot Convert It Now. Would You Like to Schedule It to Be Converted the Next Time the System Restarts (Y/N)? Press Y at the message.
Step 5. Restart the computer. The disk converts its format to NTFS. This process takes considerable time to complete, but at completion, you can access the Properties dialog box for the disk you’ve converted and note that it is formatted with the NTFS file system.
Encrypting Files
You can use either the cipher command-line utility or the advanced attributes of the file or folder to encrypt a file. To use the cipher utility for encrypting a file named Myfile.txt located in the C:mydir folder, the full command to use is as follows:
cipher /e c:mydirmyfile.txt
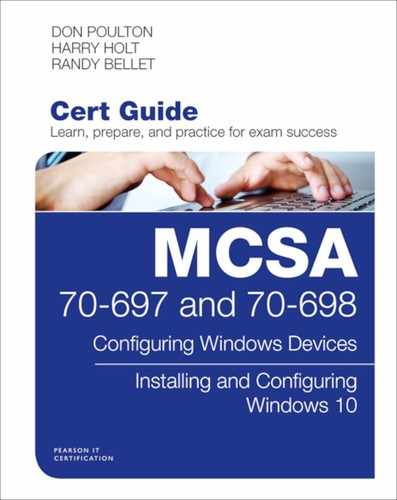
To change the Advanced encryption attribute of a file, open File Explorer and navigate to the file. Right-click the file and select Properties. On the General tab, click the Advanced button in the Attributes section. The Advanced Attributes dialog box opens, as shown in Figure 14-1.

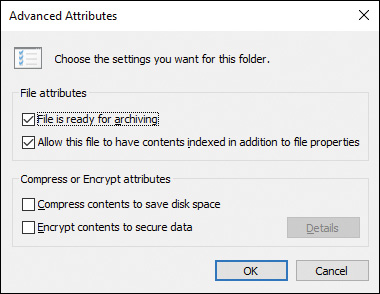
Figure 14-1 Advanced Attributes Dialog Box Enabling You to Either Compress or Encrypt a File
Select the Encrypt Contents to Secure Data check box and click OK. Then click OK again to close the file’s Properties dialog box. You are given a warning dialog that lets you choose between encrypting just the file that you had selected or both the file and its parent folder. Select one of the options and click OK.
Note
Note that the compression and encryption attributes are mutually exclusive. In the Advanced Attributes dialog box, if you select the Compress Contents to Save Disk Space check box, the check mark disappears from the Encrypt Contents to Secure Data check box. These two attributes are mutually exclusive—you can select only one.
After a file has been encrypted, you can view its encryption attribute details by again right-clicking the file, selecting Properties, and then clicking the Advanced button on the General tab. In the Advanced Attributes dialog box, click the Details button. The User Access To (file) dialog box opens, as shown in Figure 14-2.

Figure 14-2 Adding Other Users to Encrypted File Access List
You can see who is able to open the encrypted file, and you can add other user accounts to share the encrypted file and view the designated data recovery agent, if any. Click the Add button to share the encrypted file. A dialog box listing all the EFS-capable certificates for users opens. If a user has never been issued a certificate, the user’s account does not appear in this dialog box.
Tip
If the desired user has not been issued an EFS certificate, she needs only to log on to the computer and encrypt a different file. This automatically creates a certificate that will be visible the next time you attempt to share an encrypted file.
After a file is encrypted, an unauthorized user attempting to open the file is given an error message that says the user does not have access privileges. If an unauthorized user tries to move or copy an encrypted file, the user receives an Access Is Denied error message.
Backing Up EFS Keys
What if a user were to encrypt a file using EFS and then the user’s account were to become corrupted or be deleted for any reason? Or what if the user’s private key were to become corrupted or lost? You would be unable to decrypt the file, and it would be permanently inaccessible. Windows 10 offers the capability for backing up EFS certificates and keys to reduce the likelihood of this occurring. Use the following procedure to back up EFS keys:
Step 1. From the User Access dialog box previously shown in Figure 14-2, click Back Up Keys.
Step 2. The Certificate Export Wizard starts. Click Next.
Step 3. On the Export File Format page, the Personal Information Exchange–PKCS #12 (.PFX) format is selected by default. If desired, select the Include All Certificates in the Certification Path if Possible and Export All Extended Properties options, and then click Next.
Step 4. On the Password page, type and confirm a password. This is mandatory, and you should choose a hard-to-guess password that follows the usual complexity guidelines. Then click Next.
Step 5. On the File to Export page, type the name of the file to be exported, and then click Next. By default, this file is created in the user’s Documents library with the .pfx extension.
Step 6. Review the information on the completion page, and then click Finish.
Step 7. You are informed the export was successful. Click OK.
Step 8. You should move this file to a location separate from the computer, such as a USB key that you store securely (such as in a locked cabinet).
Decrypting Files
The process of decryption is the opposite of encryption. You can either use the cipher command or change the Advanced attribute for encryption on the file.
To use the cipher command to decrypt the file, access the taskbar Search text box, type cmd into the Search box, and then press Enter. At the command prompt, type cipher /d c:myfoldermyfile.txt and press Enter. The file will be decrypted.
To use the Advanced Attributes method, open File Explorer and navigate to the file. Right-click the file and select Properties. On the General tab, click the Advanced button. In the ensuing Advanced Attributes dialog box, clear the Encrypt Contents to Secure Data check box. Click OK, and then click OK again.
If you are not the person who originally encrypted the file, or if you are not the designated recovery agent, you will receive an error for applying attributes that says the access is denied.
EFS Recovery Agents
What if the user’s keys, even though backed up, were to become lost or corrupted? Without some type of recovery capability, such a file would become permanently inaccessible. EFS in Windows 10 uses the concept of recovery agents as a means to recover encrypted data in such a situation.
Designated recovery agents are user accounts authorized to decrypt encrypted files. When a user account is designated as a recovery agent, you essentially are granting it a copy of the key pair. If you lose the key pair, or if they become damaged, and if there is no designated recovery agent, there is no way to decrypt the file and the data is permanently lost. By designating a recovery agent before a user first uses EFS, you can ensure that encrypted files and folders remain accessible by someone responsible for their maintenance.
Windows 10 can include two levels of EFS recovery agents:
![]() Local computer: By default, the local administrator account created when you first install Windows 10 is the recovery agent. Note that this account is not the account whose name you specify during Windows 10 installation; it is a built-in account that can be accessed from the Local Users and Groups node of the Computer Management snap-in. The account is disabled by default, but you can enable it from its Properties dialog box by clearing the Account Is Disabled check box.
Local computer: By default, the local administrator account created when you first install Windows 10 is the recovery agent. Note that this account is not the account whose name you specify during Windows 10 installation; it is a built-in account that can be accessed from the Local Users and Groups node of the Computer Management snap-in. The account is disabled by default, but you can enable it from its Properties dialog box by clearing the Account Is Disabled check box.
![]() Domain: When you create an AD DS domain, the first domain administrator account is the designated recovery agent. You can use Group Policy to designate additional recovery agents, and you can delegate the responsibility of EFS recovery to other users if desired.
Domain: When you create an AD DS domain, the first domain administrator account is the designated recovery agent. You can use Group Policy to designate additional recovery agents, and you can delegate the responsibility of EFS recovery to other users if desired.
You can use Group Policy to designate additional recovery agents. A user must have an appropriate certificate before he can be designated as a recovery agent. Use the following procedure:
Step 1. Open Group Policy and navigate to the Computer ConfigurationWindows SettingsSecurity SettingsPublic Key PoliciesEncrypting File System node.
Step 2. Right-click this node and choose Add Data Recovery Agent.
Step 3. The Add Recovery Agent Wizard starts with a Welcome page. Click Next.
Step 4. On the Select Recovery Agents page shown in Figure 14-3, select a user from the Recovery Agents list and then click Next. (If necessary, click Browse Folders to locate a certificate for the desired user.)

Figure 14-3 Add Recovery Agent Wizard Enabling You to Designate Additional Users as EFS Recovery Agents
Step 5. You are informed that you have successfully completed the wizard. Review the information about the designated recovery agents, and then click Finish.
Note
For more information on backing up keys and designating recovery agents in EFS, refer to “How to Back Up the Recovery Agent Encrypting File System (EFS) Private Key in Windows” at http://support.microsoft.com/kb/241201 and “Create and Verify an Encrypting File System (EFS) Data Recovery Agent (DRA) Certificate” at https://technet.microsoft.com/en-us/itpro/windows/keep-secure/create-and-verify-an-efs-dra-certificate.
Configuring Disk Quotas
First introduced in Windows 2000 and improved with each successive version of Windows is the concept of disk quotas. This feature allows an administrator to set a limit on the amount of disk space used by an individual user. You can send a warning to users when they reach a certain level of disk usage, and you can write an event to the event log if a user attempts to exceed his quota. When you have enabled disk quotas, Windows 10 also collects disk usage statistics for all users enabled on the volume, thus allowing the administrator to keep track of disk usage. Thereby, the administrator can manage disks more efficiently and prevent users from “hogging” disk space.
File Explorer enables you to enable quotas on a per-volume, per-user basis. Use the following procedure to enable disk quotas:
Step 1. In File Explorer, right-click the volume (partition) on which you want to enable disk quotas, and then select Properties.
Step 2. In the Properties dialog box, click the Quota tab, and then click the Show Quota Settings command button to display disk quota information.
Step 3. On the Quota Properties dialog box, select the Enable Quota Management check box. Then specify values for the quota parameters described in Table 14-2 and shown in Figure 14-4.
Table 14-2 Disk Quota Configuration Options
Option |
Description |
Enable Quota Management |
Enables quota management and enables the other options so that you can configure them. |
Deny Disk Space to Users Exceeding Quota Limit |
When users exceed their quota, they receive an Out of Disk Space message and they cannot write further data. |
Do Not Limit Disk Usage |
Select this option when you do not want to limit the amount of disk space used. |
Limit Disk Space To |
Configures the disk space limit per user. |
Set Warning Level To |
Configures the amount of disk space that a user can write before receiving a warning. |
Log Event When a User Exceeds Their Quota Limit |
Writes an event to the Windows system log on the computer running disk quotas whenever a user exceeds her quota limit. |
Log Event When A User Exceeds Their Warning Level |
Writes an event to the Windows system log on the computer running disk quotas anytime a user exceeds his quota warning level, not his actual quota. |
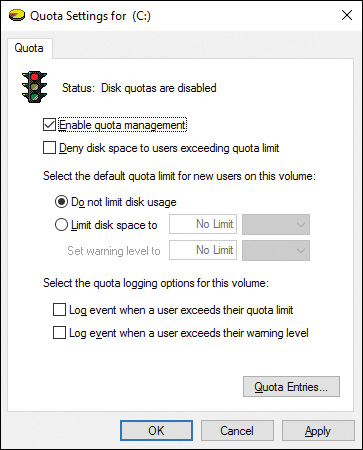
Figure 14-4 Enabling Disk Quotas for Individual Users on Given Disks
Step 4. To configure quota entries for specific users, click the Quota Entries command button. From the Quota Entries dialog box, you can view the status of all quotas configured on the volume, including the username, amount of space used, quota limit, warning level, and percentage used.
Step 5. To add a quota entry, click Quota > New Quota Entry, type the username to whom the quota will apply in the Select Users dialog box, and then click OK. Then in the Add New Quota Entry dialog box (see Figure 14-5), select Limit Disk Space To, specify the desired limit and warning levels, and then click OK. Repeat as needed to add quotas for other users.
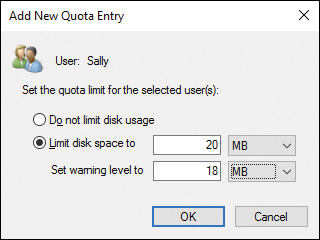
Figure 14-5 Add New Quota Entry Dialog Box Enabling You to Add a Disk Quota for a Single User
Step 6. After making any changes and closing the Quota Entries dialog box, click OK or Apply. A Disk Quota message box (see Figure 14-6) warns you that the disk will be rescanned and that this may take several minutes.
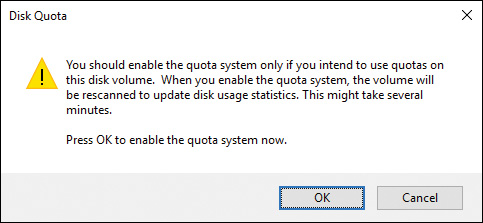
Figure 14-6 Warning That the Disk Volume Will Be Rescanned to Update Disk Usage Statistics
Step 7. Click OK to close this message box and start the scan.
Table 14-2 describes the options that are available on the Quota tab of the disk’s Properties dialog box mentioned in Step 3.
When the disk quota system is active, a user checking the properties of the volume where it is enabled sees only the amount of space permitted on the quota; the available space is the permitted space minus the space already used. If a user tries to copy a file that is larger than the allowed space, he receives a message that the file cannot be copied. In addition, an event is written to the Event log if you have selected the appropriate check box described in Table 14-2. You can view usage statistics by clicking the Quota Entries button.
Note
You can enable quotas only on volumes formatted with the NTFS file system. Only administrators can enable quotas, but they can permit users to view quota settings.
Some Guidelines for Using Quotas
The following are a few guidelines for using disk quotas:
![]() When installing applications, use the default Administrator account rather than your own user account. That way, the space used by the applications will not be charged against your quota if you have one.
When installing applications, use the default Administrator account rather than your own user account. That way, the space used by the applications will not be charged against your quota if you have one.
![]() If you want to use disk quotas only to monitor disk space usage, specify a soft quota by clearing the Deny Disk Space to Users Exceeding Quota Limit check box in File Explorer. That way, users are not prevented from saving important data.
If you want to use disk quotas only to monitor disk space usage, specify a soft quota by clearing the Deny Disk Space to Users Exceeding Quota Limit check box in File Explorer. That way, users are not prevented from saving important data.
![]() Set appropriate quotas on all volumes that a user can access. Provide warnings to the users, and log events when they exceed their quota limit and/or warning level.
Set appropriate quotas on all volumes that a user can access. Provide warnings to the users, and log events when they exceed their quota limit and/or warning level.
![]() Be aware that use of hard quotas might cause applications to fail.
Be aware that use of hard quotas might cause applications to fail.
![]() Monitor space used and increase the limits for those users who need larger amounts of space.
Monitor space used and increase the limits for those users who need larger amounts of space.
![]() Set quotas on all shared volumes, including public folders and network servers, to ensure appropriate use of space by users.
Set quotas on all shared volumes, including public folders and network servers, to ensure appropriate use of space by users.
![]() If a user no longer stores files on a certain volume, delete her disk quota entries. You can do this only after her files have been moved or deleted, or after someone has taken ownership of them.
If a user no longer stores files on a certain volume, delete her disk quota entries. You can do this only after her files have been moved or deleted, or after someone has taken ownership of them.
Note
You should be aware that NTFS file compression actually has no particular effect on the amount of quota space available to such a user. Disk quotas are calculated based on the amount of space occupied by uncompressed folders and files, regardless of whether files are compressed or not compressed.
Configuring Object Access Auditing
Users on a network are naturally curious about the myriad of volumes, folders, and files that they find. They like to “poke around” to see what’s there. And some can have malicious thoughts, so sensitive information might be accessed, modified, or even deleted. Corporate security policies generally stipulate that records must be kept of who attempts to access or modify such sensitive information. For this purpose, Microsoft has included object access auditing in its operating systems ever since the early days of Windows NT.
Object access is just one kind of a large list of events that Windows enables you to audit. Windows enables you to audit user access to files, folders, and printers by configuring the Audit policy for the local computer. If you need to audit computers that are members of an AD DS domain, you can configure the Group Policy in the domain or OU that contains these computers. Otherwise, you can configure the Local Group Policy setting for object access auditing. We discussed auditing in more detail in Chapter 12, “Managing Mobile Devices.”
To configure object access auditing, you must configure two pieces of information:
![]() Enable success or failure auditing for object access.
Enable success or failure auditing for object access.
![]() Specify the folders, files, or printers for which access is to be audited.
Specify the folders, files, or printers for which access is to be audited.
Enabling Object Access Auditing
Use the following procedure to enable object access auditing on a Windows 10 computer:
Step 1. From the Search box or Cortana, type gpedit.msc into the text box and select Edit Group Policy from the results. This opens the Local Group Policy Editor MMC snap-in.
Step 2. Navigate to the Computer ConfigurationWindows SettingsSecurity SettingsLocal PoliciesAudit Policy node. You receive the series of policy options shown in Figure 14-7.
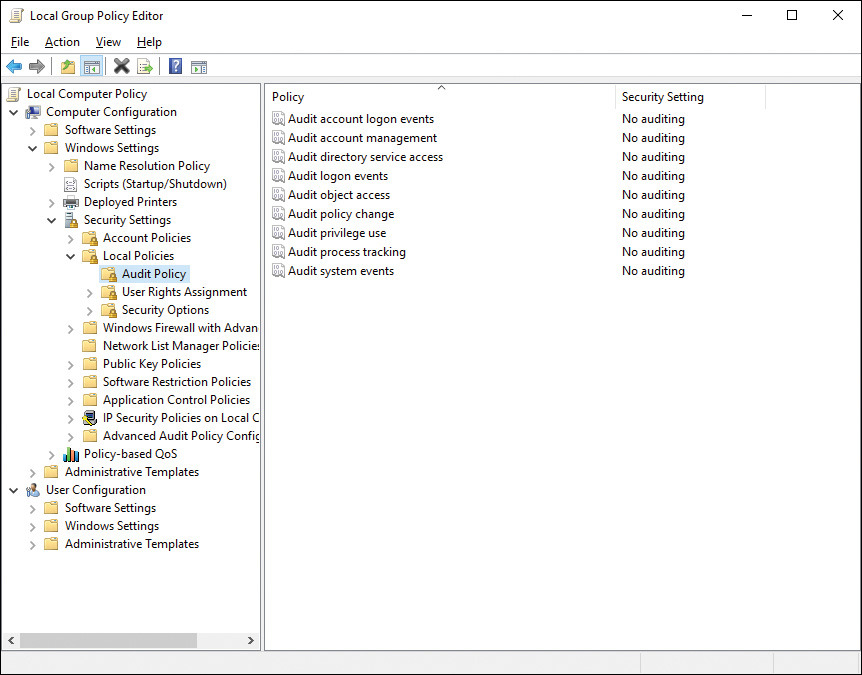
Figure 14-7 Audit Policy Subnode in the Local Group Policy Editor Enabling You to Audit Several Types of Actions on Your Windows 10 Computer
Step 3. Double-click Audit Object Access. You receive the Audit Object Access Properties dialog box shown in Figure 14-8.
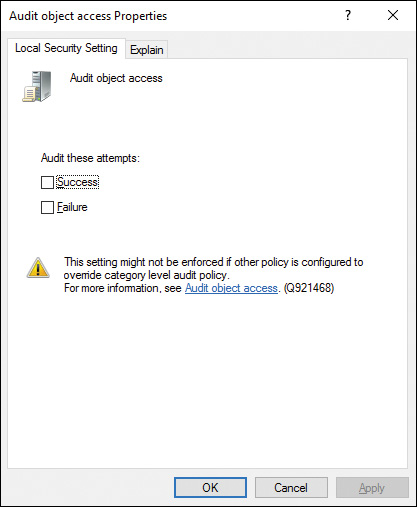
Figure 14-8 Enabling Auditing to Trigger an Event Log Entry When an Action Has Completed Successfully, or Has Failed, or Both
Step 4. To audit successful and/or failed attempts at accessing files, folders, or printers, select Success and/or Failure as required. Select the Explain tab of the Properties dialog box to obtain more information on what the setting does.
Step 5. Click OK or Apply.
Note
Additional audit policies are available in the Advanced Audit Policy subnode of Group Policy, available from the Computer ConfigurationWindows SettingsSecurity SettingsLocal PoliciesAudit Policy node. For more information on advanced audit policy settings as a whole, refer to “Advanced Security Audit Policy Settings” at https://technet.microsoft.com/en-us/itpro/windows/keep-secure/advanced-security-audit-policy-settings.
Specifying Objects to Be Audited
To track object access or directory service access, you must configure the system access control list (SACL) for each required object. Use the following procedure:
Step 1. In File Explorer, right-click the required file, folder, or printer and choose Properties.
Step 2. Select the Security tab of the object’s Properties dialog box.
Step 3. Click Advanced to open the Advanced Security Settings dialog box, and then select the Auditing tab.
Step 4. You are warned that you must be an administrator or have the appropriate privileges to view the auditing properties of the object. Click Continue to proceed, and then click Yes in the UAC prompt if you receive one.
Step 5. Click Add to display the Auditing Entry dialog box. To add users or groups to this dialog box, click Select a Principal.
Step 6. Type the required user or group into the Select User or Group dialog box, and then click OK.
Step 7. On the Auditing Entry dialog box that appears (see Figure 14-9), select the types of actions you want to track, and then click OK.

Figure 14-9 Configuring the SACL for a User or Group
Step 8. The completed auditing entries appear in the Advanced Security Settings dialog box, as shown in Figure 14-10. Click OK twice to close these dialog boxes.

Figure 14-10 Advanced Security Settings Dialog Box Displaying Information on the Types of Object Auditing Actions That Have Been Specified
After you have configured object access auditing, attempts to access audited objects appear in the Security Log, which you can view from Event Viewer in the Administrative Tools folder. For more information on any audited event, right-click the event and choose Event Properties. For more information on Event Viewer and viewing the logs it contains, refer to Chapter 19, “Monitoring and Managing Windows.”
Tip
Ensure that the security log has adequate space to audit the events that you configure for auditing, because the log can fill rapidly. The recommended size is at least 128 MB. You should also periodically save the existing log to a file and clear all past events. If the log becomes full, the default behavior is that the oldest events will be overwritten (and therefore lost). You can also configure the log to archive when full and not to overwrite events, but new events will not be recorded. Loss of recorded events could be serious in the case of high-security installations.
Note
You can also use the Auditpol.exe command-line tool to perform audit policy configuration actions. For information on the subcommands available for this command, open a command prompt and type auditpol /?. For additional information on this command, refer to “Auditpol” at http://technet.microsoft.com/en-us/library/cc731451.aspx. The information refers to Windows 8.1 and Windows Server 2012, but no changes to the auditpol command were made for Windows 10.
Configuring Shared Resources
Sharing is a basic concept of networking in any computer environment. Simply put, sharing means making resources available on a network. Typically, this means a folder on one computer is made accessible to other computers that are connected to the first computer by a network. The purpose of sharing folders is to give users access to network applications, data, and user home folders in one central location. You can use network application folders for configuring and upgrading software. This serves to centralize administration because applications are not maintained on client computers. Data folders allow users to store and access common files, and user home folders provide a place for users to store their own personal information. You can also share other resources, such as printers, so that users can print to a printer not directly attached to their computer.
You can share folders according to either or both of two file sharing models:
![]() Public Folder Sharing: The simplest means of sharing folders, this model involves the use of a shared folder located within each of the Windows libraries. However, you cannot limit access to items in these public folders; you can only enable or disable public folder sharing for all libraries from the Advanced Sharing Settings dialog box in the Network and Sharing Center, previously introduced in Chapter 6, “Windows 10 Networking.”
Public Folder Sharing: The simplest means of sharing folders, this model involves the use of a shared folder located within each of the Windows libraries. However, you cannot limit access to items in these public folders; you can only enable or disable public folder sharing for all libraries from the Advanced Sharing Settings dialog box in the Network and Sharing Center, previously introduced in Chapter 6, “Windows 10 Networking.”
![]() Standard Folder Sharing: Enables you to utilize a standard set of permissions that determine user access to files and folders across the network, in a similar fashion to that used in previous Windows versions. More secure than public folder sharing, you can enable or disable standard folder sharing on a per-computer basis.
Standard Folder Sharing: Enables you to utilize a standard set of permissions that determine user access to files and folders across the network, in a similar fashion to that used in previous Windows versions. More secure than public folder sharing, you can enable or disable standard folder sharing on a per-computer basis.
Using the Network and Sharing Center to Configure File Sharing
As introduced in Chapter 6, the Network and Sharing Center enables you to perform actions related to sharing of resources on your computer with others on the network. Click Change Advanced Sharing Settings to obtain the Advanced Sharing Settings dialog box shown in Figure 14-11. Among other networking options, you can specify the file sharing options described in the list that follows.
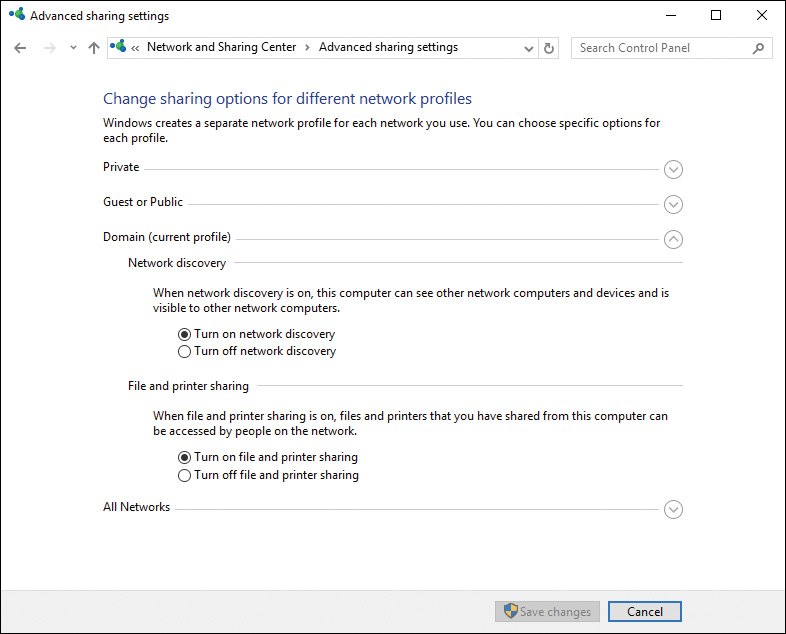
Figure 14-11 Advanced Sharing Settings Dialog Box Enabling You to Configure Several Global File and Folder Sharing Settings
![]() File and Printer Sharing: Enables the Standard Folder Sharing model, thereby allowing others on the network to access shared files on your computer and print from printers attached to your computer.
File and Printer Sharing: Enables the Standard Folder Sharing model, thereby allowing others on the network to access shared files on your computer and print from printers attached to your computer.
![]() Public Folder Sharing: Enables the Public Folder Sharing model, thereby allowing others on the network to access files in your Public folders of each Windows library (Documents, Pictures, Videos, and Music).
Public Folder Sharing: Enables the Public Folder Sharing model, thereby allowing others on the network to access files in your Public folders of each Windows library (Documents, Pictures, Videos, and Music).
![]() Media Streaming: Enables others on the network to access shared music, pictures, and videos on the computer and enables your computer to access these types of shared information on the network.
Media Streaming: Enables others on the network to access shared music, pictures, and videos on the computer and enables your computer to access these types of shared information on the network.
![]() File Sharing Connections: Enables you to select the level of encryption used to protect file sharing connections. You should keep the default of 128-bit encryption selected unless you need to share files with devices that understand a lower level of encryption only.
File Sharing Connections: Enables you to select the level of encryption used to protect file sharing connections. You should keep the default of 128-bit encryption selected unless you need to share files with devices that understand a lower level of encryption only.
Sharing Files, Folders, and Printers
Shared folders are folders on the local hard drive that other users on a network can connect to. For the exam, it is critical that you understand how to manage and troubleshoot connections to shared resources, how to create new shared resources, and how to set permissions on shared resources. The process that Windows 10 uses to share folders is that an administrator selects a folder, regardless of its location in the local folder hierarchy, and shares it through the Sharing tab of the folder’s Properties dialog box.
Administrators may find that the Computer Management snap-in is helpful in file and folder security management. To open this snap-in in Windows 10, right-click Start and choose Computer Management from the menu that appears. You can also open Computer Management from within Administrative Tools, which is found in the System and Security category of Control Panel. If you have enabled the Administrative Tools feature on the Start menu, click the tile for Computer Management from this location. To manage file and folder security, expand the Shared Folders node in the left pane. Select the Shares subnode to see the shared folders, as shown in Figure 14-12. The hidden administrative shares are followed by a dollar sign ($) and cannot be modified. From the remaining shared folders, select one to double-click and view the security settings on the folder.
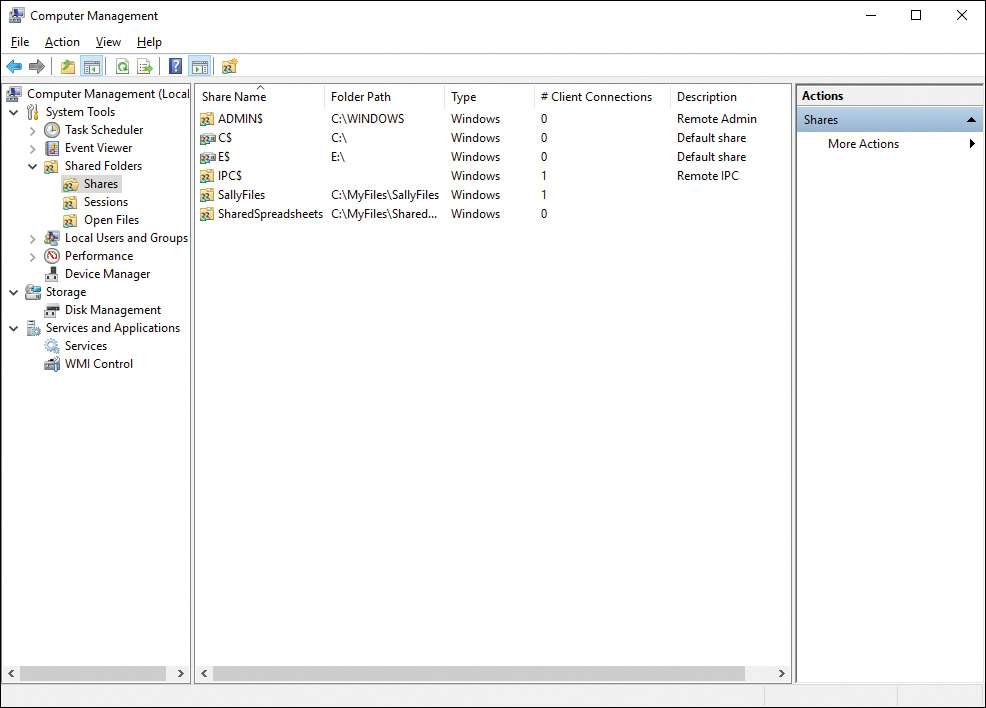
Figure 14-12 Viewing Shares on Your Computer from the Shared Folders Node of the Computer Management Snap-In
Aside from the default administrative shares, there are no folders that are automatically shared with the network. To share files with other users across the network, you must manually do so for each folder containing the files that you want to share. To share a folder with other network users, you can open any File Explorer window and then use the following procedure:
Step 1. In a File Explorer window, navigate to the folder, right-click it, select Share With, and then click Specific People. The File Sharing dialog box opens, as shown in Figure 14-13.
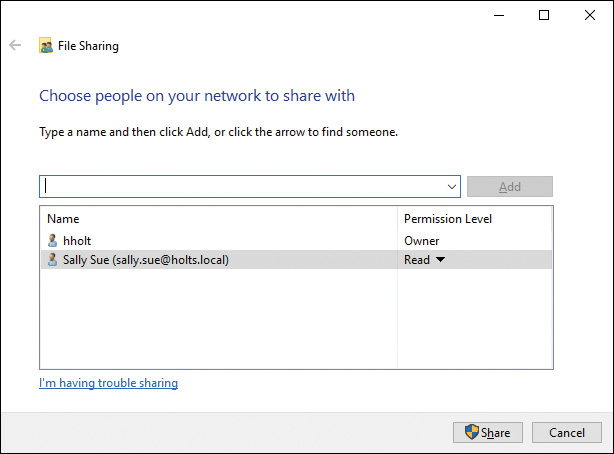
Figure 14-13 File Sharing Dialog Box Enabling You to Choose Those You Want to Share a File With
Step 2. Type the name of a user with whom you want to share the folder, and then click Add. The name appears in the Name list with a default permission level of Read (for example, Sally Sue in Figure 14-13).
Step 3. To share with another user, repeat Step 2 as many times as required. When finished, click Share. If you receive a User Account Control (UAC) prompt, click Yes.
Step 4. When the file is shared, you receive a message informing you that your folder is shared. This message enables you to email the link to the users with whom you shared the folder or copy it to other programs or documents. Click Done.
To add people to the sharing list, repeat this procedure and select Change Sharing Permissions from the File Sharing dialog box. Then type the name of the required user and click Add. To remove a shared folder, right-click the folder and select Share With > Stop Sharing.
Configuring Shared Folder Permissions
Windows 10 shares folders to others as Read, which means that the users you specify can view but not modify available files. The Advanced Sharing feature in Windows 10 enables you to modify these properties when necessary.
When granting full access to your local files to other users across a network, your computer becomes vulnerable to both unintentional and intentional attacks. Not only can the data be viewed for malicious purposes, such as corporate spying, it can be altered or destroyed on purpose or accidentally. For this reason alone, you should always grant the most restrictive permissions necessary for a network user to conduct work on those files. Granting just enough permission without being too lenient requires careful consideration. If you are too stringent, users can’t get their jobs done. If you are too lenient, the data is at risk.
Use the following procedure to modify shared folder properties:
Step 1. In a File Explorer window, right-click the shared folder and choose Properties.
Step 2. Click the Sharing tab (see Figure 14-14).
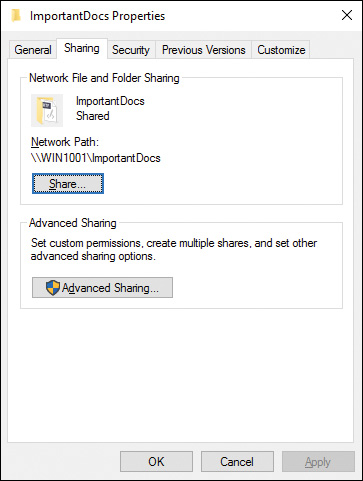
Figure 14-14 Sharing Tab of a Folder’s Properties Dialog Box Enabling You to Modify Shared Folder Properties
Step 3. Click Advanced Sharing. If you receive a UAC prompt, click Yes. The Advanced Sharing dialog box shown in Figure 14-15 appears. This dialog box provides you with the shared folder options introduced in Table 14-3.

Figure 14-15 Advanced Sharing Dialog Box Enabling You to Configure Several Properties of Shared Folders
Table 14-3 Shared Folder Options in Windows 10
Option |
Description |
Share This Folder |
Click to start sharing the folder. |
Share Name |
This is the folder name that remote users will employ to connect to the share. It will appear in a user’s File Explorer window, or the user can access it by typing \computernamesharename at the Run command. (Press the Windows key +R to open the Run command, or select it from the Start right-click menu.) |
Comments |
This information is optional and identifies the purpose or contents of the shared folder. The comment appears in the Map Network Drive dialog box when remote users are browsing shared folders on a server. |
User Limit |
This sets the number of remote users who can connect to a shared resource simultaneously, reducing network traffic. For Windows 10, the limit is 20 (it was 10 on Windows Vista and older client versions of Windows). |
Permissions |
Permissions can be assigned to individual users, groups, or both. When a folder is shared, you can grant each user and each group one of the three types of permissions for the share and all of its subdirectories and files, or choose to specifically deny them those permissions. |
Caching |
Enables offline access to a shared folder. |
Step 4. To add an additional share name, click Add under the Share Name section. (If this command button is dimmed, ensure that the Share This Folder option is selected and click Apply.) An additional share name enables users to access the shared folder under this name.
Step 5. To change the maximum number of simultaneous users, type the required number or use the arrows to select a number. This number cannot be higher than 20 on a Windows 10 computer.
Step 6. To change shared folder permissions, click Permissions. This displays the Permissions For (folder name) dialog box shown in Figure 14-16. By default, the creator of the share receives Full Control permission, and other users receive the Read permission. Click Add to add an additional user or group, and then modify this user’s permissions as desired. Click OK when finished. The available shared folder permissions are as follows:
![]() Read: Users are allowed to view but not modify files.
Read: Users are allowed to view but not modify files.
![]() Change: Users are allowed to view and modify files, but not change the attributes of the shared folder itself.
Change: Users are allowed to view and modify files, but not change the attributes of the shared folder itself.
![]() Full Control: Users are allowed to perform any task on the folder or its constituent files, including modifying their individual attributes and permissions used by others accessing them.
Full Control: Users are allowed to perform any task on the folder or its constituent files, including modifying their individual attributes and permissions used by others accessing them.

Figure 14-16 Permissions For (Folder Name) Dialog Box Enabling You to Configure Permissions That Apply to Users Accessing the Folder Across the Network
Tip
If you select permissions from the Deny column, you are explicitly denying access to that user or group. Such an explicit denial overrides any other permissions allowed to this group. Remember this fact if users experience problems accessing any shared resources across the network.
Step 7. To modify settings that affect how users view and access shared folder contents, click Caching (as shown earlier in Figure 14-15) and configure the settings in the Offline Settings dialog box as required.
Step 8. To set granular security permissions on the folder, click the Security tab and modify the settings in the dialog box shown in Figure 14-17 as required. These permissions apply to everyone accessing the folder either locally or across the network; more restrictive permissions configured here override those configured from the Sharing tab. We discuss these settings in detail later in this chapter.
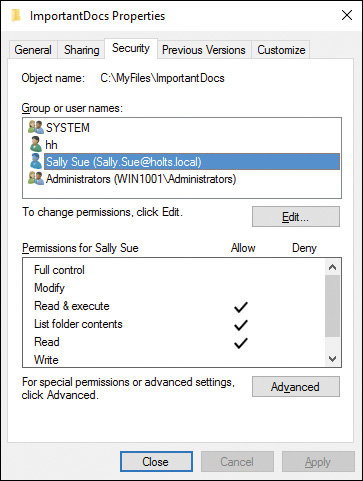
Figure 14-17 Security Tab of a Folder’s Properties Dialog Box Enabling You to Configure Granular Permissions for Users and Groups Accessing the Folder
Step 9. When you are finished, click Close to close the folder’s Properties dialog box. You can also click Apply to apply your changes and continue making modifications.
Use of the Public Folder for Sharing Files
Windows 10 provides the Public folder as a location for sharing files as a default. By default, Public Folder Sharing is turned off. To use this folder for sharing files, access the Advanced Sharing Settings dialog box shown previously in Figure 14-11 and specify the desired option in the Public Folder Sharing section. You have the following options at C:UsersPublic:
![]() Turn on Sharing So Anyone with Network Access Can Read and Write Files in the Public Folders: Shares the folder with Full Control shared folder permission. If password protected sharing is turned on, a password is required.
Turn on Sharing So Anyone with Network Access Can Read and Write Files in the Public Folders: Shares the folder with Full Control shared folder permission. If password protected sharing is turned on, a password is required.
![]() Turn off Public Folder Sharing (People Logged On to This Computer Can Still Access These Folders): Disables sharing of the Public folder.
Turn off Public Folder Sharing (People Logged On to This Computer Can Still Access These Folders): Disables sharing of the Public folder.
By default, this folder is located at C:UsersPublic and becomes visible when you select the Turn on Sharing option. You can configure additional security options on this folder by accessing the Sharing tab of its Properties dialog box from this location and following the procedure outlined earlier in this section.
Mapping a Drive
Mapping a network drive means associating a shared folder on another computer with a drive letter available on your computer. This facilitates access to the shared folder. Proceed as follows to map a drive on a Windows 10 computer:
Step 1. Right-click Start and choose File Explorer.
Step 2. Select This PC.
Step 3. From the ribbon menu, select the Computer tab, and then click the Map Network Drive button.
Step 4. In the Map Network Drive Wizard, select the drive letter to be assigned to the network connection for the shared resource. Drive letters being used by local devices are not displayed in the Drive list. You can assign up to 24 drive letters.
Step 5. Enter the UNC path for the server and share name you want to map. For example, to connect to the shared folder HRPolicies on a computer named WIN2016SVR01, type \win2016svr01HRPolicies, as shown in Figure 14-18. You can also click Browse to find the shared folder, and then select the desired path.

Figure 14-18 Mapping a Network Drive
Step 6. Select a connection option, as follows:
![]() Reconnect at Sign-In: This option is enabled by default and creates permanent connections. It reconnects the user to the shared folder each time the user logs on unless the user manually disconnects from the resource.
Reconnect at Sign-In: This option is enabled by default and creates permanent connections. It reconnects the user to the shared folder each time the user logs on unless the user manually disconnects from the resource.
![]() Connect Using Different Credentials: Enables you to connect to a shared folder using a different user account. This option is useful if you are at another user’s computer and need to connect to a resource to which the currently logged-in user does not have the appropriate access.
Connect Using Different Credentials: Enables you to connect to a shared folder using a different user account. This option is useful if you are at another user’s computer and need to connect to a resource to which the currently logged-in user does not have the appropriate access.
Step 7. Click Finish.
Command-Line Administration of Shared Folders
Windows 10 provides the net share command that you can use to manage shared resources. This is useful if you need to use scripts for automating administrative tasks. The syntax is as follows:
net share [sharename] [/parameters]
In this command, sharename is the name of the shared resource, and /parameters refers to any of a series of parameters that you can use with this command. Table 14-4 describes several of the more common parameters used with this command.
Table 14-4 Several Common Parameters Used with the net share Command
Parameter |
Description |
/users:number |
Specifies the maximum number of users who can access the shared resource at the same time. Specify Unlimited to allow the licensed limit of users. |
/cache:option |
Enables offline caching, according to the value of option: Documents: Specifies automatic reintegration of documents. Programs: Specifies automatic reintegration of programs. Manual: Specifies manual reintegration. BranchCache: Enables BranchCache and manual caching of documents on the shared folder. None: Advises the client that caching is inappropriate. |
/delete |
Stops sharing the specified resource. |
/remark:“text” |
Adds a descriptive comment. Enclose the comment (text) in quotation marks. |
Note that you can also use this command without any parameters to display information about all the shared resources on the local computer.
Media Streaming
Turning media streaming on enables users and devices on the network to access music, pictures, and videos in Windows Media Player and from devices attached to the computer, such as digital cameras, portable device assistants (PDAs), smartphones, and so on. In addition, the computer can locate these types of shared files on the network. To turn media sharing on, access the Media Streaming section of the Advanced Sharing Settings dialog box and click Choose Media Streaming Options. In the Choose Media Streaming Options for Computers and Devices dialog box that appears, click Turn on Media Streaming. You can then customize media streaming options, including selecting a media library and choosing what types of media will be accessible according to star ratings and parental control settings.
Note
For further information on media streaming, consult the Windows 10 Help and Support Center.
Configuring File Libraries
First introduced in Windows 7, a library is a set of virtual folders that are shared by default with other users of the computer. By default, Windows 10 includes six libraries (Camera Roll, Documents, Pictures, Saved Pictures, Music, and Videos). Documents and Pictures libraries are automatically pinned to the File Explorer folder on the taskbar, so you can access those libraries by right-clicking the taskbar folder icon. You can also access the libraries by clicking View on the File Explorer toolbar; then, on the expanded toolbar that appears, click Navigation Pane > Show Libraries. This adds a Libraries entry to the folder list of the File Explorer window. Click this entry to view the libraries, as shown in Figure 14-19. The subfolders you see here are actually pointers to the folder locations on the computer. You can also think of them as the results of search queries. From the Libraries folder, you can create a new library by right-clicking Libraries in the folder list and choosing New > Library in the toolbar and providing a name for your new library.
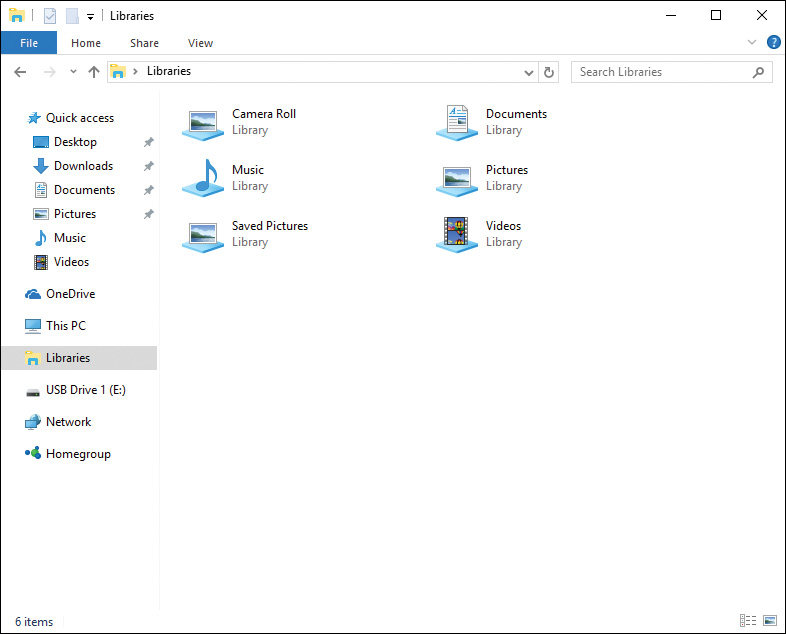
Figure 14-19 Six Default Libraries in Windows 10
Each library contains a user-based subfolder, located by default at C:Users\%username%, as well as a public subfolder from C:UsersPublic, which you can view by right-clicking the library and choosing Properties. From the dialog box, shown in Figure 14-20, you can add folders by clicking the Add button and navigating to the desired folder; this can even include shared folders located on other computers on the network. You can also add folders to a library from any Explorer window by right-clicking the folder and choosing the Include in Library option from the pop-up window.

Figure 14-20 Library Properties Dialog Box Allowing You to Add Folders to a Library and Change Other Properties
The Properties dialog box shown in Figure 14-20 enables you to change several other properties of the selected library. The check mark indicates the default save location used by programs such as Microsoft Office. To change this location, select the desired location and click the Set Save Location button. You can add additional folders to the library by clicking Add and selecting the desired folder, similar to that discussed in the previous paragraph. To remove a folder from the library, select it and click Remove.
HomeGroup
First introduced in Windows 7 is the concept of a homegroup, which is a small group of Windows 7, 8.1, or 10 computers connected together in a home or small office network that you have designated in the Network and Sharing Center as a home network. Computers running any edition of Windows 7, 8.1, or 10 can join a homegroup, but you must have Pro, Enterprise, or Ultimate 7 to create a homegroup. Computers running Windows Vista or earlier cannot join a homegroup. To create or join a homegroup, you must set your computer’s network location profile setting (discussed in Chapter 16, “Configuring and Maintaining Network Security”) to Private. Refer to the section “Configuring Network Discovery” in Chapter 16 for more information.
Creating a Homegroup
You can create a homegroup from the HomeGroup applet, which is accessed from the Network and Internet category of Control Panel by clicking HomeGroup. You can also access this applet by accessing the Search bar or Cortana and typing homegroup into the Search field, or by clicking HomeGroup from the Network and Sharing Center. From the Share with Other Home Computers dialog box shown in Figure 14-21, click Create a Homegroup, and then click Next. As shown in Figure 14-22, the Create a Homegroup Wizard enables you to select the type of resources you want to share with other computers. For each resource listed here, select Shared or Not Shared as required. After making your selections and clicking Next, the wizard provides you with a password that you can use to add other computers to the homegroup (see Figure 14-23). Make note of this password so that you can join other computers to the homegroup, and then click Finish.
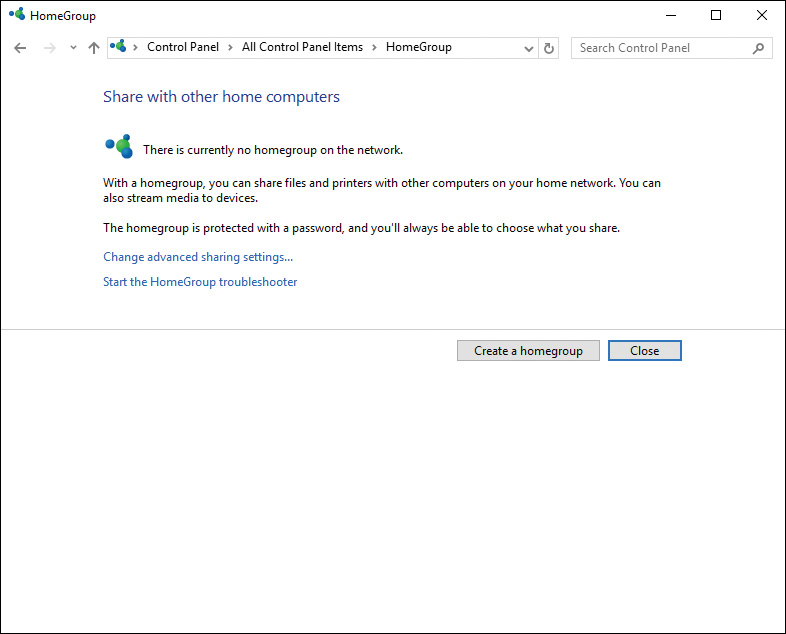
Figure 14-21 The Homegroup Applet Displaying Option to Create a Homegroup

Figure 14-22 Determining the Type of Resources You Want to Share on the Homegroup

Figure 14-23 Password That Enables You to Join Other Computers to the Homegroup
Joining a Homegroup
After you have created a homegroup, when you move to another computer on the network, the computer recognizes the homegroup and the Share with Other Home Computers dialog box informs you of this (see Figure 14-24). Click Join Now to join the homegroup, select the libraries you want to share, and then type the homegroup password when requested.
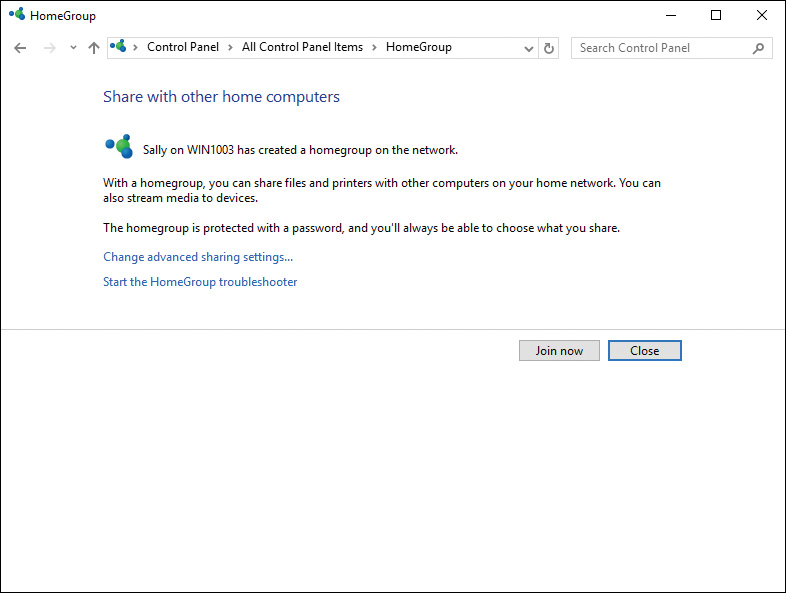
Figure 14-24 If a Homegroup Exists on the Network, You Are Prompted to Join It
Note
If your computer is joined to a domain, you can still join a homegroup. However, you cannot share libraries or printers to the homegroup, and you cannot create a homegroup. This feature enables you to bring a portable computer home from work and access shared resources on your home network. Furthermore, it is possible to use Group Policy to prevent domain computers from being joined to a homegroup.
After you’ve joined a homegroup, you receive the Change Homegroup Settings dialog box shown in Figure 14-25 when you access the HomeGroup option in the Control Panel Network and Internet category. From here you can change the types of libraries and printers that are shared with other homegroup computers. You can also perform any of the other self-explanatory actions shown in Figure 14-25 under Other Homegroup Actions. Selecting the Change Advanced Sharing Settings option takes you to the Advanced Sharing Settings dialog box previously shown in Figure 14-11.
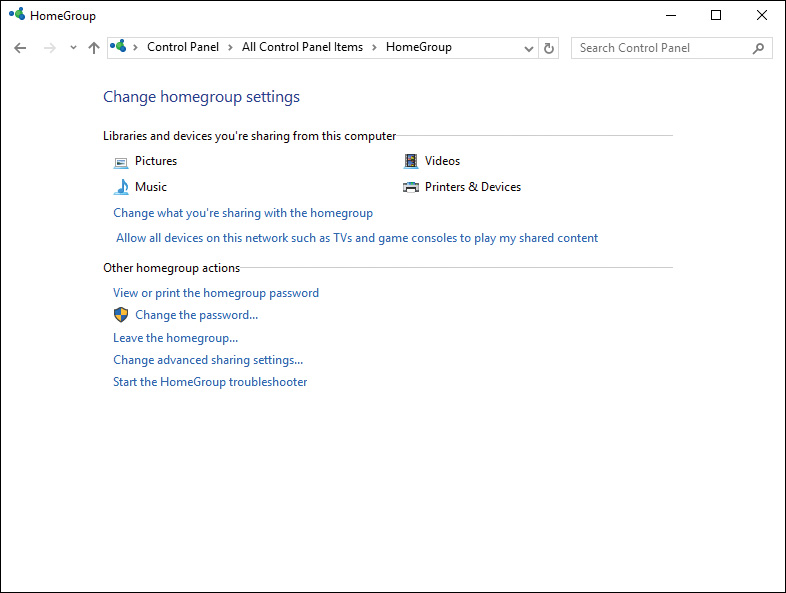
Figure 14-25 Change Homegroup Settings Dialog Box Enabling You to Change Which Items You Share on the Homegroup, or Perform Other Configuration Actions
Selecting the Allow All Devices on This Network Such as TVs and Game Consoles to Play My Shared Content option displays the dialog box shown in Figure 14-26. The list includes all computers and other media devices found on the network, including media players, electronic picture frames, and others. You can allow or block media access to each device individually by selecting the drop-down lists provided, or you can allow or block all devices by choosing from the appropriate command buttons.
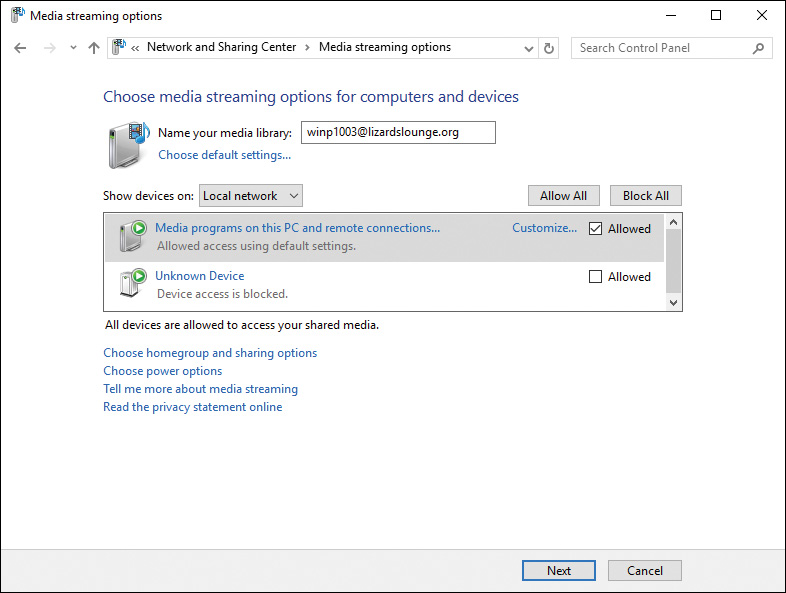
Figure 14-26 Choose Media Streaming Options for Computers and Devices Dialog Box Enabling You to Choose Which Devices Are Allowed to Access Shared Media
You can also modify the file sharing options for subfolders located within any of your shared libraries. To do this, navigate to the desired library and select the folder. From the Share With section of the Share tab, choose one of the following:
![]() Homegroup (View): Shares the file or folder with Read permission to all users in the homegroup.
Homegroup (View): Shares the file or folder with Read permission to all users in the homegroup.
![]() Homegroup (View and Edit): Shares the file or folder with Full Control permission to all users in the homegroup.
Homegroup (View and Edit): Shares the file or folder with Full Control permission to all users in the homegroup.
![]() Specific People: Displays the Choose People on Your Network to Share With dialog box previously shown in Figure 14-13. Type the name of the user with whom you want to share the folder, and then click Add.
Specific People: Displays the Choose People on Your Network to Share With dialog box previously shown in Figure 14-13. Type the name of the user with whom you want to share the folder, and then click Add.
OneDrive
In Windows 10, you can share files and folders in OneDrive just like any other folder on your local computer. If you have joined a HomeGroup, you can share your OneDrive (or any folders in it) with users on your homegroup. All the options are the same as any other folder, so you can share as view, as view and edit, or select specific users in your homegroup to share with.
You learned other aspects of OneDrive—how to set it up and configure OneDrive settings, in Chapter 9, “Managing User Data.” Refer to the “Supporting Data Storage” topic in Chapter 9 for the details on OneDrive.
Troubleshooting Data Access and Usage
Sharing files and folders with other computers on your network, whether using a central server or a distributed set of Windows computers, is a convenient and efficient way of managing data. Ensuring that users have the level of permissions that they need can become a complex and frustrating task, however, especially when the number of users and computers grows. To deal with these issues, you need an understanding of how permissions work in a Windows network, as well as how NTFS permissions work with share permissions to secure files and folders.
Effective Permissions
Users who belong to more than one group may receive different levels of permission. Both shared folder and NTFS permissions are cumulative. Your effective permissions are a combination of all permissions configured for your user account and for the groups of which you are a member. In other words, the effective permission is the least restrictive of all permissions that you have. For example, if you have Read permissions for a given file, but you are also a member of a group that has Modify permissions for the same file, your effective permissions for that file or folder would be Modify.
However, there is one important exception to this rule. If you happen to be a member of yet another group that has been explicitly denied permissions to a resource (the permission has been selected in the Deny column), then your effective permissions will not allow you to access that resource at all. Explicit denial of permission always overrides any allowed permissions.
Putting the two types of permissions together, the rules for determining effective permissions are simple:
![]() At either the shared folder or NTFS permissions level by itself, if a user receives permissions by virtue of membership in one or more groups, the least restrictive permission is the effective permission. For example, if a user has Read permission assigned to his user account and Full Control permission by virtue of membership in a group, he receives Full Control permission on this item.
At either the shared folder or NTFS permissions level by itself, if a user receives permissions by virtue of membership in one or more groups, the least restrictive permission is the effective permission. For example, if a user has Read permission assigned to his user account and Full Control permission by virtue of membership in a group, he receives Full Control permission on this item.
![]() If the user is accessing a shared folder over the network and has both shared folder and NTFS permissions applied to it, the most restrictive permission is the effective permission. For example, if a user has Full Control NTFS permission on a folder but accesses it across the network where she has Read shared folder permission, her effective permission is Read.
If the user is accessing a shared folder over the network and has both shared folder and NTFS permissions applied to it, the most restrictive permission is the effective permission. For example, if a user has Full Control NTFS permission on a folder but accesses it across the network where she has Read shared folder permission, her effective permission is Read.
![]() If the user is accessing a shared folder on the computer where it exists, shared folder permissions do not apply. In the previous example, this user would receive Full Control permission when accessing the shared folder locally.
If the user is accessing a shared folder on the computer where it exists, shared folder permissions do not apply. In the previous example, this user would receive Full Control permission when accessing the shared folder locally.
![]() If the user has an explicit denial of permission at either the shared folder or NTFS level, he is denied access to the object, regardless of any other permissions he might have to this object.
If the user has an explicit denial of permission at either the shared folder or NTFS level, he is denied access to the object, regardless of any other permissions he might have to this object.
Tip
It is important to remember that specifically denying permission to a file within a folder overrides all other file and folder permissions configured for a user or for a group that may contain that user’s account. There is no real top-down or bottom-up factor to consider when it comes to denying permissions. If a user is a member of a group that has been denied a permission to a file or folder, or if a user’s individual account has been denied a permission to a particular resource, that is what counts. If you are denied access to a folder, it does not matter what permissions are attached to a file inside the folder, because you cannot get to it.
Practical Guidelines on Sharing and Securing Folders
When you share folders, it is important to control how they are used. To control the use of shared folders, you should be aware of how shares are applied in Windows 10. The following facts should be kept in mind.
![]() Denying permissions overrides all other shared permissions that may be applied to a folder: If a user is part of a group that is denied permission to access a particular resource, that user will not be able to access that resource, even if you grant her user account access to the share.
Denying permissions overrides all other shared permissions that may be applied to a folder: If a user is part of a group that is denied permission to access a particular resource, that user will not be able to access that resource, even if you grant her user account access to the share.
![]() Multiple permissions accumulate: You may be a member of multiple groups, each with a different level of permissions for a particular shared resource. Your effective permissions are a combination of all permissions configured for your user account and the groups of which you are a member. As a user, you may have Read permissions for a folder. You may be a member of a group with Change permissions for the same folder. Your effective permissions for that folder would be Change. If you happen to be made a member of yet another group that has been denied permissions to a folder, your effective permissions will not allow you to access that folder at all. That is the one important exception to this rule.
Multiple permissions accumulate: You may be a member of multiple groups, each with a different level of permissions for a particular shared resource. Your effective permissions are a combination of all permissions configured for your user account and the groups of which you are a member. As a user, you may have Read permissions for a folder. You may be a member of a group with Change permissions for the same folder. Your effective permissions for that folder would be Change. If you happen to be made a member of yet another group that has been denied permissions to a folder, your effective permissions will not allow you to access that folder at all. That is the one important exception to this rule.
![]() Copying or moving a folder alters the shared permissions associated with that folder: When you copy a shared folder, the original shared folder is still shared, but the copied folder is not. When you move a shared folder to a new location anywhere, that folder is no longer shared by anyone.
Copying or moving a folder alters the shared permissions associated with that folder: When you copy a shared folder, the original shared folder is still shared, but the copied folder is not. When you move a shared folder to a new location anywhere, that folder is no longer shared by anyone.
![]() When you share a folder that is located on an NTFS volume, you still need to consider the NTFS permissions that apply to that folder: There may already be NTFS permissions in place on a folder that you are in the process of sharing. You will need to consider how your NTFS and shared folder permissions combine. (See the next item.) If there aren’t any NTFS permissions on that folder, you may need to configure NTFS permissions for your shared folder, or it is possible that no one will be able to access it.
When you share a folder that is located on an NTFS volume, you still need to consider the NTFS permissions that apply to that folder: There may already be NTFS permissions in place on a folder that you are in the process of sharing. You will need to consider how your NTFS and shared folder permissions combine. (See the next item.) If there aren’t any NTFS permissions on that folder, you may need to configure NTFS permissions for your shared folder, or it is possible that no one will be able to access it.
![]() When shared folder and NTFS file and folder permissions combine, the most restrictive permissions apply: When both NTFS and shared folder permissions apply to the same folder, the more restrictive permission is the effective permission for that folder. Do not lose sight of the fact, however, that shared folder permissions have no effect on users who are logged in to the computer locally.
When shared folder and NTFS file and folder permissions combine, the most restrictive permissions apply: When both NTFS and shared folder permissions apply to the same folder, the more restrictive permission is the effective permission for that folder. Do not lose sight of the fact, however, that shared folder permissions have no effect on users who are logged in to the computer locally.
![]() When a folder resides on an NTFS volume: You need at least the NTFS Read permission to be able to share that folder at all.
When a folder resides on an NTFS volume: You need at least the NTFS Read permission to be able to share that folder at all.
Configuring Shared Printers
If you have turned on file and printer sharing from the Advanced Sharing Settings dialog box, you can share any printer attached to your computer so that others on the network can print documents to it. Use the following steps to share a printer:
Step 1. From the Search bar or Cortana, type printers, and then select Devices and Printers. You can also access the Hardware and Sound category in Control Panel and select Devices and Printers.
Step 2. In the Devices and Printers Control Panel applet, right-click your printer and choose Printer Properties.
Step 3. Click the Sharing tab to display the dialog box shown in Figure 14-27.

Figure 14-27 Sharing a Printer
Step 4. Click Change Sharing Options to enable the sharing options on this dialog box.
Step 5. Click Share This Printer and either accept the share name provided or type a different name. This name identifies the printer to users on other computers.
Step 6. If users are running older Windows versions, click Additional Drivers to install drivers for these Windows versions. Select the required drivers from the Additional Drivers dialog box that appears, and then click OK.
As with shared folders, you can assign share permissions for printers. Select the Security tab of the printer’s Properties dialog box to configure the options shown in Figure 14-28. By default, the Everyone group receives the Print permission and the Administrators group receives the Print, Manage This Printer, and Manage Documents permissions. Table 14-5 describes the printer permissions, including Special Permissions.

Figure 14-28 Changing Permissions for Shared Printers
Table 14-5 Printer Permissions in Windows 10
Parameter |
Description |
Users can connect to a given printer to print documents and control print job settings for their own documents only. This can include pausing, deleting, and restarting only their own documents in the print queue. |
|
Manage This Printer |
Users can assign forms to paper trays and set a separator page. In addition, they can change the printing order of documents in the queue, pause, resume, and purge the printer, change printer properties, and delete the printer itself or change printer permissions. Users with this permission can also perform all tasks related to the Manage Documents permission. |
Manage Documents |
Users can pause, resume, restart, and cancel all documents. They can also set the notification level for finished print jobs and set priority levels and specific printing times for documents to print. |
Special Permissions |
Enables the assignment of granular permissions, including Read Permissions, Change Permissions, and Take Ownership. To configure special permissions, click the Advanced button. |
Note
For more information on configuring printer permissions, refer to “Set or Remove Permissions for Printer Use” at https://technet.microsoft.com/en-us/library/cc719924(v=ws.10).aspx.
Configuring Location Aware Printing
Location Aware Printing, first introduced in Windows 7, enables you to automatically print to a printer on the network your computer is currently connected to. For example, if you have a portable computer that you use both at home and in the office, you can print to the office computer when you are at work. Returning home in the evening, you print a document, and this print job automatically goes to the home printer without your having to change the default printer, thereby simplifying this task and reducing problems from attempting to print to the wrong printer.
Location Aware Printing in Windows 10 obtains network names from several sources, including the Active Directory Domain Services (AD DS) domain name at work and the SSID of your home wireless network. The Manage Default Printers dialog box then enables you to associate a default printer with each network to which you connect, and Windows automatically specifies the assigned printer as the default when you connect to its network.
To use Location Aware Printing, you need to be running Windows 10 Pro, Education, or Enterprise edition. The feature is not available in Windows Mobile or the Home edition of Windows 10.
Use the following procedure to set up Location Aware Printing:
Step 1. Access the Action Center and select All Settings.
Step 2. Click the Devices option and then select Printer & Scanners from the Settings menu.
Step 3. From the Printers & Scanners settings page in Figure 14-29, click the Let Windows Manage My Default Printer toggle to On.
Step 4. Each time you use a printer on a specific network, Windows automatically uses it as the default whenever you connect to that network.
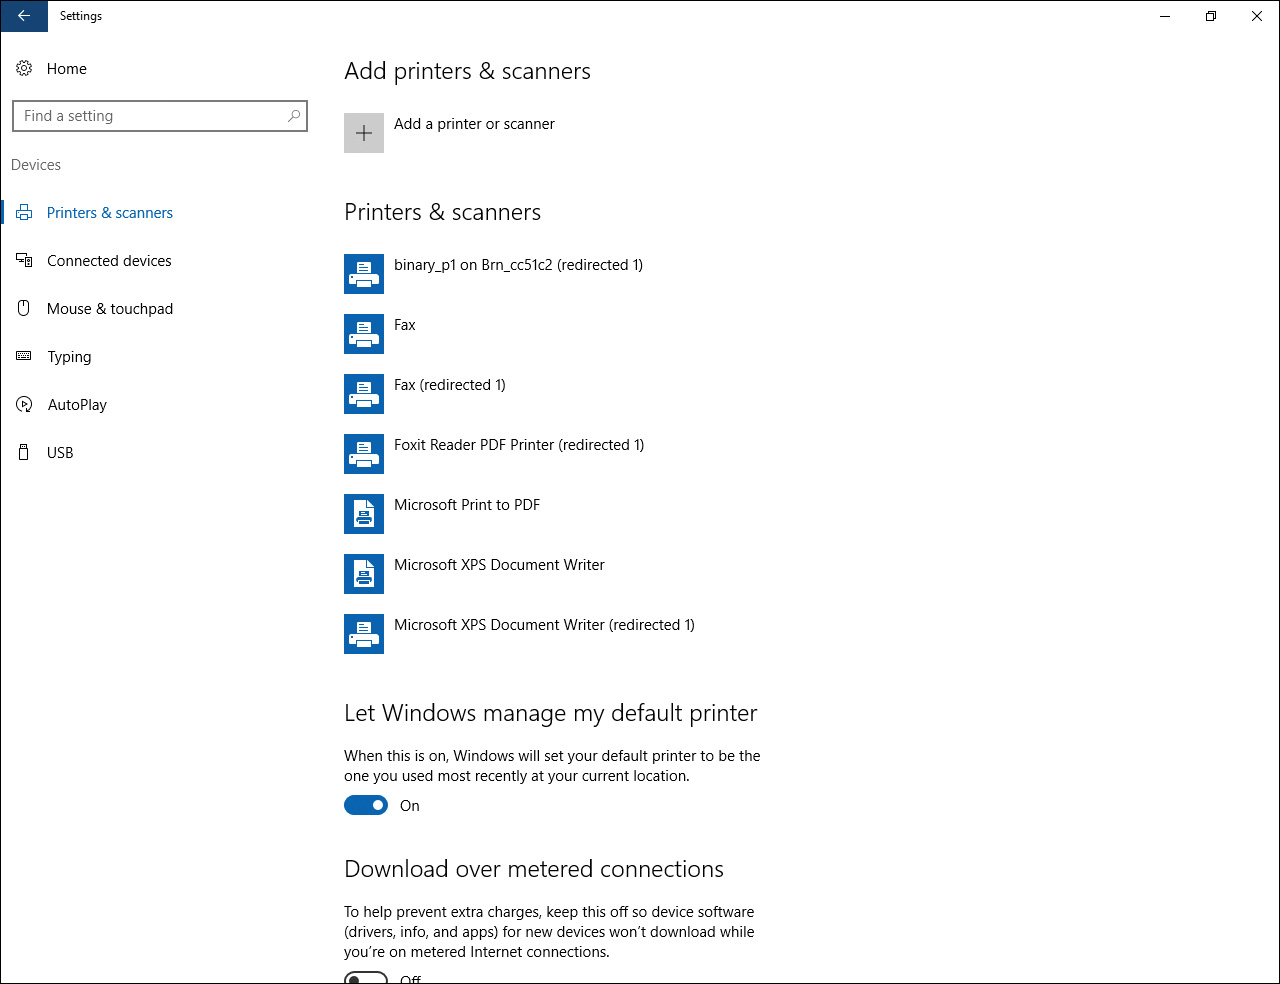
Figure 14-29 Printers & Scanners Settings Page Enabling You to Work with Printers and Tell Windows Whether to Automatically Manage Your Default Printer
If you want to change the default printer for a network, you can select a default printer while you are connected to that network. Access the Devices and Printers Control Panel applet, right-click the printer, and then select Set as Default Printer from the pop-up menu.
To stop Windows from changing your default printer every time you use a specific printer, you can turn off the Let Windows Manage My Default Printer setting. You can then manually manage your default printer, and it will not change even if you connect to a different network. With the setting turned off, you also have a new option in the Printers & Scanners settings page. It will identify the current default printer with the word Default just under the name of the printer. To change the default, select the printer you want to use, and then click the Manage button. From the Settings page of the printer, click the Set as Default button to make that printer your default.
Exam Preparation Tasks
Review All the Key Topics
Review the most important topics in the chapter, noted with the Key Topics icon in the outer margin of the page. Table 14-6 lists a reference of these key topics and the page numbers on which each is found.
Table 14-6 Key Topics for Chapter 14
Key Topic Element |
Description |
Page Number |
Shows how to use EFS to encrypt files or folders. |
||
Step List |
Shows how to back up EFS keys. |
|
Step List |
Shows how to configure disk quotas. |
|
Describes available disk quota configuration options. |
||
Step List |
Shows how to enable object access auditing. |
|
Step List |
Shows how to specify objects to be audited. |
|
Advanced Sharing Settings dialog box enables you to configure several global file sharing and network discovery options. |
||
Advanced Sharing dialog box allows you to set share permissions, user limits, and other options. |
||
Describes available folder sharing options. |
||
Specifying shared folder permissions. |
||
Paragraph |
Describes the concept of libraries. |
|
Paragraph |
How to create a HomeGroup. |
|
List |
Describes the interaction between share permissions and NTFS permissions. |
|
Printer permissions in Windows 10. |
||
The Printers & Scanners settings page allows you to set whether you want Windows to manage your default printer. |
Complete the Tables and Lists from Memory
Print a copy of Appendix B, “Memory Tables” (found on the book’s website), or at least the section for this chapter, and complete the tables and lists from memory. Appendix C, “Memory Tables Answer Key,” also on the website, includes completed tables and lists to check your work.
Definitions of Key Terms
Define the following key terms from this chapter, and check your answers in the glossary.
administrative shares
auditing
certificate
decryption
disk quotas
encryption
Encrypting File System (EFS)
hidden shares
library
public folder sharing
recovery agent
shared folder permissions
shared folders
system access control list (SACL)