Chapter 9 Managing User Data
This chapter covers the following subjects:
![]() Configuring Data Storage: Windows 10 enables you to create several types of disk volumes on your computer. This section introduces you to these volume types and shows you how to create, manage, and troubleshoot problems with disks. It also shows you how to defragment your disks so that performance is kept optimum.
Configuring Data Storage: Windows 10 enables you to create several types of disk volumes on your computer. This section introduces you to these volume types and shows you how to create, manage, and troubleshoot problems with disks. It also shows you how to defragment your disks so that performance is kept optimum.
![]() Supporting Data Storage: This section provides an overview of Distributed File System (DFS), which places shared folders located on different servers into a single folder tree, to simply access by users. Storage Spaces is a recent technology innovation in Windows that lets you consolidate multiple disks into a single logical drive. This section introduces Storage Spaces in Windows and how it is used and configured. It also covers OneDrive cloud storage for Windows systems.
Supporting Data Storage: This section provides an overview of Distributed File System (DFS), which places shared folders located on different servers into a single folder tree, to simply access by users. Storage Spaces is a recent technology innovation in Windows that lets you consolidate multiple disks into a single logical drive. This section introduces Storage Spaces in Windows and how it is used and configured. It also covers OneDrive cloud storage for Windows systems.
![]() User Data Migration and Configuration: You can redirect library folders, such as documents, music, pictures, and videos, to common locations such as shared folders on a server. This enables you to keep track of users’ documents and ensure that they are properly and regularly backed up.
User Data Migration and Configuration: You can redirect library folders, such as documents, music, pictures, and videos, to common locations such as shared folders on a server. This enables you to keep track of users’ documents and ensure that they are properly and regularly backed up.
![]() Configuring Local, Roaming, and Mandatory Profiles: Windows provides user profiles that are composed of desktop settings, files, application data, and the specific environment established by the user. You can configure roaming user profiles that are stored on a server so that they are available to a user regardless of the computer being used.
Configuring Local, Roaming, and Mandatory Profiles: Windows provides user profiles that are composed of desktop settings, files, application data, and the specific environment established by the user. You can configure roaming user profiles that are stored on a server so that they are available to a user regardless of the computer being used.
This chapter covers the following objectives for the 70-697 and 70-698 exams:

Support data storage: Identifying and resolving issues related to the following: DFS client including caching settings, storage spaces including capacity and fault tolerance, OneDrive.
Migrate and configure user data: Migrate user profiles; configure folder location; configure profiles including profile version, local, roaming, and mandatory.

Configure data storage: Configure disks, volumes, and files system options using Disk Management and Windows PowerShell; create and configure VHDs; configure removable devices; create and configure storage spaces; troubleshoot storage and removable device issues.
Now we take these file sharing concepts further and look into a Microsoft technology that assists users in locating these resources as their organizations grow in size and add additional file servers—the Distributed File System (DFS). DFS places all the shared resources into a single folder tree that encompasses all these servers and their shares, wherever they might be located on a large, sprawling network.
As the amount of information stored on hard disks and accessed across various types of networks has grown, information storage technology has kept pace. The Storage Spaces technology, which was first introduced for Windows 8 and Windows Server 2012, enables you to create cost-effective, highly available, scalable, and flexible storage systems by using virtualization technology to create pools of storage on groups of physical disks. Microsoft expects you to be up-to-date on this latest in information-storage technologies.
The OneDrive feature has become a staple of Microsoft’s cloud offerings for Windows 10 and enables you to share images, documents, and so on among computers, smartphones, and other devices in different physical locations. Microsoft expects you to be knowledgeable about all these new features when taking the 70-697 exam.
Many companies can purchase new computers with Windows 10 already loaded or upgrade certain computers from Windows Vista, 7, or 8.1. Users who will be working with these computers may have been using older Windows computers for several years, and these computers will have applications with user- or company-specific settings as well as important data on them. Microsoft provides tools to assist you in migrating users and applications to new Windows 10 computers, and you are expected to know how to perform these migrations in an efficient manner as part of the 70-697 exam.
“Do I Know This Already?” Quiz
The “Do I Know This Already?” quiz allows you to assess whether you should read this entire chapter or simply jump to the “Exam Preparation Tasks” section for review. If you are in doubt, read the entire chapter. Table 9-1 outlines the major headings in this chapter and the corresponding “Do I Know This Already?” quiz questions. You can find the answers in Appendix A, “Answers to the ‘Do I Know This Already?’ Quizzes.”
Table 9-1 “Do I Know This Already?” Foundation Topics Section-to-Question Mapping
Foundation Topics Section |
Questions Covered in This Section |
Configuring Data Storage |
1–9 |
Supporting Data Storage |
10–16 |
User Data Migration and Configuration |
17–18 |
Configuring Local, Roaming, and Mandatory Profiles |
19–20 |
Caution
The goal of self-assessment is to gauge your mastery of the topics in this chapter. If you do not know the answer to a question or are only partially sure of the answer, you should mark that question as wrong for purposes of the self-assessment. Giving yourself credit for an answer you correctly guess skews your self-assessment results and might provide you with a false sense of security.
1. Your hard disk is configured as a basic disk, and you do not want to convert it to dynamic storage because you want to enable dual-booting. Which of the following partition types can you configure on the disk? (Choose all that apply.)
a. Simple volume
b. Primary partition
c. Extended partition
d. Spanned volume
e. Mirrored volume
f. Striped volume
g. Logical drive
h. RAID-5 volume
2. You have added a new 5 TB hard disk to your Windows 10 computer and initialized it. You now want to create a single volume that uses the entire space on the disk, so you start the DiskPart tool from an administrative command prompt. On attempting to create the volume, you receive an error. Which of the following commands should you execute first?
a. convert basic
b. convert dynamic
c. convert gpt
d. convert mbr
3. Which tab of a volume’s Properties dialog box enables you to check the volume for errors?
a. General
b. Tools
c. Hardware
d. Quota
e. Customize
4. You want to add additional space to your D: partition so that you can store a large number of digital images. You do not want to add an additional drive letter, so you run the Extend Volume Wizard. What type of volume are you creating?
a. Simple volume
b. Spanned volume
c. Mirrored volume
d. RAID-5 volume
5. Which of the following RAID technologies are fault-tolerant? (Choose all that apply.)
a. Spanning
b. Striping
c. Mirroring
d. Striping with parity
6. You have four hard disks in your computer and want to create a RAID-5 volume. The amount of free space on the disks is as follows: Disk 0, 2 TB; disk 1, 1.5 TB; disk 2, 800 GB; disk 3, 1 TB. What is the maximum size of RAID-5 volume that you can create?
a. 2.4 TB
b. 3.2 TB
c. 4.5 TB
d. 5.3 TB
7. You want to ensure that your Windows 10 computer will always boot, so you decide that you want to implement fault tolerance on your system and boot volumes. Your computer has two hard disks. You start the DiskPart command and select the system/boot volume. What command should you use?
a. create volume stripe disk=0,1
b. create volume mirror disk=0,1
c. create volume raid disk=0,1
d. add disk = 1
8. One morning, you start the Optimize Drives utility to optimize your C: drive. This drive is 250 GB in size with a free space of 22 GB. After lunch, this utility is still running, and you start to wonder what else you should do to optimize disk usage. Which of the following can you do to improve the rate of disk response? (Choose all that apply.)
a. Run the Disk Cleanup utility.
b. Back up old data and then delete this data from the drive.
c. Uninstall several applications whose files are on this drive.
d. Just let the Optimize Drives utility run overnight.
9. Your computer has three volumes, C:, D:, and E:. You want to optimize the C: and D: volumes only from the command line. What command will do this? (Choose two; each is a complete solution.)
a. defrag c: d:
b. defrag /e:
c. defrag /E e:
d. defrag /E c: d:
10. What enables you to create logical groupings of shared folders on different servers that facilitate the access to data by users on the network?
a. DFS Namespaces
b. DFS Replication
c. Disk Cleanup
d. Storage Pools
11. You can use DFS Replication and DFS Namespaces either separately or together; each does not require the presence of the other. You can also use DFS Replication to replicate ________.
a. standalone DFS namespaces
b. Active Directory
c. a server image
d. the Registry
12. You have created a storage pool on a Windows 10 computer from two physical drives, each with 2 TB capacity. What is the maximum size you can specify for a storage space created from this pool?
a. 4 TB
b. 2 TB
c. 1 TB
d. No limit
13. You are planning to use Storage Spaces in Windows, and would like to use parity resiliency because it makes the most efficient use of disk capacity. How many drives must exist (minimum) in the storage pool?
a. 2
b. 3
c. 5
d. 1
14. You have two storage spaces, called “movies” and “music,” created from a single storage pool. The total pool capacity is 500 GB, so you have created each storage space to use 250 GB size (maximum). You have used only 10% of the pool space, but you now need to copy a 300 GB file to the “movies” storage space. What is the easiest way to configure Storage Spaces to be able to copy the file?
a. Delete the “music” storage space and expand the “movies” storage space.
b. Add an additional drive to the storage pool.
c. Just copy the file, because there is room in the storage pool.
d. Increase the size of the “movies” storage space.
15. You have a folder connected to your OneDrive storage on your Windows 10 PC, but would like to use a new corporate OneDrive account with more storage. How can you change your OneDrive folder?
a. Go to OneDrive.com and configure the account to use a different computer and folder name.
b. Open Control Panel, find the OneDrive applet, and change the credentials in OneDrive settings.
c. Add the corporate account to the computer, and log on to the system with the new corporate account.
d. Open PC Settings, access the OneDrive settings, and change the OneDrive account credentials under Sync settings.
16. You are using a Windows 10 PC and have a number of files on your OneDrive storage that you want to keep in sync on your local computer automatically. What would you use to enable this feature?
a. Configure the OneDrive Windows app to copy the files.
b. Open the OneDrive app, select the folders and files you want to keep in sync, and select the Make Offline app command to make the files available offline.
c. Log in to OneDrive.com and select the computer and synchronization settings you want to use.
d. Use the OneDrive mobile app to copy your files.
17. Which of the following folders can you redirect to a shared folder on a server so that they can be easily backed up? (Choose all that apply.)
a. Documents
b. Music
c. Pictures
d. Videos
18. Which of the following are components of a domain-based folder redirection implementation? (Choose all that apply.)
a. A Windows Server 2012 R2 or higher computer configured as a router
b. A Windows Server 2012 R2 or higher computer configured as a domain controller
c. A Group Policy Object (GPO) that specifies folder redirection settings
d. A Windows Server 2012 R2 or higher computer configured as a global catalog server
e. A Windows Server 2012 R2 or higher computer configured with a shared folder accessible to network users.
19. You want to ensure that all users on your company’s network are provided with common settings that appear on any computer on the network, regardless of the computer they log on to. Further, you want to ensure that these settings cannot be modified by users and kept after logging off. What profile type do you configure?
a. Roaming profile
b. Mandatory profile
c. Local profile
d. Permanent profile
20. You want to copy a user profile so that another user of the same computer can use the same settings specified in the first profile. What do you do?
a. From the System dialog box, click Advanced System Settings. In the System Properties dialog box that appears, select the Profiles tab, select the default profile, and then click Copy To. Then type or browse to the desired location and click OK.
b. From the System dialog box, click Advanced System Settings. In the System Properties dialog box that appears, select the Profiles tab and then click Settings. Select the default profile and click Copy To. Then type or browse to the desired location and click OK.
c. From the System dialog box, click Advanced System Settings. In the System Properties dialog box that appears, select the Advanced tab and then click Settings under User Profiles. Then, in the User Profiles dialog box, select the default profile and click Copy To. Then type or browse to the desired location and click OK.
d. In File Explorer, browse to %systemdrive%UsersDefault UserProfiles. Right-click this folder, choose Copy, browse to the desired user in the Users subfolder, access the Profiles subfolder of this user, right-click it, and choose Paste.
Foundation Topics
Configuring Data Storage
Storage needs for computers have changed significantly over time. You could feed the data of hundreds of computers from just 10 years ago into a single computer today and still not fill its hard disk. Part of the reason is that today’s data is much different than that of 10 years ago. It includes multimedia files, 20-plus megapixel images, extended attributes, complex formulas, and WYSIWYG (What You See Is What You Get) formatting. The result is that the size of a single file can be hundreds of megabytes (MB) or even several gigabytes (GB). So, although storage space has grown, the demand for storage space has increased along with it.
As the amount of information stored on hard disks and accessed across various types of networks has grown, information storage technology has kept pace. Microsoft introduced Storage Spaces technology in 2012, which enables you to create cost-effective, highly available, scalable, and flexible storage systems by using virtualization technology to create pools of storage on groups of physical disks. New for Windows Server 2016 is Storage Spaces Direct, which brings new features to this software-defined storage technology, enabling multiple servers to participate in a shared virtual storage cluster. This topic focuses on Storage Spaces for Windows 10.
Configuring Storage Using Disk Management and Windows PowerShell
Windows 10 offers several tools and utilities that assist you in working with disks and volumes, including removable disks. We discussed configuring policies with removable disks in Chapter 8, “Windows 10 Data Security.” You can use the Computer Management Microsoft Management Console (MMC) snap-in or the DiskPart command-line utility to manage disks. We introduced the DiskPart utility in Chapter 2, “Implementing Windows,” with regard to creating virtual hard disks (VHDs); here we discuss them in detail.
We introduced the Computer Management tool in Chapter 1, “Introducing Windows 10,” and have mentioned its use in several other chapters of this book. This tool includes the Disk Management snap-in, which enables you to manage disks and other storage devices in Windows 10. To open Computer Management, right-click Start and choose Computer Management from the menu that appears.
Windows also enables you to open the Disk Management snap-in from its own console by right-clicking Start and choosing Disk Management from the menu that appears. Disk Management opens in its own console, as shown in Figure 9-1.


Figure 9-1 The Disk Management Tool Containing the Main Administration Utilities for Disk Devices
The following list summarizes the major actions you can perform from the Disk Management snap-in:
![]() Create dynamic disks: Disks can be either basic (the default) or dynamic. You can convert a basic disk to a dynamic disk but you cannot change back. Your only avenue to reverting to a basic disk is by deleting all volumes on the dynamic disk, losing the data, creating a new basic volume, and restoring the data from a backup.
Create dynamic disks: Disks can be either basic (the default) or dynamic. You can convert a basic disk to a dynamic disk but you cannot change back. Your only avenue to reverting to a basic disk is by deleting all volumes on the dynamic disk, losing the data, creating a new basic volume, and restoring the data from a backup.
![]() Create volumes: You can create several types of volumes on a dynamic disk and on a basic disk. Microsoft provides a wizard to assist you in creating these volumes.
Create volumes: You can create several types of volumes on a dynamic disk and on a basic disk. Microsoft provides a wizard to assist you in creating these volumes.
![]() Extend volumes: You can add additional unallocated space on a disk to an existing volume. Windows 10 provides the Extend Volume Wizard to assist you in this action.
Extend volumes: You can add additional unallocated space on a disk to an existing volume. Windows 10 provides the Extend Volume Wizard to assist you in this action.
![]() Shrink volumes: You can reduce the size of a volume to generate unallocated space for creating or extending a different volume.
Shrink volumes: You can reduce the size of a volume to generate unallocated space for creating or extending a different volume.
![]() Display properties of disks and volumes: For disks, you can obtain the same information as provided by Device Manager. For volumes, you can obtain information about free space and device properties. This feature also lets you optimize (defragment) the volume, share the volume, configure an access control list (ACL), back up all files on the volume, and create shadow copies of files and folders within the volume.
Display properties of disks and volumes: For disks, you can obtain the same information as provided by Device Manager. For volumes, you can obtain information about free space and device properties. This feature also lets you optimize (defragment) the volume, share the volume, configure an access control list (ACL), back up all files on the volume, and create shadow copies of files and folders within the volume.
Basic and Dynamic Disks
When you first install Windows 10, the hard disk on which you install Windows is set up as a basic disk. When you add a brand new hard disk to your computer, this disk is also recognized as a basic disk. This disk type is the one that has existed ever since the days of MS-DOS. Starting with Windows 2000, Microsoft offered a new type of disk called a dynamic disk. This disk type offers several advantages over the basic disk, including the following:
![]() You can create specialized disk volumes on a dynamic disk, including spanned, striped, mirrored, and RAID-5 volumes. Basic disks are limited to primary and extended partitions, and logical drives.
You can create specialized disk volumes on a dynamic disk, including spanned, striped, mirrored, and RAID-5 volumes. Basic disks are limited to primary and extended partitions, and logical drives.
![]() You can work with and upgrade disk volumes on the fly, without the need to reboot your computer.
You can work with and upgrade disk volumes on the fly, without the need to reboot your computer.
![]() You can create an almost unlimited number of volumes on a dynamic disk. A basic disk can only hold a total of four primary partitions, or three primary plus one extended partition.
You can create an almost unlimited number of volumes on a dynamic disk. A basic disk can only hold a total of four primary partitions, or three primary plus one extended partition.
Dynamic disks have their disadvantages, however:
![]() The disk does not contain partitions or logical drives and therefore can’t be read by another operating system.
The disk does not contain partitions or logical drives and therefore can’t be read by another operating system.
![]() On a multiboot computer, the disk will not be readable by operating systems other than the one from which the disk was upgraded.
On a multiboot computer, the disk will not be readable by operating systems other than the one from which the disk was upgraded.
![]() Laptop computers do not support dynamic disks.
Laptop computers do not support dynamic disks.
Besides a disk type, all disks have one of two partition styles:
![]() Master Boot Record (MBR): Uses a partition table that describes the location of the partitions on the disk. The first sector of an MBR disk contains the master boot record plus a hidden binary code file that is used for booting the system. This disk style supports volumes of up to 2 terabytes (TB) with up to four primary partitions or three primary partitions plus one extended partition that is subdivided into any number of logical drives.
Master Boot Record (MBR): Uses a partition table that describes the location of the partitions on the disk. The first sector of an MBR disk contains the master boot record plus a hidden binary code file that is used for booting the system. This disk style supports volumes of up to 2 terabytes (TB) with up to four primary partitions or three primary partitions plus one extended partition that is subdivided into any number of logical drives.
![]() GUID Partition Table (GPT): Uses extensible firmware interface (EFI) to store partition information within each partition and includes redundant primary and backup partition tables to ensure structural integrity. This style is recommended for disks larger than 2 TB, and for disks used on Itanium-based computers. Not all previous Windows versions can recognize this disk style, however.
GUID Partition Table (GPT): Uses extensible firmware interface (EFI) to store partition information within each partition and includes redundant primary and backup partition tables to ensure structural integrity. This style is recommended for disks larger than 2 TB, and for disks used on Itanium-based computers. Not all previous Windows versions can recognize this disk style, however.
When you add a new disk of less than 2 TB, it is added as an MBR disk. You can convert an MBR disk to a GPT one using either Disk Management or the DiskPart tool, provided there are no partitions or volumes on the disk. To use Disk Management, right-click it and choose Convert to GPT Disk. To use DiskPart, proceed as follows:
Step 1. Open an administrative command prompt, type DiskPart, and accept the User Account Control (UAC) prompt. You see the DiskPart command window.
Step 2. Type list disk to get the disk number of the disks on your system.
Step 3. Type select disk n where n is the number of the disk you want to convert.
Step 4. Type convert gpt. DiskPart informs you that it has successfully converted the selected disk to GPT format.
If you want to convert a GPT disk back to MBR, the procedures are the same. You must back up all data and delete all volumes on the disk before performing the conversion. In Disk Management, right-click the disk and choose Convert to MBR Disk. In DiskPart, use the same steps and type convert mbr in the last one.
Note
For more information on using GPT disks, refer to “Using GPT Drives” at https://msdn.microsoft.com/en-us/library/windows/hardware/dn653580(v=vs.85).aspx.
Working with Basic Disks
When you first install Windows 10 on a new computer or add a new disk to an existing Windows 10 computer, the disk appears in Disk Management as a basic disk. Windows 10 enables you to create a new partition (aka a simple volume) from the free space on a new or existing disk. This partition can be primary or extended or a logical volume. Keep in mind that a single basic disk can contain up to four primary partitions or three primary partitions plus an extended partition; the extended partition can contain any number of logical drives. Use the following procedure to create a partition:
Step 1. Right-click Start > Disk Management to open the Disk Management snap-in. Alternatively, you can open Computer Management as already discussed and then select Disk Management in the left pane.
Step 2. Locate the disk in the right pane that contains the unallocated space where the new volume will reside.
Step 3. Right-click the unallocated space of the disk, and select New Simple Volume from the shortcut menu.
Step 4. The New Simple Volume Wizard starts. Click Next.
Step 5. On the Specify Volume Size page, type the size of the partition in megabytes and then click Next.
Step 6. On the Assign Drive Letter or Path page shown in Figure 9-2, accept the drive letter provided or use the drop-down list to select a different letter. Then click Next.

Figure 9-2 Assigning a Drive Letter to Your Partition or Mount It in an Empty NTFS Folder
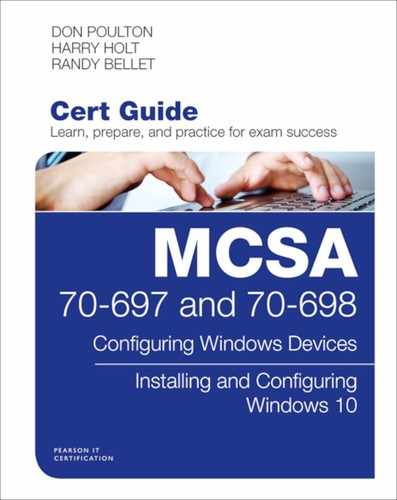
Step 7. On the Format Partition page shown in Figure 9-3, choose the file system (FAT, FAT32, or NTFS) to format the partition. Provide a volume label name or accept the default of New Volume (this name will appear in the Computer window). If formatting with NTFS, you can modify the allocation unit size and/or enable file and folder compression. When done, click Next.
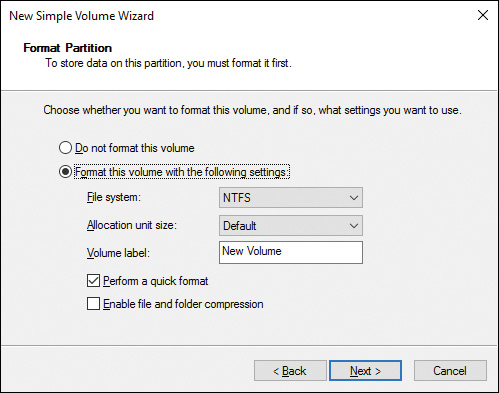
Figure 9-3 Choices for Formatting a New Partition
Step 8. Review the information provided on the completion page and then click Finish. Windows creates and formats the partition and displays its information in the Disk Management snap-in.
On a basic disk, Disk Management also enables you to perform several other management activities. You can extend, shrink, or delete volumes as necessary. Extending a volume enables you to add unallocated space to the volume. Right-click the volume and choose Extend Volume. The Extend Volume Wizard informs you what space is available and enables you to add additional space or select a smaller amount of space, as shown in Figure 9-4. Modify the amounts in MB as required, click Next, and then click Finish to extend the volume.
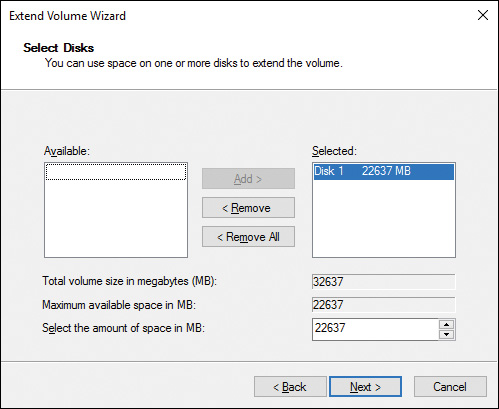
Figure 9-4 Extend Volume Wizard Helping Extend a Volume on a Basic or Dynamic Disk
Note
If you add additional space on another disk from the Available column in the Extend Volume Wizard, you will be creating a spanned volume. The wizard will ask you to convert the disks to dynamic storage. You learn more about this later in this chapter.
Shrinking a partition enables you to free up space to be used on a different partition. To do so, right-click the desired partition and choose Shrink Volume. In the Shrink Volume dialog box shown in Figure 9-5, type the amount of space you want to shrink the volume by. (Note the size after shrink to avoid overshrinking the volume.) Then click Shrink.

Figure 9-5 Shrink Volume Dialog Box for Shrinking a Partition or Volume
To view how a partition is configured, you can look at its properties in the Disk Management utility. Right-click the partition and select Properties from the shortcut menu. The Properties dialog box that appears has the following tabs (not all tabs will appear if the disk is not formatted with the NTFS file system):
![]() General: As shown in Figure 9-6, this tab provides an immediate view of the space allocation on the disk in a pie chart. The General tab also allows you to type a volume name and to click a button that executes the Disk Cleanup graphical utility. This utility enables you to remove unnecessary files from your disk, such as the Temporary Internet Files folder, downloaded program install files, and the Recycle Bin.
General: As shown in Figure 9-6, this tab provides an immediate view of the space allocation on the disk in a pie chart. The General tab also allows you to type a volume name and to click a button that executes the Disk Cleanup graphical utility. This utility enables you to remove unnecessary files from your disk, such as the Temporary Internet Files folder, downloaded program install files, and the Recycle Bin.

Figure 9-6 Volume’s Properties Displaying Its Space Allocation
![]() Tools: This tab has the following two buttons:
Tools: This tab has the following two buttons:
![]() Check: Displays an Error Checking dialog box that enables you to click Scan Drive, which executes the GUI version of Chkdsk.
Check: Displays an Error Checking dialog box that enables you to click Scan Drive, which executes the GUI version of Chkdsk.
![]() Optimize: Executes the GUI version of Defrag.
Optimize: Executes the GUI version of Defrag.
![]() Hardware: Displays the storage device hardware for the computer. You can obtain properties for any device, similar to that obtained from Device Manager, by selecting it and clicking Properties.
Hardware: Displays the storage device hardware for the computer. You can obtain properties for any device, similar to that obtained from Device Manager, by selecting it and clicking Properties.
![]() Sharing: Enables you to share the disk so that others can access information on it. Doing this for the entire drive is not considered a good practice. It is generally unnecessary because the computer automatically generates an administrative share for each partition when Windows starts.
Sharing: Enables you to share the disk so that others can access information on it. Doing this for the entire drive is not considered a good practice. It is generally unnecessary because the computer automatically generates an administrative share for each partition when Windows starts.
![]() Security: Enables you to assign access permissions to files and folders on the disk, similar to those discussed in Chapter 8, “Windows 10 Data Security.”
Security: Enables you to assign access permissions to files and folders on the disk, similar to those discussed in Chapter 8, “Windows 10 Data Security.”
![]() Quota: Enables you to assign disk quotas to users on the disk. This lets you limit the amount of space used on the disk by an individual user, who will receive a Disk Full message if he attempts to use more space than assigned to his quota.
Quota: Enables you to assign disk quotas to users on the disk. This lets you limit the amount of space used on the disk by an individual user, who will receive a Disk Full message if he attempts to use more space than assigned to his quota.
![]() Customize: Enables you to optimize folders on the disk for purposes such as general items, documents, pictures, music, or videos. You can also choose to display a different icon that will appear in the Computer window or restore default settings.
Customize: Enables you to optimize folders on the disk for purposes such as general items, documents, pictures, music, or videos. You can also choose to display a different icon that will appear in the Computer window or restore default settings.
You can delete a logical drive or partition easily from within the Disk Management utility. Simply right-click the logical drive and select Delete Volume from the shortcut menu, as depicted in Figure 9-7. A prompt appears to verify that you want to delete the logical drive or partition. When you click Yes, Windows deletes the drive or partition. Windows prevents you from deleting the system partition, the boot partition, or any partition that contains an active paging file. Extended partitions can be deleted only if they are empty of data and logical drives.

Figure 9-7 Disk Management Utility Enabling You to Delete a Partition or Logical Drive
Converting Basic Disks to Dynamic
The process to convert a basic disk to a dynamic disk requires that you have a minimum of 1 MB of available space on the disk. Best practices state that when you make changes to a disk configuration, you should back up the data before starting, just in case you need to restore it after you are finished. Even so, converting a basic disk to a dynamic disk should not have any effect on your data.
You can convert a basic disk to dynamic at any time. Any partitions that are on the disk are converted to simple volumes in this process. To perform a conversion, you must be logged on as an administrator of the computer.
Step 1. In Disk Management, right-click the disk to be converted to dynamic and choose Convert to Dynamic Disk.
Step 2. If more than one hard disk is present, you receive the dialog box shown in Figure 9-8. Select any additional disks that you want to convert to dynamic, and then click OK.

Figure 9-8 Converting Any of Your Disks to Dynamic Storage at the Same Time
Step 3. The Disks to Convert dialog box shows you the disks that will be converted. Click Convert to proceed.
Step 4. Disk Management warns you (see Figure 9-9) that you will be unable to start installed operating systems except the current boot volume. Click Yes to proceed.
Figure 9-9 Warning That You Will Be Unable to Start Other Operating Systems if You Convert to Dynamic Storage
Step 5. The disk is converted to dynamic, and the display in Disk Management is updated accordingly.
To convert a dynamic disk back to basic, you must first back up all data on the disk and delete all volumes. Then right-click the disk in Disk Management and choose Convert to MBR Disk. The conversion proceeds, and the display in Disk Management is updated within a few seconds.
Working with Dynamic Disks
When you convert a basic disk to a dynamic disk, the existing partitions are converted to simple volumes, and fault-tolerant volumes are converted into dynamic volumes. Dynamic volumes can be changed on the fly, as the name “dynamic” implies. A dynamic volume is a unit of storage initially created from the free space on one or more disks. Table 9-2 lists the volume types available on a dynamic disk.
Table 9-2 Dynamic Volume Types
Volume Type |
Number of Disks |
Configuration |
Fault Tolerance |
Simple |
1 |
A single region or multiple concatenated regions of free space on a single disk. |
None |
Spanned |
2 to 32 |
Two or more regions of free space on 2 to 32 disks linked into a single volume. Can be extended. Cannot be mirrored. |
None |
Striped |
2 to 32 |
Multiple regions of free space from two or more disks. Data is evenly interleaved across the disks, in stripes. Known as RAID Level 0. |
None |
Mirrored |
2 |
Data on one disk is replicated on the second disk. Cannot be extended. Known as RAID Level 1. |
Yes, with maximum capacity of the smallest disk |
RAID-5 |
3 to 32 |
Data is interleaved equally across all disks, with a parity stripe of data also interleaved across the disks. Also known as striping with parity. |
Yes, with maximum capacity of the number of disks minus one (if you have five 200 GB disks, your volume would be 800 GB) |
Creating a simple volume on a dynamic disk proceeds exactly as already described for creating a partition on a basic disk. As with basic disks, you can also extend, shrink, or delete a volume. We look at the methods of creating and working with striped, mirrored, and RAID-5 volumes later in this chapter.
Dynamic volumes allow you to change their properties on an as-needed basis. If you have a computer, for example, that is running short of space, you can install an extra hard drive and extend an existing simple or spanned volume so that the new space is immediately available without directing the user to use drive J for this data, drive C for that data, drive Y for the network, and so on. Users find multiple drive letters confusing, so being able to keep it all under one letter is highly preferable. Unfortunately, you cannot extend a system volume or a boot volume. Because most computers are installed with a single volume, C:, which includes boot and system files, any volumes created on a new disk added to the computer must have a separate drive letter from the C: drive.
To increase the size of a simple volume, in Disk Management, right-click the existing volume and select Extend Volume from the shortcut menu. The Extend Volume Wizard starts, and you are prompted to select the disk or disks that contain the free space you will be adding. After you specify the size of free space to add, you need to confirm your options and click Finish. The volume is extended and appears in the Disk Management window with new space allocated to it.
The Disk Management utility is fairly comprehensive, but it is not the only tool available in Windows 10 to configure or manage disks. Some of these tools harken back to the days of DOS and Windows 3.x, yet they are still very useful, especially if there is a problem accessing the graphical user interface (GUI):
![]() Chkdsk.exe: A command-line utility that verifies and repairs FAT- or NTFS-formatted volumes. (For NTFS drives, use the CHKDSK C: /R command to automatically check and repair disk problems.)
Chkdsk.exe: A command-line utility that verifies and repairs FAT- or NTFS-formatted volumes. (For NTFS drives, use the CHKDSK C: /R command to automatically check and repair disk problems.)
![]() Cleanmgr.exe: Also known as Disk Cleanup, a GUI utility that deletes unused files.
Cleanmgr.exe: Also known as Disk Cleanup, a GUI utility that deletes unused files.
![]() Defrag.exe: Also known as Disk Defragmenter, a command-line utility that rearranges files contiguously, recapturing and reorganizing free space in the volume. Optimizes performance.
Defrag.exe: Also known as Disk Defragmenter, a command-line utility that rearranges files contiguously, recapturing and reorganizing free space in the volume. Optimizes performance.
![]() DiskPart.exe: A command-line utility that can run a script to perform disk-related functions. DiskPart’s nearest GUI counterpart is the Disk Management utility.
DiskPart.exe: A command-line utility that can run a script to perform disk-related functions. DiskPart’s nearest GUI counterpart is the Disk Management utility.
![]() Fsutil.exe: A command-line utility that displays information about the file system and can perform disk-related functions.
Fsutil.exe: A command-line utility that displays information about the file system and can perform disk-related functions.
RAID Volumes
The acronym “RAID” refers to Redundant Array of Independent (or Inexpensive) Disks—it is a series of separate disks configured to work together as a single drive with a single drive letter. You have already seen three of the most common types of RAID arrays in Table 9-2: RAID-0 (disk striping), RAID-1 (mirroring), and RAID-5 (disk striping with parity). Other versions of RAID also exist but are generally unused; you are unlikely to see these referenced on the 70-698 exam.
When you use fault-tolerant volumes, a disk can fail and the operating system will continue to function. The failure can be repaired with no loss of data. Most Windows 10 computers do not have fault-tolerant volumes. An administrator should understand how to handle the errors that can plague a hard disk. Refer to Table 9-2 for common problems that can also plague fault-tolerant volumes.
Caution
Don’t confuse the RAID-5 or mirrored volumes that you can create within the Windows 10 operating system with RAID-5 or mirrored drives that are configured in a hardware storage array. A disk array produces a highly performing, fault-tolerant volume that appears in Windows 10 Disk Management as a simple volume. When you create mirrored or RAID-5 volumes in Windows 10, you achieve fault tolerance but lose some performance to disk management processes, especially if a disk fails.
Creating a RAID-0 Volume
A RAID-0 (striped) volume contains space on 2 to 32 separate hard disks. Data is written in 64 KB blocks (stripes) to each disk in the volume, in turn. A striped volume offers considerable improvement in read/write efficiency because the read/write heads on each disk are working together during each I/O operation. A striped volume offers a maximum amount of space equal to the size of the smallest disk multiplied by the number of disks in the volume. However, the striped volume does not offer fault tolerance; if any one disk is lost, the entire volume is lost. Note that the system or boot volume cannot be housed on a striped volume.
You can create a striped volume by using 2 to 32 separate hard disks in Disk Management. Use the following procedure:
Step 1. In Disk Management, right-click any one disk to be made part of the striped volume, and choose New Striped Volume.
Step 2. The New Striped Volume Wizard starts and displays the Select Disks page shown in Figure 9-10. The disk you initially selected appears under Selected. Select the disks you want to use from the Available column and then click Add.
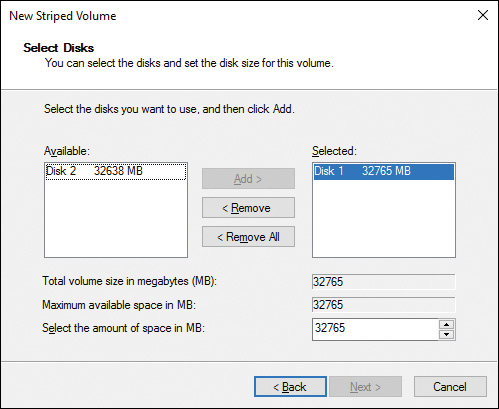
Figure 9-10 Select at Least Two Disks to Create a Striped Volume
Step 3. Disks you add appear in the Selected column. If you want to change the amount of space to be allocated, modify the value under Select the Amount of Space in MB. When done, click Next.
Step 4. From the Assign Drive Letter or Path page shown in Figure 9-11, accept the default or choose another drive letter or select the option to mount the volume in an empty NTFS folder, if desired. Then click Next.
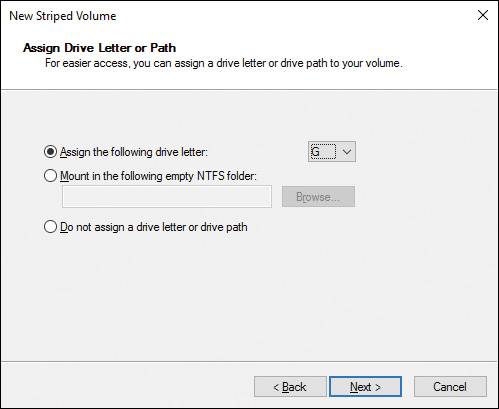
Figure 9-11 Assigning a Drive Letter or Mount Path for a Striped Volume
Step 5. Choose the desired options in the Format Volume page shown in Figure 9-12 and then click Next.

Figure 9-12 Options for Formatting Your Volume
Step 6. Review the information on the completion page and then click Finish.
Step 7. If any of the disks to be used in the volume are configured as basic disks, you receive the same message previously shown in Figure 9-9, warning you that you will be unable to boot other operating systems. To create your volume, you must click Yes and convert these disks to dynamic storage, as discussed earlier in this chapter.
Step 8. The volume is created and formatted, and appears in the Disk Management snap-in display.
Caution
Remember that RAID-0 is not fault-tolerant, as mentioned in Table 9-2. RAID-0 writes data in 64 KB blocks to each disk in the array sequentially, thereby improving read/write performance. However, if you lose any one of the disks in the array, all data is lost, and you must restore the data from backup after replacing the lost disk and re-creating the array.
Creating a Spanned Volume
You can extend storage space on an existing volume to a new disk by creating a spanned volume. This is essentially a volume that spans two or more disks and enables you to add space without the need to specify a new drive letter. Note that the spanned volume is even less fault-tolerant than a simple volume; if any one disk fails, all data is lost from all disks and must be restored from backup.
To create a spanned volume, right-click the desired volume and choose Extend Volume. From the Extend Volume Wizard, select the available disk(s) and complete the steps in this wizard, as previously described and shown in Figure 9-4. If you have multiple unallocated disks, you can alternatively select New Spanned Volume, and create your spanned volume using the New Spanned Volume Wizard. The process is the same.
Creating a Mirrored Volume
A mirrored volume contains two disks, each of which is an identical copy of the other, thereby providing fault tolerance at the expense of requiring twice the amount of disk space. You can use a mirrored volume to provide fault tolerance for the system and boot volumes, as well as any data volumes.
Creating a mirrored volume is similar to that of creating a striped volume. Use the following procedure:
Step 1. In Disk Management, right-click any one disk to be made part of the striped volume and choose New Mirrored Volume.
Step 2. Steps displayed by the New Mirrored Volume Wizard are similar to those of the New Striped Volume Wizard and outlined in the previous procedure. When you have completed the procedure, the mirrored volume appears in the Disk Management display.
Creating a RAID-5 Volume
A RAID-5 volume is similar to a striped volume in that data is written in 64 KB stripes across all disks in the volume; however, this volume adds a parity stripe to one of the disks in the array, thereby providing fault tolerance. The parity stripe rotates from one disk to the next as each set of stripes is written. The RAID-5 volume offers improved read performance because data is read from each disk at the same time; however, write performance is lower because processor time is required to calculate the parity stripes. You cannot house the system or boot volumes on a RAID-5 volume.
Creating a RAID-5 volume is also similar; remember that you must have at least three disks to create this type of volume. Select New RAID-5 Volume from the right-click options and follow the steps presented by the New RAID-5 Volume Wizard.
Note
For more information on how RAID-5 volumes function, refer to “RAID-5 Volumes” at http://technet.microsoft.com/en-us/library/cc938485.aspx.
Using DiskPart to Create Striped, Mirrored, and RAID-5 Volumes
You can use the DiskPart command-line utility to create striped, mirrored, and RAID-5 volumes. To perform any of these tasks, first execute the following commands from an administrative command prompt:
Diskpart
List disk
Select disk=n
Convert dynamic
The List disk command returns the disk numbers on your computer that you use when entering the commands to create the desired volume. The Select disk command selects a disk you want to work with and the Convert dynamic command converts the disk to a dynamic disk; repeat these two commands for each disk that needs to be converted to dynamic storage before beginning to create your volumes.
To create a mirror, you actually add a mirror to an existing simple volume. Use the Select volume command to select the volume to be mirrored, and then use the following command:
Add disk=n [noerr]
In this command, n is the disk number of the disk to be added to the current simple volume and noerr enables a script containing this command to continue processing even if an error has occurred. To obtain disk numbers used in this command, use the List disk command.
Use the following command to create a striped volume:
Create volume stripe [size=size] disk=n[,n[,…]] [noerr]
In this command, size is the number of MB used in each disk for the striped volume and n is the disk number (repeat from 2 to 32 times for each disk in the striped volume). If you do not specify a size, the size is assumed to be that of the smallest disk in the array. For example, if you specify three disks with unallocated space of 300, 400, and 500 GB and do not specify a size, DiskPart uses 300 GB per disk for a total striped volume size of 900 GB.
Creating a RAID-5 volume is similar to that of creating a striped volume. Use the following command:
Create volume raid [size=size] disk=n[,n[,…]] [noerr]
The parameters have the same meaning; in this case, repeat the disk number from 3 to 32 times. For the same example with three disks with unallocated space of 300, 400, and 500 GB, and which do not specify the size parameter, DiskPart uses 300 GB per disk for a total RAID-5 volume size of 600 GB.
Managing and Troubleshooting RAID Volumes
Several things can go wrong with RAID volumes. Spanned and striped volumes are particularly vulnerable; as has already been mentioned, failure of any one disk in the volume renders the entire volume useless, and data must be restored from backup. If one disk in a mirrored volume fails, you can break the mirror and use the data on the other disk as a simple volume. If one disk in a RAID-5 volume fails, the system reconstructs the missing data from the parity information and the volume is still usable, but without fault tolerance and with reduced performance until the failed disk is replaced. If more than one disk in a RAID-5 volume fails, the volume has failed and must be restored from backup after the disks have been replaced.
Besides the volume statuses already described for partitions on basic disks and simple volumes, Disk Management can display the following messages with RAID volumes:
![]() Resynching: Indicates that a mirrored volume is being reinitialized. This status is temporary and should change to Healthy within a few seconds.
Resynching: Indicates that a mirrored volume is being reinitialized. This status is temporary and should change to Healthy within a few seconds.
![]() Data Not Redundant or Failed Redundancy: For a mirrored or RAID-5 volume, this status usually means that half of a mirrored volume was imported, or that half is unavailable, or that only part of the underlying disks of a RAID-5 volume were imported. You should import the missing disk(s) to re-create the volume. You can also break the mirror and retain the half that is functioning as a simple volume. If you have all but one of the underlying disks of a RAID-5 volume, you can re-create the RAID-5 volume by adding unallocated space of a different disk.
Data Not Redundant or Failed Redundancy: For a mirrored or RAID-5 volume, this status usually means that half of a mirrored volume was imported, or that half is unavailable, or that only part of the underlying disks of a RAID-5 volume were imported. You should import the missing disk(s) to re-create the volume. You can also break the mirror and retain the half that is functioning as a simple volume. If you have all but one of the underlying disks of a RAID-5 volume, you can re-create the RAID-5 volume by adding unallocated space of a different disk.
![]() Stale Data: This status is shown when you import a disk that contains a mirrored volume half, or a portion of a RAID-5 volume, with a status other than Healthy before it was moved. You can return the disk to the original PC and rescan the disk to fix the error.
Stale Data: This status is shown when you import a disk that contains a mirrored volume half, or a portion of a RAID-5 volume, with a status other than Healthy before it was moved. You can return the disk to the original PC and rescan the disk to fix the error.
Creating and Configuring VHDs
For the 70-698 exam, Microsoft expects you to know how to create and configure virtual hard disks (VHDs). VHDs can be used for creating and managing Windows images, and used for native boot scenarios as well as virtualized operating systems using Microsoft Hyper-V.
Review the material in Chapter 2, “Implementing Windows.” VHDs are covered in the “Alternate Installation Media” section. VHDs used for virtualization are covered in Chapter 10, “Windows Hyper-V.” The material in Chapter 10 is written for the 70-697 exam, but the section on “Virtual Disks” will also be needed for the 70-698 exam for a thorough understanding of how to create and configure VHDs.
Removable Devices
Windows Disk Management can be used to manage removable devices such as USB hard drives, thumb drives, SD cards, and other removable storage. The same tools are available for managing these storage devices that you use for internal drives.
There are a few things you should be aware of when working with removable storage. Review the section “Access to Removable Media” in Chapter 8, “Windows 10 Data Security.” The section provides details on using Local Security Policy or GPOs to control user access to removable media. Issues related to the use of removable media may be identified or resolved using these policies.
Users may want to use their removable storage devices in more than one device, and they should know how to unplug or remove the device without corrupting or losing data. By default, Windows attempts to provide the best performance for the disk, but if users unplug the drive without telling Windows to eject the drive first, it can cause data errors. You can configure this setting in the Properties of the drive using the following procedure:
Step 1. In Disk Management, right-click the disk and select Properties from the context menu.
Step 2. Select the Policies tab to view the removal policy options, as shown in Figure 9-13.
Step 3. Select either Quick Removal or Better Performance.
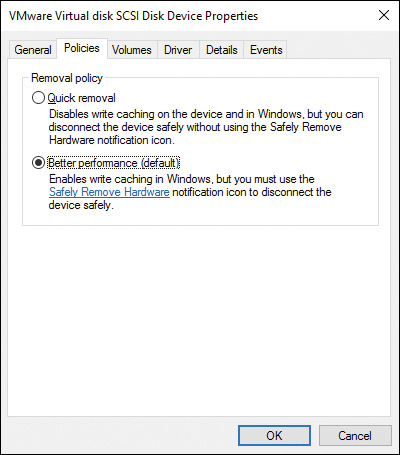
Figure 9-13 Performance and Removal Policies of a Removable Storage Device
Storage Spaces
Windows 10 Storage Spaces, a technology first introduced for Windows 8, provides a more convenient method for adding additional storage to a computer when it is needed. Traditionally, when a Windows system becomes short on storage, adding an additional hard disk only partially solves the issue; it requires some careful management of storage, requiring movement of files over multiple disks or even reinstalling software to move the installation files to the new drive, freeing space on the original drive.
Storage Spaces solves this problem by allowing you to add the disk to a virtual storage space and managing the additional space for you, presenting two or more disks as a single drive. To the user, it appears as though the original drive has been replaced with a larger one.
With Storage Spaces, you organize physical disks together into a storage pool and use the pool capacity to create storage spaces. After a disk drive is part of a storage pool, you can add new drives to it to increase the size of the virtual drive. Note the following characteristics of Storage Spaces:
![]() Storage Spaces are presented as virtual drives in File Explorer. They are used like any other drive, making it easy to work with files on them.
Storage Spaces are presented as virtual drives in File Explorer. They are used like any other drive, making it easy to work with files on them.
![]() You can create Storage Spaces with lots of storage, adding more drives to them when you run low capacity in the pool. Drives can be attached through USB, SATA, or Serial Attached SCSI (SAS).
You can create Storage Spaces with lots of storage, adding more drives to them when you run low capacity in the pool. Drives can be attached through USB, SATA, or Serial Attached SCSI (SAS).
![]() Storage Spaces can provide some protection to your files. With two or more drives in the storage pool, you can create Storage Spaces with redundancy in case of a drive failure—or even failure of two drives by creating a three-way mirror Storage Space.
Storage Spaces can provide some protection to your files. With two or more drives in the storage pool, you can create Storage Spaces with redundancy in case of a drive failure—or even failure of two drives by creating a three-way mirror Storage Space.
![]() Storage Spaces use thin provisioning, which means that physical space is allocated only when it is actually used to store files. Thin provisioning allows you to create Storage Spaces with more virtual capacity than actually exists on the physical drives in the storage pool.
Storage Spaces use thin provisioning, which means that physical space is allocated only when it is actually used to store files. Thin provisioning allows you to create Storage Spaces with more virtual capacity than actually exists on the physical drives in the storage pool.
Creating a Storage Space
You can create Storage Spaces after you have more than one drive connected to the Windows computer. When you have connected all the drives you want to use, use the following procedure to create a Storage Space:
Step 1. Access the Search bar or Cortana, and enter Storage Spaces into the Search box.
Step 2. Select the Storage Spaces item from the search results. The Storage Spaces Control Panel applet will be displayed, as shown in Figure 9-14.
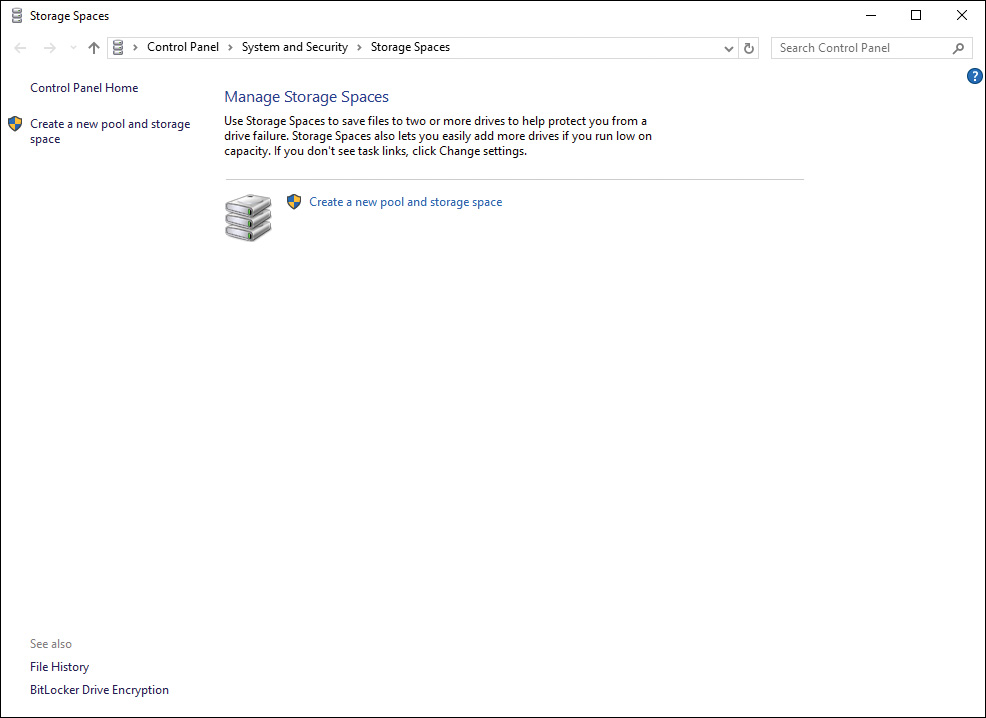
Figure 9-14 Storage Spaces Control Panel Applet
Step 3. Click the Create a New Pool and Storage Space link. If the UAC confirmation dialog box is displayed, click Yes to proceed.
Step 4. Select the drives you want to use for the new pool, and then click Create Pool.
Step 5. Select a drive letter and name, the Resiliency type, and the maximum size for the storage space, from the screen as shown in Figure 9-15.
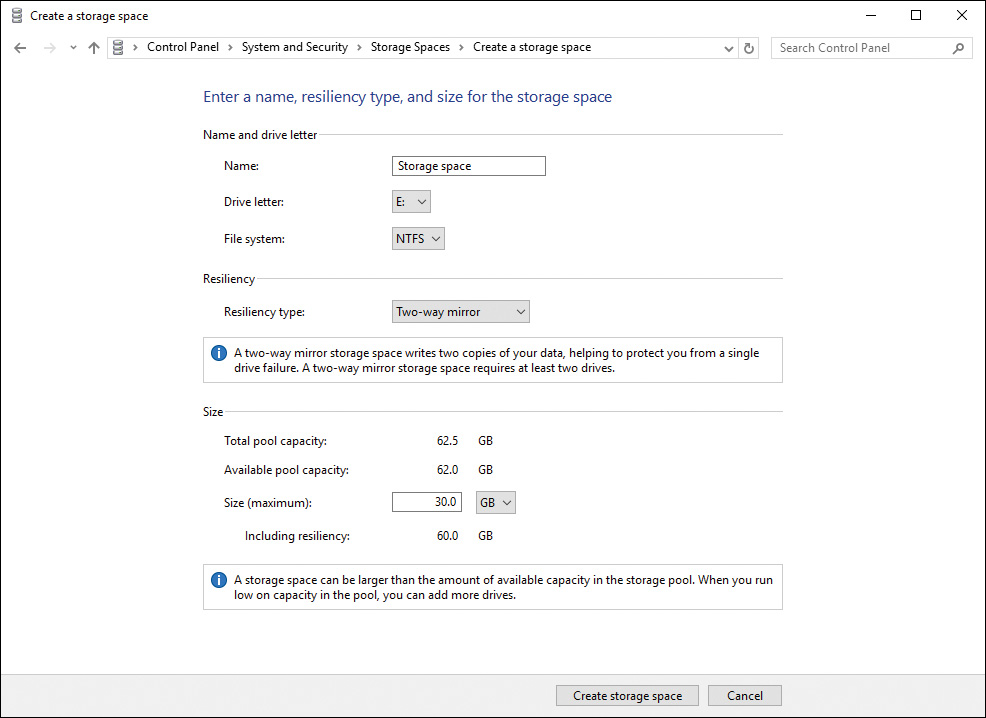
Figure 9-15 Entering a Name, Resiliency Type, and Size for a New Storage Space
Step 6. Select the Create Storage Space button to complete the configuration and create the new Storage Space.
Caution
When adding drives for use with Storage Spaces, there is no need to format or assign letters to the new drive. If any of the drives are formatted, Windows warns you that the drive will be reformatted, and any files on the drive will be permanently lost. Make sure you do not have any data that you want to keep on any of the drives you add to a storage pool, because the files will be destroyed and cannot be recovered.
After the Storage Space is created, you can now use it just as you would any other drive, with the drive letter you specified in Step 6.
The Resiliency Type can be used to provide protection from physical disk failure in your Storage Space, if you use more than one drive to create it. Table 9-3 lists the resiliency options, type of hardware failure protection, and the required number of drives for each.
Note that resiliency will require more disk space, similar to using a RAID volume discussed earlier in the chapter. Configuring a Storage Space using two-way mirror resiliency, for instance, will allow you to use only half of the storage capacity of the two drives.
Table 9-3 Storage Space Resiliency Options
Resiliency Type |
Protection |
Minimum Number of Drives |
Simple (no resiliency) |
None |
1 |
Two-way mirror |
Protects data from failure of a single drive |
2 |
Three-way mirror |
Protects data from failure of up to two physical drives |
5 |
Parity |
Protects data from failure of a single drive |
3 |
Troubleshooting Storage and Device Issues
An administrator should understand how to handle the errors that can plague a hard disk. Common problems are listed in Table 9-4. We look at the Windows 10 Startup Repair Tool in Chapter 20, “Configuring System Recovery Options.”
Table 9-4 Troubleshooting Disk Errors
Error |
Problem or Process |
Possible Repairs |
Non-System Disk or Disk Error |
Basic input/output system (BIOS) generates this error when the master boot record (MBR) or boot sector is damaged or when a different device is configured as the boot device in the BIOS. |
Check the BIOS and reconfigure, if necessary. Remove any nonsystem media from the floppy, USB, or optical drives. Repair the boot volume with Windows 10 Startup Repair Tool. Reinstall Windows 10. Replace the hard disk. |
There is not enough memory or disk space to complete the operation |
Disk is full. |
Free up space on the hard disk by deleting files, removing applications, or compressing files. Add another disk and extend the volume to span both disks. |
Missing Operating System |
No active partition is defined. |
Check the BIOS settings and configure if they incorrectly identify the boot disk. Boot up with a floppy or other bootable media. Use Diskpart.exe to mark the boot volume as active. Use Windows 10 Startup Repair Tool. Reinstall Windows 10. |
Invalid Media Type |
Boot sector is damaged. |
Repair the boot volume with Windows Startup Repair Tool. Reinstall Windows 10. Replace the hard disk. |
Hard disk controller failure |
BIOS’s disk controller configuration is invalid, or the hard disk controller has failed. |
Check the BIOS and reconfigure controller. Replace the hard disk controller. |
The volume properties of a disk as displayed in the graphical display in the Disk Management snap-in (refer to Figure 9-1) provide you with a status display, which can help you in troubleshooting disk problems. The following volume statuses can appear:
![]() Healthy: This status is normal and means that the volume is accessible and operating properly.
Healthy: This status is normal and means that the volume is accessible and operating properly.
![]() Active: This status is also normal. An active partition is a partition or volume on a hard disk that has been identified as the primary partition from which the operating system is booted.
Active: This status is also normal. An active partition is a partition or volume on a hard disk that has been identified as the primary partition from which the operating system is booted.
![]() Failed: This status means that the operating system could not start the volume normally. Failed usually means that the data is lost because the disk is damaged or the file system is corrupted. To repair a failed volume, physically inspect the computer to see whether the physical disk is operating. Ensure that the underlying disk(s) has an Online status in Disk Management.
Failed: This status means that the operating system could not start the volume normally. Failed usually means that the data is lost because the disk is damaged or the file system is corrupted. To repair a failed volume, physically inspect the computer to see whether the physical disk is operating. Ensure that the underlying disk(s) has an Online status in Disk Management.
![]() Formatting: This status is temporary, appearing only while the volume is being formatted.
Formatting: This status is temporary, appearing only while the volume is being formatted.
![]() Unknown: This status means that you’ve installed a new disk and have not created a disk signature, or that the boot sector for the volume is corrupt, possibly because of a virus. You can attempt to repair this error by initializing the underlying disk by right-clicking the disk and selecting Initialize from the shortcut menu.
Unknown: This status means that you’ve installed a new disk and have not created a disk signature, or that the boot sector for the volume is corrupt, possibly because of a virus. You can attempt to repair this error by initializing the underlying disk by right-clicking the disk and selecting Initialize from the shortcut menu.
![]() Data Incomplete: This status appears when a disk has been moved into or out of a multidisk volume. Data is destroyed unless all the disks are moved and imported on the new computer.
Data Incomplete: This status appears when a disk has been moved into or out of a multidisk volume. Data is destroyed unless all the disks are moved and imported on the new computer.
![]() Healthy (At Risk): This status indicates I/O errors have been detected on an underlying disk of the volume, but that data can still be accessed. The underlying disk probably shows a status of Online (Errors) and must be brought back online for the volume to be corrected.
Healthy (At Risk): This status indicates I/O errors have been detected on an underlying disk of the volume, but that data can still be accessed. The underlying disk probably shows a status of Online (Errors) and must be brought back online for the volume to be corrected.
When you see a status other than Healthy for your volumes, or other than Online for your disks, you can attempt to repair by selecting the Rescan Disks option from the Action menu in Disk Management.
Managing File System Fragmentation
All disks, regardless of the file system in use (FAT16, FAT32, or NTFS), divide disk space into clusters, which are groups of disk sectors that are the smallest units of space available for holding files. The size of clusters depends on the file system in use and the size of the partition; for example, for NTFS-formatted volumes of more than 2 GB but less than 16 TB in size, the default cluster size is 4 KB.
A file is stored in the first available clusters on a volume or partition, and not necessarily in contiguous space. Thus, if empty space has been left on the volume as a result of moving, editing, or deleting files, these small noncontiguous clusters will be used. Access to files that are fragmented in this way takes a longer time because extra read operations are required to locate and access all the pieces of the file. You can defragment your disks with either the Optimize Drives GUI tool or the command-line defrag.exe tool.
Optimizing Drives
Windows 10 provides a tool called the Optimize Drives utility (formerly called the Disk Defragmenter) to locate and consolidate these fragmented files into contiguous blocks of space. Consequently, access time is improved. You can access the Optimize Drives utility by clicking Optimize from the Tools tab of any partition’s Properties dialog box or by accessing the Search charm and typing defrag into the Search field and clicking Defragment and Optimize Drives in the Programs list.
Any of these methods opens the newly redesigned Optimize Drives utility, as shown in Figure 9-16. This tool enables you to configure scheduled optimization or to analyze or optimize any disk volume immediately.

Figure 9-16 Optimize Drives Utility Enabling You to Perform On-Demand and Scheduled Optimization
You can perform the following actions from the Optimize Drives GUI utility:
![]() Schedule Optimization: Click Change Settings to set up a schedule. By default, Windows schedules optimization to take place on all disks weekly, as shown in Figure 9-17. You can choose to optimize disks on a daily or monthly basis if desired by selecting these options from the drop-down list shown, or select disks to be optimized by clicking the Choose command button.
Schedule Optimization: Click Change Settings to set up a schedule. By default, Windows schedules optimization to take place on all disks weekly, as shown in Figure 9-17. You can choose to optimize disks on a daily or monthly basis if desired by selecting these options from the drop-down list shown, or select disks to be optimized by clicking the Choose command button.

Figure 9-17 Optimize Drives: Optimization Schedule Dialog Box Enabling You to Specify the Schedule for Optimization
![]() Analyze disk: Select a disk and click Analyze to have the Optimize Drives utility check the current level of fragmentation. Although the dialog box says you need to first analyze your disks, they are first analyzed when you click Optimize.
Analyze disk: Select a disk and click Analyze to have the Optimize Drives utility check the current level of fragmentation. Although the dialog box says you need to first analyze your disks, they are first analyzed when you click Optimize.
![]() Perform an On-Demand Optimization: Select a disk and click Optimize. Disk optimization first analyzes the disk and then performs a multipass optimization, displaying its progress as shown in Figure 9-18. If you need to stop an optimization in progress, click Stop.
Perform an On-Demand Optimization: Select a disk and click Optimize. Disk optimization first analyzes the disk and then performs a multipass optimization, displaying its progress as shown in Figure 9-18. If you need to stop an optimization in progress, click Stop.

Figure 9-18 Optimize Drives Utility Displaying the Progress of Disk Optimization
Note
It is recommended that you have at least 15 percent of free space on a disk volume before running the Optimize Drives utility. Otherwise, the optimization process will take much longer and may be incomplete. Use the Disk Cleanup tool first, if necessary, to optimize the amount of available free space.
Tip
Disks can become quite fragmented after you’ve uninstalled applications or deleted large files. Further, when installing large applications, the installation runs much better when plenty of contiguous space is available, and the application will also run better later. It is a good idea to analyze your disk after deleting large files or before installing applications and then run the optimization if necessary.
The Defrag.exe Command-Line Tool
You can use Defrag.exe to optimize a volume from the command line. As with other command-line utilities, you can include it as part of a script to be executed when the disk is not in use. To do so, perform the following steps:
Step 1. Right-click Start and choose Command Prompt (Admin).
Step 2. Click Yes to accept the UAC prompt, and then type the following command:
Defrag <volume> | /C | /E <volume> [/A | /X | /T] [/H] [/M] [/U]
[/V]
Table 9-5 describes the parameters of the Defrag command:
Table 9-5 Parameters Available with the Defrag Command
Parameter |
Meaning |
volume |
The drive letter of the volume to be optimized. You can specify more than one drive letter if needed. |
/B |
Optimize boot files and applications but do not optimize the rest of the volume. |
/C |
Optimize all local volumes. |
/E |
Optimize all local volumes except those specified. |
/A |
Analyze the volume and display a report, but do not optimize. |
/X |
Perform free space consolidation. |
/T |
Track an optimization already in progress. |
/H |
Run the optimization at normal priority (by default, runs at low priority). |
/M |
Optimize multiple volumes simultaneously in parallel. |
/U |
Print the optimization process on the screen. |
/V |
Use verbose mode, which provides additional detailed information. |
For example, the command defrag C: /X /V would optimize the C: volume, perform free space consolidation, and provide verbose output.
Error Checking
Occasionally, a volume might not appear in the Optimize Drives dialog box. This might happen because the disk contains errors such as bad sectors. You can check a disk for errors and repair problems by accessing the Tools tab of the disk’s Properties dialog box and clicking Check. You receive the Error Checking dialog box shown in Figure 9-19. This dialog box shows any errors it finds on the drive; if none are found, it displays the You Don’t Need to Scan This Drive message. In any case, you can perform a more thorough error-checking procedure by clicking Scan Drive. This displays an Error Checking message box and then reports any errors it happens to find.
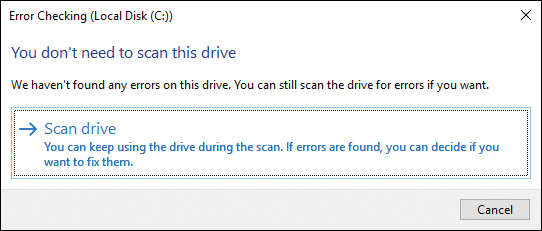
Figure 9-19 Checking a Disk for Errors
Supporting Data Storage
Windows 10 supports many data storage technologies that users can utilize to store their documents and files. In the previous section you learned how to configure Storage Spaces in Windows 10, and in this topic you learn more about Storage Spaces support and maintenance. You will also learn about support for Dynamic File System (DFS) caching used in Windows 10, and supporting OneDrive storage.
DFS Client Configuration Including Caching Settings
The typical large organization has many file servers that users require access to as they perform their assigned tasks. Imagine the difficulty that the average user could have in locating the appropriate server from dozens of possibilities when attempting to access that one vital piece of information when putting together a budget forecast for the upcoming fiscal year. Multiply that by the myriads of possibilities when marketing analysts are formulating trends for corporate products and deciding what should be emphasized in both manufacturing and advertising efforts in the months to come. Then you can see how much simpler such tasks become if the users need to access only a single tree of shared folders that includes all the servers that hold the required files. This is what Distributed File System (DFS) does—a user can type a single Universal Naming Convention (UNC) path such as \servernamesharename, or select a single root within the Network folder, and obtain access to shares located on multiple servers across the network. Users located in branch offices receive optimized access across the wide area network (WAN) to the most easily accessed file source; further, replication of files and folders can be optimized to facilitate access to everyone regardless of where they might be located within a multisite enterprise network.
First introduced with Windows Server 2003, DFS Replication provides WAN-friendly replication and simplified access to files wherever they are located. DFS includes the two technologies described in Table 9-6.
Component |
Description |
DFS Namespaces |
Enables you to create logical groupings of shared folders on different servers that facilitate the access to data by users on the network. Such groupings are presented to users as a virtual folder tree or namespace. DFS Namespaces is optimized to connect users to data within the same Active Directory Domain Services (AD DS) site wherever possible, thereby minimizing the need for use of WAN links. |
DFS Replication |
An efficient multimaster replication component that synchronizes data between servers with limited bandwidth network links. DFS Replication replaces the older, problematic File Replication Service (FRS) used in older Windows server operating systems for replicating data across the network. DFS utilizes a new compression algorithm called Remote Differential Compression, which optimizes file replication by sending only the updated portions of changed files rather than the complete files. On AD DS networks operating at the Windows Server 2008 or higher domain functional level, DFS Replication is used for replicating AD DS partitions and the SYSVOL shared folder. |
Note
You can use DFS Replication and DFS Namespaces either separately or together; each does not require the presence of the other. You can also use DFS Replication to replicate standalone DFS namespaces.
Understanding how DFS works is important for supporting client caching on Windows 10. The same pool of files can exist on multiple file servers throughout an organization’s network. Users access the share using a common UNC filename. Typically this works automatically, but if a Windows computer is connected to a remote server over a slower link, it can cause performance issues for the network and for the user.
The DFS Namespace includes a referral list of actual shares (targets) the client can use to access the files. The referral list is ordered by network location, with the closest server at the top. The client will start connection attempts using the list, and when it cannot connect, it checks the next target in the referral list, and so on. If the current target becomes unavailable, the client will immediately switch to the next target location. Clients will use the referral list received from the domain for up to 30 minutes by default. This referral cache can become stale during that window, and clients will continue to attempt connecting to removed targets. You can modify these properties for a DFS namespace by using the Referrals tab on the Properties dialog for the namespace, as shown in Figure 9-20.
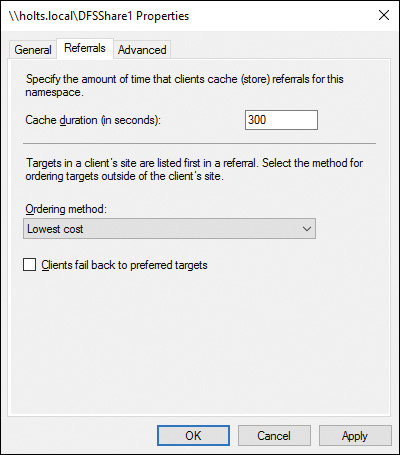
Figure 9-20 Using the Referrals Tab of the DFS Namespace Properties Dialog to Modify the Cache Duration and Fail Back
The Cache Duration setting determines how long clients will cache the referral list before requesting a new list of targets. Typically, if a client fails to connect to the first target in the referral list, it will connect to another target and continue to use that target during the session, even if the closer target becomes available. By checking the Clients Fail Back to Preferred Targets check box, you can force clients to disconnect from the more remote target and connect to the first target in the referral list as soon as it refreshes the list.
Managing Storage Spaces
In the previous section, “Configuring Data Storage,” you learned about setting up Storage Spaces and how to troubleshoot them. It is important to note the distinction between storage pools and Storage Spaces. A storage pool consists of one or more physical hard drives grouped together to provide some amount of storage capacity. After you have added physical drives to a storage pool, they are no longer directly usable by Windows. You can add drives to a storage pool at any time, but note that after you have created storage space that makes use of the pool, drives cannot be removed from the pool without first deleting the storage space, which will destroy all the files it contains.
You can create multiple storage spaces for each storage pool. As shown previously in Figure 9-15, you can specify the maximum size for a storage space when you create it. You are not limited to the amount of capacity in the storage pool—this allows you to create storage spaces with more space than is actually available. As the storage space fills up, you can add more drives to the storage pool. You can change the storage space size at any time, as long as it is large enough to contain the files that have been written to it.
You can manage your storage spaces and pools from the screen shown in Figure 9-21. From the links at the top, click Create a Storage Space, Add Drives, or Rename Pool to perform these functions. The default name of the first pool will be Storage Pool, but as you add new storage pools to the system, you will want to give them meaningful names based on their use or the drives used to make up the pool. You can also add drives when you need to expand the capacity of a storage pool.
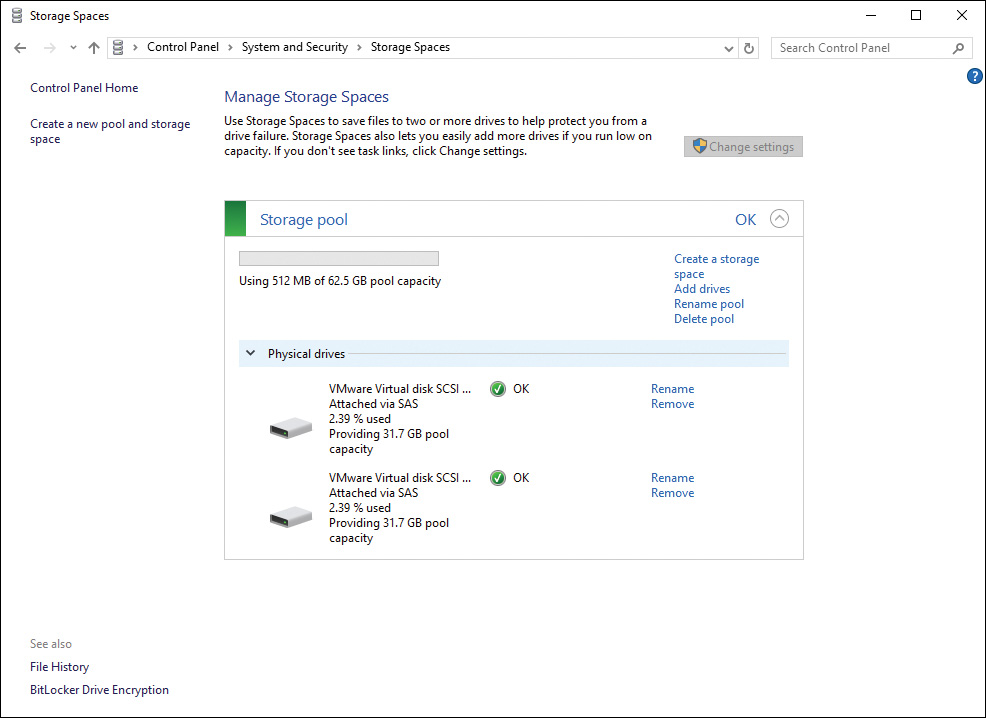
Figure 9-21 Managing Storage Spaces
The physical drives are listed in the bottom section of the screen. You can use the Rename link for each drive to provide a friendlier name. In the figure, there is no Remove link available for the drives. That is because the pool is already being used by storage spaces. If no storage spaces exist for the pool, the Remove option will also be available for each physical drive.
Configuring Fault Tolerance of Storage Spaces
If a physical drive in a storage pool fails, you can replace the physical drive, add it to the storage pool, and Windows will rebuild any resiliency for you. If a Simple (no resiliency) storage space was using the drive, the files on that storage space will be lost. Action Center will notify you when it detects a problem with the storage pool drive, and the Manage Storage Spaces will display Errors or Warnings, as shown in Figure 9-22.
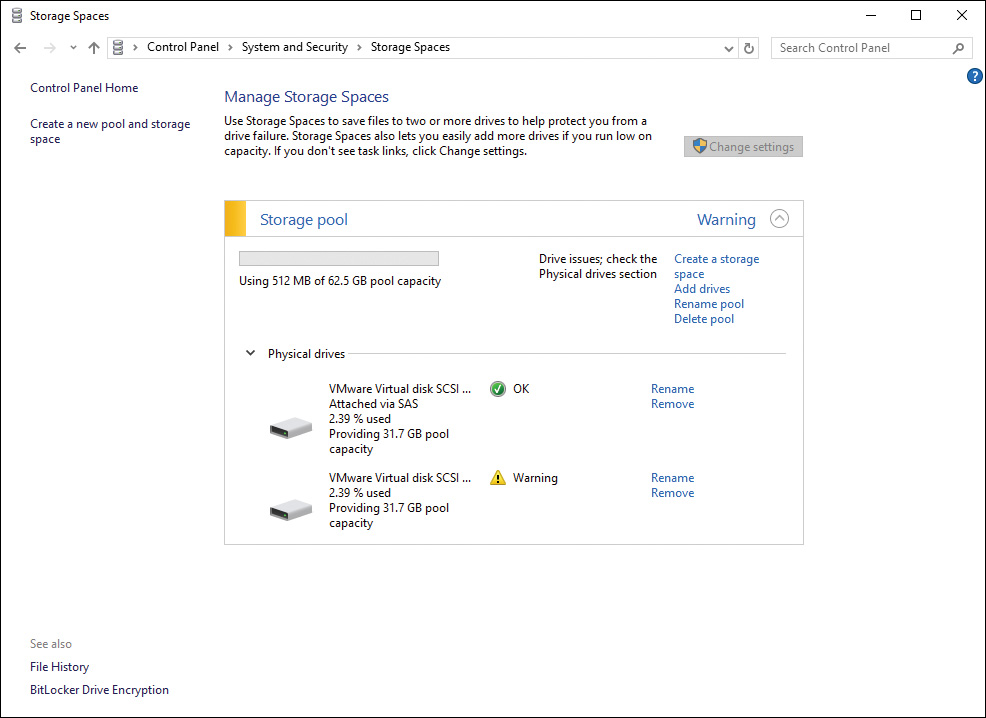
Figure 9-22 Storage Pool Drive Failure
After the drive has been replaced, access the Manage Storage Spaces screen and select the Add Drives link to add the replacement drive to the storage pool. Unlike RAID, the replacement drive need not match the failed drive in any way. Windows will begin repairing the resiliency on any existing storage spaces configured for resiliency in that storage pool. Figure 9-23 shows the pool with a new physical drive attached and ready to be added to the Main Pool. You can then use it to replace the failed drive to restore the resiliency to the storage space.

Figure 9-23 Failed and Replaced Drives in a Storage Pool
After the new drive has been added and resiliency on the storage space rebuilt, you can then remove the failed drive from the storage pool.
Managing Storage Spaces with PowerShell
Microsoft provides several PowerShell cmdlets for managing storage pools and storage spaces. Some of the useful cmdlets available are listed here:
![]() Get-SpacesPhysicalDisk: Gets all Physical Disks that can be used to create a storage pool.
Get-SpacesPhysicalDisk: Gets all Physical Disks that can be used to create a storage pool.
![]() New-SpacesPool: Creates a new storage pool. Use the -PhysicalDisks parameter to specify the disks to use.
New-SpacesPool: Creates a new storage pool. Use the -PhysicalDisks parameter to specify the disks to use.
![]() New-SpacesVolume: Creates a new storage space. This command accepts parameters including -DriveLetterToUse, -ResiliencyType, and -Size.
New-SpacesVolume: Creates a new storage space. This command accepts parameters including -DriveLetterToUse, -ResiliencyType, and -Size.
![]() Repair-SpacesConfiguration: Use this command to force the rebuild of resiliency when replacing a failed drive or adding a new one.
Repair-SpacesConfiguration: Use this command to force the rebuild of resiliency when replacing a failed drive or adding a new one.
Note
For more information on PowerShell cmdlets used for managing Storage Spaces and how to use them, refer to “Storage Spaces Cmdlets in Windows PowerShell” at https://technet.microsoft.com/en-us/library/hh848705.aspx. Although the article references Windows Server 2012 R2 and Windows 8.1, the functionality of the cmdlets is the same in Windows 10.
Configuring OneDrive
As a companion to Windows 10 integration with cloud computing using cloud apps, cloud communication, and cloud accounts, Microsoft has integrated Windows 10 with its cloud storage solution called OneDrive. Like Windows Store Apps, use of OneDrive requires a Microsoft account. Each account has access to a limited amount of space for free, and Microsoft offers upgraded storage for an annual fee.
OneDrive enables a single cloud for every Windows user. A person’s important files are centrally available, instantly accessible, and ready to share, enabled by single sign-on with a Windows account. OneDrive is the Windows 8.1 user’s solution to the problem of keeping files in sync across multiple devices; instead, all devices connect to the OneDrive, and users can easily share files by providing permission for other Windows account users to access their files.
Windows account holders can access their OneDrive storage in four ways:
![]() The Windows 8.1 OneDrive app, available only on Windows 8.1 and Windows 10 computers.
The Windows 8.1 OneDrive app, available only on Windows 8.1 and Windows 10 computers.
![]() The OneDrive desktop application, which is available for Windows 7, Windows Vista, and Mac OS X. The features of the desktop application are built in to Windows 10.
The OneDrive desktop application, which is available for Windows 7, Windows Vista, and Mac OS X. The features of the desktop application are built in to Windows 10.
![]() Using OneDrive.com from a web browser. From OneDrive.com, users can also share files with others by enabling permissions and access to their files from any computer.
Using OneDrive.com from a web browser. From OneDrive.com, users can also share files with others by enabling permissions and access to their files from any computer.
![]() Using the OneDrive mobile app for tablets, Windows 10 Mobile, and other mobile devices.
Using the OneDrive mobile app for tablets, Windows 10 Mobile, and other mobile devices.
Reference the following sections for information about the OneDrive app, the OneDrive desktop application, and the configuration options for OneDrive.
OneDrive App
Open the OneDrive app by clicking the OneDrive app on the Start menu, or the OneDrive link in File Explorer. If you are not logged in to your Windows account, you are prompted to log in or sign up for an account when you click the tile. The first time you sign in, the OneDrive app tells you where on your computer the OneDrive folder is located, which is in your local user directory by default (such as C:UsersJaneOneDrive).
Initially, OneDrive will be blank except for the “Getting Started with OneDrive” PDF file, which you can open to view a tutorial for OneDrive. Use your OneDrive folder just like any other folder in File Explorer. You can drag and drop files from other locations, delete and rename files, and so on. You can also use the right-click menu option View Online, which will open your default browser so that you can log in to OneDrive and manage your files from the web interface.
Moving or copying files from your local PC to the OneDrive is accomplished using a copy-and-paste or cut-and-paste operation:
Step 1. Browse the folders in This PC to the file you want to move or copy.
Step 2. Right-click the file or files to select them.
Step 3. Click Cut from the app commands to move the files, or Copy to copy them.
Step 4. From the left-side menu, select OneDrive.
Step 5. Right-click and then select Paste.
By default, all the files and folders in the OneDrive will be fully synched with your online OneDrive storage area. These files can always be browsed, but if you try to open or edit them, they will open in Read-Only mode. To edit the file, you can switch to Read-Write mode, and the file will be synched with your online storage the next time you are connected to the Internet.
You can choose which folders you want to sync locally. To do so, right-click OneDrive and then select Choose OneDrive folders to sync. You can uncheck any folders you do not want stored locally. They will disappear from your OneDrive folder but will still be available in the online storage.
If you have plenty of space on your PC, you may want to make the entire OneDrive available offline.
OneDrive Desktop
When you are logged in to a Windows account on your PC, OneDrive storage is integrated with File Explorer and desktop applications. You can use the OneDrive and the files and folders in it just like any other drive. Remember, however, that if you have shared any folders publicly, any new files in those folders are also shared publicly on the Internet.
You can save files directly from many desktop applications to the OneDrive folders just as you would to any other location. Notice that for many desktop applications, such as Microsoft Office, OneDrive will be the recommended location that appears when you save documents.
Note
For computers running older versions of Windows, or other Mac OS X versions, the OneDrive desktop app must be downloaded from the Microsoft website before integration with the File Explorer will work. See https://onedrive.live.com/about/en-us/download/ for the download location. The download link will not appear on computers running Windows 8.1 or later.
OneDrive Settings
Some OneDrive settings in Windows 10 are now configured in the OneDrive web interface. You can use the right-click option View Online to open your default browser and log in to your OneDrive account. Click the gear icon, and then select Options to view the settings as shown in Figure 9-24. From this page you can access the OneDrive configuration settings, described further in the list that follows.
Figure 9-24 OneDrive Settings Available on the Web Interface
![]() Storage: By default, all Windows account users are provided 5 GB of storage at no charge. Additional storage can be purchased from Microsoft. From this screen you can buy additional storage.
Storage: By default, all Windows account users are provided 5 GB of storage at no charge. Additional storage can be purchased from Microsoft. From this screen you can buy additional storage.
![]() Office File Formats: The site also allows you to select the default file format for Office documents. You can choose between Microsoft Office Open XML format and OpenDocument Format. If you use the OneDrive app for iOS or Android devices, OpenDocument format may be more compatible for your use.
Office File Formats: The site also allows you to select the default file format for Office documents. You can choose between Microsoft Office Open XML format and OpenDocument Format. If you use the OneDrive app for iOS or Android devices, OpenDocument format may be more compatible for your use.
![]() Tagging: If your PC or other device has a camera, you can choose to automatically add tags to your photos. Tagging helps you organize your photos by date, location, and by the device you were using to capture the photo.
Tagging: If your PC or other device has a camera, you can choose to automatically add tags to your photos. Tagging helps you organize your photos by date, location, and by the device you were using to capture the photo.
![]() Notifications: You can enable notifications that OneDrive sends you by email. Select whether you want OneDrive to notify you when someone makes changes to files you have shared. You can also get a notification when OneDrive recaps your photos. Turning off this notification will also stop OneDrive from creating photo albums for you, which it does when you have been taking photos of an event or a trip.
Notifications: You can enable notifications that OneDrive sends you by email. Select whether you want OneDrive to notify you when someone makes changes to files you have shared. You can also get a notification when OneDrive recaps your photos. Turning off this notification will also stop OneDrive from creating photo albums for you, which it does when you have been taking photos of an event or a trip.
![]() Device Backups: If you are storing settings for any of your devices on OneDrive, you can view the backups by clicking the Device Backups link.
Device Backups: If you are storing settings for any of your devices on OneDrive, you can view the backups by clicking the Device Backups link.
![]() The Sync Your Settings page of Windows 10 modern settings allows you to configure your PC to synchronize a number of local settings to your OneDrive storage. To access the page, select All Settings from the Action Center, select Accounts, and then click Sync Your Settings. Refer to Figure 5-3 in Chapter 5, “Installing and Managing Software,” for more details on sync settings. By default, all your local settings will be uploaded to the OneDrive. This feature provides a convenient way to move from device to device and take your settings along, as long as you log in with your Microsoft account and have access to the Internet.
The Sync Your Settings page of Windows 10 modern settings allows you to configure your PC to synchronize a number of local settings to your OneDrive storage. To access the page, select All Settings from the Action Center, select Accounts, and then click Sync Your Settings. Refer to Figure 5-3 in Chapter 5, “Installing and Managing Software,” for more details on sync settings. By default, all your local settings will be uploaded to the OneDrive. This feature provides a convenient way to move from device to device and take your settings along, as long as you log in with your Microsoft account and have access to the Internet.
You can toggle the following settings on or off for OneDrive sync:
![]() Sync Settings automatically syncs your PC settings across all your devices when it is toggled on.
Sync Settings automatically syncs your PC settings across all your devices when it is toggled on.
![]() Theme
Theme
![]() Internet Explorer Settings
Internet Explorer Settings
![]() Passwords
Passwords
![]() Language Preferences
Language Preferences
![]() Ease of Access
Ease of Access
![]() Other Windows Settings
Other Windows Settings
The Other Windows Settings syncs items such as settings for some devices (printer and mouse options), File Explorer Settings, and notification preferences.
User Data Migration and Configuration
Users of Windows computers in an organization have lots of data that they keep track of and work with on a constant basis. They may have many Word documents, Excel spreadsheets, notes, databases, and all kinds of information. This is one of the pain points in migrating to a new version of Windows, such as Windows 10. Although performing an in-place upgrade is an option that will preserve users’ settings and files and keep everything in the same place, it might not be a practical way of upgrading computers in a large enterprise. Users also need a way of restoring their files and settings if they need a new or updated device.
In this section, you learn some tools to help users migrate to a new computer without losing their settings by migrating their Windows profiles to their new device. You will also learn about folder redirection, which can help ensure that those important files and documents are stored in a safe location where they will be backed up and secured.
Migrating User Profiles
Windows 10 provides the User State Migration Tool (USMT) to assist you in migrating users from old computers to new ones. The tool is part of the Windows Assessment and Deployment Kit (ADK), which you learned about in previous chapters, including Chapter 2, “Implementing Windows.” If you have a large number of users to migrate in a corporate environment, you can customize USMT to suit the needs of your migration requirements.
User State Migration Tool
Intuitively, you might first think that migrating a large number of users to new Windows 10 computers could be as simple as using the xcopy command or a tool such as Robocopy to move files from their old computers to a network share, and then moving them back to the new computers at a later time. However, users like to store data on various locations on their local hard drives; they have customized application settings and specific files (such as Microsoft Outlook PST files) that might be hard to locate after such a move is finished. Users also like to set up individual desktop preferences, such as wallpapers and screen savers. Using USMT enables you to move all these items and more in a seamless manner to their appropriate locations on the new computer so that the users can resume working on this computer with minimal delay.
You can use USMT to quickly and easily transfer any number of user files and settings as a part of operating system deployment or computer replacement. It includes migration of the following items:
![]() Local user accounts.
Local user accounts.
![]() Personalized settings from these accounts, such as desktop backgrounds, sounds, screen savers, mouse pointer settings, Internet Explorer settings, and email settings including signature files and contact lists.
Personalized settings from these accounts, such as desktop backgrounds, sounds, screen savers, mouse pointer settings, Internet Explorer settings, and email settings including signature files and contact lists.
![]() Personal files belonging to these accounts including user profiles, the Desktop folder, the My Documents folder, and any other folder locations users might have utilized. USMT includes the capability to capture files even when they are in use, by means of Volume Shadow Copy technology.
Personal files belonging to these accounts including user profiles, the Desktop folder, the My Documents folder, and any other folder locations users might have utilized. USMT includes the capability to capture files even when they are in use, by means of Volume Shadow Copy technology.
![]() Operating system and application settings, including the user profile folders, or storage folders on the local disk defined within specific application settings.
Operating system and application settings, including the user profile folders, or storage folders on the local disk defined within specific application settings.
![]() Information contained in previous Windows installations and included in Windows.old folders.
Information contained in previous Windows installations and included in Windows.old folders.
This tool reduces the costs of operating system deployment by addressing the following items:
![]() Technician time associated with migration
Technician time associated with migration
![]() Employee learning and familiarization time on the new operating system
Employee learning and familiarization time on the new operating system
![]() Employee downtime and help desk calls related to repersonalizing the desktop
Employee downtime and help desk calls related to repersonalizing the desktop
![]() Employee downtime locating missing files
Employee downtime locating missing files
![]() Employee satisfaction with the migration experience
Employee satisfaction with the migration experience
USMT consists of three executable files: ScanState.exe, LoadState.exe, and UsmtUtils.exe, and three migration rule files: MigApp.xml, MigUser.xml, and MigDocs.xml. You can modify these migration rules files as necessary. They contain the following settings:
![]() MigApp.xml: Rules for migrating application settings
MigApp.xml: Rules for migrating application settings
![]() MigDocs.xml: Rules that locate user documents automatically without the need to create custom migration files
MigDocs.xml: Rules that locate user documents automatically without the need to create custom migration files
![]() MigUser.xml: Rules for migrating user profiles and user data
MigUser.xml: Rules for migrating user profiles and user data
Note
You should not use MigDocs.xml and MigUser.xml together in the same migration. Otherwise, some migrated files might be duplicated if these files include conflicting instructions regarding target locations.
You can also create customized .xml files according to your migration requirements, as well as a Config.xml file that specifies files and settings to be excluded from migration (such as a user’s large folder full of images and music). ScanState.exe collects user information from the old (source) computer based on settings contained in the various .xml files, and LoadState.exe places this information on a newly installed Windows 10 (destination) computer. The source computer can be running Windows Vista, 7, 8, 8.1, or 10.
Caution
USMT is designed specifically for large-scale, automated transfers. If your migrations require end-user interaction or customization on a computer-by-computer basis, USMT is not recommended. In these cases, use PC Mover Express (a third-party tool), File History (if migrating from Windows 8 or 8.1), or manually copy your User folder instead.
Using the USMT involves running ScanState.exe at the source computer to collect the user state data to be migrated and transferring it to a shared folder on a server. Then you must run LoadState.exe on the destination computer to load the user state data there, as shown in Figure 9-25. Microsoft refers to the server used for this purpose as the technician computer. When migrating multiple users, you can create a script to automate this process.
Figure 9-25 Components Involved in Performing a User State Migration Process
Preparing the Server to Run USMT
You need to create and share the appropriate folders on the technician computer before running USMT. This procedure requires the Windows Assessment and Deployment Kit (ADK) for Windows 10 1607, which you can download from https://developer.microsoft.com/en-us/windows/hardware/windows-assessment-deployment-kit and install. Use the following procedure:
Step 1. Create and share a folder named USMT on the technician computer. The migrating user should have Read permission to this folder, and the local administrator on the destination computer should have at least Modify permission to this folder. Ensure that this folder has enough storage space available to meet the needs of all computers to be migrated.
Step 2. Create and share a folder named MigStore on the technician computer. Both the migrating user and the local administrator on the destination computer should have at least Modify permission to this folder.
Step 3. In the USMT folder, create two subfolders named Scan and Load.
Step 4. Insert the Windows ADK disc and follow the instructions in the Setup program that automatically starts to install Windows ADK.
Step 5. Copy all files from the C:Program Files(x86)Windows Kits10Assessment and Deployment KitUser State Migration Tool structure using the correct architecture folder created during the Windows ADK installation to the USMT shared folder. You will have amd64, arm64, and x86. For example, use the following syntax:
xcopy " C:Program Files (x86)Windows Kits10Assessment and
Deployment KitUser State Migration Toolx86" \servershare
USMT
Step 6. Make any required modifications to the .xml files included in this folder, or create any additional .xml files as needed.
Collecting Files from the Source Computer
After you have created and shared the appropriate files on the technician computer, including the USMT folder and its contents, you are ready to scan the source computer and collect information to be exported to the new computer. Use the following procedure:
Step 1. Log on to the source computer with an account that has administrative privileges. This user should have permissions to the shares on the server as described in the previous procedure.
Step 2. Map a drive to the USMT share on the server.
Step 3. Open a command prompt and set its path to the Scan folder on the mapped USMT share.
Step 4. To run ScanState, type the following command:
scanstate \servernamemigrationmystore /config:config.xml
/i:miguser.xml /i:migapp.xml /v:13 /l:scan.log
In this command:
![]() /i: is the include parameter, which specifies an XML file that defines the user, application, or system state being migrated.
/i: is the include parameter, which specifies an XML file that defines the user, application, or system state being migrated.
![]() /config: specifies the config.xml file used by scanstate.exe to create the store.
/config: specifies the config.xml file used by scanstate.exe to create the store.
![]() servername is the name of the server on which you installed the Windows ADK tools.
servername is the name of the server on which you installed the Windows ADK tools.
![]() l: is a parameter that specifies the location of Scan.log, which is the name of a log file that will be created in the USMT share and will hold any error information from problems that might arise during the migration. If any problems occur, check the contents of this file.
l: is a parameter that specifies the location of Scan.log, which is the name of a log file that will be created in the USMT share and will hold any error information from problems that might arise during the migration. If any problems occur, check the contents of this file.
![]() The v:13 parameter specifies verbose, status, and debugger output to the log file.
The v:13 parameter specifies verbose, status, and debugger output to the log file.
Note
Both ScanState and LoadState support a large range of command-line options. Refer to the links in “User State Migration Tool (USMT) Command-Line Syntax” at https://technet.microsoft.com/en-us/itpro/windows/deploy/usmt-command-line-syntax.
Loading Collected Files on the Destination Computer
Before loading files to the destination computer, you should install Windows 10 and all required applications on this computer. However, do not create a local user account for the migrating user (this account is created automatically when you run LoadState). Join the computer to the domain if in a domain environment. Then perform the following procedure:
Step 1. Log on to the destination computer as the local administrator (not the migrating account).
Step 2. Map a drive to the USMT share on the server.
Step 3. Open an administrative command prompt and set its path to the Load folder on the mapped USMT share.
Step 4. To run LoadState, type the following command: (The set of .xml files should be the same as used when running ScanState.)
loadstate \servernamemigrationmystore /config:config.xml
/i:miguser.xml /i:migapp.xml /lac /lae /v:13 /l:load.log
Step 5. Log off and log on as the migrating user and verify that all required files and settings have been transferred.
In this command, /lac and /lae specify that local accounts from the source computer will be created and enabled on the destination computer. The other parameters are the same as defined previously for the ScanState tool. You can specify the password by using /lac:ThePassword.
Note
For more information on LoadState, refer to “LoadState Syntax” at https://technet.microsoft.com/en-us/itpro/windows/deploy/usmt-loadstate-syntax.
Using the USMT in Offline Mode
As already discussed, USMT is designed for use when large numbers of users must be migrated from older computers to new computers running Windows 10. You can also use this tool when you have had to perform a full system reset due to an issue or for other reasons (system reset is covered in Chapter 20, “Configuring System Recovery Options”). After performing the restore, you can use a USB drive to hold the required commands for migrating user data from the Windows.old folder. Use the following procedure:
Step 1. Download and install the Windows ADK as discussed earlier in this chapter.
Step 2. Prepare an external USB drive by creating a USMT folder in the root directory. This folder should have x86 and amd64 subfolders for migrating 32-bit and 64-bit installations, respectively.
Step 3. Copy the Program FilesWindows ADKToolsUSMT folder from the computer on which you installed Windows ADK to the USMT folder in the USB drive.
Step 4. Use Notepad to create a batch file for x86 file migrations. Microsoft suggests the following batch file:
@ECHO OFF
If exist D:USMT*.* xcopy D:USMT*.* /e /v /y C:WindowsUSMT
If exist E:USMT*.* xcopy E:USMT*.* /e /v /y C:WindowsUSMT
If exist F:USMT*.* xcopy F:USMT*.* /e /v /y C:WindowsUSMT
If exist G:USMT*.* xcopy G:USMT*.* /e /v /y C:WindowsUSMT
If exist H:USMT*.* xcopy H:USMT*.* /e /v /y C:WindowsUSMT
If exist I:USMT*.* xcopy I:USMT*.* /e /v /y C:WindowsUSMT
If exist J:USMT*.* xcopy J:USMT*.* /e /v /y C:WindowsUSMT
If exist K:USMT*.* xcopy K:USMT*.* /e /v /y C:WindowsUSMT
Cd c:windowsusmtx86
ScanState.exe c:store /v:5 /o /c /hardlink /nocompress /
efs:hardlink /i:MigApp.xml /i:MigDocs.xml /offlineWinOld:c:
windows.oldwindows
LoadState.exe c:store /v:5 /c /lac /lae /i:migapp.xml
/i:migdocs.xml /sf /hardlink /nocompress
:EOF
Step 5. Save this file to the USB drive as Migrate.bat.
Step 6. Log on to the computer that has been upgraded using an administrative account.
Step 7. Insert the USB drive and copy the Migrate.bat file to the desktop.
Step 8. Right-click this file and choose Run as Administrator. If you receive a UAC prompt, click Yes.
Step 9. When the batch file finishes, access the C: Users folder and confirm that all user files have been migrated to the appropriate file libraries.
This batch file locates USMT files and copies them to the C:Windows folder so that the ScanState.exe command can create a hard-link migration store at C:Store from the Windowsold folder. This hard-link migration process creates a catalog of hard links to files that are to be migrated. The LoadState.exe command then remaps the catalog of hard links to their appropriate locations in the Windows 10 installation. For AMD 64-bit machines, modify the batch file by changing the x86 subfolder references to amd64.
Configuring Folder Location
Microsoft includes the technologies of folder redirection and offline files for redirection of the paths of local folders to a network location while caching their contents locally for increased speed and availability. In this section, we take a look at folder redirection. Chapter 12, “Managing Mobile Devices,” covers offline files in more detail. Using folder redirection, you can redirect the path of a known folder to a local or network location either manually or by using Group Policy. The process is transparent to the user, who works with data in the folder as if it were located in its default place.
Note
For more information on folder redirection, see the links found at “Folder Redirection, Offline Files, and Roaming User Profiles Overview” at https://technet.microsoft.com/en-us/library/hh848267(v=ws.11).aspx.
Benefits of Folder Redirection
Users and administrators benefit from using folder redirection in the following ways:
![]() Users’ documents are always accessible to them, regardless of which computer they log on to.
Users’ documents are always accessible to them, regardless of which computer they log on to.
![]() When roaming user profiles are used, only the network path to a folder such as the Documents folder is part of the profile. This eliminates the need for copying the contents of this folder back and forth at each logon and logoff, thereby speeding up the logon/logoff process.
When roaming user profiles are used, only the network path to a folder such as the Documents folder is part of the profile. This eliminates the need for copying the contents of this folder back and forth at each logon and logoff, thereby speeding up the logon/logoff process.
![]() You can configure the Offline File technology so that users’ files are always available to them, even when they are not connected to the network. Their files are automatically cached and are in the same logical location (for example, the U: drive) on the laptop as they are when they are connected to the network, facilitating their working on the files when they are away from the office.
You can configure the Offline File technology so that users’ files are always available to them, even when they are not connected to the network. Their files are automatically cached and are in the same logical location (for example, the U: drive) on the laptop as they are when they are connected to the network, facilitating their working on the files when they are away from the office.
![]() It is easy to back up all users’ files from a central server without interaction by the user. The administrator or backup operator can accomplish this task as part of the routine backup task.
It is easy to back up all users’ files from a central server without interaction by the user. The administrator or backup operator can accomplish this task as part of the routine backup task.
![]() Administrators can use Group Policy to configure disk quotas, thereby controlling and monitoring the amount of disk space taken up by users’ folders.
Administrators can use Group Policy to configure disk quotas, thereby controlling and monitoring the amount of disk space taken up by users’ folders.
![]() You can standardize users’ working environments by redirecting the Desktop folder to a common shared location. This standardization can help with remote support problems because the support staff will know the desktop layout of the users’ computers.
You can standardize users’ working environments by redirecting the Desktop folder to a common shared location. This standardization can help with remote support problems because the support staff will know the desktop layout of the users’ computers.
Redirecting Library Folders
Libraries are sets of virtual folders (Documents, Pictures, Music, and Videos), which you can access by clicking the folder icon in the Windows 10 taskbar. You can also access libraries from any File Explorer window, where they are visible among the items listed in the left pane. Also recall that you can create a new library by right-clicking the Libraries node, choosing New > Library in the context menu, and providing a name for your new library.
First introduced with Windows 7 and continued in Windows 10 is the concept of virtualized folders. In Windows 10, a library is a set of virtual folders that are shared by default with other users of the computer. By default, Windows 10 includes six libraries (Documents, Pictures, Music, Saved Pictures, Camera Roll, and Videos). Documents, Pictures, Music, and Videos libraries are shown in File Explorer by default. To view all libraries categorized, select Show Libraries from the File Explorer’s Navigation Pane drop-down. This will show the Libraries folder as shown in Figure 9-26. You can also see them when you open a File Explorer window and navigate to C:UsersPublic. The subfolders you see here are actually pointers to the folder locations on the computer. You can also think of them as the results of search queries. From the Libraries folder, you can create a new library by clicking New Item and selecting Library in the toolbar and providing a name for your new library.
Figure 9-26 Windows 10 Four Default Libraries; You Can Create New Ones
Right-click any library and choose Properties to view its contents. Notice that each library contains a user-based subfolder, located by default at C:Users\%username%. You can add additional folders by clicking the Add button shown in Figure 9-27 and navigating to the desired folder in the Include Folder dialog box, as shown in Figure 9-28; this can even include shared folders located on other computers on the network. You can also add folders to a library from any File Explorer window by selecting the folder and clicking the Add to Library option in the Explorer toolbar.
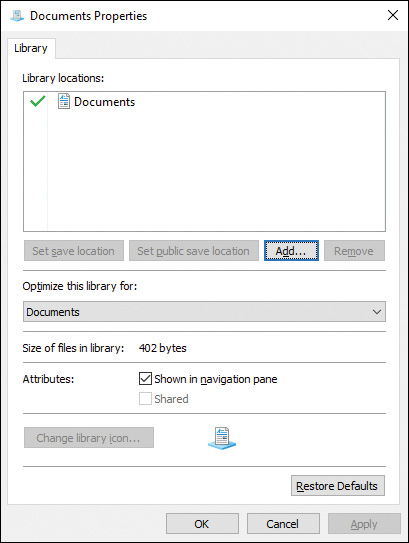
Figure 9-27 Each Library by Default Contains a User Subfolder

Figure 9-28 Adding a Folder to the Documents Library
The library’s Properties dialog box also enables you to add folders and configure several additional properties. The check mark shown in Figure 9-27 indicates the default save location used by programs such as Microsoft Office. To change this location, select the desired location and click the Set Save Location command button. To change the location of public saved documents, select the appropriate folder and click the Set Public Save Location button. To remove a folder from the library, select it and click Remove. To remove all added folders from the library and reset it to its default settings, click the Restore Defaults button.
Implementing Domain-Based Folder Redirection
Implementation of folder redirection requires an Active Directory Domain Services (AD DS) domain and a server running Windows Server 2012/R2 or higher. You can also use a server running an older version of Windows Server, but some functionality might not be available. Use the following procedure to implement a Group Policy Object (GPO) that enables folder redirection in an AD DS domain or organizational unit (OU):
Step 1. Open Server Manager on a computer with the Group Policy Management console installed.
Step 2. Click Tools > Group Policy Management to display the Group Policy Management Console.
Step 3. Right-click the domain or OU where you want to configure Folder Redirection and choose Create a GPO in This Domain, and Link It Here.
Step 4. In the New GPO dialog box, type a name for the GPO and then click OK.
Step 5. Right-click this GPO and choose Edit to open the Group Policy Management Editor console.
Step 6. Navigate to User ConfigurationPoliciesWindows SettingsFolder Redirection. You receive the options shown in Figure 9-29.
Step 7. Right-click the folder to be redirected from the Details pane in Figure 9-29 and choose Properties. This action displays the Properties dialog box for the selected folder, as shown in Figure 9-30.
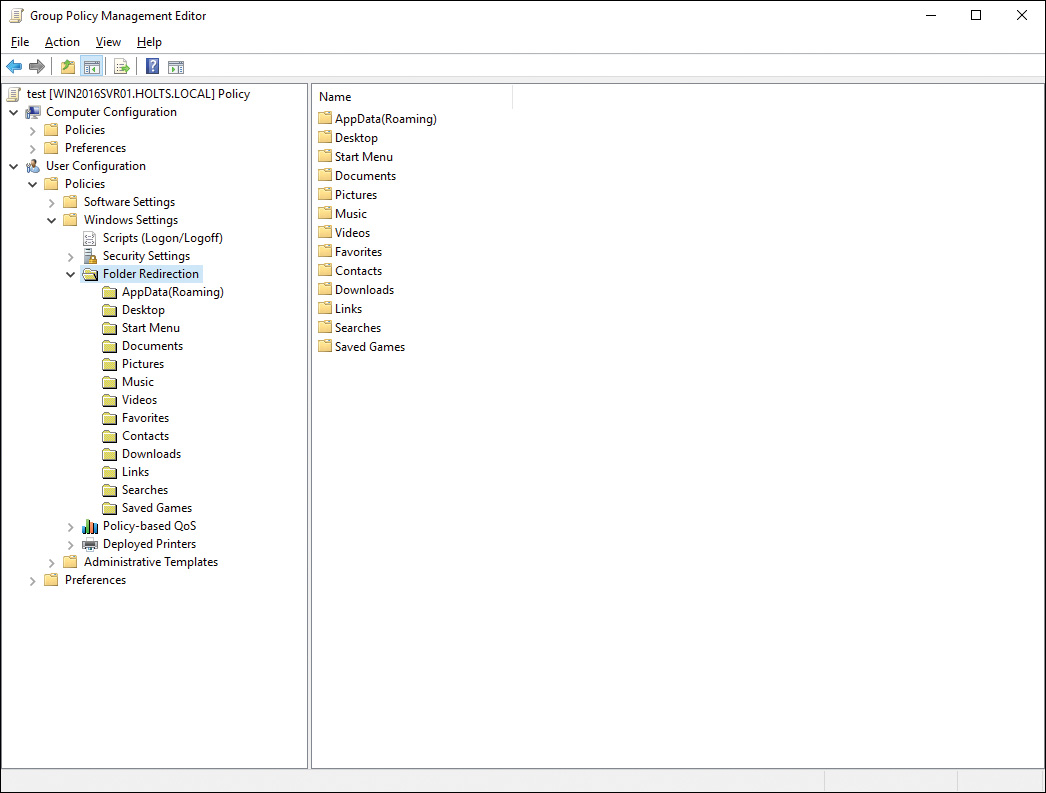
Figure 9-29 Implementing Folder Redirection in Windows Server 2016

Figure 9-30 Choices for Implementing Folder Redirection in Windows Server 2016
Step 8. Under Setting, select from the following choices:
![]() Basic–Redirect Everyone’s Folder to the Same Location: This option redirects all folders to this location.
Basic–Redirect Everyone’s Folder to the Same Location: This option redirects all folders to this location.
![]() Advanced–Specify Locations for Various User Groups: This option redirects folders to different locations depending on the users’ security group memberships. The bottom part of the dialog box changes so that you can specify a Universal Naming Convention (UNC) path for each security group.
Advanced–Specify Locations for Various User Groups: This option redirects folders to different locations depending on the users’ security group memberships. The bottom part of the dialog box changes so that you can specify a Universal Naming Convention (UNC) path for each security group.
![]() Not Configured: Folder redirection is not applied.
Not Configured: Folder redirection is not applied.
Step 9. Choose an option from those shown and described in the list that follows. To create a folder for each user, choose Create a Folder for Each User Under the Root Path. Type or browse to the desired path (in general, you will want to use a UNC path such as \server1documents), and then click OK or Apply.
![]() Redirect to the User’s Home Directory: This option redirects users’ folders to the home directory as specified in the user account’s Properties dialog box in the Active Directory Administrative Center. This option works only for client computers running Windows 7 Professional, Windows Server 2008, or later, and is available only for the Documents folder.
Redirect to the User’s Home Directory: This option redirects users’ folders to the home directory as specified in the user account’s Properties dialog box in the Active Directory Administrative Center. This option works only for client computers running Windows 7 Professional, Windows Server 2008, or later, and is available only for the Documents folder.
![]() Create a Folder for Each User Under the Root Path: This option enables you to specify a root path in the form of a UNC path to a shared location. A subfolder is automatically created for each user in this location, and the folder path appears at the bottom of the dialog box.
Create a Folder for Each User Under the Root Path: This option enables you to specify a root path in the form of a UNC path to a shared location. A subfolder is automatically created for each user in this location, and the folder path appears at the bottom of the dialog box.
![]() Redirect to the Following Location: This option enables you to specify a UNC path to the specific folder for each user. The username is automatically appended to the path you provided to create a unique folder name.
Redirect to the Following Location: This option enables you to specify a UNC path to the specific folder for each user. The username is automatically appended to the path you provided to create a unique folder name.
![]() Redirect to the Local User Profile Location: This option redirects users’ folders to the local user profile location specified in the user account’s Properties dialog boxes in Active Directory Administrative Center. This option is useful for returning redirected folders to their original default location.
Redirect to the Local User Profile Location: This option redirects users’ folders to the local user profile location specified in the user account’s Properties dialog boxes in Active Directory Administrative Center. This option is useful for returning redirected folders to their original default location.
Step 10. You receive a message box regarding Group Policy settings in Windows Server 2003 or older operating systems. Click Yes to accept this message and implement folder redirection.
Step 11. You are returned to the Group Policy Management Console. Ensure that the GPO you created displays a GPO status of Enabled and that the Link Enabled column reads Yes.
Note
For more information on implementing folder redirection in a domain environment, including a complete procedure for deploying domain-based folder redirection, refer to “Deploy Folder Redirection with Offline Files” at https://technet.microsoft.com/en-us/library/jj649078(v=ws.11).aspx.
Note
Applying these policies requires security filtering, and a recent update may affect the capability of older computers to apply group policy updates. To correct this issue, make sure that the domain computers group has Read permissions on your GPO. For details, refer to “MS16-072: Security Update for Group Policy: June 14, 2016” at https://support.microsoft.com/en-us/help/3163622/ms16-072-security-update-for-group-policy-june-14,-2016.
Configuring Local, Roaming, and Mandatory Profiles
When a user logs on to a Windows 10 computer, the operating system generates a user profile. This profile is composed of desktop settings, files, application data, and the specific environment established by the user. For example, a user named Peter logs on to Windows 10, changes his desktop wallpaper to a picture of his dog, edits the user information in Microsoft Word, configures a dial-up connection to his Internet service provider (ISP), and adjusts the mouse so that it is easier to double-click. When Sharon logs on to the same computer using her own account, she sees the default settings for Windows 10, not Peter’s settings. When Peter logs on next, Windows finds Peter’s existing profile and loads his settings—the wallpaper, the Word data, the dial-up connection, and the mouse click settings.
Windows 10 provides the following profile versions:
![]() Local: A profile that is available only on the computer and for the user for whom it is configured.
Local: A profile that is available only on the computer and for the user for whom it is configured.
![]() Roaming: A profile that has been placed on a server so that it is available to a given user no matter which computer she is logged on to. A user is free to make changes to this profile version at any time.
Roaming: A profile that has been placed on a server so that it is available to a given user no matter which computer she is logged on to. A user is free to make changes to this profile version at any time.
![]() Mandatory: A profile that has been placed on a server but is configured as read-only; the user is unable to make any changes to it.
Mandatory: A profile that has been placed on a server but is configured as read-only; the user is unable to make any changes to it.
In addition to these profile types, it is possible to set up a temporary profile, which is loaded by default if the user is unable to load her normal profile.
When Windows 10 is connected to a Windows network, you can configure a user profile to roam the network with the user. Because the profile is stored in a subfolder in the Users folder on the %systemdrive% volume, you can configure the profile to be placed on a network drive rather than a local hard disk, thereby making it accessible to the user regardless of which computer she is using.
User profiles allow users to customize their own settings without impairing another user’s configuration. User profiles were developed in response to organizations that routinely provided shared desktop computers. In cases where a user absolutely requires certain settings to use the computer comfortably, having to share a computer with another person who then removes the needed configuration can be frustrating, and it causes a loss of productivity. Another advantage to user profiles is that, when used in conjunction with network storage of data, the desktop computer is easily replaceable—users can use any computer on the network without having to perform extra tasks to customize the computer to suit their needs.
To use profiles, each user must have a separate user account. The user account can be a domain account or a local account. There are four types of profiles, which are detailed in Table 9-7.
Profile |
Created For |
How It Works |
Local |
Every user at first logon |
When the user logs on to a computer, whether it is connected to a network or not, a local profile is created and saved in the local Users folder for that user. All changes are saved when the user logs off. |
Roaming |
Users who log on to different computers on the network |
The profile is stored on a server. When a user logs on to a network computer, the profile is copied locally to the computer. When the user logs off the network, changes to the profile are copied back to the server. |
Mandatory |
Administrative enforcement of settings (This is applied to user accounts that are shared by two or more users.) |
The profile is stored on a server. When a user logs on to a network computer, the profile is copied locally to the computer. No changes are saved when the user logs off the server. Only an administrator can make changes to the profile. |
Temporary |
Users that were unable to load their profile |
When an error condition exists that prevents a user from loading her normal profile, a temporary profile is loaded. When the user logs off, all changes are deleted. |
User profiles consist of a Registry hive that incorporates the data typically found in NTuser.dat, saved as a file that is mapped to the HKEY_CURRENT_USER Registry node, and a set of profile folders.
You can change the location where Windows looks for a user’s profile. When you do so, you must be logged on to the computer as a member of the Administrators group. Use the following procedure:
Step 1. Right-click Start and choose Computer Management.
Step 2. Expand the Local Users and Groups folder and select Users. Information about all users configured on the computer appears in the Details pane.
Step 3. Right-click a user account and select Properties from the shortcut menu.
Step 4. Click the Profile tab.
Step 5. Type the location of the profile in the Profile Path text box. For example, type the UNC path as shown in Figure 9-31. Then click OK.

Figure 9-31 Configuring a User’s Profile Path
Step 6. From this dialog box, you can perform the following actions:
![]() Click Default Profile and then click Copy To in order to copy an existing profile to another computer. This is useful in a nondomain situation where you want to standardize profiles between computers.
Click Default Profile and then click Copy To in order to copy an existing profile to another computer. This is useful in a nondomain situation where you want to standardize profiles between computers.
![]() Click Delete to delete a profile for a user. This is useful when you are moving a computer to a different user.
Click Delete to delete a profile for a user. This is useful when you are moving a computer to a different user.
![]() Click Change Type to change the profile from a local profile to a roaming profile, or vice versa.
Click Change Type to change the profile from a local profile to a roaming profile, or vice versa.
Step 7. When finished, click OK.
Using Roaming and Mandatory Profiles with Active Directory
Roaming and mandatory profiles require a network server for implementation. Although it is recommended that you have an AD DS network for this, you can implement these profiles on other network servers. An AD DS network is recommended for use with roaming and mandatory profiles because of the additional management features that are provided by Group Policy. For example, you can specify additional folders to include in the profile, as well as mark certain folders to exclude from the profile.
An additional advantage to using Group Policy in conjunction with roaming profiles is that you can prevent users from running applications that you deem to be unacceptable, or allow a user to run only a short list of applications. Even if a user has installed the application and incorporated its data into the user’s profile prior to the restriction policy, the GPO will prevent the user from running it.
When you use Group Policy together with roaming profiles, you can ensure that a user’s Windows 10 settings are exactly what you want the user to have. You can create a default user profile that includes the desktop icons, startup applications, documents, Start menu items, and other settings. Then, you can use Group Policy to manage the way that the user interacts with the network, such as preventing access to Control Panel. You can even use Group Policy to publish certain applications that the user can install, and you can redirect users’ Documents and Desktop folders to a network location. When a user logs on to the network the first time, the desktop will be configured with the settings that are appropriate for your organization. If the user makes changes to the profile, those changes will be saved. The user can then log on to an entirely different computer the next day and automatically see the environment he configured for himself, plus have immediate access to his personal files, folders, and applications.
For more information on using roaming profiles in AD DS, including a detailed procedure for setting up a sample implementation, refer to “Deploy Roaming User Profiles” at https://technet.microsoft.com/en-us/library/jj649079(v=ws.11).aspx.
Implementing Roaming Profiles
Local profiles cause an administrative headache when users roam around the network, and when computers are routinely exchanged throughout the network. For example, if Joe logs on at PC1 and saves a file that holds key information for his job on his desktop, and later on Joe logs on at PC2 because PC1 was replaced with new hardware, he is likely to have a panic attack to discover that his file is missing. Roaming profiles overcome this problem.
When a user with a roaming profile logs on for the first time, the following process takes place:
1. Windows checks for the path to the user’s roaming profile.
2. Windows accesses the path and looks for the profile. If no profile exists, Windows generates a folder for the profile.
3. Windows checks for a cached copy of the profile listed in HKLMSOFTWAREMicrosoftWindows NTCurrent VersionProfileList. If a local profile is found, and the computer is a member of a domain, Windows looks in the domain controller’s NETLOGON share for a default profile for the domain. The default domain profile is copied to the local computer folder %systemdrive%Users\%username%. If there is no domain default, Windows copies the default local profile to the same location.
4. The NTuser.dat file is mapped to the Registry’s HKEY_CURRENT_USER key.
5. Windows updates the user’s %userprofile% environment variable with the new location of the profile.
6. When the user logs off, the local profile is copied to the network path configured in Windows.
7. The next time the user logs on to the same computer, Windows opens the locally cached copy of the user’s profile and compares it with the copy on the domain server. Windows merges the contents of the two profiles.
You can make changes to whether a computer uses local or roaming profiles in Control Panel. Use the following procedure:
Step 1. From the System and Security category of Control Panel, click System. You can also right-click Start and choose System from the programs list that appears.
Step 2. From the System dialog box that appears, click Advanced System Settings.
Step 3. Click the Advanced tab and then click the Settings button under User Profiles to display the dialog box shown in Figure 9-32.

Figure 9-32 Profile Management Options
Step 4. From this dialog box, you can perform the following actions:
![]() Change Profile Type: Select a profile and click Change Type to change the profile from a local profile to a roaming profile, or vice versa.
Change Profile Type: Select a profile and click Change Type to change the profile from a local profile to a roaming profile, or vice versa.
![]() Delete a Profile: Select a profile and click Delete to delete an existing profile. This is useful when you are moving the computer to a different user.
Delete a Profile: Select a profile and click Delete to delete an existing profile. This is useful when you are moving the computer to a different user.
![]() Copy a Profile: Select a profile and click Copy To in order to use the same settings for another user on the same computer.
Copy a Profile: Select a profile and click Copy To in order to use the same settings for another user on the same computer.
Step 5. When finished, click OK.
Establishing Mandatory Profiles
A mandatory profile is a roaming profile that can’t be changed by the user. You configure the profile identically to the roaming profile. After the profile has been configured and saved as the NTuser.dat file in the user’s profile path on the network, you need to rename the file to NTuser.man.
When the NTuser.dat file is renamed with the .man extension, it is treated as though it is a read-only file. At user logon, the file is read the same way as a roaming profile. However, if a user makes any changes to the environment, the changes are discarded when the user logs off. A mandatory profile is helpful in managing the desktop environment for users who unpredictably and accidentally delete items from their desktop and Start menu, or make other unintended changes. A mandatory profile is not useful for users who need a dynamic environment for running a variety of applications.
Starting with Windows 8.1 and Windows Server 2012 R2, mandatory profiles become super-mandatory profiles when stored in a profile path ending in .man; for example, \serversharemandatoryprofile.man. When a super-mandatory profile is in use, users who use these profiles cannot log on if the server on which the profile is stored becomes unavailable. With ordinary mandatory profiles, a user can log on with the locally cached copy of the mandatory profile.
When you configure a mandatory profile to be used in an organization to be shared by a variety of users or computers, and when a single user moves around a network to use different computers, the profile’s graphical presentation should be made to run at a level that all the computers can support. For example, if you have some computers that support a maximum 1680 × 1050 resolution, you should not create a profile with a 1920 × 1080 resolution setting because it will not display correctly on some of the computers.
If you need to make changes to a mandatory profile, rename the profile back to NTuser.dat, log on as the user, and configure the computer. When you have completed the changes, you should log off so that the changes are saved to the profile. Then, after logging on as an administrator, you can rename the file as NTuser.man. If this is a profile that should be used by multiple people, you can replace the other users’ NTuser.man files with the new version.
Note
For more information on mandatory user profiles, refer to “Create Mandatory User Profiles” at https://technet.microsoft.com/en-us/itpro/windows/manage/mandatory-user-profile.
User Profiles and Operating System Versions
Most networks include computers running different Windows versions, such as Windows 7, Windows 8.1, and Windows 10, as well as servers running either the original or R2 versions of Windows Server 2008 or 2012 along with Windows Server 2016. Each newer operating system version has introduced modifications to roaming and mandatory user profiles. Consequently, if a user moves between computers running different Windows versions, the user profiles are not compatible with each other. Profile versions include the following:
![]() Version 1 profiles used by Windows Vista, Windows Server 2008, and older Windows versions
Version 1 profiles used by Windows Vista, Windows Server 2008, and older Windows versions
![]() Version 2 profiles used by Windows 7 and Windows Server 2008 R2
Version 2 profiles used by Windows 7 and Windows Server 2008 R2
![]() Version 3 profiles used by Windows 8 and Windows Server 2012
Version 3 profiles used by Windows 8 and Windows Server 2012
![]() Version 4 profiles used by Windows 8.1 and Windows Server 2012 R2
Version 4 profiles used by Windows 8.1 and Windows Server 2012 R2
![]() Version 5 profiles used by Windows 10 and Windows Server 2016
Version 5 profiles used by Windows 10 and Windows Server 2016
![]() Version 6 profiles used by Windows 10, 1607 and Windows Server 2016, 1607.
Version 6 profiles used by Windows 10, 1607 and Windows Server 2016, 1607.
When a user logs on to a Windows 10 computer for the first time after using an older computer, Windows 10 automatically updates the profile to version 5. If the user then logs on to an older computer, the available profile is incompatible and is not loaded; further, the profile might become corrupted.
Microsoft recommends that you keep roaming, mandatory, super-mandatory, and domain default profiles created in one Windows version separate from those that were created in a different Windows version. For more information, including the Registry entry that must be created, refer to “Deploy Roaming User Profiles” at https://technet.microsoft.com/en-us/library/jj649079.aspx.
Exam Preparation Tasks
Review All the Key Topics
Review the most important topics in the chapter, noted with the Key Topics icon in the outer margin of the page. Table 9-8 lists a reference of these key topics and the page numbers on which each is found.
Table 9-8 Key Topics for Chapter 9
Key Topic Element |
Description |
Page Number |
Disk Management tool used for managing storage |
||
Step List |
Creating a new storage volume |
|
Volume properties and space allocation |
||
Dynamic volume types |
||
Step List |
Creating a striped volume |
|
Configuring removable storage |
||
Step List |
Creating a Storage Space |
|
Troubleshooting disk errors |
||
Using the Optimize Drives utility |
||
Parameters available with the Defrag command |
||
Managing Storage Spaces |
||
Using the User State Migration Tool |
||
List |
Benefits of folder redirection |
|
Creating and working with Windows Libraries |
||
Step List |
Implementing folder redirection |
|
Configuring a user profile path for roaming profiles |
||
Managing user profiles |
Definitions of Key Terms
Define the following key terms from this chapter, and check your answers in the glossary.
active partition
basic disk
Disk Management snap-in
DiskPart
distributed file system (DFS)
DFS folder
DFS Namespace
DFS Replication
dynamic disk
extended partition
folder redirection
local user profile
logical drive
mandatory profile
mirroring
partition
primary partition
RAID-5
roaming profile
storage pool
storage space
striping
user profile
volume