Chapter 18 Managing Desktop Applications
This chapter covers the following subjects:
![]() Implementing Apps: The primary purpose of deploying Windows in an organization is to support apps that users need to perform their duties. This section teaches you how to implement the Windows Store for Business, a private store similar to the public Windows Store that you can use to make volume-purchased apps available to your users as well as your own Line-of-Business (LOB) apps. This section also discusses Windows 10 startup options and managing the startup for Windows features.
Implementing Apps: The primary purpose of deploying Windows in an organization is to support apps that users need to perform their duties. This section teaches you how to implement the Windows Store for Business, a private store similar to the public Windows Store that you can use to make volume-purchased apps available to your users as well as your own Line-of-Business (LOB) apps. This section also discusses Windows 10 startup options and managing the startup for Windows features.
![]() Desktop Application Compatibility: Many applications currently in use today were originally written for Windows 7 or older versions of Windows. Some of these might not work properly with Windows 10. This section describes methods you can use to make these applications work properly. It also discusses Windows Installer, default program settings, and App-V applications.
Desktop Application Compatibility: Many applications currently in use today were originally written for Windows 7 or older versions of Windows. Some of these might not work properly with Windows 10. This section describes methods you can use to make these applications work properly. It also discusses Windows Installer, default program settings, and App-V applications.
![]() User Experience Virtualization: User Experience Virtualization (UE-V) is a technology available in Windows 10 that allows you to maintain users’ application and Windows settings and customizations across devices and logins. Learn about the capabilities of UE-V and how to configure UE-V in your organization.
User Experience Virtualization: User Experience Virtualization (UE-V) is a technology available in Windows 10 that allows you to maintain users’ application and Windows settings and customizations across devices and logins. Learn about the capabilities of UE-V and how to configure UE-V in your organization.
![]() Using Microsoft Intune for Desktop Apps: When you manage Windows computers with Microsoft Intune using the Intune client, you can make desktop applications available to your users, or automatically deploy them on your managed computers.
Using Microsoft Intune for Desktop Apps: When you manage Windows computers with Microsoft Intune using the Intune client, you can make desktop applications available to your users, or automatically deploy them on your managed computers.
This chapter covers the following objectives for the 70-697 and 70-698 exams:

Implement apps: Configure desktop apps, configure startup options, configure Windows features, configure Windows Store, implement Windows Store apps, implement Windows Store for Business, provision packages, create packages, use deployment tools, use the Windows Assessment and Deployment Kit (ADK).

Support desktop apps: Support considerations include the following: desktop app compatibility using Application Compatibility Toolkit (ACT) including shims and compatibility database; desktop application coexistence using Hyper-V, Azure RemoteApp, and App-V; installation and configuration of User Experience Virtualization (UE-V); deploy desktop apps by using Microsoft Intune.
We have finished looking at configuration and troubleshooting of hardware devices attached to or included with your computer. Having done so, it is now time to turn to the software applications installed on the computer. With each new version of Windows comes updated applications, including Internet Explorer, now in version 11, expected to be the last version of Internet Explorer, and the new default browser, Windows Edge. However, organizations and individuals have invested big money in applications that were run on older computers running operating systems such as Windows Vista, 7, and 8.1. A new operating system brings with it the potential for compatibility issues, in which software written for older operating systems might not run properly, or stop responding (hang), or not even start. For the 70-697 and 70-698 exams, it is important that you know how to configure applications so that they work properly on Windows 10.
Windows 10 brings an entirely new suite of small-scale applications written for Universal Windows Platform (UWP), which users can purchase and download from the new Windows Store and that are designed to work with Windows 10 computers, Windows 10 Mobile for phones, tablets, and even Xbox. Although some of these apps can enhance productivity in a corporate environment, downloading and using many of them can become a major distraction for users during the work day. For organizations, Microsoft now offers the Windows Store for Business. This is a private store, available only on Windows 10 devices, that you can use to acquire apps, volume purchase apps for your organization’s employees, and even restrict your users and devices to using only the Store for Business on their connected devices. You learn about the Store for Business, how it integrates with other cloud services, such as Azure and Microsoft Intune, and learn how to manage the store and your private store apps.
There are some other tools that you need to learn about that help manage applications for Windows 10. You learn about the Application Compatibility Toolkit (ACT), and you return to the Microsoft Intune management tool to learn about how it can help you distribute desktop apps. You also learn about some additional features of the Windows Assessment and Deployment Kit (ADK).
“Do I Know This Already?” Quiz
The “Do I Know This Already?” quiz allows you to assess whether you should read this entire chapter or simply jump to the “Exam Preparation Tasks” section for review. If you are in doubt, read the entire chapter. Table 18-1 outlines the major headings in this chapter and the corresponding “Do I Know This Already?” quiz questions. You can find the answers in Appendix A, “Answers to the ‘Do I Know This Already?’ Quizzes.”
Table 18-1 “Do I Know This Already?” Foundation Topics Section-to-Question Mapping
Foundation Topics Section |
Questions Covered in This Section |
Implementing Apps |
1–3 |
Desktop Application Compatibility |
4–8 |
User Experience Virtualization |
9–10 |
Using Microsoft Intune for Desktop Apps |
11–12 |
Caution
The goal of self-assessment is to gauge your mastery of the topics in this chapter. If you do not know the answer to a question or are only partially sure of the answer, you should mark that question as wrong for purposes of the self-assessment. Giving yourself credit for an answer you correctly guess skews your self-assessment results and might provide you with a false sense of security.
1. Fast Startup in Windows 10 makes use of what technology?
a. Sleep Mode
b. Hibernation
c. SSD
d. PowerShell
2. To deploy Windows Store for Business, what type of accounts do you need to configure for your users?
a. Office 365 accounts
b. Microsoft accounts
c. Azure Active Directory accounts
d. Microsoft Intune accounts
3. Your organization has deployed the Windows Store for Business, and a lot of applications are being added. You would like to delegate some other employees to manage the applications, but not users or the store settings. Which role should you assign? (Each answer represents a complete solution. Choose two.)
a. Admin
b. Billing Administrator
c. Purchaser
d. User Administrator
e. Global Administrator
4. You want to advertise a Windows Installer package named Program.msi to all users of the computer. Which of the following commands should you type?
a. msiexec /am Program.msi
b. msiexec /au Program.msi
c. msiexec /jm Program.msi
d. msiexec /ju Program.msi
5. You have obtained a minor compatibility fix that is designed to enable an engineering program to work with Windows 10 while the developers update the program as a more permanent solution. What is this compatibility fix generally known as?
a. Compatibility mode
b. Filter
c. Shim
d. Hotfix
6. You would like all file types that currently open in Internet Explorer to open with Firefox instead. What should you do? (Each correct answer represents a complete solution. Choose two.)
a. From the Programs applet in Control Panel, select Set Your Default Programs and then select Associate a File Type or Protocol with a Program. From the list that appears, select the extensions that currently open in Internet Explorer and click Change Program. In the Open With dialog box that appears, select Firefox.
b. From the Programs applet in Control Panel, select Default Programs, and then select Set Your Default Programs. From the list that appears, select Firefox, and then click Set This Program as Default.
c. From the Programs applet in Control Panel, select Default Programs, and then select Set Program Access and Computer Defaults. In the dialog box that appears, select Custom, and then select Mozilla Firefox.
d. From a File Explorer list, right-click any file with an .htm or .xhtml extension and choose Open With > Choose Default Program. Then select Firefox from the list that appears.
7. You are working with a financial application your company has used successfully on Windows 7 computers for more than seven years. The application does not respond when accessed on a Windows 10 Pro computer. What compatibility option should you try in order to get this program working?
a. Run This Program in Compatibility Mode For (and select Windows 7)
b. Reduced Color Mode
c. Disable Display Scaling on High DPI Settings
d. Run This Program as an Administrator
8. You are implementing App-V in your enterprise. Where are the programs stored?
a. On a server file share
b. On the client computers
c. On the App-V publishing server
d. On the App-V management server
9. Which of the following settings are synchronized by default on a UE-V enabled system? (Select all that apply.)
a. Microsoft Office 2016
b. Start menu settings
c. All applications in the Program Files folder
d. Internet Explorer 11
e. Windows accessories
10. When you deploy UE-V in your organization, which of the following steps should you perform first?
a. Create the settings storage location.
b. Deploy the UE-V agent.
c. Deploy the Group Policy Object with UE-V settings.
d. Create settings location templates.
11. What tool is used to place applications available for installation into Microsoft Intune?
a. Intune Portal upload tool
b. Intune Software Publisher
c. PowerShell Intune cmdlets
d. Windows Update
12. You have published several applications to the Intune Portal and sent some emails to a few users asking them to test the installations and make sure the applications are installed correctly. They all responded that the applications were not available from the Portal when they logged in. What do you need to do to make sure the applications are available for installation?
a. Create new Azure AD user accounts for the users.
b. Deploy the applications to a user group.
c. Add the users to Office 365.
d. Deploy the applications to the device group.
e. Give the users your administrator credentials.
Foundation Topics
Implementing Apps
You have learned about the Windows Store and the Universal Windows Platform (UWP) apps in earlier chapters, mainly in Chapter 5, “Installing and Managing Software.” The material in the “Windows Store and Cloud Apps” section was specific to the 70-697 exam; however, it will be covered in the 70-698 exam, so you should review that material for both exams.
In this section, we cover material more specific to the 70-698 exam. You will need to review Chapter 5 for some of the objectives related to Windows Store and UWP. The following objectives are fully covered in Chapter 5, so the topic coverage is not included in this chapter:
![]() Configure Windows Store
Configure Windows Store
![]() Implement Windows Store apps
Implement Windows Store apps
![]() Provision packages
Provision packages
![]() Create packages
Create packages
![]() Use deployment tools
Use deployment tools
Startup Options and Windows Features
One of Microsoft’s objectives when developing Windows 10 was to improve the boot and startup times for the Windows operating system. If you have been using Windows 10, you are probably impressed by how fast it starts up, and it is clear that Microsoft succeeded in its goal of making Windows boot much faster than in previous versions.
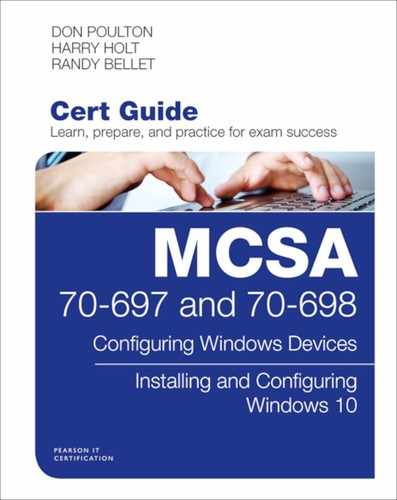
Windows 10 includes a feature called Fast Startup, which leverages Hibernate to enable startup faster than is typically required for a normal cold boot. This feature was called Fast Boot in Windows 8 and 8.1. Typically, Fast Startup is enabled by default in Windows 10. You can check the option in Control Panel.
Step 1. From Control Panel, access Power Options.
Step 2. From the Power Options Control Panel applet, select Choose What the Power Buttons Do.
Step 3. In the Shutdown Settings section, look for the Turn On Fast Startup option, as shown in Figure 18-1.
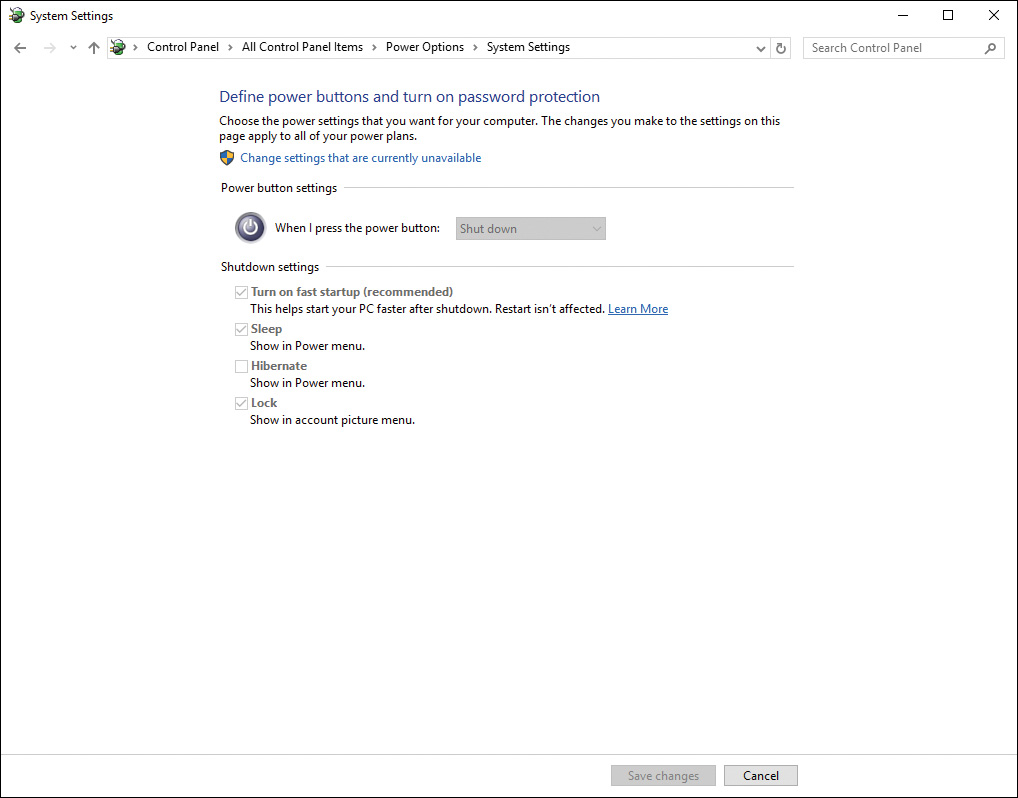
Figure 18-1 Enabling or Disabling the Fast Startup Option in the Control Panel Power Settings
Step 4. To enable the option, click the Change Settings That Are Currently Unavailable link, and then check the Turn On Fast Startup (Recommended) option.
This option stores your computer’s state by storing certain settings from the computer’s memory into a file called hiberfil.sys in the root of the C: drive. When you start up the computer, it loads up the file in what is called Hybrid Startup mode.
Applications that are configured to start up during Windows boot can also affect the startup speed of the computer. You can view and manage the startup applications from the Task Manager. Use the steps that follow to view the startup applications.
Step 1. Right-click the taskbar and select Task Manager from the pop-up menu (or press Ctrl+Shift+Esc).
Step 2. Click the More Details option at the bottom of the Task Manager window.
Step 3. From the Details view, select the Startup tab.
The Startup tab of Task Manager displays your startup applications, similar to Figure 18-2. The screen lists all the applications that will start up during Windows boot, along with the Publisher, the Status, and the Startup impact.


Figure 18-2 Startup Tab of the Task Manager Details View Allowing You to View and Manage Startup Applications
Notice from Figure 18-2 that impact shown for OneDrive is High. This indicates that OneDrive can significantly impact the startup speed of the system. From the dialog box you can select Microsoft OneDrive from the list and then click the Disable button. OneDrive will then not start up during the Windows boot. You can still use and access OneDrive after the system boots, or when you need to use it, but it will automatically start and sync up your OneDrive files. You can start it later from the Start menu to reenable the file sync.
Windows Store for Business
Introduced for Windows 10 and Windows 10 Mobile is the Windows Store for Business. It is designed for businesses that want to purchase and deploy store apps for their users from a central location. In this way it provides value to organizations by enabling volume purchases of apps and a central point for managing distribution. You can also use the Windows Store for Business for deploying Line-of-Business (LOB) apps that you have developed for employees.
Windows Store for Business requires Windows 10 on a computer or mobile device, and users need Microsoft Azure AD accounts, which you create in the Azure AD. You can optionally use Microsoft Intune to manage distribution of the apps to users and devices. You learned about Microsoft Intune in Chapter 13, “Microsoft Intune.”
Signup and User Configuration
To get started using Windows Store for Business, sign up at https://businessstore.microsoft.com. If you already have an Azure account, after you agree to the terms of service, your account will be set up. The first person to sign in must be a Global Admin of the Azure AD tenant. You can then access the main page of the store, which will be similar to Figure 18-3.

Figure 18-3 Home Page of the Windows Store for Business
When you sign up, you can then assign roles to other employees in the Azure AD to administer the Windows Store for Business. The store is integrated with Azure AD, Office 365, and, if you are using Microsoft Intune, it can integrate with that management tool as well. You learned about these cloud services in Chapter 13.
You can assign roles to other users in your organization to help administer the store and the apps you make available through purchase or upload. From the store portal shown in Figure 18-3, click the Settings menu and then select Permission. When you first sign up, the only user will be yourself, and as mentioned, you will have the Global Admin role. To add other users, click the Add People link. This displays the page shown in Figure 18-4.

Figure 18-4 Assigning User Roles in Windows Store for Business
Using the Assign Roles to People page, click in the Search box to find a user. Recall that users must exist in your tenant Azure AD, and you can search by name or email address. Select the user you want from the search list, and the user will be added to the box. You can select multiple users if you want to assign the same role to several people. Check the box for the role to assign, and then click the Save button.
The Store for Business administrators will have permissions to configure a number of settings in the store.
![]() Account information: Manage the organization account and payment information, and configure whether to make offline-licensed apps available through the Store for Business account.
Account information: Manage the organization account and payment information, and configure whether to make offline-licensed apps available through the Store for Business account.
![]() Device Guard signing: Use the Device Guard signing portal to add unsigned apps to a code integrity policy. You can also sign code integrity policies.
Device Guard signing: Use the Device Guard signing portal to add unsigned apps to a code integrity policy. You can also sign code integrity policies.
![]() LOB publishers: You can assign developers in your organizations to become LOB publishers. Your list of LOB publishers can be activated or invited. LOB publishers can add custom-developed apps to your store.
LOB publishers: You can assign developers in your organizations to become LOB publishers. Your list of LOB publishers can be activated or invited. LOB publishers can add custom-developed apps to your store.
![]() Management tools: View the management tools integrated with Azure AD. You can choose one for management app updates and distribution, as shown in Figure 18-5. If you used Microsoft Intune as an MDM as described in Chapter 13, it is available to activate as the management tool in your integrated Windows Store for Business account.
Management tools: View the management tools integrated with Azure AD. You can choose one for management app updates and distribution, as shown in Figure 18-5. If you used Microsoft Intune as an MDM as described in Chapter 13, it is available to activate as the management tool in your integrated Windows Store for Business account.

Figure 18-5 Selecting a Device Management Tool to Use with Windows Store for Business
![]() Permissions: Manage permissions for organizational employees.
Permissions: Manage permissions for organizational employees.
![]() Private store: Update the name for the private store. The name will be displayed on a tab in the Store.
Private store: Update the name for the private store. The name will be displayed on a tab in the Store.
Device Guard is a set of features designed to improve security of connected devices using virtualization-based security options. Implementing Device Guard locks down devices so that only the software or programs from trusted software publishers is allowed to run on the device. To use LOB applications on these devices requires signing the applications so that they are trusted on the device and will be allowed to run. You learned about Device Guard in Chapter 7, “Windows 10 Security.”
Note
To learn more about Device Guard signing for Windows Store for Business, see “Device Guard Signing” at https://technet.microsoft.com/en-us/itpro/windows/manage/device-guard-signing-portal.
Note that the preceding roles are Windows Store for Business roles. Permissions for each role are shown in Figure 18-4. Users in your Azure AD will automatically be assigned permissions in the store, as detailed in Table 18-2.
Table 18-2 Global User Account Permissions in Windows Store for Business
Permission |
Global Administrator |
User Administrator |
Billing Administrator |
Assign Roles |
Yes |
Yes |
No |
Modify Company Profile |
Yes |
No |
No |
Manage Store for Business Settings |
Yes |
No |
No |
Acquire Apps |
Yes |
No |
Yes |
Distribute Apps |
Yes |
No |
Yes |
Sign Policies and Catalogs |
Yes |
No |
No |
Global user roles are assigned in Azure AD. Use the following procedure to assign Global roles in Azure AD:
Step 1. Log in to the Azure portal at https://portal.azure.com.
Step 2. Select Azure Active Directory from the menu.
Step 3. From the Azure AD submenu, select Users and Groups.
Step 4. Select All Users, and then select the user you want to configure. You can use the Search box at the top of the All Users list to find a user.
Step 5. From the user menu shown, select Directory Role.
Step 6. From the Directory role page, use the option buttons to select whether the user is a normal User, a Global Administrator, or a Limited Administrator.
Step 7. If you select Limited Administrator, a list of options appears. You can select multiple administration roles. The two that apply to the Store for Business are the Billing Administrator role and the User Administrator role.
Step 8. After making your selections, click the Save button.
When a user has an applicable Global rule in your Azure AD, she can sign into the Windows Store for Business and perform the functions based on her role, as described in Table 18-2.
Working with Store for Business Apps
Similar to the Window Store, the Windows Store for Business has thousands of apps that you can acquire and make available to your users. The apps are UWP apps, designed for Windows 10, Windows Phone, Surface Hub, Windows IoT, and HoloLens. Some apps may have been written for Windows 8 or Windows 8.1, but are compatible with Windows 10. When you add an app to your inventory, it will be assigned to a specific platform, or be available for all devices.
There are two licensing models for the apps you can add to your Windows Store for Business:
![]() Online licensing: This is the traditional model also used in Windows Store. Users connect to the Store for Business to get an app and license, based on their Azure AD accounts. You can distribute these apps by assigning them to your users, adding it to the private store for users to download, or distribute them through a management tool.
Online licensing: This is the traditional model also used in Windows Store. Users connect to the Store for Business to get an app and license, based on their Azure AD accounts. You can distribute these apps by assigning them to your users, adding it to the private store for users to download, or distribute them through a management tool.
![]() Offline licensing: For apps that are available for offline licensing, you can download the apps and deploy them using your private network. This allows you to deploy these apps on devices that cannot access the store. To distribute these apps, you can either use a provisioning package in a deployment image or use a management tool such as Microsoft Intune.
Offline licensing: For apps that are available for offline licensing, you can download the apps and deploy them using your private network. This allows you to deploy these apps on devices that cannot access the store. To distribute these apps, you can either use a provisioning package in a deployment image or use a management tool such as Microsoft Intune.
Some apps in the Store for Business are free, and some require a licensing fee. To acquire apps that require a fee, add payment information to your Store for Business account, or you can provide a payment method when you acquire the app. Use the following procedure to acquire apps from the Store:
Step 1. Log in to your Store for Business portal with an account that has permissions to acquire apps.
Step 2. Select the Shop menu, or use the Search bar to find an app, and then click the app you want to purchase.
Step 3. From the app description page, select the license type.
Step 4. Free apps are added to your Inventory when you select Get the App. For paid apps, select the quantity of the app you want and click Next. If your account does not have a payment method configured, you will be prompted for payment.
Step 5. After the app has been acquired, it appears in your Inventory. Select Inventory from the Manage menu to see your apps. Your Inventory is displayed, as shown in Figure 18-6.
Step 6. To add the app to your private store, click the Actions column for the app and then select Add to Private Store.

Figure 18-6 Your Windows Store for Business Inventory
From the Inventory page shown in Figure 18-6, you can start assigning apps to users. To do so, click the Actions column for the app and then select Assign to People. Type the name of a user into the box provided, as shown in Figure 18-7. You can continue to add names for all the people you want to assign the app to. When you are finished, click the Assign button.

Figure 18-7 Assigning an App to Users in the Store for Business
Client Configuration
By default, when users log in to their computers using their Azure AD credentials, the Store for Business private store will be available as a tab on the Store when they open it, as shown in Figure 18-8. Users who are using a device that is not connected to the Azure AD, or who are using a local account, can still access the private store by using the Add Work or School Account option and signing in with their Azure AD credentials, as shown in Figure 18-9.
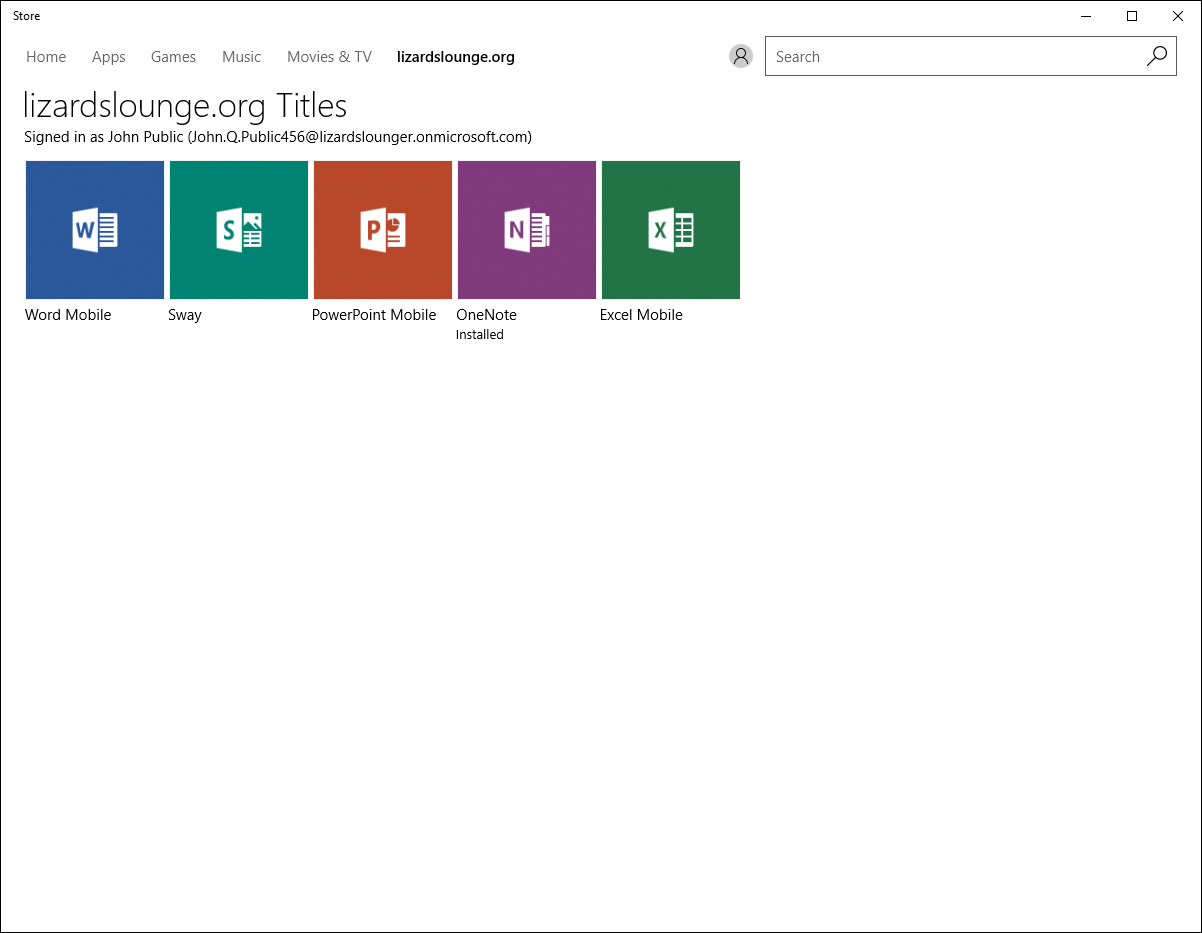
Figure 18-8 Private Store Tab on the Windows 10 Store App
Figure 18-9 Adding a Work or School Account to the Windows 10 Store App
You can configure your devices to limit access only to your organization’s private store. If you are using Microsoft Intune to manage your devices, you can configure a policy to enforce the store setting. Use a Custom Configuration policy and configure the ApplicationManagement/RequirePrivateStoreOnly policy setting, as shown in Figure 18-10.
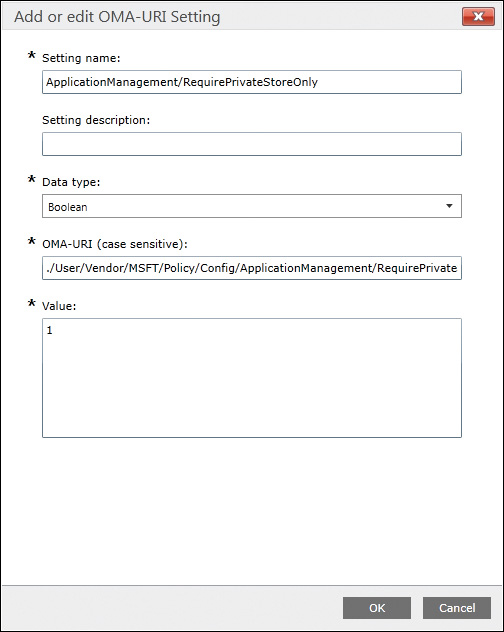
Figure 18-10 Allowing Only the Private Store Using Microsoft Intune Policy
You can also enforce the setting to allow only your private store by using Group Policy Objects. The GPO setting is found in Computer ConfigurationAdministrative TemplatesWindows ComponentsStore. Enable the policy called Only Display the Private Store Within the Windows Store App, as shown in Figure 18-11 to allow only the private store. You can then attach the GPO to any OU in your Active Directory.

Figure 18-11 Allowing Only the Windows Store Using Windows Group Policy Objects
Note
For more information about Windows Store for Business and how to manage your private store and apps, start with the references in the article “Windows Store for Business” at https://technet.microsoft.com/en-us/itpro/windows/manage/windows-store-for-business.
Windows Assessment and Deployment Kit (ADK)
You learned some of the features and applications available in the Windows Assessment and Deployment Kit (ADK) in previous chapters of this text. Table 18-3 is provided here as a reference to the tools provided in the ADK that you have learned about and the chapter where it is covered. This section focuses on how the ADK can help you to implement apps and administer them on Windows 10.
Table 18-3 Tools and Features of the ADK and Where They Are Covered
Topic |
Chapter |
Windows System Image Manager |
Chapter 2, see “Performing an Unattended Installation of Windows 10” |
Installing the ADK |
Chapter 2, see “Performing an Unattended Installation of Windows 10” |
Windows Imaging and Configuration Designer (ICD) |
Chapter 4, see “The Windows Imaging and Configuration Designer (ICD)” |
Provisioning Packages |
Chapter 4, see “The Windows Imaging and Configuration Designer (ICD)” |
User State Migration Tool (USMT) |
Chapter 9, see “Migrating User Profiles” |
A lot of functionality is available in the ADK. You can review Chapter 2 for information about installation of the ADK and the options available to install on a reference computer or an administration computer. Several additional tools are discussed in this chapter. If you are preparing for the 70-698 exam, you should also review the topics in other chapters, and the topics in the following list are also required for the 70-697 exam:
![]() Application Compatibility Tools: You learn about these tools in the next section, “Desktop Application Compatibility.” The Microsoft SQL Server 2012 Express database is also available in the ADK and can be used for storing your application compatibility settings.
Application Compatibility Tools: You learn about these tools in the next section, “Desktop Application Compatibility.” The Microsoft SQL Server 2012 Express database is also available in the ADK and can be used for storing your application compatibility settings.
![]() Microsoft User Experience Virtualization (UE-V) Template Generator: You learn about UE-V in this chapter in the “User Experience Virtualization” section. The template is a useful tool for managing UE-V.
Microsoft User Experience Virtualization (UE-V) Template Generator: You learn about UE-V in this chapter in the “User Experience Virtualization” section. The template is a useful tool for managing UE-V.
![]() Microsoft Application Virtualization (App-V) Sequencer: You learn about App-V in the next section, “Desktop Application Compatibility.”
Microsoft Application Virtualization (App-V) Sequencer: You learn about App-V in the next section, “Desktop Application Compatibility.”
Desktop Application Compatibility
As noted in Chapter 2, “Implementing Windows,” when you move to a new operating system, you should look at software compatibility while you are in the planning, development, and testing phases of the new operating system. Windows 10 is no different in this matter. Many applications that were originally developed for Windows Vista, 7, or 8.1 might not run properly on Windows 10; antivirus applications developed for older Windows operating systems in particular are often incompatible.
In this section you learn how to use the Application Compatibility Toolkit (ACT) to identify incompatible applications and develop a strategy to deal with them. You also learn about some strategies for supporting incompatible applications, and tools for handling application coexistence when it can be problematic.
Application Compatibility Toolkit (ACT) and Compatibility Database
ACT is a Microsoft resource that helps administrators resolve compatibility of their applications with Windows 10. ACT is included with the Windows ADK and provides compatibility fixes, modes, and help messages; tools for created customized fixes and help messages; compatibility databases; and a query tool you can use to search for installed compatibility fixes on local computers.
Using the Application Compatibility Toolkit (ACT)
ACT helps organizations to produce a comprehensive inventory of fixes and compatibility modes. It also identifies which applications might require additional testing or the use of a shim, which is a minor system compatibility fix that assists in enabling older applications to work properly with Windows 10.
ACT 6.1 is included with the Windows Assessment and Deployment Kit (ADK), which you can download from https://msdn.microsoft.com/en-us/windows/hardware/commercialize/adk-install. If you installed the ADK as described in Chapter 2, using the defaults as previously shown in Figure 2-9, you will need to return to the installation wizard to complete the installation and configuration of ACT. Use the following procedure:
Step 1. In the taskbar Search text box or Cortana, type adk and then select adksetup.exe.
Step 2. You are informed that the features installed are up-to-date and given additional options. Click Change and then click Continue.
Step 3. From the Select the Features You Want to Change dialog box, select Application Compatibility Toolkit (ACT) and Microsoft SQL Server 2012 Express, and then click Change.
Step 4. If you receive a UAC prompt, click Yes.
Step 5. Wait while installation of ACT takes place. Click Close when finished.
After you’ve installed the ACT, you can access the Compatibility Administrator by typing compatibility administrator into the Search bar or Cortana and selecting this item from the list that appears. As shown in Figure 18-12, the Compatibility Administrator comes loaded with fixes and settings for hundreds of applications that Microsoft has tested. You can apply compatibility fixes and compatibility modes to any application and then save the information you’ve configured to an SQL database, either on a computer running SQL server or by using SQL Express, available for installation of the ADK.
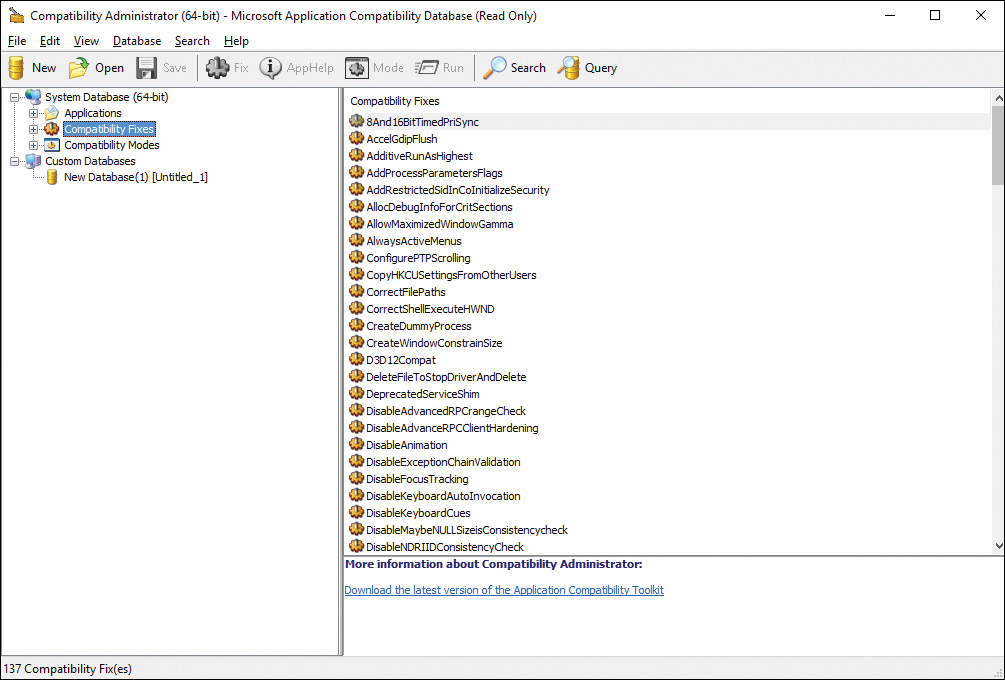
Figure 18-12 Compatibility Administrator Helps You to Configure the Compatibility of Hundreds of Applications Originally Written for Older Windows Versions
Note that there are two versions of the Compatibility Administrator, a 32-bit and a 64-bit version. You need to use the 32-bit version for 32-bit applications, and the 64-bit version for 64-bit applications. You also need to maintain separate databases for each.
You can search for fixes that are currently installed using the Search tool. To find applications that have fixes, ensure that you are using the right version of the Compatibility Administrator (32-bit or 64-bit) for the applications you want to search:
Step 1. From the Compatibility Administrator window, click the Search button.
Step 2. Click the Browse button and select the directory to search.
Step 3. Select at least one of the search options: Entries with Compatibility Fixes, Entries with Compatibility Modes, and/or Entries with AppHelp.
Step 4. Click the Find Now button to start the search. Any results will show up in the lower window, as shown in Figure 18-13.
Step 5. Click the Export button to save your search results to a text file. You can also double-click one of the files to view details of the fix from the database.

Figure 18-13 Compatibility Administrator Allowing You to Search for Fixes for Applications Installed on the Local Computer
A lot of fixes are included with the ACT. These fixes are small pieces of code that capture API calls and translate them to current Windows API calls so that the application works the same way it did on older versions. You can search for applications with fixes using the Compatibility Administrator. Expand the Applications node from the left pane to find the application by name. Select the application to view the fixes available, as shown in Figure 18-14.
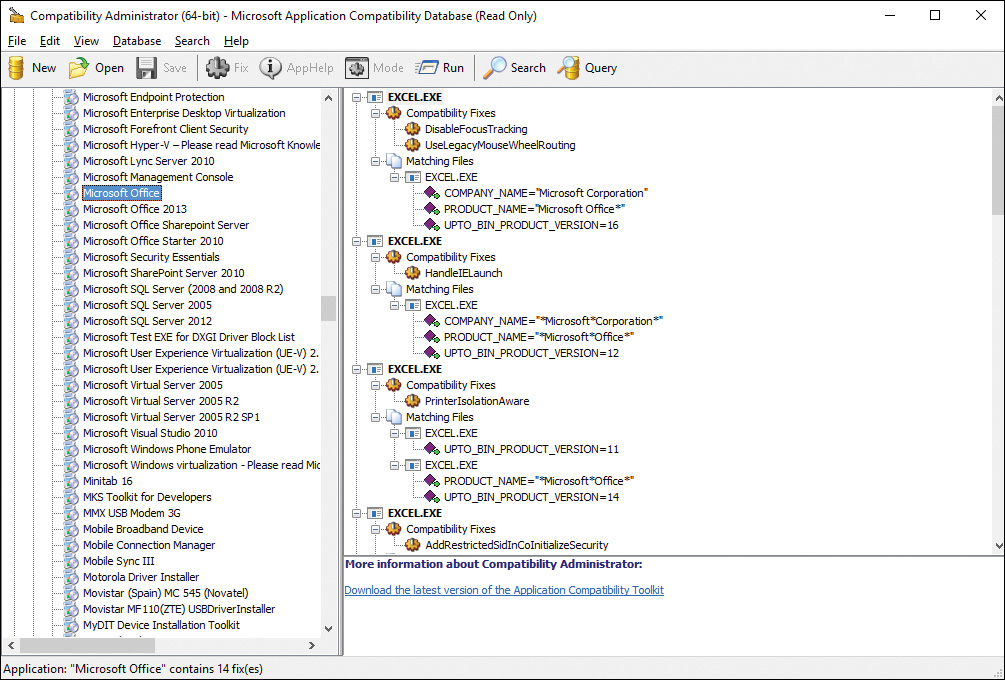
Figure 18-14 Compatibility Administrator Allowing You to Find Existing Fixes Available for Many Applications
You can enable and disable any fix using the Administrator tool. It may be necessary to disable a fix; for example, if a vendor has released a new version of the application, you will need to disable the fix to test the application and confirm that the new version is correct. To disable a fix, select the application from the list in the left pane, click the Database menu, and then select Disable Entry. You can enable a fix using the same procedure.
More details in the usage and configuration of ACT are beyond the scope of the 70-697 exam and are not included here.
Note
To learn more about using the tool to manage and create fixes, follow the references in the article “Managing Application-Compatibility Fixes and Custom Fix Database” at https://technet.microsoft.com/en-us/itpro/windows/plan/managing-application-compatibility-fixes-and-custom-fix-databases?f=255&MSPPError=-2147217396.
Note
Most of the functionality available in previous versions of the ACT has been replaced with Upgrade Analytics, part of the Microsoft Operations Management Suite of tools. Learn more about the Upgrade Analytics solutions by following the links in the “SUA User’s Guide” at https://technet.microsoft.com/en-us/itpro/windows/plan/sua-users-guide.
Using Windows Installer
Windows Installer is an application installer and configuration service that Microsoft has provided with Windows versions dating back to Windows XP and Windows Server 2003. It enables you to install, configure, update, and patch applications efficiently, thereby reducing total cost of ownership (TCO). Currently in version 5.0, Windows Installer running on a Windows 10 or Windows Server 2016 computer supports the installation of applications on all versions of Windows, including approved apps on Windows 10. Windows Installer offers a method of installing applications in a consistent manner. Using this method, a manufacturer can provide a way to package an application so that administrators can create scripted packages and deploy the application to Windows computers throughout a network.
Windows Installer enables administrators to deploy software so that it is always available to users and repairs itself if needed. The software is always available to a user, regardless of what happens. If a user’s computer fails, a support person needs only to provide a replacement computer with Windows 10 installed. The user starts the computer and logs on, and the required software packages are automatically installed. Should necessary files become corrupted or deleted, they are automatically reinstalled the next time the user requires the application.
Recent improvements in the functionality of Windows Installer include the following:
![]() Windows Installer 3.0 and later can install multiple patches with a single transaction that integrates the progress of installation, rollbacks, and reboots. This includes that application of patches in a specified sequence.
Windows Installer 3.0 and later can install multiple patches with a single transaction that integrates the progress of installation, rollbacks, and reboots. This includes that application of patches in a specified sequence.
![]() Windows Installer 4.5 and later can use transaction processing in installing multiple packages. In other words, if the entire installation cannot complete successfully or is canceled by the user, Windows Installer rolls back changes and restores the computer to its original status. This ensures that all packages in a multipackage transaction are installed or none of them are installed.
Windows Installer 4.5 and later can use transaction processing in installing multiple packages. In other words, if the entire installation cannot complete successfully or is canceled by the user, Windows Installer rolls back changes and restores the computer to its original status. This ensures that all packages in a multipackage transaction are installed or none of them are installed.
![]() Windows Installer 5.0 can enumerate all components installed on the computer. In addition, packages can be used to customize the services on a computer. Developers can modify packages for installing an application according to per-user or per-computer scenarios.
Windows Installer 5.0 can enumerate all components installed on the computer. In addition, packages can be used to customize the services on a computer. Developers can modify packages for installing an application according to per-user or per-computer scenarios.
![]() Windows Installer 5.0 enables administrators to author packages to secure new accounts, Windows services, files, folders, and Registry keys. You can use a security descriptor that specifies permissions denial or inheritance from a parent source, or specifies permissions of a new account.
Windows Installer 5.0 enables administrators to author packages to secure new accounts, Windows services, files, folders, and Registry keys. You can use a security descriptor that specifies permissions denial or inheritance from a parent source, or specifies permissions of a new account.
Windows Installer uses the following file types:
![]() Application installation files use the .msi file extension. These are the basic files that install all programs.
Application installation files use the .msi file extension. These are the basic files that install all programs.
![]() Transform files use the .mst extension. These files are created to “transform,” or script, the way the installation takes place.
Transform files use the .mst extension. These files are created to “transform,” or script, the way the installation takes place.
![]() Patch files use the .msp extension. These files apply hotfixes or other patches that correct bugs or security problems with the associated application.
Patch files use the .msp extension. These files apply hotfixes or other patches that correct bugs or security problems with the associated application.
In an Active Directory Domain Services (AD DS) environment, Windows Installer takes advantage of Group Policy Objects (GPOs) for deployment purposes. You can use a GPO to deploy applications in any of the following ways:
![]() Publish a Package to Users: Provides users who receive this GPO with the capability to install the application through the Control Panel Programs applet. The application will also be installed when the user attempts to open a file whose extension is associated with the application.
Publish a Package to Users: Provides users who receive this GPO with the capability to install the application through the Control Panel Programs applet. The application will also be installed when the user attempts to open a file whose extension is associated with the application.
![]() Assign a Package to Users: Automatically provides the application within the Start screen of any computer that the user logs on to. The application installs upon the activation of the icon in the Start screen or when the user attempts to open a file whose extension is associated with the application.
Assign a Package to Users: Automatically provides the application within the Start screen of any computer that the user logs on to. The application installs upon the activation of the icon in the Start screen or when the user attempts to open a file whose extension is associated with the application.
![]() Assign a Package to Computers: Installs the application automatically upon startup.
Assign a Package to Computers: Installs the application automatically upon startup.
Caution
Never assign a Windows Installer Application to both a user and a computer. If you do so, and the two GPOs use different transforms, the operating system will install and uninstall the application every time it is accessed.
When you right-click any .msi file, you see the options shown in Figure 18-15 pertaining to file installation actions, as described in the list that follows.

Figure 18-15 Windows Installer Options Pertaining to Application Installation Actions
![]() Install: The default. Installs the application using default parameters.
Install: The default. Installs the application using default parameters.
![]() Repair: Attempts to repair an unsuccessful installation. Use this option when you’ve had a problem.
Repair: Attempts to repair an unsuccessful installation. Use this option when you’ve had a problem.
![]() Uninstall: Use this option to remove the application, especially when the application installs improperly.
Uninstall: Use this option to remove the application, especially when the application installs improperly.
![]() Troubleshoot Compatibility: Starts a wizard that enables you to test program compatibility settings before installing the program.
Troubleshoot Compatibility: Starts a wizard that enables you to test program compatibility settings before installing the program.
From the command line, you can use the Msiexec.exe file along with the .msi package name to install, uninstall, or repair the package, as well as to advertise or create an installation package. (Advertising a program does not install it on a computer—it makes the application available for the user to install.) You can use any of the following actions with Msiexec.exe from a command prompt:
![]() To install an application, type msiexec /I filename.msi, where filename is the name of the application.
To install an application, type msiexec /I filename.msi, where filename is the name of the application.
![]() To remove an application, type msiexec /X filename.msi.
To remove an application, type msiexec /X filename.msi.
![]() The repair parameters can assist when troubleshooting a Windows Installer problem. To repair the application, type msiexec /F [parameter] filename.msi, where [parameter] refers to an option listed in Table 18-4 describing the repair action to be performed.
The repair parameters can assist when troubleshooting a Windows Installer problem. To repair the application, type msiexec /F [parameter] filename.msi, where [parameter] refers to an option listed in Table 18-4 describing the repair action to be performed.
![]() To advertise an application, type msiexec /J [parameter] filename.msi. There are two parameters for advertising: m advertises to all users on the computer, whereas u advertises only to the current user.
To advertise an application, type msiexec /J [parameter] filename.msi. There are two parameters for advertising: m advertises to all users on the computer, whereas u advertises only to the current user.
![]() Administrative installation packages are required for deploying applications from network shares. To create an administrative package for deployment, type msiexec /A filename.msi.
Administrative installation packages are required for deploying applications from network shares. To create an administrative package for deployment, type msiexec /A filename.msi.
Table 18-4 Msiexec.exe Repair Parameters
Parameter |
Function |
Troubleshooting Usage |
a |
Reinstalls all the files for the application |
Use when the application does not completely install. |
c |
Reinstalls any missing file or one whose checksum is invalid |
Use when you receive file missing error messages. |
d |
Reinstalls any missing file or an invalid version of a file |
Use after installing a different application that overwrites shared files and you receive errors or experience problems. |
e |
Reinstalls any missing file, or an equal or older version of a file |
Use when you have rolled back another application’s installation and then you receive error messages. |
m |
Rewrites the Registry entries of the application that are attached to the computer (HKEY_LOCAL_MACHINE) |
Use when the application displays the same error for all users who use the computer. |
o |
Reinstalls any missing file or an older version of a file |
Use when you have rolled back another application’s installation and then you receive error messages. |
p |
Reinstalls any missing file |
Use when the application does not finish copying files. |
s |
Re-creates application shortcuts |
Use when you use a Start screen or desktop icon and the application does not open, but you can run the application from the command line or Run dialog box. |
u |
Rewrites the Registry entries of the applications that are attached to the user (HKEY_USERS or HKEY_CURRENT_USER) |
Use when the application works for one user but does not work for another, even though they are using the same computer. |
v |
Caches a package locally (overwriting any existing cached package) and then runs the application from the source |
Use when you install from a network location that is connected by a slow or unpredictable network link, or when the application has failed during the file copy process. The v option should be used only for reinstall—do not use this option for the first installation. |
Note
For additional parameters used with Msiexec.exe, open a command prompt and type msiexec /?. Also refer to “Command-Line Options” at https://msdn.microsoft.com/en-us/library/aa367988.aspx.
The Windows Installer service runs on each computer and depends upon the Remote Procedure Call (RPC) service. The Windows Installer service, by default, does not start up automatically when you boot Windows 10. Instead, it starts up whenever an .msi package is run. The service works in conjunction with the Msiexec.exe executable file, which interprets the information in the .msi file.
Note
You can use Msiexec.exe to repair .msi packages. If you have trouble with an .msi package, you can run the Msiexec.exe file from the command line to repair the package. You can also use Msiexec.exe to control the installation process through its optional command-line switches, whether you run it from the command line or use it in a script.
Understanding MSI Features and Support
Before Windows Installer standards were published for use by third-party manufacturers, each manufacturer developed a proprietary method of installation. These methods used different installation executables and assorted parameters and had varying degrees of scripting capabilities. A few companies developed software that could create a standard installation package, but they did not manage problems with files overwriting newer versions of the same file (the old DLL hell), and most had no method for rolling back versions nor provided a granular deployment method.
Windows Installer uses a standard set of installation rules. Compliant applications must handle versioning rules to prevent overwriting newer files, maintain a record of any changes made to Windows—both file changes and Registry keys—and be capable of functioning with the Msiexec.exe file and Windows Installer service.
The .msi file acts as a relational database in which the fields in the file contain the instructions that can effectively deploy an application. When an installation begins, the Windows Installer service and Msiexec.exe cooperatively convert the .msi data into an installation/uninstallation script.
A management application programming interface (API) is part of Windows Installer. This API tracks the installed applications, noting which features and components are selected and the path chosen by the installer. The API is able to determine which component is not functioning properly and is able to selectively reinstall the component, which avoids having to reinstall the entire application.
You can customize how an application is installed by creating a transform file, which has the extension of .mst. The transform file answers the questions that the installation process asks, such as the path for the application, the component selection, and other configuration options.
Note
For more information on Windows Installer, refer to “Windows Installer” at https://msdn.microsoft.com/en-us/library/windows/desktop/cc185688(v=vs.85).aspx and links found in the document.
Implementing Shims
A shim is a minor system compatibility fix that assists in enabling applications originally written for older Windows versions to work with a newer operating system such as Windows 10. Applications communicate with Windows by calling functions built in to the operating system via an internal structure called the application programming interface (API). As the Windows operating system evolves from one version to the next (and even with updates to the same version), modification of these functions to suit all applications in use could limit the ability to improve Windows functionality or require considerable additional software code. This could lead to a “bloated” operating system.
By using a shim, the import address table redirects application programming interface (API) calls to the shim, whose code implements modifications that enable the application to work properly with Windows 10. An example would be the redirection of application output to a user-specific folder rather than a general folder, thereby enabling you to configure a more restrictive access control list (ACL) than would be otherwise needed. You can also use shims to locate system files that have been moved to a new location because of a change in Windows architecture; however, you cannot use a shim to circumvent built-in Windows security mechanisms.
Caution
You should regard shims as a temporary fix for your applications, to be used only until an updated version of the application becomes available.
Microsoft creates shims on a per-application basis and packages them in custom shim database files with the .sdb extension. You can install these files using the sdbinst.exe command-line tool, which is found in the %systemroot%system32 folder on a 32-bit computer and in the %systemroot%sysWOW64 folder on a 64-bit computer, as well as using the Compatibility Administrator, which you learned about earlier in this chapter. Open an administrative command prompt and type the following:
Sdbinst filename.sdb [-?] [-q] [-u filepath] [-g GUID] [-n "name"]
In this command, the parameters are as follows:
![]() filename.sdb: The path and name of the shim database you are installing
filename.sdb: The path and name of the shim database you are installing
![]() [-?]: Displays help information
[-?]: Displays help information
![]() [-q]: Quiet mode (automatically accepts prompts)
[-q]: Quiet mode (automatically accepts prompts)
![]() [-u filepath]: Uninstalls the database specified by the file path
[-u filepath]: Uninstalls the database specified by the file path
![]() [-g GUID]: Specifies the database to be installed using a GUID
[-g GUID]: Specifies the database to be installed using a GUID
![]() [-n “name”]: internal name of file (for uninstall only)
[-n “name”]: internal name of file (for uninstall only)
The workflow recommended by Microsoft for implementing shims includes the following steps:
Step 1. Create a new compatibility database (*.sdb) using the Compatibility Administrator, which is a component of the Application Compatibility Toolkit (ACT).
Step 2. Select the application and then select the required compatibility fixes or shims.
Step 3. Test the application with the compatibility fix or shim.
Step 4. Save the compatibility database and deploy using the sdbinst.exe command.
Note
For more information on using shims, refer to “Managing Application-Compatibility Fixes and Custom Fix Databases” and the references provided at https://technet.microsoft.com/en-us/itpro/windows/plan/managing-application-compatibility-fixes-and-custom-fix-databases.
Configuring File Associations and Default Program Settings
By default, when you open a file with a known extension, Windows opens this file with an application known as the default program. For example, Windows opens image files with the new Windows 10 Photos app by default. If you have more than one image viewer program installed on your computer, such as Irfan View, Breeze Browser, Adobe Bridge, or others including the older Windows Photo Viewer, you can choose which program opens the image by default when you double-click an image file with a given extension such as .jpg or .tif. Windows stores information in the Registry for all file types for which a default association has been defined or for which you have created a default program setting.
Modifying Default Program Settings
To modify default program settings or create new settings, use the following steps:
Step 1. Open Control Panel from the Start menu Windows System category and choose the Programs category.
Step 2. Click Default Programs to see the options shown in Figure 18-16.

Figure 18-16 Control Panel Programs Applet Enabling You to Set Default Programs or Associate File Types with the Desired Program
Step 3. Click Set Your Default Programs, and in the Set Your Default Programs window, select the program whose options you want to configure. You receive the options shown in Figure 18-17.
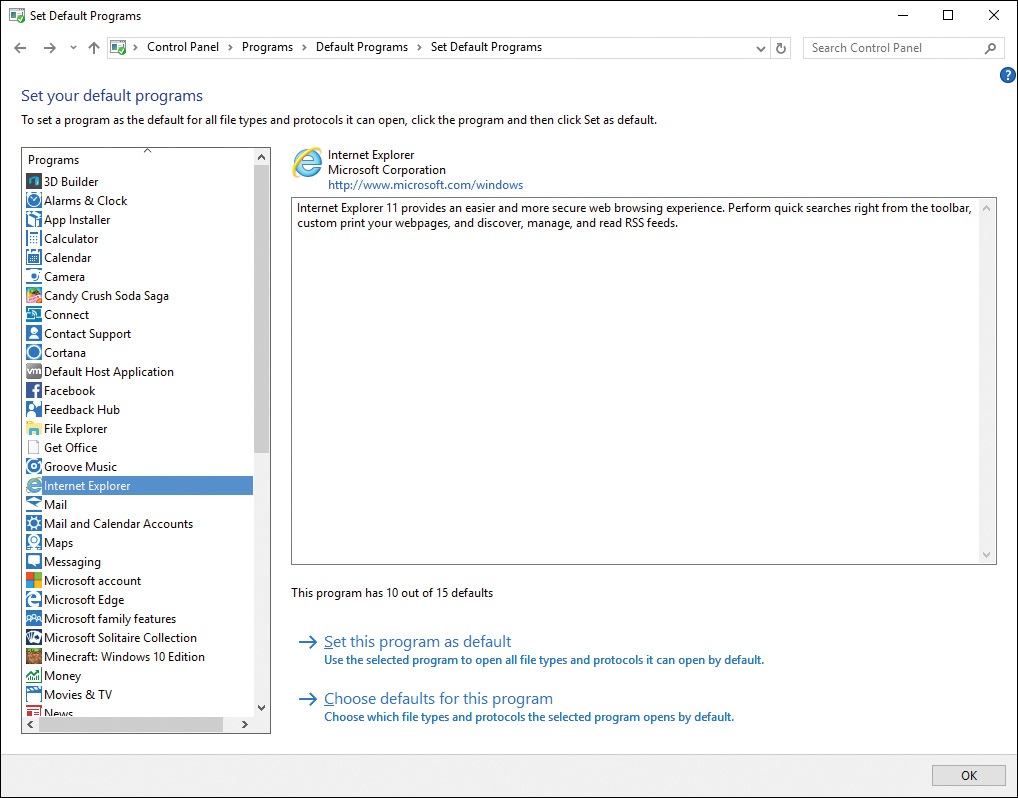
Figure 18-17 Set Your Default Programs Window Enabling You to Select a Program That Will Act as the Default for All File Types and Protocols That It Can Open
Step 4. To use the selected program to open all file types and protocols it is capable of opening, click Set This Program as Default. To select from a list of file types and protocols, click Choose Defaults for This Program.
Step 5. The Set Associations for a Program window shown in Figure 18-18 provides a list of file types the chosen program can open. Select the file extensions you want to have the program open. To choose all file types, select the Select All check box. To remove file types, deselect their check boxes. When finished, click Save.
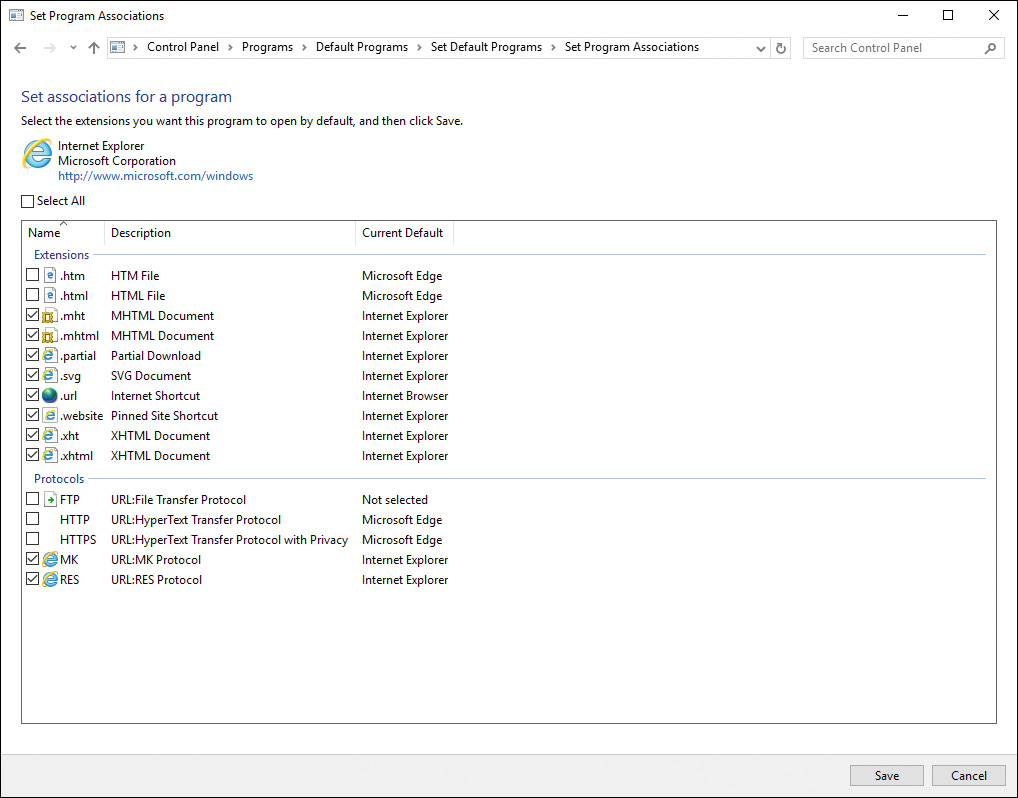
Figure 18-18 Selecting a Program as the Default for Its File Types
Step 6. You are returned to the Set Your Default Programs window. If desired, select another program to modify its file associations. When finished, click OK to return to the Default Programs applet.
Associating File Extensions with Specific Programs
The Default Programs applet also lets you associate a file extension with a program. Use the following steps:
Step 1. From the Default Programs applet, click Associate a File Type or Protocol with a Program. You receive the Associate a File Type or Protocol with a Specific Program window shown in Figure 18-19.
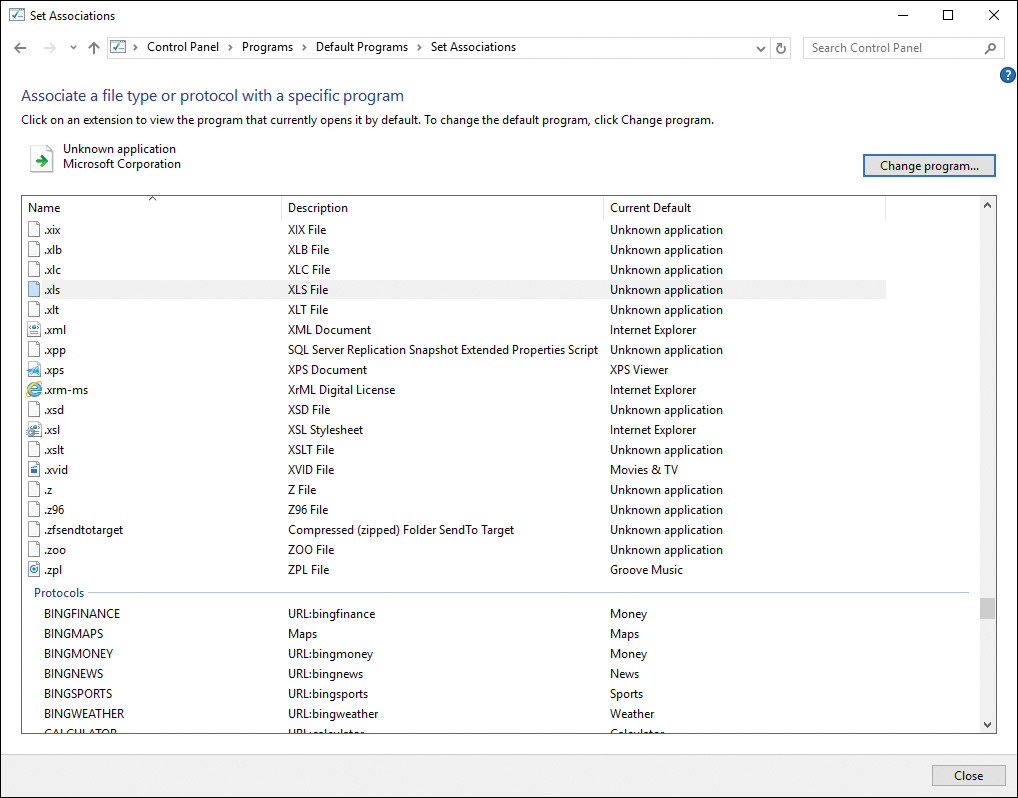
Figure 18-19 Associate a File Type or Protocol with a Specific Program Window Enabling You to Choose the Default Program to Be Used with a File Using a Given Extension
Step 2. Scroll this list and select the extension whose default program you want to modify; for example, .xls. Then click Change Program.
Step 3. If you want to change the default program, click More Apps to expand the list of available programs, as shown in Figure 18-20.
Step 4. Select the desired program and then click OK. The list updates to reflect the change you’ve made.
Step 5. Repeat for any other extensions you want to modify. When finished, click Close to return to the Default programs applet.
If Windows cannot associate the selected file extension with a program, you are given the option of trying an app on the computer or locating one from the Windows Store. Selecting an app on the computer brings up a list similar to that shown in Figure 18-20. Select a program you think might be able to open the file extension.

Figure 18-20 List of Programs That Are Capable of Opening a File with the Given Extension
Note
You can also modify a file association from any File Explorer window. Right-click a file with the extension you want to modify and choose Open With. You receive a dialog box similar to that shown in Figure 18-20, which enables you to accept the current default or choose a new one.
Caution
It is possible that the selected application will be unable to open a file with the extension you have selected. If you receive an error message when attempting to open such a file, return to the Set Associations window, click Change Program again, and either select another program on the computer or attempt to locate one online.
Configuring Application Compatibility Mode
As in previous Windows versions, Windows 10 provides the Application Compatibility mode that assists you in troubleshooting applications that do not run properly in Windows 10. In general, applications originally written for Windows 7 or Windows 8.1 should work in Windows 10. Applications written for older versions of Windows might not run properly, might stop responding (hang), or might refuse to start at all. If these applications worked properly in previous Windows versions, this could indicate a compatibility issue with Windows 10. Application Compatibility mode emulates the environment found on versions of Windows as far back as Windows 95. This mode also provides several other options that might enable a program to run. Use the following procedure to configure Application Compatibility mode:
Step 1. Right-click the shortcut to the program from the Start menu or desktop and choose Properties.
Step 2. Select the Compatibility tab to display the options listed in Table 18-5 and shown in Figure 18-21.
Table 18-5 Application Compatibility Options
Option |
Description |
Run compatibility troubleshooter |
Starts a troubleshooting routine that attempts to discern the cause of compatibility problems. You are presented with options to try a set of recommended compatibility settings or troubleshoot the program further based on problems suggested in Figure 18-22. |
Run this program in compatibility mode for |
Select the Windows version from the drop-down list that you know the program works properly on. |
Reduced color mode |
Uses a limited set of colors to run the program. Some older programs are designed to run in this color space. |
Run in 640×480 screen resolution |
Runs this program in a smaller window. Try this option if the graphical user interface (GUI) appears jagged or is rendered poorly. |
Disable display scaling on high DPI settings |
Shuts off automatic font resizing if you are using large-scale font sizes. Try this option if large-scale fonts interfere with the program’s appearance. |
Run this program as an administrator |
Some programs require Administrator mode to execute properly. You will receive a User Account Control (UAC) prompt when this option is selected. This option is not available to nonadministrative users. |
Change settings for all users |
Enables you to choose settings that will apply to all users on the computer. |
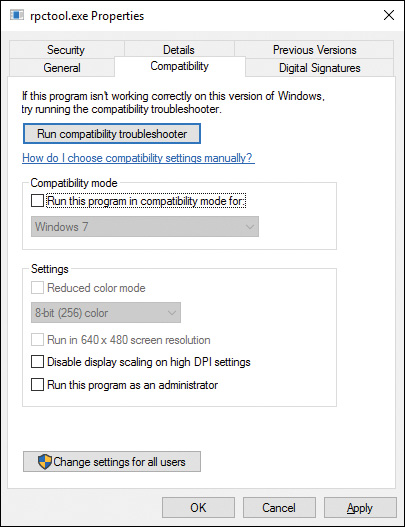
Figure 18-21 Compatibility Tab of an Application’s Properties Dialog Box

Figure 18-22 Program Compatibility Troubleshooter Enabling You to Choose from Several Possible Compatibility Problems
Step 3. Select one or more of these options and then click Apply.
Step 4. Test the program to see if it works properly. If necessary, repeat Steps 3 and 4 until the program does work properly.
Caution
You should not use the Program Compatibility options with older antivirus programs, disk utilities, or system programs. Such programs might cause data loss or create a security risk.
Desktop Application Coexistence
During deployment planning for rolling out Windows 10 in your organization, you will need to make an effort to identify any applications that may not be compatible with Windows 10. You may also encounter scenarios that require an older version of an application to run on the same computer with the newer version. Because many applications update the older version instead of leaving it in place, you need to find a way to isolate the older and newer versions.
In some circumstances, you may have applications that will not work even with Compatibility mode. It might be an older application that is still needed or that the organization is heavily invested in. You might run into applications that a small group in your organization needs but that cannot run in Windows 10.
Eliminating these programs from your organization can be problematic. Even if it is a small group of users who rely on it, their business processes might rely on that application for day-to-day operations. It might be an application developed in-house that will take a significant effort to update. Or it might have been developed by a third-party vendor that is no longer in business.
Supporting applications that need to coexist with other applications, or need to be accessible from Windows 10 but cannot run in Windows 10 natively, can be supported in one of three ways.
![]() Use Client Hyper-V: You can use Windows Client Hyper-V for any of these scenarios. Users can run an older version of Windows as a VM under Hyper-V and access their application in the virtual desktop. Older applications can be supported the same way, even if compatible with Windows 10. You can run the older application in a Windows 10 VM, while the newer application is available directly on the host. You learned about Hyper-V in Chapter 10, “Windows Hyper-V.”
Use Client Hyper-V: You can use Windows Client Hyper-V for any of these scenarios. Users can run an older version of Windows as a VM under Hyper-V and access their application in the virtual desktop. Older applications can be supported the same way, even if compatible with Windows 10. You can run the older application in a Windows 10 VM, while the newer application is available directly on the host. You learned about Hyper-V in Chapter 10, “Windows Hyper-V.”
![]() RemoteApp: Another option for handling incompatible applications is to run them as a RemoteApp on a Windows Server. This is a good option for running multiple versions of an application, but it may be problematic if the application is incompatible with Windows 10, because you would need to use older versions of Windows Server. An application that will not run on Windows 10 cannot be hosted in RemoteApp on Windows Server 2016. So consider the road map for your server infrastructure in this case. You learned about RemoteApp in Chapter 17.
RemoteApp: Another option for handling incompatible applications is to run them as a RemoteApp on a Windows Server. This is a good option for running multiple versions of an application, but it may be problematic if the application is incompatible with Windows 10, because you would need to use older versions of Windows Server. An application that will not run on Windows 10 cannot be hosted in RemoteApp on Windows Server 2016. So consider the road map for your server infrastructure in this case. You learned about RemoteApp in Chapter 17.
![]() App-V: App-V is a virtualization technology that allows you to virtualize applications and run them side by side on the same computer. Similar to RemoteApp, users can access an application in App-V from anywhere and use it as if it is installed locally on their device. You will learn about App-V next in this section.
App-V: App-V is a virtualization technology that allows you to virtualize applications and run them side by side on the same computer. Similar to RemoteApp, users can access an application in App-V from anywhere and use it as if it is installed locally on their device. You will learn about App-V next in this section.
Managing App-V Applications
In recent years, as the workers have become more mobile and require access to their files and applications anywhere at any time, Microsoft has developed technologies to help make mobility easier for workers and the IT professionals that support them. Virtualization technologies and cloud computing are part of this mobility evolution. Microsoft Application Virtualization (App-V) is Microsoft’s application virtualization and streaming solution.
App-V enables centralized management of application management and deployment. User applications and their application settings are maintained centrally and are managed using Active Directory and Group Policies. Only the App-V client is required on local Windows platforms, allowing users to access their applications from any organization client over the network, or when offline if the application has been run previously from that client computer. The application is never installed locally.
Overview of App-V
With App-V 5.1, virtual applications work more like traditional, locally installed applications. Applications are isolated as in older versions, but now separate App-V applications can be enabled to communicate with each other, allowing integrations between them when required.
To take advantage of centralized management and distribution of App-V applications, Windows Configuration Manager 2012 or App-V v5 server is required. On the server side, App-V includes an App-V Management Server along with a database to provide the overall management of the infrastructure, an App-V Publishing Server for hosting and streaming functionality for the virtual applications, and an App-V Reporting Server and database that provides App-V reporting services. Using these components allows an administrator to manage the applications and sessions, and publish applications for users to the Publishing Server. Users access their applications using an App-V client.
The App-V client is configured to connect to the server to stream the content or, optionally, download to a local drive. Note that App-V applications can run without a centrally managed infrastructure. The applications still run in isolation and are not installed locally, but applications cannot be updated and per-user authorization is not possible.
Application Virtualization, and virtualization in general, is a complex and involved topic, with its own field of study. For the 70-697 exam, you need not be an expert in virtualization technologies, but you should be able to identify App-V as a concept and know some basics of working with the App-V client on Windows 10.
The App-V client is distributed as part of the Microsoft Desktop Optimization Pack (MDOP). Windows 10 and Windows 8.1 already have all the software required for the App-V 5.1 client. For Windows 7 and Windows Server 2012, the following software is required:
![]() Microsoft Windows .NET Framework 4.5 (full package).
Microsoft Windows .NET Framework 4.5 (full package).
![]() Windows PowerShell 3.0 or later.
Windows PowerShell 3.0 or later.
![]() The App-V Sequencer client may be needed to manage App-V packages.
The App-V Sequencer client may be needed to manage App-V packages.
Note
For more information on deploying the App-V client, see “Planning for the App-V 5.1 Sequencer and Client Deployment” at https://technet.microsoft.com/en-us/itpro/mdop/appv-v5/planning-for-the-app-v-51-sequencer-and-client-deployment and links found in the document.
Note
Managing and maintaining an enterprise App-V infrastructure are out of the scope of Exam 70-697 and this book. For details on the infrastructure configuration and management, start with the “Microsoft Application Virtualization 5.1 Administrator’s Guide” at https://technet.microsoft.com/en-us/itpro/mdop/appv-v5/microsoft-application-virtualization-51-administrators-guide.
You can manage the App-V client and configuration from the client computer using the client management console, by using PowerShell, or using Group Policy.
The App-V Management Console
The App-V client provides a management application that can be used to perform some basic tasks for the App-V applications published for the user. Start the App-V client by clicking the Microsoft App-V Client UI tile from the Start menu, or typing App-V into the Search box or Cortana, and then clicking the Microsoft Application Virtualization Client link. From this screen, shown in Figure 18-23, you can work with the available App-V applications and App Connection Groups.

Figure 18-23 Managing App-V Applications from the App-V Client Management Console
The App-V client management console has the following features:
![]() Overview tab:
Overview tab:
![]() The Update tile is used to refresh an App-V application or receive a new package.
The Update tile is used to refresh an App-V application or receive a new package.
![]() Use the Download tile to download all the packages published to the user.
Use the Download tile to download all the packages published to the user.
![]() Work Offline is used to disable all automatic and manual updates of App-V applications.
Work Offline is used to disable all automatic and manual updates of App-V applications.
![]() Virtual Apps tab: Displays all the packages published to the user. You can select a package from the list to view the included applications and display information about package use and how much of the package has been downloaded to the computer. You can also use the Repair function to repair a misbehaving App-V package, but note that this will delete any user settings for that package.
Virtual Apps tab: Displays all the packages published to the user. You can select a package from the list to view the included applications and display information about package use and how much of the package has been downloaded to the computer. You can also use the Repair function to repair a misbehaving App-V package, but note that this will delete any user settings for that package.
![]() App Connection Groups tab: Clicking this tab displays all the connection groups available. Recall that a Connection Group is used to allow communication and integration between virtual applications. Select a group to view which packages are included.
App Connection Groups tab: Clicking this tab displays all the connection groups available. Recall that a Connection Group is used to allow communication and integration between virtual applications. Select a group to view which packages are included.
App-V Command-Line Utilities
With App-V version 5.1, Microsoft has provided a suite of PowerShell scripts for managing applications, packaging, updates, and other tasks. These scripts require PowerShell version 3.0 or later. PowerShell version 3.0 was included with Windows 8, and PowerShell version 5.1 is included with Windows 10. Note the link at the bottom of the App-V management console screen from Figure 18-21 called Show PowerShell commands. Clicking the link displays the available commands for managing App-V applications on the client. Table 18-6 describes each command and how it is used.
The [path] parameter in these commands refers to the location of the App-V package. Typically this will be an HTTP URL such as http://appv-server/apps/MyApplication.appv; however, the path could also be the name of a file on a file share or even the local computer.
Table 18-6 PowerShell Commands for Managing App-V Clients
Command |
Purpose |
Get-AppvClientPackage |
Returns a list of all App-V packages currently on the system. The following switch parameters are available to filter the results: -Name, -Version, -PackageId, and -VersionId. |
Mount-AppvClientPackage |
Downloads a package published for the user into the App-V cache. |
Set-AppvPublishServer |
Use to enable or disable automatic and manual updates of App-V applications. |
Mount-AppvClientConnectionGroup |
Download and/or repair Application Connection Groups available to the user. |
Get-AppvPublishingServer |
Display the current path(s) or URL(s) used for locating and downloading App-V applications. Returns the descriptive location name and a numeric ServerId for each publishing server. |
Add-AppvPublishingServer |
Add a new publishing location for App-V applications. The following parameters are required: -Name LocationName -URL path or url. |
Sync-AppvPublishingServer |
Checks the server and adds or removes packages and connection groups based on entitlements for the user. The parameter -ServerId can be used to select a specific server to sync. |
Note
For more details about these commands, open a PowerShell version 3.0 prompt from a Windows computer with App-V 5.1 client installed, and type Get-Help followed by the name of command.
User Experience Virtualization
If you have used any Windows computer for a long period of time, you likely know how frustrating it is when the computer either dies or the hard drive becomes unrecoverable. Even if you have saved all your files and backups, you will have to reconfigure all your applications and their custom settings, the appearance of your system, and other settings to get back to the way you are used to working. Even if you have not, as an IT professional you know how frustrating it can be for your users.
It is also difficult if you work on different devices, because you need to duplicate your setup or deal with the defaults on any device you do not use the most.
With User Experience Virtualization (UE-V), you can capture all your customized settings for Windows and your application and store them on your private network on a server file share. When you log on to a device, your settings are applied. UE-V can apply custom settings on any device you use, and even on virtual desktop (VDI) sessions when you log on.
UE-V consists of both a server and client component. The client component is included with Windows 10 Enterprise edition. Table 18-7 describes at a high level the components involved in UE-V and the purpose of each.
Component |
Purpose |
UE-V Service |
The UE-V Windows service runs on every device that needs to synchronize user settings. It monitors applications and Windows settings and synchronizes any changes between devices. |
Settings packages |
Configuration settings are stored in settings packages managed by the UE-V service. The packages are locally stored and then copied to the file share storage location. |
Settings storage location |
The storage location is a network file share that users have access to. |
Settings location templates |
Location templates are XML files used by UE-V to determine how to monitor and synchronize application settings and synchronize settings between devices. |
Universal Windows applications list |
The applications list is used by UE-V to determine which applications are enabled for synchronization. The list typically includes most Windows applications. |
Some settings are synchronized by default on UE-V–enabled systems:
![]() Microsoft Office 2016, 2013, and 2010
Microsoft Office 2016, 2013, and 2010
![]() Internet Explorer 10 and 11
Internet Explorer 10 and 11
![]() Windows accessories (WordPad, NotePad)
Windows accessories (WordPad, NotePad)
![]() Desktop background
Desktop background
![]() Ease of Access
Ease of Access
![]() Desktop settings (Start menu, taskbar, folder options, desktop icons, and regional and language settings)
Desktop settings (Start menu, taskbar, folder options, desktop icons, and regional and language settings)
Settings for applications are synchronized (saved and copied to the storage location) when you close the application. Settings for Windows are synchronized when you log off the device or when the device screen is locked.
Getting Started with UE-V
UE-V requires Windows 10 Enterprise or Windows 8 or 8.1 Enterprise or Pro edition for client computers. Clients must also have PowerShell 3.0 or later and .NET Framework 4.5 or later. It also requires Windows Server 2012 or later on the server side.
You will need to perform some configuration on the server and enable UE-V on client devices. Note that these are only basic high-level tasks. You should deploy UE-V in a lab environment and test it to make sure it meets your organization’s requirements, and carefully plan the implementation if it does.
Select a centrally located computer and create the storage location. You should create a security group specifically for all UE-V users. Grant the group permission to create a directory, and grant full permission to all subdirectories. You should grant Full control at the share level to your UE-V group, and Read and Create Folders permissions to the UE-V group at the NTFS level. If you are using System Center Configuration Manager (SCCM) in your organization, you can install and use the UE-V Configuration Pack to configure settings.
You can also configure UE-V using Group Policy Objects. Settings are available as administrative templates for computers and for users. Policy settings are available for configuring the UE-V services as well as specific settings for desktop applications and UWP apps. In Group Policy Management Editor, navigate to Computer ConfigurationAdministrative TemplatesWindows ComponentsMicrosoft User Experience Virtualization to edit the GPOs for UE-V, as shown in Figure 18-24.

Figure 18-24 Configuring UE-V Using Group Policy Objects
The most important of the UE-V Group Policies are as follows:
![]() Enable UEV: This policy allows you to enable or disable the UE-V feature and services.
Enable UEV: This policy allows you to enable or disable the UE-V feature and services.
![]() First Use Notification: Enable this policy setting to enable a notification in the system tray that appears the first time the UE-V agent is run.
First Use Notification: Enable this policy setting to enable a notification in the system tray that appears the first time the UE-V agent is run.
![]() Settings Storage Path: Use this policy to configure the UNC path name for the UE-V storage location. The share must be accessible by all UE-V users.
Settings Storage Path: Use this policy to configure the UNC path name for the UE-V storage location. The share must be accessible by all UE-V users.
![]() Settings Template Catalog Path: If you use custom settings location templates, you can enable this policy and configure the UNC path name where the templates are stored.
Settings Template Catalog Path: If you use custom settings location templates, you can enable this policy and configure the UNC path name where the templates are stored.
![]() Tray Icon: This setting enables an icon in the system tray to display notifications for UE-V on users’ computers.
Tray Icon: This setting enables an icon in the system tray to display notifications for UE-V on users’ computers.
![]() Do Not Synchronize Windows Apps: This policy defines whether UE-V synchronizes settings for Windows Store and UWP apps. By default, app settings are synched. You can enable this policy to turn off synchronization for apps.
Do Not Synchronize Windows Apps: This policy defines whether UE-V synchronizes settings for Windows Store and UWP apps. By default, app settings are synched. You can enable this policy to turn off synchronization for apps.
Group Policy folders under Microsoft User Experience Virtualization, Applications, and Windows Apps contain a long list of applications that are synchronized by default. You can customize which applications and apps are synchronized by enabling or disabling the policy for each policy in these folders. If you do not configure these policies, the applications and apps will be synchronized by default.
Custom Settings Location Templates
UE-V will synchronize many applications based on the default templates that are included. If you want to use UE-V to synchronize other applications, such as third-party or LOB applications, you need to create custom location templates to support those applications.
The Windows Assessment and Deployment Kit (ADK) includes as an installation option the UE-V Template Generator, a tool that you can use to create custom settings location templates. After the generator is installed, you can start it using the icon on the Start menu, or by searching for ue-v in the Search bar or Cortana. The UE-V Template Generate screen will be similar to Figure 18-25.

Figure 18-25 UE-V Settings Location Template Generator Tool
Use the following procedure to create a custom settings location template:
Step 1. From the UE-V settings location template generator, click Create a Settings Location Template.
Step 2. On the Specify Application page, click the Browse button to find the application .exe or shortcut (.lnk). Click Next.
Step 3. Wait for the application to start, and then close the application. The template generator will run in the background and detect where the application stores its settings. After the application is closed, click the Next button to continue.
Step 4. On the Review Locations page, check the Registry and Files locations that were detected. You can uncheck the boxes for any location you do not want to include in the synchronization. Click Next.
Step 5. On the Edit Template page, shown in Figure 18-26, you can review the location settings detected and modify them if needed. Click the Registry tab to see Registry locations, and the Files tab to view the files used for the application’s settings. When you are satisfied, click Create.
Step 6. Select a location and save your XML template file.
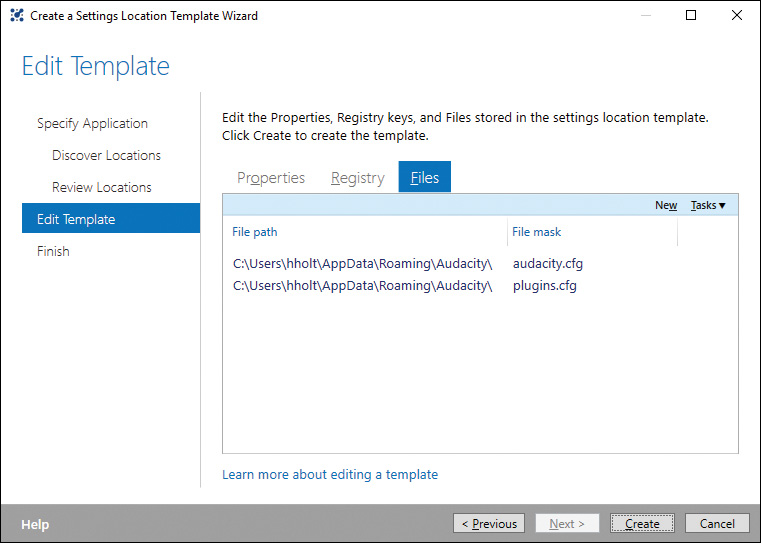
Figure 18-26 Editing a Location Template Using the UE-V Generator Tool
You should test your template before deploying it to the organization. If you need to make changes after testing, you can use the UE-V template generator to edit the template and save your changes.
You can deploy your template using SCCM, Group Policy, or using the UE-V settings template catalog, which is a share location you set up on the server when deploying UE-V for your organization. Templates deployed to the settings template catalog location are automatically updated by the UE-V service.
Note
For more information about UE-V, planning for deployment in an organization, and details for server and client configurations, start with the article “User Experience Virtualization (UE-V) for Windows 10 Overview” at https://technet.microsoft.com/en-us/itpro/windows/manage/uev-for-windows.
Using Microsoft Intune for Desktop Apps
In Chapter 13, “Microsoft Intune,” you learned how to use the Microsoft Intune cloud-based management tool as a Mobile Device Management (MDM) solution, as well as how to enroll devices and Windows computers. You also learned about adding apps to Microsoft Intune and side-loading apps to configured devices.
For Windows 10 computers that you manage with Microsoft Intune and the Intune client, you can also manage desktop applications and deployment for your managed computers. The process is similar to deploying apps and deep linking apps, which you learned about in Chapter 13.
You can deploy applications that use Windows Installer (.exe or .msi files) by publishing the application files to Microsoft Intune. Publishing your applications is the first step. The process is the same as publishing a UWP (.appx) application. To install applications on PCs, they must be capable of silent installation without user interaction. Apps that cannot perform silent installation on computers will fail.
Use the following steps to publish desktop apps to Intune:
Step 1. Log in to the Intune portal, select the Apps menu, and then select Apps from the submenu. All your current apps are displayed.
Step 2. Click the Add App link. This launches the Intune Software Publisher Wizard.
Step 3. On the Software Setup page, in the Select How This Software Is Made Available to Devices box, select Software Installer. For the Select the Software Installer File Type, select Windows Installer. Click the Browse button and select the application setup file. If other files in the folder are required, check the Include Additional Files and Folders from the Same Folder check box. Click Next.
Step 4. On the next page, enter the publisher in the Publisher box, if it is not filled in automatically. You can optionally select an image to use for the application’s icon. Click Next.
Step 5. On the Requirements page, you must select an architecture (32-bit or 64-bit) and an operating system if the application has minimum Windows version requirements. Select Any for these fields if the software runs on any version. Click Next.
Step 6. On the Detection rules page, you can tell Intune how it can tell if the software is already installed on a computer. This is useful for automatic deployment. Choose from either Default Detection Rules or add your own detection rule. You can add a rule based on whether a specific file exists, a Registry key, or an MSI product code, as shown in Figure 18-27. Click Next.

Figure 18-27 Selecting Software Detection Tools in the Intune Software Publishing Wizard
Step 7. If the application installer needs any command-line arguments when it runs, you can provide them on the Command-Line Arguments page. If it does not, select No. If it does, select Yes and enter the arguments in the box provided. For instance, if the application is an .msi, you can add the /s parameter so that it will install silently.
Step 8. The Return Codes pages allows you to select return codes to determine whether the installation was successful. Enter any return codes you want Intune to evaluate during the installation, or select No and then click Next.
Step 9. Review the Summary page to make sure all your selections are correct, and then click the Upload button to upload your application installer to Intune.
After the upload of your application setup program is complete, the application appears in the list of apps on the Intune portal. The next step is to make your desktop application available for users to install. From the Intune portal list of apps, select the new application and click the Manage Deployment link to get started.
You can select the user groups that will be allowed to install the software, or select from device groups where you want the software deployed. You can use any combination of user and device groups for the deployment. When you click Next, you can select the Deployment Action for the groups you selected. For devices, you can only select Required Install. That means that Intune will automatically download the installer and install the application on those devices. For user groups, you can select Required Install or Available Install.
If you simply want to make the application available for users to download and install when they need it, you can select Available Install for the user group. Recall from Chapter 13 that user groups are managed in Azure AD. When you are finished with your selections, click the Finish button on the Manage Deployment Wizard.
Users can access the Microsoft Intune Center from the Windows 10 system tray icon, and click the Get Applications from the Company Portal link. The link will bring up the default browser so that the user can access the portal. After logging in, the user can view the apps available, as shown in Figure 18-28. Applications the user selects to install will be installed silently on the local computer.
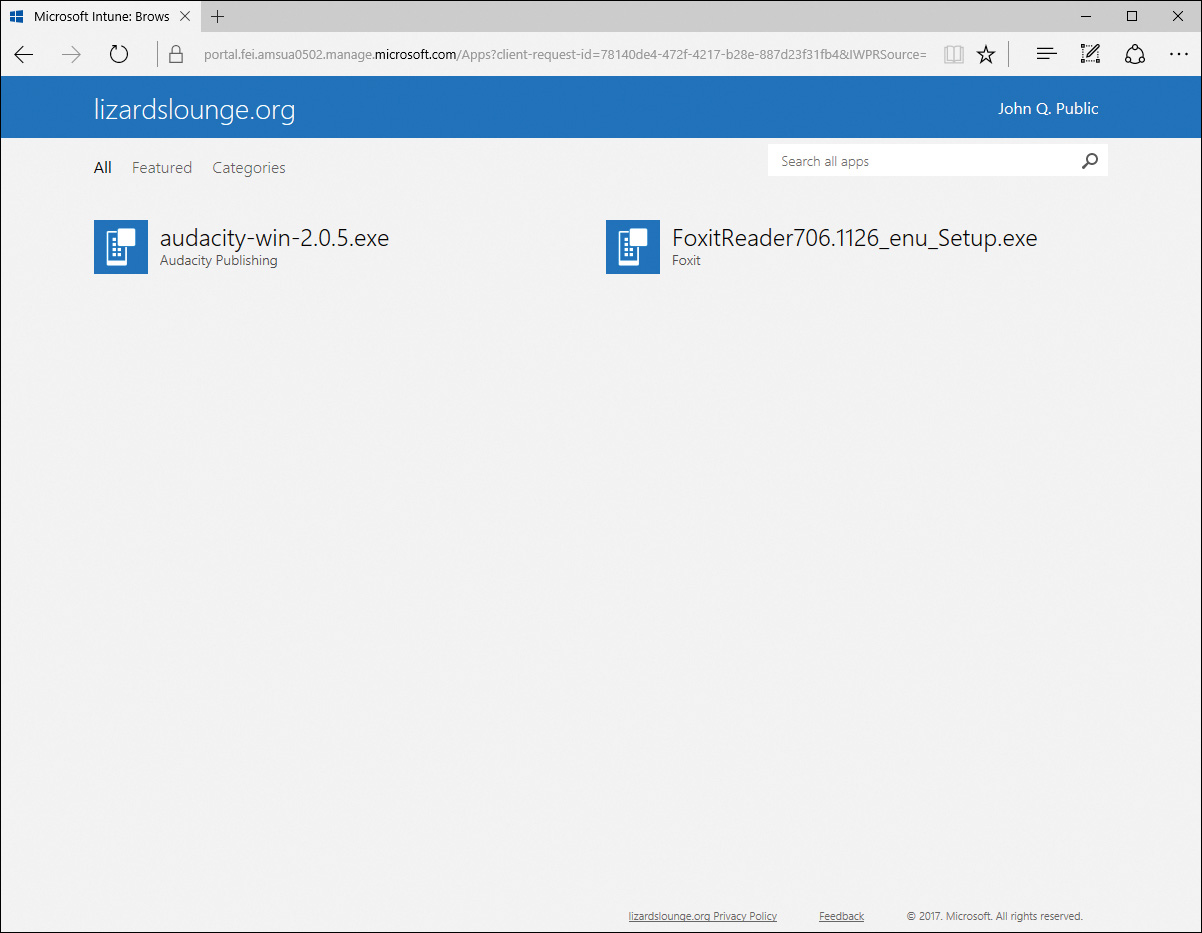
Figure 18-28 User Installation of Desktop Applications That You Make Available in the Microsoft Intune Portal
Note
For more information on installing desktop applications in Microsoft Intune, see “Add Apps for Windows PCs That Run the Intune Software Client” at https://docs.microsoft.com/en-us/intune/deploy-use/add-apps-for-windows-pcs-in-microsoft-intune.
Exam Preparation Tasks
Review All the Key Topics
Review the most important topics in the chapter, noted with the Key Topics icon in the outer margin of the page. Table 18-8 lists a reference of these key topics and the page numbers on which each is found.
Table 18-8 Key Topics for Chapter 18
Key Topic Element |
Description |
Page Number |
Enable or disable the fast startup option in Control Panel |
||
The startup tab of the Task Manager details view allows you to view and manage startup applications |
||
Assigning user roles in Windows Store for Business |
||
Step List |
Managing global rules for Store for Business using Azure AD |
|
The Compatibility Administrator helps you to configure compatibility settings for older programs |
||
List |
File types used with Windows Installer |
|
List |
Describes available methods of software deployment using Group Policy |
|
List |
Describes types of actions you can perform using Msiexec.exe |
|
Shows you how to set up default file types and protocols to be opened by a program |
||
Shows you how to select file extensions to be opened by a program by default |
||
Selecting a default program to be used with a specific file extension |
||
Application Compatibility Options |
||
Manage App-V applications from the App-V client management console |
||
PowerShell commands for managing App-V clients |
||
Components of UE-V |
||
UE-V Group Policies |
||
Step List |
Publishing an application to Microsoft Intune |
Complete the Tables and Lists from Memory
Print a copy of Appendix B, “Memory Tables” (found on the book’s website), or at least the section for this chapter, and complete the tables and lists from memory. Appendix C, “Memory Tables Answer Key,” also on the website, includes completed tables and lists to check your work.
Definitions of Key Terms
Define the following key terms from this chapter, and check your answers in the glossary.
application compatibility
Application Compatibility Manager
Application Compatibility Toolkit (ACT)
App-V
Assessment and Deployment Kit (ADK)
default program
fast startup
.msi file
.msp file
.mst file
online licensing
offline licensing
private store
settings location template
shim
UE-V
Windows Store for Business