6
Updating and Drawing the Graphics Environment
All objects in a graphics environment undergo a cyclical process of being updated and then drawn. This occurs in the main game loop and is synchronized by a frame rate clock. Building this ability into our graphics engine and application at this point is critical for further functionality, such as physics and other interactivity, to be added down the line. Adding a strong foundation to facilitate this early on is crucial in order to succeed in graphics processing and rendering down the line.
Herein, we will examine the purpose of the main game loop and add a clock to regulate the frame rate in our project. Coordinated with this loop are updates to objects so that they can become whatever we need them to be, from audio sources to game characters. Therefore, we will also be concentrating our efforts on developing an object’s abilities.
To this end, in this chapter, we will be examining the following:
- Introducing the main game loop
- Updating and drawing objects
- Measuring time
By the end of this chapter, you will have gained an understanding of how objects in a game engine can take on individual properties that allow them to serve a variety of purposes. This will include developing a code architecture to support this functionality.
Technical requirements
In this chapter, we will be using Python, PyCharm, and Pygame as in the previous chapters. Before you begin coding, create a new folder called Chapter 6 in the PyCharm project for the contents of this chapter.
The solution files containing the code can be found on GitHub at https://github.com/PacktPublishing/Mathematics-for-Game-Programming-and-Computer-Graphics/tree/main/Chapter06 in the Chapter06 folder.
Introducing the main game loop
To keep any windowed application alive, the program must instigate an endless loop. We created one in Chapter 1, Hello Graphics Window: You’re On Your Way, to keep the graphics window open in the first exercise through the implementation of a while loop. Since then, we’ve continued to use this design pattern in every application. This loop in a game is called the main game loop. Each loop produces one frame of graphics. In Pygame, this frame is pushed to the screen using the pygame.display.update() or pygame.display.flip() methods.
Thus far, our graphics applications have been very simple with very little happening within the loop – however, in a full-fledged game engine, the loop is quite complex and contains multiple significant events, as illustrated in Figure 6.1:
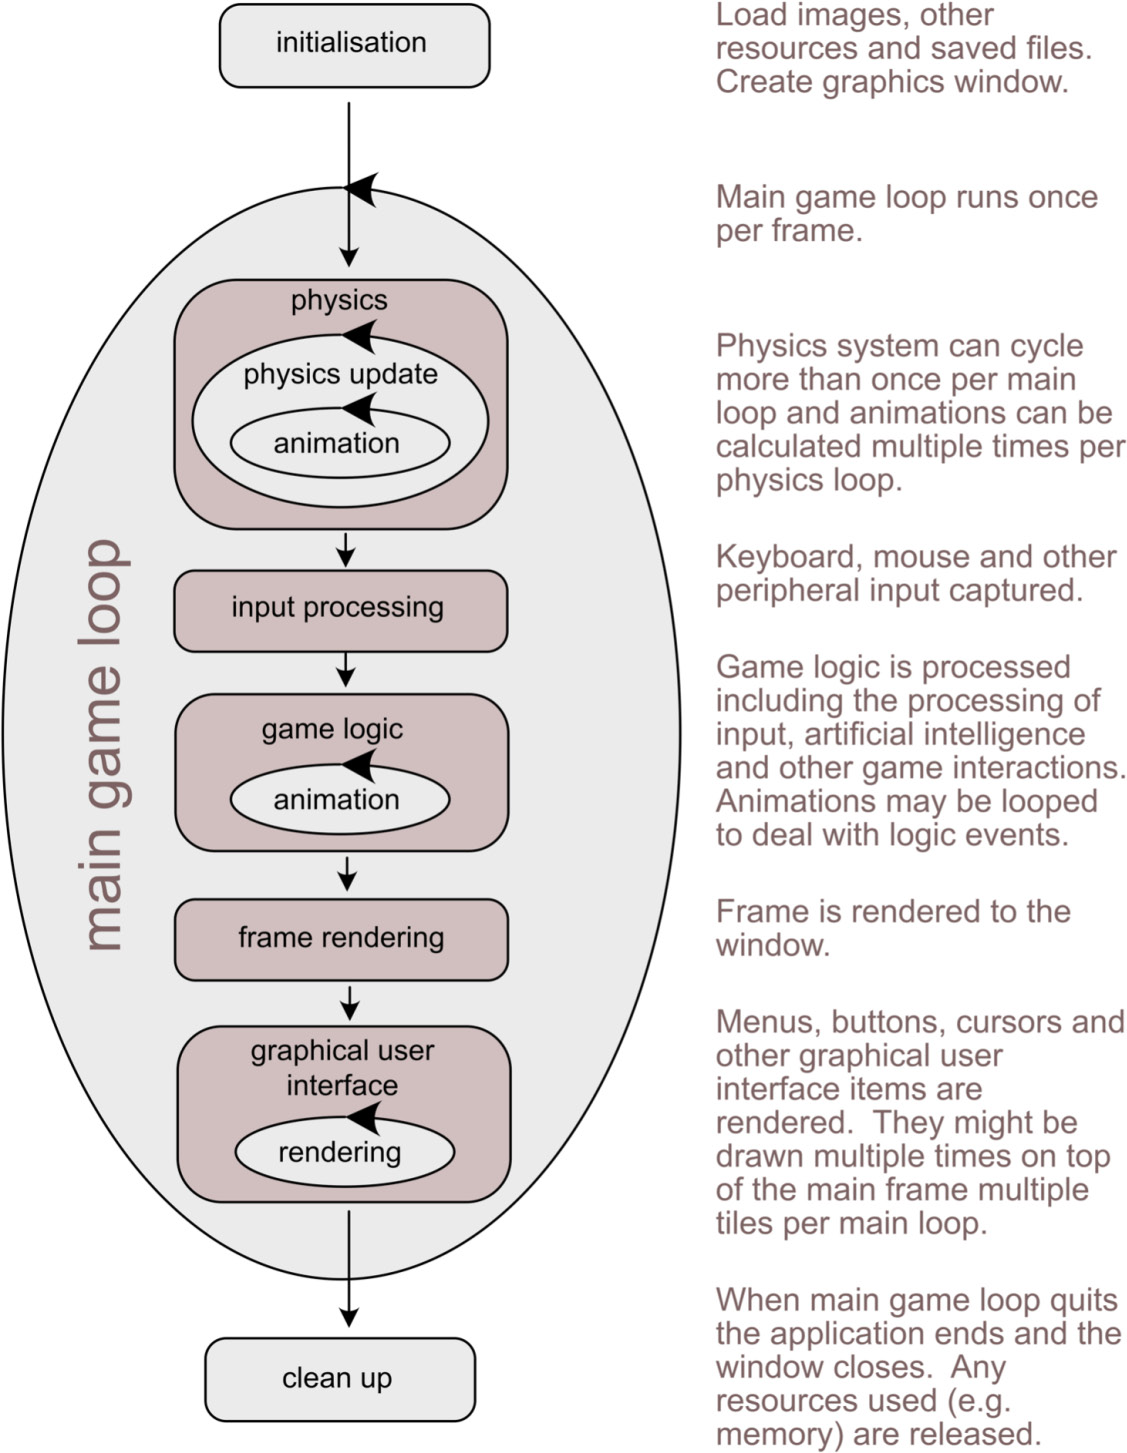
Figure 6.1: The main game loop and associated processes
After the application begins running, various items are initialized and loaded, such as images, sounds, and other resources, and the main graphics window is created, the program enters an endless loop. The loop continues to run until the user quits the application. The main game loop contains various subsections, which we are yet to explore through code – however, we will briefly examine them now.
The physics system is a major part of most games, more so in 3D games. Most of the work undertaken by it is for determining collisions and calculating the reactions of game objects. As the physics applied to one game object may affect other game objects, such as two balls colliding, the physics system maintains its own loop, and this may need to loop several times per main game loop to ensure the positions of all game objects have been updated before they are rendered. Within the physics system, procedural animations can be updated many times. For example, if we were using code to place a character’s hand on a moving object and that object was moving under the influence of physics, then the animations would need to be updated as the object moved.
After the user input has been processed, the game logic is processed. Essentially, this is all the code you’ve written that determines how the game works. It includes how user input influences the game environment, what should occur when certain objects impact other objects (for example, a bullet hits a character), and how the game environment changes and moves forward over time. During this process, another animation loop may occur to process further procedural animations, which could be influenced by user input or other programmed events.
Following this, after all the game processing has occurred, the frame is ready to be rendered and the pixels are drawn in the graphics window.
Before the main loop finishes its cycle, the graphical user interface that sits atop the main frame is rendered. In some game engines, this can have its own cycle, causing it to be rendered multiple times per main graphics loop. This allows for user input in the form of button presses or mouse movements, among other things, to be updated and drawn quickly despite the time taken to draw a single frame of the main game environment.
After the main loop ends, the graphics window closes and the application performs a clean-up process that releases any system resources it is using, such as memory allocation, back to the operating system.
Many of the processes that occur within the main game loop influence the appearance and behavior of drawn objects. It therefore makes sense that individual objects are given the ability to control their own updates within each loop. To facilitate this, in the next section, we will add components to objects that will embody this functionality.
Updating and drawing objects
Objects in a game or graphics application are entities within the system that possess numerous properties and methods that allow them to exist and interact within their environment.
As shown in Figure 6.2, a typical object possesses many subparts or components:
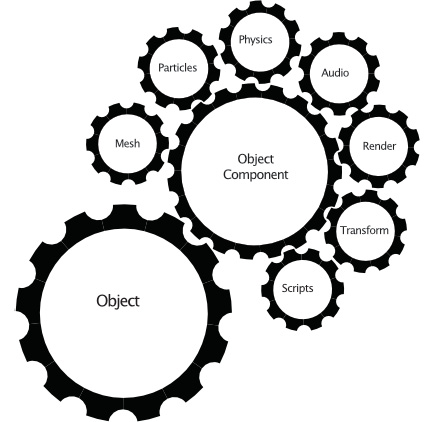
Figure 6.2: A game object and a few of its components
You can think of components as functionality added to the object, for without the components, the object is nothing except a placeholder. The object may have all or only a subset of the components, as illustrated in Figure 6.2. For example, you might have an object in the environment that only plays a sound. For this, it would only need an audio component, whereas an object representing a game character might have a mesh that defines what it looks like, a render component that tells the game engine how to draw it on the screen, and a transform component that stores its location and orientation in the world.
In a way, you might consider the cube that we created in the exercises in Chapter 4, Graphics and Game Engine Components, as a component. However, our code isn’t structured in the same way that it is in Figure 6.2, so it’s time to fix that.
As we continue working on the Python/OpenGL project through the book we will start making classes inspired by each of the components in Figure 6.2. We will start by creating an object class.
Let’s do it…
In this exercise, we will start turning our graphics project into a real engine through the addition of components. Don’t forget to create a new folder for the code in this chapter. Let’s get started with the exercise:
- Create a new Python script called HelloObject.py. Copy the code from the HelloLights.py you completed in Chapter 5, Let’s Light It Up!, or grab a fresh copy of the one included with Chapter 5 on GitHub. You will also need to make copies of Cube.py and Mesh3D.py in the new Chapter 6 folder.
- Create a new Python script called Object.py and add the following code:
from Mesh3D import *
class Object:
def __init__(self, obj_name):
self.name = obj_nameself.components = []def add_component(self, component):
self.components.append(component)def update(self):
for c in self.components:if isinstance(c, Mesh3D):c.draw()
In this, we have created a generic object class that is capable of storing multiple components. Components are added with the add_component() method into a list which is then searched through to find components constructed with the Mesh3D class in update().
- Be sure to include Object at the top of HelloObject.py as in the following:
from Object import *
- Modify the code in HelloObject.py as follows to make use of the new Object class:
..
glTranslatef(0.0, 0.0, -3)
glEnable(GL_DEPTH_TEST)
cube = Object(“Cube”)
cube.add_component(Cube(GL_POLYGON,
“images/wall.tif”))glEnable(GL_LIGHTING)
..
Note that you must remove the previous variable, mesh, and replace it with the instantiation of a cube as an object and then add the cube mesh component to it. Within the main loop, be sure to replace mesh.draw() with cube.update().
- Run the HelloObject.py script. You will not notice any changes in its current functioning.
- We will now add another component to create a transform. Create a new script called Transform.py and add the following code:
import pygame
class Transform:
def __init__(self, position):
self.set_position(position)def get_position(self):
return self.positiondef set_position(self, position):
self.position = pygame.math.Vector3(position)
This component defines the object’s location in 3D space. Notice the use of the Pygame Vector3 class. You will be seeing this a lot. Besides other things, this class stores a tuple in the form of x, y, and z. This makes the code more intuitive to read.
- To integrate the new Transform class, we need to add it as a component in the HelloObject.py script first as follows:
from Mesh3D import *
from Transform import *
..
class Object:
..
glEnable(GL_DEPTH_TEST)
cube = Object(“Cube”)
cube.add_component(Transform((0, 0, -1)))
cube.add_component(Cube(GL_POLYGON,
“images/wall.tif”))
By including the cube.add_component(Transform((0, 0, -1))) line, you are setting the location of the cube to (0,0,-1) – however, you must remember that earlier in the code from step 4 we set the following:
glTranslatef(0.0, 0.0, -3)This is already offsetting whatever is drawn by z = -3. Therefore, by adding the Transform component with z = -1, the total offset for the cube will be the addition of these, which equates to z = -4.
- To get the Transform component to affect the drawing, further changes need to be made to the add_component and update functions in the Object class. Therefore, next we test if the component is of type Transform and push it into first position in the list.
from Transform import *
..
def add_component(self, component):
if isinstance(component, Transform):
self.components.insert(0, self.components)self.components.append(component)
def update(self):
for c in self.components:
if isinstance(c, Transform):pos = c.get_position()glTranslatef(pos.x, pos.y, pos.z)if isinstance(c, Mesh3D):c.draw()
There are a couple of things to take note of in this code. First, a Transform component is treated as a very special case, and you will see that it is inserted first in the component list. This is because the position needs to be set before any drawing is done by Mesh3D. Next, the update method, before drawing the mesh, calls a glTranslatef() method to ensure that the movement from the Transform component is taken into consideration and sent to OpenGL.
- It’s time to test the program out again by running it. Before you do, try and imagine what you might see. I can bet you won’t see what’s about to come. Run your code (and get it running) before moving on to the next point.
If your cube flew off into the distance, as shown in Figure 6.3, then the program is running as it should:
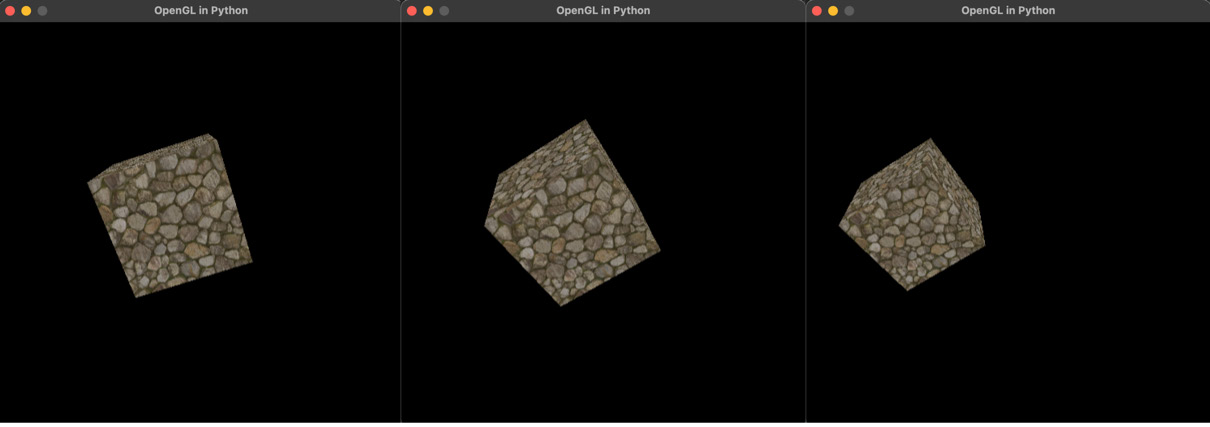
Figure 6.3: A rotating cube moving off into the distance
Here’s what’s happening. In each main loop, the Object class’s update method is called. This runs a glTranslatef() method before drawing the mesh. It does this for every frame. The thing with glTranslatef() is that it’s compounding. So, in each loop, z = -1 is added to the position of the cube and this animates it flying off into the distance. So, how do we fix this?
- OpenGL has a very clever mechanism. It’s able to store the current state of the environment, draw something, and then return to the previous state. What we want to do is basically save the position of the first glTranslate(0, 0, -3), add the glTranslate(0, 0, -1) method, draw the cube, and then take away the last glTranslate(). We do it by modifying the update method in Object to the following:
def update(self):
glPushMatrix()
for c in self.components:
if isinstance(c, Transform):pos = c.get_position()glTranslatef(pos.x, pos.y, pos.z)if isinstance(c, Mesh3D):c.draw()glPopMatrix()
In short, think of glPushMatrix() as fixing the graphics environment with respect to transformations (including a translate). This causes OpenGL to remember the current state of the environment. When glPopMatrix() is called, OpenGL returns to the last remembered state of the environment. Don’t worry too much about the technical details that are going on in the background at this time, as we will cover them in detail in later chapters.
For now, though, you can run your code to check that the cube doesn’t fly off into the distance anymore, as illustrated in Figure 6.4.
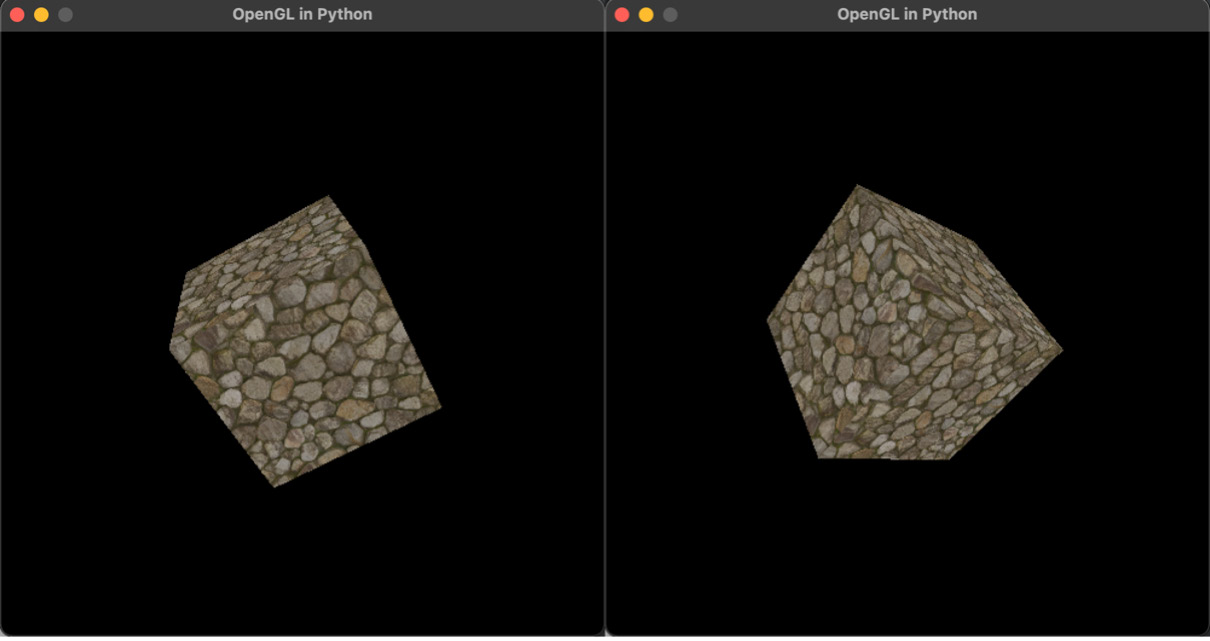
Figure 6.4: A cube rotating in place
Its rotation will look slightly different and this is because we’ve added the extra translate inside the object’s update method. If you set this translate to (0, 0, 0), the rotation animation will look exactly as it did before.
Your turn…
Exercise A: Add another cube to the scene that has a different texture and a translate of (0, 1, 0). To ensure all objects in the scene have their update method called, create a list called objects = [] before your cube creation code. Duplicate the three lines of code you used to create the original cube, change cube to cube2, and append each new object into the list. Loop through the objects list in the main loop to call the update methods of each, not forgetting to remove the original call to update.
In this section, we’ve seen how to update and draw multiple graphics objects. To ensure consistent frame rates in an application, controlling the speed of the main game loop is crucial. This can be done by setting the clock speed in Pygame.
Measuring time
Time is used in graphics to control animations – these are any moving objects or changing images. It’s also useful for determining the frame rate at which your application is running. There are numerous useful functions for this in the Pygame API, and you can read the details here: https://www.pygame.org/docs/ref/time.html. The frame rate is expressed in frames per second (FPS), and this is an important measurement as it specifies how fast the main loop takes to execute. It’s important to keep the loop running at the same rate for the entire application to ensure smooth performance and animations. If the loop changes speed, then the experience becomes jittery.
Currently, in our code, the frame rate will be as fast as your computer can run it. However, it might not be consistent, as your operating system processes other things in the background. To see just how fast your computer is running the main loop, try removing the following from the code:
pygame.time.wait(100)
The animated rotation will now go at breakneck speed. Replace it with this instead:
print(‘tick={}, fps={}’.format(clock.tick(),
      clock.get_fps())).
Here, the clock is defined above the while loop as clock = pygame.time.Clock().
When run, this will print out the tick, which is the number of milliseconds that have passed since the last time tick() was called, or the number of milliseconds the last main loop took to execute and the FPS. The type of output you will get in the console may look similar to the following:
tick=2, fps=714.2857055664062
tick=1, fps=714.2857055664062
tick=1, fps=714.2857055664062
tick=1, fps=666.6666870117188
tick=2, fps=666.6666870117188
Note, get_fps() averages the FPS every 10 frames, so you won’t get any values initially.
To control this and smooth out the FPS, we can make a simple modification to the code using pygame.time.Clock().
Let’s do it…
Add a clock into the main game loop of HelloObject.py as follows:
clock = pygame.time.Clock()
fps = 30
while not done:
   ..
   pygame.display.flip()
   clock.tick(fps)
pygame.quit()
These simple additions will keep the FPS as close as possible to the value set in the fps variable. It works by keeping track of how long the previous frame took and then adding a small waiting time where necessary to slow the loop down. Try running this to see how running at 30 FPS slows down the animation compared to not controlling the main loop speed. If you increase the value of fps, it will speed up the animation.
Thorough control over the speed of the frame rate and hence, the main game loop is an important feature in a graphics engine. In this section, we’ve used the clock speed in Pygame to control this to ensure a scene is drawn smoothly.
Summary
In this chapter, the fundamental elements of a graphics rendering engine were explored. It was a whirlwind introduction to numerous concepts that will be thrashed out in later chapters but was essential to gaining an overview of how to move our coding structure forward.
We began by looking at the complexities of the main game loop and the many processes an object moves through to be updated and drawn. Using this knowledge, we then added component functionality to the objects in our project to ready them for the expansion of the engine we are developing. In addition, we also explored how time is an essential controlling component of the main loop and added this practicality to the code base. There was more programming in this chapter than mathematics, but again, a lot of it was laying down a good base on which to build our mathematics functionality.
In the next chapter, we will add functionality to our application that will cater to user input through the integration of methods to manage commands from the keyboard and mouse. This will allow us to program functions to deal with input, such as mouse clicks, moves and drags, and keyboard presses, releases, and holds.
Answers
Exercise A:
glEnable(GL_DEPTH_TEST)
objects = []
cube = Object(“Cube”)
cube.add_component(Transform((0, 0, -1)))
cube.add_component(Cube(GL_POLYGON, “images/wall.tif”))
cube2 = Object(“Cube2”)
cube2.add_component(Transform((0, 1, 0)))
cube2.add_component(Cube(GL_POLYGON, “images/brick.tif”))
objects.append(cube)
objects.append(cube2)
glEnable(GL_DEPTH_TEST)
..
..
while not done:
   ..
   glClear(GL_COLOR_BUFFER_BIT | GL_DEPTH_BUFFER_BIT)
   glRotatef(5, 1, 0, 1)
   for o in objects:
       o.update()
   pygame.display.flip()