
Chapter 15. Cryptography and Data Protection
IN THIS CHAPTER
- Introduction to Cryptography
- Using Secret-Key Encryption
- Using Public-Key Encryption
- Working with Hashes and Digital Signatures
- Using the Data Protection API (DPAPI)
Protecting the data used and generated by your application has become exceedingly important in this day and age. The spread of viruses throughout the Internet is so commonplace that most consumers with PCs own some form of virus protection. When designing and building applications that will be exposed to the Internet, one of the primary concerns is security: preventing theft of valuable data as well as controlling damage from malicious attackers.
If you send data over a clear channel that anyone else can read, you can bet that someone is trying to glean some useful information out of the data you’re sending. This chapter introduces you to the concepts and programming techniques that you will need to prevent people from reading your private data, as well as techniques that you can use to validate whether data has changed and whether data was sent from a legitimate source. All of this is possible with cryptography and data protection.
Introduction to Cryptography
Cryptography is the science of hiding information from prying eyes. A lot of people think that cryptography is a fairly new science, when in truth it has been around for a long time. As long as people have needed to send secret messages, people have needed cryptography. For example, Julius Caesar used a very simple cipher of shifting letters 19 characters to the right that eventually became known as the Caesar cipher. Encrypted information is no good to anyone if the intended recipient of the data doesn’t know how to decrypt it. The balancing act of many cryptographic problems is that the sender of encrypted information needs to be able to allow the recipient to decrypt the data without allowing anyone else who might intercept the message to decrypt it as well.
This section discusses the various types of cryptographic tasks that are commonly performed. There is a mythos surrounding much of the science of cryptography that often intimidates developers into developing less secure applications. Hopefully this section will illustrate that you don’t need a degree in applied mathematics to utilize the cryptographic tools available to you in the .NET Framework. The next few sections discuss different types of encryption. In a real-world scenario, the different types of encryption are often used in conjunction with each other to maximize data integrity.
Secret-Key Encryption
Secret-key encryption is a symmetric form of encryption. When using secret-key encryption, the same key that is used to encrypt the data is used to decrypt the data. This type of encryption is the fastest form of encryption, and is extremely efficient at encrypting large streams of data such as files, documents, long conversations, and so on.
Secret-key algorithms are also referred to as block ciphers. This is because the encryption is done one block at a time. The algorithm determines the size of the block (8, 16, 24, or 32 bytes). Block ciphers can potentially be reversed, however, because a block cipher will encrypt the same block of data the same way every time. So, for example, the same unencrypted block of 8 bytes will produce the same encrypted output every time. This consistency in output can allow a potential hacker to determine the encryption key. This is resolved through the use of an initialization vector (IV). The IV is used to help encrypt the first block of the stream, and then a portion of the first block is used to encrypt the second. This blending of blocks will prevent the same 8-byte block from creating predictable encryption results because each time that block is encrypted, it is being encrypted with a portion of the preceding block in the stream.
The downside to secret-key encryption is that both parties need to have access to the secret key.
Public-Key Encryption
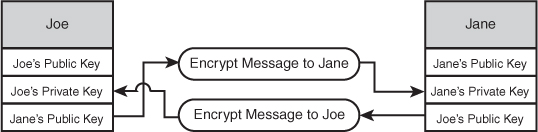
Public-key encryption is an asymmetric encryption algorithm because the key used to encrypt the data is not the key used to decrypt the data. To exchange data between parties using public-key encryption, the sender will encrypt the data with the receiver’s public key. Then the receiver can decrypt the data with her private key. The reverse also applies for sending a message in the other direction. In this way, the public key can be transmitted over any channel, regardless of how secure the channel might be.
Take a look at Figure 15.1. It shows how Joe’s public key is used to encrypt messages sent to Joe, and Jane’s public key is used to encrypt messages sent to Jane.
Figure 15.1 Public-key encryption.
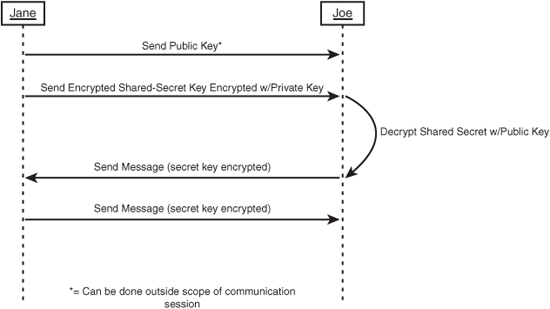
The problem here is that public-key encryption is fairly slow, and is optimized for encrypting and decrypting small amounts of data. It doesn’t work on large streams of data the way block ciphers (secret-key encryption) work, so using public-key encryption to send message after message would be impractical. A real-world scenario would involve Joe using Public Key Cryptography Standards (PKCS) to send Jane a shared secret that was generated for just that one conversation. Jane could then use her private key to decrypt the shared secret. When both parties have the shared secret, they can converse securely and efficiently without fear of anyone intercepting and decrypting their messages. This scenario is illustrated in the sequence diagram shown in Figure 15.2.
Figure 15.2 Real-world scenario combining PKCS with secret-key encryption.
Hashing
A hash is a reduced representation of a large amount of binary data. When a set of data is hashed, it is reduced to a fixed-length set of bytes. The benefit of a hash is that, when using an appropriate hashing algorithm, it is statistically impossible to have two sources of data produce the same hash value. This means that for any arbitrarily long set of data, there is only one unique hash value that represents that set of data.
You can detect if data has been tampered with using hashes. If you send someone a message as well as the hash of that message, she can then hash that message on her end using the same hashing algorithm, and compare it against the transmitted hash. If the two hash values are identical, you can be assured that the message has not been tampered with. However, if the hashes don’t match, the message has been modified since it was transmitted.
This isn’t all that secure. If someone intercepts the original message, they could just as easily rehash the altered message and send it along to the recipient who will validate the message as unmodified. In reality, the hash is usually encrypted using PKCS such that only the recipient can decrypt the hash using his private key. This prevents the message (and the hash) from being tampered with.
The encryption of hashes leads me to another extremely common task in cryptography: digital signatures.
Digital Signatures
Forgery aside, a human signature is evidence that a document was signed by the person who claims to be the originator. So, when the document ends with “Sincerely, Kevin Hoffman,” and is followed by my signature, that is reasonable proof that I am indeed the one who wrote the document.
The same can be said of an electronic document or message. You can “sign” that message with a digital signature that serves as proof that you are the one who created that document.
When you digitally sign a message, the first thing you do is create a hash of the message. This hash is then encrypted using your private key. This allows anyone with your public key to decrypt the hash, rehash the message on their machine, and compare the two to validate the authenticity of the signature. You encrypt the hash using your private key because you do not want to restrict the list of people who can verify the authenticity of your signature. Therefore, anyone with your public key should be able to verify that a message came from you. Likewise, you should be able to verify the authenticity of any messages sent by people for whom you have public keys.
Using Secret-Key Encryption
Secret-key encryption, also referred to as symmetric encryption, is designed to work on large amounts of data. As such, symmetric encryption code works on streams of data as opposed to arrays of bytes. When you wrap a stream of regular data inside a specialized encryption stream called a CryptoStream, data is encrypted on the fly as it is placed into the stream. The same is true of decryption; data is decrypted on the fly as it is read from the stream.
As mentioned earlier, in symmetric encryption the key used to encrypt the data is the same key that is used to decrypt the data. As a result, the safety of the key is paramount. If someone were to obtain your key, not only could he decrypt your private data, but he could encrypt his own data as if he were you.
Also, remember that to properly encrypt blocks of data using symmetric encryption, you need an Initialization Vector (IV) to allow the encryption algorithm to encrypt blocks with partial data from previous blocks to reduce the predictability of output.
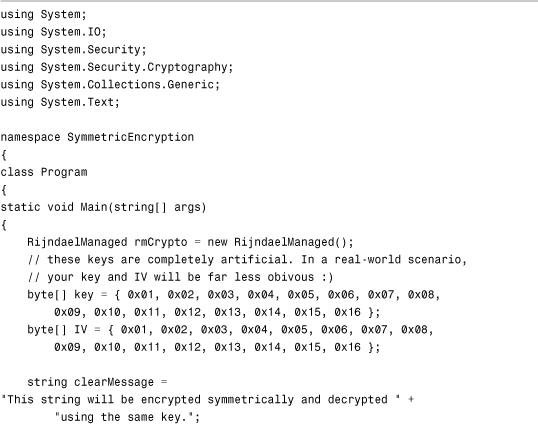
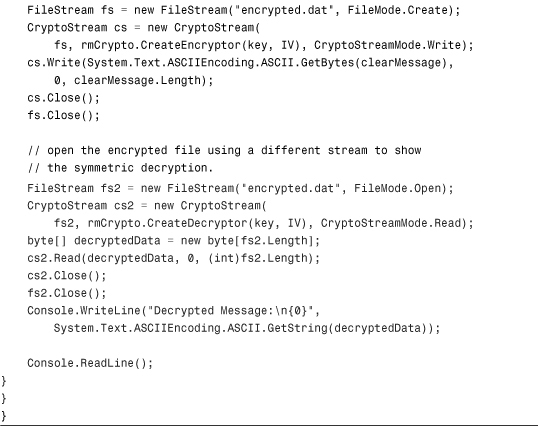
The code in Listing 15.1 shows the use of symmetric encryption and decryption to encrypt a message into a binary file on disk and then use another CryptoStream to read from the encrypted file.
Listing 15.1 Symmetric Encryption and Decryption
Using Public-Key Encryption
Working with public-key encryption isn’t quite as hard as it seems. The task of encrypting and decrypting data in a PKCS environment all boils down to one thing: key management. You need to know where your keys are, and you need to make sure that they are protected before you can reliably use public-key encryption.
One of the most common tasks in PKCS encryption is the generation and storage of new keys. Fortunately, the RSA cryptographic service provider will create the public/private key pair automatically for you if you don’t supply one. RSA is named for the three people who invented the cryptographic algorithm: Ron Rivest, Adi Shamir, and Leonard Adleman.
You definitely don’t want your private key lying around in a simple file on your hard drive, because then all data encrypted with that key becomes just as vulnerable as your hard drive (which is pretty vulnerable).
To solve this problem, Windows allows you to make use of key containers. A key container is a secure place to store your key, and you are the only one who has access to that container. Even an administrator with full access to the hard drive will be unable to obtain the key from your key container (unless they have your login and password, of course).
To store your key pair in a container, you need to make use of the CspParameters class. This class maintains a list of parameters that are passed to a cryptographic service provider upon instantiation. One of these parameters is a property called KeyContainerName. This name can be anything you choose, but make sure it’s something that your application can reproduce, because if you forget the container name, you will lose the key pair.
The following few lines of code will create an instance of the CspParameters class, indicate the name of the key container, and instantiate the RSA crypto provider. If this is the first time these lines of code have been executed, a new key pair will be generated and placed in the container:
CspParameters csp = new CspParameters();
csp.KeyContainerName = "SAMSContainer";
RSACryptoServiceProvider rsa = new RSACryptoServiceProvider(csp);
// perform encryption/decryption operations
Each time the code instantiates an RSA crypto provider with the same container name, the code will reuse the existing key pair. Note that another application, logged on under another user, will not be able to read the key information, even if the container name matches. For more information about Windows key containers, you can look up the Cryptography topic in the MSDN documentation at http://msdn.microsoft.com.
To demonstrate how to send an encrypted message from one person (or application) to another, I’ll start with Jane and John Doe. Jane creates an instance of the RSA provider, and saves her key in an XML file using the ToXmlString() method on the RSACryptoServiceProvider class. The contents of this XML file aren’t all that pretty to look at, but if you’re interested you can see the JanesKey.xml file with the code accompanying this book.
As mentioned before, to send a message to Jane, you need to encrypt it with Jane’s public key. So, to create an application that simulates this process, the application will read Jane’s public key from the JanesKey.xml file, and use that information to encrypt a message to her, as shown in the following example:
RSACryptoServiceProvider rsa = new RSACryptoServiceProvider();
StreamReader sr = File.OpenText(@"........JanesKey.xml");
string rsaXml = sr.ReadToEnd();
sr.Close();
rsa.FromXmlString(rsaXml);
string messageToJane = "Hey Jane, this is John. How are things?";
byte[] encrypted = rsa.Encrypt(
System.Text.ASCIIEncoding.ASCII.GetBytes(messageToJane), false);
FileStream fs = new FileStream(@"........MessageToJane.dat", FileMode.Create);
fs.Write(encrypted, 0, encrypted.Length);
fs.Close();
The code in this sample creates an RSA provider, which loads Jane’s public key using the FromXmlString method. Then the message is encrypted into an array of bytes, which is then stored in a file called MessageToJane.dat. If you run this sample on your own, you’ll see that the encrypted file takes up 128 bytes, far more than the plain text version of the message.
To continue the sample, we need to switch to Jane’s perspective. She will be attempting to decrypt John’s message with her private key. So she’ll need to load her key either from a container or from an XML file with the FromXmlString method. For simplicity in this sample, she’ll load it from XML, as shown in the following example:
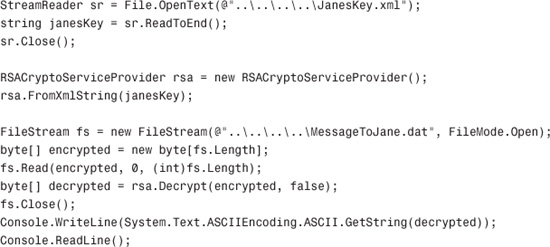
There are only a few steps in the preceding code. First, Jane’s key pair is loaded from the XML file (this is ordinarily a bad practice...use key containers for safe storage of key pairs) and then John’s encrypted message is loaded into a byte array. That byte array is then decrypted using Jane’s private key, and the decrypted message is displayed on the console.
Working with Hashes and Digital Signatures
Hashes and digital signatures work hand in hand in order to give your code the ability to sign data as well as verify that the data has not been tampered with.
The sequence of events typically works like this:
- Your application produces data that needs to be transmitted to another location or to be read by another application.
- Using your private key, your application creates an encrypted signature from a hash of the data to be transmitted.
- The data payload, containing both the data and the encrypted signature, is transmitted to a remote location and/or read by another application.
- The other application decrypts the hashed signature using the sender’s public key, and then compares the decrypted hash against a hash that the other application computed on its own using the same hash algorithm. If the computed hash matches the decrypted hash, the other application can be sure that the data has not been tampered with.
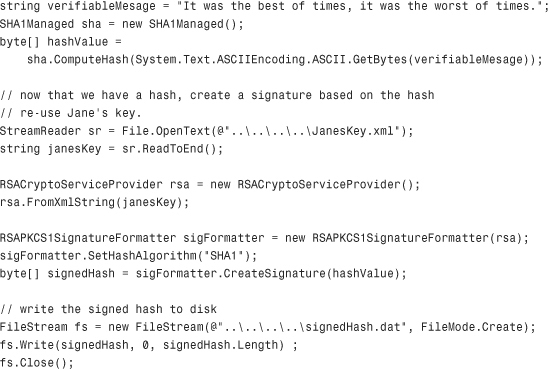
Let’s take a look at the first half of the process, the hashing of data and the creation of a signature from that hash:
Next, we’ll need to write some code that reads the signed hash from the data file, computes its own hash, and does a comparison to verify the authenticity of the data. The following is the code contained in a console application that does this:
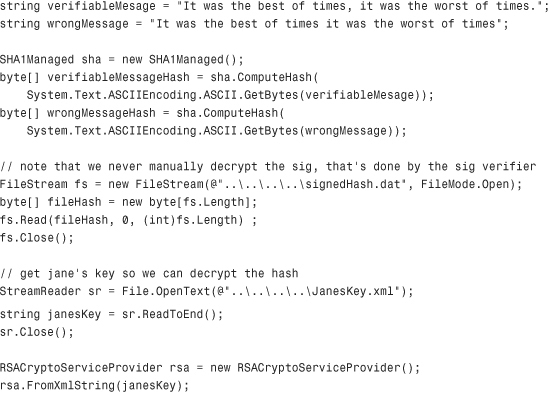
The first thing that this code does is create hashes from two different strings. One string is the original and valid data, whereas the other string is missing a comma. If all that I’ve said about hashing and signatures is true, the missing comma should cause a signed hash validation to fail, simulating data that has been tampered with.
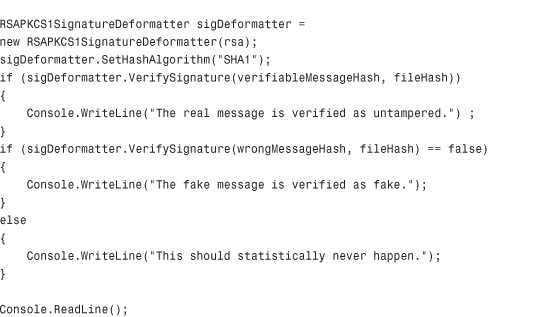
Next the key is loaded from the XML file (in a real-world scenario, the key would probably be coming from an OS-level key container). A signature deformatter is then loaded based on the SHA-1 hashing algorithm.
Finally, two comparisons are made: one comparison against the legitimate hash, and one against the hash that simulates tampered data. When we run the application, the output confirms that the digital signature is doing its job:
The real message is verified as untampered.
The fake message is verified as fake.
Using the Data Protection API (DPAPI)
A fairly common technique among teachers is to show the student how to do something the hard way, to make sure they understand the mechanics of what is going on, and then when they understand that, show them an easier way of doing things.
The Data Protection API (DPAPI) is no different. It provides a simplified API for protecting and unprotecting your data while removing the burden of explicitly generating and managing encryption keys from the developer.
When working with data protection, you need three things:
- Data—The data that you want to encrypt or decrypt.
- Entropy—Put simply, this is a random set of bytes used to add a measure of unpredictability to the encrypted output of your protected data. This is not required, but can come in handy.
- Protection Scope—When working directly with the cryptographic service providers, there is no sense of scope. With DPAPI, you can choose the scope in which you want the data protected. This means that you can choose to allow only a specific user to decrypt encrypted data or anyone on the machine. The following is a list of possible values for the protection scope:
CurrentUser—Data is associated with the user. Only code being executed by or on behalf of the user can decrypt the data.LocalMachine—The data is protected at the machine level. Remote attempts to access the data will fail. This option is common in server-side enterprise applications.
One thing to keep in mind about the data protection API is that it is not designed for sending secure data from a source to a specific destination. It is designed to allow your application to encrypt data so that the data stored by your application will not be compromised. If you protect data using DPAPI, and then send the data to someone else, they will have no way of decrypting that data.
Both PKCS and DPAPI are extremely powerful encryption tools, but each one has a specific purpose. Knowing when to use PKCS and when to use DPAPI can save you countless hours of rewriting and troubleshooting.
Listing 15.1 is an illustration of how to encrypt and decrypt information using the Data Protection API. Run the code several times to convince yourself that the protection isn’t session based and will work every time the protection scope matches the scope of the protected data.
When writing code with the Data Protection API, there are two different kinds of protection that you can use. You can choose to work with protected memory, which turns any array whose length is a multiple of 16 bytes into unreadable gibberish. When you lift the protection on that array, it becomes readable again. The main benefit of this is that when the array is protected, there is nowhere in memory that contains a decrypted copy of that data. This means that malicious attackers examining the memory used by your application or even trying to reverse engineer your application will not be able to locate the protected data in memory.
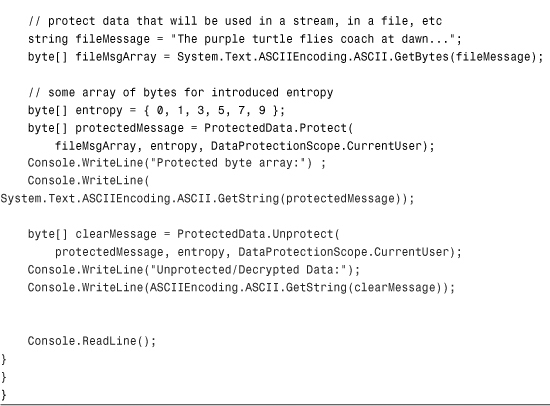
The second mode of working with the Data Protection API is more traditional. You pass it an array that you want encrypted, an entropy array, and a protection scope. As a return value, you are given an encrypted array of bytes. This method is more suitable for encrypting streams of data, files, and other longer strings. There is also no restriction that the protected data’s size be a multiple of 16 as there is with memory protection.
The code in Listing 15.2 illustrates both memory protection and data protection using the Data Protection API.
Listing 15.2 Memory and Data Protection Using DPAPI
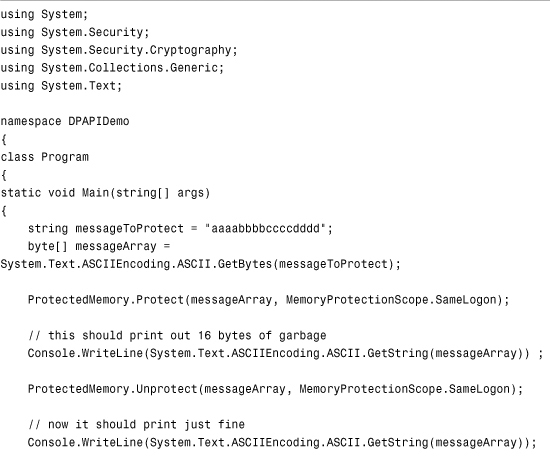
Make sure that when you create this application, you also add a reference to the System.Security assembly; otherwise, you won’t be able to use the ProtectedMemory class or the DataProtection class.
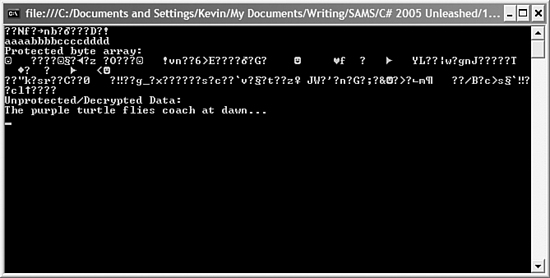
When you compile and run the application, you will get output that looks like the output shown in Figure 15.3.
Figure 15.3 Output from the data protection sample.
Summary
Today, virtually all application developers have to worry about the security of their data in some fashion. This chapter provided you with an introduction into the world of cryptography as it applies to protecting valuable data within your applications. This chapter covered the concepts behind public-key encryption, secret-key encryption, hashing, digital signatures, and using the Data Protection API to protect in-memory structures as well as large amounts of data like streams.
After reading this chapter, you should now be able discuss the various benefits and drawbacks of each type of encryption, when those types should be used in real-world examples, and you should have enough information to be able to create the code for your own secure data solution.