
Chapter 14. Code Access Security
IN THIS CHAPTER
- Introduction to Code Access Security (CAS)
- Using and Administering Security Policy
- Using Imperative Security
- Using Declarative Security
Introduction to Code Access Security (CAS)
Code Access Security (hereafter referred to as CAS) is a feature of the CLR that protects resources from unauthorized access. Not too long ago, there was a lot of concern about ActiveX controls because when you trusted such a control, you trusted it completely and implicitly. That meant that if you downloaded and trusted an ActiveX control, that control could then access your hard drive, delete important files, or otherwise wreak havoc with your computer. Even worse, innocent ActiveX controls could be used as security holes through which malicious code could be injected onto your computer.
CAS provides a stock set of permissions and permission groups that can be used to restrict access to protected resources, giving the end user peace of mind knowing that no .NET code can ever access anything on his machine without his explicit permission. In addition, CAS includes the underlying plumbing that makes all of this possible. CAS is built directly into the .NET Framework so that it is impossible to write managed code that exists outside the boundaries defined by CAS. As you will see later in this chapter, end users and IT administrators alike can create and manage security policy for their computers or for an entire enterprise, choosing exactly which resources specific applications can access.
Permissions are enforced in such a way that code with limited security cannot make use of code with unrestricted security to gain access to protected resources. When the code demands a permission (illustrated in the Imperative and Declarative Security sections), the CLR walks backward along the call stack, examining the permission levels of each assembly in the stack. If the CLR finds an assembly that does not have the permission being requested by the code, the CLR will deny permission to everything on the call stack. This is illustrated in Figure 14.1.
Figure 14.1 Using the call stack to ensure secure access to resources.
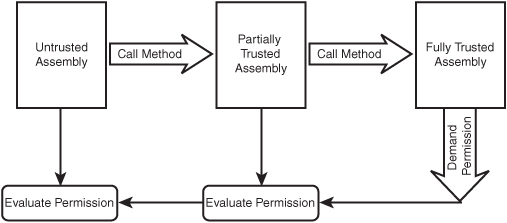
In this hypothetical scenario, untrusted code makes a call to an assembly that is partially trusted, which then in turn makes a call into a fully trusted assembly. In other scenarios, this could turn into a huge security hole and allow the untrusted code to do things like delete files in the system directory or make damaging changes to the registry. However, when the fully trusted assembly indicates that it needs a specific permission in order to continue, the CLR then walks backward along the call stack and examines the permission levels of all calling assemblies. If any of them have been denied the permission in question, so too will the fully trusted assembly, even though that assembly has the permission. This prevents exploiting fully trusted code for malicious purposes.
Using and Administering Security Policy
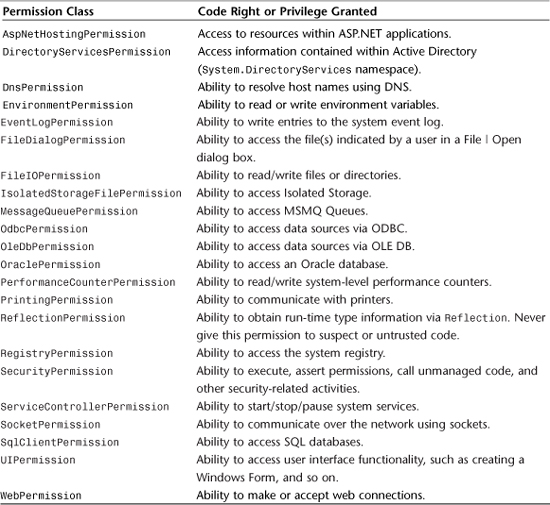
Before getting too deep into a discussion on how to use and administer the security policy, you should know what kinds of permissions can be granted and denied to your code and the code of other developers. Table 14.1 lists the various permission classes available within the .NET Framework. CAS is implemented in such a way that each permission is actually a class. You will see more about permission classes in the section on Imperative Security. Don’t worry if you don’t understand the purpose of each permission, as that will become clear when you work with the technology related to each permission, such as ASP.NET, networking, and so on.
Table 14.1 Code Access Permissions
In addition to the Code Access Security permissions shown in Table 14.1, there are also Identity Permissions and Role-Based Security Permissions. Identity permissions allow code to restrict the callers based on their identity rather than by permissions that have been explicitly granted. For example, you could choose to build an assembly that can only be invoked by other code that you have developed, or you can build an assembly that can only be invoked by code written by Microsoft.
Table 14.2 shows the list of Identity Permissions with which you can work.
Table 14.2 Identity Permissions
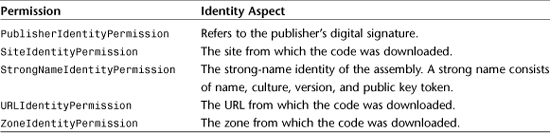
One identity that is missing from the list in Table 14.2 is the identity of the user who is running the code. This is an extremely important aspect because the code needs to know the user who invoked it in order to determine if the user can access certain protected resources such as system files, files owned by other users, or even the network.
You can also write code that restricts the identity of the user who invoked the code based on that user’s name or even his domain group/role membership using the PrincipalPermission class.
Code Access Security Administration
The .NET security policy is configured through the use of very specific XML files in certain locations. Although it might be useful for you to know the location and the format of these XML files, such information is beyond the scope of this chapter.
Instead, you can make use of some tools that ship with the .NET Framework that allow you to modify the security policy using a easy-to-use, friendly user interface.
The main tool for administering the .NET Framework security policy (as well as many other settings) can be found in your Administrative Tools control panel menu. It is called .NET Framework 2.0 Configuration. This application is displayed in Figure 14.2.
Figure 14.2 .NET Framework 2.0 configuration.
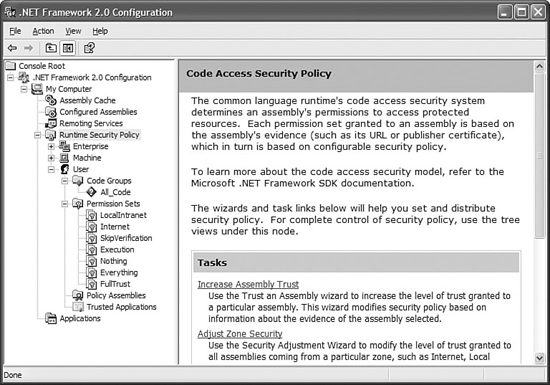
To administer the runtime security policy, click the Runtime Security Policy node. You will see the following task list in the right-hand content panel:
- Increase Assembly Trust—Allows you to browse for a specific assembly and increase the trust level of either that specific assembly, or all assemblies with the same public key (all assemblies produced by the same company).
- Adjust Zone Security—Modifies the security settings for each of the zones (Internet, Local Intranet, Trusted, My Computer, and so on).
- Evaluate Assembly—Examines an assembly and displays that assembly’s effective permission levels, including permissions inherited from enterprise-level policies.
- Create Deployment Package—Takes an existing security policy level and places it in a Windows Installer (msi) package that can then be used to distribute the policy via Group Policy or Systems Management Server (SMS).
- Reset All Policy Levels—Restores the security policy for the computer to the original settings created by the .NET Framework 2.0’s installation. This will remove all changes made since the framework was installed.
You will make use of this administration tool when creating some of the sample applications shown in the following two sections of the chapter dealing with Imperative and Declarative security.
Using Imperative Security
Imperative security is where you create instances of permissions and then use those instances to Demand() or Assert() those permissions, and much more. A demand is used when you want to tell the CLR that if there is code on the call stack that does not have the indicated permission level, a SecurityException will be thrown. An Assert is where your code asserts a specific permission level. All code on the stack after the assert will actually have the permission your code asserted, regardless of the assembly’s original permission level. You must be very careful when asserting permissions because permission assertions can be used to create holes and exploits in CAS.
Creating an instance of a permission works just like creating an instance of any other class, as shown in the following code:
FileIOPermission filePerm = new FileIOPermission(FileIOPermissionAccess.Write,
AppDomain.CurrentDomain.BaseDirectory);
The interesting thing to note here is that in order to create an instance of the permission, the code itself must have that permission. In other words, you must have a permission before you can demand that all callers on the stack prior to your code have that permission.
To create a sample that illustrates both Imperative Security programming as well as the demand of permissions on a call stack, start off by creating a new console application. In VS 2005, right-click the project, choose Properties, and then choose the Signing tab. Click the Sign This Assembly checkbox, and then choose New from the drop-down box to create a new strong name key pair. Then, create a Class Library project and perform the same steps to create a new SNK (strong-name key) file and sign the class library. Add a reference from the console application to the class library.
With this in place, you can go into the .NET Framework 2.0 Configuration tool in the Runtime Security Policy area. Create a code group that contains only the strong name for the console application, and a code group for the class library. The console application should have just Internet trust, whereas the class library should be fully trusted. Make sure that the console application’s code group has a check next to “This policy level will only have the permissions from the permission set associated with this code group”; otherwise, the code group will not enforce any restrictions.
At this point, you should have two code groups at the machine level beneath the All_Code parent group. This is an excellent simulation of a partially trusted assembly attempting to call a fully trusted assembly. By default, the .NET Framework does not allow partially trusted assemblies to call code from fully trusted assemblies. To counteract this, you can add the assembly-level attribute AllowPartiallyTrustedCallers to the assembly as shown in the following code:
[assembly:AllowPartiallyTrustedCallers()]
With all this in place, change the Class1 definition in your class library to the following code in Listing 14.1.
Listing 14.1 Class1.cs
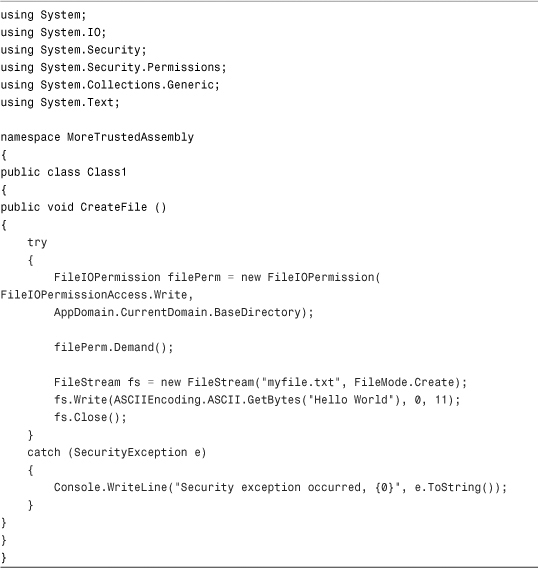
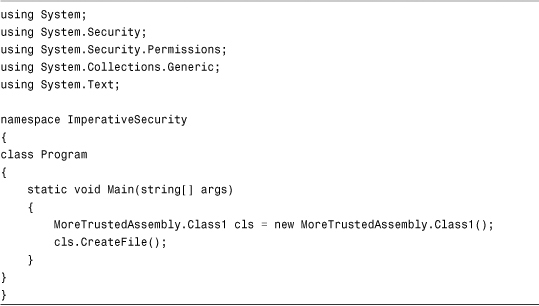
The preceding code will create a text file. Without the permission demand, then the partially trusted caller would be able to create the file, even if the caller had no File I/O permission. Now modify the Program.cs from your console application to look like the code shown in Listing 14.2.
Listing 14.2 Program.cs
With the current security settings, we get the following output when executing the code:
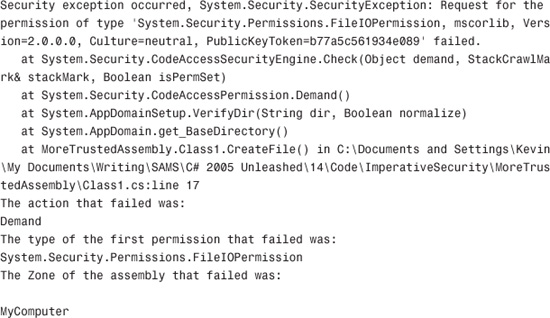
Now all you need to do is go back to the code group you created for the console application and change the trust level from Internet to FullTrust. This will result in no output, and you’ll see that the file myfile.txt has been created.
Enforcing Identity Imperatively
You can use the PrincipalPermission class to enforce identity constraints on the user. It is extremely important to remember that the user comes directly from System.Threading.Thread.CurrentPrincipal. You may notice that this value isn’t set by default in a console application, so you have to do it manually. The code shown in Listing 14.3 shows how you can use the PrincipalPermission class not only to enforce specific constraints, but also to use it to create a union or intersection of multiple identity constraints, such as requiring that the caller be both part of the Administrators group and the Users group.
Listing 14.3 Imperative Identity Enforcement
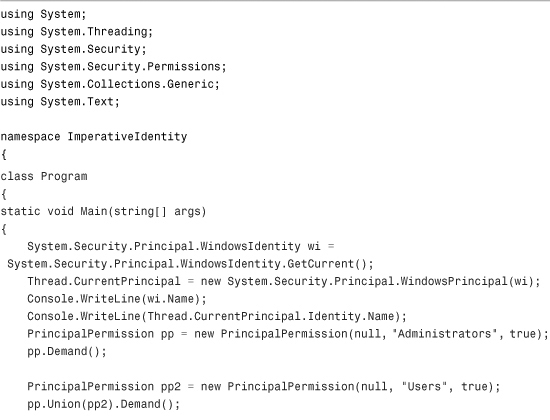

If you pass a null to the name parameter of the PrincipalPermission constructor, the permission will not require anything of the user’s name. Note that this name requires the domain or computer name prefix. Additionally, if you pass a null to the Role parameter, the permission will not require any explicit role membership. If you pass a null to both name and role parameters and just pass true to the third parameter, the permission will indicate that the calling user simply needs to be authenticated.
Using Declarative Security
Imperative security involves manually creating an instance of a permission within a method to protect the entire method using that permission and declarative security involves the use of code attributes. Declarative security also allows the CLR and other developers to interrogate an application’s security needs even if it’s not running by examining the security attributes using Reflection.
When you apply a permission attribute to a method, the code within the method cannot be executed unless the stack-walk check performed by the CLR for the security permission evaluates to true.
The code in Listing 14.4 illustrates the use of a code attribute in declarative security. You can follow the routine from the previous imperative samples to restrict the trust level of this code so that the permission demand will fail.
Listing 14.4 Declarative Security
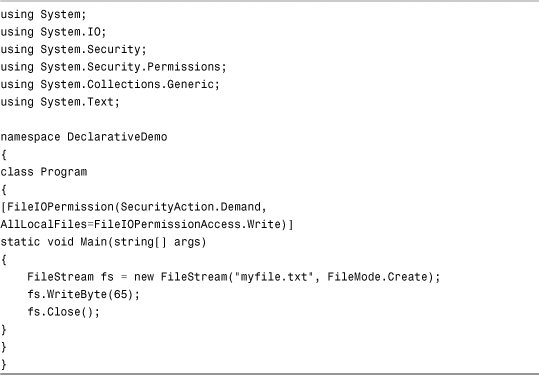
Refer to the list of permissions earlier in this chapter for the list of permission attributes that you can apply to methods and classes. Also note that you can apply the PrincipalPermission attribute to a method, effectively preventing anyone who does not pass the identity check from executing that method.
The first edition of this book showed you how you can create code that will block unwanted callers from using your public classes by using the StrongNameIdentityPermissionAttribute class declaratively. The idea is that you restrict the list of potential callers to only those callers that have that public key.
This works just fine in .NET 1.0 and .NET 1.1. However, in .NET 2.0, any fully trusted assembly will satisfy any demand, including link demands for strong name identity permissions. In other words, if you decorate your method with a StrongNameIdentityPermission attribute like the one in the following code, you will only be protecting yourself against partially trusted callers.

If you try to access this code from another C# application that you created on your own hard drive, it would work just fine, completely allowing access to the GetSecretWord() method, because code you create on your own machine is fully trusted by default.
If you really need to limit the access to your code, you can create an internal method, which will only be visible to code within your assembly, and then use the InternalsVisibleToAttribute class to indicate to what assembly you want to expose internal members and essentially create a “friend” assembly. The use of that attribute, however, is beyond the scope of this chapter.
Summary
This chapter has provided you with coverage of one of the core pieces of the .NET Framework: Code Access Security. CAS provides a mechanism for restricting access to protected and potentially dangerous resources like system files, regular files, network sockets, web sites, registry settings, and much more. CAS works intelligently to prevent the situation where an untrusted caller can exploit a fully trusted assembly to create a security hole. Although it is difficult to create this scenario, you can leave yourself open to attack and exploitation through the misuse of permission assertions and allowing partially trusted callers. Through the use of both imperative and declarative coding with CAS in mind, you can create secure applications that can access the resources they need while preventing malicious code from exploiting that same access.