
Chapter 25. ASP.NET Personalization and Customization
IN THIS CHAPTER
- User Interface Tailoring with Themes and Skins
- Working with ASP.NET User Profiles
- User Customization with Themes and Profiles
As websites become more full-featured, their peers too need to become more full-featured and robust. One of the features of modern websites that most users have come to expect (often at the pain and expense of the developer) is the ability to personalize and customize their own experience on that website. This feature is often used in portals such as Yahoo, Google, MSN, and so on. Users want to be able to change the look and feel of the website as well as supply information that tailors content to themselves, such as their zip code, interests, hobbies, and so on. This chapter shows you how new features of ASP.NET 2.0 allow you to give users this functionality by using themes, skins, and user profiles.
User Interface Tailoring with Themes and Skins
Before ASP.NET 2.0, a developer had to hand-code the “engine” that provided support for user customization of look and feel. This engine typically resulted in the user selecting a theme from a list. Under the hood, the user’s selection would be used to dynamically choose which Cascading Style Sheet (CSS) would be used to support the HTML output of a given page. If a user selected the 'Green' theme, the engine would dynamically decide to use Green.css as a page’s style sheet, using various shades of green and complementary colors. Likewise, if the user chose the 'Red' theme, the page would be rendered using the Red.css style sheet.
The good news for developers is that this dynamic theme engine is built into ASP.NET 2.0. All of the work required to dynamically change the look and feel of a page has been done for us, and much more.
The creation of themes is the easy part. The hard part is populating the themes with the right styles and UI elements to make them compelling to your users. Themes are so modular that they can easily be created by a designer and then handed to the developer upon completion.
ASP.NET has several custom folder names that it recognizes within an ASP.NET application. Each of these folders has a unique purpose. For example, the App_Code folder contains classes that will be compiled and visible to the entire application. For themes, the App_Themes folder contains all of the themes installed for a given application.
To create a themes folder, first create an empty ASP.NET website called ThemesSkins. Then, right-click the project in Visual Studio, choose Add ASP.NET Folder, and then select Theme. This will create a new folder called App_Themes.
To create a new theme, right-click the App_Themes folder and add a new folder. The name of the folder will be the name of the theme, so choose the folder name carefully.
To this folder, you can add style sheets (.css files) and skin files. The purpose of the style sheet is fairly obvious: The ASP.NET theme engine reads all style sheets in the folder (determined by the page’s current theme setting) and includes them as standard stylesheet links in the rendered output.
Skin files contain control definitions. Within a theme, you can have multiple skins (represented by a unique ID). By using skin files, you can define the default behavior of a grid view based on a theme, and you can even define alternate UI settings for that grid view based on the skin ID. For example, the default behavior for a grid in the 'Blue' theme could be to display regular rows with a white background and alternating rows with a blue background. You could define an 'Inverse' skin that indicates that the grid view should be displayed with blue regular rows and white alternating rows. The possibilities are endless, and the power put in the hands of graphic designers and web designers is enormous.
To get started and see how themes work, create three folders in your App_Themes directory: Blue, Red, and Green. In each of those folders, add a new style sheet of the same name, for example, Blue.css or Red.css. Finally, add a new skin file called Controls.skin to each of the folders. Then create a master page called Site.master, delete the standard default.aspx, and then create a new one that utilizes Site.master as its master page. After all this, you should have a directory structure that looks like the one shown in Figure 25.1.
There are two ways to control what theme a page uses for rendering. The first is to use the <pages> element in the Web.config file, as shown in the following line:
<pages theme="Green"/>
Figure 25.1 Creating a themed application.
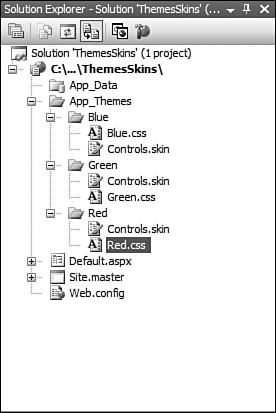
This line of XML in the configuration file indicates that all pages within the application will default to the Green theme. Each page can individually override the theme choice in one of two ways.
The second way involves using the @Page directive at the top of the page, as shown in the following example:
<%@ Page Language="C#" MasterPageFile="~/Site.master"
AutoEventWireup="true" CodeFile="Default.aspx.cs"
Inherits="_Default" Title="Home Page"
Theme="Red" %>
This code is used by a page to override the Web.config setting and force the page to use the "Red" theme. You can also programmatically set the page’s current theme. Because the page’s theme selection has such a drastic impact on how the page is rendered, that selection needs to be done early in the page’s life cycle. The following code shows a page’s OnPreInit method overridden to programmatically set the page theme:
protected override void OnPreInit(EventArgs e)
{
base.OnPreInit(e);
Theme = "Green";
}
If you attempt to set the page’s theme at any other stage in the page life cycle, you will get a runtime error.
To see the theme system in action, add some content to the master page and the default.aspx page and set the background color in each of the themes’ css file to the appropriate color (for example, set the background-color style attribute in Blue.css to blue).
When you run the application the first time, you should see the default behavior (no theme). Experiment with changing the Web.config theme setting and the page’s setting and programmatic setting to see how that affects the display. The programmatic change of the theme setting overrides all previous theme selections for that page.
Next, let’s add some skins to dynamically control the appearance and behavior of specific controls. To do this, open up the Controls.skin file in the Green theme and add the following code:
The code in a skin file contains partial control definitions. You must include the runat="server" portion, but you cannot set the ID property of the control. In addition, you can only set UI and display properties. This means that you can set the regular and alternating styles on a grid, but you cannot set its data source within the skin file.
Tip
You can choose to include all of your control definitions for the theme in a single skin file (for example, Controls.skin), but that can get extremely difficult to maintain on a large project. If you have several skins, and each skin has unique control definitions, it can be more efficient to create a different skin file for each skin ID. For example, you might create a Normal.skin file for the default control definitions for the theme, and an Inverse.skin for inverted controls, and so on. Using this method can make skins easier to create for designers and easier for developers to maintain.
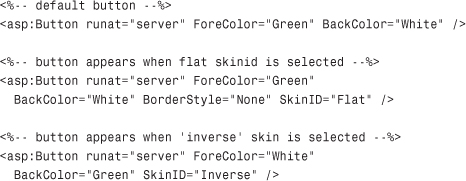
Now, create a new page called skindemo.aspx and choose your Site.master master page. If you created a content placeholder in the master page, you can set the following code in the skindemo.aspx file:

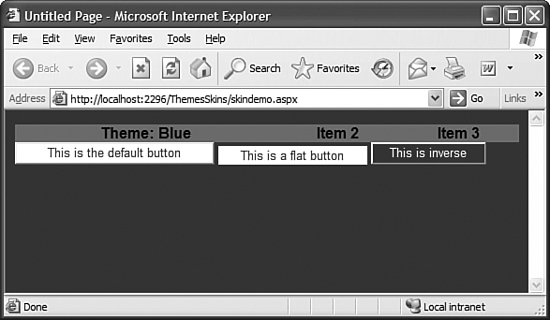
When you run this page in the debugger, you will see your master page content and the child content merged onto a green background. The first button will display with a standard border, the second button has no border, and the third button has a regular border but the colors are inverted.
The power of the new IntelliSense in Visual Studio 2005 never ceases to impress. If you were typing the code in by hand and following along, you probably noticed that as you typed SkinID= IntelliSense actually popped up and displayed a list of skins defined. The new IntelliSense is shown in Figure 25.2.
Figure 25.2 IntelliSense displaying a list of defined skins.

You can also create a global theme. A global theme is one that is available to all applications on a given server. This can be particularly useful if you have multiple applications running on the same server that you want to share a set of common themes as well as have their own private themes. To create a global theme, you follow the same rules as for creating a page theme, except that the global theme is stored in the following directory:
[IIS root]aspnet_clientsystem_web[versionThemes[Theme]
So on my system, a global theme called Christmas might be in the following directory:
C:inetpubwwwrootaspnet_clientsystem_web2_0_50727ThemesChristmas
By default, the global Themes directory hasn’t been created, so you will have to create it when you create your first global theme.
As you can see, the mechanics of creating and using skins has been made extremely simple by the new ASP.NET theme support. The hard part is, as it should be, in the design of the style sheets and skin files. Because skins are file-based and extremely modular, the web and graphic designers can create these files on their own and insert them into the website as they become available without hindering the rest of the development process.
Tip
When building themes, you can have images that are specific to an individual theme. When you refer to that image from a control in a skin file, the URL is relative to the theme directory. This means that an image stored in App_ThemesBlueimageslogo.jpg would be referred to as <asp:Image ImageUrl=""imageslogo.jpg""/>.
Working with ASP.NET User Profiles
It is becoming harder and harder to find web applications that don’t store information in user profiles. Information such as a user’s name, e-mail address, phone number, and even credit card information is stored by so many websites that most users are pretty used to filling out profiles and new-user forms on websites.
In the past, every time you needed an application that maintained user profile information, you had to create a database (or at least a few tables in an existing database) to store that information and probably a library of classes that encapsulated the interaction with the back-end profile store. That task has been made obsolete in ASP.NET 2.0. This section of the chapter shows you how to configure application services (used to store profiles and much more, such as membership data), how to use an ASP.NET profile provider, and finally how to write code that allows the storage and retrieval of user profile data.
Configure Application Services
To store profile information in an underlying database, you need to have the database created and the appropriate tables and stored procedures created. Fortunately, ASP.NET provides a wizard that walks you through the process of creating the application services database. Application services consist of membership data, profile data, personalization data (discussed in Chapter 26, “Introduction to Web Parts”), role data, and event data. This allows you to create one application services database, and it will take care of many of the tasks that used to require manual development effort in previous versions of ASP.NET.
To create a new database or configure an existing one for application services, you need to use the ASP.NET SQL Server Setup Wizard that ships with ASP.NET. It is a command-line tool called aspnet_regsql. This tool will automatically be in your path if you open up a Visual Studio 2005 Command Prompt (in the Visual Studio Tools subfolder under Visual Studio 2005 in your Start menu).
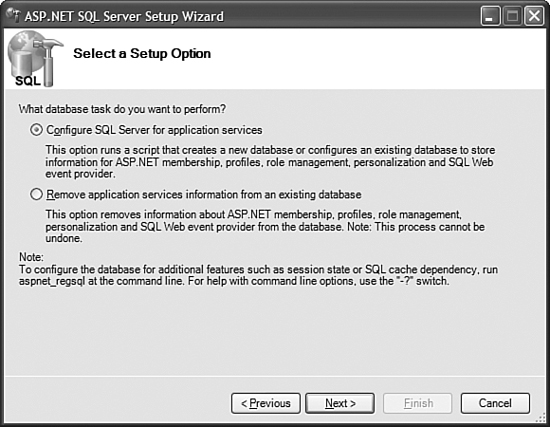
When you execute aspnet_regsql with no parameters, you will first be prompted with a screen indicating the application’s purpose. When you click Next, you will see the screen displayed in Figure 25.3.
You will be prompted for the name of the SQL Server in which the application services database will be created, as well as for credentials (or you can use default Windows credentials). Keep in mind that all you’re doing at this stage is creating the database; none of the information you enter here will be recorded in any ASP.NET application.
Figure 25.3 ASP.NET SQL Server Configuration Wizard.
After you follow all the directions in the ASP.NET SQL Server Configuration Wizard, you can go into your SQL Server Management Studio and look at the contents of the database you just created. It doesn’t have to make much sense because the ASP.NET providers expose a very robust API for interacting with that data.
Configuring the Profile Provider
When the application services database has been created and is ready for use, you will need to create an application that utilizes that database for its profile provider.
To configure your application to use a specific profile provider, you need to use the <profile> element and the <connectionStrings> element of the Web.config file.
Create a new ASP.NET application called UserProfiles and leave all of the default content in place. Add a Web.config file to the project.
The first step to configuring an application to use a profile provider is to create a connection string that points at the application services database, as shown in the following code:

This creates a connection string that will establish a connection to the application services database created during the wizard (the one in the example is called ASPNET_AppServices—you will have to replace the database name with the name of the one you created). This connection string follows all the rules of standard ADO.NET SQL connection strings.
The next step is to configure the profile provider by indicating which connection string the profile provider will use to connect to its data. You also need to specify the type of the profile provider. In this case, we’ll be using the System.Web.Profile.SqlProfileProvider.
The <profile> section (contained within <system.web>) looks like the one shown in the following code:
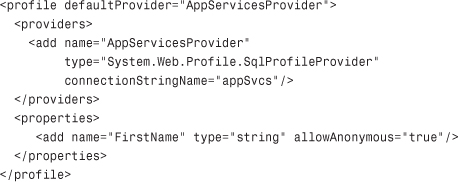
The <profile> element indicates which provider defined within the subelement <providers> will be used as the default provider. The <properties> element will be discussed in the “Using ASP.NET Profiles” section.
If you run your application as it is now with just the default content and the modified Web.config, you will get a runtime error if the connection to the profile data source failed, and your application will run just fine if the profile data source connection worked properly.
Using ASP.NET Profiles
At its very core, a user profile is really nothing more than a collection of name-value pairs. For example, a sample user profile might contain the following name-value pairs:
If you create a database table that contains user profile data and just the columns from the preceding list, you could write code that reads and writes user profiles from that table. The problem is that user profiles tend to grow over time, and you may need to add or remove columns at some point in your application’s life. If you have a fixed set of columns in that table, this kind of maintenance can become a nightmare.
The ASP.NET profile providers fix this problem by allowing the properties that belong to a user’s profile to be arbitrary. You can define the list of properties that you want to manage for your users directly within your Web.config file. The profile provider takes care of the details of persisting and retrieving the data, leaving you with a very simple API for managing user profile data: the Profile object.
The Profile object is available to all web pages, and inherits from System.Web.Profile.ProfileBase. Table 25.1 lists the properties that come with the base profile class.
Table 25.1 ProfileBase Properties

In addition to the stock properties defined by the ProfileBase class, ASP.NET actually adds a property to the Profile object for every property you have defined in Web.config. For example, if you have defined the FirstName property in Web.config (see the <profile> element from the preceding section), you can write code that looks like this:
lblFirstName.Text = Profile.FirstName;
Profile.FirstName = txtFirstName.Text;
This is extremely powerful because even at design time, you have a strongly typed, IntelliSense-aware set of properties that are read from Web.config. Defining a property in the <properties> subelement of the <profile> element is fairly easy. You use the following format:
<add name="FirstName" type="string" allowAnonymous="true"/>
The name of the property is self-explanatory. This name will also be used as a property name on the dynamically constructed Profile object. The type attribute indicates the data type. You can actually use any .NET data type, even one you have created:
<add name=""ShoppingCart"" type=""MyApp.Utilities.ShoppingCart"" />
The only requirement on the data type of the profile property is that it must be a type that can be resolved from the ASP.NET project, so the type needs to be either in the App_Code directory of the application or in an assembly that is referenced by the project.
Note
If you are planning on using a custom-created type as a profile property, that type must be serializable. You should follow the same rules for out-of-process session-state data when determining what to store in a user’s profile: It must be consistently serializable. When you serialize and then deserialize the object, it should represent exactly the same data. There should be no “side-effect” code in any property accessors, and it should have an empty default constructor.
The allowAnonymous attribute indicates whether an anonymous profile (a profile owned by an unauthenticated user) should have that property. In such situations, you might choose to allow an anonymous user to have a shopping cart and then migrate their anonymous profile to a named profile as they create an account during the checkout process. When they have a named profile, they can have additional properties such as a name, address, billing and shipping information, and so on.
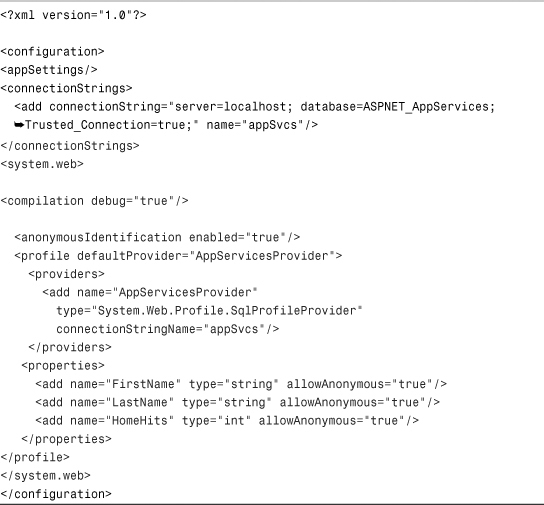
To illustrate how to use profiles and profile properties, let’s get started with a full Web.config that stores the user’s first and last names as well as the number of times that the user has hit the home page. Listing 25.1 contains a complete Web.config using the previously configured application services database and three profile properties, all of which are allowed by anonymous users.
Listing 25.1 A Web.config Supporting Profile Properties
Now add a page to your application called MyProfile.aspx. This page will be responsible for allowing the users to edit their first and last names, as well as displaying the number of times they have accessed the home page of the application. The source code for MyProfile.aspx.cs is shown in Listing 25.2.
Listing 25.2 MyProfile.aspx.cs

The code is pretty straightforward. If the page is not a postback, the user’s profile information is loaded into the appropriate text box and label controls. After the user clicks Save, the user’s profile information is modified according to the data contained in the two text boxes, and the Profile.Save() method is called to ensure the data is stored in the database. Any developers who have had to code their own profile storage system can appreciate how incredibly powerful it is to now have design-time, strongly typed profile properties and to have the complexity of storing and retrieving those profiles handled automatically by ASP.NET’s SQL Profile Provider.
The only remaining piece of work that needs to be done to create a full-featured application using profiles is to migrate the anonymous profile to a real profile when the anonymous user becomes authenticated. To handle this situation, just add the following method to the Global.asax.cs file:
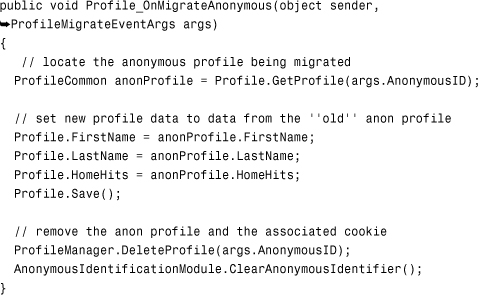
Because an anonymous profile can only be migrated to a named profile when the user goes from being anonymous to being authenticated, you will probably not run into this situation until you start using the Membership provider that is discussed in Chapter 28, “Securing Your ASP.NET Applications.” Keep this code in mind, and when you’re done with both this chapter and Chapter 28, you can try to create an application that uses both Membership and Profile providers not only to authenticate users, but also to store their profile information.
User Customization with Themes and Profiles
Perhaps one of the most powerful uses of both profile and theme technology is to combine the two by allowing the users to choose their own theme and store that choice as a profile property. The Theme property of the Page object is a string type, so you can add a user profile property to store the currently selected theme with the following <add> element in the <properties> element of the <profile> element:
<add name="Theme" type="string" allowAnonymous="true"/>
To see this all work together, go back to the ThemesSkins solution you created earlier if you were following along. That web application has three themes defined: Blue, Red, and Green. It also has a Site.master page with some random content in it just to illustrate that themes are applied to the final rendering and don’t interfere with Master Page composition. The Controls.skin file in all of the themes has been modified to make sure that they all had Flat and Inverse button definitions to make the sample show up more clearly.
The first thing to do is to modify the Site.master so that it is displaying the name of the user’s currently selected theme. To do this, just add a label anywhere you want in the Site.master and set the page’s code as follows:
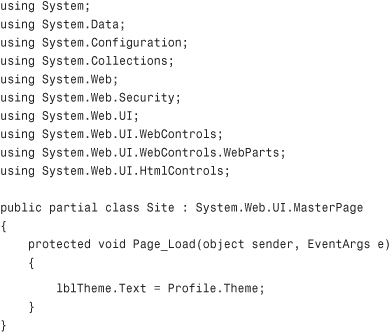
Next, you’ll want to create a MyProfile.aspx page used to allow the users to view and save their own profiles just as you did in the preceding section. Set the ASPX code as follows:
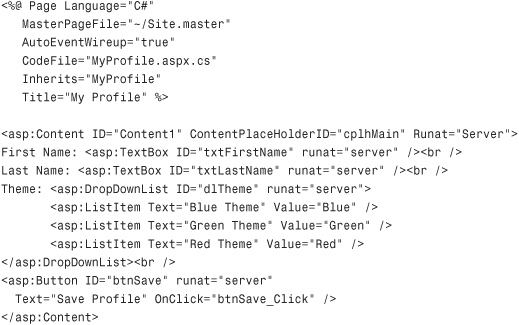
Then enter the following code for MyProfile.aspx.cs:

The last step is to modify any existing pages so that they dynamically set the theme based on the user’s profile. Add the following lines of code to any existing page to do just that:
protected override void OnPreInit(EventArgs e)
{
base.OnPreInit(e);
Page.Theme = Profile.Theme;
}
This framework allows your users to select the look and feel that they prefer most, with very little work done by the developer. When the themes have been created either by the developer or by designers, the hard work is done. Setting up a profile property to store the user’s theme is just a matter of adding one line to the Web.config file, and modifying a page to dynamically change its theme based on the user’s profile only takes a few more lines of code. If all your pages inherit from the same base page, you could make that change in the base page and your entire site could automatically have the dynamic theme selection ability. Figure 25.4 shows a page where the theme name is displayed by Site.master and the rest of the content has been skinned and themed dynamically based on the user’s profile (though the color might not be obvious).
Figure 25.4 Themes, skins, and user profiles in action.
Summary
In previous versions of ASP.NET, giving the users the ability to modify their own profiles and storing those profiles in a back-end database was a commonly required activity. It was also tedious and increased the time to market for virtually any product that required it. Developers often created their own reusable user profile APIs and databases to ease the pain of this task. With ASP.NET 2.0, the task of storing and retrieving user profile data is handled automatically, and adding profile properties is as simple as modifying the Web.config file.
The notion of creating themes and skins was often left for the most advanced sites because it required a lot of extra code and often made pages more difficult to read and maintain. With ASP.NET 2.0, theme and skin support is built into every application with very little overhead in a modular, easy-to-use fashion.
Combining the power of user profiles with themes and skins allows the users to choose the way the site looks and feels, giving them control and flexibility over the site and allowing them to feel that they have the ability to customize their own experience.
The next chapter, “Introduction to Web Parts,” will take the user’s ability to customize his own experience to the next level and uses the application services database discussed in this chapter.