
Chapter 40. Using Enterprise Services
IN THIS CHAPTER
- Registering Serviced Components
- Just-in-Time Activation and Pooling
- Queued Components
- Role-Based Security
- Transactions
- Shared Properties
- Loosely Coupled Events
Enterprise Services is a suite of tools and functionality made available to enterprise applications through an operating system feature called COM+. COM+ is a component management system that provides tremendous power above and beyond the component features that the .NET Framework provides. COM+ provides a hosted environment for components that gives them abilities such as Justin-Time activation, support for distributed transactions, object pooling, security, and even the ability for one component to subscribe to events published by another component.
This chapter assumes that you already have some basic familiarity with COM+, its purpose, and how it works. This chapter provides you with instructions on how to use C# 2005 to take advantage of the many features of COM+ Enterprise Services.
Registering Serviced Components
Before you get into the meat of writing code that takes advantage of the many services available through COM+, you need to be aware of the most basic of all COM+ tasks: registration. In order for a component to take part in COM+ transactions, be JIT-activated, exist within a pool, and so on, that component must be registered with COM+. You can either manually register your components or you can make use of special assembly-wide code attributes to automatically register the components. In order to test any of the code written in the remainder of this chapter, you will have to register the components.
Manual Registration
Manual registration of a serviced component involves using the regsvcs.exe command-line tool. This tool ships with the .NET Framework. For a complete reference on this tool, check out the MSDN documentation for it at http://msdn2.microsoft.com/enus/library/04za0hca.aspx.
Before you can register your components, the assembly in which they reside needs to have a strong name. Strong-naming an assembly is as simple as checking the appropriate box in the Project Settings area.
To register all public classes within an assembly as serviced components within a COM+ application (a COM+ application is a collection of components that share similar properties and configuration), you can use the following syntax:
regsvcs /appname:TestApp MyComponents.dll
The appname parameter refers to the name of the COM+ application. If you are unfamiliar with the basic features of COM+ and how it works, consult the administrator’s guide for your operating system.
Automatic Registration
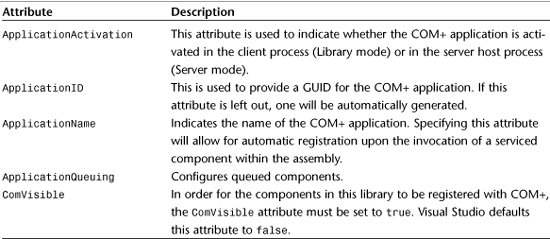
Automatic registration can be much simpler than manually registering your components. Through the use of a special set of code attributes, you can embed COM+ information into your assembly. The first time the assembly is loaded and these attributes are found, the components contained in your assembly can be registered automatically before the first line of component code is executed. Table 40.1 contains a list of the attributes involved in automatic registration as well as the configuration that can take place during that configuration.
Table 40.1 Enterprise Services Assembly-Wide Attributes
To see how automatic registration works, and to create the first serviced component in this chapter, start by creating a new console application called ComPlusHelloWorld. Add a new Class Library project to the solution called HelloLib.
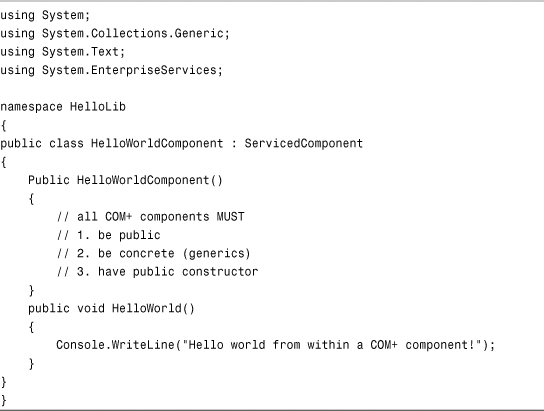
In the class library, add a reference to the System.EnterpriseServices Assembly, delete Class1.cs, and add a new class called HelloWorldComponent.cs. The code for this class is shown in Listing 40.1.
Listing 40.1 HelloWorldComponent
Add a strong name to this assembly and make sure that the ComVisible attribute in the AssemblyInfo.cs file is set to false. Also, add the following attributes to the AssemblyInfo.cs file:
[assembly: ApplicationActivation(ActivationOption.Library)]
[assembly: ApplicationName("Hello World Application")]
Now add a reference to the HelloLib project and the System.EnterpriseServices assembly from the ComPlusHelloWorld console application project. Modify Program.cs in the Console Application to contain the following code:
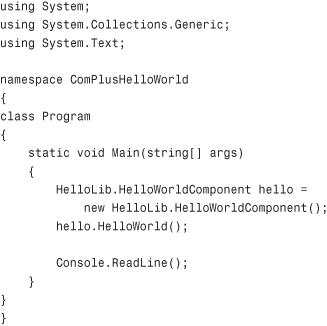
Note that nothing special needs to be done to create an instance of a serviced component other than adding a reference to the component’s assembly.
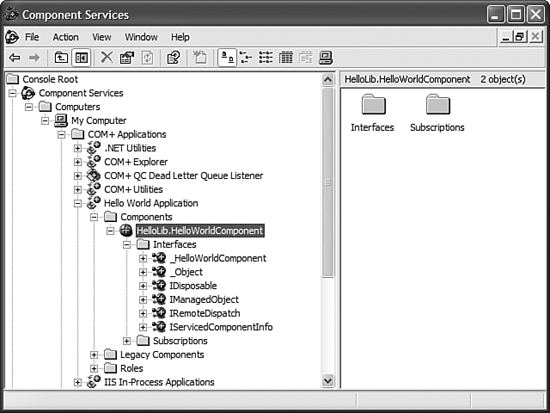
Run the console application and you will see the “Hello World” message from the component. Then go into the Component Services administrative control panel to verify that a COM+ application was indeed created for your assembly. Figure 40.1 shows the Component Services control panel showing the new COM+ application.
Figure 40.1 An automatically registered COM+ application.
Now that you know the mechanics of creating a serviced component, registering it, and utilizing it, you can continue through this chapter and learn how to make use of the various COM+ services.
Just-in-Time Activation and Pooling
In enterprise applications, many server resources often sit idle waiting for client requests. The problem arises from the fact that, in most circumstances, these resources are consuming precious space on the server whether they are idle or not. The Just-in-Time Activation service provides a way around the wasting of idle resources. An object that is JIT-activated will be activated just before a method is invoked. When the call is complete, it will be deactivated again. Even while the object is deactivated, clients with references to that object will still have valid references. This can create a performance increase for components that are called infrequently.
To create a component that is JIT-activated, you need to first create a class that inherits from System.EnterpriseServices.ServicedComponent. To do this, you need to add a reference to the System.EnterpriseServices assembly. A class that is JIT-activated looks like this:
[JustInTimeActivation]
public class MyJITClass : ServicedComponent
{
// class implementation
}
The sequence of events for working with a JIT-activated object is as follows:
- Client/consumer of the component creates an instance of the object.
- Client invokes a method call on the component.
- Component is activated.
- Actual method is invoked.
- Component is de-activated.
The concept of object pooling deals with another enterprise resource issue. Components within an enterprise application often have very high instantiation overhead. Their initial use often obtains things like database connections or even remote connections to other parts of the application via web services or remoting. Situations where it takes a long time to create objects but those objects are not used for very long are perfect for pooling.
An object pool is a store of preinstantiated objects. If 50 objects are sitting in a pool waiting for a client to make a request, those clients don’t incur the heavy initial creation penalty. The following class will reside in an object pool:
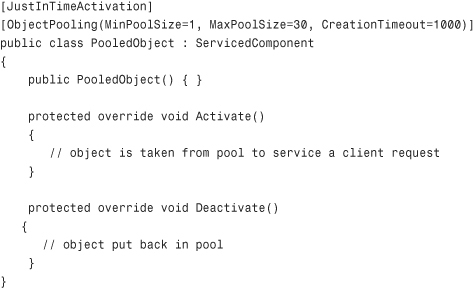
Object pooling is one of the powerful features of COM+ and it alleviates some of the burden and cost of the initial instantiation of objects by storing a pool of preinstantiated components and making them available for immediate use.
Queued Components
Queued components provide an asynchronous client model for invoking methods on COM+ Serviced Components. Sometimes the client wants to make a method call on a COM+ component but then wants to go on about its business without worrying about how long it takes for the method to complete. This is where queued components help. If a serviced component is queued, the method calls to that component are stored in a Microsoft Message Queuing (MSMQ) queue. When the component has time, it will then process the messages in the queue. This gives your component the ability to perform long-running operations without halting the client application or without using multithreaded programming. The use of MSMQ grants the transmission of messages a measure of reliability and durability. If the power on a server fails with messages still in the queue, they will be processed when the server starts up again.
To implement a component that receives method calls via a queue, you need to define an interface, mark that interface with the InterfaceQueueing attribute, and then define a class that inherits from ServicedComponent as well as implements the interface, as shown in the following code:
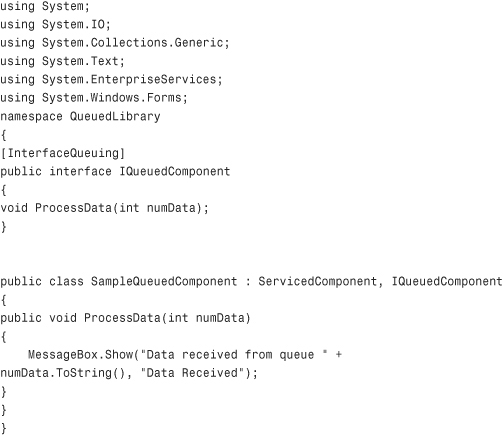
Obviously, in a production environment you won’t want to be using the MessageBox method because there will rarely be a case where a queued method call will have any meaningful user interface.
Queued components must reside in server-side assemblies that have enabled queuing. The attributes used to accomplish this are as follows:
[assembly: ApplicationName("Queued Component Demo")]
[assembly: ApplicationQueuing(Enabled=true,
QueueListenerEnabled=true, MaxListenerThreads=100)]
[assembly: ApplicationActivation(ActivationOption.Server)]
Again, you must provide any COM+ assembly with a strong name for it to be able to be imported into COM+. Because the queued components assembly must run as a server-activated object, it cannot take part in automatic registration; you must use the regsvcs.exe tool to register the COM+ application before a client can communicate with it.
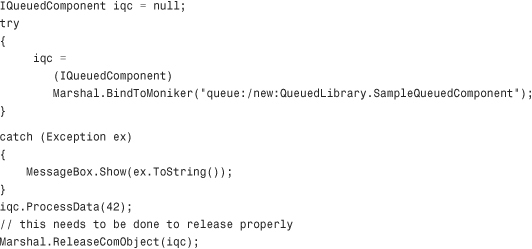
To create a client that consumes a queued component, you need to make use of the System.Runtime.InteropServices.Marshal class. You use Marshal.BindToMoniker instead of new to create an instance of the object:
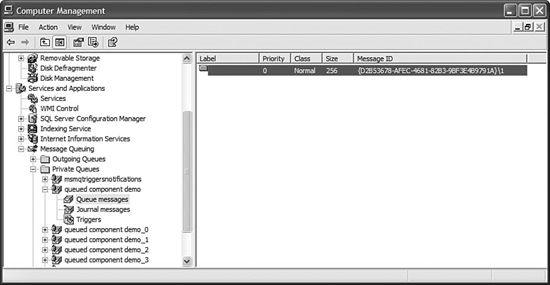
After invoking a method on a queued component, you should see a new message appear in a private queue, as shown in Figure 40.2.
Figure 40.2 MSMQ containing a queued component message.
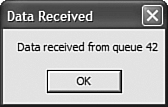
Either the message will be processed on its own, or you can force the message to be processed immediately by starting and stopping the COM+ application. After the message has been processed, it disappears and the method is invoked, as evidenced by the dialog box shown in Figure 40.3.
Figure 40.3 Dialog box displayed as a result of a queued component method call.
Role-Based Security
COM+ provides full support for role-based security. Roles can be added to a COM+ application that contain a list of authorized users or groups. The code within a COM+ application can then check to see if the calling user belongs to a specific role and act accordingly. This allows for method-call-level security against unauthorized use.
To see this in action, first you need to make sure that your COM+ application authenticates method calls. By default, this authentication is turned on, so you should only need to modify these settings if you previously turned them off.
Within your application, you can check to see if the calling client belongs to a specific role with the following line of code:
SecurityCallContext.CurrentCall.IsCallerInRole("My Role");
Before checking to see if a caller belongs to a certain role, you should make sure that security checking is enabled for the application:
if (SecurityCallContext.CurrentCall.IsSecurityEnabled) ...
If security checking is not enabled, the IsCallerInRole method won’t do you any good. Also keep in mind that these roles are roles defined using the Component Services control panel—they are not Windows security groups, although you can include a Windows security group in a COM+ role.
Transactions
Transactions within a serviced component are controlled either with code inside a method call or with attributes. Transactions in COM+ work in a similar fashion as the new System.Transactions namespace in the .NET Framework. If a serviced component indicates that a transaction should commit, then if that component is the owner of the transaction, it will commit. However, if that component was invoked by another component, the component will only be allowed to “vote” as to the commit status of the parent transaction. This can all be configured through various options.
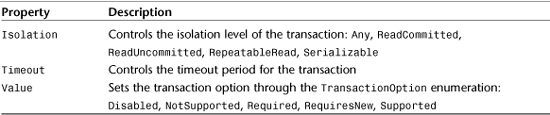
To control the transactional properties of a class through attributes, you use the TransactionAttribute class.
Table 40.2 contains a list of the properties that can be set for the TransactionAttribute class.
Table 40.2 TransactionAttribute Properties
The following code shows a class with the TransactionAttribute controlling transaction options for the component:
[Transaction(TransactionOption.Required,
Isolation=TransactionIsolationLevel.Serializable,
Timeout=20)]
public class TransactionalComponent: ServicedComponent
{
// class implementation
}
Using the ContextUtil property of the ServicedComponent class, your component can manually control its vote for transaction commit or rollback, as shown in the following lines:
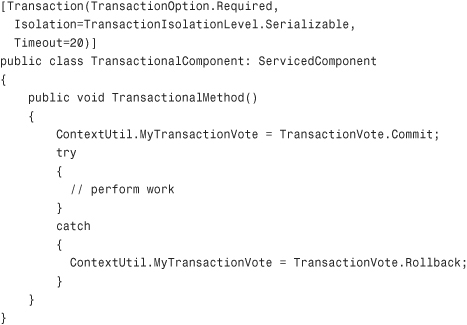
This code will perform some task and if an exception occurs during the execution of that task, the method will indicate that the transaction should be rolled back.
Note
Keep in mind that transactions only work with Compensating Resource Managers (CRM). What this boils down to is that not all work will be automatically rolled back if your component indicates a rollback. For example, if your transaction modified a database and modified a text file and then indicated a rollback, the database would roll back all changes made during the transaction, but the text file would not. This is because files on disk aren’t transactional. You need to be acutely aware of which resources you affect during a transaction to make sure they all roll back properly.
Shared Properties
Even though statelessness is a common goal and often a requirement for many enterprise applications, especially those making use of serviced components, sometimes state needs to be maintained.
A COM+ application can have its own state in the form of shared property groups and shared properties. This state is scoped for the entire COM+ application. This means that if the COM+ application is library-activated, the state is available to any code within the process that started the application. If the COM+ application is server-activated, the state is available to any client. In fact, in a server-activated COM+ application, clients can actually shut down and the state will be waiting for them when they start back up again (provided the server application hasn’t restarted).
To see shared properties in action, this next sample will illustrate using shared properties to store the last assigned order number. If COM+ can maintain information like this in-memory, shared, and available to all COM+ components within an application, that can be a tremendous savings of time and resources by not requiring the components to make a connection to the database just to receive the last assigned order number.
You have already seen how to create and register these components, so that information won’t be repeated here. Basically all you need to do is create a class library that has the following Enterprise Services attributes:
[assembly: ApplicationName("Shared Property Demonstration")]
[assembly: ApplicationActivation(ActivationOption.Server)]
Then, add a class called SharedPropComponent to the library and enter the code shown in Listing 40.2.
Listing 40.2 A ServicedComponent That Makes Use of Shared Properties
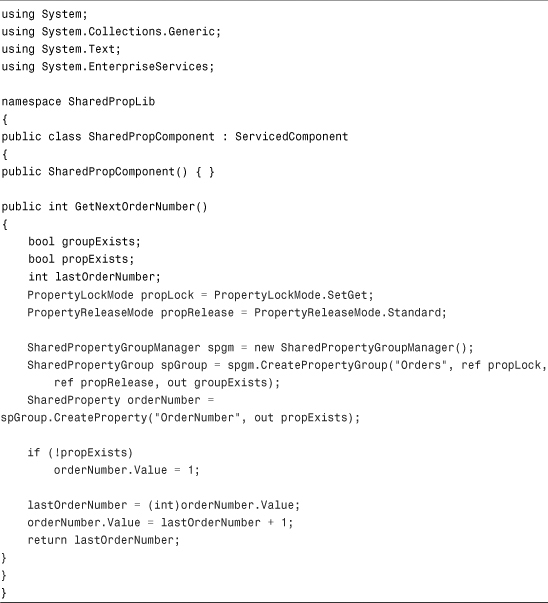
This code uses a property group called "Orders", and a property within that group called "OrderNumber". Remember that all of the code that accesses property groups is scoped to the current COM+ application, so you don’t need to waste an entire group segregating your application from other COM+ applications manually. After registering the application manually using regsvcs.exe (because server-activated applications can’t be registered automatically), use the following code as a test harness for the new component:
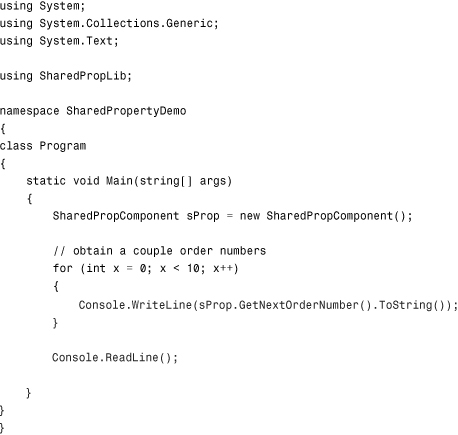
What you should expect to see is that the first time you run the application it will count from 1 to 10.
Tip
You might need to disable authentication checks on the application before this will work. Various development environments are often not configured to allow the developer’s account to do things such as work with shared property groups. To disable security and authentication checks, use the Properties dialog for the COM+ application itself, not the component.
What’s more interesting is that if you shut down the test harness application and then start it back up again, it will count from 11 to 20. The timeout is configurable; you can set the timeout period or leave the server application running indefinitely. If the COM+ server application has not shut down due to idle timeout, all of the information contained within the shared property groups and shared properties will remain intact, even though there isn’t a single client consuming a component within the application.
Shared properties can be used for all kinds of things. If your application wants to maintain relatively transient state information but doesn’t want to incur the overhead of using a database to do so, the COM+ shared property system is definitely the technology to use.
Loosely Coupled Events
Within a COM+ application, it is possible to have one component throw an event and have another component listen for and respond to that event. The event itself is decoupled from the components themselves and managed through the COM+ infrastructure, allowing for some pretty powerful techniques to be employed within your application.
Creating a loosely coupled event system involves the following tasks:
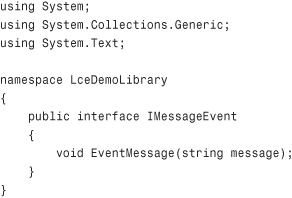
- Create an event interface. This is an interface that will describe the features of the event.
- Create an event component that implements the interface. The event component itself must be derived from
ServicedComponentand implement the event interface. - Define an event sink. The event sink is essentially the listener component that will be passed to the event when the event is fired by the publisher.
- Create a publisher that fires the event.
The event interface is quite simple; it’s just an interface that defines the method required by the event:
Next, create the event class that implements the event interface. This class is just a simple serviced component:
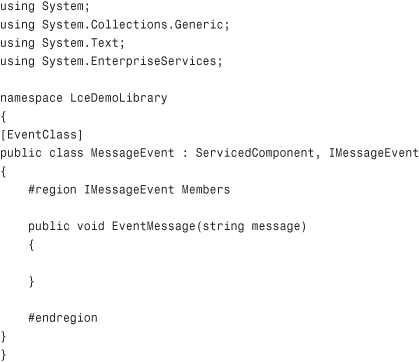
Note that there is no real implementation for the EventMessage event. This is deliberate as the real work comes from the event sink (the subscriber).
To create the event sink or subscriber class, add the following class to the class library:
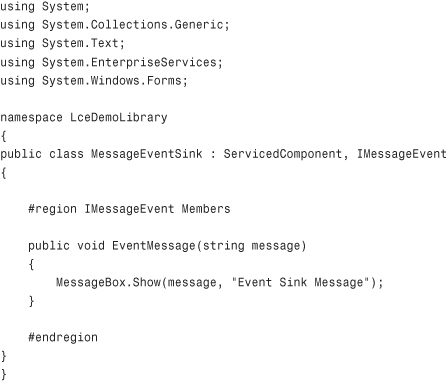
Note that the event sink component implements the same interface as the event component. This is done so that COM+ can tell which events can be subscribed to by which subscribers or sinks.
With this library built, register it manually using the regsvcs.exe tool. In order for it to work, you need to use the Component Services administration console to hook up the event subscription, and you can’t do that until the COM+ application has been registered.
After the application has been registered, open the Component Services administration console and expand the newly registered application. Expand the component node for the LceDemoLibrary.MessageSink component, right-click the Subscriptions node, and choose New, then Subscription. Browse to select the MessageEvent class underneath the IMessageEvent interface and select to have the subscription enabled immediately.
Now create a test harness that looks something like this:
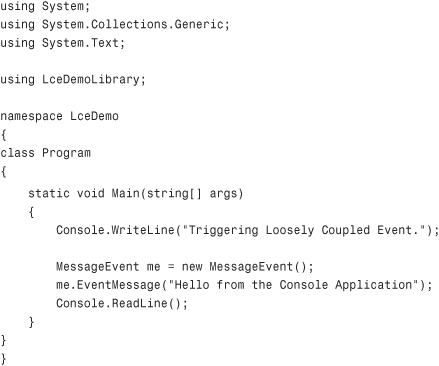
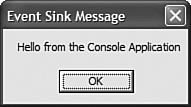
When you run this application, the event is created and then COM+ will pass that event directly to the event sink you created by virtue of the subscription configured earlier. Without any delay, you should see the dialog box in Figure 40.4.
Figure 40.4 Dialog box as a result of loosely coupled event handling.
Loosely coupled events provide a wealth of power, flexibility, and reliability, which are the cornerstone features of COM+ Enterprise Services that no COM+ developer should forget about.
Summary
COM+ provides an extremely powerful suite of tools and services for enterprise applications that covers everything from JIT activation to object pooling, and data sharing to loosely coupled, reliable durable events. This chapter showed you how you can take advantage of the various COM+ services through managed code. The task of utilizing COM+ is extremely easy with code attributes and a few special classes available to COM+ components for things like security checking and voting on transaction outcomes. After completing this chapter, you should be ready to start using COM+ in your applications and making informed decisions about when COM+ makes sense to use in an enterprise application.