
Chapter 20. Strongly Typed DataSets
IN THIS CHAPTER
- Introduction to the Typed
DataSet - Connecting Typed
DataSets to Live Data - Annotating a Typed
DataSet - Extending a Typed
DataSetUsing Partial Classes
So far in this book you have been exposed to many different aspects of data access using ADO.NET. One of the core pieces of ADO.NET is the DataSet, an in-memory representation of relational data that can contain multiple related tables, each with primary and foreign keys. DataSets also let you perform queries on the data contained within them, as well persisting that data in XML format. Using a DataAdapter, you can synchronize data contained in a DataSet with data stored in a back-end data source such as SQL Server or Oracle.
This chapter introduces you to a special kind of DataSet, the typed DataSet. You will learn the basics of working with typed DataSets, as well as how to use functionality new to Visual Studio 2005 and .NET 2.0 to connect those DataSets to live data sources using TableAdapter classes. Finally, you’ll see how to tailor the member and method names of your typed DataSets to increase their readability and ease of use as well as how to extend the DataSet functionality using the new C# 2.0 partial classes.
Introduction to the Typed DataSet
A typed DataSet is a DataSet whose data structure is known at compile time, allowing Visual Studio to create strongly typed wrappers for the tables, rows, columns, and relationships contained within the DataSet.
You can create a typed DataSet in several ways. The easiest, of course, is to use the designer provided by Visual Studio. The schema (metadata including columns, tables, keys, and relationships) for the typed DataSet is dictated using a dialect of XML called XSD (XML Schema Definition). You can also create a typed DataSet by supplying an XSD file as input to the XSD.EXE command-line tool.
In this section you’ll see the various ways in which you can produce a typed DataSet and how you can use that DataSet to work with your data.
Using an XSD Schema to Create a Typed DataSet
The format and language of XSD itself is beyond the scope of this chapter. If you want to know all about the XSD standard, you can check out the XML Schema home page at http://www.w3.org/XML/Schema. The important thing to note here is that XML Schema is used for many purposes above and beyond the typing of DataSets. XML Schema has numerous uses, and Microsoft has utilized various extensions to the XSD Schema to provide additional features for typed DataSets.
Take a look at the following sample schema, which defines a table called Books that contains columns describing individual titles:
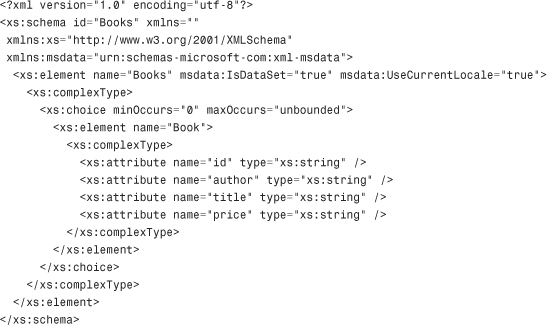
This schema defines the structure of a DataSet, and you can use the XSD command-line tool to create a C# class that inherits from System.Data.DataSet that provides strongly typed members specific to the preceding schema, as shown in the following code:
xsd books.xsd /d /namespace:SAMS.DataSets
This creates a class named SAMS.DataSets.Books and places it in a file named books.cs. This class inherits from System.Data.DataSet, and exposes strongly typed members on each of its rows such as id, author, title, and price. You don’t need to access members using the indexer notation as in the following example:
myDataSet.Tables["Books"].Rows[0]["author"]
Instead, you can use the far more friendly (and strongly typed) member accessors provided by the SAMS.DataSets.Books class:
myDataSet.Books[0].author
If you don’t know enough about XSD to create a schema from scratch, you can also use the XSD tool to infer a schema from an instance document. An instance document is just an XML document that contains data rather than metadata. For example, an instance document that produces the book schema is shown in the following code:

To infer an XSD schema from your source data without having to know all of the intricacies of the XSD language, you can issue the following XSD command:
xsd books.xml
This will create the books.xsd file, which you can then use to create a typed DataSet.
Using the Designer to Build a Typed DataSet
Now that you’ve seen how to build a typed DataSet the “hard” way, this section will walk you through creating one visually, using the Visual Studio designer. It seems as though using raw XSD to create DataSets is not as common as it was with the first iterations of the .NET Framework and Visual Studio. In fact, support for viewing the XSD source for a DataSet created with Visual Studio has been completely removed from the product, you have to open an XSD file as if it were an XML file to get to the source view.
To get started, create any project type you like, but a console project will do just fine for this exercise. Next, right-click the project and choose Add, and then New Item. Select the DataSet template from the list of options presented to you and give it a suitable name.
You will be presented with a blank design surface onto which you can drag items from the Toolbox or even directly from the Server Explorer. This means that you can accomplish some pretty amazing things just by dragging a table from your source database onto your DataSet’s design surface.
For now we’ll keep it simple and just drag a DataTable onto the design surface. You can call it whatever you like. Right-click the table and choose Add, and then Column. You can choose the column name, its data type, whether it autoincrements, and much more. You can then right-click your key column and choose Set Primary Key. The interface looks and feels very much like the table creation screens in the SQL Server Management Studio application for SQL Server 2005.
Create a second table and give it a column that matches the primary key column in the first table. Drag a DataRelation from the Toolbox onto the design surface, and you can easily and visually set up a parent-child relationship between the two tables, as illustrated in Figure 20.1.
Figure 20.1 A simple DataSet with a parent table and a child table.
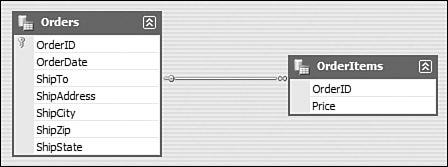
The design surface is an extremely powerful tool because it not only distances you from the low-level XSD generation, but it provides you with a user interface that lets you see the relationships between all of the tables in your DataSet at a quick glance, as well as the columns in each table.
Programming with a Typed DataSet
Writing code that uses typed DataSets is the easiest part of all. As you saw earlier, with a typed DataSet you don’t need the string- or ordinal-based member access as shown in the following example:
myDataSet.Tables["Books"].Rows[0]["author"]
Instead, you can access the members in a more user-friendly fashion because the class that derives from DataSet has exposed strongly typed members:
myDataSet.Books[0].author
After you have added a DataSet to your project and configured it using the designer, you can create an instance of it and begin working with it just as you would any other DataSet. Listing 20.1 provides an illustration of how to populate a typed DataSet using its strongly typed members.
Listing 20.1 Populating a Typed DataSet Programmatically
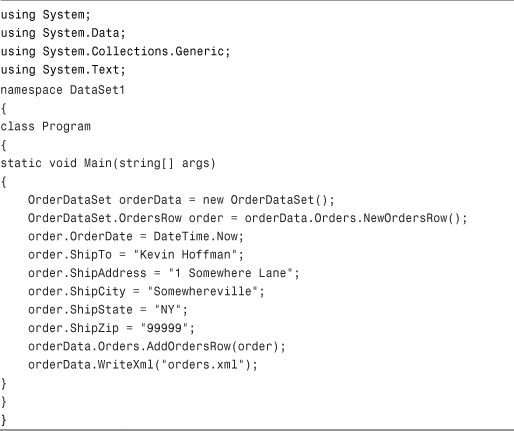
For those of us who prefer business objects with meaningful and appropriately typed members over the generic nature of the traditional DataSet, the typed DataSet is an extremely powerful tool, providing developers with the power and flexibility of the standard DataSet coupled with the easy-to-read and easy-to-maintain strongly typed members. Using a typed DataSet’s strongly typed members, you can actually catch type mismatch errors at compile time that might have otherwise taken hours or days to track down using a standard DataSet.
Connecting Typed DataSets to Live Data
DataSets on their own are a pretty powerful tool, but a DataSet doesn’t do anyone any good without any data. This section shows you the basics of using a DataAdapter to populate a typed DataSet as well as how to use some of the new features of ADO.NET 2.0, such as the TableAdapter component.
Filling a DataSet Manually Using a DataAdapter
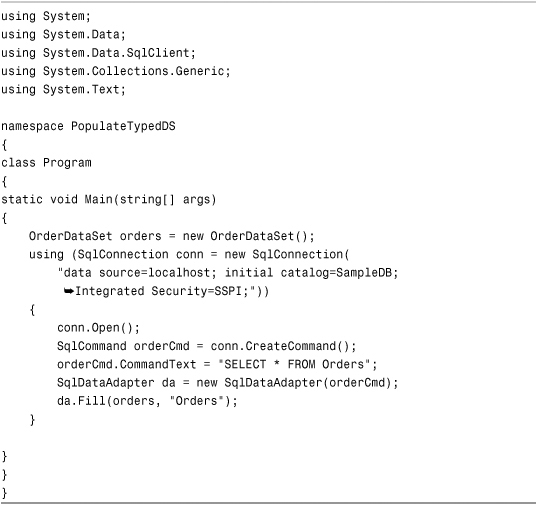
If you are familiar with working with standard DataSets and DataAdapters, the material in this section should be very familiar to you. A typed DataSet is really just a class that derives from System.Data.DataSet in order to provide a developer with a DataSet that is specific to one schema. As a result of this, any existing code that works on standard DataSets will also work on a typed DataSet, including the DataAdapter. The code in Listing 20.2 shows that you can use a DataAdapter to populate a typed DataSet the same way you would have used one to populate a basic DataSet.
Listing 20.2 Populating a Typed DataSet using a Standard DataAdapter
Filling Typed DataSets Using TableAdapters
A TableAdapter can be thought of as a strongly typed DataAdapter that specializes in synchronizing one table between a typed DataSet and the relational back-end database. With previous versions of ADO.NET, Microsoft realized that one of the most common tasks that people performed on DataSets was exchanging data between the DataSet and the database. Using a DataAdapter such as SqlDataAdapter can accomplish this, but the regular DataAdapters are not designed to work with specific types. When you create a TableAdapter using the DataSet designer, that TableAdapter is designed according to your rules for how data should be loaded into the indicated table.
To create a TableAdapter, drag one from the Toolbox onto a blank area of the design surface. Though you might initially think so, you can’t drag a TableAdapter onto an existing table within your DataSet designer. The reason for this is that the act of dragging a TableAdapter onto the design surface brings up a wizard that prompts you for information on how the adapter can connect to the database, whether it should use stored procedures or SQL statements, and a host of other options. This also will read the schema information from the database and use that to generate the actual table in the DataSet.
After being created by the wizard, each TableAdapter starts off with two very important methods:
Fill—This method populates only the table for which the adapter was created. When you call this method, the adapter will read the connection string information obtained by the wizard from inside theDataSet’s XSD file, as well as the query information you indicated, and use that to select data from the database table and place it in the strongly typedDataTable.GetData—This method performs the same function asFill(), except that instead of filling a destination table, this method returns a new instance of the strongly typed table, prepopulated with the results from the defaultSELECTquery specified during theTableAdapterconfiguration wizard.
Figure 20.2 shows the design surface after creating two TableAdapters (and, as a result, two strongly typed DataTables) by indicating to the configuration wizard the location of the tables in the database and the queries that should be run by the adapter.
Figure 20.2 Connected TableAdapters and their corresponding tables.
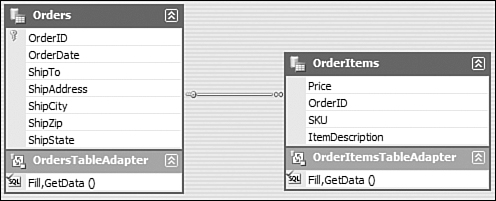
TableAdapters, despite their direct association with a single strongly typed table, do not appear as nested classes within a typed DataSet. Instead, they show up in their own unique namespace related to the DataSet itself.
For example, the DataSet in Figure 20.2 is called ConnectedOrderDataSet. All of the table adapter classes created for that DataSet will appear in a namespace called ConnectedOrderDataSetTableAdapters.
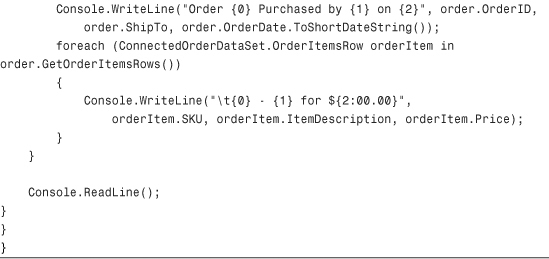
The code in Listing 20.3 shows how to use the Fill() methods on TableAdapters to populate a typed DataSet with data retrieved directly from the database.
Listing 20.3 Populating a Typed DataSet with TableAdapters
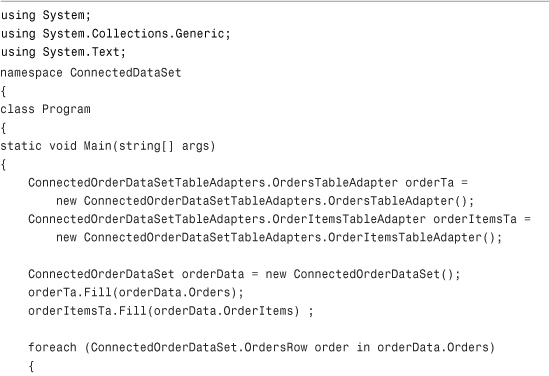
One thing that may seem to be missing from the preceding code is the use of a connection string or a connection at all. This is because when you configured the TableAdapter using the wizard, you specified the connection to use and you also specified the query to use when retrieving data from the table. Other options you can choose during the wizard include giving the TableAdapter the ability to directly send INSERT, UPDATE, and DELETE statements to the database.
At the end of the wizard creation, you will see a summary of the actions taken. This typically includes the creation of INSERT, UPDATE, DELETE, and SELECT statements to be used in synchronizing data between the table and the database. This allows you to do things like change a row, call Update() on the TableAdapter, and have the change automatically propagated to the database:
orderData.Orders[0].ShipTo = "Modified User";
orderTa.Update(orderData.Orders);
Unfortunately, some of the queries that the wizard generates on your behalf aren’t the most efficient. You can easily remedy this by supplying your own manually written query to provide the most optimal update experience possible.
Take a look at the screenshot of the Query Builder that is integrated directly into Visual Studio in Figure 20.3. As you can see, the query used for the TableAdapter’s UpdateCommand property is pretty inefficient.
Figure 20.3 The QueryBuilder editing a TableAdapter’s UpdateCommand.
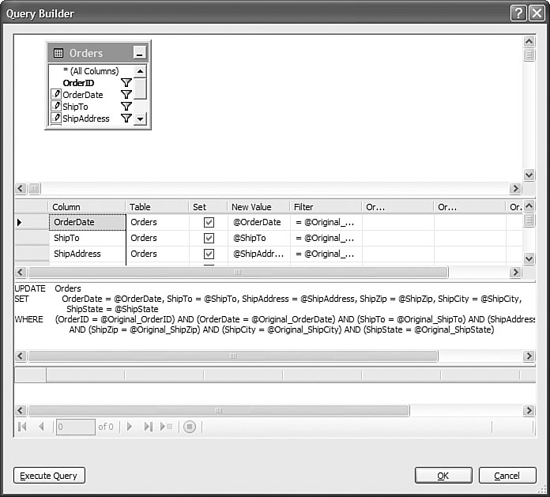
The power at your fingertips with the combination of typed DataSets, the TableAdapter, and the integrated Query Builder is pretty impressive. You can visually design and edit all of the SQL statements (or stored procedures) that will be used when updating and querying the underlying data source. You can combine all of this with the new ability of data adapters to update in batches to create some extremely powerful data access mechanisms with just a few lines of C#.
Adding Additional Queries to a Typed DataSet
One of the limitations of the DataAdapter is that it only has room for four commands: INSERT, UPDATE, SELECT, and DELETE. The new TableAdapter recognizes the fact that there may be five or six different ways in which you want to retrieve data with the same schema. For example, at one point in your application you might want only the orders that belong to a specific user, and at another point in the application you might want just the orders placed on a specific date. At the same time, you want to be able to maintain the parent/child relationship between orders and order items. You can do this by creating additional queries and placing them inside the TableAdapter.
To add an additional query to an existing TableAdapter, just right-click the TableAdapter on the design surface and choose Add Query. This brings up the query configuration wizard, which first asks if you want to create a new SQL statement, a new stored procedure, or attach your query to an existing stored procedure. You don’t have to re-enter any connection information because that is already stored as part of the TableAdapter itself.
You will see a dialog prompting you to enter a SQL statement that will be used to populate the data table. You can click the Query Builder button to get a more interactive dialog. You can create a parameterized query here, which will, in turn, create a method on the table that accepts that parameter. In this example, the following query was entered into the dialog:
SELECT OrderID, OrderDate, ShipTo, ShipAddress, ShipZip, ShipCity, ShipState
FROM Orders
WHERE (ShipCity = @City)
This query will be used in order to selectively fill the table with orders that were shipped to a specific city. When prompted for the method names for the fill and getdata operations, select something that describes the nature of the operation. In this case, FillByCity and GetDataByCity are descriptive and appropriate.
After you add the query to your TableAdapter, you can call that method the same way you would call any other method and pass the filter parameter:
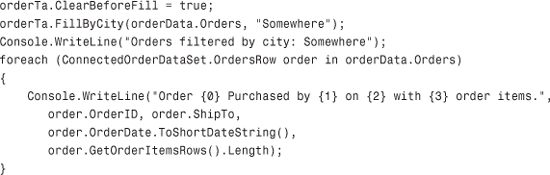
The power of being able to create additional parameterized queries exposed as methods on a TableAdapter is something that just hasn’t been available to developers until ADO.NET 2.0. The preceding code also demonstrates that the parent-child relationships remain intact when the parent table has been filtered using a custom query.
Annotating a Typed DataSet
When you create a typed DataSet, the XSD tool that generates the C# class provides default names for all of the members, including properties, methods for obtaining child rows, table class names, and row class names. For example, if you were to create a table called Customers, the default class name for a customer would be CustomersRow, not Customer. To access the customer’s order history, you would have to use the GetOrderHistoryRows() method rather than something more appropriate like GetOrderHistory().
You can solve this problem by annotating your DataSet. In previous versions of Visual Studio, you could access the XSD text for a typed DataSet directly from within the IDE. For some unknown (and highly aggravating) reason, that feature is no longer present in Visual Studio 2005 by default. To get at the XML view of an XSD file, right-click it in the Solution Explorer and choose Open With and then select the XML Editor option.
When you look at the inside of the XSD file, you will notice that there are a lot of attributes that begin with msprop:Generator_. These are all customizable annotation attributes. By changing these attributes, you can directly control the names of the classes, members, and methods created when the DataSet class is built.
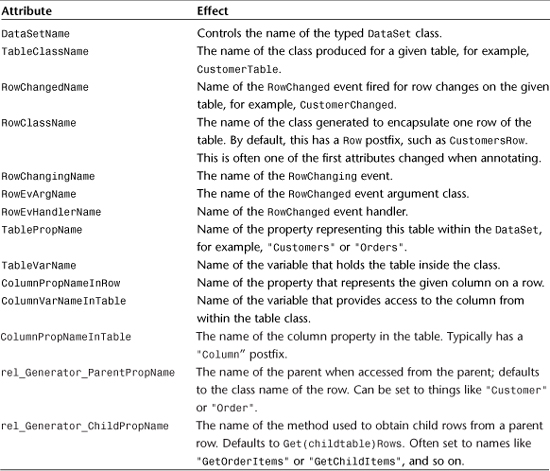
Table 20.1 shows the various annotation attributes and what effect they have on the typed DataSet.
Table 20.1 Annotation Attributes (All Prefixed by msprop:Generator_ Unless Otherwise Specified)
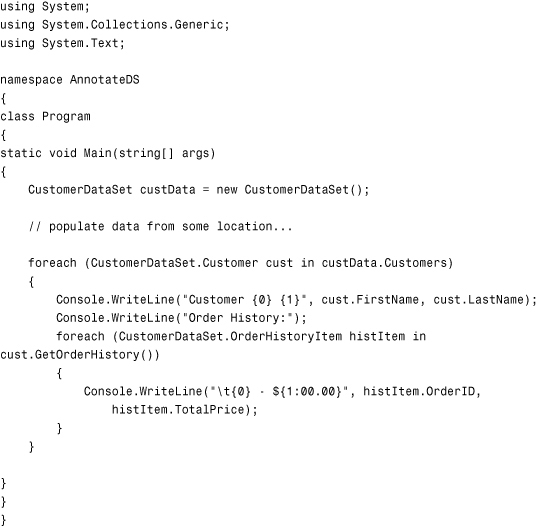
With several of the preceding annotations applied to a typed DataSet containing customer data with a Customers table and an OrderHistory table, you can write code that looks much cleaner and is far more readable than code generated with no annotations:
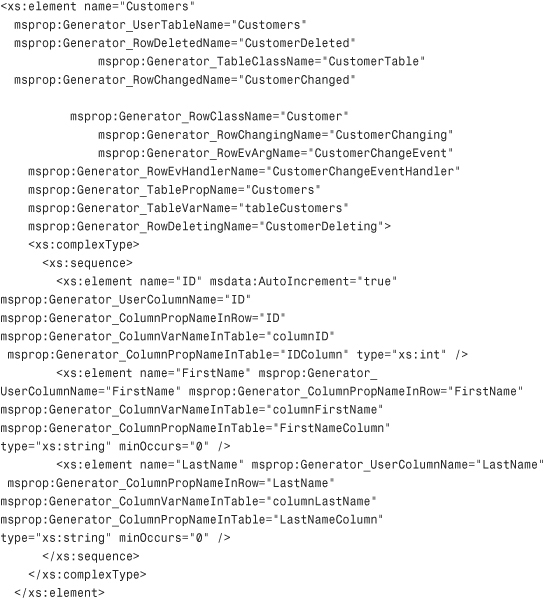
Because the contents of an XSD file can get fairly bloated, I will only show you the annotated "Customers" element from the preceding typed DataSet:
Extending a Typed DataSet Using Partial Classes
After you have created your typed DataSet and configured all of your TableAdapters to run all of the queries that you need and annotated it so that all of the members have appropriate names, you still may find that you want to extend the functionality of your typed DataSet. For example, you may decide that you have several operations that will be performed frequently on the data, such as summing the total price of all orders within the DataSet. Rather than creating a separate utility class that takes a ConnectedOrderDataSet as a parameter, you can actually extend the class itself through the use of partial classes in C#.
To do this, you can either right-click the DataSet in the Solution Explorer and choose View Code, or you can right-click the design surface of the DataSet designer and choose View Code. If this is the first time you have done this, you’ll see an empty partial class implementation like the one that follows:
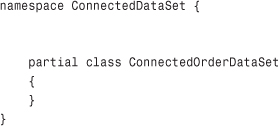
To add your own custom functionality, all you have to do is add the methods you want, such as the method shown in the following code:
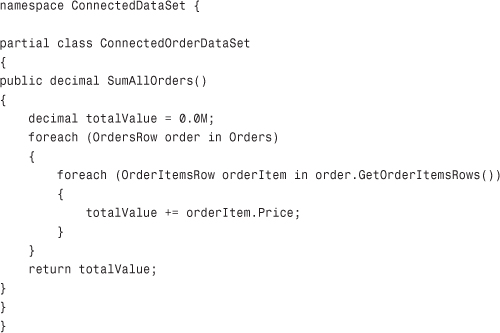
With this method in place, you can call this method on the DataSet just like any other method:
Console.WriteLine("Total sum of all purchases in DataSet: ${0:00.00}",
orderData.SumAllOrders());
Summary
This chapter started with a basic introduction to the typed DataSet including the various ways in which you can create one. In addition, this chapter covered how to connect a typed DataSet to live data sources using conventional DataAdapters as well as the new TableAdapter component. Finally, you saw how to extend the functionality already provided by a typed DataSet by adding additional queries to a TableAdapter and by adding code to the partial class provided by the typed DataSet.
After reading this chapter, you should have a firm grasp of how you can use typed DataSets in your application to increase productivity, code reuse, and ease of maintenance.