
Chapter 12. Assemblies and AppDomains
IN THIS CHAPTER
- Introduction to Assemblies
- Assemblies Under the Hood
- Building and Using Assemblies
- Storing and Retrieving Assembly Resources
- Localization and Satellite Assemblies
- Introduction to
AppDomains - Programming with
AppDomains
Whether you’re building Web Forms applications, web services, Windows applications, applications for PDAs, or even console applications, you are working with assemblies and AppDomains. Regardless of whether you’re aware of it, assemblies and AppDomains are at the core of all .NET applications.
This chapter provides you with an introduction to assemblies, as well as a detailed view of what they are, how they work, and how they’re built and used by applications. Next, this chapter covers the AppDomain and how knowledge of the existence of AppDomains can make your applications more powerful and more reliable.
Introduction to Assemblies
The assembly is the core unit of logical deployment within the .NET Framework. Whenever you compile your code, it must eventually end up in an assembly. When your application is executed after deployment, its assemblies are loaded by the Common Language Runtime. As you will see in the next section, there is a lot more to the assembly than meets the eye. A lot of developers take it for granted that an assembly is just another word for “DLL,” but that couldn’t be further from the truth.
An assembly is a logical container that stores not only compiled code, but also metadata and resources. Assemblies serve the following purposes:
- Assemblies are containers for compiled code that will be executed by the CLR.
- Assemblies are a logical unit of security. When code permissions are granted or denied, they are often done so at the assembly level.
- Assemblies serve as a logical unit of version control. Every type and resource contained within a given assembly shares the same version number (and other identifying information, such as public key and culture).
- As mentioned, assemblies are a logical unit of deployment. When you deploy your application, it is deployed at the assembly level.
Some of this might not make much sense at the moment, but it will become much clearer in the next section, where we take a look at the internals of assemblies in the .NET Framework.
Assemblies Under the Hood
Many developers assume that an assembly is just a simple DLL or an EXE file; simply the output produced by compilation. On the surface, this appears to be true, but there is a lot more to an assembly than just storing the compiled code.
Inside the assembly, there is far more than just the compiled code. As mentioned earlier, when the compiler creates an assembly, it stores compiled code as well as metadata.
Figure 12.1 illustrates the contents of a .NET assembly. There is a manifest, a list of the types contained within the assembly, assembly-level metadata, and finally the MSIL code created by the compiler.
Figure 12.1 Contents of a .NET assembly.
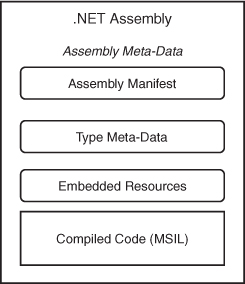
When you build an assembly (discussed in the next section), the compiler does a lot of things for you. It stores the list of types contained in that assembly, a list of dependencies (referenced assemblies that are required for the assembly to function properly), resources such as multilingual strings and images, and finally the compiled MSIL code.
An assembly can actually be a multifile assembly. In a multifile assembly, you can separate blocks of MSIL code and types into multiple modules. When you create the assembly, you then link the multiple modules via the assembly manifest of the primary assembly. This allows you to create a single logical assembly that can actually contain 20 different files. The beauty of this is that when the CLR attempts to load the primary assembly, it will automatically load all of the multiple files that make up the assembly. If one of the files is missing, the assembly will not load.
Introducing the Assembly Manifest
The assembly manifest is a collection of metadata that describes the contents of the assembly. It contains metadata about the assembly itself such as the version number, the public key, and so on. In addition, it contains a list of dependencies. These dependencies are checked when the assembly is loaded. If one of the dependencies fails to load, so too does the assembly. The manifest also contains a list of the resources used by the assembly.
To take a look at what the CLR sees when it loads an assembly manifest, you can use the ILDASM.EXE tool that comes with the .NET Framework SDK. To use this, you can open up a Visual Studio 2005 Command Prompt from the Visual Studio Tools group on your Start menu. Then type ILDASM and a new window will appear. Select File, then Open, and then browse to WindowsMicrosoft.NETFrameworkv2.0.50727 and select System.Data.dll. You’ll see a plethora of information about the types, resources, and metadata contained within the assembly appear in a useful tree structure. Double-click the MANIFEST node and you will see a window that looks like the one shown in Figure 12.2.
Figure 12.2 An assembly manifest, as seen by the ILDASM tool.
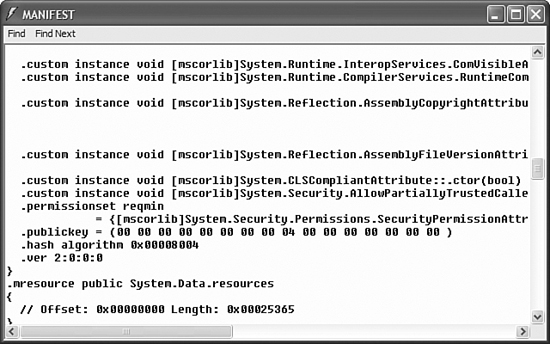
You don’t need to understand the language of the statements contained in the manifest, but it should be pretty easy to recognize a lot of the elements being discussed here. When browsing through the manifest, you can see the list of dependencies when you see the .assembly extern statements. The list of resources contained within the assembly is also stored within the manifest.
Building and Using Assemblies
There are several ways to go about creating an assembly. The first method, using Visual Studio, you should already be quite familiar with. Every time you have created a solution so far in this book, you have created an assembly. When you create a “Class Library” project within Visual Studio, the output of that Class Library is an assembly with the .DLL extension.
The other way to create an assembly is to use the Assembly Linker tool, AL.EXE. This tool provides a command-line interface to linking multiple compiled modules into an assembly. In fact, this is the only way for you to create a multimodule assembly in C#, as opposed to VB.NET, which allows for the creation of multiple modules per assembly directly within Visual Studio.
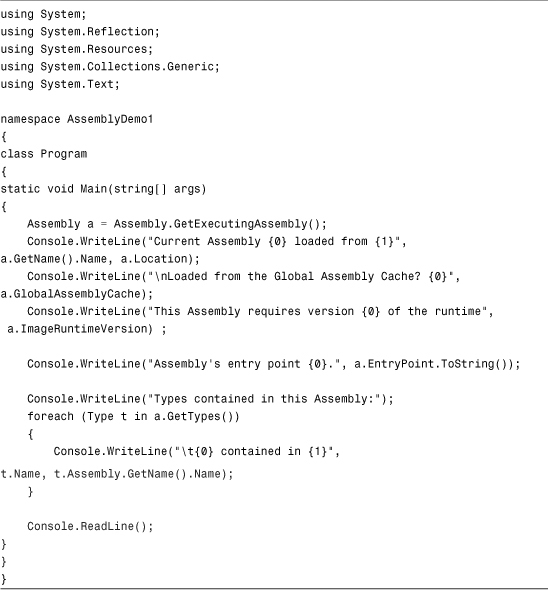
You can also use; Reflection to obtain information about an assembly. Listing 12.1 shows how you can retrieve some basic information from the assembly’s manifest using the Assembly class.
Listing 12.1 Using the Assembly Class
You can also use the Assembly class to load and obtain information from other assemblies. If you add a “Class Library” project to the preceding sample, you can modify the code so it reads information from the compiled DLL in addition to the executable file. This is illustrated in Listing 12.2.
Listing 12.2 Loading an External Assembly
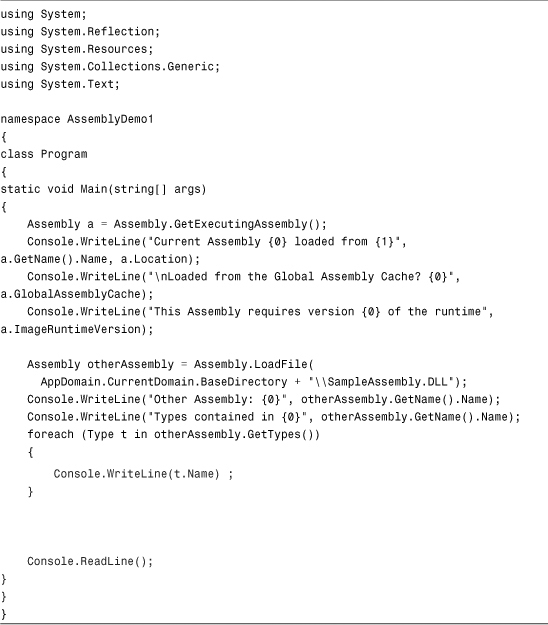
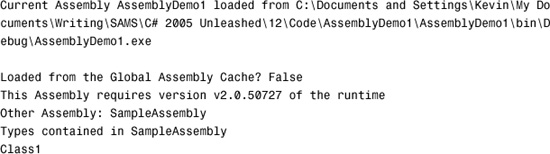
When you run this application, after having created an empty class library called SampleAssembly and adding a reference to that project from the main project, you get the following output:
Storing and Retrieving Assembly Resources
If you have experience with storing and retrieving resources in assemblies from previous versions of the .NET Framework, you’ll be pleasantly surprised at how easy it is to do in C# 2.0.
Many applications need resources. These resources can be things like images, icons, files, or strings that can be displayed in multiple languages. Developers often embed these resources in their assemblies so that they are easy to find, easy to use, and won’t accidentally be deleted from the disk. The resources are often so critical to the deployment of the application that, by embedding them within an assembly, they become a fixed part of the deployment and can’t be removed.
The process of adding resources to a project is quite simple in Visual Studio 2005. The new resource manager is extremely easy to use and allows you to organize all of your resources quickly and easily.
The first step is to add a resource file to your project. To add a resource to the project, right-click your project and choose Add and then select New Item. Find the Resources File item template and choose a name for the resources. By having multiple resource files in your project, you can organize resources categorically and make things easier to find.
A feature new to Visual Studio 2005 is the addition of a wrapper class that provides strongly typed members that expose the resources you create in your resource file. Each resource file in your project (it has a .resx extension) is converted into a class at compile time by Visual Studio.
In this way, if you create a resource file called StringMessages.resx in your project, and then create a string resource named Hello, you will be able to use the following line of code:
Console.WriteLine(StringMessages.Hello);
And the type of the resource will be a string, not an object. This is an extremely powerful new feature that dramatically increases productivity for developers working with resources.
The demo in Listing 12.3 consists of a console application called ResourceDemo, and a resources file called DemoResources. To that resource file, a string called Greeting has been added, shown in Figure 12.3.
Figure 12.3 Adding a string to a resource file using the Resource Editor.
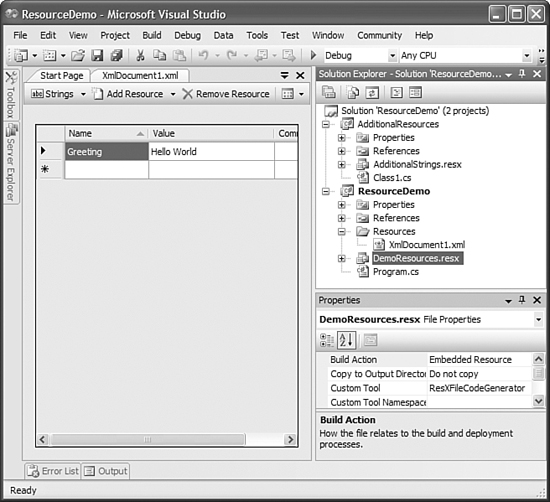
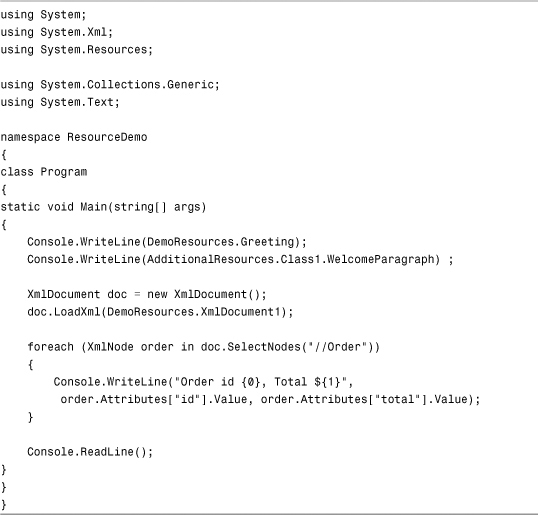
A class library called AdditionalResources was then created, and a resource file was added to that project in order to illustrate the right pattern for sharing resources between assemblies. Finally, an XML document was added as a file-type resource to the DemoResources resource file. The code in Listing 12.3 shows how to make use of the strongly typed class wrapper that is generated at compile time for access to embedded resources.
Listing 12.3 Accessing Resources Using the Strongly Typed Wrappers
The WelcomeParagraph string resource in the AdditionalResources class library is exposed as a static property as shown in the following example:
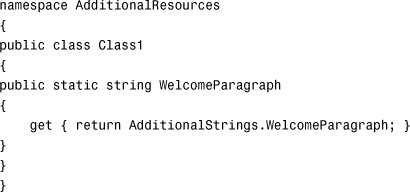
This illustrates a good design pattern: Each assembly should be responsible for determining to what resources it should provide external access. Although it is still possible using Reflection to get these resources, if you control the encapsulation you can control how your resources are used properly.
Localization and Satellite Assemblies
Satellite assemblies are a special kind of assembly that allows you to store resources for multiple languages in an easy-to-access format. You can create a satellite assembly, which is basically just a resource-only assembly, to contain resources for one specific language. This provides you with a lot of flexibility because you could create your application with support for a single language, and then deploy additional languages as satellite assemblies without having to recompile any of your main application code.
Creating applications with localization and globalization in mind is becoming a far more common task. In fact, it is becoming the norm for many application developers. With the use of satellite assemblies, it becomes even easier as you can hire contracted translators to supply you with XML files containing translations that you can then use to build a satellite assembly.
The .NET Framework uses a hub-and-spoke model for locating multilingual resources. If a resource is not available for the locale-specific culture in which the user resides (or claims to reside), the CLR will look for locale-neutral resources for the user’s language. Finally, if none of those can be found, the CLR will use the default resources found in the main assembly. An illustration of the hub-and-spoke model for resource localization is shown in Figure 12.4.
Figure 12.4 Resource location model.
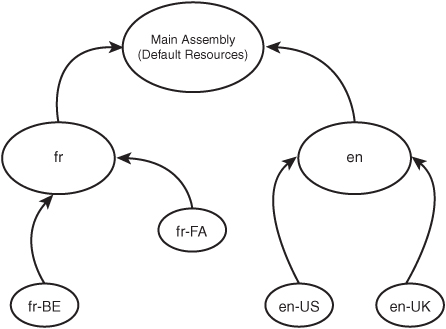
As you can see from Figure 12.4, the resource location starts at the most specific possible: the combination of language and locale. Then, if there is no match found, the locale is dropped and an attempt is made to find general resources for a specific language. If that attempt fails, the resources will be used directly from the main assembly in the default language of the application, which is often English.
When you add a resources file to your application, by default you just use a regular filename, such as MyStrings.resx. However, to supply resources (including images, icons, files, and so on) for a different culture, all you have to do is append the locale ID to the end of the filename, such as MyStrings.fr.resx and MyStrings.fr-CA.resx, and so on. Your application will still only create one strongly typed wrapper class called MyStrings, but instead of serving up the default content only, it will automatically detect the culture of the thread making the request for the resource and hand out the appropriate value. This removes the burden of conditional programming from you and makes it easier to support multiple languages.
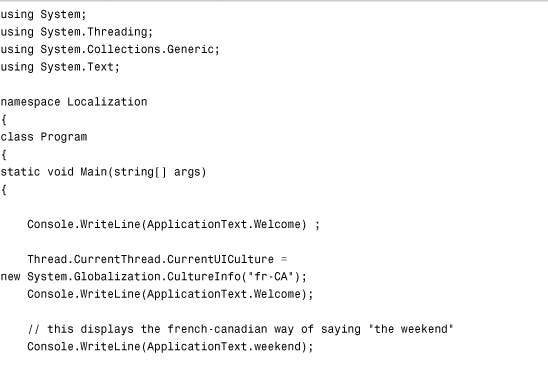
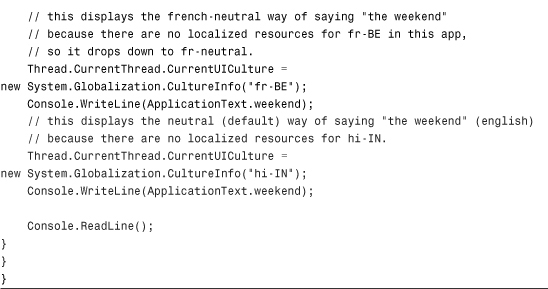
The code in Listing 12.4 shows what it looks like to print out a value (the phrase for “the weekend”) in multiple cultures by setting the current UI culture.
Listing 12.4 Displaying Localized Strings
Introduction to AppDomains
Whereas the assembly is a logical unit of deployment, the AppDomain is a logical unit of execution. The AppDomain is a sandbox in which .NET code runs. The AppDomain provides a container in which code can execute safely, knowing that code running outside the AppDomain cannot negatively impact it. As you will see throughout this book, cross-process communication done with Remoting is actually the process of passing information between AppDomains, whether they are on the same machine or different machines.
Throughout the course of an application, your code may load a lot of assemblies creating instances of other classes. Without the use of the AppDomain class, all of those assemblies will remain in memory for the lifespan of your application. If you are coding a long-running server application, this is unacceptable. Using the AppDomain class, however, you can manually control the loading and unloading of assemblies, as well as create an isolated environment to run potentially volatile tasks.
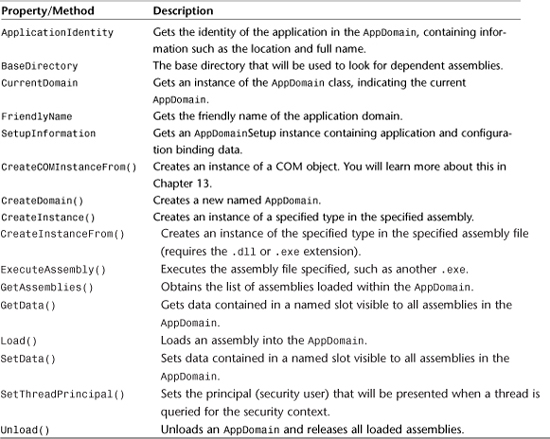
The AppDomain class represents the properties and functionalities of this memory sandbox, as shown in Table 12.1.
Table 12.1 AppDomain Properties and Methods
Programming with AppDomains
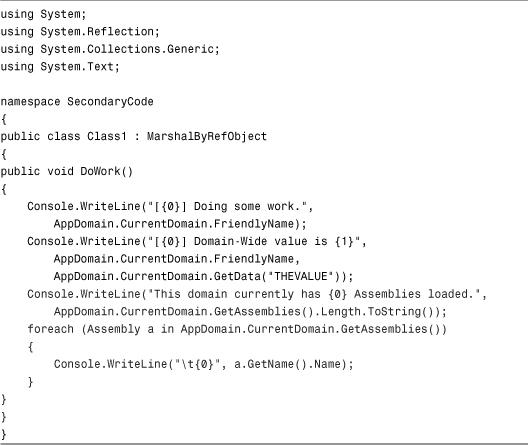
To illustrate how to program with AppDomains, we are going to create a solution that has a console application and a class library. The code in the console application is going to create a new AppDomain and use that new AppDomain to execute code within the class library. When that secondary code is finished executing, the code in the console application will then unload the temporary AppDomain, illustrating how you can gain tight control over the memory consumption of your application by manually loading and unloading certain AppDomains. The code for the class library is shown in Listing 12.5.
Listing 12.5 A Class Library with Simple Code for Displaying the AppDomain’s Loaded Assembly List
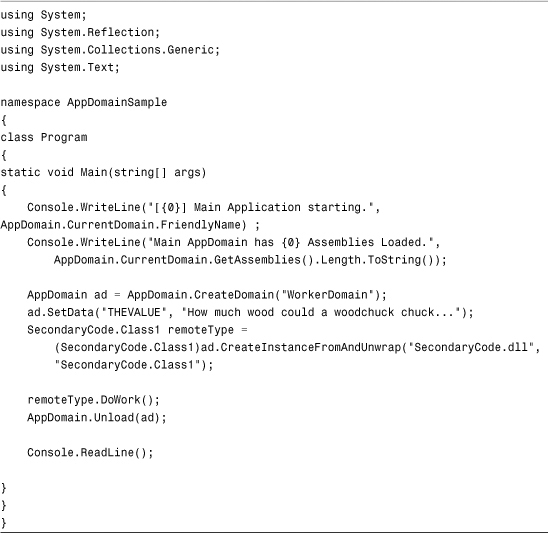
Listing 12.6 shows the code that creates a new AppDomain and executes code within it.
Listing 12.6 Creating and Unloading an AppDomain
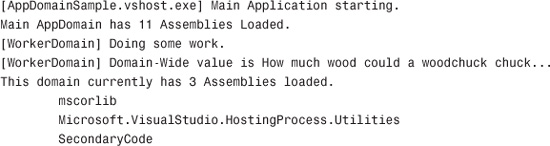
To prove that the work is being executed in a separate AppDomain, the output of the preceding code looks as follows:
Working with AppDomains may not be something that you do every day as a .NET developer, but being armed with the knowledge of how they work and how they fit into the overall architecture of the framework will help you create better applications.
Summary
In this chapter, you learned about two core concepts within the .NET Framework: the assembly and the AppDomain. The assembly is the most basic logical unit of deployment in the framework. It contains a manifest that stores metadata about the assembly and its dependencies, as well as information about resources and types contained within the assembly. In addition, the assembly contains compiled MSIL code. Lastly, you learned about the AppDomain, the core logical unit of execution within the framework. All code runs within an AppDomain. By being aware of the AppDomain’s presence, you can create code that exerts tight control over which assemblies are loaded and unloaded and how they are executed.
The combined knowledge of how both assemblies and AppDomains work as well as interoperate will give you a tremendous advantage as you move forward to learn about more complex aspects of the .NET Framework and C# 2.0.