
Chapter 24. Using Master Pages
IN THIS CHAPTER
Master Pages are just one of the many new productivity features included with ASP.NET 2.0. The use of Master Pages allows your web application to easily maintain a consistent look and feel.
Before ASP.NET 2.0, the task of creating a consistent look and feel was often tedious and time consuming. This chapter first takes you through a quick tour of what it looks like to create a consistent look and feel in ASP.NET 1.1. After that, you will see an introduction to the basic concepts behind Master Pages.
By the end of the chapter you will be able to perform everything from simple Master Page tasks to some of the more advanced techniques that you can use in your own high-quality web applications.
The World Before Master Pages
Before you can really understand how much time and effort Master Pages can save developers, you should know what it was like performing a similar task in ASP.NET 1.1. This section gives you information on the practical need for a consistent (and easily modifiable) GUI for your web applications and shows you how much effort was involved in creating such a GUI for an ASP.NET 1.1 application.
If you have a lot of experience with the frustration of creating common and consistent layouts for ASP.NET, you thoroughly understand the problems that Master Pages solve and you can probably skim some of this section and skip to the Master Pages introduction.
The Need for a Consistent GUI
Anyone who has had to do web design for more than five minutes will tell you that one of the most important aspects of good design is consistency. If your home page is extremely artistic and covered with all kinds of flashy artwork and the rest of your site is functional but bland, your users will be discouraged and put off by the lack of consistent look and feel. If your entire website has extremely professional graphics, but no two web pages have the same color scheme, your users will be just as disappointed with your application.
In most cases, designers prefer to have the entire site follow a consistent look and feel. This doesn’t mean that the whole site needs to be one color, but each functional area of the site should contain pages that are visually similar. Users should be able to tell where they are and what they are doing as much from the “feel” of the page as from the text on it.
The problem is that professional-looking pages and consistent GUIs often involve a lot of redundant HTML, even with the use of style sheets. Almost every time you sit down to start work on a website, the first thing you need to do is come up with a way to standardize the pages for that site. Not only do developers need to be able to create a consistent look and feel, but they need to be able to make changes to the GUI that affect the entire site without having to manually edit every single page in the site.
Creating a Consistent GUI in ASP.NET 1.1
Although ASP.NET introduced the concept of reusable server-side controls and those controls drastically improved the development process, there is still nothing built directly into ASP.NET 1.1 that supports the notion of creating a standardized look and feel throughout an entire website or functional areas within that site.
The solution in ASP.NET 1.1 was to create a set of reusable controls (often User Controls for ease of use) that could be included on every page within a functional area to provide a common look and feel as well as some common functionality. This was done to add things like navigation strips on the left side of a page, headers on top, footers on the bottom, and often navigation or toolstrips on the right side of a page.
After you created the user controls, you then had to lay out each and every page within your site to include those controls in the right place. This was an extremely error-prone process because a typo or failed paste operation on a page could create an unintended gap in the consistent look and feel or even bugs. Figure 24.1 illustrates what a sample of the HTML required to lay out a consistent look and feel looks like. With graphics and styles added into the HTML, that layout code would have to be pasted into each new page.
As you can see, this process is cumbersome, repetitive, and extremely prone to errors. The rest of this chapter will show you how the use of Master Pages in ASP.NET 2.0 makes the process of creating a consistent look and feel for your web site smooth, elegant, reliable, and easy to maintain.
Figure 24.1 A minimal layout design required for each page to have a consistent look and feel in ASP.NET 1.1.

Introduction to Master Pages
Master Pages are a framework that is built into ASP.NET that provide for the creation and maintenance of reusable page templates that can be used to give a website a consistent look and feel.
Some of the more adventurous programmers may have even created their own frameworks for ASP.NET 1.1 that provided similar functionality. The good news is that the capability provided by Master Pages is provided as an integrated feature of ASP.NET 2.0.
Master Pages and Content Pages
Master Pages is actually a broad term that really encompasses two distinct concepts:
- The Master Page
- The Content Page
The Master Page
The Master Page functions just like any other ASP.NET page, with a few exceptions. The role of the Master Page is to provide a master layout to which all content pages (defined shortly) using the master must adhere. It can (and should) contain standard HTML, styled elements, server-side controls, and even C# code if necessary. It also contains placeholder controls that indicate where content can appear in associated content pages.
The Content Page
The content page is subservient to a single master page. It defines the content that appears in the placeholders defined within the master page. Interestingly enough, a content page can be a master page for one or more additional content pages. That topic will be explained later in this chapter in the section on advanced topics.
Creating Your First Master Page
Now that you’re familiar with the basic concepts behind Master Pages and the need that created them, you can create your own Master Page.
To create a new master page using Visual Studio, simply create a new web project. When you have a new web application, right-click the project, choose Add New Item and then select the Master Page template from the list.
The empty master page contains the code in Listing 24.1.
Listing 24.1 An Empty Master Page
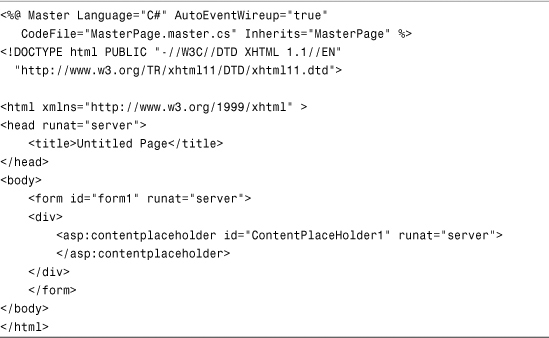
As you can see, there is a single ContentPlaceHolder control defined by default. You can change the layout to include as many content placeholders as you like.
To create content placeholders to represent the layout shown in Figure 24.1, you can create a master page like the one described in Listing 24.2. If you are following along, call this Master Page SiteMaster.master so that it can be used in later samples in this chapter.
Listing 24.2 A Master Page with Multiple Content Placeholders (SiteMaster.master)

Take some time to flip back and forth between the HTML view and the design view after you create your first master page so that you can get used to the difference between fixed areas of content and areas of content that will be defined by Content Pages themselves.
Creating Your First Content Page
To create a content page based on an existing master, you just follow the same steps you would follow if you were creating a new Web Form, with one small exception.
Right-click the existing web project and choose Add New Item. When the dialog appears, click to select the Web Form template, and down at the bottom of the dialog box, make sure that the Select Master Page option is clicked. When you click the Add button, you will then be prompted to choose the master page to which the Content Page will be associated. If you were following along with the preceding sample, create a new Web Form called ContentSample3.aspx and choose the SiteMaster.master file as the master page. The first thing you should notice is that when you create the content page, Visual Studio has automatically created some empty Content elements. Switch to design view and you will see where those elements fit within the context of the Master Page.
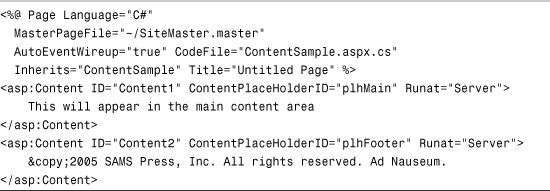
Enter the code for ContentSample as shown in Listing 24.3.
Listing 24.4 HTML Source for ContentSample3.aspx, a Web Form Using a Master Page
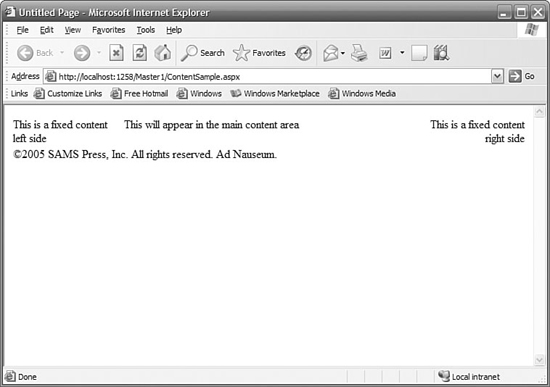
Now highlight the ContentSample page in the project and start it up in the debugger. You will see a page that looks much like the one shown in Figure 24.2.
Figure 24.2 The ContentSample page, demonstrating the use of a Master Page and multiple content areas.
Using a Default Master Page
When you create a content page, there is a special metacommand statement that indicates the associated master page that is part of the @Page statement: MasterPageFile. If you want to enforce more control over the look and feel of your site, but you don’t want to have to manually change every single page in your site, you can define a default master page.
Another use for default master pages allows you to change the master page for a group of content pages without modifying the individual pages. For example, you might want to change the master page for a short period of time to put up a seasonal look and feel such as a page styled for Christmas or Halloween.
To specify a default master page, you can make use of the <pages> element in a website’s web.config file, as shown in the following example:
<pages masterPageFile="~/SiteMaster.master" />
The only issue I have with the default master page approach is that if you remove the master indication from the content page, the visual designer won’t properly display the master layout. Losing some interactivity in the designer is a small price to pay for being able to use the <pages> directive to define a default master page. Keep in mind that each subdirectory can contain its own web.config file and thus could also contain its own <pages> directive to define a default master page for the directory. This lack of functionality in the designer may change in the final release of Visual Studio 2005.
Master Pages “Under the Hood”
When you create a master page, you are actually creating a class of type System.Web.UI.MasterPage. This class inherits from UserControl, which in turn inherits from TemplateControl. This should give you some idea that at the core of the Master Pages system, you are really just dealing with a specialized user control that is designed to render content within special placeholders.
At runtime, the master page is compiled and the content contained within the content areas is compiled as well. One really important thing to keep in mind that will become more important in the advanced section is the notion that when a content page is rendered, the rendering is relative to the content page’s location, not the master page’s location. The master page itself can also be accessed programmatically at runtime via the Master property on the Page object, and you will see more about this property in the next section.
Advanced Master Pages Techniques
This section covers some of the more advanced techniques that are useful when dealing with Master Pages, such as nesting, the use of the Master property, strongly typed Master Pages, and the intricacies of handling relative paths when dealing with rendered content pages.
The real power of Master Pages shines when you begin adding reusable code to them as well as reusable user interface elements and styles.
Nested Master Pages
You can actually indicate that one master page is the master of another. There are a few restrictions to doing this and it can be a bit tricky to get working properly the first time you try it.
The main restriction is that when a master page is a child master page, the top-level element in the ASPX for that page must be a Content control and nothing else. Often when people think of nesting they think of classic ASP or even ASP.NET, where two different user controls were included back-to-back in a page, as shown in the following snippet:
<custom:TopHeader id="topHeader" runat=server /><br/>
<custom:MidHeader id="midHeader" runat=server/><br/>
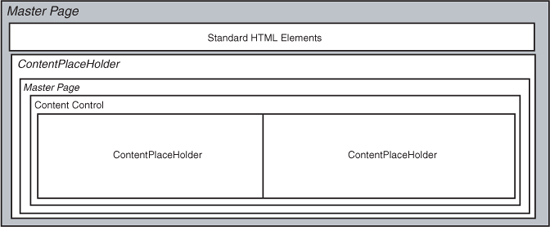
The trouble here is that the preceding code is actually a linear sequence of controls, and not a nesting of controls. When you define the topmost master page, you define content areas in which other master pages will render themselves. The child master pages then define content placeholders that content pages will fill, completing the rendered pages. Take a look at Figure 24.3 to see an illustration of how master page nesting works to create a complete rendered page.
Figure 24.3 Illustration of Master Page nesting with Content Pages.
One thing to keep in mind when working with nested Master Pages is that the Visual Studio designer will not render any portion of a nested Master Page hierarchy except the topmost parent. All nested master pages and all content pages that utilize those master pages will not display in design mode, so you will have to do it the “old-fashioned” way and actually run the page to see what the final rendering looks like.
The “Master” Property
There’s more to Master Pages than just creating reusable layout and style to maintain a consistent look and feel. Master Pages are also accessible programmatically at runtime. Each ASP.NET 2.0 page has a property called Master that is of type MasterPage.
You can use this property to access a host of properties and methods to provide common functionality across all pages that are associated with a given Master Page. Because MasterPage inherits from System.Web.UI.Page you can access all page-related properties of the master page.
More commonly, however, developers will expose methods and properties on the master page that provide functionality that can be shared among all pages that utilize the master.
For example, in the preceding nesting example you saw a Master Page used for an R&D department in a fictitious company. Assume that you need to provide a function called IsDevelopmentSupervisor that you want to be available to all pages within R&D that will indicate whether the current user is an R&D supervisor. You could add the following method to the RDMaster.master code-behind:
public bool IsDevelopmentSupervisor()
{
return (Context.User.Identity.Name.ToUpper() == "KEVIN");
}
Obviously in a production application you would replace this logic with something that queried the current user’s Role membership, but the code is fine for this sample.
If you type “Master.” into the Page_Load event handler in the code-behind for the RDdefault.aspx page, you’ll notice that the method you just entered isn’t there. Even after you rebuild the entire solution it won’t appear. This is because the Master property is of type MasterPage. If you want access to a member of a specific Master Page, you will need to typecast it, as shown in the following code found in the RDdefault.aspx.cs file:
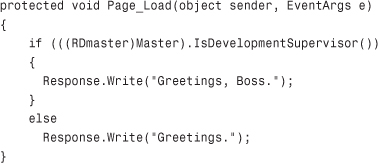
The preceding code typecasts the Master property to the RDmaster class where the IsDevelopmentSupervisor method has been defined.
Strongly Typed Master Pages
Sometimes you will be writing code for pages and not know at design time which master the page will be associated with, but that isn’t the most common scenario. More often than not, you will probably know at design time the type and file of the Master Page. If you know that information, you can give ASP.NET the information and it will provide you with a strongly typed Master property.
To create a strongly typed Master property, you just use the MasterType command in the ASPX file as follows:
<%@ MasterType VirtualPath="~/RDmaster.master" %>
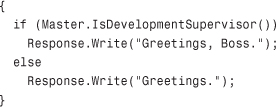
If you do this, you’ll be reminded of another incredibly handy feature in VS 2005: IntelliSense works inside the <%@ %> tags. After you recompile the page, you can change the previous typecasting code into the following, and it will even support IntelliSense:
Handling Relative Paths
A common problem among developers working on ASP.NET 1.1 sites is that the use of User Controls could create issues with relative paths. For example, if a user control refers to a relative path, that path will be treated as relative to the container of the control at runtime. This makes locating images, files, and other URLs somewhat of a mess when dealing with a lot of User Controls in different locations.
The same problem can arise when dealing with Master Pages. Take a look at the following simple HTML tag:
<img src="images/navBorder.jpg" alt="Navigation Border" />
The hard thing to remember about Master Pages is that they aren’t really pages on their own; they simply provide the ability to lay out content in containers. As a result, the HTML rendered by the code in the Master Page will actually render relative to the content page.
The way to get around this is to make appropriate use of server-side controls. As you probably know, there is a server-side control for virtually every HTML tag, including the img tag.
If you are putting HTML into a Master Page, and you know that the relative path of the code in the Master Page is not going to be the same as the relative path in the Content Page, then you can just put a runat="server" tag inside the control, and ASP.NET will take care of determining the appropriate location of the image. So, to make the image tag render appropriately regardless of where the Content Page exists in the directory structure, just change the code to look as follows:
<img src="images/navBorder.jpg" alt="Navigation Border" runat="Server"/>
Because server-side controls consume memory and add to the processing time of your page, you should use them sparingly. A good way to deal with it is to create the Master Page without a single server-side image or URL control and then to selectively convert client-side controls into server-side controls until the Content Page renders properly.
Summary
This chapter provided you with an introduction to Master Pages. The key to understanding why Master Pages are so incredibly useful is understanding the programming and layout headaches created by previous versions of ASP.NET and legacy web development environments such as ASP.
Master Pages are a key part of the essential idea behind ASP.NET: making the development process easier, faster, more scalable, and far more reusable than in previous versions. By using Master Pages, you can create reusable layouts to provide a consistent look and feel, as well as create standardized code that can be made available to all pages that use a particular master page. By making the use of Master Pages a standard practice when creating your ASP.NET applications, you can significantly decrease the User Interface development time while also decreasing the UI maintenance time, as well as providing standard functionality to groups of related pages.