
Chapter 17. ADO.NET Fundamentals
IN THIS CHAPTER
- Introduction to ADO.NET
- Establishing a Connection
- Communicating with the Data Source
- Working with the Data
ADO.NET is the set of classes and tools built into the .NET Framework that allow you to create powerful, scalable, and reliable data-driven applications. Using ADO.NET, you can connect to databases of all sorts including SQL Server, Oracle, Microsoft Access, and even some other less common database formats. When connected to a database, you can query and manipulate data in a wide variety of ways.
ADO.NET is an extremely large topic. As such, this one chapter won’t cover all of it. This chapter focuses on the fundamentals of ADO.NET programming: using the data providers, connecting to a database, and performing data query and manipulation operations. Other chapters (such as Chapters 18, “Advanced ADO.NET Techniques,” and 19, “Working with ADO.NET Data Providers”) will show you some more advanced features of ADO.NET, and Chapter 20, “Strongly Typed DataSets,” will give you a look at programming with SQL Server 2005 using C#.
Introduction to ADO.NET
ADO.NET is a collection of objects designed to present the developer with a unified, object-oriented interface to relational data stores such as SQL Server, Oracle, and Microsoft Access. ADO.NET consists of several classes that are shared among all data providers such as the DataSet class and base classes such as the DbConnection class and the DbDataReader class. The other portion of ADO.NET is the portion supplied by each data provider. For each data provider, there is a set of classes that interface directly with that data type. For example, there are classes that are specific to SQL Server, to Oracle, to OLE DB data sources, and to ODBC data sources. However, because each of these classes all inherit from common base classes and implement standard interfaces, your experience with one data provider can be reused in working with a different provider.
Establishing a Connection
In most cases when working with data and ADO.NET, you will need to establish a connection to the data source. This data source can be SQL Server 2000, SQL Server 2005, Oracle, Microsoft Access, or any number of other types of data including file-type sources such as Paradox files or even Microsoft Excel documents.
This section provides you with a basic overview of what ADO.NET is and how it works. After that, the discussion will move on to connection strings, what they are, and how you can construct them programmatically. Finally, you will see how to connect to a database and use that connection to query schema and metadata information.
Building a Connection String
Connection strings are often semicolon-delimited strings and contain the information that tells an ADO.NET data provider how to establish a link to the database. Take a look at the following connection string:
Initial Catalog=Northwind; Server=localhost; User Id=sa; Password=password;
That connection string will open the Northwind sample database on the default SQL Server instance running on the local computer, and will authenticate as the system administrator (sa).
If you have been programming with the same database server for a long time, you can probably construct valid connection strings in your sleep. However, if you’re working with a new data provider that has a different connection string format, or you want an easy way to programmatically construct connection strings, there is a new tool in ADO.NET 2.0 to make that task easy.
That tool is the System.Data.Common.DbConnectionStringBuilder class and the classes that descend from it. At its core, it is a dictionary that stores the list of name/value pairs that make up a connection string. Individual providers can then create classes that inherit from DbConnectionStringBuilder to expose strongly typed properties for connection string elements that are specific to that particular provider.
You can either use the base class as a general tool for building connection strings, or you can use the derivative classes for creating connection strings specific to a particular data provider.
For example, if you want to use the basic DbConnectionStringBuilder class, you can simply use the Add method to build the dictionary of connection settings, as shown in the following example:
DbConnectionStringBuilder connBuilder = new DbConnectionStringBuilder();
connBuilder.Add("server", @".SQLExpress");
connBuilder.Add("Initial Catalog", "TestDB");
connBuilder.Add("Integrated Security", "SSPI");
The preceding lines of code set up the name/value pairs necessary to connect to a SQL Express database named TestDB on the local server using integrated Windows authentication. To access the formatted connection string, you can use the ConnectionString property of the DbConnectionStringBuilder class.
To make use of a connection string builder class that is specific to a provider, you can use the derivative class, as in this example:
SqlConnectionStringBuilder sqlBuilder = new SqlConnectionStringBuilder();
sqlBuilder.DataSource = @".SQLExpress";
sqlBuilder.InitialCatalog = "TestDB";
sqlBuilder.IntegratedSecurity = true;
As you can see, the manually added name/value pairs from the basic DbConnectionStringBuilder class have been replaced by strongly typed properties. This is a huge benefit because the developer no longer has to remember exactly how to format all the different properties of the connection string. In addition, IntelliSense will automatically give the developer a list of all the connection string options available. If you are using a full SQL Server instance instead of just SQL Express, you would use the server name (or its IP address) for the DataSource property.
Using the DbConnection Classes
When you have a connection string, you’re ready to connect to your data source. A connection represents a live connection to the data source. In most cases that connection is a network connection between the ADO.NET data provider and the RDBMS server such as SQL Server or Oracle, but it could just as well be a connection to a file on disk, such as an Excel document.
Before seeing the code to establish a database connection, you should be aware of the cost of connections. As a general rule of thumb, database connections are expensive, and acquiring new connections can be costly both in terms of time and resources.
To help alleviate this, many data providers support the notion of connection pooling. When pooling is used, connections are placed in a pool when they are first created. When a pooled connection is closed, it is returned to the pool instead of being completely destroyed. The next time your application requests a database connection with the same connection string, the data provider can then retrieve the previously created connection from the pool at a much lower cost than creating one from scratch. Connection pooling is typically enabled in the connection string itself, so if you aren’t sure if your provider supports pooling, you can take a look at the provider-specific DbConnectionStringBuilder to see if there are any pooling-related options.
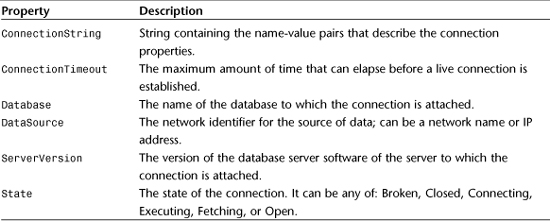
Before wading into the code for creating and using a connection, take a look at Tables 17.1 and 17.2, which detail the methods and properties exposed by classes that derive from DbConnection.
Table 17.1 DbConnection Methods
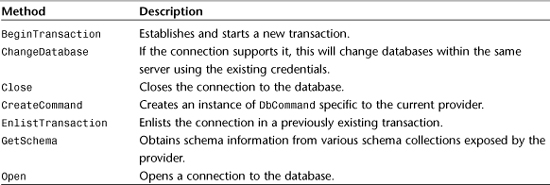
Table 17.2 DbConnection Properties
To experiment with creating a connection, opening that connection, and then obtaining information that can only be obtained when the connection is open, create a new Console application. The code in Program.cs should be as shown in Listing 17.1. If you installed VS.NET 2005 with SQL Express, you should be able to run this sample on your machine. If not, you can modify the connection string to point to the location of a SQL Server 2000 or 2005 instance elsewhere.
Listing 17.1 Program.cs for a Console Application Verifying a SQL Connection
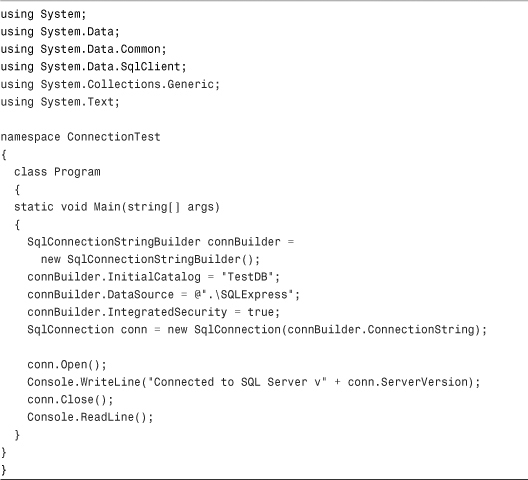
The ServerVersion property of the SqlConnection object is a property that cannot be accessed unless a valid connection has been established. When you run this application you should see a valid version number for SQL Server (version 9 and higher for SQL Server 2005). Remember that Console.ReadLine() waits for the user to press Enter before continuing processing. A lot of commercial applications will attempt to make a “ping”-type connection to a database before allowing the user to enter any data to verify that there is a valid, running data source. If no database connection can be established, many applications will display an error message and halt processing.
Communicating with the Data Source
This section shows you how to communicate with a data source when you have an open connection. Communication with the data source typically takes the form of executing commands and retrieving data, and now with ADO.NET 2.0 you can query schema and metadata information.
Executing Commands
The command is the basic unit of work when communicating with a data source. Commands are used to execute simple SQL statements like the following:
SELECT * From Customers
Commands are also used to execute stored procedures, update or delete data, and retrieve complex result sets. All commands inherit from the DbCommand class, whether they are for SQL Server, Oracle, or any other ADO.NET data provider.
The sequence of code when working with a DbCommand is as follows:
- Create an instance of a
DbCommandderivative. - Create command parameters and populate parameter values.
- Execute the command.
- Handle the output and/or results of the command.
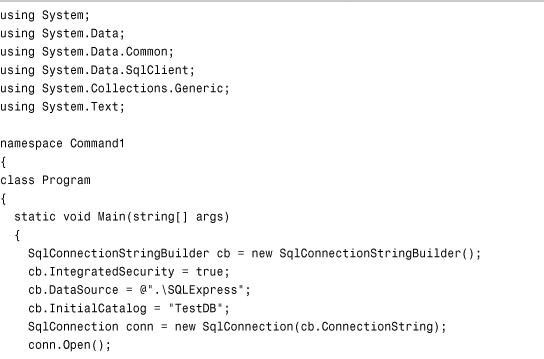
The code in Listing 17.2 illustrates how to execute a SQL statement using parameters against a SQL Server database.
Listing 17.2 Executing a Parameterized SQL Statement Using a SqlCommand
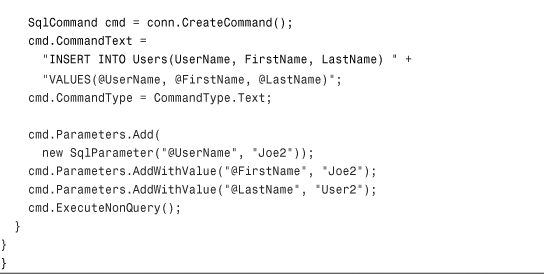
The preceding code uses two different methods for adding new SqlParameter instances. The first method, Add, takes a SqlParameter instance as an argument. The second method, AddWithValue, is a shortcut that lets you supply the parameter name and an object value. You can also use commands to execute stored procedures, as illustrated in Listing 17.3.
Listing 17.3 Executing a Stored Procedure Using a SqlCommand Object
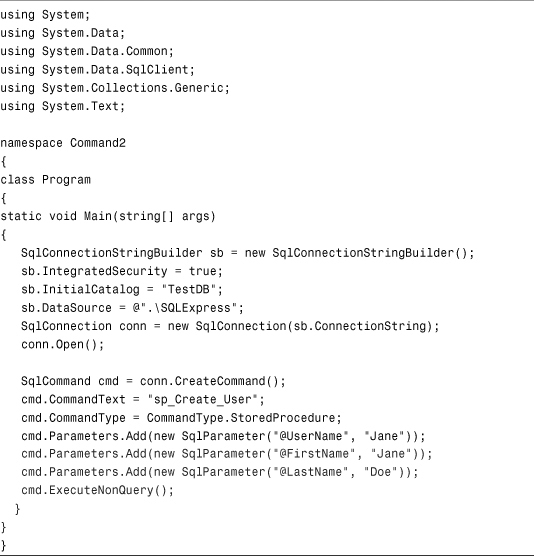
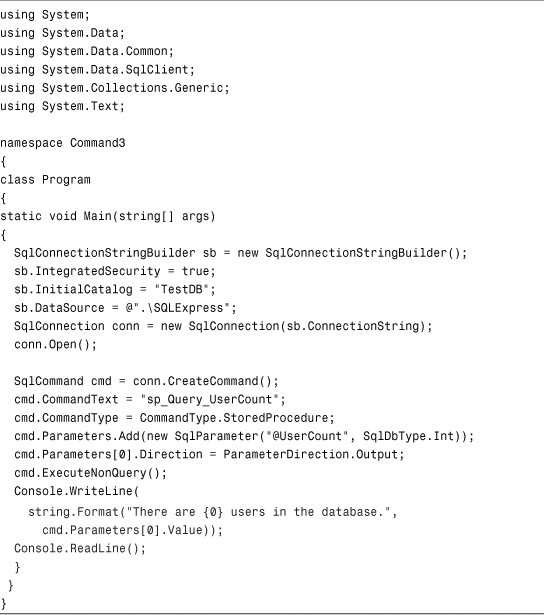
The preceding code executes a stored procedure named sp_Create_User that contains an INSERT statement that looks similar to the one from the previous listing (17.2). Just as you can supply input parameters to a stored procedure, you can also obtain output parameters when executing stored procedures. This comes in handy when you have stored procedures that perform calculations or provide valuable data in output parameters. The code in Listing 17.4 shows the execution of a stored procedure called sp_Get_UserCount that returns the number of users stored in the database.
Listing 17.4 Using a Stored Procedure with Output Parameters
Using DataReaders
So far you’ve seen how to use commands to execute SQL statements that take input parameters and return output parameters. What you haven’t yet seen is how to use commands to obtain multiple rows of data, one of the most common uses for commands.
Result sets are obtained through the use of DataReaders. A data reader is a highly efficient object that traverses data in a forward-only fashion and is optimized for reading results of queries. There are many different kinds of data readers, all of which inherit from the DbDataReader class. The following is a list of the data readers that inherit directly from DbDataReader:
DataTableReader—A forward-only reader that traverses aDataTable.OdbcDataReader,OracleDataReader,SqlDataReader,SqlCeDataReader—These are all data readers specific to their respective data providers.
To use a data reader, you must use one of the Execute methods of a command that returns a data reader. For example, the SqlCommand class provides the following methods that return various data readers:
ExecuteReader—Executes the command and returns aSqlDataReaderinstance.ExecuteXmlReader—Executes the command and returns anXmlReaderinstance.
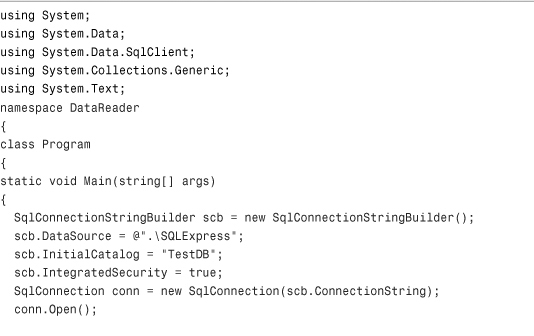
The code in Listing 17.5 illustrates the use of a simple data reader. The data reader allows you to access the columns in a result set either ordinarily (by numeric index), or by the field name itself. As you will see in Listing 17.5, there is a GetXXX method for each possible data type, as well as a GetObject if one of the other data types won’t suffice.
Listing 17.5 Using a DataReader
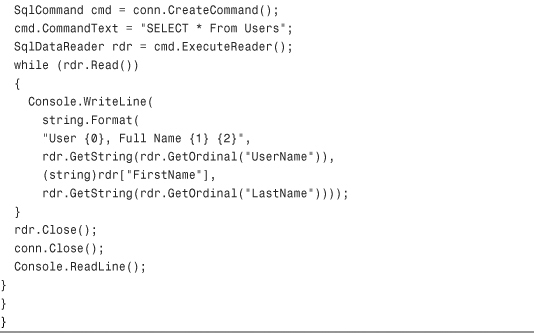
In the preceding code, you can see that the GetString method will obtain the string in the column indicated by an ordinal position. To determine a named column’s ordinal position, you can use the GetOrdinal method. Also, if you want direct object access to the columns of the reader, you can use array-indexing notation to access columns by name or by ordinal value. All DataReaders operate on a single row of data at any given time. This is what makes them so fast and memory efficient. To advance a reader from one record to the next, you can call the Read() method. This will fetch the next row from the data source. If the reader is at the end of the record set, the Read() method will return false. After you have advanced beyond a given row, you cannot go back to that row again. All DataReaders are forward-only and will dispose of all information regarding previous rows after they are advanced.
There are many reasons to use a DataReader in an application. For example, you might need to read through several thousand rows of data in order to arrive at some conclusion in your application. If you were to load all of those rows into a single DataSet at once, it would consume a lot of memory. The DataReader allows your application to work with a single row at a time, providing a fast, forward-only means of reading through large numbers of rows. If the data you’re working with is smaller in nature, you can use the overhead of a DataSet without too much worry about impacting the performance of your application.
Using Schema Discovery
Schema Discovery is a new feature of ADO.NET introduced in version 2.0. Schema Discovery adds new functionality to the basic DbConnection class that provides for discovering detailed information about the database connection as well as the metadata stored on the server.
For example, using Schema Discovery, you can now easily obtain a list of all tables in the system, stored procedures, users, functions, and much more depending on what features the particular data provider supports.
Schema Discovery all takes place within the new method GetSchema. If you invoke this method with no arguments, you will receive in return a table that contains a list of all the possible arguments for the GetSchema method. This way, you can interrogate the connection to see what information you can obtain via GetSchema.
When you invoke GetSchema on a SQL 2005 database, you will receive a table that looks similar to the one in Table 17.3.
Table 17.3 Results of Invoking GetSchema() with No Arguments on SQL Server 2005
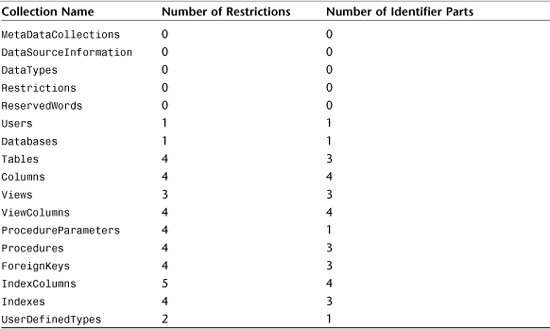
The number of restrictions and identifier parts is useful to an extent, but the really important information is the name of the collection. This string can be passed to GetSchema as an argument to retrieve information.
The NumberOfRestrictions column indicates the number of restrictions that appear in the Restrictions collection for the indicated collection. So, from Table 17.3, you can tell that there are two defined restrictions for the UserDefinedTypes collection, and both of those will appear in the results if you call GetSchema("Restrictions").
The NumberOfIdentifierParts column that you receive when you invoke GetSchema() with no arguments indicates the number of columns in the table that uniquely identify an entity. For example, when you call GetSchema on the Columns collection, you receive quite a bit of information. The first four columns (TABLE_CATALOG, TABLE_SCHEMA, TABLE_NAME, and COLUMN_NAME) are the four pieces of information that uniquely identify a single column within that table. If you look at Table 17.3, you’ll see that for the Columns collection, the number of identifier parts is indeed 4.
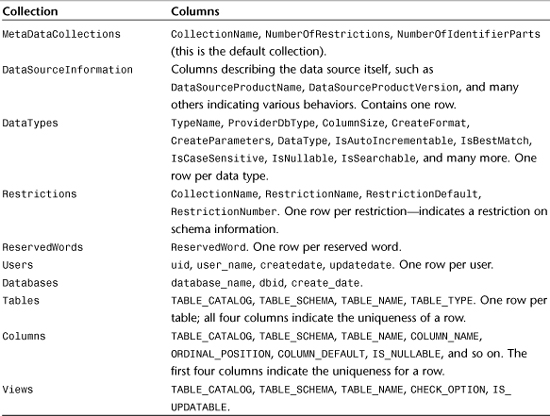
Table 17.4 shows all of the columns for each collection when invoking GetSchema. Keep in mind that this varies depending on your data provider. The information in Table 17.4 was obtained from SQL Express 2005.
Table 17.4 Columns Provided for Each Schema Collection Used with GetSchema()
Working with the Data
In the preceding sections you have learned how to connect to a data source. In addition, you have learned how to communicate with that source for data retrieval, manipulation, and schema queries. Armed with that knowledge, you can begin writing applications that interact with and manipulate data. A wide variety of tools are available to you for doing this. In later chapters, you will see how to work with data on specific platforms such as Windows Forms and ASP.NET. This section illustrates tools that are common to all platforms and are central to ADO.NET: the DataSet and the DataAdapter.
Introduction to the DataSet
The DataSet is an extremely powerful class. Essentially this class is an in-memory database. It can contain tables made up of multiple columns of varying data types. Each table can contain multiple rows, and those rows can be related to each other through foreign keys as well as complex relationships that enforce parent/child data constraints. DataTables can assign new, unique, numeric identifiers to rows as they are added to the table. DataSets can also persist their data in various formats such as XML and even a newly added binary format for ADO.NET 2.0.
When a DataSet contains data, you can use various methods to search the contents of the tables contained within it. You can even treat a DataSet as if it was an XML document and perform XPath queries against it.
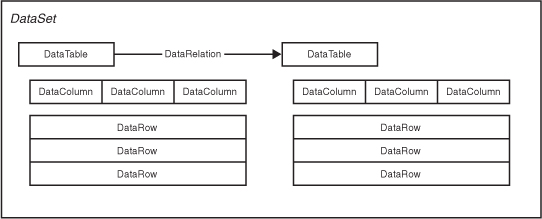
As shown in Figure 17.1, the DataSet is extremely powerful and flexible and really does have many of the features of a server-hosted database, but contained in a compact, flexible, object-oriented form.
Figure 17.1 The DataSet hierarchy.
The code in Listing 17.6 illustrates a few basic tasks that can be accomplished with the DataSet, including dynamically creating a data structure, adding and deleting rows, and querying information contained in a DataTable.
Listing 17.6 Working with a DataSet
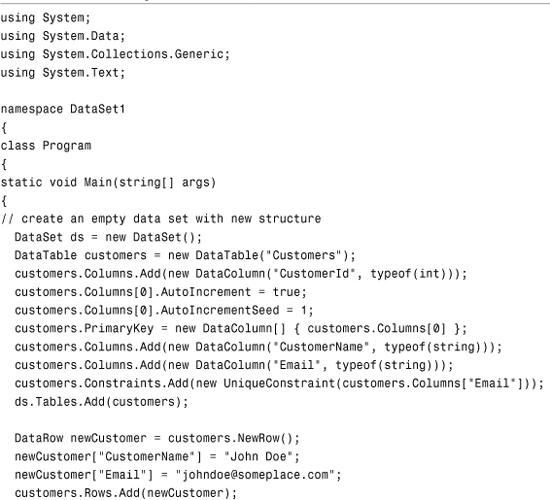
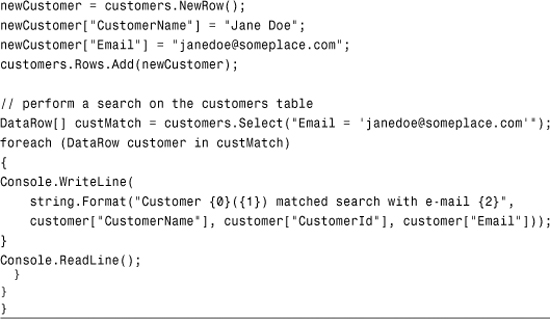
The preceding code creates a new DataSet with a single table. The Customers table consists of three columns: a unique identifier that autoincrements, a user name, and an email address. There is also a unique constraint placed on the email address column so that users in this table cannot share the same email address. Finally, the code utilizes the Select method to retrieve a list of users that have a given email address.
When the code is executed, the following line is output to the console:
Customer Jane Doe(2) matched search with e-mail [email protected]
Using a DataAdapter
The DataAdapter class functions very much like an electrical plug. An electrical plug connects an appliance to a power source. The DataAdapter connects a DataSet (or DataTable) to a data source. This “plug” has four prongs, one for each type of connection that can take place:
InsertCommand—This command is executed when an item in an associatedDataTableis ready to be inserted into the data source.DeleteCommand—This command is executed when an item in an associatedDataTableis ready to be deleted from the data source.UpdateCommand—This command is executed to commit pending changes to an item in aDataTable.SelectCommand—This command is executed to populate theDataTableorDataSetwith the information retrieved from the data source.
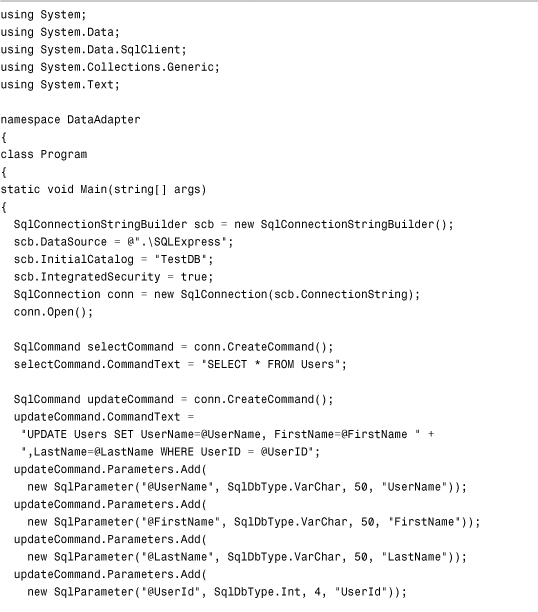
The best way to see how a DataAdapter works is to look at an example in action. The code in Listing 17.7 illustrates the creation of a DataAdapter as well as several commands. These commands are then executed when the DataSet invokes the Update() method. The sample in Listing 17.7 shows how users can be updated, deleted, inserted, and queried in a DataSet, and then have all of those changes persisted to a data source by the DataAdapter.
To follow along with this sample, you should have a SQL Express (or SQL Server; you’ll have to modify the data source property) database called “TestDB.” In that database, there is a table called Users with the following columns: FirstName, LastName, UserName, and UserID. You can discern the data type and size of these columns from the stored procedure being invoked in the code in Listing 17.7.
Listing 17.7 Using a DataAdapter to Connect a DataSet to a Data Source
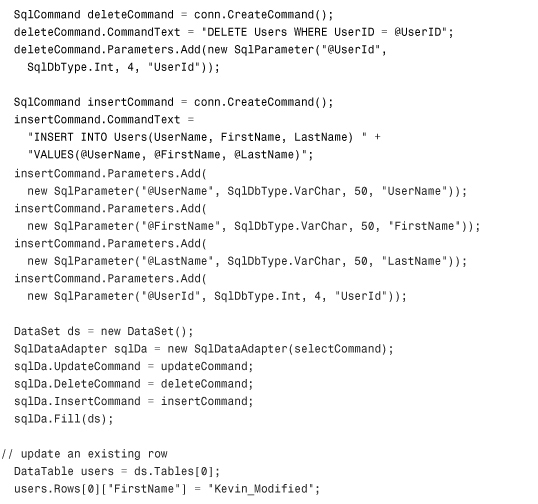
As you can see from Figure 17.2, the second user (originally called "SecondUser”) has been removed from my database. The first user was modified so that the first name was set to "Kevin_Modified". Finally, you can also see that a new user was created. All of this was accomplished by invoking a single Update() method on the DataAdapter.
Figure 17.2 View of data after being modified by the SqlDataAdapter.
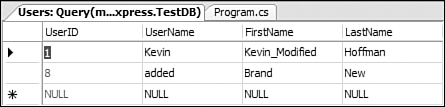
These modifications were made possible because each time you modify anything in a DataSet, you modify the RowState of the row. The RowState indicates whether the row is supposed to be deleted, brand new, or needs to be updated. When the Update() method is invoked, the DataAdapter will iterate through all of the rows that have been inserted, deleted, or modified, and will invoke the corresponding InsertCommand, UpdateCommand, or DeleteCommand, using that row’s columns to feed the parameters for the command.
Summary
This chapter has provided you with a basic overview of what ADO.NET 2.0 is and what you can accomplish with it. At this point you should be comfortable with the idea behind data-driven applications and you should feel ready to start experimenting with your own data access applications using the information presented in this chapter. You should be able to start using your own DataSets, DataAdapters, and Connections now, and hopefully you will be able to make use of some of the new features of ADO.NET 2.0 such as Schema Discovery.
This chapter is not designed to be a complete reference for ADO.NET. Rather, it is intended that this chapter will provide you with enough background information that you will be able to follow along in subsequent chapters where data access technology and code becomes more complex and intricate.