Now you can slice and dice your data without a Ginsu! Subjects are great way to organize and relate data. In Microsoft CRM, you can relate subjects to cases, products, and knowledge base articles. Subjects are like buckets. Associate a case, for example, with a subject, and it goes into that subject bucket. Over time as cases build, you can run reports based on subject bucket. For example, a computer laptop manufacturer may decide to create three subjects: Hard Drive, Screen, and Keyboard. When a customer calls and opens a case regarding her laptop's malfunctioning screen, the case is associated with the Screen subject.
By tracking the subject of a case, an organization's support manager can then report on the number of cases open by support technician by subject. Additionally, support organizations can route cases by subject, ensuring the most qualified support technician is assigned to the case.
If subjects are arranged in buckets, it's possible for buckets to contain other buckets. This is called nesting. Subject nesting allows one bucket to reside inside another bucket. For example, the hard drive bucket could be found in the laptop bucket. Another, hard drive bucket could be found inside the desk-top computer bucket.
Also remember that Microsoft CRM subjects can not only be products but also services. For this chapter, we use Bikes, Clothing and Accessories, and Company Information as our subjects.
Structuring your subjects and their relationships to one another is important. We show you how to create your primary subjects and if required in your organization sub-subjects.
Microsoft CRM uses a collapsible tree system — trees, not buckets — much like the ones that Windows and Microsoft Outlook use. Creating a subject tree offers the following benefits:
A consistent hierarchy for associating contacts with products, sales literature, and knowledge base information
Easy access to information related to specific subjects
Centralized management of subjects (including creating, editing, and removing subjects) and their relationships to one another in the subject tree
Building a subject tree is easy, but figuring out what to put on which branch can be difficult. We recommend scheduling a brainstorming session with different departments in your company. Divide your products and services into categories and topics. Then determine if you will need to further define one or all of your topics into sub-topics. Repeat this process until you're comfortable that your subject definition is detailed enough to aid in reporting, but not so detailed that you will have trouble differentiating one branch from the branch above it.
Brainstorming can become perplexing and lead to lengthy discussions. Don't worry — spending time on the subject tree at the beginning is far better than building the subject tree on the fly. And moving things around in the subject tree later isn't as easy as placing them at their appropriate level in the first place. Additionally, ad hoc subject design may not account for the needs of your entire organization. You can save yourself time and aggravation by having a blueprint in place first.
No hard-and-fast rules exist when defining the structure of a subject tree. Each company has its own priorities. But you might want to consider the following items when defining your subject tree structure:
Price lists
Sales literature
Product specs
Warranty information
Service contracts
Knowledge base articles
Note
Only users with the appropriate access rights can create subjects and add items to a subject tree. (See Chapter 8 for more information.)
Tip
You can also relate items such as product catalogs and sales literature to subjects.
After you create the outline or blueprint for your company's subject tree, be sure to save it where you can access it easily when you're ready to build it. A good idea is to have the administrative assistant (who as we all know, truly runs the company) create the outline in a Word document.
Before you can use subjects in CRM, you must create at least one subject. You add subjects, maintain them, and delete them from the subject management area, which you can find in Settings. Here's how you get to it:
On the navigation pane, click the Settings button, which is second up from the bottom.
The Settings navigation options show at the top of the navigation pane.
In the navigation pane, click the Business Management Link, which is second from the top.
Business Management options are now available on the right.
In the Business Management pane, click the Subjects link on the bottom right.
The Subject Management area replaces Business Management on the right. See Figure 23-1.
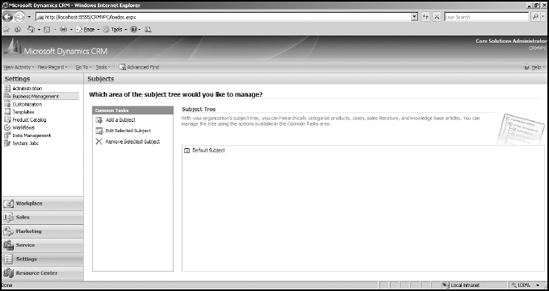
Three options appear in the Common Tasks pane, which is to the left of the main display: Add a Subject, Edit Selected Subject, and Remove Selected Subject. We cover each of these in the following sections.
On the right is the Subject Tree. When accessing the Subject Management area for the first time, you'll find a single subject: Default Subject. A plus sign is located just to the left of the default subject, leading one to believe that additional subjects are available to cascade down. However, clicking the plus sign doesn't reveal any additional data; instead, the plus sign turns to a dot, indicating that this tree doesn't have children.
You've taken the time to create a subject hierarchy. Now it's time to add your subject tree to Microsoft CRM. Because you can nest subjects in a treelike format, we add a new subject at the root level (or the tree trunk, which is the same level as the default subject).
To add subjects, follow these steps:
In the Common Tasks area of the Subjects window, click Add a Subject.
The Add Subject dialog box appears.
Enter a title for the subject and (if desired) a description.
Note
The title is required; you can't save the form without a title.
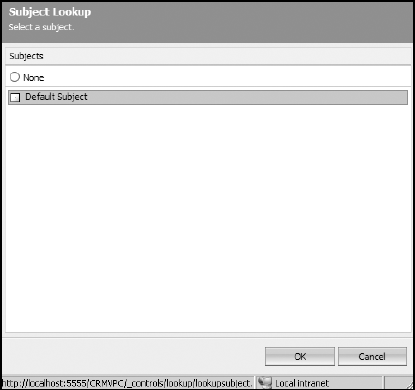
To place the new subject under a previously created subject, click the magnifying glass icon next to the Parent Subject field, then click OK.
The Subject Lookup dialog box appears, as shown in Figure 23-2.
Tip
If you navigate to the selected parent and child before you click Add a Subject, the Parent Subject field is automatically populated with your highlighted selection.
Click the appropriate plus sign (+) to the left of a subject to open the subject tree, highlight the subject you want as the parent, and click OK.
The new subject is added to the subject tree. This design flexibility enables you to create a sophisticated hierarchy to match the blueprint you came up with at the brainstorming session.
Note
The desired parent can be the child of another subject.
If you selected a parent subject and you want to display the subject you just added, you must click the plus sign to the left of the parent.
If you add the new subject as the child of a child, continue clicking plus signs until you drill down to the appropriate level.
Tip
Clicking the plus sign to the left of a subject displays its children (if any exist) and is the easiest way to drill down into a subject. If the plus sign turns into a dot, you know that you're at the end of the line for that subject.
Note: Whenever you make an addition or revision to the subject tree and click OK, Microsoft CRM saves the subject and refreshes the window. If you drill down several levels to add a new subject and click OK, the screen refresh takes you all the way back to the top-level view of the subject tree (arrgh!). It does this so that you'll always have an up-to-date view of your subject tree, but be prepared to spend a few extra mouse clicks when adding lots of branch subjects.
The Edit Selected Subject option is the second option in the Common Tasks pane. (Refer to Figure 23-1.) This option enables you to rename a subject or move it to another location in the subject tree.
Modifying and updating the subject tree is part of the evolutionary process of any business. Should you do so, all edits cascade through the system, meaning the new subject name changes anywhere the subject is in use. This includes historical data.
To edit a subject, follow these steps:
In the Subject Tree area of the Subjects window, highlight the subject.
In the Common Tasks pane, click Edit Selected Subject.
The Edit Subject dialog box appears.
Edit the subject's title, change the subject's parent/child relationship in the subject tree, or revise the description notes, all by entering text into the respective fields.
To change the parent subject, you must use the magnifying glass at the end of the field. You can modify the title and description by entering text.
Tip
Don't forget to change the Default subject to something that matches your business.
Tip
If you made a subject a child of another subject and would like to remove the parental relationship (would that be orphaning the subject?) click the magnifying glass icon and select the None button at the top of the dialog box.
Click OK.
The Edit Subject dialog box closes, and your edits are saved.
Note
Changing the subject title changes the title throughout the application. This means that historical records, such as cases, will have the new value as subject title and not the original value.
The Remove Selected Subject option, the last option in the Common Tasks pane, enables you to delete a subject from the subject tree. You might choose this option if a product line is discontinued or a service is no longer offered.
Microsoft CRM allows you to remove only subjects that aren't associated with existing records, such as Cases, Knowledgebase Articles, and Products. If you remove a subject from the subject tree, and that subject has child branches, child subjects move up a level.
To remove a subject, follow these steps:
In the Subject Tree area of the Subjects window, highlight the subject you want to remove.
In the Common Tasks pane, click Remove Selected Subject.
When a window appears asking whether you're sure you want to delete the subject, click OK.
The window closes and the subject tree refreshes, minus the subject you removed.
Now that you've built a rather complex subject tree, how do you use it? As we mention earlier, you can use subjects with knowledge base articles, cases, sales literature, and products.
For example, let's assume that Dick in the service department opens a new case pertaining to a software problem that Mr. Wayne is having with the Series 211 Transporter. Something about this case strikes him as familiar. Because other cases are associated to the subject "Series 211 Transporter," Dick can search for those cases and get a list of them almost instantly. Alfred, his cube neighbor, gets a request for sales literature on the Series 211 Transporter. He conducts a search for all sales literature linked to the subject "Series 211 Transporter" and gets a list of all related documents. Last but not least, there's Barbara, in the cube across the way. At a potential customer's request, she's researching the electrical requirements of all backup power supplies that your company sells. She performs a knowledge base search of all articles related to the subject "Power Supplies" and prints those articles.
Holy association, Batman! You mean by associating and organizing subject trees with logical, explanatory details, you can easily retrieve your company's data and information? Correct, Boy Wonder!
Subjects provide a mechanism to report on case issues. For example, the engineers responsible for developing future generations of The Series 211 Transporter may propose a redesign based on metrics learned from subjects.
Let's go back to Dick and the case he just opened with Mr. Wayne. He wants to make sure this case is linked to the Series 211 Transporter subject. Others might come across the same problem. Dick knows that this is important information for any of the customer service representatives in his company.
You can link new or existing cases to subjects by following these steps:
Third from the bottom of the navigation pane, click the Service button.
At the top of the pane, click Cases (under Service).
To start a new case, click the New button in the upper-left corner of the form. Or to open an active case, double-click it.
Both options display the Case window.
In the Case window, click the magnifying glass icon to the right of the Subject field.
The Subject Lookup window displays the subject tree. Although you may have only one subject tree for your company, you can design the subject tree with as much complexity as you need.
Locate the subject to which you want to link the case.
You may need to click a plus sign or two to drill down to the appropriate subject.
After you locate the subject you want, double-click it or highlight it and click OK.
The subject you select is displayed in the Subject field of the Case window.
Tip
The Form Assistant on the far right displays the subject tree when you enter the Subject field. You can locate the subject as in Step 5 above and skip Step 6 by simply selecting a subject from the form assistant.
Click the Save and Close icon in the upper-left corner of the window.
Your case is now related to the subject you selected.
Warning
We recommend that you relate cases to subjects when you first create the cases. However, if you aren't sure of the best subject to link to, you can assign or change the subject later. Keep in mind that changing a subject related to a case may cause problems if a user has worked on the case and related information to the previous subject.
Note
Subjects relate similar cases. Searching for cases with similar issues helps customer service representatives quickly find solutions to problems.
Suppose a customer calls with a problem with one of your company's products — the Hop-n-Pop toaster just won't hop when it pops the bread out. Your customer service representatives can check to see whether any other cases are linked to the same product using the Advanced Find feature. This offers you the ability to conduct detailed searches in almost any searchable field in Microsoft CRM.
To view all cases linked to a specific subject, follow these steps:
In the menu bar (at the top of the screen), choose Tools
Advanced Find.
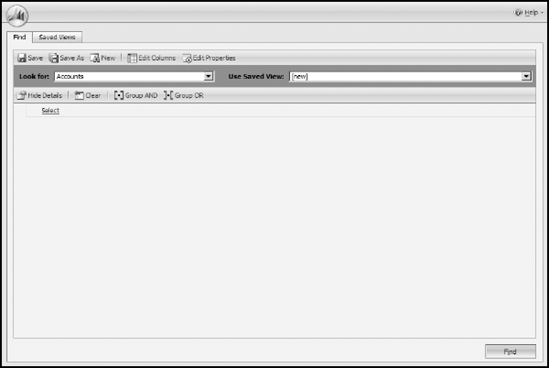
The Advanced Find dialog box appears, as shown in Figure 23-3. The Look For field tells the program where to look for the parameters you're going to add later. The Use Saved View lists searches you've saved previously. The area below these fields is where you'll enter the data you want to search for.
In the Look For field, verify that Cases is in the box; if it isn't, click the arrow to the right and choose Cases.
The look for box defaults to the entity you are on when you launch Advanced Find. It may not have cases in the box when the form first opens.
If below the Look For drop-down box you see Show Details and perhaps certain field values such as Owner Equals Current User, click the Show Details button. If not, skip to step 5.
The Show Details button changes to Hide Details and now you can change the query options.
Click the Clear button to clear out the current search parameters.
You can skip this step if there aren't any search parameters showing.
Mouse over the Select option to activate the Select drop-down menu, and then click the arrow or in the box to open the menu.
The options in the Select drop-down box are related to the entity you're querying and vary based on the item selected in the Look For drop-down list. For example, if you chose (in Step 2) to look for Documents, your search options are File Size, Author Name, File Name, and so on. If you chose Facilities/Equipment, you can search for Name, Primary E-Mail, Business Unit, and so on.
The list of items in the drop-down box have fields listed under two headers: Fields and Related. Fields represent the fields associated with the primary entity you are querying (in this instance Cases). Related, on the other hand, contains a list of entities related to the primary entity (again in our example, Cases).
The options in the Select drop-down box are related to the entity you're querying and vary based on the item selected in the Look For drop-down list. For example, if you chose (in Step 2) to look for Documents, your search options are File Size, Author Name, File Name, and so on. If you chose Facilities/Equipment, you can search for Name, Primary E-Mail, Business Unit, and so on.
Select a field to query.
In our case, Subject.
Place your cursor over the word Equals and set the Condition for the search from the drop-down menu.
Again, placing your cursor over the word Equals activates the drop-down menu. Click it to open the menu and make your selection.
Under Enter Value, select or enter the appropriate value.
The value you enter depends on the field you chose in step 6. Because we chose Subject in our example, the value field is a Lookup. If we chose a field that is a textbox, you would type your selection in the box.
Repeat steps 5-9 to add additional search criteria or skip to step 9.
The value you enter depends on the field you chose in step 6. Because we chose Subject in our example, the value field is a Lookup. If we chose a field that is a textbox, you would type your selection in the box.
Click the Find button (in the lower left).
A new window appears with your search results, created from the choices you made in the main Advanced Find window.
To open an entry in the search results list, double-click it.
Note
Single-clicking in a hyperlink field brings you to that record. If you want to open a selection as per Step 9 above, double-click a non-hyperlinked field.
For more on Advanced Find, see Chapters 3 and 13
The process of linking a subject to a knowledge base article is the same as that for linking subjects to cases. (We discuss the knowledge base in detail in Chapter 24.) A knowledge base article is a record (stored in the knowledge base) that contains information. It may document a process, contain the history of the company, provide details on the company's health or retirement plan, or list employee addresses and phone numbers.
You can create a link between a knowledge base article and a subject when you create the article. You can also link existing articles to existing subjects. Linking knowledge base articles to specific subjects provides your customer service representatives with a quick and easy way to search for similar problems and solutions in a specific subject.
To link a new article to a subject, follow these steps:
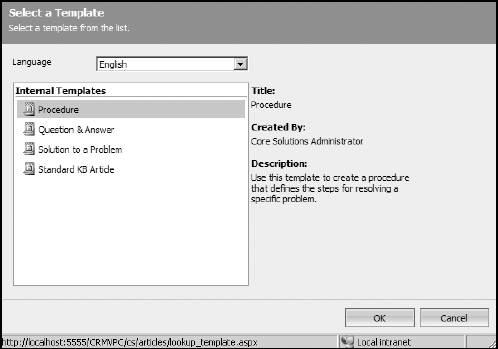
On the menu bar (at the top of the screen), choose New Record
Article.The Select a Template dialog box appears, as shown in Figure 23-4.
Select the appropriate language and template.
Templates help format your articles so that they're uniform in appearance, making them easier to read. (This is handy when you have a client on the phone.) Microsoft CRM has several predefined templates, and you can also create your own. (For more on templates, see Chapter 24.) Microsoft CRM also allows for multi-lingual templates. After you select your language in the Language drop-down box, click a template to highlight it and check the right side of the Select a Template window. You'll find basic information about the template you selected.
Click OK.
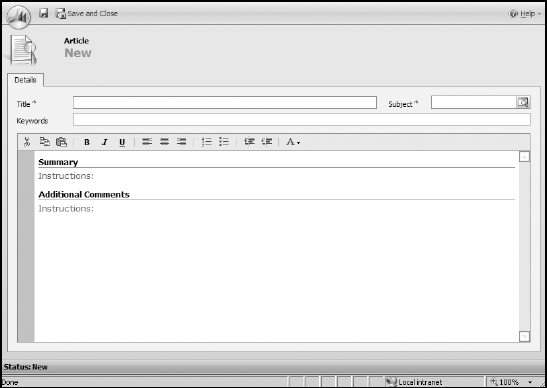
The Article: New window appears, as shown in Figure 23-5. (You find out about creating and submitting articles in Chapter 24.)
Enter a title for your new article.
Select the subject to which you want to link your article.
To do so, click the magnifying glass icon to the right of the Subject field. In the Subject Lookup window that appears, select the subject from the subject tree. You may need to click a plus sign or two to drill down to the appropriate subject.
Add keywords.
In the body of the template, place your cursor over the reddish text and click it.
The predefined text is removed, and a free-form field appears so you can enter your Article question.
Tip
You can edit text in this field just like in a Microsoft Word document.
Repeat step 7 as required by the template your chose.
Just like in Step 7, the predefined text is removed, and a free-form field appears so you can enter your answer.
Click the Save or Save and Close icon.
Your article is now related to the subject you selected.
To link a previously created knowledge base article to a subject, follow these steps:
Note
Only users with the appropriate security access can edit knowledge base articles.
Click the Service button, which is third from the bottom of the navigation pane.
At the top of the pane, select Knowledge Base.
The Knowledge Base window appears.
Under Article Queues: select Draft, Unapproved, or Published to find the knowledge base articles you'd like to select from.
All draft or unapproved articles are displayed in the main window.
Draft articles have been composed but haven't been submitted for approval by a user with editors' rights; consider them works in progress.
Unapproved articles have been submitted to a user who has been assigned the task of reviewing and approving articles.
Published articles have been approved for the general population. After an article is published, the Subject link can't be altered. However, if you find you need to change a published article, you can un-publish the article to make the necessary changes.
Click the desired article.
The Article window appears.
Select the subject to which you want to link your article.
To do so, click the magnifying glass icon to the right of the Subject field. In the Subject Lookup window that appears, select the subject from the subject tree. You may need to click a plus sign or two to drill down to the appropriate subject.
Click the Save and Close icon.
The article is now linked to the subject you selected.
Let's say that another customer calls about the Hop-n-Pop toaster. She heard that an attachment is available that allows the user to toast hamburger buns. You can search the knowledge base for the article that talks specifically about the bun toaster option.
To view knowledge base articles linked to a specific subject, choose Go To
As with cases and articles, you can link products listed in the product catalog to subjects. This is an efficient way to set up metrics for tracking sales by department, product type, sub-product type, and so on. And you can edit the Subject field related to a product catalog item at any time, as long as the product remains active. (See Chapter 7.)
To link a product to a subject, follow these steps:
In the lower part of the navigation pane, click the Settings button.
In the upper Part of the navigation pane, select Product Catalog.
The Product Catalog window appears. Detailed information on using the Product Catalog is in Chapter 7.
In the Settings window, select Product Catalog.
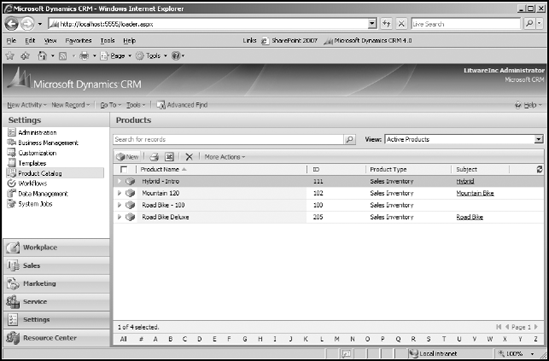
Select Products.
The Products window appears, as shown in Figure 23-6.
In the window's toolbar, click the New button (or double-click an existing product to edit it).
The Product: New window appears. Chapter 7 contains detailed information about this window. For now, direct your attention to the Subject field.
Select the subject you want to link your product to.
To do so, click the magnifying glass icon to the right of the Subject field. In the Subject Lookup window that appears, select the subject from the subject tree.
or
Use the form assistant to the right.
Click the Save and Close icon.
Your product is now related to the subject you selected.
Searching for products linked to a subject requires using the Advanced Find feature, which is described earlier in this chapter in "Putting the case link to work."
You follow the same types of steps to link a piece of sales literature to a subject as you do to link cases and articles to a subject. What's the advantage? Here's an example: Suppose you have a training manual that you sell. Your marketing department has created a two-page advertisement for the manual in PDF format. It would be handy to be able to link the ad with the product using a subject relation.
When customers call to request training information related to a specific product, you can easily search for all the training materials associated with the product, including the spiffy ad slick. You can then e-mail those documents to your customers, and within minutes they can be perusing the information and deciding about training.
To link sales literature to a subject, follow these steps:
On the navigation pane, click the Sales button.
At the top of the pane, select Sales Literature.
The Sales Literature window appears.
On the Sales Literature window's toolbar, click the New button or double-click an existing sales literature item.
If you click New, the Sales Literature: New window appears. Otherwise, you see the window for the existing literature item. Chapter 17 contains detailed information about this window.
Select the subject you want to link your sales literature to.
To do so, click the magnifying glass to the right of the Subject field. In the Subject Lookup window that appears, select the subject from the subject tree.
Click the Save and Close icon.
Your sales literature is now related to the subject you selected.
Note that you can edit subjects related to sales literature at any time.
Searching for sales literature linked to a subject requires using the Advanced Find feature, which we describe earlier in "Putting the case link to work."