What are contracts? In Microsoft CRM contracts aren't legal documents, they're an indication that the person requesting support is under a support plan.
Essentially, a contract is defined in Microsoft CRM as an agreement or plan that depreciates with time or use. For instance, say a customer purchases an extended warranty. That warranty expires over time, perhaps over the next three years. That's a contract. Or say your customer purchases a support plan based on a number of incidents or cases. His contract will expire when he's used up the number of incidents. Microsoft CRM also allows you to combine the two options. This means that customers can purchase number-of-incident plans that expire either when they use all of the incidents or when the contract expires.
The best part about contracts is that you don't have to do anything after they're executed. Contracts are tracked by the system. Better yet, if you define some workflow rules, contract renewal can be handled in an automated function as well. (See Chapter 9 for more on workflow rules.)
When creating contracts in Microsoft CRM you first create a contract template. Templates are a great way to quickly execute contracts, as most organizations have a few standard contracts.
After you create them, you can associate contracts with cases. If per-incident contracts are associated with cases, they'll automatically decrement when you use them.
This chapter is all about creating and using contracts. Getting started with contracts is simple. You first need to create a new contract template.
Why contract templates? As we discussed, Microsoft CRM contracts are based on duration or the total number of cases. When they're based on the total number of cases, contracts can also have an expiration date. This creates a "whatever comes first" scenario. Defining a template aids in the creation of contracts by simplifying data entry later. And of course, we create contract templates because we have to. All new contracts are based on contract templates.
In this chapter, we look at how Bob's Building Blocks (BBB) uses contracts in Microsoft CRM. BBB sells building blocks that children the world over love. Often, the children (or most likely their parents), need help building the intricate block models. A few years ago, BBB had the inventive idea of selling support access at a discounted rate. The support plans are prepaid and allow members to call 10 times at a deeply discounted rate. To track the status of a client's support plan, BBB uses Microsoft CRM. (If not, what would be the point of this chapter?)
Note
You need to create contract template before creating the actual customer contract.
The first step in creating a Microsoft CRM contract is to create a contract template. First, follow these steps to create a contract template:
Click the Settings button, which is the second button from the bottom of the navigation pane.
At the top of the navigation pane, click Templates.
Click the Contract Templates option.
The Contract Templates window appears, listing all current contract templates.
On the Contract Templates window's toolbar, click the New button.
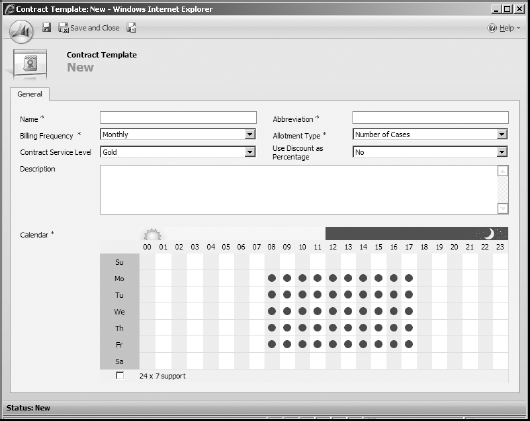
The Contract Template: New window appears, as shown in Figure 26-1.
Fill in the Name and Abbreviation fields.
The name can be anything you want. For the abbreviation, use something that you think logically abbreviates your contract name. The abbreviation is an alternate way to refer to the contract.
Choose a billing frequency from the Billing Frequency drop-down list.
Choose a billing cycle, whether it's monthly, bimonthly, quarterly, semiannually, or annually.
Select an Allotment Type.
The three options for providing support are Number of Cases, Time, and Coverage Dates.
Number of Cases: Offer your services by the case or call. For example, you might offer a five-call service package in which Bob's Building Blocks allows five support calls.
Time: You can provide your services for an amount of time, whether it's hours, days, and so on. For example, Bob's Building Blocks might offer their support contract for 5 hours of time.
Coverage Dates: Set a time frame for your services. For example, Bob's Building Blocks may offer unlimited support 12 months from the date of purchase.
If you want, select a service level and discount, and fill in the Description field.
Use the Service Level field to designate the contract's status.
Fill in the Calendar grid.
Set the days and hours of support this contract offers by clicking in the appropriate box. A green dot appears in each box you click. In our example, Mr. Wayne provides his services from 8 a.m. to 5 p.m., Monday through Friday.
If you provide an option for clients to purchase a support contract with extended support hours (weekends or after 5 p.m. in our example), you must create additional contract templates to reflect those options.
Tip
Here's a quick trick to save clicks: Assume Bob's Building Blocks offers 24-hour support on weekdays. Their support is closed on weekends. Click the 24×7 check box at the bottom and then click the Sunday label (Su) at the top of the grid. The green dots in the Sunday row disappear. Repeat for the Saturday (Sa) row.
Click the Save and Close icon in the upper left corner.
The Contract Template: New window closes, and your new contract appears in the Contract Templates window.
Before we get into showing you how to create your contracts, let's go over the different levels of contract status: draft, invoiced, active, on hold, cancelled, and expired. Because everyone can see contracts, the status allows your sales and service staff to be consistent with their answers and support.
Each contract starts out as a draft and automatically moves to active status once the beginning date has been reached, regardless of whether it's still a draft or has been invoiced. Contracts expire on the end date specified in the contract. Your sales and service staff can place contracts on hold or cancel them.
Here's the list of contract status types:
Draft: After a contract is created, it automatically has draft status. This is the default option and allows your staff full access to it for modifications or updates.
Invoiced: After the contract is ready for use, it can be invoiced (from the Actions menu). We show you how to do this later in the "Adding Contract Lines to a New Contract" section. After you invoice the contract, you can't edit the dates, contract names, and contract ID.
Active: A contract still in draft status moves to active status automatically after the beginning date set in the contract is reached. For example, if your beginning date is June 18, 2009, the contract will go to active status on that date. As with invoiced contracts, you can't edit the dates, contract names, and contract ID after the contract becomes active.
Expired: A contract expires automatically on the end date set in the contract. After this happens, you can't open new cases against it. (Although you can close existing cases.) You can renew expired contracts. When renewing you can edit the Contract Start and End dates, the Contract Name, as well as billing information on the General tab. On the details tab, you can change the Service Level, the Contract Template, and the Owner. For more information, see the section, "Renewing Contracts," later in this chapter.
Cancelled: You can cancel (from the Actions menu) a contract that is active or invoiced, but you can't edit cancelled contracts.
On Hold: You can place a contract on hold (from the Actions menu). While it's on hold, you can't log cases against it. To take it off hold, choose Release Hold from the Actions menu.
As we mentioned earlier, you'll need to create a contract template before creating a contract. If you haven't, please see the section, "Creating a Contract Template," earlier in this chapter. With at least one contract template, the Bob's Building Blocks team is ready to sell contracts to customers. That's a good thing because little Timmy is on the phone and wants his block set built . . . NOW! After your support specialist has determined that Timmy needs to purchase a set of five support cases — and Timmy's mom has provided a valid credit card number — you're ready to create a contract.
Here's how to create a contract:
In the lower part of the navigation pane, click the Service button.
In the upper part of the navigation pane, select Contracts.
In the Contracts window's toolbar, click the New button.
The Template Explorer dialog box appears.
Double-click the contract template you'd like to use.
The Contract: New window appears, as shown in Figure 26-2. For our example, we'll choose the B5P Template to create the contract for Timmy.
We'd like to point out two things about this Contract: New window. First, as with most of Microsoft CRM, the fields with the red asterisks (on your screen) are required. Second, you can't modify the Contract ID field. The contract ID is generated automatically when you click the Save and Close button to create the contract. However, your system administrator can specify some of the characteristics of the contract ID.
In the Contract Name field, enter a name for the contract.
For our example, we've used Little Timmy and his street address
Fill in the Customer field.
To do so, click the magnifying glass and select the customer from the Look Up Records window. You can also open the Form Assistant on the right of the screen and select Customer from the drop-down list. When you do, a list of customers appears.
Enter the contract start and end dates.
You can use the calendars or enter the dates manually.
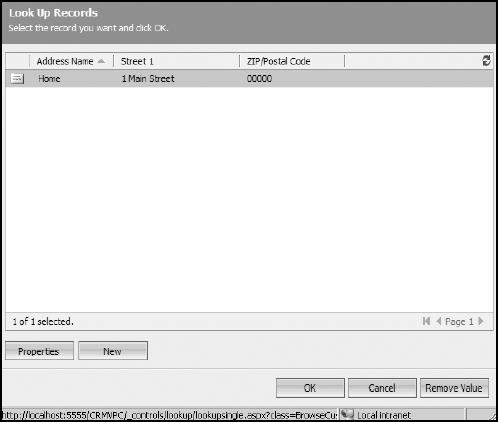
Use the magnifying glass to select the Contract Address.
The contract address Look Up shows the address on hand for the customer. Select the appropriate address. In our example, we have only one address for Little Timmy. (See Figure 26-3.)
The Bill To Address automatically fills in to reflect the contract address; change it if necessary.
Tip
When creating a contact address, make sure to enter an address name. Without it, the address won't show in the contract address field.
Tip
It's worth taking the time to add these addresses now because you need them later when you change the contract's status.
Click Save (the disk icon) to record these addresses.
Click the Details tab in the Contract: New window and fill it in as necessary.
The only required fields (Contract Template and Owner) are already filled in. You can choose the type of discount you want the customer to have (percentage or amount) and enter a description for the contract. You can also indicate the service level agreement.
To add a note, do so on the Notes tab.
Click Save (the disk icon).
Your contract is now a draft. Keep this in mind for the rest of the chapter. We will move it out of draft status later, in the "Adding Contract Lines to a New Contract" section.

Now that you've saved the contract, the following options are live. These options allow you to enter or view information relative to the contract during its life:
Information: You entered the initial information for the contract here.
Contract Lines: This option outlines what the contract covers. You can associate several contract lines (for example, hardware, software, parts, and maintenance) with a single contract.
Activities: This is where you find every activity scheduled as part of the support in the contract, such as phone calls, e-mails, tasks, and appointments.
History: All completed or closed activities go here.
Cases: All cases related to this contract are visible here.
Tip
Shortcut alert! For the most part, your contracts will contain a lot of the same information (such as billing frequency or pricing). Instead of creating a contract from the template, you can open a contract similar to the one you want to create and copy it.
Follow these steps to copy a contract:
In the lower part of the navigation pane, click the Service button.
In the upper part of the navigation pane, select Contracts.
Double-click the contract you want to copy.
Tip
We recommend that you write down the current contract ID number. When you get to Step 4, the contract is copied with all the same information except the contract ID. The program generates a new contract ID for the new contract you're creating. The only way you can distinguish your new contract from the old one is by the contract ID.
On the main menu (at the top of the screen), choose Actions
Copy Contract.
The Create from Existing Contract dialog box appears. You can choose to copy over cancelled contract lines as well, just by selecting the box in this window. (For more on contract lines, see the next section.)
Click OK.
You return to the open contract window. The new contract usually takes a minute to pop up, so be sure to keep an eye on that contract ID.
Check the contract ID to make sure you're using the new contract.
Go ahead and change the new contract information.
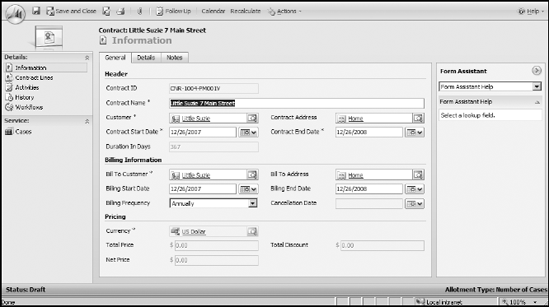
For our example, we made a new contract for Little Timmy's neighbor, Little Suzie, by copying her contract and giving it a new name, as shown in Figure 26-4.
When changing the information, make sure that that you change both the Bill to Customer and the Bill to Address in the Billing Information section.
Now that you have your new contract for Little Suzie set up, it's time to create one or more contract lines. A contract line is a description of what the contract is covering. For example, you might offer an in-home building block inspection. Once a month, your team of Bob's Building Blocks Building Block Inspectors will visit the customer's home to check on the stability and overall structural safety of the building blocks. Or you may want to indicate that the contract is covering Little Timmy's new purchase, the Astro Wars Space Station. That would mean that this contract will not cover his purchase of the Astro Wars Moon Station. Of course, you could have more than one contract line associated with a contract, so if it is appropriate you could add the Moon Station as one of the products covered by the contract.
Contracts need not be associated with products. If you're simply allowing Little Suzie to call for support, then a single contract line is all that is needed.
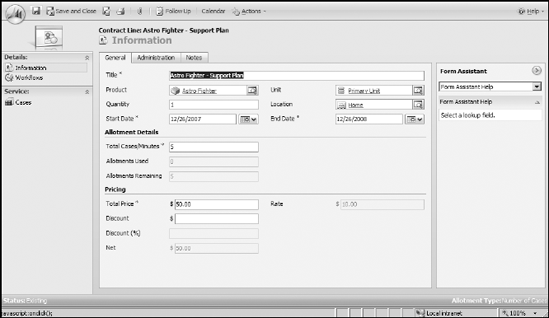
The Contract Line: New window has three tabs: General, Administration, and Notes. The General tab has areas for the following:
General Information: This includes the name of the contract line and the product.
Allotment Details: These details show the total minutes or cases, how many have been used, how many remain, and pricing.
Total Price: This shows the price for the product for this contract.
To add a contract line, follow these steps:
In the lower part of the navigation pane, click the Service button.
In the upper part of the navigation pane, select Contracts.
Double-click the contract that you want to add a line to.
In the navigation pane, click Contract Lines.
The Contract Lines window for that contract appears.
In the window's toolbar, click the New Contract Line button.
In our example, shown in Figure 26-5, we're using Little Timmy's Astro Fighter.
In the first section, type a title for this contract line and choose the start and end dates.
These three fields are required, but the others in the top section aren't. The start and end dates default to the contract start and end dates but can be changed.
In the Allotment Details section, enter the number of minutes or cases you want to specify for this contract.
The other two fields are optional and show how much the customer has used and how much is left.
In the Pricing section, enter the total price for this product for this contract.
Of the remaining fields under Pricing, Discount is the only one you can fill in. Keep in mind that the amount or percentage of the discount is determined by what was entered for this product on the product list. The other two fields are filled in automatically based on the discount you enter. Net is the total after the discount is applied.
Click Save (the disk icon).
Click the Administration tab and check your customer. Enter a serial number if necessary.
The customer field is required and should already be filled in. The serial number field is optional and is a good place to track product serial numbers against the contract (say for inventory or quality assurance, for instance).
On the Notes tab, enter information important to this contract.
The Notes tab, like the other Notes areas in Microsoft CRM, offers a free-form place to enter data.
Click the Save and Close icon.
The new contract line appears in the Contract window's main display. You see the contract line's title, product, allotments remaining, and net (a dollar amount).
Now that you've added a contract and the contract lines, you can see how Microsoft CRM tracks things such as time, available cases, or remaining minutes. In just a few clicks and a glance, you can easily see the status and details of a contract. We know what that translates to: getting information to the customer quickly, which means happy customers.
As we mentioned, you can move a contract from draft to invoiced status, if the start date hasn't yet been reached.
Follow these steps to move a contract from draft to invoiced status:
In the lower part of the navigation pane, click the Service button.
In the upper part of the navigation pane, select Contracts.
The Contracts window appears.
Double-click the contract you created earlier.
On the menu bar (at the top of the screen), choose Actions
Invoice Contract.The status of the contract, displayed in the lower left corner of the window, is updated to Invoiced (if the start date has not yet been reached) or Active (if the start date has been reached).
Expired contracts are automatically updated to expired status on their end dates. The other status levels — cancelled, on hold, and renew — can be updated.
As we mentioned, you can renew cancelled or expired contracts in a few short steps:
In the lower part of the navigation pane, click the Service button.
In the upper part of the navigation pane, select Contracts.
The Contracts window appears.
Double-click the contract you want to renew.
From the menu bar (at the top of the screen), choose Actions
Renew Contract.The Renew Contract dialog box appears, asking for verification and whether you want to copy the cancelled contract lines as well.
Click OK.
Keep an eye on the status in the lower left corner. When you renew a contract, its status is changed automatically to draft.
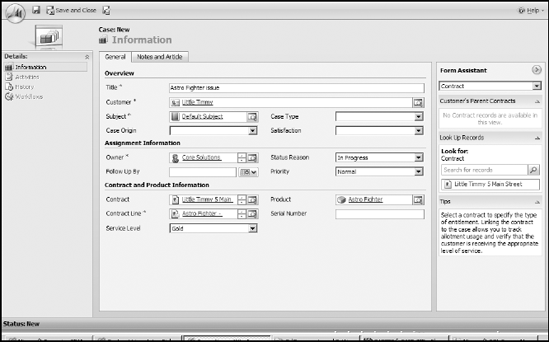
Little Timmy needs help completing his Astro Fighter. He calls Bob's Building Blocks for help. The Bob's support agent takes his call and, prior to beginning the session, she opens a case. She wants to associate Little Timmy's support contract with the case. (You can learn how to create a case in Chapter 22.) Here we show you how to associate that case to the contract.
See the instructions in Chapter 22 for opening a new case. Then follow these steps to link the new case to Little Timmy's contract.
In the newly created case, go to the Form Assistant and select Contract from the first drop-down menu.
Available contracts associated with the customer are listed in the Form Assistant under the lookup field. Only active and invoiced contracts appear.
Find and select the contract.
The Contract field under Contract and Product Information in the main window should now be filled in. (See Figure 26-6.) Now that you've assigned the contract, you have to assign the contract line associated with this call.
Click the magnifying glass icon to the right of the Contract Lines field.
The Look Up Records dialog box appears, listing all the contract lines associated with this contract.
Find the contract line, highlight it, and click OK.
The case is now properly linked to the contract, and any work performed while resolving the case will be tracked against the active contract.
Click the Save and Close button.
Remember the cardinal rule of computers: save, Save, SAVE!