Before customer relationship management, or CRM, became a household term, organizations were focusing on something called sales force automation or SFA, which was essentially software that helped automate the sales process. Sales activities, opportunities, prospects, clients, and more were stored in the sales database. Salespeople would interact with the sales database either in the office or from a remote office. Remote office data was often synchronized back to the home office system. SFA was a great tool to help sales people win new business, but what about the rest of the organization?
Prior to the introduction of CRM software, customer service departments also recognized the need for effective case management software and often built or developed specific software for case or incident management. We think you're getting the picture: two products and two disparate databases. CRM solves the issue conceptually by treating the organization as a whole and recognizing that all customer-facing interactions should be stored in a single source or database.
A prime benefit of having sales and customer service share a single database is that customer interactions by both groups are captured in a central place. Sales people aren't blindsided by ongoing customer issues when calling on an existing customer. Customer service knows which customers or prospects to support, what the support requester's value is to the organization, and lots more. Management can report on customer value — the amount of revenue or margin attained from a specific customer minus the costs associated with sales and support.
In Microsoft CRM, the Service module (found in the navigation pane) has several entities, but the heart of the Service module is the Cases feature, where you can view, resolve, and reactivate cases in an easy and comprehensible manner.
A case (also known as an incident) is simply a record of customer interaction with the customer service department. When a customer has a question or a problem, the representative who interacts with the customer opens a case. The customer's issue can originate from a phone call, e-mail, or a support form on your Web site. (For more on this, see Chapter 21.) The customer service representative responsible for the incident opens a case to document the problem and its eventual solution. Cases need not be problems, but they should be a record of customer interaction with the customer service department.
Tip
Those of you without a customer service department need not skip this chapter. Cases still provide value to your organization if you view cases as important customer service follow-up. These can be items that — if they aren't attended to in a timely fashion — could alienate the customer. By using the Cases feature, you're elevating certain customer issues above simple calendar follow-ups or tasks. Even if you don't have a customer service department, we strongly recommend that you discuss how to use cases with your CRM dealer.
Some companies refer to cases as tickets or issues. Whatever they're called in your organization, active case management is the name of the game; the better you manage your cases, the better your customer service and customer satisfaction.
In this chapter, we show you how to create cases and assign them to someone on your team. You find out how to open an existing case and resolve it, scheduling activities related to gaining the solution along the way. We even explain how cases interact with queues and contracts. (For a refresher on queues, see Chapter 25; for contracts, see Chapter 26.) You also find out how to reactivate a case when necessary.
The case management path looks like this: A customer service representative (CSR) takes a call. Let's say the customer's having a problem with one of your time transporters. He dialed Camelot, A.D. 495 and ended up in Peoria, 1958.
The CSR creates a case and links it to the appropriate customer. The case is assigned to an engineer. The engineer sets about finding a solution, generating a few e-mails to the customer along the way. The engineer solves the problem and closes the case.
A week later, the customer calls back with the same problem. A CSR (not necessarily the same one as before) reactivates the case, and the solution process begins anew. A more thorough solution is developed and recorded, and the case is closed again. A month later, a different customer calls with the same problem. Any CSR can search the database for all cases related to the same problem. This is case management at its best.
Cases are listed in the main display area of the Cases window, like the one shown in Figure 22-1. You use this window to open cases, and then add notes and schedule activities, with the goal of resolving the case. The Cases window is also where you assign cases to other service representatives, share cases, or accept them yourself. The entire service team can use this window to collectively track the current status and ultimate disposition of cases.
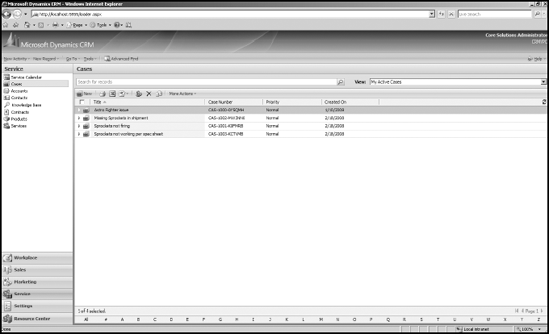
To open the Cases window, click the Service button at the bottom of the navigation pane. Then select Cases from the list of options at the top of the pane.
The main part of the window has a list of all your active cases. You can filter this list by choosing one of the following options from the View drop-down menu.
Active Cases: All cases assigned to you or your fellow team members that haven't been resolved.
All Cases: All cases assigned to you or your fellow team members that are open or have been resolved.
My Active Cases: All cases assigned to you that haven't been resolved. During a Microsoft CRM session, when entering the Cases window for the first time or going back to it, the View option always reverts to My Active Cases (unless it's changed by the system administrator).
My Resolved Cases: All cases assigned to you that have been resolved.
Resolved Cases: All cases assigned to you or your fellow team members that have been resolved.
Note
These are the views you get "out of the box." Your implementation partner or system administrator can add, rename, and delete views.
You can sort cases also by column headings. Just click a column heading to sort as follows:
Title displays cases alphabetically.
Status displays cases alphabetically by status (resolved or active). The status column is visible when choosing the All Cases view.
Case Number displays cases in numerical order.
Priority displays cases by level of importance.
Created On displays cases in chronological order.
Again, note that your system administrator can add columns to this list or delete columns from this list.
Tip
Click a column header a second time to display the cases in reverse order.
You have two ways to find specific cases. The Look For field at the top of the Cases window lets you search active cases by title or case number. You may type the full title or any part of it. Click the Find button, and a list of matching cases appears. Use the wildcard character * to type only a portion of the text string you're looking for. For example, searching for *porter returns Porter, Transporter, and Exporter.
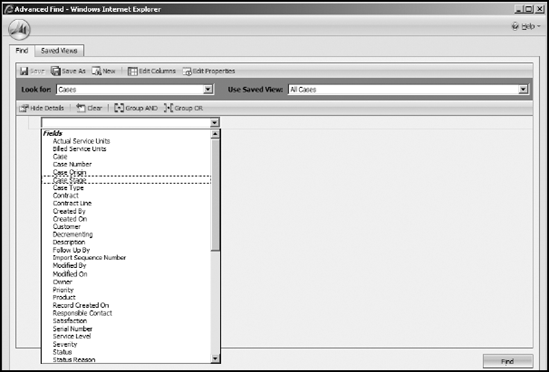
You can also use the Advanced Find feature to search various fields. To do so, choose Tools
Anyone with create case rights can create or add a case to the Microsoft CRM system. Rights are assigned by your system administrator. Cases can be created in two places: from the main Cases navigation area or from an account or contact record. However you get to the new case window, the form is the same. To open a case from the Cases area in the service module, follow these steps:
On the navigation pane, click the Service button.
At the top of the navigation pane, select Cases.
The Cases window appears on the right. (Refer to Figure 22-1.)
On the Cases toolbar, click New.
The Case: New window appears, as shown in Figure 22-3.
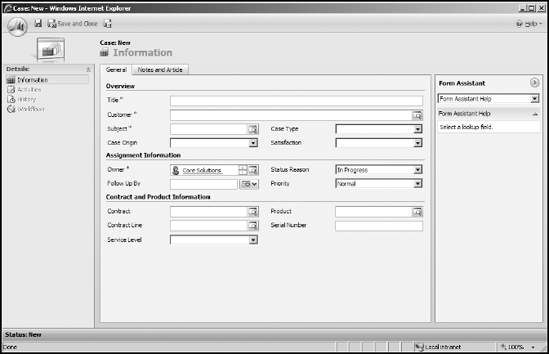
The Case: New window has two tabs: the General tab and the Notes and Article tab. The General tab is divided into three sections: Overview, which has six fields to further define the case; Assignment Information; and Contract and Product Information.
Some fields (such as Subject) have a magnifying glass to the right of the field. This means you must use the magnifying glass or the Form Assistant to fill in the field. For more information on both options, see Chapter 3.
Tip
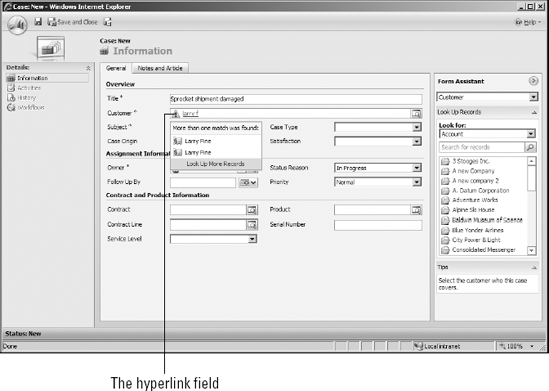
Lookup fields (magnifying glass icons) now has autocomplete. To enter the "Sprocket Design" as the subject click in the subject field and begin typing part of the word and tab out of the field. If auto-complete finds more than one match, the various options will be displayed.
Remember, all fields with a red asterisk are required. Follow these steps to complete the Overview area of the General tab:
In the Title box of the General tab, enter a title for the case.
The title is a short description of the reported issue. The Title field can hold a maximum of 175 characters.
Click in the Customer field and begin typing the customer name (account or contact). Before you complete the name, tab to the Subject field.
You can use the magnifying glass instead, or the Form Assistant, but we're going to explore the autocomplete feature. By leaving the Customer field — in our case, tabbing to the Subject field — we triggered auto-complete. The auto-complete options are:
If the customer name is unique in your database, it will show in the field blue in color and underlined (hyperlink). If so, skip to Step 3.
If there is a yellow caution icon with the sequence of letters typed underlined in red, it means more than one possible match has been found.
The more you type, the less likely you'll find duplicate records.
Click the hyperlink field (Figure 22-4).
Select the account or contact from the list.
The account is entered into the Customer field.
Use the Form Assistant to fill in the Subject field.
The Subject option categorizes your cases by subject, such as Sprocket Delivery Issues or Sprocket Quality. You can link the case to a subject in your subject tree. (For more on the subject tree, see Chapter 23.)
Back on the General tab, in the Case Origin field, click the arrow and select how you received the case.
Note: Your system administrator can edit this list.
In the Case Type field, select a value from the drop-down list.
The value categorizes the case as a question, problem, or request. (Your system administrator can also edit this list.)
(Optional) In the Satisfaction field, select the option that best indicates the customer's level of satisfaction with your service.
Typically, you fill out this field prior to closing the case, not when first opening the case.
The Assignment Information area of the General tab has four fields. Fill them in as follows:
(Optional) Select the Owner field and choose who you want to assign the case to for resolution.
This field defaults to you, the creator of the case. You can leave it as it is or reassign the case to another user.
In the Follow Up By field, select the date on which the owner should follow up on the case.
You can click the calendar or make a selection from the drop-down list.
In the Status Reason field, select the option that best describes the current status of the case.
In the Priority box, set a priority for this case.
The Contract and Product Information area offers five more fields to define your case:
In the Form Assistant, select the Contract option.
Select a contract to link this case to.
In the Form Assistant, select the Contract Line option.
Set the case to a contract line here.
In the Service Level field, click the arrow and select the appropriate service level from the list.
In the Form Assistant, select the Product option.
This lets you link the case to a particular product.
In the Serial Number field, enter a serial number associated with this case or with a product associated with this case.
If a serial number is associated with a contract line, you can fill it in from the Form Assistant.
Now you can move on to the Notes and Article tab.
The other tab of the Case: New window, Notes and Article, is much simpler than the General tab, as you can see in Figure 22-5. This is where you can enter any notes and articles pertaining to the case. For example, you can note your conversation with the customer in the Notes section and attach a knowledgebase article used to help the customer. You can also e-mail the knowledgebase article from here.
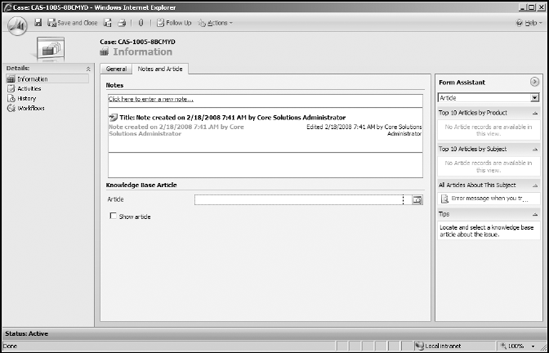
Figure 22.5. The second tab of the Case: New window shows the Notes and Knowledge Base Article areas.
To fill in the first area of the Notes and Article tab, follow the self-explanatory instruction to "Click here to enter a new note." A data entry area appears for you to manually enter a note. Enter as many notes as you like.
In the second area, you can link an article that ties into this particular case. If you use the Form Assistant and select the Article option, Microsoft CRM automatically displays your top ten article selections based on the links you defined in the knowledge base. (For more information on the knowledge base, see Chapter 24.) If this list doesn't show you the article you need, you can use the magnifying glass.
Click the Show Article check box to display the article you selected in the Notes and Article tab. After the article is displayed, you can e-mail it to a client from this tab by clicking E-Mail KB Article.
To look up a knowledge base article in your library and attach it to this case, do the following:
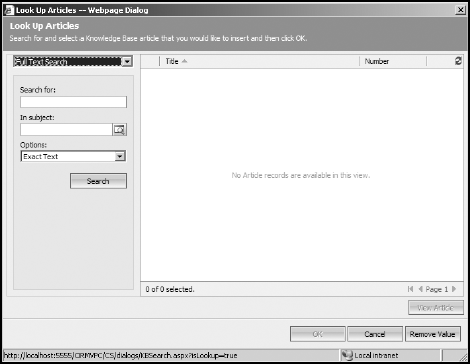
Click the magnifying glass icon at the end of the Article field.
The Look Up Articles dialog box appears, as shown in Figure 22-6. You have a handful of ways for searching the knowledge base.
Click the arrow in the top drop-down box to choose one of the following options to search for articles:
Full Text Search: Search the full text of articles for specific words.
Keyword Search: Search by keyword.
Title Search: Search by article title.
Article Number Search: Search for an article number.
Subject Browse: Browse all the subjects to find what you want.
In the Search For field, enter the word or words that you want to find.
In the In Subject field, make a selection:
Click the magnifying glass to the right of the field.
The Look Up a Subject dialog box appears, listing your subjects organized by headings and subheadings. You can choose a specific subject for the program to search. For example, if you select the subject Marketing, the program won't look for your text in Sales, Service, or Thank You Letters.
Select a subject.
Click OK.
In the Options field, make a selection from the drop-down list.
You have two options: Exact Text, which means the search looks for exact matches only, and Use Like Words, which searches for the string of text you entered. For example, enter the word pro and you'll get everything containing that sequence of letters.
Click the Search button.
A list of articles meeting your search criteria appears on the right.
When you find the article you want, double-click it (or select it and click OK) to attach it to the case.
You return to the Case: New dialog box, where you can continue adding articles or exit the case altogether. You can attach only one article per case.
Tip
You can view the article prior to selecting it by clicking View Article on the bottom right.
To e-mail the article, click the Show Article check box.
The article displays below the check box.
In the knowledgebase article window, click E-Mail KB Article.
Fill out the e-mail form and send.
To save your data, click the Save and Close button in the upper left corner of the Case form.
The next step in working with a case is to assign it (if you're the assigner) or accept it (if you're the assignee).
Often, cases are assigned to a queue that customer service representatives (CSRs) monitor. (For more on queues, see Chapter 25.) Of course, you can assign cases directly to an individual based on skill set, availability, or both. Microsoft CRM has provisions for assignment to either a queue or an individual. A case can be assigned to only one queue or one person at time.
However, there is no limit to the number of times a case is assigned.
Through the use of workflow, case assignment can be automated based on the rules you establish. (For more on workflow, see Chapter 9.) For example, if a case has a subject of "Shipment Missing," a workflow rule could be employed that will assign it to the shipping department queue.
The first thing you want to do to start work on a case is to assign it to a queue or an individual. In the following steps, we assign a case to a queue. Here's all you need to do:
On the navigation pane, click the Service button.
At the top of the navigation pane, select Cases.
The Cases window appears on the right.
In the Cases window, select a case.
To select several records for an ensuing action, hold down the Ctrl key and click. Selecting the check box at the top of the first column (under the New button) selects all cases.
Click the Assign icon on the toolbar above the list of cases.
The Assign to Queue or User dialog box appears, displaying two options for managing cases. Route Case is a powerful option after you establish workflow rules. Find out more about defining workflow rules and processes in Chapter 9.
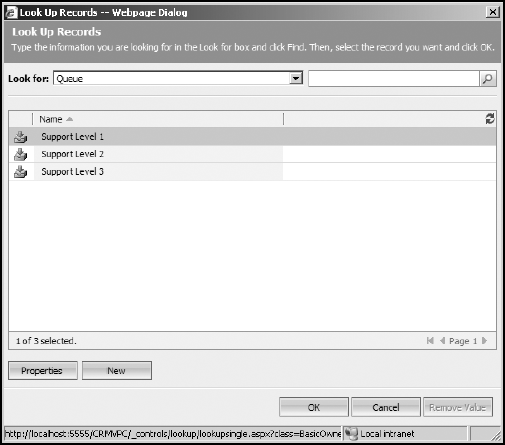
Click the Assign to Another User or Queue option and then click the magnifying glass icon to the right of the field.
The Look Up Records dialog box appears, as shown in Figure 22-7.
In the Look For field, choose User or Queue.
By default, the field displays User. In this example, we're assigning the case to a queue, so we select Queue from the Look For drop-down box.
Select a Queue.
When you change the Look For field to Queue, a list of all of the queues in the system are displayed. To limit the list, you can use the Search for Records field to the right of the Look For field. Type in all or part of the queue name and click the magnifying glass icon.
Select the Queue and click OK.
Note
You must highlight the appropriate user or queue even if only one match is listed.
When you click OK, you return to the Confirm Assignment dialog box, where the username appears.
Click OK to close the Confirm Assignment dialog box.
You return to the window of the case you were assigning, and that case is assigned.
Note
With this method, we assigned one or more cases to a queue without opening the individual case form.
Alternatively, case assignments can happen from the open case form by performing these steps:
Open a case.
Click the magnifying glass to the right of the Owner field; or from the toolbar, choose Actions
Assign.
Follow Steps 4 through 8 in the preceding step list.
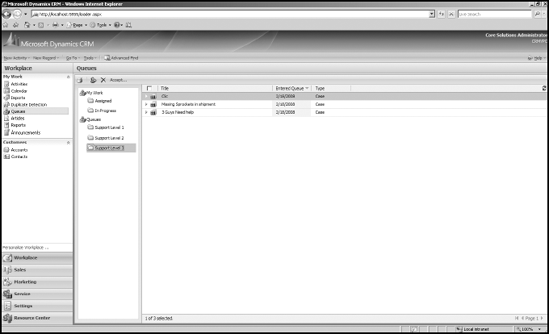
For queues to work effectively, people need to monitor them. When someone responsible for monitoring a particular queue sees that a case has been assigned to the queue, he or she needs to take ownership of the case. In doing, so, the case is removed from the queue and the owner is the CSR working on the case.
Follow these steps to monitor a queue and accept ownership of a case record:
On the navigation pane, click the Workplace button.
At the top of the navigation pane, in the My Work section, select Queues.
If a plus sign appears next to My Work, click it first to open the list. The Queues window appears on the right, with its own navigation pane and a list of queues. (See Figure 22-8.)
In the Queues window, click a folder under My Work.
Each folder is a separate queue. All cases assigned to that queue appear in the main window.
Note
In Microsoft CRM, you can't reject a case or an activity. (By activity, we mean a task, a fax, a phone call, an e-mail, a letter, or an appointment.) If you don't want to accept a case or an activity that is assigned to you, you must reassign it to another user or queue.
Click the Case you want to accept.
To select multiple cases, hold down the Ctrl key and click.
At the top of the Queues window, click the Accept button.
The Confirm Assignment dialog box appears.
Click OK.
The case is now removed from the queue and assigned to you in your In Progress queue.
As you work toward resolving a case, you typically have to perform certain activities to obtain a solution. For example, you might need to perform tests on the Spacely Sprocket to see whether it will repeat the problem your customer reported.
In this scenario, you'd perform the following steps to log your time and associate it with the case:
On the navigation pane, click the Service button.
At the top of the navigation pane, select Cases.
The Cases window appears.
In the Cases window, double-click the case you're working on.
To follow along with the example, we double-clicked the case for which we're scheduling a test.
In the Case navigation pane, click the Activities option.
The window shows uncompleted activities associated with the case.
On the toolbar, click the New Activity button.
The New Activity dialog box appears. Because we're performing a test on the equipment, we use Task.
Highlight Task and then click OK.
The Task: New window appears.
Enter a subject that describes the task you'll perform.
Note that the Regarding field already displays the case title, and your name should be in the Owner field. The Duration defaults to 30 minutes, but you can change this using the drop-down menu. If appropriate, you can also complete the Due date and time; Priority; Category; and Subcategory fields.
Click the Save and Close icon.
The task now appears in the main display for the associated case.
To complete the task (and automatically accrue billable time against the case), follow these steps:
In the Cases window, double-click the appropriate case.
The Case window appears, showing the case you selected. (The title of the window includes the name of the case.)
In the navigation pane, click the Activities option.
You see a list of all activities associated with this case.
Double-click the task you want to close.
Click the Save as Completed icon.
In the Case window, you'll see that the task is no longer displayed under Activities in the navigation pane. But wait! Click History, which shows the completed task. If you had spent one hour performing the task, for example, the customer would now be on the hook for one hour of contract time.
Tip
You can close an activity as completed instead of saving and reopening. If the activity isn't a scheduled activity, but one you're entering in for historical purposes, simply click the Save as Completed icon.
Tip
You can associate existing activities with this case by clicking the Add Existing Activity button to the right of the New Activity button.
Case resolution is the system's way of indicating that the problem is solved. (Many organizations like to set an intermediate status indicating that, from the technician's perspective, the case is resolved, but the customer has a period of time to indicate otherwise. This is a good topic to take up with your dealer.) You can resolve cases on the first call as they happen, or after extensive research.
Warning
In some cases, multiple activities are generated to help resolve a case. In Microsoft CRM, you can't mark a case as resolved if any activities associated with the case remain uncompleted. This might require completing phone calls, tasks, and appointments, sending e-mail messages, and more. This prevents a user from accidentally closing a case before completing all mandated workflow and activities.
After you determine a solution to a case and complete all associated activities, follow these steps to change a case's status to resolved:
In the Cases window, double-click the case you want to resolve.
Tip
You may find it helpful to first select My Active Cases from the View drop-down menu in the upper right corner of the window.
From the menu bar (at the top of the screen), choose Actions
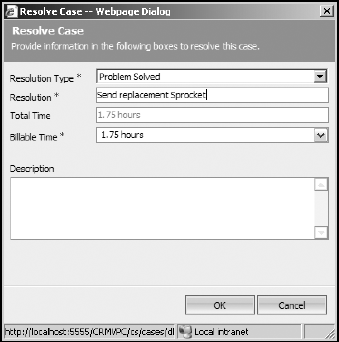
Resolve Case.The Resolve Case dialog box appears, as shown in Figure 22-9. The dialog box has the following options:
Resolution Type: A drop-down box in which you can indicate if the problem is solved.
Resolution: A required field (see the red asterisk) for a brief description of how the case was resolved.
Total Time: Microsoft CRM automatically calculates and fills in the Total Time field. Total time is defined as the sum of time spent on all activities associated with the resolution of the case. CRM recognizes the following activities in the total time calculation; task, fax, phone call, letter, e-mail, and appointment.
Billable Time: A required field that defaults to total time, but you override it to adjust for the actual time to bill on the case. If this activity is linked to a contract, the billable time you indicate here is applied against the total time listed in the contract.
Description: A note field to any case-related information not covered in the actual case. This is a good place to put the resolution results.
Click OK.
The Resolve Case dialog box closes. Note that the case status updates to Resolved in the lower left corner of the Case window.
If a customer calls with a recurrence of a previously resolved problem, you need to reopen or reactivate the case. Follow these steps:
In the Cases window, select My Resolved Cases or All Resolved Cases from the View drop-down menu.
A list of all your resolved cases appears.
Double-click the case you want to reactivate.
In the menu bar (at the top of the screen), choose Actions?Reactivate.
The Reactivate Confirmation dialog box appears.
Click OK.
The case status in the lower left corner of the Case window appears as Active.
As you can see, Microsoft CRM offers extensive choices to help you better serve your customers, with almost everything just a few clicks away.