
Before we can create Content Types, we need to define all of the individual Site Columns that will appear (ultimately) in our SharePoint lists. First, please look at the rather extensive set of Site Columns you get "out-of-the-box" and please feel free to reuse them instead of duplicating something similar.
Note
The Site Columns available will depend first on the version of SharePoint you have available - Foundation, Standard, or Enterprise. Secondly, on which features (Standard, Enterprise, and Publishing) are enabled at the Site Collection and Site level.
In our case, we will be defining a document library to hold our proposals. We are going to define the following additional Site Columns that we require:
- Proposal Amount: Number
- Proposal Client: Single line of text
- Proposal Type: Choice field
Note
For simplicity of the example, the client is a single line of text. This could have been another long list (the client list) and we could then define a "lookup" to be able to choose the client (for example, from a drop-down menu) for the proposal.
We will create the Visual Studio project that we will be working with in this chapter:
- Open Visual Studio 2010. From the File menu, select New | Project.
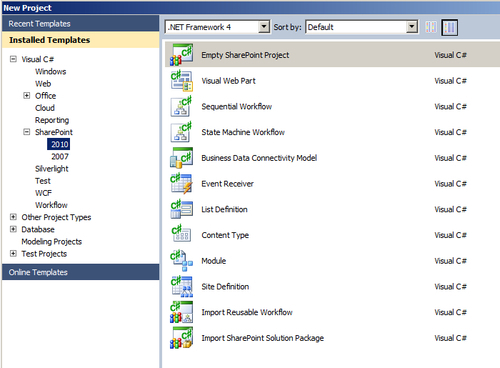
- From the Installed Templates, navigate to the SharePoint 2010 section and select Empty SharePoint Project. In my case, I have named my project SP2010ProposalLibrary.
Take a moment to look at the available Visual Studio SharePoint 2010 templates available to us. We will be taking advantage of some of these in the future chapters, such as the Visual Web Part in the next chapter:
- On the SharePoint Customization Wizard screen, type in the "Chapter 2 URL" in the box What local site do you want to use for debugging?. Please select Deploy as a FARM solution and click on Finish.
- In the Solution Explorer, right-click on the project and select Add | New Item.
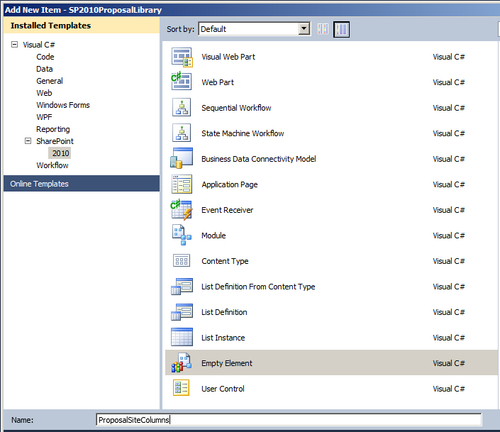
- From the Installed Templates for SharePoint 2010, select Empty Element. Provide a name such as ProposalSiteColumns. Take a moment to view all of the available project items. There is not one specifically for Site Columns, but shortly we will be taking advantage of the items for Content Type and for List Definition. Click on Add:
- You will see that a Feature was added called Feature1! We will review this in more detail later. For now, right-click on the node that says Feature1 and select Rename. Change the name to ProposalLibrary.
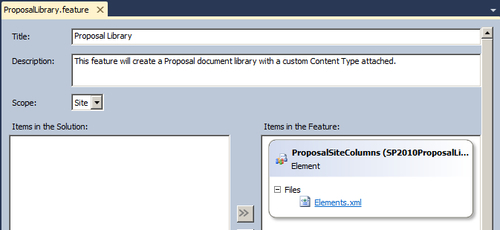
Double-click on the Proposal Library Feature to see the Designer. Change the Title to something more meaningful such as Proposal Library as well as the Description. Change the Scope from Web (meaning a Site Feature) to Site (meaning a Site Collection Feature). As a best practice, I always recommend deploying Site Columns and Content Types to the Site Collection Feature level:
Note
OPTIONAL: It is professional to add an icon (image) to your Feature. If you wish, choose any image formats can be PNG, JPG, or ICO. Target an image size around 32 x 32, although this is not strict for dimension. Typically, you may choose a company logo or such.
To add the image to your Feature:
- Right-click on your project and choose Add | SharePoint Images mapped folder.
- Click on the SP2010ProposalLibrary folder that was created. Right-click on the folder and select Add | Existing Item. Navigate to the location for your image.
- Double-click on the ProposalLibrary Feature to expose the properties window. Locate the Image URL property and type in the path and image relative to the images folder. In my case, it is
SP2010ProposalLibrary/OpenHighwayLogo.png.
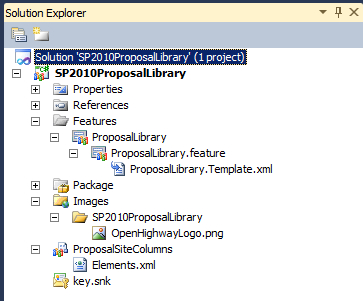
Your Solution Explorer should now look similar to the following:
Get ready to generate GUIDs! You will need to generate a lot of GUIDs as a SharePoint developer, as every unique thing you define will require a GUID. For example, Each Site Column, each Content Type, each Feature, each SharePoint Solution require unique GUIDs. GUIDGEN.exe installs with Visual Studio
- From Visual Studio 2010, you can select the GUIDGEN tools from the Tools menu.
- If it does not appear there, go to the Windows Start menu and type in GUID and choose GUID Generator. The following screen will appear. You can generate a New GUID (shows in the Result section) and use Copy to copy the value to the clipboard, which you can then Paste into Visual Studio. Select the Registry Format. Go ahead and "copy" a GUID now.

Ok, this is not the most exciting development you will do in your lifetime, as you will simply be hand typing some XML:
- Open up the
ElementsXML file underneath ProposalSiteColumns. Enter the following XML. You can type in these very GUIDs, or you can generate your own in place of the ones provided:<?xml version="1.0" encoding="utf-8"?> <Elements xmlns="http://schemas.microsoft.com/sharepoint/"> <Field ID="{9F5F7490-93E7-45E1-80BE-D8FCF7000BFD}" Group="Packt Publishing Columns" Type="Currency" Name="ProposalAmount" DisplayName="Proposal Amount" ShowInDisplayForm="TRUE" ShowInNewForm="TRUE" ShowInEditForm="TRUE" Required="TRUE" /> <Field ID="{4B2E0D5D-CD83-4426-A1FC-C9C22AF8A48C}" Group="Packt Publishing Columns" Type="Text" Name="ProposalClient" DisplayName="Proposal Client" ShowInDisplayForm="TRUE" ShowInNewForm="TRUE" ShowInEditForm="TRUE" Required="TRUE" /> <Field ID="{0907E678-2BED-496E-BE96-B3007BED6555}" Group="Packt Publishing Columns" Type="Choice" Name="ProposalType" DisplayName="Proposal Type" ShowInDisplayForm="TRUE" ShowInNewForm="TRUE" ShowInEditForm="TRUE" Required="TRUE" > <CHOICES> <CHOICE>Internal</CHOICE> <CHOICE>External</CHOICE> </CHOICES> </Field> </Elements> - Right-click the SP2010ProposalLibrary project and select Deploy Solution. Wait until you see the Deploy Succeeded message in the bottom left-hand corner of Visual Studio.
Let us go and verify that our Feature had been deployed and our Site Columns are defined.
- Navigate to the Chapter 2 site. Select Site Actions | Site Settings.
- Click on Site Collection Features that appears under the Site Collection Administration section. Notice that the Proposal Library is there and is activated:

- Select Site Actions | Site Settings. Select the Site columns link in the Galleries section. Scroll down and you will see our three custom Site Columns in the Packt Publishing section:

Congratulations! You have created your first real Feature with Visual Studio 2010 SharePoint 2010 developer tools; created some Site Columns, deployed them to the sample site, and activated the Feature.
Here is some further information and explanation regarding Site Columns and the meaning of the Elements.xml file:
While these are not all the possible types of columns you can create as Site Columns, here are some of the most common ones:
Elements.xml is a file that contains "provisioning instructions". In this case, instructions for creating several "Field" elements, also known as Site Columns. As we examine more SharePoint items, you will see different types of instructions. There can be one or more Elements.xml files in the SharePoint Solution file, and each of these instruction files will be referenced in the feature.xml file.
Note that Elements.xml is the default and the usual name for the file that contains provisioning instructions. However, the name can be one of your choice, and possibly more helpful such as ProposalSiteColumns.xml.