
You can write a book on LINQ. Many books, in fact, have been written on LINQ. I suggest you seek out 101 LINQ Samples on MSDN to get a feel for the vaguely SQL-like syntax for querying data. You can use LINQ to query just about anything, as Microsoft has "providers" for SQL data, XML, objects, and now…. SharePoint! The role of the provider is to translate the LINQ query into the "native" query format in the case of SharePoint that is actually CAML (Collaborative Application Markup Language).
But to use LINQ against SharePoint, you need a "data context" - physically a C# class that is generated from the data source - meaning in our case the SharePoint lists in your site. There is a command-line utility called SPMetal.exe, whose purpose in life besides having the coolest name Microsoft has come up with is to generate said C# file when pointed at a SharePoint site.
It is a bit of a bother to run that utility, so the recently available Visual Studio 2010 SharePoint Power Tools integrate this tool into Visual Studio. It was a suggested part of your development environment setup in Chapter 1, Setting Up a Development Environment, but we will download this as part of the Getting ready exercise.
First, we need to create a site collection for this chapter:
- Go to Central Administration and click on the link for Create Site Collections.
- Ensure the correct web application is selected. Enter Chapter 5 for the title and Chapter5 in the textbox for the URL.
- Leave the Template Selection defaulted to Team Site, and enter administrator for the Primary Site Collection Administrator.
- Leave all other options at their default values. Scroll to the bottom and click on Ok.
- When the Top Level Site Successfully Created screen appears, click on the link provided. Bookmark the site to your favorites.
Note
IMPORTANT NOTE: I will refer to this site in this chapter as the Chapter 5 URL, for later purposes of creating Visual Studio 2010 projects. For example, in my case, this URL is http://intranet.theopenhighway.net/sites/Chapter5: .
The Feature Stapling from Chapter 2, SharePoint Development with Visual Studio, has resulted in the automatic creation of the Proposal library we will be querying. Create six or more Proposals called "Proposal1", "Proposal2", and so on. Ensure the amounts are different as our Top 5 will be based upon this amount.
I strongly recommend you download the following productivity tool. It is a brilliant little Visual Studio Server Explorer extension from fellow SharePoint MVP Waldek Mastykarz that will greatly help with your SharePoint LINQ development. I will be using it during the recipe:
- Use your favorite search engine to find "Imtech Get SPMetal Definition Extension". Download and install the software.
- We will create the Visual Studio project that we will be working with in this recipe. Open Visual Studio 2010. From the File menu, select New | Project.
- From the Installed Templates, navigate to the SharePoint 2010 section and select Empty SharePoint Project. In my case, I have named my project Chapter5LINQWebPart.
- On the SharePoint Customization Wizard screen, type in the Chapter 5 URL in the box What local site do you want to use for debugging?. Ensure that you select Deploy as a FARM solution and click on Finish.
- In the Solution Explorer, right-click on the project and select Add | New Item.
- From the Installed Templates for SharePoint 2010, select Web Part (Note: Do NOT select Visual Web Part). Provide the name WebPartLINQProposals. Click on Add.
- Rename the Feature from Feature1 to WebPartLINQProposals. Open the Feature Designer and provide a Title and Description for the Feature.
- Optional: As we did in Chapter 2, add an image and set the
ImageURLproperty of the Feature.
Your Solution Explorer should now look similar to the following:

First we need to generate our Data Context. And Waldek's utility is going to help us out. And it gives us an opportunity to check out the SharePoint Connections section of Server Explorer!
- Open the Server Explorer (same area as your ToolBox). If you do not see it, then you will find it under the View menu of Visual Studio.
- Right-click on SharePoint Connections and add the Chapter 5 URL of your site collection.
- Expand the nodes. Expand into Lists and Libraries, and then Document Libraries. Your Server Explorer should look similar to the following:

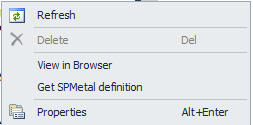
- Right-click on Proposals and select Get SPMetal definition:
- Wait patiently, and a
Proposals.csfile will appear in your Visual Studio Solution. Open theProposals.csfile to examine the generated content. You will see the definition for the ProposalsDataContext exactly what we will need for SP LINQ!
Now it is time to write our first SharePoint LINQ Query!
- Open the
WebPartLINQProposals.csfile and add the following code in theCreateChildControlsmethod. The first thing we should do is ensure that the Proposals list actually exists in this site (that is, the Proposal Library Feature has been activated on this site):const string PROPOSAL_LIBRARY = "Proposals"; Label myLabel1 = new Label(); SPWeb site = SPContext.Current.Web; string siteUrl = SPContext.Current.Web.Url; // Make sure the site you are placing the web part on actually // has a Proposals list defined! SPList proposals = site.Lists.TryGetList(PROPOSAL_LIBRARY); if (proposals != null) { //TODO: LINQ Query to retrieve proposals } else { // Likely, the Proposal Library feature has not been // activated on this site myLabel1.Text = "There is no proposal list on this site."; this.Controls.Add(myLabel1); } - In place of
TODO: LINQ Query to retrieve proposalsfrom the preceding code, add the following code. Here we are performing the actual LINQ query and ensuring that we have at least one result (that is, the Proposals list could be empty):#region LINQ Query to retrieve proposals ProposalsDataContext pdc = new ProposalsDataContext(siteUrl); // Here we sort proposals in descending amount order. // Be sure to only select the fields we specifically need, // and use the opportunity to give them a "friendly" name. var query = from proposal in pdc.Proposals orderby proposal.ProposalAmount descending select new+ { Name = proposal.Name, Client = proposal.ProposalClient, Amount = proposal.ProposalAmount, }; if (query.Count() == 0) { //The proposal library is currently empty myLabel1.Text = "There are currently no Proposals."; this.Controls.Add(myLabel1); } else { //TODO: Create link buttons for top 5 proposals } #endregion - In place of
TODO: Create link buttons for top 5 proposalsfrom the preceding code, add the following code. Here we "take" the top 5 (Take is a LINQ Extension method), and then format the results into a list of links. That is, clicking the link will download the document:#region Create link buttons for top 5 proposals // Take the top 5 proposals var top5Proposals = query.Take(5); myLabel1.Text = "Here are the top 5 Proposals:"; this.Controls.Add(myLabel1); this.Controls.Add(new HtmlGenericControl("br")); foreach (var thisProposal in top5Proposals) { LinkButton proposalLink = new LinkButton(); string formatAmount = ((double)thisProposal.Amount).ToString("C2"); proposalLink.Text = thisProposal.Client + "(" + formatAmount + ")"; proposalLink.PostBackUrl = siteUrl + @"/" PROPOSAL_LIBRARY + @"/" + thisProposal.Name; this.Controls.Add(proposalLink); } #endregion - Open the
Elements.xmlfile and change the group to your own value in my case "Open Highway". - Open the
WebPartLINQProposals.webpartfile and provide a title and description for the Web Part.
That is it! Now we can deploy and test our Web Part:
- Press F5 to deploy the Solution and enter the debugging mode.
- From the home page, put the home page in edit mode. Place your cursor under the welcome text. From the Insert tab in the ribbon, click on the Web Part icon. Under the category you created in the
.webpartfile (in my case Open Highway), select the Proposals Web Part and click on Add. - You should see something similar to the following:
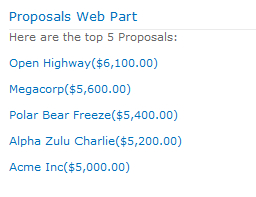
- By clicking on any of the links, you will download the corresponding document.
Congratulations! You have accomplished your first "real" data access in SharePoint 2010 using the new capabilities of LINQ to SharePoint. This forms a core and common task in SharePoint development creating a Web Part that queries SharePoint data and performs some type of "content roll up" and display.