
To me, and put simply, Silverlight is Microsoft's answer to Adobe Flash, as both provide the ability to deliver Rich Internet Applications (or RIA). The high visual appeal is often highlighted in these types of applications, but as a developer this is the web's way of creating a fully client-side running application, in our case executing in the Silverlight run time environment. It is also my developer way of saying that I cannot Graphic Design my way out of a wet paper bag. Please do not count on any stunning visuals in this section.
While I know that WPF and Silverlight are quite different, I like to think of Silverlight as WPF's younger cousin in that they both rely on creating user interface by painting canvases of XAML (eXtensible Application Markup Language).
Fortunately, SharePoint 2010 now provides integrated support for hosting Silverlight applications, and as a matter of fact uses Silverlight itself to replace the boring old user interface that used to be there. For example, if you use Site Actions | More Options to create a new list or library, the selection of the list or library type is a Silverlight application.
You could, with some effort, integrate Silverlight applications into SharePoint 2007, but the real problem was getting SharePoint data "there" (remember, client-side) in the running application because I found the old lists web service (lists.asmx) relatively clumsy and unusable.
In a similar fashion to the Windows Application, we will use the SharePoint Client Object Model to get the data to our Silverlight application.
Note
The SharePoint Client Object Model references for each type of application .NET Client, Silverlight, and ECMAScript (next section) are different. That is why you will see this referred to specifically as the .NET Client OM, the Silverlight Client OM, and the ECMAScript Client OM. Also the mechanisms change the .NET Client OM is a synchronous model (you wait for the answer when you ask for it) and both Silverlight and ECMAScript are asynchronous (a callback function will be triggered to deliver the result).
We will create the Visual Studio project that we will be working with in this recipe:
- Open Visual Studio 2010. From the File menu, select New | Project.
- From the Installed Templates, navigate to the SharePoint 2010 section and select Empty SharePoint Project. In my case, I have named my project Chapter5ClientOMSilverlight.
- On the SharePoint Customization Wizard screen, type in the Chapter 5 URL in the box What local site do you want to use for debugging?. Ensure you select Deploy as a SANDBOXED solution and click on Finish.
Note
No, that was not a typo please ensure you select SANDBOXED solution, which will be explained in more detail later.
- From the File menu, select Add | New Project. In the Installed Templates section, select Silverlight and then select Silverlight Application. Provide a name such as SilverlightClientOM and click on OK.
- Uncheck the box Host the Silverlight application in a new website and click on OK.
- When the MainPage.xaml appears, I took a quick moment to change the background color. As I want to feel more in tune with emerging technology, I chose the background color "Azure".
- In the Solution Explorer, right-click the references of the SilverlightClientOM project and choose Add Reference. You will (inconveniently) need to use the Browse tab and navigate manually to the
C:Program FilesCommon FilesMicrosoft SharedWeb Server Extensions14TEMPLATELAYOUTSClientBinfolder. - Add references for both Microsoft.SharePoint.Client.Silverlight and Microsoft.SharePoint.Client.Silverlight.Runtime.
- In the Solution Explorer, right-click on the Chapter5ClientOMSilverlight (the empty SharePoint) project and select Add | New Item.
- From the Installed Templates for SharePoint 2010, select Module. Provide the name SilverlightClientOM and click on Add. Be sure to right-click and delete the
Sample.txtfile that was automatically created. - Note that when we added the module, we automatically got a Feature. Rename the Feature from Feature1 to SilverlightClientOM. Open the Feature Designer and provide a Title and Description for the Feature.
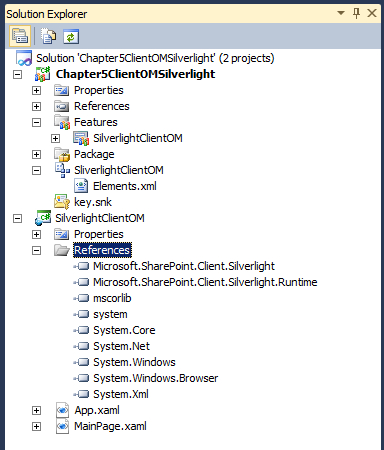
Your Solution Explorer should now look similar to the following:
As this is a "Sandboxed" solution, this execution model relies on a very specific SharePoint service that we need to start:
Note that a Silverlight application is packaged as a XAP file (in an analogous way that the SharePoint solution is packaged as a WSP file). The XAP file is the official output of this type of Visual Studio project, as a DLL would be the official project output of a class library. Finally, for our case, the Silverlight application must be loaded into SharePoint and that means we have to get the XAP file physically from somewhere. That "somewhere" will be the out-of-the-box "Site Assets" library for your site. You can view the Site Assets library from Site Actions | View All Site Content.
Our first recipe must then deal with the SharePoint deployment aspects of the Silverlight XAP file. We will include the Silverlight project output (XAP file) as part of our Solution, and then deploy it to our site into the Site Assets library:
- In the Chapter5ClientOMSilverlight project, click on the SilverlightClientOM module and note the properties:
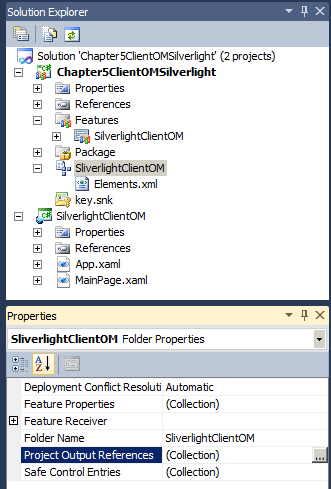
- Click on the ellipses of the property Project Output References. Click on Add. When you change the drop-down selection for Project Name to SilverlightClientOM and the Deployment Type drop-down to ElementFile you will see the following:

- Click on OK.
- Under the SilverlightClientOM module folder, open the Elements.xml file. By default, it wants to deploy our XAP file to a URL (a document library) that matches our Silverlight project name. Change SilverlightClientOM to SiteAssets in the URL property. This file should now look as follows:
<Elements xmlns="http://schemas.microsoft.com/sharepoint/">
<Module Name="SilverlightClientOM">
<File Path="SilverlightClientOMSilverlightClientOM.xap" Url="SiteAssets/SilverlightClientOM.xap" />
</Module>
</Elements>
- Silverlight applications can be easily hosted in SharePoint with the Silverlight Web Part. We are going to verify our work to date by adding the Silverlight Web Part to our home page and configuring it. Press F5 to build and deploy your application. Click on Attach on the Attach Security Warning dialog.
- When the home page opens, go to Site Actions | View All Site Content and choose the Site Assets Library. Verify that the Silverlight XAP file was correctly deployed as follows:

- Go back to the home page and put the home page in edit mode. Place your cursor under the welcome text. From the Insert tab in the ribbon, click on the Web Part icon. Under the Media and Content category, select the Silverlight Web Part and click on Add. Enter the full path for the URL and click on OK in my case it is
http://intranet.theopenhighway.net/sites/Chapter5/SiteAssets/SilverlightClientOM.xap. At the same time I changed the Title property under the appearance section to Top 5 Proposals. Click on OK on the Web Part properties dialog and save your page edits. - You should now see the Web Part appear on the page as a rather uninteresting Azure colored square.
This first little recipe is once again applicable to any Silverlight application you wish to develop in SharePoint.
Now it is time to use the Silverlight Client Object Model to show the top 5 proposals in our Silverlight Web Part:
- Open the
MainPage.xaml.csfile, and add the following code immediately above theMainPagemethod, in order to declare the required variables:int labelPositionYStart = 10; int labelPositionYIncrement = 30; const string PROPOSAL_LIBRARY = "Proposals"; // Replace the following with your web application const string WEB_APP_URL = "http://intranet.theopenhighway.net"; private Web site; private ListCollection siteLists; private List proposalList; private CamlQuery camlQuery; private ListItemCollection proposalItems;
- Add the following
usingstatement:using Microsoft.SharePoint.Client;
- Add the following code as a new method below the
MainPagemethod, which will create the series of hyperlinks for the top 5 proposals when the query is returned:private void CreateHyperLinks() { // THIS method is running on the UI thread int i = 0; foreach (ListItem proposalItem in proposalItems) { // Format the hyperlink based on the information for // this proposal double doubleAmount = (double)proposalItem["ProposalAmount"]; string formatAmount = doubleAmount.ToString("C2"); string proposalText = proposalItem["ProposalClient"] + " (" + formatAmount + ")"; // Create a windows link label control and dynamically add // it to the Windows Form controls collection. HyperlinkButton hlb = new HyperlinkButton(); int labelPositionY = labelPositionYStart + (i * labelPositionYIncrement); hlb.Width = 400; hlb.NavigateUri = new Uri (WEB_APP_URL + (string)proposalItem["FileRef"] ); hlb.Margin = new Thickness(10, labelPositionY, 0, 0); hlb.Content = proposalText; LayoutRoot.Children.Add(hlb); i++; } } - Add the following two methods immediately above the
CreateHyperLinksmethod you just added. These are the call back functions for the asynchronous call to the client service:private void OnRequestSucceeded(Object sender, ClientRequestSucceededEventArgs args) { // Classically, this callback executes on a "background thread", // and therefore you will find yourself without access to // create controls on the Main Page. So, we give control back // to a method on the main UI thread using BeginInvoke Dispatcher.BeginInvoke(CreateHyperLinks); } private void OnRequestFailed(Object sender, ClientRequestFailedEventArgs args) { // Handle error, display error message } - Add the following code within the MainPage method, and immediately below the InitializeComponent() statement. Similar to the previous recipe on the .NET Client Object Model, this will prepare the CAML query and send it to the server for execution:
string SiteCollectionURL = ApplicationContext.Current.Url; using (ClientContext clientContext = new ClientContext(SiteCollectionURL)) { site = clientContext.Web; siteLists = site.Lists; proposalList = siteLists.GetByTitle(PROPOSAL_LIBRARY); camlQuery = new CamlQuery(); camlQuery.ViewXml = "<View>" + "<Query>" + "<OrderBy>" + "<FieldRef Name='ProposalAmount' Ascending='False' />" + "</OrderBy>" + "</Query>" + "<RowLimit>5</RowLimit>" + "</View>"; proposalItems = proposalList.GetItems(camlQuery); // The Load command batches up our commands. Nothing actually // happens yet. If you check out the actual ListItemCollection // that is proposalItems, you will note it is still "null". clientContext.Load(proposalItems); // Now the commands are sent to the SharePoint server via // the Client.svc. When this line of code completes, you will // note that proposalItems is now populated! The server has // returned the object back to the client. clientContext.ExecuteQueryAsync(new ClientRequestSucceededEventHandler(OnRequestSucceeded), new ClientRequestFailedEventHandler(OnRequestFailed)); } - Press F5 to run deploy and run the Silverlight application. When the home page appears you should see a result similar to the following. Try clicking on a link and you will be prompted to download/view the Microsoft Word document:

Congratulations! You have successfully created a Silverlight application that uses the Client Object Model to retrieve the top 5 proposals from the Proposals Library.
A Sandbox Solution (versus Farm Solution) is simply an alternative method of deployment that has a different execution model. The differences are:
- Where the SharePoint solution file ( WSP) is deployed
- How the code is loaded and executed
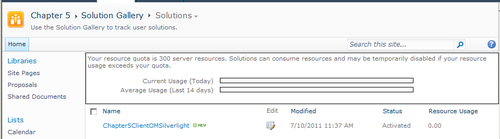
To address the first point, a Sandbox Solution is deployed and activated at the Site Collection level, not the Farm level. There is a special gallery called the Solutions gallery, which is just a special library for WSP files. By the way, "yes", this also implies that you would by definition need to deploy this feature to the Solution gallery of each site collection where you wanted to use this Silverlight application.
From Site Actions | Site Settings, click on the Solutions link that appears under the Galleries section. You will see our Chapter5ClientOMSilverlight Solution (WSP file) as Activated.
If you go to the Site Features page (from Site Settings), you will see our Feature appear, activated, "as normal":
Our second point was in how the code is executed. Remember in the Getting ready section that you had to ensure the "Sandboxed Code Service" was running on the server? To execute the code, it is NOT loaded in process with the IIS Application pool worker process (w3wp.exe), but rather an instance of a "sandbox" process (SPUCWorkerProcess.exe). Feel free to check out the processes in Task Manager to verify this. This means the code is running in a "sandbox" a safe, secure, and isolated process. For example, if the application were to fatally crash, it would only take out the sandbox, not your whole web application where, I assure you, your Farm Administrators would not be so pleased!
There is a whole new world to Sandboxing you should explore - such as the ability to assign resources and quotas to the solutions. And also limitations such as you can only use a subset of the SharePoint object model. Please take time to research your Sandbox options online.