
In this recipe, we will implement the Visio 2010 workflow created in the previous recipe, and we will accomplish this by using SharePoint Designer 2010.
Now we will import, implement, and enhance the workflow in SharePoint Designer 2010:
- Open SharePoint Designer 2010 to the Chapter 7 URL. In the Navigation section, click on Workflows.
- In the ribbon, click on the Import from Visio button. On the dialog that pops up, browse to the ProposalAmountWorkflow.vwi file. Click on Next.
- In the Import Workflow from Visio Drawing dialog, provide a workflow name such as Proposal Amount Approval, and run this as a List Workflow against the proposals list. Click on Finish:

- The workflow edit screen will open. Fill in all of the Log to History list messages appropriately. Change the title box of the workflow.
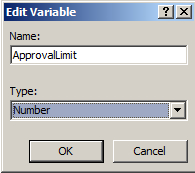
- We will use a variable to hold the dollar limit that will trigger an approval. In the ribbon, click on Local Variables. On the Edit Variable dialog, provide the Name ApprovalLimit and Type as Number:
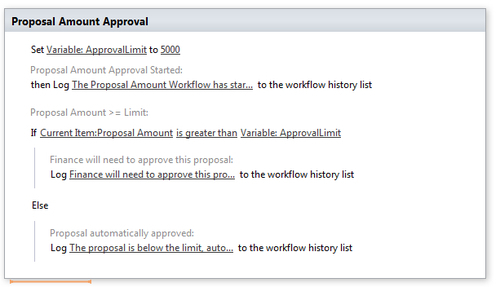
- Place your cursor at the top of the workflow (above the text Proposal Amount Approval Started). From the Actions ribbon, select Set Workflow Variable. Click on workflow variable and choose Variable: ApprovalLimit. Click on value and enter 5000.
- For the value this test value, click on the first value and click on the fx button. Choose Current Item and Proposal Amount and click on OK:

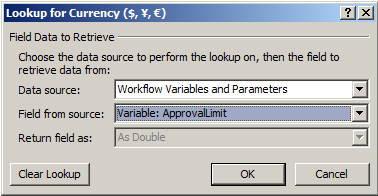
- Click on this test and choose is greater than. Click on the second value and click on the fx button. Choose Data source as Workflow Variables and Parameters and choose Field from source as Variable: Approval Limit:
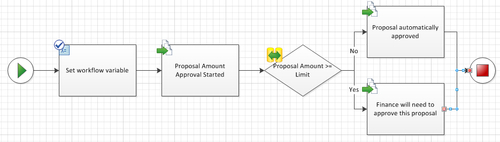
- Your workflow should now look as follows:
- In the ribbon, click on Workflow Settings. In the Settings section of the screen, select the Show workflow visualization on status page checkbox.
- In the ribbon, click on Check for Errors | Save | Publish.
- In the ribbon, click on the Export to Visio button, and name the updated file ProposalAmountWorkflow_updated.
It is now time to test our workflow! Note that we have already associated this workflow directly with the Proposals list with SharePoint Designer. So the workflow is ready to go:
- Navigate to the Chapter 7 URL and the Proposals library. Ensure that you have one proposal available that is for $5,000 or less, and one proposal that is for more than $5,000.
- Select the proposal that is for $5,000 or less, and run the Proposal Amount Approval workflow. Start the workflow by clicking on the Start button when prompted. The workflow will finish immediately.
- In the Proposals library, click on the Completed link for the workflow you just ran. First of all note the awesome new "workflow visualization" capabilities of SharePoint 2010! This is accomplished courtesy of Visio Services, but note this is not simply a Visio diagram of your workflow. Look carefully at the green check marks it actually visually shows the path through the workflow and the path through the compare shape (for example, proposal automatically approved)!

- Note further down the workflow status page that our History Log entries appear as expected for this proposal:

- Now run the workflow again for a proposal that is over $5,000. Go to the workflow details when the workflow completes. Note the Visio diagram depicts the path to "Finance" and the Workflow History appears as expected:

Congratulations! As you can see, a workflow can rapidly be designed in Visio 2010 and quickly implemented and tested using SharePoint Designer 2010. This is a mere scratch on the surface of developing workflows using these tools. The possibilities are nearly limitless keeping in mind that to date I have not yet had to use Visual Studio 2010 to develop a custom workflow. Visio and SharePoint Designer have so far been up to the challenge of creating the custom workflow scenarios I have so far encountered in SharePoint 2010.
We are able to work seamlessly back and forth between Visio 2010 and SharePoint Designer 2010. Note that during the implementation of the above SharePoint Designer workflow, it was enhanced by adding a "Set Workflow Variable" step. This means the original diagram you presented to the user is now out of date. Or perhaps some documentation you created for the workflow is out-of-date.
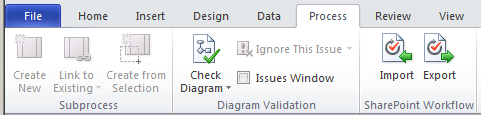
In the last step before we tested the workflow, we had already exported the updated Visio Workflow Interchange (VWI) file. Open a new (blank) Microsoft SharePoint Workflow in Visio 2010. In the ribbon on the Process tab, click on the Import button:
Browse to the file you had previously created, ProposalAmountWorkflow_updated.vwi and note our updated diagram similar to what you have seen in the workflow visualization, now appears in Visio:
So let us say now we are satisfied that the logic works for testing the proposal amount, and you are ready to start assigning actual tasks to the Finance department. Go ahead and use Visio to complete the workflow visually. Export the updated diagram and re-import it back to SharePoint Designer. Everything you had previously implemented is preserved, and you can focus on the implementation of the new elements.