
The out-of-the-box approval workflow is awesome and the majority of workflows in my experience tend to be some form of approval. The number one frustration with the previous version (2007) of the approval workflow was that it was not customizable. One small change request, no matter how trivial, meant creating an approval type workflow entirely from scratch. In SharePoint 2010, you are 100 percent able to leverage the out-of-the-box approval workflow using SharePoint Designer 2010!
If you have been jaded in the past by turning to the previous version of SharePoint Designer and its severe limitations on workflow development, I encourage you to look again! SharePoint Designer 2010 is a spectacular leap forward in SharePoint 2010 workflow development capabilities!
Now, I recommend you never, ever "touch" something provided out-of-the-box, so you will be directed first to make a copy of the out-of-the-box approval workflow, and then make your changes to that copy. Firstly this is a safety net in case anything goes terribly wrong with your changes, but importantly if anyone goes to use the "out-of-the-box approval" and it has in fact been changed, they will be mystified as to why it is not working the way they would expect.
Let us get ready by making a copy of the out-of-the-box workflow:
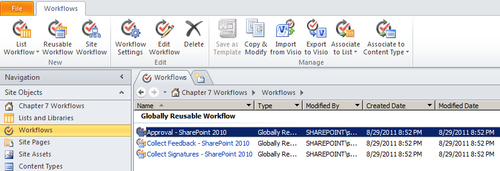
- Open the Chapter 7 URL in SharePoint Designer 2010. In the Navigation section click on Workflows. Ensure the approval workflow is highlighted. In the Workflows ribbon, click on Copy and Modify:
- In the Create Reusable Workflow dialog, name the workflow template External Proposal Approval. Modify the description if you wish. Choose Content Type as Proposal from the drop-down. Click on OK:

- You are ready to begin modifying this workflow!
In this recipe, the goal is to modify the workflow so that only Proposal Types of External will go through the approval process. Otherwise the proposal will automatically be approved. In either case, we should write to the History Log to show what type of proposal it was:
- I will be referring to the following commands in the workflow ribbon:

- Your workflow edit screen currently appears as follows. Where the flashing orange bar is will be referred to as the "cursor":

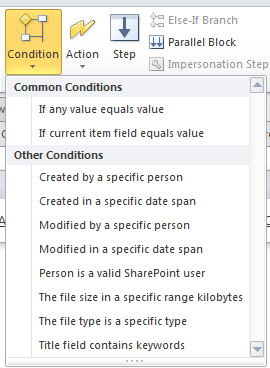
- Developing a SharePoint Designer 2010 workflow is basically a series of Conditions and Actions. Click on the Condition drop-down and choose If current item field equals value:
- Click on the text "Step 1" and rename it. Click on the action Start Approval Workflow task.., and then click on Move Up in the workflow ribbon. Your screen should look as follows:

- Click on the field link and you will get a drop-down choice, choose Proposal Type. Click on the value link and you will get a drop-down list of choices choose External.
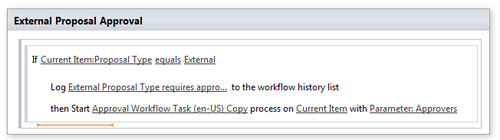
- Click immediately above Start Approval to place your cursor there. From the Action drop-down, choose Log to History List:

- Click on the this message link in the log to history list action. Type External Proposal Type requires approval as the message. Click immediately below the Start Approval Workflow" action to place your cursor there. The workflow should look as follows:
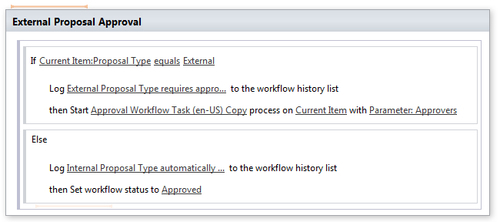
- Click on the Else If Branch icon in the workflow ribbon. From the Action drop-down, choose Log to History List. Click on the this message link in the Log To History List action. Type Internal Proposal Type automatically approved as the message.
- Immediately click below this newest log to history action. From the Action menu, choose Set Workflow Status. If the workflow status does not show Approved, then click on the status and set the choice to Approved. The workflow should now look as follows:
- In the ribbon, click on Check for Errors. After some time you should see a message box that states The workflow contains no errors. Click on OK.
- In the ribbon, click on Save. After the workflow is saved, click on Publish Globally.
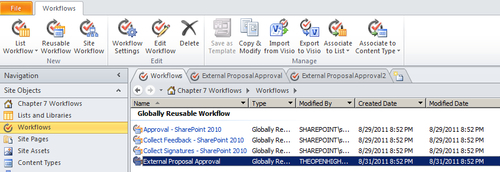
- Go back to the Workflows link in the left-hand Navigation section. Highlight the External Proposal Approval workflow:
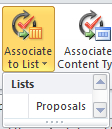
- Now click on the Associate to List icon and select Proposals:
- The Add a Workflow screen will open in the browser. For whatever bizarre reason, the Content Type does not default to Proposal! Change the Content Type to Proposal. Name the workflow my External Approval. Click on Next:

- See the previous recipe for filling out the Association Form. Click on Save.
We can now test your workflow:
- Choose a proposal of type Internal. Start the my External Workflow. Note the workflow ends right away with a status of approved. From the proposal library, click on the Approved link. Note the workflow history was written as expected.

- Choose a proposal of type External. Start the my External Workflow. From the proposal library, click on the In Progress link. Note the workflow history was written as expected with the message External Proposal Type requires approval. Also note a task has been assigned. Feel free to complete the task in order to finish the workflow.
Copying and modifying an existing out-of-the-box workflow is an excellent way to maximize the reuse of, say, the approval workflow and minimize the development time of a custom approval workflow.