
Operating Systems
Domain Objectives
• 1.1 Compare and contrast common operating system types and their purposes
• 1.2 Compare and contrast features of Microsoft Windows versions
• 1.3 Summarize general OS installation considerations and upgrade methods
• 1.4 Given a scenario, use appropriate Microsoft command line tools
• 1.5 Given a scenario, use Microsoft operating system features and tools
• 1.6 Given a scenario, use Microsoft Windows Control Panel utilities
• 1.7 Summarize application installation and configuration concepts
• 1.8 Given a scenario, configure Microsoft Windows networking on a client/desktop

Objective 1.1 Compare and contrast common operating system types and their purposes
32-bit vs. 64-bit
32-bit operating systems can be used with either 32-bit or 64-bit processors. 32-bit processors, once common, are now used primarily by very low-performance tablets. Consequently, most computers and mobile devices use 64-bit operating systems.
RAM Limitations
32-bit operating systems can address up to 4 GB of RAM, while 64-bit operating systems can address much higher amounts. For example, Windows 10 Home 64-bit edition can address up to 128 GB, while Windows 10 Pro, Education, and Enterprise 64-bit editions can address up to 2 TB. The maximum RAM size in a given system is also affected by the chipset and motherboard design. Current motherboards made for 64-bit processors support total RAM configurations much smaller than the maximum limits of these operating systems.

EXAM TIP Be sure to know differences between 32-bit and 64-bit operating systems (RAM sizes, software compatibility).
Software Compatibility
64-bit operating systems are designed to run both 64-bit and 32-bit software, while 32-bit operating systems can use only 32-bit software.
Workstation Operating Systems
Workstation operating systems are used on desktop and laptop computers. These include Microsoft Windows, Apple macOS, and Linux.
Microsoft Windows
Current versions of Microsoft Windows are 7, 8/8.1, and 10. These are available in 64-bit and 32-bit versions. All versions support touch screen, keyboard, touchpad, and mouse interfacing.
Cross-Reference
Apple Macintosh OS
The macOS interface (shown in Figure 1.1-1) has a Desktop, as you’d expect, though you’ll access frequently used, running, and pinned applications through the Dock. The interface features Spaces—essentially multiple Desktops—that can have different backgrounds and programs. You can open Spotlight (COMMAND-SPACEBAR) to search for files and applications, and Apple keyboards use the F3 key (see Figure 1.1-2) to open Mission Control (see Figure 1.1-3), where you switch between desktops, applications, windows, and more. Launchpad displays apps in a grid, and Apple keyboards use the F4 key (refer to Figure 1.1-2) to open it. Apple macOS supports mouse, keyboard, and touchpad interfacing, but not touch screen interfacing.

FIGURE 1.1-1 macOS Sierra desktop

FIGURE 1.1-2 Mission Control (F3) and Launchpad (F4) buttons on a keyboard

FIGURE 1.1-3 Mission Control showing two open apps on Desktop 1, another app in its own window, and three desktops
EXAM TIP Be sure to know the major features of the macOS interface.
Linux
There are many different distributions (distros) of Linux that offer a variety of graphical user interfaces, called desktop environments (DEs), as well as the traditional Terminal command-line interface. The popular Ubuntu Linux 18.04 LTS distro (see Figure 1.1-4) comes with the GNOME 3 DE; frequently used utilities and applications are locked on the Launcher on the left side of the screen. Click Activities to search for new apps. The top-right corner of the desktop provides access to network, volume, and Shutdown options.

FIGURE 1.1-4 Ubuntu Linux 18.04 LTS
EXAM TIP Other popular Linux distros include Fedora, Red Hat Enterprise, CentOS, Debian, Arch Linux, and Raspbian, but the CompTIA A+ 220-1002 exam does not cover differences between distros; it does emphasize common Linux features and basic commands.
Cell Phone/Tablet Operating Systems
Mobile operating systems (that is, OSs for cell phones and tablets) are substantially different than those made for workstations. These operating systems are optimized for touch input, long battery life, and small form factors.
Microsoft Windows
Although Microsoft is phasing out its Windows Mobile smartphone OS, 32-bit versions of Windows 10 are used on low-cost tablets from a variety of manufacturers. 64-bit versions of Windows 10 are used on more powerful tablets such as the Microsoft Surface and Surface Pro.
Android
For simplicity, think of Google Android and iOS as opposites. Android (see Figure 1.1-5) is an open-source OS, based on yet another open platform, Linux. Google writes the core Android code and occasionally releases new versions (named after a dessert or candy), at which point vendors modify it to support unique hardware features or customize the look and feel; this means “Android” differs from vendor to vendor.

FIGURE 1.1-5 Android 7 (Nougat) on a Samsung smartphone
You can purchase and download Android apps through various app stores, such as Google Play and the Amazon Appstore. Android app stores tend to be fairly open compared to the Apple App Store, which imposes tight controls on third-party app developers, and Android makes it easier to install apps downloaded from a website.
EXAM TIP Be sure to know the differences between Android (open source, often modified by hardware vendors) and iOS (closed source, controlled by Apple and used on Apple-branded devices only) for the exam.
iOS
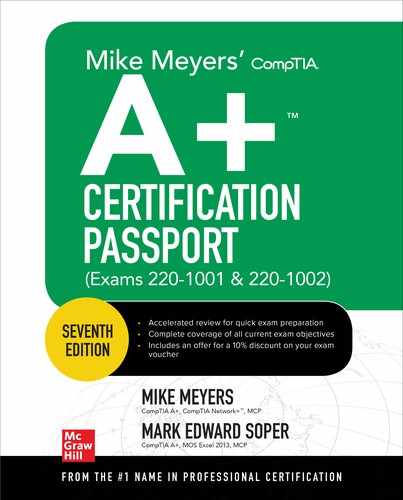
Apple’s closed-source mobile operating system, iOS (see Figure 1.1-6), runs on the iPhone, iPad, and iPod Touch. Apple tightly controls the development of the hardware, OS, developer tools, and app deployment platform. Apple’s strict development policies and controls for third-party developers contribute to its high level of security. iOS apps are almost exclusively purchased, installed, and updated through Apple’s App Store.
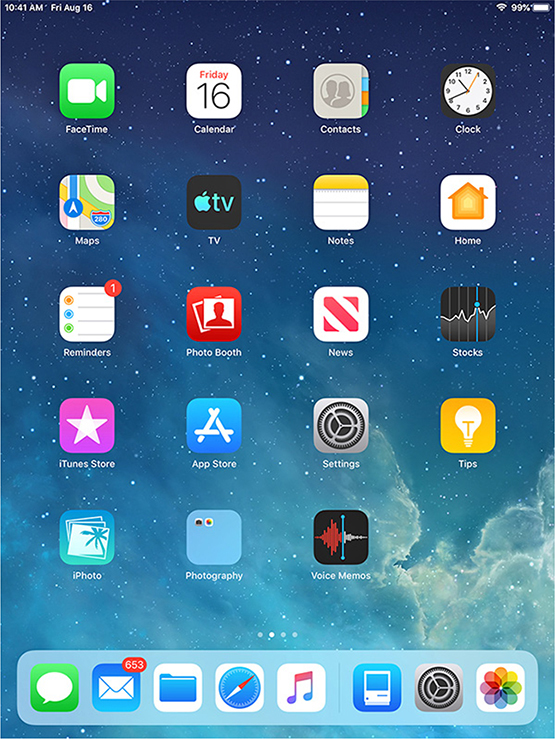
FIGURE 1.1-6 iOS 12.4 on an iPad Mini
Chrome OS
Google Chrome OS is designed for low-cost laptops called Chromebooks that will be connected to the Internet at all times. Chrome OS is browser-based, so it’s an easy OS to use if you’ve used a web browser on any device.
Most recent Chromebooks are also compatible with Android, enabling access to Google Play and its vast array of Android apps. A Chromebook that is Android compatible can also be used offline. Some Chromebooks also feature touch screens. For these reasons, it makes sense for CompTIA to classify Google Chrome OS as a mobile operating system.
Vendor-specific Limitations
Some mobile device and operating system vendors place limitations on what can be done with their operating systems. Google exercises little control over how its open-source Android OS is used and who can modify it. Because Microsoft develops its closed-source Windows 10 OS and then licenses it to device makers, it knows the OS won’t be modified and it controls which devices get a license. Apple doesn’t even license its closed-source iOS, electing instead to retain control and tailor-fit the software to its own devices.
Companies building devices that use an open-source OS such as Android don’t have to share the OS developer’s philosophy. If the OS’s license allows it, each of the device makers can modify the OS before installing it on their own closed-source devices—and never release those modifications. The modifications might only enable special hardware to work, but they can also install apps you don’t want and can’t remove, cause third-party apps to malfunction, or collect information.

NOTE Devices running “Android” with significant closed-source modifications can be so vastly different from familiar Android devices that you have to throw the rulebook out to manage them. We describe what is normal for Android devices, but none of these are rules.
End-of-Life
The term “end-of-life” refers to an operating system or device that is no longer marketed or supported by the vendor. For example:
• Windows XP
• Windows Vista
• MacBook, Air, Pro (some 2011 models and all earlier models)
Hardware that is “end-of-life” might not even be upgradeable. For example, Windows 10 Mobile devices will not be supported after December 10, 2019, and no upgrades to a newer version of Windows will be available.
NOTE Apple uses the term “vintage” to refer to products that have not been manufactured for more than five years and less than seven years ago, and uses the term “obsolete” for products that have not been manufactured for at least seven years. Most vintage products cannot be serviced by Apple (with a few geographic exceptions) and no obsolete products can be serviced by Apple.
Update Limitations
Each vendor has its own specific update limitations:
• Android devices receive updates and upgrades from the hardware vendor. However, many hardware vendors don’t offer updates and upgrades.
• iOS and macOS devices that are less than five years old generally can be upgraded to the latest versions, although in some cases, it might be necessary to upgrade to an older version first.
• Most devices running non-Mobile versions of Windows 7 or later can be updated or upgraded. However, some processors and chipsets don’t support the latest releases of Windows 10.
Compatibility Concerns Between Operating Systems
With very few exceptions, applications made for one operating system generally cannot be used on other operating systems. To make this possible, consider the following options:
• 32-bit versions of an app can usually be run in a 64-bit version of the supported OS, but not vice versa.
• Virtualization enables macOS or Linux to run Windows apps, and vice versa. Virtualization also enables Windows to run Android apps.
• Emulators enable Windows to run iOS apps.
• The Wine compatibility layer enables Linux, macOS, and BSD (a family of UNIX-like OSs) to run some Windows apps.

ADDITIONAL RESOURCES Learn more about Wine at www.winehq.com.
REVIEW
Objective 1.1: Compare and contrast common operating system types and their purposes
• 32-bit processors are found primarily in very low-performance tablets, but 32-bit software can be used by 64-bit processors.
• 32-bit processors are limited to 4 GB of addressable RAM.
• The memory limits of 64-bit processors are much higher than motherboard and RAM designs allow.
• Workstation operating systems are used on laptops and desktops. These include Microsoft Windows, macOS, and Linux. All three use GUIs as their primary user interface.
• Cell phone/tablet operating systems (also called mobile operating systems) include Android, iOS, and Google Chrome OS. Microsoft Windows Mobile is being phased out.
• Operating systems, applications, and devices reach end-of-life status when they are no longer supported by the vendor. Update options vary by vendor and device.
• To enable apps from one operating system to run on another operating system, virtualization, emulators, and compatibility layers can be used.
1.1 QUESTIONS
1. Your application needs 8 GB of RAM to work properly. Which of the following must be true as well about this application?
A. It requires a 32-bit processor, but can use a 64-bit processor.
B. It cannot run on Linux.
C. It must be run on Windows.
D. It requires a 64-bit processor.
2. A user has questions about using a Samsung smartphone after the company switched from Droid smartphones. Which is the most helpful response?
A. They both use Android, so they should work the same way.
B. Let’s set up the Samsung so it looks like the Droid.
C. Vendors can modify Android for their devices, so let me help you with what’s new and different.
D. Ask your boss to get you an iPhone.
3. A user has a pre-2011 MacBook that has a defective hard disk drive and wants to get it replaced. Which of the following options is the best response?
A. Tell the user that the MacBook cannot be repaired.
B. Contact Apple’s vintage parts center for a replacement.
C. Ask the user to call Apple and claim the MacBook has a lifetime warranty.
D. Check third-party sources for compatible drives.
4. A user has asked you for a list of popular Linux distributions. Which of the following does not belong in this list?
A. Fedora
B. Ubuntu
C. macOS
D. Arch Linux
5. Your company’s executive committee has asked you to modify iOS for company-provided smartphones. Which of the following accurately describes why this cannot take place?
A. Apple is a closed-source software vendor.
B. Apple is an open-source software vendor.
C. iOS has no source code.
D. iOS is short for “incomprehensible operating system” and therefore can’t be modified.
1.1 ANSWERS
1. D Only a 64-bit processor supports RAM amounts above 4 GB.
2. C Android is an open-source operating system, so devices from different vendors running Android typically vary a great deal.
3. D Because this device is too old for Apple to service, third-party parts sources are the only way to find a replacement drive.
4. C Although macOS uses many command-line (Terminal) apps that are also supplied with Linux, it is actually based on UNIX.
5. A Apple does not provide its source code to any other vendors.
Objective 1.2 Compare and contrast features of Microsoft Windows versions
All current Windows versions share some structural features; we’ll look at these features first, and then at specific versions.
EXAM TIP Be sure to know the differences between the Windows 7, 8/8.1, and 10 interfaces for the exam.
• Windows boots to the welcome (or login) screen, where you select a user account and provide credentials to log in.
• After logging in on most Windows systems, you’ll be taken to the primary interface for traditional desktop and laptop computers—the Windows Desktop (see Figure 1.2-1). User accounts enable each user to personalize the interface with their own desktop icons and wallpapers, sound effects, color schemes, language and accessibility options, and so on.
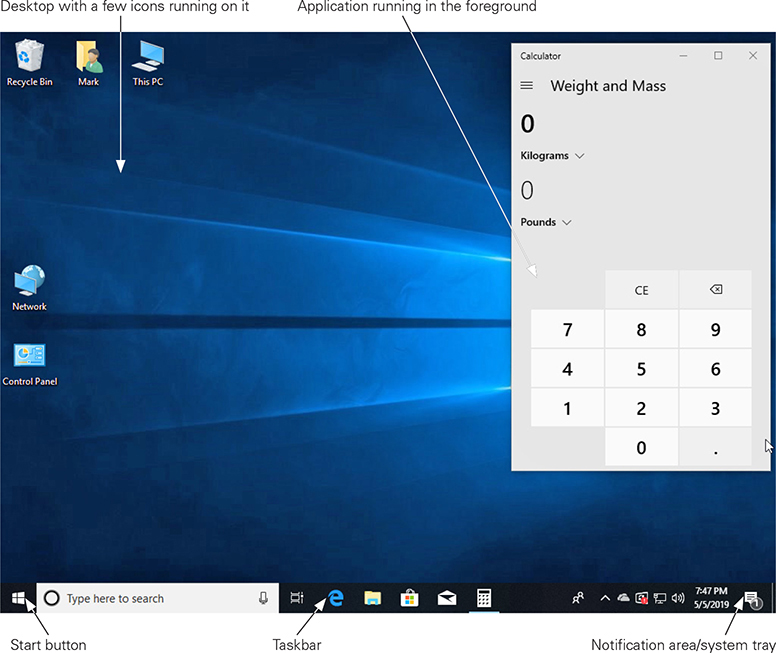
FIGURE 1.2-1 Windows 10 with application open
NOTE Windows 7, 8.1, and 10 all start at the Desktop, but Windows 8 starts instead at the mobile-friendly Start screen. Since Windows 8 is the lone exception, we’ll cover its Start screen in the “Windows 8” section.
• The taskbar, at the bottom of the Desktop by default, has a Start button for quick access to the Start menu, favorite programs, running programs, and the notification area or system tray.
• The Start menu provides compact access to most of your system’s programs, settings, documents, and utilities, and enables you to search for other elements.
• The notification area or system tray contains icons for notifications, common settings, longer-running background programs, and a clock.
• You interact with an icon, button, or other interface element by moving the cursor to the element with your pointing device and clicking it. One left-click selects items on the Desktop itself (open them with a double-click) and items on the taskbar; a right-click opens a context menu (see Figure 1.2-2) with options that depend on what you clicked.

FIGURE 1.2-2 Context menu for File Explorer (Windows 10)
• Programs can be pinned to the taskbar. Pinned programs enable you to launch favorite programs with a left-click.
• Folders open in Windows Explorer (Windows 7), later renamed File Explorer, from which you can browse up or down the directory tree; copy, paste, move, create, and delete files and folders; view and modify file or folder properties and attributes; and access some other important views. File icons differ by extension and the program associated with that extension; Windows hides known extensions by default.
• File Explorer’s This PC view (corresponds to the Windows 7 Computer view) shows accessible storage volumes (see Figure 1.2-3) and devices.
FIGURE 1.2-3 This PC in Windows 10
NOTE Microsoft changes UI options and features with every version of Windows and enables users to further customize the UI—having to hunt for specific files and folders is normal.
Windows Explorer/File Explorer are available from the Taskbar in Windows 7 and later. The default locations/folders are consistent between Windows 7 and Windows 8: Favorites, Libraries, HomeGroup (if in a home network), Computer, and Network. But Microsoft changed the lineup in Windows 8.1 and again in Windows 10, compressing Libraries and Computer into This PC, adding OneDrive, dropping HomeGroup in later versions of Windows 10, and more.
• The Network view shows devices connected to your network as well as available remote networked resources.
• Windows can assign drive letters to storage drives and volumes (the primary drive is traditionally assigned “C:”), giving each its own directory tree with the drive letter as the root directory. Windows creates a few special folders at the root (C:) of the drive you install it on: Windows, Program Files, and Users. As you might expect, the OS itself is installed in the Windows directory.
EXAM TIP The Windows directory is also called SystemRoot, which you may see written as a variable (%SystemRoot%) at the start of a longer path, such as %SystemRoot%Fonts.
• 32-bit versions of Windows have a single C:Program Files folder where many applications install by default. 64-bit versions have a second folder, in order to store 32-bit and 64-bit programs separately. 64-bit programs use C:Program Files, whereas 32-bit programs use C:Program Files (x86).
EXAM TIP Be sure to know the differences between Program Files and Program Files (x86) on 64-bit Windows versions for the exam.
• The Users folder contains a folder for each user’s files and programs as well as settings specific to the account. Windows creates a number of folders for personal documents here; you’ll need to know a few of them: Desktop, Documents, Downloads, Music, Pictures, and Videos. The path to your user folders when viewed in Command Prompt mode is the same in any version of Windows. For example, C:UsersMark. However, the way this information is shown in Windows Explorer/File Explorer varies with the version of Windows in use. For example, in Windows 7, the path in Windows Explorer is Computer | Local Disk | Users | Mark, but in Windows 8 and later, the path in File Explorer is This PC | Local Disk (C:) | Users | Mark.
EXAM TIP Know the personal directory paths (for example, C:UsersMarkDesktop).
• Windows sends a deleted file to the Recycle Bin folder until you empty the bin or restore the item (by right-clicking it and selecting Restore). Eventually, Windows will delete the file to make room for newly deleted files. If you need a deleted file that isn’t in the Recycle Bin, a third-party recovery utility might work.
• Windows uses a portion of your hard drive space as virtual memory, a slow extension of system RAM that enables the size of loaded programs to exceed physical RAM capacity at the expense of performance.
EXAM TIP The terms virtual memory, swap file, and page file all refer to the same thing: space on the hard drive reserved as temporary storage for running programs.
Windows 7
Windows 7 is the last version of Windows to have only a classic Desktop (although a few Windows 7 systems include touch screens).
• Open windows have an interface transparency feature called Aero or Aero Glass.
• Click the Start button to get access to applications, tools, files, and folders (see Figure 1.2-4).
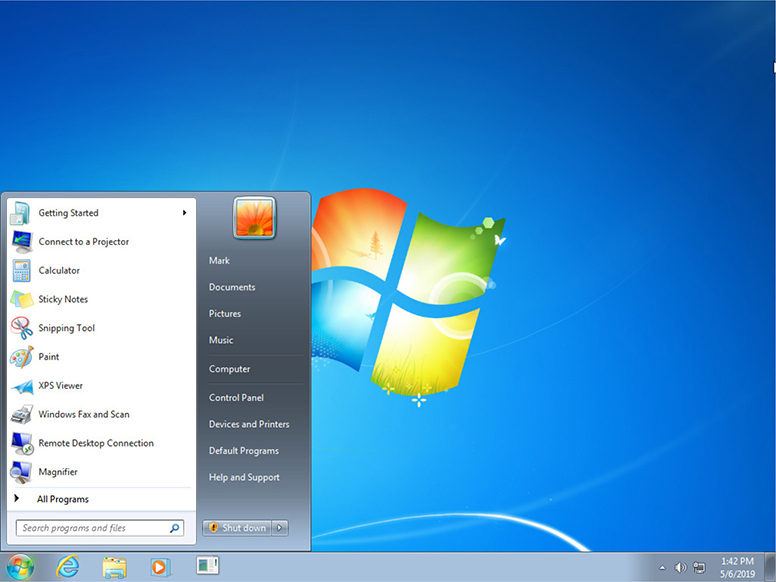
FIGURE 1.2-4 Windows 7 Desktop with Start menu
Windows 8
Windows 8 still has a classic Desktop, accessed by pressing the WINDOWS LOGO KEY, though it lacks a visible Start button (see Figure 1.2-5). Windows 8 also supports side-by-side apps, which streamline arranging windows to compare or reference documents.

FIGURE 1.2-5 Windows 8 Start screen
Windows 8 and 8.1 have some hidden interface components that activate when you move the cursor to certain locations:
• The bottom-left corner activates the Start button while on the Start screen in Windows 8.
• The top- and bottom-right corners reveal the Charms bar (see Figure 1.2-6), a location for tools called charms: the combined Search charm searches both the computer and the Internet; the Share charm can share photos, e-mail messages, and more; the Settings charm opens Settings.

FIGURE 1.2-6 Charms accessed by moving the cursor to the upper- or lower-right corner
Windows 8.1
With the Windows 8.1 update (see Figure 1.2-7), Microsoft brought back traditional features that it dropped in Windows 8, such as the Start button, easy access to a Close button for apps, and booting directly to the desktop.

FIGURE 1.2-7 Windows 8.1
Windows 10
Windows 10 (shown in Figure 1.2-8) blends the Windows 7 interface with some progressive features from the Modern UI used in Windows 8/8.1. In particular, Microsoft refined the Start menu in Desktop mode (see Figure 1.2-9), removed the much unloved Charms bar, incorporated essential tools such as Search and its companion tool Cortana into the taskbar, further streamlined side-by-side apps, and added Task View to create multiple desktops for grouping applications by task.

FIGURE 1.2-8 Windows 10 with a few applications open

FIGURE 1.2-9 Start menu in Windows 10 Desktop mode
Windows 10 can also run in Tablet mode, which resembles the Windows 8/8.1 user interface. Figure 1.2-10 shows Windows 10 running in Tablet mode. Windows 10 can be configured to open in Tablet mode on touch screen systems, or users can switch between Desktop and Tablet mode at any time.
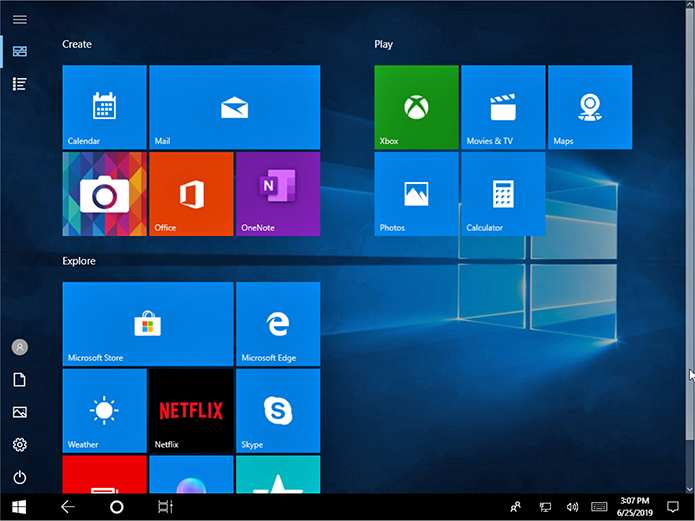
FIGURE 1.2-10 Windows 10 Tablet mode
Windows 7 Editions
Windows 7 was released in six editions: Starter, Home Basic, Home Premium, Professional, Ultimate, Enterprise. Table 1.2-1 provides a quick reference to some of the major differences between these editions. For the exam, concentrate on the business-oriented features that are not present in home editions.
TABLE 1.2-1 Select Windows 7 Features by Edition

NOTE CompTIA uses the term “32-bit” for x86 (x86 is a reference to the 8086 CPU) and “64-bit” for x64. Using x86 and x64 makes Tables 1.2-1, 1.2-2, and 1.2-3 a little less cluttered.
Windows 8/8.1 Editions
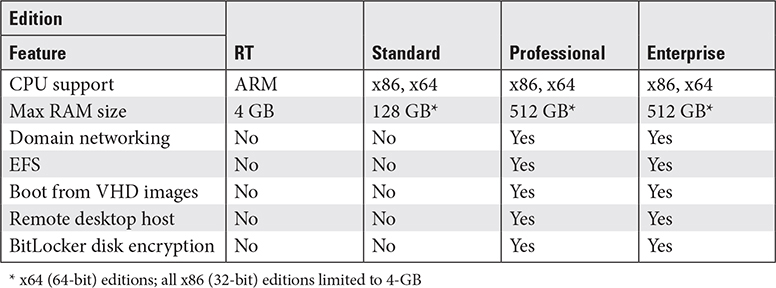
Windows 8/8.1 were released in four editions: RT, Standard, Professional, and Enterprise. Table 1.2-2 provides a quick reference to some of the major differences between these editions.
TABLE 1.2-2 Select Windows 8/8.1 Features by Edition
Windows 10 Editions
Windows 10 was released in several major editions: Standard, Pro, Enterprise, and Education. Table 1.2-3 provides a quick reference to some of the major differences between these editions.
TABLE 1.2-3 Select Windows 10 Features by Edition

EXAM TIP To see the Windows version and edition in the System applet:
Windows 7: Right-click Computer | Properties
Windows 8/8.1/10: Right-click This PC | Properties
In all versions, you can use WINDOWS KEY-PAUSE or access this information through Control Panel.
Windows Corporate vs. Personal Needs
The various Windows 7, 8/8.1, and 10 editions have common core features but differ in their support for the following features intended to meet corporate needs:
• Domain access
• BitLocker
• BranchCache
• Encrypting File System (EFS)
CompTIA A+ 220-1002 objective 1.2 also lists one personal feature that is included in some home-oriented editions of Windows: Media Center (styled as Media center in objective 1.2).
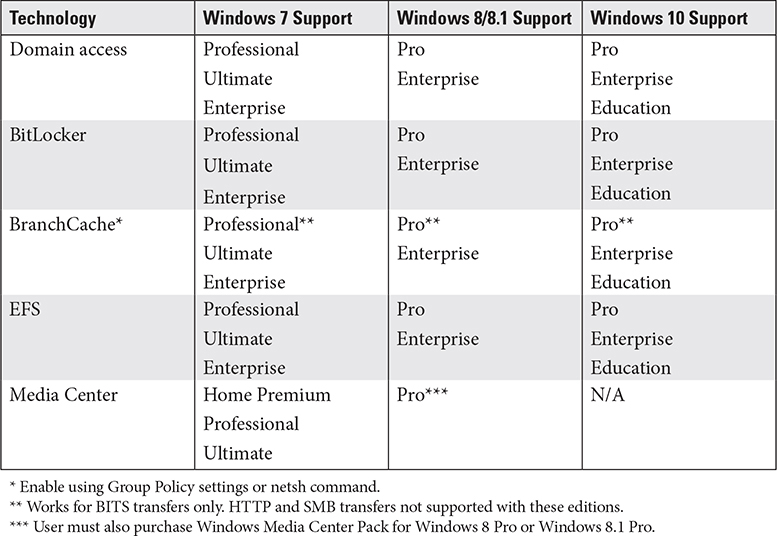
Table 1.2-4 provides a quick reference to the different versions and editions of Windows that support these features.
TABLE 1.2-4 Personal and Corporate Windows Features by Version and Edition
Domain Access
Workgroup networks, in which each computer can share folders or printers with other computers, are suitable when no more than 30 computers are connected. However, for larger networks, or networks that need more control and security, a Windows domain is preferable. A domain is a network that has centralized user accounts, passwords, and resources such as printers and folders.
A domain controller stores a set of domain accounts. A user logging on to any computer on the domain may use their one domain account to log on to the entire network. Domain access refers to the ability to join a network that uses Windows Server as a domain controller.
BitLocker
BitLocker is Microsoft’s full-disk encryption feature for internal drives. BitLocker To Go encrypts removable-media drives such as USB flash memory (thumb) drives. Editions that support BitLocker also support BitLocker To Go. BitLocker is supported on business-oriented editions of Windows because business computers often store proprietary and confidential information that needs to be encrypted.
BitLocker’s full-disk encryption normally requires a computer with a Trusted Platform Module (TPM). To use BitLocker on systems without a TPM, you must change Group Policy settings.
Media Center
Windows Media Center is designed with an HDTV-friendly user interface for playback and recording of cable and broadcast TV, DVD and Blu-ray movie viewing (with the appropriate codecs), and CD music listening. Support for Media Center was removed as standard in Windows 8 and 8.1 and cannot be added to Windows 10.
BranchCache
BranchCache is a Microsoft bandwidth optimization technology that fetches content from central servers and caches it on local servers or workstations to reduce the load on wide area networks.
EFS (Encrypting File System)
Encrypting File System is a file and folder encryption technology that prevents encrypted files and folders from being used by anyone who does not have the original user’s encryption credentials, even if the other user is an administrator. Just as with BitLocker, EFS is found in business-oriented versions of Windows because of business needs for the protection of confidential and proprietary information.
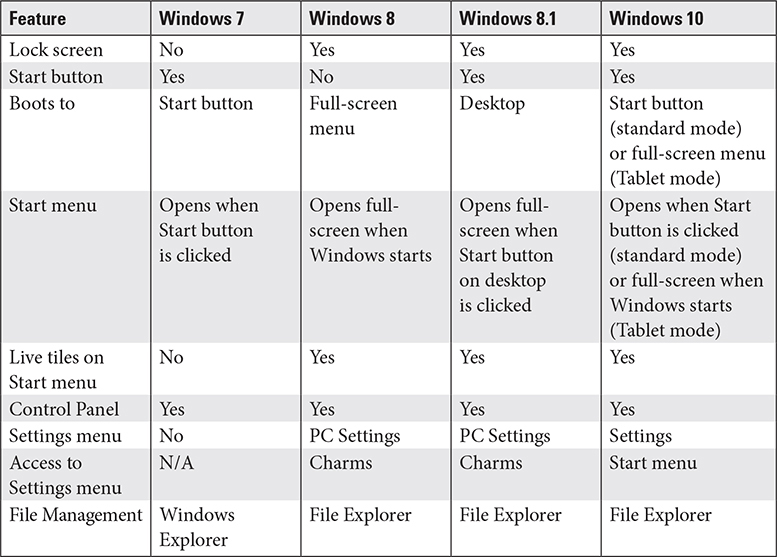
Desktop Styles/User Interface
Windows 7, 8, 8.1, and 10 differ in a variety of ways, including desktop styles and user interfaces. Table 1.2-5 provides a comparison of these differences, some of which will be discussed in Objectives 1.5 and 1.6.
TABLE 1.2-5 Windows Desktop Style/User Interface Comparison
REVIEW
Objective 1.2: Compare and contrast features of Microsoft Windows versions
• Windows 7 includes only a Desktop mode, regardless of the device type using it.
• Windows 8 uses a touch-oriented Start screen that occupies the entire Desktop, regardless of the device type using it.
• Windows 8.1 improves on Windows 8 by providing a Start button and the ability to boot directly to the Desktop.
• Windows 10 supports both Desktop and Tablet modes, with ability to detect which interface is in use for automatic switching between modes if desired.
• Most Windows editions support 32-bit (x86) and 64-bit (x64) processors. Business-oriented editions support BranchCache, EFS file and folder encryption, BitLocker full disk encryption, and domain networking, along with larger amounts of RAM than home-oriented versions. Home-oriented versions of Windows 7 include Media Center, which is an option in Window 8 and 8.1, but is not available for Windows 10.
• Windows versions also differ in menu display, how settings are managed, and how files are managed.
1.2 QUESTIONS
1. A Windows 10 Standard user wants to use BitLocker but cannot find it on the list of programs. The user should do which of the following?
A. Upgrade from Windows 10 to Windows Server
B. Open the Optional Features menu in Settings and add it
C. Upgrade from Windows 10 Standard to Windows 10 Pro
D. Downgrade to Windows 7
2. A Windows 8.1 user upgrades to Windows 10 and finds that the Start screen has been replaced by a Start menu that occupies only a portion of the screen. The user prefers the Start screen. What should the user do?
A. Open Settings and configure Tablet mode
B. Undo the upgrade and return to Windows 8.1
C. Disconnect the keyboard to force the system to use the Start screen
D. Upgrade to Windows 10 Pro
3. A Windows 10 user has heard about Cortana. Which feature of the Windows 10 Desktop provides access to Cortana?
A. Task Manager
B. Search
C. Notifications
D. Settings
4. In most cases, upgrading to a newer version of Windows will add features. However, sometimes newer versions of Windows drop features found in older versions. If a user upgrades from Windows 7 to Windows 10, which of the following features will no longer be available? (Choose two.)
A. Media Center
B. BitLocker
C. Workgroup
D. HomeGroup
5. A Windows administrator is looking for evidence of illegal files on a coworker’s computer. She is unable to open some files in the user’s Pictures folder. Which Windows feature did the coworker use to block access?
A. BitLocker
B. Hyper-V
C. EFS
D. Family Safety
1.2 ANSWERS
1. C Business-oriented versions of Windows have BitLocker, but home versions do not.
2. A Tablet mode enables Windows 10 to use the Windows 8.1 Start screen with either a touch screen or mouse interface.
3. B Cortana uses the Search window in current versions of Windows 10.
4. A D Media Center was removed as a standard feature in Windows 8/8.1, but could be added as an option. It was removed entirely in Windows 10. HomeGroup was available in early releases of Windows 10, but it was removed from Windows 10 in 2018.
5. C Encrypting File System (EFS) prevents access by other users to encrypted files unless the other users are given a copy of the encryption certificate.
Objective 1.3 Summarize general OS installation considerations and upgrade methods
One of the most common tasks for a computer technician is performing an operating system installation or upgrade. There are many ways to perform these, and this objective discusses how they work and helps you determine when you use a particular method.
Boot Methods
To install or upgrade Windows, macOS, or Linux, a variety of boot methods are available. The following sections cover the boot methods you need to understand for the CompTIA A+ 220-1002 exam. (The installation choices are described a bit later in the “Type of Installations” section.)
Optical Disc (CD-ROM, DVD)
To perform a clean install from an optical disc, follow this procedure:
1. Make sure the target computer is configured to boot from the optical disc.
2. With the bootable OS disc inserted, restart the computer.
3. Follow the onscreen prompts to boot from the disc and start the installation process.
To perform an upgrade install from an optical disc, follow this procedure:
1. Open the OS optical disc in the file navigation app of the current operating system.
2. Open the installation app on the disc and follow the prompts to perform the upgrade.
EXAM TIP Be familiar with the processes of booting from an optical disc, external drives, flash drives, PXE (network), internal hard drives, and hard drive partitions.
External Drive/Flash Drive (USB/eSATA)
To boot from a USB or eSATA drive:
1. Start up the computer and configure the BIOS or UEFI firmware to boot from the desired drive.
2. With the bootable OS drive connected or inserted, restart the computer.
3. Follow the onscreen prompts to boot from the drive and start the installation process.
To perform an upgrade install from a USB flash drive, follow this procedure:
1. Open the OS USB flash drive in the file navigation app of the current operating system.
2. Open the installation app on the USB flash drive and follow the prompts to perform the upgrade.
Network Boot (PXE)
Network boot is supported by Windows, Linux, and macOS. Windows and Linux refer to this feature as PXE, and macOS (and OS X) uses the term NetBoot and NetInstall.
The Preboot Execution Environment (PXE) can boot from a network location using protocols such as IP, TFTP (Trivial FTP), DHCP, and DNS. If your NIC supports PXE, you can enable it in the system setup utility from whichever screen has other options for your NIC (see Figure 1.3-1). While you’re there, move network locations to the top of the boot sequence.
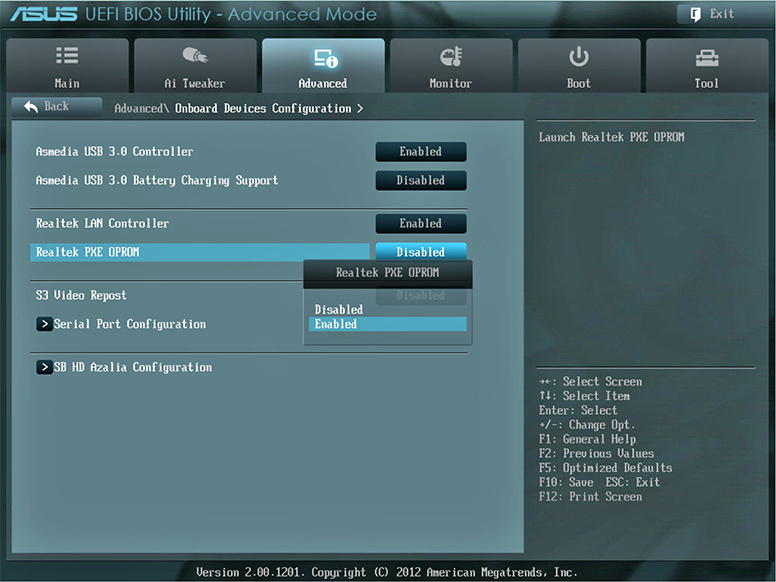
FIGURE 1.3-1 Selecting the PXE boot ROM option for the built-in Ethernet port on Mark’s computer
EXAM TIP PXE (Preboot Execution Environment) refers to network boot.
On a Windows or Linux system, when you reboot, somewhere along the familiar boot process you’ll see the instruction “Press F12 for network boot.” (It’s almost always F12.) If the system can find and connect to a server, you’ll be asked to press F12 again to continue booting from the network (see Figure 1.3-2), at which point you’ll see a selection screen if there are multiple images, or be taken directly to the Windows installer if there’s just one.

FIGURE 1.3-2 Network boot
ADDITIONAL RESOURCES To learn more about configuring PXE with Windows 10, go to docs.microsoft.com and search for “Configure a PXE Server to Load Windows PE.” To learn more about using PXE in Linux, go to linuxconfig.org and search for “Network booting with Linux – PXE.”
macOS supports NetBoot on Mac and iMac computers, produced in 2017 or earlier. Users can start NetBoot by holding down the N key at startup to go directly to the default NetBoot image or can use the Startup Disk preference pane to select the desired image.
NOTE Current models with the Apple T2 security chip don’t support NetBoot, and macOS Server no longer includes UI tools for configuring NetBoot or NetInstall. As an alternative, Apple recommends using the open-source NetSUS or BSDPy tools.
ADDITIONAL RESOURCES To learn how to create a NetBoot, NetInstall, or NetRestore volume, and to learn which computers support booting from network volumes, see https://support.apple.com/en-us/HT202770. For a change list for macOS Server 5.7.1 and alternatives to no-longer-provided functions, see https://support.apple.com/en-gb/HT208312.
Internal Fixed Disk (HDD/SSD)
The normal installation process for an operating system uses an internal fixed disk as its target. At the end of the process, you can boot from the internal fixed disk into the OS.
If you want to install the operating system onto the hard disk without using an additional drive, you can prepare the drive with installation files after you move it to a different computer. When you reinstall the drive into the original computer and set the computer to boot from the hard drive, the drive will start the installation process.
ADDITIONAL RESOURCES For details, go to www.instructables.com and search for “Install Windows 8 Directly from Hard Drive.” A similar procedure works for all current Windows versions. To learn how to install Ubuntu Linux directly from the hard drive, go to www.howtogeek.com and search for “How to Boot Linux ISO Images Directly from Your Hard Drive.”
Internal Hard Drive (Partition)
If you want to install the operating system onto the hard disk from a regular partition on the same hard disk, you can move the drive to a different computer, create an installation partition, assign it a drive letter, and copy the installation files to it. Copy the boot sector files to the new drive letter. When you reinstall the drive into the original computer and set the computer to boot from the hard drive, the drive will start the installation process. You can remove the drive letter and its contents after the installation process is complete.
To install Windows from a hidden recovery partition provided by some computer vendors, see the system documentation.
ADDITIONAL RESOURCES For details for Windows, go to www.bleepingcomputer.com and search for “Clean Install Windows Directly from the Hard Disk Drive.”
Type of Installations
Operating systems can be installed using a variety of different methods. You need to understand these methods so that you can choose the right one for a particular situation (or exam question scenario).
Creating Installation Media
Most of the time, you will need to create some type of installation media before performing an operating system installation or upgrade. Although this is not specifically an A+ exam topic, knowing how to create different media types is valuable as you practice installation and upgrading for the exams and in your day-to-day work as a technician.
Creating a Bootable Optical Disc
To create a bootable optical disc:
1. Download an ISO image of the OS.
2. Burn the image to an optical disc large enough for the image (usually a DVD) using an ISO image burner app.
Creating a Bootable USB Flash Drive or Hard Drive
To create a bootable USB flash drive or hard disk drive:
1. Download an ISO image of the operating system.
2. Transfer the image to a USB flash drive large enough for the image (an 8-GB drive is large enough for Windows; 4 GB is large enough for most Linux distros) using an ISO to USB imaging app. All files on the drive will be overwritten!
Creating a Bootable eSATA Hard Drive
To create a bootable eSATA hard drive:
1. Disconnect all internal SATA drives.
2. Make sure the eSATA drive is connected and turned on.
3. Boot the system from an optical drive or USB flash drive that contains the OS.
4. Install the OS to the eSATA drive.
5. Turn off the system and reconnect all internal SATA drives.
Unattended Installation
An unattended installation, also known as a scripted installation, uses a script file to provide answers to the prompts displayed during the installation process. Windows uses the Windows Assessment and Deployment Kit (Windows 8/8.1/10) or Window Automated Installation Kit (WAIK) to create scripts.
EXAM TIP Unattended (scripted) installations are very important for mass system installs.
With current versions of Ubuntu Linux and similar Debian-based distributions, you can use the unattended-upgrades package to perform an automated update. You can also use scripts to create an unattended installation of Ubuntu 16.04 LTS or later. macOS can use vendor-provided or third-party tools.
ADDITIONAL RESOURCES To learn more about automated updates, go to https://linuxize.com and search for “How to set up automatic updates.” To learn more about scripts for an unattended installation, go to https://github.com and search for “Linux unattended installation.” To learn how to perform a silent installation or upgrade of macOS 10.13.4 (High Sierra update) or later, go to www.techrepublic.com and search for “How to silently upgrade or install macOS 10.13.4.”
In-place Upgrade
An in-place upgrade, also known as an upgrade installation, replaces the existing operating system with a new installation of either a newer version or the same version. On Windows systems, an in-place upgrade enables users of Windows 7 or 8/8.1 to upgrade to Windows 10 without losing data or needing to reinstall their apps.
To start an in-place upgrade with Windows, start the computer normally, insert/connect the installation media (ISO image file, DVD, or USB flash drive), and start the installation program. Follow the prompts until the process is complete.
EXAM TIP In-place upgrades are also used for repair installations.
Clean Install
A clean installation usually starts with an empty hard drive, but since the process partitions and formats the hard drive, it can also erase and install over an existing installation. A clean install won’t carry over problems from the old OS, but you’ll have to reconfigure the system and reinstall software. Begin by booting from installation media.
EXAM TIP A clean install wipes out all existing operating system files, apps, and user data.
Repair Installation
An in-place upgrade can also be used to repair an existing installation, again without losing data or reinstalling apps. To start a repair install with Windows, set the computer to boot from the installation media, insert/connect the same version of installation media (ISO image file, DVD, or USB flash drive) that was used to install Windows, start the computer, boot from the installation media, and start the installation program. When prompted, select Repair your computer (see Figure 1.3-3). Follow the prompts until the installation process is complete.
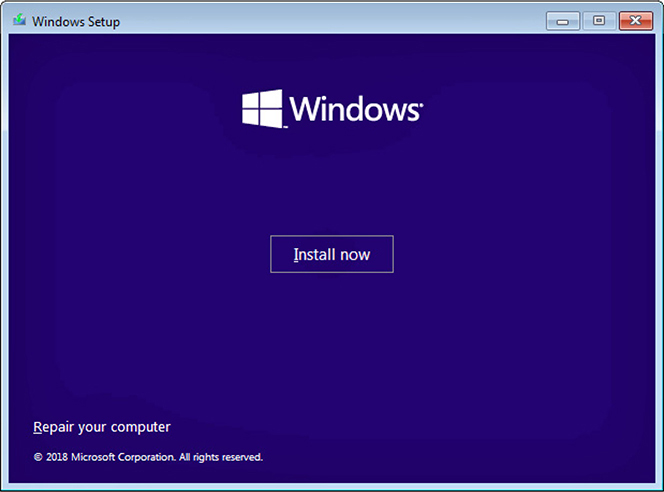
FIGURE 1.3-3 Repairing Windows from the installation media
EXAM TIP Repair installations in Windows start the same way as in-place upgrades, but the user must select the Repair option when prompted. A repair installation is called Reinstallation in Linux.
Linux refers to a repair installation as Reinstallation. This option is available on some distributions, such as Ubuntu, when you start the computer with the same version of Linux on a Live CD or USB drive. The installation program detects the existing Linux install and asks you if you want to reinstall (keeping files and programs), or erase and install.
With macOS, start macOS Recovery (turn on the computer and immediately press COMMAND-R). From the macOS Utilities menu, select Reinstall macOS. You must have a working Internet connection to use Reinstall macOS.
Multiboot
A multiboot (or dual-boot) installation configures your system with more than one OS to choose from, each in its own partition or volume. If you only have a single drive with one partition, you can use Disk Management in Windows to shrink your existing partition and create a new one in the reclaimed space.
EXAM TIP For success, format the system partition using a file system that is common to all installed operating systems. You must install operating systems in order from oldest to newest, and you must install Windows before other operating systems. Any system with at least one hard drive can be configured for multibooting.
Remote Network Installation
A remote network installation uses a network location as the installation media. Larger organizations may use this along with special scripts to automatically select options and answer all the prompts that us mere mortals have to deal with manually during the installation process. As previously covered, unattended installations can even install applications once the OS is in place.
EXAM TIP Remote network installations use a network location for installation media, and can be scripted to run automatically.
Image Deployment
Image deployment saves tons of time when you manage many systems. An image is a complete copy of a hard drive volume that includes an operating system and often includes preinstalled apps. You can use special software to set up a fully loaded system by copying the image over from removable media or the network.
EXAM TIP An image used for image deployment can also contain software.
Recovery Partition
Some prebuilt systems come with a factory recovery partition, other recovery media, or the ability to create recovery media. These can restore the active system partition or the entire hard drive to fresh-from-the-factory condition from a recovery image.
EXAM TIP A recovery partition, recovery media, or the Reset Your PC/Remove Everything setting should be regarded as a last resort for fixing a computer, as it wipes out all apps and user data.
Refresh/Restore
All modern versions of Windows include System Restore, which returns Windows to its condition as of a specified date and time using information stored in restore points.
NOTE The Refresh/Restore options covered in this section aren’t really a type of installation, but are included in this objective because they are used to fix issues with an installed operating system.
The Refresh/Reset options were introduced in Windows 8. They are available through the PC Settings | General menu or the Recovery Environment’s Troubleshoot menu.
• Refresh your PC Rebuilds Windows; preserves user files, settings, and Microsoft Store apps (but deletes all other applications)
• Reset your PC Removes all apps, programs, files, and settings and freshly reinstalls Windows
In Windows 8.1, these options are located in PC Settings | Update and recovery | Recovery.
In Windows 10, the Refresh and Reset options are combined into a single menu, Reset this PC menu, which offers these options instead:
• Keep my files (removes apps and settings; equates to Refresh in Windows 8/8.1)
• Remove everything (removes apps, settings, and personal files; equates to Reset in Windows 8/8.1)
To access these Windows 10 options, go to Settings | Update & Security | Recovery | Reset this PC.
EXAM TIP Refresh/Reset options are provided in Windows 8/8.1. In Windows 10, it’s Reset this PC with two options (Keep my files or Remove everything).
Partitioning
Partitioning is the process of electronically subdividing a physical drive into one or more units called partitions. Windows supports three partitioning schemes: the older master boot record (MBR) partitioning scheme, its own proprietary dynamic storage partitioning scheme, and the newer GUID partition table (GPT). Microsoft calls an MBR-partitioned or GPT-partitioned drive a basic disk and a dynamic-storage-partitioned drive a dynamic disk. Windows doesn’t mind if you mix schemes on different drives.
EXAM TIP A globally unique identifier (GUID) is a number with an almost-impossible chance of duplication that’s used to uniquely identify different objects.
Basic
MBR basic disk partition tables support up to four partitions. The partition table supports two types of partitions: primary and extended.
Primary
Primary partitions support bootable operating systems (extended partitions don’t). A single basic MBR disk supports up to four primary partitions, or three primary partitions and one extended partition. The partition table stores a binary active setting for each primary partition on the drive; at boot, the MBR uses it to determine which primary partition to boot to.
EXAM TIP A primary partition can be bootable.
Extended
Each partition needs a unique identifier to distinguish it. Microsoft operating systems traditionally assign a drive letter from C: to Z:. Extended partitions do not get drive letters, but an extended partition can contain multiple logical drives, each of which can get a drive letter.
EXAM TIP An extended partition can contain one or more logical drives.
Logical Drives After you create an extended partition, you must create logical drives within that extended partition. A logical drive traditionally gets a drive letter from D: to Z:.
Note that when you create partitions and logical drives in Windows, the OS prompts you to create volumes. Further, it creates logical drives automatically after you exceed four volumes on a single drive.
EXAM TIP Logical drives are found within extended partitions.
With the exception of the partition that stores boot files for Windows (always C:), primary partitions and logical drives can be assigned a drive letter or mounted as a folder on an existing primary partition. A volume mount point (or simply mount point) is the folder on one volume that points to another volume or partition. The mounted volume functions like a folder, but files stored in it are written to the mounted volume.
GPT
MBR-partitioned disks have tangible limits such as a capacity no larger than 2.2 TB and no more than four partitions. The GUID partition table (GPT) partitioning scheme effectively overcomes these limits. GPT drives are basic drives, though you need a UEFI motherboard and a UEFI-compatible OS to boot to one.
EXAM TIP GPT drives can have more than four partitions, compared to the MBR limit of four.
Dynamic
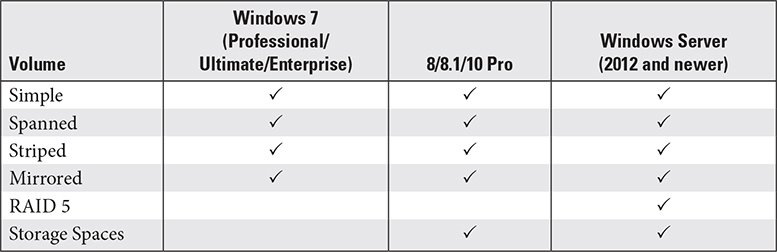
Windows’ proprietary dynamic storage partitioning, better known as dynamic disks, uses the term volume to describe dynamic disk partitions. There is no dynamic disk equivalent to primary versus extended partitions. A volume is still technically a partition, but it can do things a regular partition can’t, such as spanning. A spanned volume encompasses more than one drive (up to 32 drives in a single volume). Dynamic disks also support RAID 0 (striped), 1 (mirrored), and 5, though support differs among various Windows editions and versions (see Table 1.3-1).
TABLE 1.3-1 Dynamic Disk Compatibility
EXAM TIP Dynamic disks are not bootable, but allow separate disks to be combined into various software RAID and spanned volumes.
As Table 1.3-1 indicates, Windows 8/8.1/10 Pro also support Storage Spaces, which enables two or more non-system drives to be combined into RAID-like arrays to protect from drive failure. Objective 1.5 covers Storage Spaces in more detail.
EXAM TIP Create basic and dynamic disks in Windows using Disk Management. Storage Spaces is a separate utility. The equivalent to Disk Management in macOS is Disk Utility.
File System Types/Formatting
Formatting adds a file system to the drive—like a big spreadsheet that organizes each partition in such a way that the OS can store files and folders on the drive. Current Windows versions support these file systems: FAT32, NTFS, and exFAT/FAT64. Each has its own merits and limitations. Other file systems you need to understand for CompTIA A+ certification include CDFS, NFS, ext3, ext4, and HFS.
FAT32
FAT32 supports partitions up to 2 TB—compared to the old FAT16 file system’s limit of 2.1 GB—but it lacks local file security features found in NTFS such as permissions, compression, and encryption.
It also limits individual files to 4 GB. FAT32 stores files in clusters (also known as allocation units) which are multiples of the 512-byte block size used by standard drives. A file of any size must occupy at least one cluster, and cluster size in FAT32 increases as drive size increases, from a minimum of 4 KB (4096 bytes) for partitions up to 8 GB, and a maximum of 32 KB for partitions larger than 32 GB.
ExFAT
As thumb drive and flash memory card capacities grow, the FAT32 file system has proven inadequate because it won’t work on drives over 2 TB and limits files to 4 GB.
EXAM TIP Be sure you known the differences between FAT32 and exFAT (file size limits, disk size limits).
Microsoft wisely developed a replacement called exFAT (aka FAT64) that supports files and partitions up to 16 exabytes (EB). Like FAT32, exFAT still lacks NTFS features such as permissions, compression, and encryption. Both FAT32 and exFAT are also supported by macOS and can also be accessed by Linux when appropriate support packages are installed.
NOTE The current implementation of exFAT limits partition size to 2 TB. Current hardware limits the maximum partition size to 2 PB. The theoretical maximum is some amazing figure, like 64 zettabytes (ZB). Here are the definitions of some big number terms. A petabyte is 250 bytes, an exabyte is 260 bytes, and a zettabyte is 270 bytes. For comparison, a terabyte is 240 bytes. Remember your binary: each superscript number doubles the overall number, so 241 = 2 TB, 242 = 4 TB, and so on.
NTFS
Older versions of Windows ran well enough on FAT and FAT32, but you need New Technology File System (NTFS) to get the most out of modern versions. It supports partitions up to 16 TB, built-in compression and encryption, disk quotas, expanding dynamic partitions on the fly, and local file security.
NOTE By default, NTFS supports partitions of up to 16 TB minus 4 KB, but MBR-partitioned drives are still limited to 2.2 TB. Use GPT if you can.
NTFS uses an enhanced file allocation table, the master file table (MFT), to track the file and folder locations. NTFS partitions keep a backup copy of the most critical MFT parts in the middle of the disk, reducing the chance a serious drive error will wipe out both the MFT and the partial MFT copy.
EXAM TIP Be sure you know the differences between FAT32, exFAT, and NTFS (security, MFT).
Compression and Encryption
NTFS can compress individual files and folders to save space at the expense of slower data access; it can also encrypt files and folders to make them unreadable without a key. Microsoft calls the encryption utility in NTFS the encrypting file system (EFS), but it’s simply an aspect of NTFS, not a standalone file system.
Disk Quotas
NTFS enables administrators to set disk quotas that limit drive space use per user. To set quotas, log in as Administrator, right-click the hard drive, and select Properties. In the Local Disk Properties dialog box, select the Quota tab (see Figure 1.3-4), click Show Quota Settings, and make changes. Disk quotas on multiuser systems prevent individual users from monopolizing storage space.
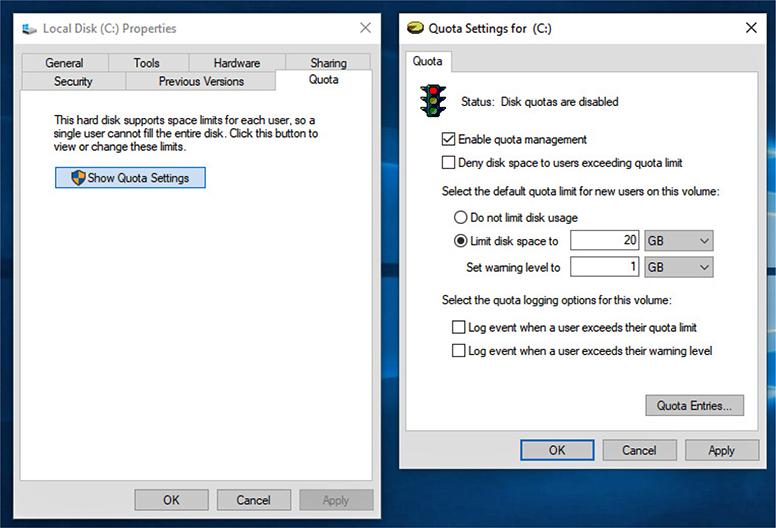
FIGURE 1.3-4 Settings up disk quotas in Windows 10
CDFS
Optical discs use a unique Compact Disc File System (CDFS), more accurately called the ISO 9660 file system. Microsoft’s Joliet extension to ISO 9660 enables optical discs to support Windows 95-style long file names.
NFS
The Network File System (NFS) enables Linux and UNIX systems to share files remotely and to use remote files as if they are stored locally. NFS has largely been replaced on Linux by Samba and SMB (Server Message Block), which are cross-platform file and printer sharing apps that work on Linux, macOS, and Windows.
EXAM TIP Linux-supported file systems include NFS, ext3, and ext4.
ext3, ext4
Most Linux distributions use ext4, the Fourth Extended File System, by default. ext4 supports volumes up to 1 exabyte (EB), with file sizes up to 16 TB, and is backward compatible with predecessors ext2 and ext3. Just know ext4’s maximum volume and file size and that these are Linux file systems.
Linux file system capabilities exceed those of macOS; it can read and write to NTFS, FAT32, exFAT, HFS+, ext2, ext3, and ext4.
HFS
Hierarchical File System Plus (HFS+) has been the default file system for Macs from 1998 through macOS 10.12 (Sierra). macOS 10.13 (High Sierra) replaced HFS+ with the new, more efficient Apple File System (APFS) for system drives. However, HFS+ is still used by Apple Time Machine backup drives. HFS+ has read-only NTFS support.
EXAM TIP HFS+ and APFS are both macOS file systems, but the recently adopted APFS is not listed in the CompTIA A+ exam 220-1002 objectives at the time of this writing.
Swap Partition
A swap partition is an optional disk structure on a Linux installation. It is roughly equivalent to a Windows swap file/page file, enabling hard disk space to be used as a substitute for faster memory. The swap partition also supports hibernation, which stores the system’s current state to disk (Windows uses a separate hibernation file for this purpose).
ADDITIONAL RESOURCES To learn how to size, create, and use a Linux swap partition, go to opensource.com and search for “An introduction to swap space on Linux systems.”
Quick Format vs. Full Format
The default format type for a Windows drive is a quick format. A quick format (also known as a high-level format) saves time by creating a FAT (file allocation table) and a blank root directory. A full format tests every drive sector for read/write integrity, marking unusable ones in the FAT, and can take many minutes when performed on a hard drive.
EXAM TIP Make sure you can describe the differences between quick format and full format.
Load Alternate Third-Party Drivers When Necessary
Windows includes drivers for standard types of drives that are accessed through normal BIOS or UEFI firmware routines. However, if you are installing Windows to a drive that uses an expansion card or a third-party RAID chip, you may need to load drivers. If so, press the F6 key or click the Load driver option in the installation process (depending upon your version of Windows) to signal Windows that you have drivers. Nothing happens immediately when you respond to this request. You’ll be prompted later in the process to insert a driver disc.
EXAM TIP Windows can’t find devices for which it has no device drivers. Device drivers are often needed for storage cards or third-party RAID arrays.
With Linux, methods vary widely among distributions. To minimize problems, check for device compatibility before choosing a Linux distribution if you are planning to use RAID.
Workgroup vs. Domain Setup
During the installation of Windows, any computer with a network adapter will prompt the user to choose a workgroup or a domain. In Windows 10, the prompt reads Set up for personal use (workgroup) or Set up for an organization (domain). So, what’s the difference?
A workgroup is set up for personal use and requires each device that will share resources to be configured with authorized users.
A domain is set up for organizational use and requires a Windows Server configured as a domain controller.
The default Windows workgroup is WORKGROUP; enter a different name if your existing workgroup uses a different name.
EXAM TIP When a user on a workgroup connects to a different computer, the user must provide a username and password for the account on the remote computer. A domain account specifies which resources are available on a domain for that user. Those resources are available as soon as the user logs into the domain.
If your network uses a domain controller, select Join a domain when prompted, enter the domain name, username, and password, and select the account type when prompted. macOS, Windows, and Linux can join existing domains after installation.
EXAM TIP Make sure you understand the differences between workgroups and domains.
Time/Date/Region/Language Settings
During installation, operating systems prompt the user to select or confirm time, date, region, and language settings. U.S. users generally need to change only the time zone if they live in a non-default time zone. Defaults are generally Eastern or Pacific time. Users in other countries might need to change some or all settings.
EXAM TIP You might need to know what setting or settings need to be adjusted depending upon your location.
Driver Installation, Software, and Windows Updates
Immediately after installing Windows, install available OS updates to obtain the latest features and patches for known bugs and vulnerabilities. Use Windows Update (located in Control Panel, PC Settings, or Settings) to check for OS updates. Depending on how up-to-date the installed Windows version is, it might be necessary to run Windows Update several times to get all the updates.
EXAM TIP A Windows installation isn’t finished until you install all available updates.
Likewise, check for driver updates for important hardware (especially if you used default drivers during installation.). Early in the installation process, Windows checks to see if you have outdated apps installed that should be removed or updated. Be sure to follow the recommendations to keep your apps updated to avoid problems.
ADDITIONAL RESOURCES Check the Microsoft Support website at https://support.microsoft.com for Windows and security update information. Check vendors’ websites for your motherboard or add-on cards (LAN, video, sound, SATA, and so on) for driver updates.
To see if updates are available for macOS Mojave (10.14.6) or later, open System Preferences | Software Update, and click Update Now if updates are available. To see if updates are available for older macOS versions, open the App Store and check Updates. Any items (macOS or apps) that have updates available are listed. Click Update All to update all listed items. Click Update for a specific item to update it.
To see if updates are available for Linux, use the distro’s command-line or GUI tools for updating the catalog and installed OS/apps.
Factory Recovery Partition
Systems from major vendors that have Windows preinstalled generally have a factory recovery partition. This is a hidden partition that contains the vendor’s customized Windows installation image. Systems with a factory recovery partition typically prompt the user to press a key during startup to restore the image if the system doesn’t start properly.

CAUTION Restoring a factory recovery partition wipes out all user data and apps, restoring the system to its as-shipped condition. This feature should be used only if there is no alternative to restoring a system to operation. Before using this feature, the system should be booted with WinPE (Windows Preinstallation Environment) or other bootable media and a file manager should be used to copy all accessible data to a different drive.
Properly Formatted Boot Drive with the Correct Partitions/Format
Using the normal clean installation process for a given operating system results in the proper formatting of the boot drive with the correct partitions and format. However, if you need to manually set up the partitions on a boot drive, make sure you understand the necessary partition scheme and partition sizes.
For example, these are the partitions needed on a Windows 10 drive according to Microsoft documentation:
• System partition (EFI system partition on a GPT drive)
• Microsoft reserved partition (MSR)
• Windows partition
• Recovery tools partition (Windows RE)
Windows 8/8.1 have the same types of partitions, but in a different order:
• Recovery tools partition (Windows RE)
• System partition (EFI system partition on a GPT drive)
• Microsoft reserved partition (MSR)
• Windows partition
Windows 7 uses a system partition and a Windows partition.
EXAM TIP Make sure you understand that the Windows partition is assigned the C: drive and that you can identify other partitions that Windows creates.
Prerequisites/Hardware Compatibility
Before performing either a clean install or an upgrade of an operating system, you should verify that the computer has the necessary prerequisites and hardware compatibility. For a system you plan to upgrade, you can use the reporting tools built into the current OS to compare the computer’s hardware with the minimum and recommended hardware for the upgraded OS:
EXAM TIP You don’t need to know how to check for compatibility for the exam; just know that you should check for compatibility before you install an OS.
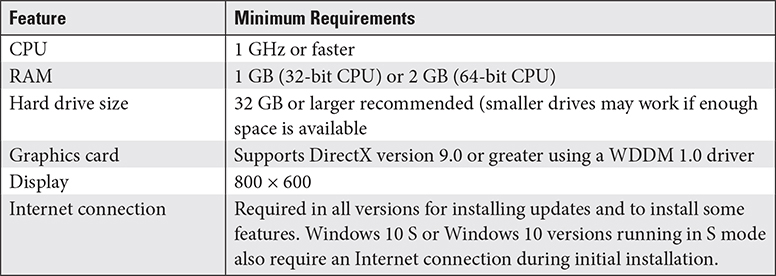
• Windows System properties or System Information (msinfo32) (hardware and OS). For an example of Windows 10 requirements, see Table 1.3-2.
TABLE 1.3-2 Windows 10 Hardware Compatibility
• Linux Varies by distribution.
• macOS Open Apple menu, About This Mac (hardware and OS).
Application Compatibility
Microsoft has developed various tools to help determine if installed applications will run properly in a particular operating system. The installers for Windows 7, 8/8.1, and 10 perform compatibility checks and will warn users of incompatible apps. The Mac App Store lists apps that are compatible with your Mac. The software repository for a given Linux distro lists apps that are compatible with your Linux PC.
EXAM TIP For the exam, don’t worry about the details of how to check application compatibility; just know that checking it is necessary.
OS Compatibility/Upgrade Path
Microsoft has a variety of upgrade paths that are officially supported (third-party tools support additional upgrade paths). In brief, here are the supported upgrade paths:

Note that users cannot upgrade to Enterprise and Education editions of Windows; their licenses do not support upgrades. For additional details, see the Microsoft website.
Linux upgrade paths in brief:
• Older 32-bit to newer 32-bit versions of the same distribution
• Older 64-bit to newer 64-bit versions of the same distribution
EXAM TIP Windows editions (except for Enterprise and Education, which do not support upgrades) can upgrade older 32-bit to newer 32-bit and older 64-bit to newer 64-bit editions. Linux also supports 32-bit to 32-bit and 64-bit to 64-bit upgrades.
By using manual installation processes, some Linux distros permit users to upgrade from a 32-bit to a 64-bit version.
macOS upgrade paths in brief:
• From 10.8 or later, upgrade to Mojave (10.14.x)
• From 10.6.8 (Snow Leopard) or 10.7 (Lion), upgrade to El Capitan (10.11), then upgrade to Mojave
REVIEW
Objective 1.3: Summarize general OS installation considerations and upgrade methods
• Boot methods that can be used for installing an OS include optical disc, external drive or flash drive, network boot (PXE), internal fixed disk, and internal hard drive partition.
• If installation media is not available, bootable optical discs, USB flash drives or hard drives, or eSATA hard drives can be created from downloadable OS ISO image files.
• An unattended installation uses a script file to provide answers to prompts that appear during the installation process. Windows, Linux, and macOS offer various utilities for creating a script file.
• Use an in-place upgrade to replace an older version of an OS with a newer one. Unlike a clean install, existing apps and files are preserved.
• To perform a clean install of Windows or Linux, the computer needs to be set to boot from the installation media (optical disc or USB). To create installation media for Windows or Linux, download the appropriate ISO disk image file and use a special image burner/transfer utility to create the installation USB drive or optical disc.
• An in-place upgrade can also be used for a repair install to fix problems with the OS. To perform a repair install, use the same version of the OS as is currently installed.
• A multiboot installation enables the user to choose from two or more different OSs at startup. Image deployment enables a single system image to be used for many similarly configured systems.
• A remote network installation uses a network location for the installation media and can be scripted.
• To restore a system to proper function, you can use a recovery partition. This method wipes out all user apps and files while returning the system to its original configuration.
• Windows 8 and above support PC reset, which, like a recovery partition, wipes out all user apps and files while returning the system to its original configuration). Windows 8/8.1 also features Refresh (preserving user files and Windows Store apps), and Windows 10 can keep user files or remove everything as part of its Reset function.
• Windows supports MBR partitions for drives up to 2.2 TB and GPT partitions for larger drives. MBR drives support no more than four partitions (one primary and up to three extended), while GPT supports many more partitions. Both are known as basic disks in Windows. Basic disks are bootable.
• Primary partitions are bootable, but extended partitions and the logical drives within them are not bootable.
• Windows dynamic disks are non-bootable, but can be configured as RAID or Storage Spaces configurations to improve drive performance or safety.
• NTFS is the native file system for Windows 7/8/8.1/10. It supports compression, encryption, security, and disk quotas. FAT32 is used primarily for flash drives or for drives shared with Linux or macOS. exFAT is used for 64-GB or larger flash drives and is also supported by macOS. ext4 is the native file system for modern Linux distributions. HFS+ is the native file system for most recent macOS editions and is used by Time Machine. Apple File System is used by High Sierra and newer versions as its default for system drives.
• A swap partition is an optical disc structure on a Linux installation.
• A quick format clears out the file allocation table or MFT; a full format rewrites all sector markings and determines if any sectors are unusable.
• Load alternate third-party drivers when necessary to support non-standard drive/host adapter hardware such as RAID.
• Workgroup setup, designed for personal use on smaller networks, requires you to specify the workgroup.
• Domain setup, designed for larger networks with Windows Server as a domain controller, requires that you specify the domain, user information, and user type.
• Time/date/region/language settings may not always be accurate, so check them and correct as needed.
• Driver installation, software, and Windows updates should be performed after the OS installation/upgrade process.
• A factory recovery partition is common on preinstalled systems so that the system can be reset to as-built condition.
• Properly formatted boot drive with the correct partitions/format—details vary according to Windows version.
• Check the prerequisites/hardware compatibility issues before installing an OS.
• Check application compatibility with the OS before buying/downloading an app.
• Windows and Linux 32-bit versions can be upgraded to newer 32-bit versions; 64-bit versions can be upgraded to newer 64-bit versions; old macOS versions might need two updates (one to the oldest version supported for updates, then to the current version).
1.3 QUESTIONS
1. You are preparing to upgrade a system running Windows 7 to Windows 10. To make sure the system meets the memory, processor, and disk space requirements for Windows 10, which of the following would you use?
A. About This PC
B. msinfo32
C. uname –a
D. DxDiag
2. Which of the following combination of settings would you use to prepare a 4-TB drive to be part of a software RAID array in Windows?
A. FAT32, MBR, Basic
B. Ext4, GPT, Dynamic
C. NTFS, GPT, Dynamic
D. HFT+, MBR, Basic
3. You are preparing to upgrade a 32-bit version of Windows 7 Home Premium to Windows 10. Which of the following Windows 10 editions can be used for the upgrade?
A. Windows 10 Pro 32-bit
B. Windows 10 Pro 64-bit
C. Windows 10 Enterprise 64-bit
D. Windows 10 Home 64-bit
4. You are reformatting an external hard disk for use with macOS Time Machine. Which of the following file systems should you use?
A. NTFS
B. ext4
C. HFS+
D. exFAT
5. You are examining a hard drive’s layout using Disk Management. It contains a primary partition and an extended partition. It has four drive letters, C, E, F, G. Where are drive letters E, F, and G located?
A. Primary partition
B. Dynamic drive
C. MSR
D. Extended partition
1.3 ANSWERS
1. B The command-line tool msinfo32 opens the System Information tool, which displays processor type, clock speed, installed memory size, available disk space, and many other hardware and software factors.
2. C The NTFS file system is the only Windows file system to support software RAID. GPT is used for drives above 2.2-TB capacity, and dynamic supports software RAID.
3. A Microsoft supports upgrades from older 32-bit versions to newer 32-bit versions. Third-party utilities would be necessary to upgrade from a 32-bit version to a 64-bit version.
4. C HFS+ is a macOS-only file system still used by Time Machine.
5. D A primary partition can only contain one drive letter, so additional drive letters are logical drives inside an extended partition.
Objective 1.4 Given a scenario, use appropriate Microsoft command line tools
Although most routine operations in Windows are performed through the GUI, Windows retains a command prompt that is used for a variety of command-line tools. Table 1.4-1 provides a reference to the commands you need to know for the CompTIA A+ 220-1002 exam.
TABLE 1.4-1 Windows Command-Line Utilities


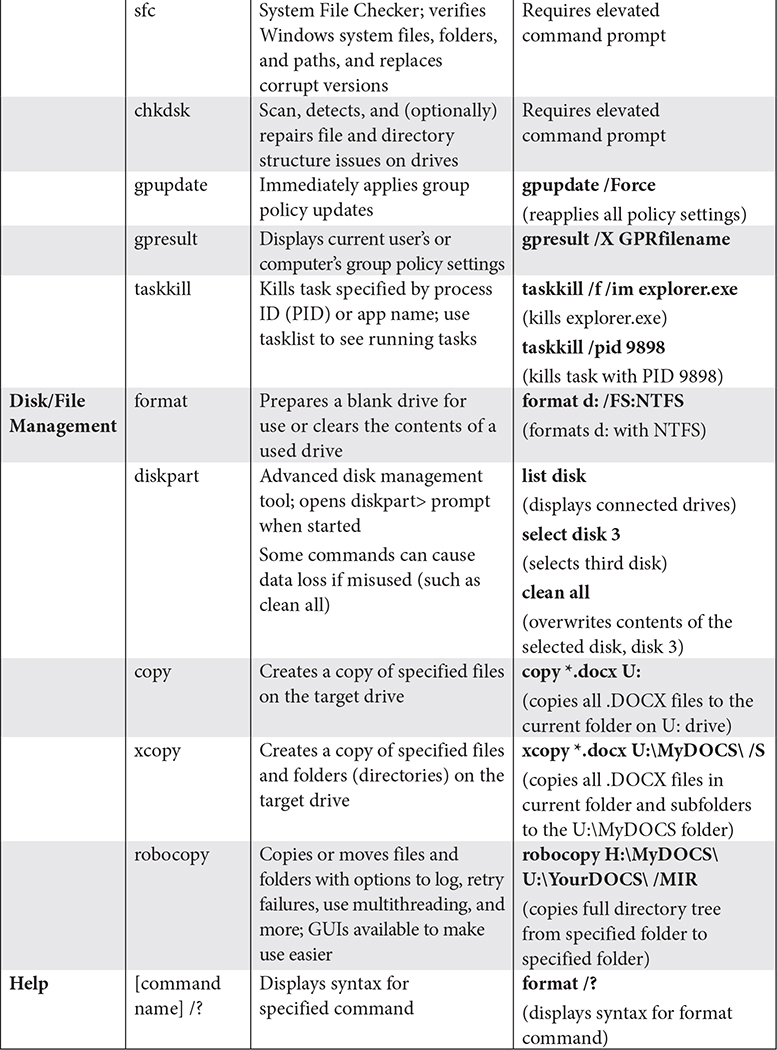
EXAM TIP Be prepared to use the appropriate commands listed in Table 1.4-1 if you are “given a scenario” on the exam.
Commands Available with Standard Privileges vs. Administrative Privileges
As noted in Table 1.4-1, some Windows commands will not function when a standard command prompt is opened. An elevated command prompt (also known as a command prompt with administrative privileges) is needed for these and other commands.
To open a command prompt with administrative privileges, use one of these methods:
• Windows 7 and newer Click Start, search for command prompt or cmd, right-click Command Prompt or cmd, and select Run as administrator.
• Windows 8 and newer Press WINDOWS KEY-X and select Command Prompt (Admin).
REVIEW
Objective 1.4: Given a scenario, use appropriate Microsoft command line tools Windows command-line tools can be used for many purposes:
• Navigation (dir, cd, ..)
• Network reporting and troubleshooting (ipconfig, ping, tracert, netstat, nslookup, net use, net user)
• System management and repairs (shutdown, dism, sfc, chkdsk, gpupdate, gpresult, taskkill)
• Disk and file management (format, diskpart, copy, xcopy, robocopy)
• Help (available for almost any command-line tool by adding /? to the command)
An elevated (administrative) command prompt is required for some commands.
1.4 QUESTIONS
1. System File Checker (sfc) is unable to repair problem files. Which command will repair the image used by sfc?
A. chkdsk
B. gpupdate
C. dism
D. ipconfig
2. You are unable to remove all of the contents of an existing hard disk using Disk Management. Which command should you use instead?
A. format
B. diskpart
C. taskkill
D. dism
3. A user calls you to ask for help with her network connection. To find out what her network settings are, which of the following commands should be run?
A. ping
B. netstat
C. net use
D. ipconfig
4. You need to use ping to check the connectivity to a network server 164.172.1.150, also known as MyServer.net. Which of the following is the correct syntax?
A. ping //MyServer.net
B. ping 164-172-1-150
C. ping MyServer.net
D. ping theserverforthisnetwork
5. You are providing telephone support to a user named Miranda that needs to access her personal folders at a command prompt. From her Users folder, which of the following commands would she need to use to get to her personal folders?
A. cd Miranda
B. Miranda.exe
C. ls Miranda
D. cd Miranda
1.4 ANSWERS
1. C The dism command repairs the SFC image file.
2. B The diskpart command has an option (clean all) to remove all contents from a connected drive.
3. D The ipconfig command can display various amounts of information about the user’s network connection, depending on which options are used.
4. C You can use either the IP address or the URL with ping. However, the syntax must be correct.
5. D cd foldername drops the focus of the command prompt down one level, and Miranda is in the next level below the Users folder.
Objective 1.5 Given a scenario, use Microsoft operating system features and tools
Windows includes a variety of features and tools that help you to manage systems, users, drives, devices, policies, and updates. The ones you need to know for the CompTIA A+ 220-1002 exam are covered in this objective.
Administrative
Most of the Administrative Tools covered in the following sections are available from the Administrative Tools folder in Control Panel (see Figure 1.5-1).

FIGURE 1.5-1 Administrative Tools in Windows 10
Computer Management
Computer Management is a Microsoft Management Console (MMC) snap-in that provides access to Device Manager, Local Users and Groups, Event Viewer, Performance, Disk Management, and Services (refer to Figure 1.5-2). Most of these tools are also available separately from the Administrative Tools folder.

FIGURE 1.5-2 Computer Management in Windows 10
EXAM TIP Computer Management is an MMC snap-in that collects several admin tools in one place, but these tools can be accessed individually in other ways that you should be able to identify.
Cross-Reference
Device Manager
Use Device Manager to view the status of system components and connected devices. You can use it to troubleshoot problem devices such as the disabled COM port in Figure 1.5-3. You can also update or roll back drivers, see power usage for USB devices, and view events for a particular device.

FIGURE 1.5-3 Device Manager window and device properties in Computer Management (Windows 10)
EXAM TIP Use Device Manager when a device has failed and causes problems for Windows. Device Manager is the first tool in Windows to use for hardware issues.
Local Users and Groups
Professional editions of Windows include the Local Users and Groups tool (see Figure 1.5-4), a more powerful tool for working with user accounts—one that won’t hold your hand like Control Panel applets do.

FIGURE 1.5-4 The Local Users and Groups tool in Windows 10 Pro
To add a group, right-click a blank spot in the Groups folder, select New Group, and enter a group name and description in the New Group dialog box. Click Add below the member list to open a dialog box that you can use to add multiple object types, such as user accounts, computers, and even other groups (see Figure 1.5-5).

FIGURE 1.5-5 Creating a new local group and selecting users in Windows 10 Pro
You can also add or remove group membership through the user’s properties. Just open the user’s folder, right-click the user, select Properties, click the Member Of tab, and click Add below the group list.
EXAM TIP Local Users and Groups is not available in Home editions of Windows.
Performance Monitor
You can start Performance Monitor by selecting it from Computer Management, from Administrative Tools in Control Panel, or from the command-line with perfmon. When you start Performance Monitor, it opens to an introduction to the tool and a System Summary showing memory, network, disk, and processor information (see Figure 1.5-6).

FIGURE 1.5-6 Initial Performance Monitor screen in Windows 10
Performance Monitor gathers and graphs real-time data on objects (system components such as memory, physical disk, processor, and network). When you first open it, Performance Monitor shows a graph of data from the set of counters, which track a specific piece of information about an object, listed below the chart. The default is % Processor Time (see Figure 1.5-7).

FIGURE 1.5-7 Resource Monitor displaying % Processor Time
To add counters, click the Add (plus sign) button or press CTRL-I to open the Add Counters dialog box. Click the Performance object drop-down list and select an object to monitor. To change the color of a counter, right-click it and select the color desired. To make one counter stand out (see Figure 1.5-8), select it in the list and press CTRL-H.

FIGURE 1.5-8 Pressing CTRL-H makes one set of data stand out.
Data Collector Sets are groups of counters you can use to make reports. Once you start a Data Collector Set, you can use the Reports option to see the results (see Figure 1.5-9). Data Collector Sets not only enable you to choose counter objects to track, but also enable you to schedule when you want them to run.

FIGURE 1.5-9 Sample report
Services
Windows has many services that run in the background, providing support for many of your system’s features. The Services applet (see Figure 1.5-10) lists available services and shows whether they are running as well as when they are allowed to run: Automatic services start early in the boot process, Automatic (Delayed Start) services start after everything else, Manual services must be launched by the user, and Disabled services won’t run. The Services applet also allows you to start, stop, pause, restart, or resume a service. In general, you use the applet to enable services to support something that isn’t working, to disable services for security or performance reasons, and to restart a malfunctioning service.

FIGURE 1.5-10 Using Services to view the properties for the BingBar services
Local Security Policy
Local Security Policy (shown in Figure 1.5-11) is used to view and configure a wide variety of policies including password, account lockout, Windows Defender Firewall, software restrictions, and many others.

FIGURE 1.5-11 Viewing available Public Key Policies objects in Local Security Policy (Windows 10)
Cross-Reference
System Configuration/Msconfig
In Windows 7, techs use the System Configuration utility (also known by its executable name, msconfig) to edit and troubleshoot startup processes and services. From Windows 8 on, this functionality moves to the Startup tab in the Task Manager, which you’ll see later in this objective.
To start the System Configuration utility, go Start | Search, type msconfig, and click OK or press ENTER. The System Configuration utility (shown in Figure 1.5-12) offers a number of handy features, distributed across the following tabs:

FIGURE 1.5-12 Windows 7 System Configuration utility
• General For the next boot, select a normal startup with all programs and services, a diagnostic startup with only basic devices and services, or a custom boot called selective startup.
• Boot See every copy of Windows you have installed, set a default OS, or delete an OS from the boot menu. You can set up a safe boot, or adjust options like the number of cores or amount of memory to use. While selected, Safe boot will always start the system in Safe mode with minimal, generic, trusted drivers for troubleshooting purposes.
• Services Enable or disable services running on your system.
• Startup Enable or disable any startup programs that load when you launch Windows.
• Tools Lists many of the tools and utilities available elsewhere in Windows, including Event Viewer, Performance Monitor, Command Prompt, and so on.
EXAM TIP Windows 8 and later also have the System Configuration utility with the same tabs as the Windows 7 version. However, the Startup tab in these versions has a link to Task Manager.
Task Scheduler
Windows uses Task Scheduler to schedule its own automatic maintenance, and you can use its powerful options to create your own tasks or modify existing schedules. Among other useful settings, each task has triggers, actions, and conditions (see Figure 1.5-13) that, respectively, define when it runs, what it does, and criteria that must be met before it runs. The Windows default overnight maintenance schedules are fine for most of us—but they may be no good for users on the night shift.

FIGURE 1.5-13 Viewing Task Scheduler’s Triggers tab (Windows 10)
EXAM TIP Task Scheduler illustrates why you need to know executable names and command-line options for common utilities—this is how a task action specifies the options a utility needs to run without user input.
Component Services
Component Services is a tool administrators and developers use to configure systems to support specific applications (typically in-house or otherwise custom applications that take advantage of data-sharing tools with names such as COM, DCOM, and COM+). Professional software can typically handle all of this by itself. If you need to use this tool, you’ll almost certainly have explicit directions for what to do with it.
Data Sources
ODBC Data Source Administrator (shown in Figure 1.5-14) enables you to create and manage Open Database Connectivity (ODBC) entries called Data Source Names (DSNs) that point ODBC-aware applications to shared databases. Once again, you’ll probably have explicit instructions if you need to use this.
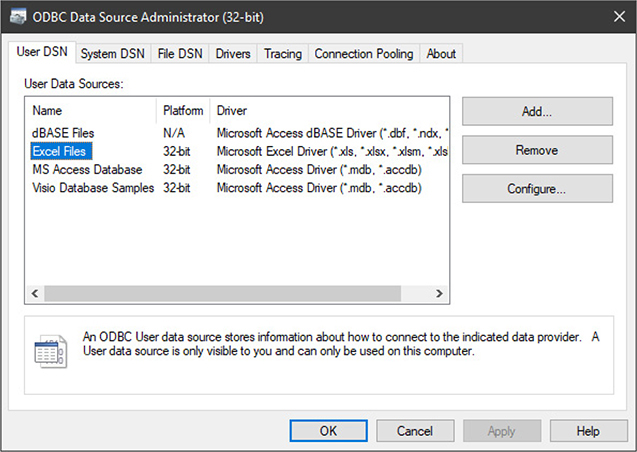
FIGURE 1.5-14 ODBC Data Source Administrator in Windows 10
Print Management
Print Management (see Figure 1.5-15) enables the user to install, view, and manage printers, printer drivers, print jobs, and print servers. Print Management is available in the Administrative Tools applet and is an MMC snap-in. It can also be launched by pressing the WINDOWS KEY-R and entering printmanagement.msc in the Run command box.
FIGURE 1.5-15 Print Management in Windows 10
Windows Memory Diagnostics
Windows Memory Diagnostic runs on the next reboot when selected. During the next reboot, the diagnostic tool checks your RAM (see Figure 1.5-16) for the sorts of problems that can cause Blue Screens of Death (BSoDs), system lockups, and continuous reboots. After the tool runs and your system reboots, you can use Event Viewer to see the results.

FIGURE 1.5-16 Windows Memory Diagnostic Tool running
EXAM TIP You can launch the Windows Memory Diagnostic Tool from Administrative Tools or as mdsched at an administrative command prompt. It is available in the Windows Recovery Environment GUI in Windows 7. In Windows 8/8.1/10, it can be run from the Windows Recovery Environment command prompt.
Windows Firewall
Windows includes a firewall that is designed to block unwanted inbound traffic. The standard Windows Firewall is configured through Control Panel | System and Security | Windows Firewall in Windows 7 and 8/8.1. In Windows 10, the firewall is called Windows Defender Firewall (see Figure 1.5-17), is part of Windows Security, and is configured through Settings | Update & Security | Windows Security. These firewalls offer different settings for public and private networks and enable apps to be added to or removed from the network permissions list (see Figure 1.5-18).

FIGURE 1.5-17 Windows Defender Firewall (Windows 10)

FIGURE 1.5-18 Preparing to add an app to the list of permitted apps
The task list on the left includes links to
• Allow a program or feature through the firewall
• Configure notification settings
• Turn the firewall on or off
• Restore firewall defaults
• Enable advanced settings (runs firewall with Advanced Security)
• Network troubleshooting
EXAM TIP Make sure you know what the firewall is called in different versions of Windows and how to start it.
Advanced Security
To enable protection against unwanted outbound traffic as well as inbound traffic, open Windows Defender Firewall with Advanced Security (Windows 10) or Windows Firewall with Advanced Security (Windows 7/8/8.1); click Advanced Settings from the Windows (Defender) Firewall’s task list. With these firewalls, you can create specific rules for inbound and outbound traffic, import policies you have already created, or export policies you have created for use on other computers (see Figure 1.5-19).
FIGURE 1.5-19 Viewing current outbound traffic rules in Windows Defender Firewall with Advanced Security (Windows 10)
EXAM TIP The Advanced Security versions of Windows Firewall can block outbound as well as inbound traffic.
Event Viewer
With a little tweaking, Event Viewer (see Figure 1.5-20) records almost any system event you might want to know about, making it useful as both a troubleshooting tool and a security tool.

FIGURE 1.5-20 Windows 10 Event Viewer default screen
Note the four main bars in the center pane: Overview, Summary of Administrative Events, Recently Viewed Nodes, and Log Summary. The Summary of Administrative Events breaks down the events into different levels: Critical, Error, Warning, Information, Audit Success, and Audit Failure. You can click any event to see a description of the event.
EXAM TIP Be sure to know the four sections (Overview, Summary of Administrative Events, Recently Viewed Nodes, and Log Summary) as well as Application, Security, and System logs in Event Viewer.
Windows Event Viewer includes classic Application, Security, and System logs, but leans heavily on filtering their contents through Views that enable custom reports by beginning/end times, error levels, and more. You can use the built-in Views or easily create your own. Administrators can configure log file location as well as maximum size and what to do when it’s reached, as shown in Figure 1.5-21.

FIGURE 1.5-21 Log Properties dialog box in Windows 10
User Account Management
Manage user accounts through the User Accounts section of Control Panel. You can create new accounts, change account types (Standard, Administrator), change User Account Control (UAC) settings, and change passwords. In Windows 10, use Windows Settings | Accounts | Your info to change your own account. To manage other users, use Windows Settings | Accounts | Family and other users. In Windows 7, you can use User Accounts, and in Windows 8/8.1, User Accounts and Family Safety (see Figure 1.5-22) to manage your own account settings as well as those of other users.
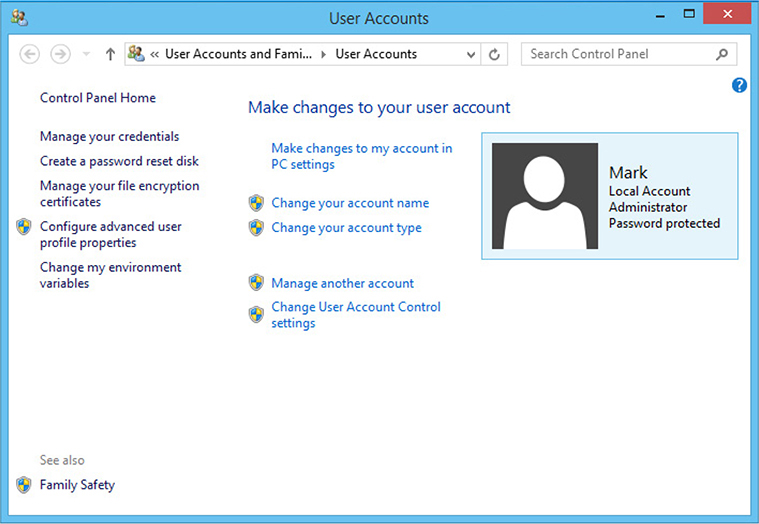
FIGURE 1.5-22 Managing user accounts in Windows 8.1
EXAM TIP Be sure to know how user account management varies in Windows 7/8/8.1 and Windows 10.
Task Manager
Half of the optimization battle is knowing what needs to be optimized. Current versions of Windows rely on the Task Manager to manage applications, processes, and services. Most users just use it to shut down troublesome programs, but it’s a great tool for keeping tabs on how hard your system is working—and, if it’s running slowly, what the cause may be. The quickest way to open the Task Manager is pressing CTRL-SHIFT-ESC. The Task Manager got a major update in Windows 8 and newer versions, so we’ll look at the major variations separately.
EXAM TIP You can do a number of things you’d normally open the Task Manager for from the command line, or even with scheduled tasks. You can start and stop services with net start <service> and net stop <service>, list processes with tasklist, and kill them with taskkill.
The Task Manager in Windows 7 enables you to control and review essential Windows components. It has six tabs:
• The Applications tab shows all the running applications on your system. If you’re having trouble getting an application to close normally, this is the place to go.
• The Processes tab (see Figure 1.5-23) shows you every running process and enables you to kill it.

FIGURE 1.5-23 Processes tab and context menu options
NOTE Every program that runs on your system is composed of one or more processes.
• The Services tab enables you to work directly with services, the small programs that control various components of Windows (such as printing, sharing files, and so on). Here, you can stop or start services, and you can go to the associated process.
• The Performance tab (see Figure 1.5-24) enables you to see CPU usage, available physical memory, the size of the disk cache, commit charge (memory for programs), and kernel memory (memory used by Windows).

FIGURE 1.5-24 Task Manager Performance tab
• The Networking tab enables you to see network use at a glance and is a good first spot to look if you think the computer is running slowly on the network.
• The Users tab enables you to see which users’ accounts are currently logged on to the local machine and, with the proper permissions, enables you to log off other users.
Task Manager Tabs in Windows 8/8.1/10
With Windows 8 and later, Task Manager defaults to a simplified Fewer details view (left side of Figure 1.5-25) for listing and terminating running programs, but you can click More details to get the traditional tabbed view (right side of Figure 1.5-25). Even here, much changed from the Windows 7 version. While the Performance, Services, and Users tabs all still exist, the Networking tab has been merged into the Performance tab, and the Task Manager gains three new tabs: App history, Startup, and Details.
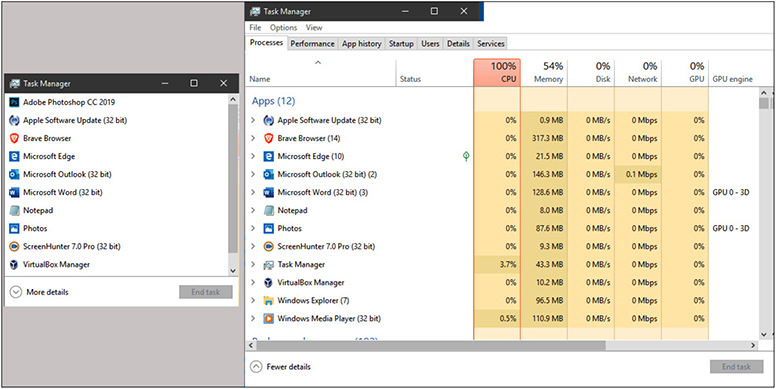
FIGURE 1.5-25 Fewer details/more details views in Windows 10 Task Manager
• Task Manager’s More details view opens on the Processes tab. When sorted by the Name column, it groups processes into three sections: Apps, Background processes, and Windows processes. Regardless of how you sort these processes, the view shows a color-coded breakdown of CPU, memory, disk, and network. Windows 10 adds GPU usage.
• The Performance tab (shown in Figure 1.5-26) serves the same purpose as in previous versions, but it is easier on the eyes and folds in performance information about disk (Disk I/O) and network use.

FIGURE 1.5-26 Performance tab in Windows 10 Task Manager showing a very active Disk 0
• The App history tab collects recent performance statistics regarding how heavily processes are hitting the CPU and network.
• The Startup tab, which moved over to Task Manager from System Configuration, enables you to control which programs load when Windows does, and assess what impact each has on the startup process.
• The Users tab serves the same basic purpose as in previous versions, but it also makes it dead simple to see what impact other logged-in users are having on system performance.
• The Details tab has all of the details that used to be in the Processes tab in the Windows 7 Task Manager.
• The Services tab is virtually unchanged, but it did receive some nice polish, such as a context-menu option to search for a process online as well as to restart a service with a single click.
EXAM TIP Be sure to know the changes in Task Manager between Windows 7 and Windows 8/8.1/10 (more tabs, Details tab instead of Processes tab, More/Fewer Details option, etc.).
Disk Management
Disk Management (located in the Computer Management MCC) is the go-to tool for adding drives or adding arrays to a Windows system, as well as for modifying them. To make changes to a drive, right-click its icon in Disk Management and choose the appropriate operation from the menu.
Drive Status
Disk Management shows the drive status of every initialized mass storage device in your system, making it handy for troubleshooting. Hopefully, you’ll see each drive listed as Healthy.
• Unallocated The disk has no file system or has a file system that is not recognized by Windows (such as a Linux- or macOS-specific file system).
• Active The disk partition used to boot the system.
• Foreign drive Shown when you move a dynamic disk to another system.
• Formatting Shown while you’re formatting a drive.
• Failed The disk is damaged or corrupt; you’ve probably lost some data.
• Online The disk is healthy and communicating properly with the computer.
• Offline The disk is either corrupt or having communication problems.
A newly installed drive is set as a basic disk; there’s nothing wrong with basic disks, though you miss out on some handy features.
Mounting
You can use Disk Management to mount a volume to an empty folder. This is helpful if you want to access an additional drive through an existing folder instead of as an additional drive letter. For example, a drive containing photos could be mounted into an empty folder called Photos that is a subfolder of your Pictures folder. A folder that is used to mount a volume is known as a mount point.
To create a mount point:
1. In Disk Management, right-click the volume you want to mount and select Change Drive Letter and Paths.
2. Click Add.
3. Click Browse.
4. Navigate to the empty folder you want to use, or click New Folder to create a folder.
5. After clicking the folder to use for the mount point, click OK.
Initializing
A drive that has not been previously connected to Disk Management must be initialized before use in your system, even if it has been formatted and contains data. Don’t worry—initialization in Disk Management-speak simply means that Disk Management identifies the drive and what its role is—such as whether it is part of a software RAID array or a spanned volume. No data is harmed. A drive is listed as Unknown until it is initialized (see Figure 1.5-27). To initialize the disk drive, right-click it and select Initialize Disk.

FIGURE 1.5-27 Unknown drive in Disk Management
Extending, Shrinking, Splitting Partitions
Disk Management can also be used to extend and shrink volumes in current versions of Windows without using dynamic disks; CompTIA calls this extending partitions and, oddly, shrinking partitions. You can shrink a volume with available free space (though you can’t shrink it by the whole amount, based on the location of unmovable sectors such as the MBR), and you can expand volumes with unallocated space on the drive.
To shrink a volume, right-click it and select Shrink Volume. Disk Management calculates how much it can shrink and lets you choose up to that amount. Extending volumes is equally straightforward; right-click and select Extend Volume.
EXAM TIP The CompTIA A+ 220-1002 exam objectives mention “splitting” partitions, but there’s no “split” option. To turn one partition into two, remove the existing partition and create two new ones, or shrink the existing partition and add a new one in the unallocated space. If you see “splitting” on the exam, know that this is what CompTIA means.
Assigning/Changing Drive Letters
Drive letters are assigned automatically by Windows when fixed or removable storage drives are connected. You can see the drive letters assigned to existing drives using Disk Management, and you can also change them. Use the New Simple Volume Wizard to assign a drive letter to a volume when you create it. To change the drive letter used by an existing volume, right-click it and choose Change Drive Letter and Paths.
CAUTION When you change a drive letter, make sure that any apps that are using that drive letter for program or data storage are configured to use the new drive letter, or they will fail.
Adding Drives
A drive that already has a file system recognized by Windows, such as an external USB hard disk or thumb drive or a flash memory card, is automatically recognized by Disk Management and assigned a drive letter.
However, a hard drive that has not been connected to the system before must first of all be initialized. Then, it can be partitioned if it has no recognized file system.
Adding Arrays
Dynamic disks can’t be used as boot disks but they support various types of drive arrays (also known as dynamic disk volume types) you can create with Disk Management:
• Spanned The capacities of two or more disks are added together. Equivalent to just a bunch of disks (JBOD) hardware array.
• Striped Data is written across two drives to enhance speed; a software version of a RAID 0 hardware array.
• Mirrored Data is written to two drives at the same time, so if one drive fails, the array can be rebuilt from the copy on the other drive; a software version of a RAID 1 array.
• RAID 5 Data and parity (recovery) information is written across three or more drives, so the array can be rebuilt if one disk fails; software version of a RAID 5 hardware array.
To create any of these arrays, you start with empty or backed-up disks (existing contents will be wiped out during the creation process). Right-click the first drive to add to the array, select the type, and add additional drives to the array. After formatting the array, specify a drive letter or mount point and convert the disks to dynamic disks when prompted. In Disk Management, each array is color coded and identified as the type of array (mirror, spanned, or striped).
EXAM TIP Be sure to know the differences between spanned, striped, mirrored, and RAID 5 arrays in Disk Management.
Storage Spaces
The Storage Spaces utility offers a more flexible type of disk array. It was introduced in Windows 8 and also available in Windows 8.1 and 10. Storage spaces are created and managed from the System and Security menu in Control Panel (the drives used by storage spaces are listed as a single drive letter in Disk Management). Storage Spaces creates a storage pool, a collection of physical drives that enable you to flexibly add and expand capacity. From free space in the storage pool, Storage Spaces creates virtual drives that feature fixed provisioning (the space required for a virtual drive is immediately subtracted from the storage pool’s free space) and resiliency, available in four configurations:
• Simple (similar to RAID 0 striping; two or more drives)
• Two-way mirror (similar to RAID 1 mirroring, two or more drives)
• Three-way mirror (five or more drives)
• Parity (similar to RAID 5, three or more drives)
Choose the drive(s) to use in the storage pool, and then create the storage space and select the type of resiliency (if any) to use (see Figure 1.5-28). Check Action Center for alerts about drives in Storage Spaces.
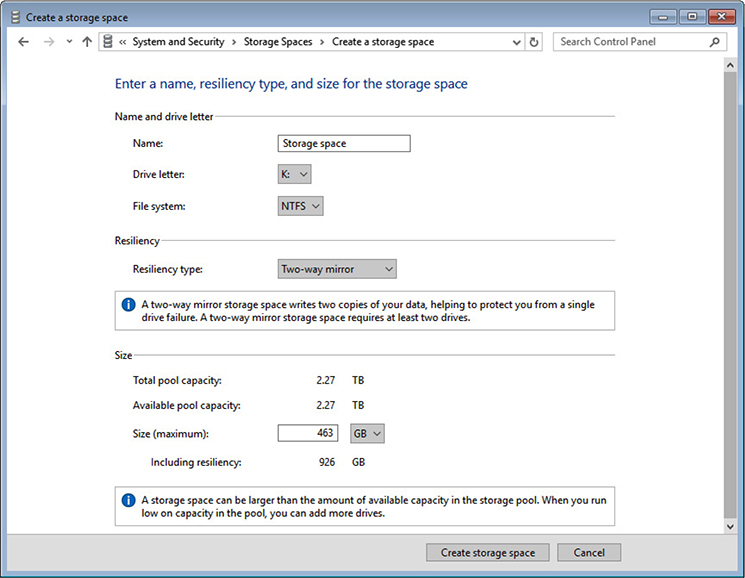
FIGURE 1.5-28 Creating a two-way mirror with Storage Spaces
ADDITIONAL RESOURCES To learn more about using Storage Spaces, go to techgenix.com and search for “Windows 10 Storage Spaces — A Comprehensive Guide.“
System Utilities
Windows includes a variety of system utilities for managing, configuring, and reporting on Windows. The following sections discuss the ones you need to understand for the CompTIA A+ 220-1002 exam.
Regedit
The Windows Registry is a database that stores the Windows hardware, software, and user configuration data in the form of keys and values.
EXAM TIP The five main keys to know are
• HKEY_CLASSES_ROOT
• HKEY_CURRENT_USER
• HKEY_LOCAL_MACHINE
• HKEY_USERS
• HKEY_CURRENT_CONFIG
The Windows Registry Editor (see Figure 1.5-29) is used to view, back up, and change system Registry settings when necessary, and regedit is the command to open the Registry Editor. The Registry Editor works the same way in Windows 7/8/8.1/10. To start it, open Start | Search or Start | Run, type regedit, and press ENTER.
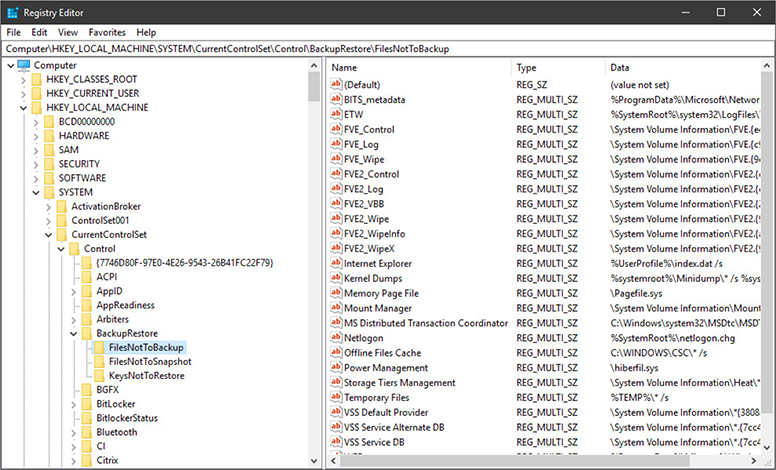
FIGURE 1.5-29 Using the Registry Editor to view files that Backup/Restore will not back up
Registry settings are generally made through Control Panel, PC Settings, or Settings menus or by applications, so changes to the Registry with the Registry Editor are rare. Generally, vendors provide detailed instructions or small regedit scripts if changes are needed.
Command
The Windows command prompt can be run from Start | Search or Start | Run by entering command or cmd and pressing ENTER, but what actually runs is cmd.exe.
EXAM TIP Launching command or cmd starts the command prompt with Standard user privileges.
Cross-Reference
Services.msc
As an alternative to opening Computer Management, then Services, you can go directly to Services via Start | Search by typing services.msc and pressing ENTER.
MMC
Windows has so many utilities that it’s hard to organize them all in a way that satisfies everyone, so Microsoft Management Console (MMC) is simply a shell program that enables you to build your own utility from individual snap-ins. To give you an idea of how powerful an MMC can be, the apps in Administrative Tools are just preconfigured MMCs. To start a blank MMC (see Figure 1.5-30), select Start | Search, type mmc, and press ENTER.
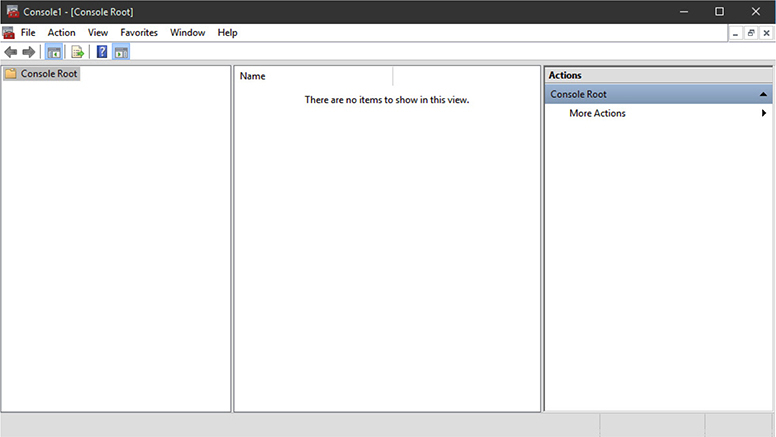
FIGURE 1.5-30 Blank MMC
EXAM TIP Be sure to know how to create a blank MMC and how to add a snap-in.
You make a blank MMC console useful by adding as many snap-ins as you like, including utilities such as Device Manager. You can even buy third-party MMC snap-in utilities. To add one, select File | Add/Remove Snap-ins and then select one from the dialog box’s list of available snap-ins (see Figure 1.5-31). Depending on the snap-in, you may need to configure some additional options before adding it. Once you’ve added the snap-ins you want, you can name the console (and put it somewhere accessible) by saving it.

FIGURE 1.5-31 Adding snap-ins to a blank MMC console
MSTSC (Remote Desktop Connection)
Microsoft’s Remote Desktop Connection, available from the Windows Accessories menu, can connect to and control a remote Windows system with a fully graphical interface (see Figure 1.5-32). Because the Remote Desktop Connection executable is mstsc.exe, you can also open it from the CLI, Search bar, or Run command box by typing mstsc and pressing ENTER.

FIGURE 1.5-32 Windows Remote Desktop Connection dialog box in normal mode (left) and after clicking Show Options (right)
EXAM TIP Be sure to know how to open Remote Desktop Connection.
Notepad
You might not think of Notepad as an important management tool, but you can use it to view the contents of a Registry patch, to view a log file created by some Windows functions, or as a script editor. Notepad is configured to open .txt files by default, but to open other types of files, right-click the file, select Open with, and choose Notepad from the list (see Figure 1.5-33).
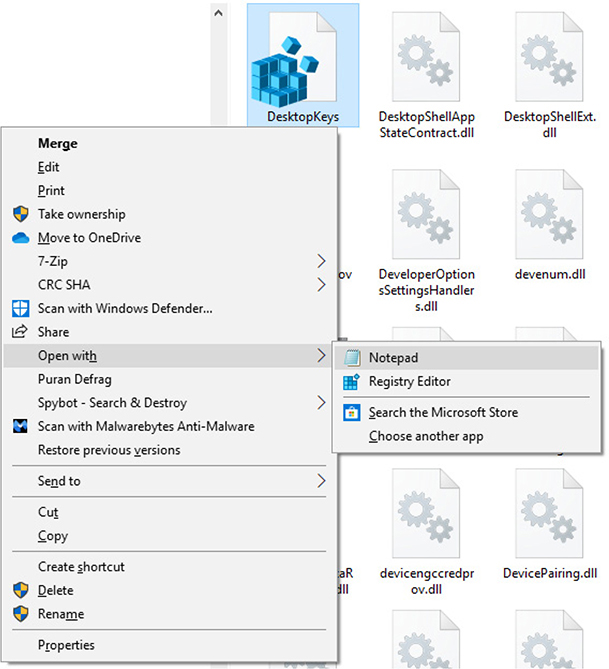
FIGURE 1.5-33 Selecting Notepad to open a Registry file with Open with
EXAM TIP Know how to use Open with to use Notepad to open other types of files.
Windows Explorer/File Explorer
Windows Explorer (Windows 7) or File Explorer (Windows 8/8.1/10) display information about internal, external, and network drives and folders.
Msinfo32
The System Information tool (shown in Figure 1.5-34), referred to by its executable, msinfo32, in CompTIA A+ 220-1002 objective 1.5, collects information about hardware resources, components, and the software environment into a nice report, enabling you to troubleshoot and diagnose any issues and conflicts. As with many other tools, you can access this tool from the Start | Search bar; simply enter msinfo32 and press ENTER.

FIGURE 1.5-34 System Information
EXAM TIP Be sure to know how to start System Information (msinfo32).
DxDiag
Microsoft created DirectX to prove a stable environment for running 3-D applications and games within Windows. DirectX includes many APIs (with names like Direct3D) that support direct access to audio and graphics hardware. Because specific cards and applications support different DirectX versions, you’ll eventually need the DirectX Diagnostic Tool (which CompTIA lists as DxDiag) to confirm a specific DirectX version is installed and working (see Figure 1.5-35). To access it, type dxdiag in the Start | Search bar and press ENTER.
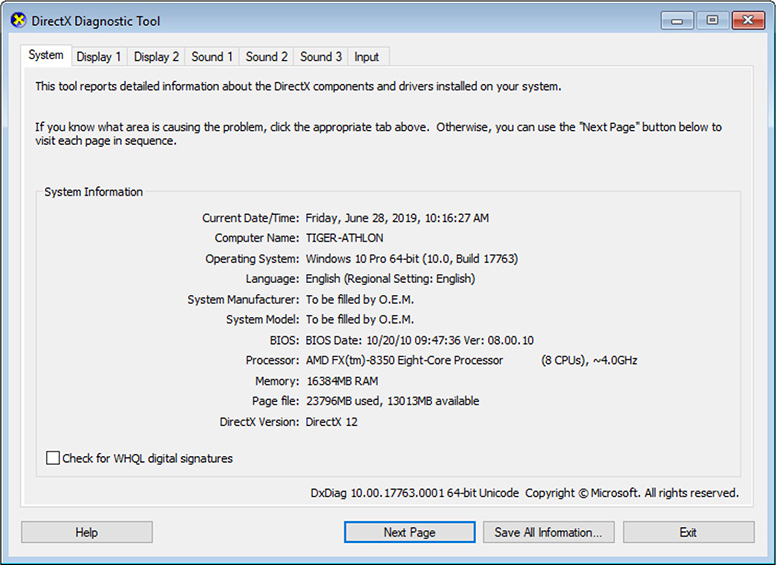
FIGURE 1.5-35 DirectX Diagnostic Tool showing the system is running DirectX 12
EXAM TIP Be sure to learn the tabs that the DirectX Diagnostic Tool uses to show different parts of the computer (System, Display, Sound, and Input). There’s a separate tab for each display and for each sound output.
Disk Defragmenter
Fragmented blocks can increase drive access times, so it’s a good idea to defragment (or defrag) your HDDs as regular maintenance. SSDs don’t fragment like HDDs, so don’t defragment them manually; let Windows handle the task.
You access the defrag tool, called Disk Defragmenter (Windows 7) or Optimize Drives (Windows 8/8.1/10) by right-clicking a drive in Computer, Windows Explorer, or File Explorer, choosing Properties, and clicking the Defragment Now or Optimize button on the Tools tab to open the defrag tool (see Figure 1.5-36). Thanks to Windows running defragmentation automatically (the default is weekly), you hardly ever need to run it manually.

FIGURE 1.5-36 Optimize Drives, the defragmentation tool in Windows 10
EXAM TIP Know how to use Disk Defragmenter or Optimize Drives, but keep in mind it runs automatically.
System Restore
System Restore provides a simple way to return to an earlier restore point (a snapshot of the system hardware and software configuration). Windows creates restore points automatically, but you also can create them manually before making changes to your system. If the computer malfunctions after new hardware or software is added, you can revert to a previous configuration. System Restore is available by clicking the System protection link in the System applet in the Control Panel. It is disabled by default in Windows 10, so if you want to use it, you must enable it.
To restore a particular snapshot, open System Restore, choose the most recent or an older restore point, click Scan for affected programs (optional; see Figure 1.5-37), and start the restore process. After the restore is complete and the system reboots, your system will be back to its configuration, with no data lost.

FIGURE 1.5-37 Selecting a restore point and scanning for affected programs in Windows 10
EXAM TIP Know how to create a restore point and how to choose it with System Restore.
Windows Update
Windows Update will check for available updates automatically, so you’ll often see available updates as soon as you open the applet (see Figure 1.5-38). In Windows 7, there are Important, Recommended, and Optional updates, but Windows 8.1/10 download and install updates automatically without letting you pick and choose.
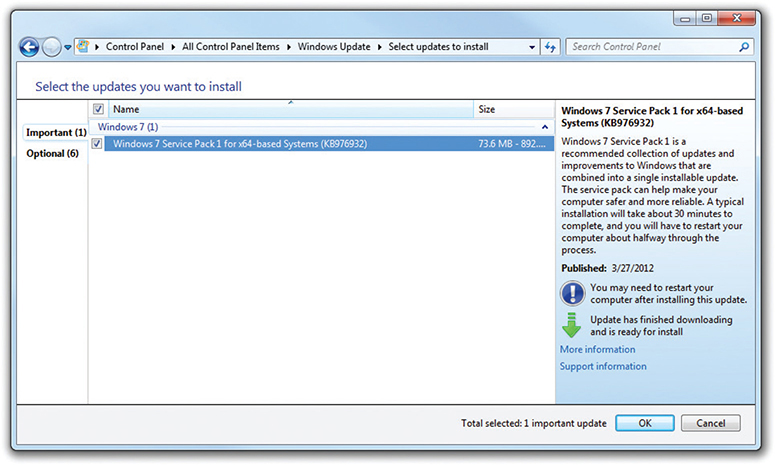
FIGURE 1.5-38 Important Windows 7 SP1 update in Windows Update
Windows Update is accessible in the Control Panel for Windows 7/8/8.1. Windows versions 8 and 8.1 also provide access to it from within the Settings app. Windows Update is only accessible through the Settings app (under Update and Security) in Windows 10 (see Figure 1.5-39).
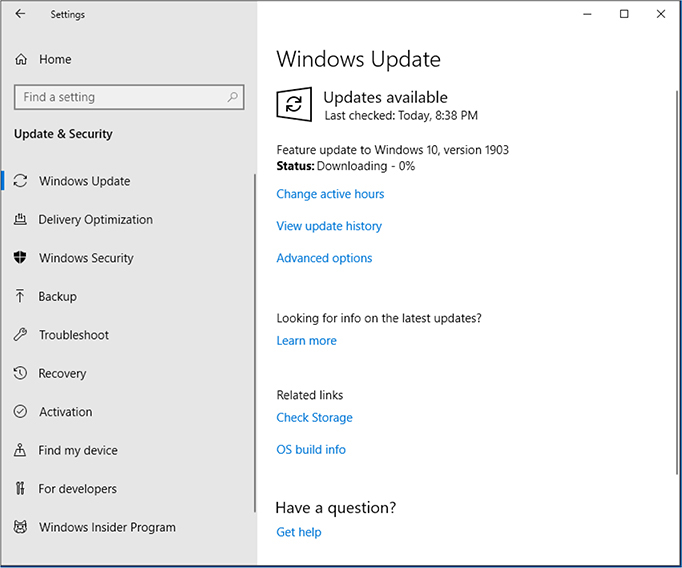
FIGURE 1.5-39 Windows Update in Windows 10
EXAM TIP The CompTIA A+ 220-1002 objectives cover many Microsoft system utilities and tools. Given a scenario on the exam, know how to access and use them all!
REVIEW
Objective 1.5: Given a scenario, use Microsoft operating system features and tools
• The Administrative Tools folder in Control Panel provides a convenient launching pad for Computer Management, Device Manager, Local Users and Groups, Performance Monitor, Services, Local Security Policy, System Configuration, Task Scheduler, Component Services, Data Sources, Print Management, and Windows Memory Diagnostics.
• Other useful tools include Windows Firewall and Windows Firewall with Advanced Security (Control Panel or Settings), Event Viewer (Computer Management), User Accounts (Control Panel), Task Manager (CTRL-SHIFT-ESC), Disk Management (Computer Management | Storage), and Storage Spaces (Control Panel).
• Several tools can be launched with Start | Run, including the Registry Editor (regedit), the command prompt (cmd), MMC, Remote Desktop Connection (mstsc), Notepad, Explorer, System Information (msinfo32), and DirectX Diagnostic Tool (dxdiag).
• The Windows defrag tool (Disk Defragmenter or Optimize) runs automatically, but it can also be run from the right-click drive properties sheet.
• System Restore and Windows Update can be launched from Control Panel or Settings.
1.5 QUESTIONS
1. You have just installed several programs, and now the computer is malfunctioning. How can you find out which programs would be removed if you run System Restore?
A. Run msinfo32
B. Use Windows Update
C. Use Scan for affected programs
D. Use Task Manager
2. You have created a two-way mirror to help protect data. However, it appears as only a single drive letter in Disk Management. Which tool shows which drives are used by the array?
A. Storage Spaces
B. RAID
C. Device Manager
D. Msconfig
3. To block unwanted outbound network traffic, you need to use the Advanced Security version of which of the following?
A. Device Manager
B. Windows Firewall
C. Task Manager
D. MMC
4. You are instructing a bench repair tech on how to view a downloaded Registry script. Which of the following methods should be used to view the script contents safely from within Windows/File Explorer?
A. Double-click the Registry file
B. Right-click the Registry file and select Properties
C. Drag the Registry file into Microsoft Word
D. Right-click the Registry file, select Open with, and choose Notepad
5. You have just upgraded a department’s systems from Windows 7 to Windows 10. One of the users is having performance problems but only sees running apps when using the Task Manager. Which option will show other running processes?
A. Click the Processes tab
B. Click More details
C. None in the Task Manager; must use another tool
D. Click Performance
1.5 ANSWERS
1. C Clicking the Scan for affected programs button in System Restore reveals the programs (and device driver updates) that were installed after the specific restore point so that you can make a note about what might need to be reinstalled or replaced.
2. A You must use Storage Spaces to see the actual drives because the array was created with Storage Spaces.
3. B The Advanced Security version of Windows Firewall can be used to create rules for managing outbound traffic.
4. D Notepad is a safe way to view any text file (and a Registry script is a text file).
5. B The default configuration of the Task Manager in Windows 10 shows only running apps. You must click More details to see processes (which show on the same tab as apps).
Objective 1.6 Given a scenario, use Microsoft Windows Control Panel utilities
Although the Settings app in Windows 10 has replaced many of the traditional Control Panel utilities, the Control Panel is still used for much system management in Windows 10 as well as in Windows 7/8/8.1. The following sections discuss the Control Panel utilities you need to understand for the CompTIA A+ 220-1002 exam. In addition to accessing these functions from the Control Panel, you can also search for them using Start | Search (Windows 7, 10) or open the Charms menu and click Search (Windows 8/8.1).
EXAM TIP The CompTIA A+ 220-1002 exam specifically assumes Classic view with large icons, so you should do what every tech does: switch from Category view to Classic view. The following sections assume you are using Classic view.
Internet Options
CompTIA refers to Internet Options, which is in fact a Control Panel applet, but the actual Windows dialog box that opens after clicking Internet Options in Control Panel is called Internet Properties. The Internet Properties tabs are used to configure Internet Explorer (IE) or Microsoft Edge. Thus, if you cannot make the configuration changes you need to in your browser, make them in Internet Properties.
NOTE You cannot configure non-Microsoft browsers with Internet Properties.
Internet Properties includes the following tabs in Windows 7/8/8.1/10:
• General Set your home page, startup options, browsing history, and appearance settings
• Security Set security levels for websites in different zones (Internet, Local intranet, etc.)
• Privacy Configure the pop-up blocker, set up InPrivate browsing, per-site settings, and cookie management
• Connections Set up Internet, VPN, LAN, proxy settings
• Programs Select default programs for browsing, HTML editing, and file associations
• Advanced Configure accessibility, graphics acceleration, multimedia, and other settings
EXAM TIP Know how to access Internet Options and configure the various Internet Properties browser settings for a given scenario.
Display/Display Settings
Beyond directly adjusting the display itself, the Display applet in Control Panel or Display Settings app enables you to adjust monitor resolution, refresh rate, driver information, color depth, and more. The specifics differ by operating system, although the options are fairly obvious once you know you can make these changes.
To adjust resolution in Windows 7, click the Adjust resolution link in the Display applet and then click the arrow in the Resolution drop-down list box (see Figure 1.6-1). Manually slide the marker to change resolution.
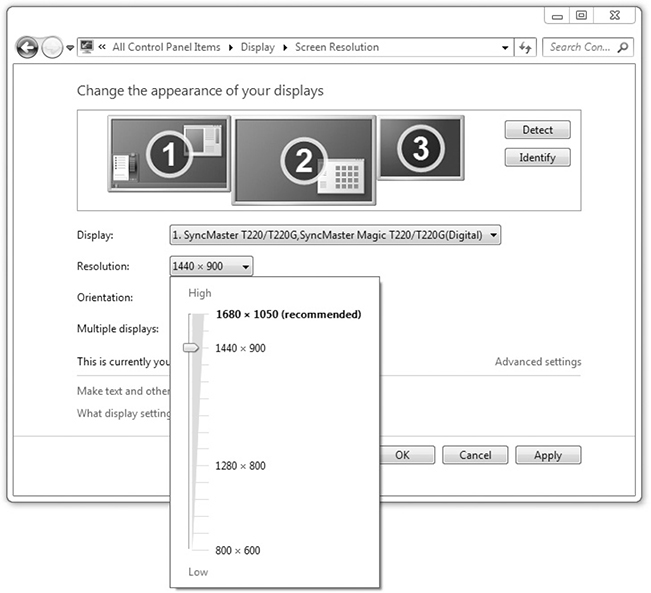
FIGURE 1.6-1 Screen Resolution options in Windows 7 Display applet
Similar options are in Display Settings in Windows 10 (see Figure 1.6-2). Windows displays only resolutions that your video card/monitor combination can accept. Normally, you should use the recommended value, which matches your monitor’s native resolution. For those with trouble seeing small screen elements, Windows supports rescaling them to a larger size (though some applications don’t handle this well).

FIGURE 1.6-2 Display Settings in Windows 10
The color quality, also called color depth, is how many colors the screen can display. Unless you have an older video card or a significant video speed issue, set your color depth to the highest supported value.
LCD displays use a fixed refresh rate (how quickly the screen redraws). However, if you are supporting old systems that use CRT displays, you can also adjust the refresh rate. If your CRT display can use refresh rates of 72 Hz or higher, flickering is reduced or eliminated. To change the refresh rate, click the Advanced settings link in the Display dialog, click Monitor, and choose a different refresh rate.
Another option you may see is multiple monitors or multiple displays (which CompTIA calls dual displays). Most systems can use two (or more) monitors like two halves of one large monitor, or to duplicate what’s happening on the first. Multiple monitors are handy if you need lots of screen space but don’t want to buy a really large, expensive monitor.
Each video card supports one or more monitors, so the first step is to confirm you have one or more video cards that, combined, can support the monitors you need. From here, it’s easy. Just plug in the monitors and Windows should detect them. Windows will show each monitor in the Display applet (see Figure 1.6-3). Select the appropriate option to extend or duplicate your desktop on the new monitor. Each monitor can use different resolutions.
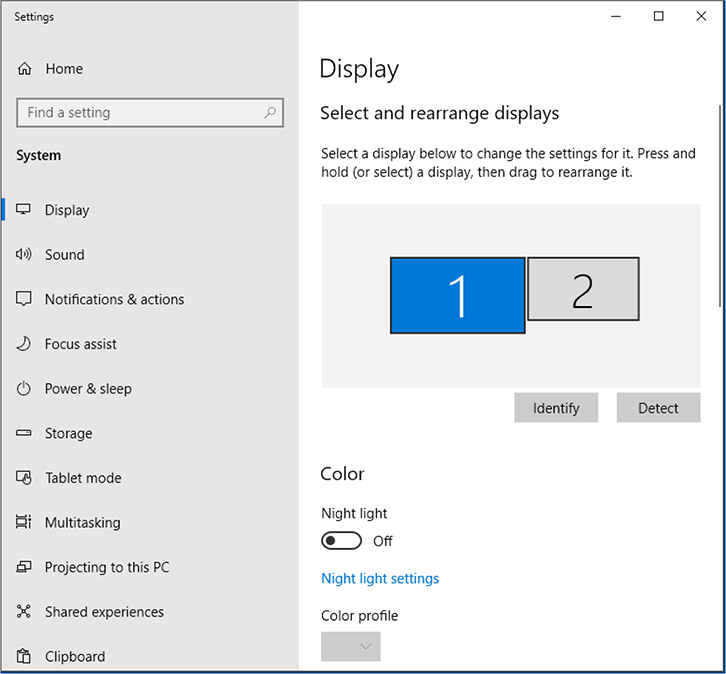
FIGURE 1.6-3 Using multiple displays in Windows 10
EXAM TIP Be sure to know how to change resolution, color depth, and refresh rate.
User Accounts
The User Accounts applet in the Control Panel enables you to manage your own account (Windows 7/8/8.1), manage other accounts, or change User Account Control settings (refer to Figure 1.5-22 in the previous objective). In Windows 10, you manage your own account using Accounts in Settings.
Cross-Reference
Folder Options
To change how files and folders are viewed in Windows 7/8/8.1, open Folder options | View tab. In Windows 10, open File Explorer options | View tab. Scroll through the options shown in Figure 1.6-4 to find these settings:
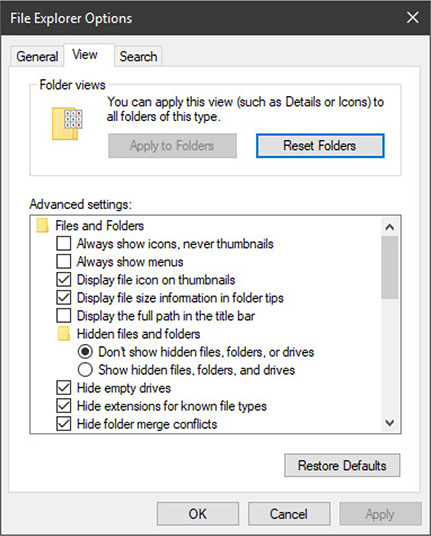
FIGURE 1.6-4 Viewing folder standard and advanced attributes options in File Explorer
• Click the Show hidden files, folders, and drives radio button to make them visible in Windows/File Explorer.
• Clear the Hide extensions for known file types checkbox to make file extensions visible.
NOTE Folder options can also be changed in Windows Explorer (Windows 7) or File Explorer (Windows 8/8.1/10).
EXAM TIP Be sure you know how to show hidden files, folders, and drives in Windows/File Explorer by changing Control Panel settings.
System
The System applet in Control Panel, in addition to displaying information about the hardware and Windows version in use, is also used for configuring performance and security settings.
Performance (Virtual Memory)
From the System applet, you can access the Performance Options dialog box to configure CPU, RAM, and virtual memory (page file) settings. To access these options, click the Advanced system settings link in the Tasks list.
NOTE You can also open the System applet by right-clicking Computer or This PC in Windows/File Explorer and clicking Properties.
On the Advanced tab of the System Properties dialog box, click the Settings button in the Performance section. The Performance Options dialog box has three tabs:
• Visual Effects Adjust visual effects for Windows.
• Advanced Adjust processor scheduling for the best performance of programs or background services, and modify the size and location of virtual memory. Virtual memory is used as a substitute for RAM when there is not enough RAM for the currently running programs.
• Data Execution Prevention (DEP) Control which programs are protected by DEP. DEP works in the background to stop viruses and other malware from taking over programs loaded in system memory.
Remote Settings
To configure whether your Windows system can act as a Remote Assistance or Remote Desktop server, go to the System applet and click the Remote settings link. The Remote tab in System Properties has checkboxes for both Remote Assistance and Remote Desktop, along with buttons to configure more detailed settings.
System Protection
System protection is used to configure the System Restore feature in Windows. To access it, click the System protection link in the task list. The System Protection tab provides options for turning on protection for each local drive connected to the system, overall system protection settings (enable/disable) and disk space to use, creating a restore point, and selecting a restore point to use when running System Restore.
Cross-Reference
Windows Firewall
Windows (Defender) Firewall provides separate settings for private (Home/Work) and public networks. To access Windows (Defender) Firewall in Control Panel, open Windows (Defender) Firewall.
Cross-Reference
Power Options
Power management refers to the ability of a system to shut down unused devices. To make this possible, the hardware, UEFI/BIOS, and OS in modern systems cooperate. The first power management standard, Advanced Power Management (APM) has been superseded by Advanced Configuration and Power Interface (ACPI). However, it’s common to refer to both standards when discussing power management.
APM and ACPI require the following: a CPU that supports SMM (system management mode), capable of being slowed down or stopped to save power; a BIOS or UEFI/BIOS that supports APM and ACPI, enabling the CPU to turn off devices; Energy Star–compliant devices that can be turned off by the CPU; and an OS that can be configured to turn off unused devices and slow down the CPU when desired.
Power Plans
In Windows, APM/ACPI settings are in the Power Options Control Panel applet (also accessible via the Power icon in the notification area—if it is present). Windows power plans—Balanced, High performance, and Power saver—enable better control over power (see Figure 1.6-5).

FIGURE 1.6-5 Windows Balanced, High performance, and Power saver power plan options
You can customize a power plan for your portable (see Figure 1.6-6) that will turn off the display or put the computer to sleep at different time intervals when on battery or AC power.
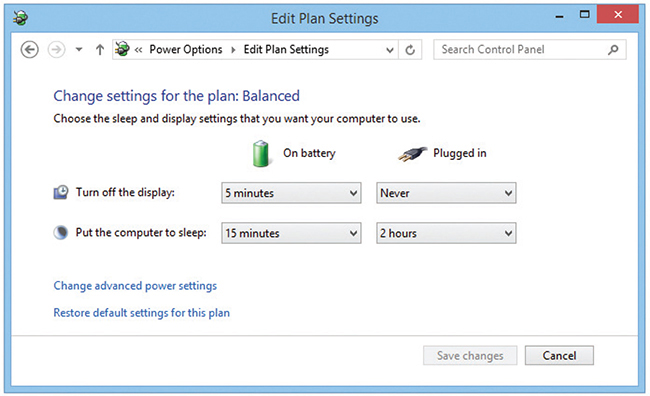
FIGURE 1.6-6 Customizing a laptop power plan in Windows
In Windows 10, you can also change display and sleep power settings: Settings | System | Power & sleep.
Sleep/Suspend/Standby/Hibernate
Optional power plan settings include sleep, suspend, standby, and hibernate.
Sleep mode (also known as suspend) runs the system at very low power by saving the current system condition to RAM. This enables the system to be fully operational in just a few seconds. Standby runs the system at less power than normal, but more than sleep mode; standby mode is found mainly in older systems. Hibernate mode takes everything in active memory and stores it on the hard drive before the system powers down, and reloads it into RAM when the system wakes. To enable these modes, you might need to open Power Options | Choose what the power buttons do. Items that are checked in Shutdown settings are enabled. To change settings, click the Change settings that are currently unavailable link (Figure 1.6-7).
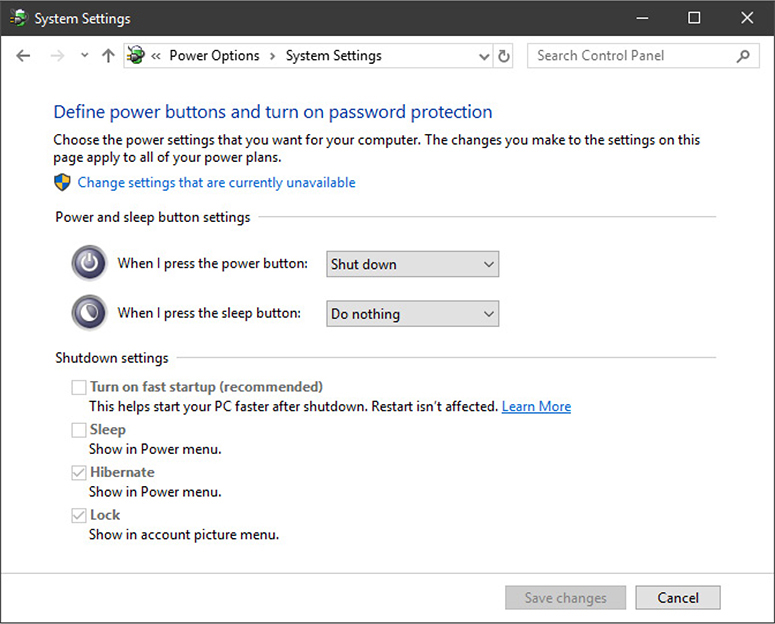
FIGURE 1.6-7 Power button and shut down settings dialog in Power Options
EXAM TIP Be sure to understand the differences between sleep/suspend, standby, and hibernate.
Credential Manager
The Credential Manager Control Panel applet is used to store and manage credentials used by websites that require logins. Select the credential type and click the credential to view details. To view a credential’s password, click Show and provide the user name and password for the credential. You can also edit or remove a credential.
Programs and Features
Programs and Features (see Figure 1.6-8) is used to view and manage installed programs, uninstall or repair programs, and turn Windows features on and off. In Windows 10, you can use either Programs and Features in the Control Panel or Apps and features in Settings to perform program management.
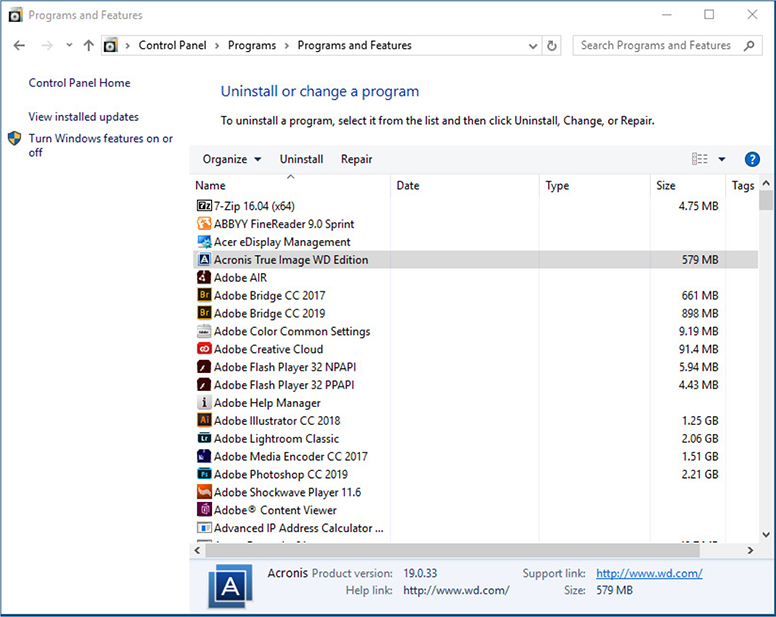
FIGURE 1.6-8 Using Programs and Features in Windows 10 to uninstall or repair an app
HomeGroup
Windows 7, 8/8.1, and early releases of Windows 10 all support HomeGroup, a home networking technology for sharing folders and printers.
To create a homegroup, open the HomeGroup applet and click Create a homegroup. Select the libraries or printers you want to share with other users and note the password (all users of the homegroup use the same password). To join an existing homegroup, open the HomeGroup applet, click Join now, enter the password, choose which libraries you want to share with everyone else, and the new computer is in the homegroup!
A homegroup is set up on one computer on the network (see Figure 1.6-9), and the homegroup password that is generated during setup is used to add other computers to the homegroup. Use File Explorer or Windows Explorer to access the contents of a homegroup or conventionally networked devices.

FIGURE 1.6-9 Creating a new homegroup in Windows 8.1
NOTE Windows 10 dropped HomeGroup support starting with version 1803. To share files and printers from Windows 10 version 1803 and newer editions, right-click a folder or printer, select Give access to, and specify the user(s) to share with. Windows 7/8/8.1 can also share with Windows 10 version 1803 and newer with the right-click menu, choosing Share with.
Devices and Printers
Devices and Printers provides centralized viewing and management of computers, monitors, printers, and peripherals (see Figure 1.6-10).

FIGURE 1.6-10 Using Devices and Printers to access computer settings
NOTE If Windows does not automatically detect a newly connected device or printer, you can use the corresponding toolbar option in the Devices and Printers applet.
Sound
The Sound applet features a Playback tab for managing speakers and headset volume and balance (see Figure 1.6-11), a Recording tab for managing microphone volume and gain, a Sounds tab for selecting and modifying sound schemes (the sounds that play during events such as system startup or errors), and a Communications tab to specify what to do with sound volume during telephone calls. Click the Configure button to set up the selected device, the Set Default button to specify which device to use as default, and the Properties button to tweak additional volume or other properties.
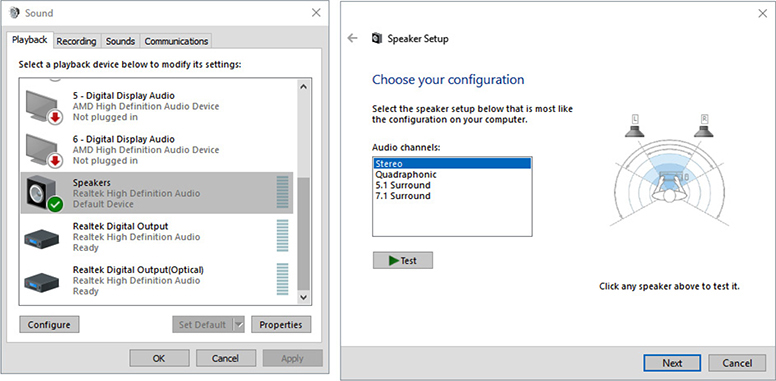
FIGURE 1.6-11 Selecting the speaker setup using the Configure button in the Sound applet
Troubleshooting
Troubleshooting is located in Control Panel in Windows 7/8/8.1 (see Figure 1.6-12) and in Settings | Update & Security in Windows 10 (see Figure 1.6-13). Click the issue you are having problems with and follow the prompts or suggested tasks to resolve the problem.

FIGURE 1.6-12 Selecting a troubleshooter in Windows 8.1

FIGURE 1.6-13 Selecting a troubleshoot tool in Windows 10
Network and Sharing Center
The Network and Sharing Center applet allows you to set up a new connection or network, set up a homegroup on supported systems, troubleshoot network problems, change network adapter settings, and change advanced sharing settings. The Windows 7 version (see Figure 1.6-14) also allows you to see the status of your network.

FIGURE 1.6-14 The Network and Sharing Center in Windows 7
EXAM TIP To see the status of your network in Windows 10, go to Settings | Network & Internet | Status.
Device Manager
The Device Manager link in Control Panel displays specific information about the hardware built into and connected to your computer. To learn more about a device, expand its category and click the device.
Cross-Reference
BitLocker
BitLocker drive encryption is supported on Professional, Ultimate, and Enterprise editions of Windows 7; Pro and Enterprise editions of Windows 8/8.1; and Pro, Enterprise, and Education editions of Windows 10. Use it to encrypt the system drive or to enable BitLocker To Go encryption on USB drives.
NOTE To use BitLocker or BitLocker To Go on systems that don’t have a Trusted Platform Module (TPM) chip, you will need to enable the option to use BitLocker without a TPM in the local security policy.
Sync Center
Sync Center is used to set up and manage file sync between remote servers and local computers. Click the Manage offline files link in the task pane to enable/or disable offline files, view offline files, set up disk usage limits, encrypt offline files, and configure when to check for slow connections.
REVIEW
Objective 1.6: Given a scenario, use Microsoft Windows Control Panel utilities Control Panel and system utilities you need to be familiar with include
• Internet Options (aka Internet Properties)
• Display/Display Settings (resolution, color depth, and refresh rate)
• User Accounts
• Folder Options (view options)
• System (performance/virtual memory, remote settings, and system protection)
• Windows Firewall
• Power Options (power plans and sleep modes)
• Credential Manager
• Programs and Features
• HomeGroup (for Windows 7/8/8.1 and older Windows 10 versions)
• Devices and Printers
• Sound
• Troubleshooting (located in Settings in Windows 10)
• Network and Sharing Center
• Device Manager
• BitLocker
• Sync Center
1.6 QUESTIONS
1. A user has just upgraded from Windows 8.1 to the latest release of Windows 10 and can no longer connect to the homegroup. What should be done next?
A. Repair HomeGroup
B. Set up Folder sharing on the computers instead of HomeGroup
C. Create a new homegroup using the Windows 10 computer
D. Upgrade all of the other computers to Windows 10
2. The corporate network has just added a proxy server. Which utility is used to configure proxy settings for each Windows computer on the network?
A. System properties
B. Network and Sharing Center
C. Internet Options
D. Sync Center
3. A user has just switched from stereo speakers to a 5.1 surround sound setup, but there is no audio coming from the center or rear speakers. Which Sound applet option is used to set up the speakers?
A. Playback
B. Communications
C. Set Default
D. Configure
4. A user reports problems with a particular app in Windows 8.1. He considered using System Restore to fix the problem, but there would be many other apps and updates that may be lost using this method. Which of the following would you try instead?
A. Uninstall and reinstall app
B. Use Apps and features
C. Use SFC
D. Use Programs and Features
5. A new Windows user (who formerly used macOS) is looking for a quick way to get access to change settings for the major devices in a computer. Which of the following would you advise using?
A. Computer Management
B. System
C. Devices and Printers
D. Settings
1.6 ANSWERS
1. B Newer releases of Windows 10 do not support HomeGroup. Folder sharing works with any version of Windows.
2. C Proxy settings are configured by clicking the Internet Options applet in the Control Panel and going to the Connections tab of the Internet Properties dialog box that opens.
3. D Different speaker configurations are viewed and selected from the Sound applet by clicking the Configure button.
4. D The Programs and Features applet is used in Windows 7/8/8.1/10 to repair programs.
5. C Devices and Printers provides shortcuts to most options that are in separate Control Panel applets or Windows 10 Settings dialogs.
Objective 1.7 Summarize application installation and configuration concepts
After installing and updating an operating system, the next step in preparing a computer for use is installing applications. The exact procedure for installing an app depends on whether you are installing it on a Windows system (and which version), Linux system, or macOS system and whether the app is located in an app store or a repository, but there are fundamental procedures that should be followed with any of the operating systems covered on the CompTIA A+ 220-1002 exam.
System Requirements
Before installing an application, compare its hardware requirements to the computer system where it will be installed (often called the target computer). Some of these requirements might include
• Processor type and speed
• Amount of available drive space
• Amount of RAM
• Graphics card and graphics memory
• Network features
EXAM TIP Drive space and RAM are the biggest concerns in application compatibility.
Drive Space
The amount of drive space available on the system drive (C: in Windows) can be a big concern on systems with limited space, such as systems running SSDs. To find out how much space an app needs, check its installation requirements first.
With Windows 10, you can sometimes install an app on a non-system drive, but if you cannot and space is limited, you might need to remove seldom-used applications to make room for one you need, run Disk Cleanup to remove unnecessary temp files, old installation, and system files and so on.
ADDITIONAL RESOURCES To learn more about Disk Cleanup, go to https://support.microsoft.com and search for “Disk cleanup.”
You can also use symbolic links in Windows 7 and newer to access software and data files on a different drive than C: and have them work properly.
ADDITIONAL RESOURCES For details, go to www.howtogeek.com and search for “The Complete Guide to Creating Symbolic Links (aka Symlinks) on Windows.”
RAM
The amount of RAM needed for an application is also a big concern on non-upgradeable systems, which now includes many laptops as well as tablets and 2-in-1 convertible devices. Although operating systems can use hard disk space as a RAM substitute (virtual memory), the application performance will leave much to be desired if the system lacks adequate RAM. Some applications will not install if RAM is inadequate.
Windows automatically configures virtual memory, but to improve system performance when you can’t add more RAM, you can increase the size of virtual memory through the System applet: click Advanced system settings | Settings (Performance section) | Advanced | Change.
ADDITIONAL RESOURCES To learn more, go to https://support.microsoft.com and search for “Virtual memory.”
OS Requirements
Most applications made for Windows, macOS, or Linux are designed to run on a range of operating system versions. However, issues such as the following can prevent an app from working on a particular OS:
• App runs in 64-bit mode only—you couldn’t run it on a 32-bit system.
• App made for a newer version of the OS than what is in use.
• App requires a newer version of DirectX 3D support than what the OS provides (Windows).
• App not compatible with the version of OS in use—some proprietary apps cannot run on Windows 10, etc.
• App cannot be expanded to full-screen—common behavior with apps made for early 32-bit Windows versions (Windows 9x/Me) when run on current versions of Windows.
Compatibility
Windows includes the following tools to enable apps made for older versions of Windows to run on the installed version of Windows:
• Compatibility wizard in Control Panel (Windows 7/8/8.1)
• Program Compatibility Troubleshooter (Windows 10)
• Compatibility tab in program’s Properties dialog box (see Figure 1.7-1)
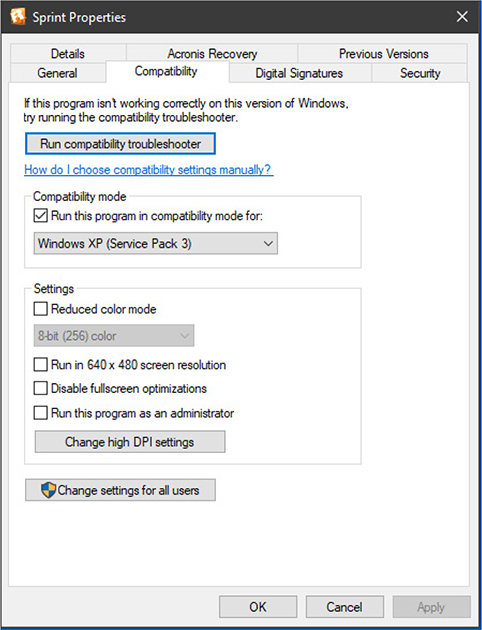
FIGURE 1.7-1 Using the Compatibility tab for an older app
Types of compatibility settings that can be used include
• Changing the version of Windows that the app detects
• Adjusting how the app uses the screen
• Running the app in administrator mode
The Compatibility wizard and Program Compatibility Troubleshooter can be used to determine the specific compatibility fixes needed for an app and apply them. The Compatibility tab (Figure 1.7-1) enables you to apply desired settings to the app before running it.
EXAM TIP Compatibility tools can help newer versions of Windows to run apps made for older versions.
Methods of Installation and Deployment
Applications can be installed from two sources: local (CD/USB) and network-based. At one time, most applications for Windows and macOS were only installed from physical (CD/USB) media. However, with the rise of high-speed networking and Internet access and frequent software updates, most packaged software sold at retail now contains a key card used for validating and obtaining the application from a download source.
Network-based application installations in Windows may come from vendor websites or, with Windows 8 and later, from the Microsoft Store app store. In macOS, almost all apps are provided by the App Store.
In Linux, apps are provided primarily by the software repository provided by the distro in use. Typical distro ISO disk images include a large software repository, but updates to the repository are obtained online, so Linux uses a hybrid of local and network-based app installation.
Android and iOS apps can be installed through the app store or, in corporate environments, via mobile device management (MDM) and mobile applications management (MAM) software.
EXAM TIP Understand the differences between local (CD/USB) and network-based application installs.
Local User Permissions
Before an application can be installed, the appropriate local user permissions must be configured. In Windows, administrator-level users can install apps. Depending on the app, the app can be installed for all users or the current user only. In macOS, apps are installed for the current user.
Folder/File Access for Installation
Apps are generally installed into specific folders. On Windows, the default installation folder is Program Files for 64-bit or 32-bit Windows. On 64-bit Windows, 32-bit apps are installed into Program Files (x86).
In macOS, apps are installed into the Applications folder. In Linux, different folders are used for application binaries (/bin, /sbin), library files (/lib), optional application software packages (/opt), and more. The Filesystem Hierarchy Standard (FHS) is the standard directory structure used by Linux distributions.
ADDITIONAL RESOURCES Go to http://refspecs.linuxfoundation.org/fhs.shtml for details on FHS 3.0.
EXAM TIP Be sure to know where apps are installed on Windows and macOS.
Security Considerations
Because apps need to interact with computer hardware, other apps, and network connections, an improperly designed app can be a security risk.
Impact to Device and Impact to Network
Most apps require access to other parts of the device’s hardware or software subsystems to work. Many apps also require access to the network to work. The Microsoft Store and Google Play app stores provide information about the permissions an app needs, so you can review this information before you install it.
EXAM TIP Review what an app needs in the way of access to device and network resources before you install it.
REVIEW
Objective 1.7: Summarize application installation and configuration concepts
• Before installing an application, the device’s hardware and software (including the operating system and other apps) should be checked for compatibility. Drive space can be an issue on mobile devices or on computers that use SSDs. Systems with non-upgradeable RAM might not be able to run some apps.
• To avoid compatibility issues with apps, Windows includes compatibility features to enable older apps to run on newer versions of Windows and newer hardware.
• Most current systems use network-based installations, either by direct download, app stores, or software repositories. Checking permissions needed by an app is useful to determine if an app is a security risk.
1.7 QUESTIONS
1. A 32-bit Windows app is being installed on two computers, a system running 32-bit Windows and a system running 64-bit Windows. Where will it be installed on the system running 64-bit Windows?
A. Program Files
B. Program Files (x64)
C. Program Files (x86)
D. Any of the above
2. A user is trying to install a 64-bit Windows app on a system running a 32-bit version of Windows. Which of the following recommendations should you make?
A. Use the Program Compatibility Wizard
B. Create a Program Files (x64) folder for the program
C. Use the Compatibility tab
D. Install a 32-bit version of the app
3. You are preparing a laptop for a trip that involves 12 hours of flight time. You have purchased a software key card from a retail store to use on the trip. When should you install the app?
A. On the flight
B. Before leaving for the airport
C. While waiting for the flight
D. Any of the above are acceptable
4. Your department is preparing to evaluate a new app that has a minimum requirement of 4 GB of RAM but recommends 8 GB of RAM. The systems you want to use have 4 GB of RAM and are expandable to 16 GB. Which of the following will help you evaluate the software most fairly?
A. Set up a large pagefile on each system
B. Install the software on all computers and see how slow they run
C. Install upgrades to 8 GB on some systems and install the app on all systems for comparison
D. Look for software that runs with 4 GB of RAM
5. Although your department is now running Windows 10, it relies on an application made for Windows 7. It doesn’t run properly on Windows 10. Which of the following could be used to help it run correctly?
A. Device Manager
B. System properties
C. Compatibility tab
D. Virtual memory
1.7 ANSWERS
1. C The Program Files (x86) folder is found only on 64-bit versions of Windows. It is used to enable both x86 (32-bit) and 64-bit apps to run properly (64-bit apps are installed into the Program Files folder).
2. D 32-bit apps work on 32-bit or 64-bit operating systems, but you cannot install a 64-bit app on a 32-bit operating system.
3. B If you wait to install the app until you go to the airport or until onboard, you might not have access to an Internet connection or might need to pay a lot for a very slow connection needed to download and configure the software.
4. C By upgrading some system to 8 GB and running the app on all systems, you can determine if the performance differences between systems with 4 GB and 8 GB of RAM justifies upgrading all computers in the department.
5. C The Compatibility tab in the application’s Properties dialog box provides access to the compatibility troubleshooter and to compatibility settings you can select manually.
Objective 1.8 Given a scenario, configure Microsoft Windows networking on a client/desktop
Microsoft Windows is ready to connect to a network as soon as it is installed. However, a number of configuration settings need to be made, which vary depending on the network type. This objective covers the Windows network settings you need to understand.
HomeGroup vs. Workgroup
The standard network type for Windows is a workgroup, which allows the computers on the network to share files, folders, and printers with each other. However, each computer on the network must have its local and remote users manually configured. The default name for a workgroup in Windows is WORKGROUP, but you can change it in the System applet.
HomeGroup technology, introduced in Windows 7 and also available in Windows 8/8.1 and early versions of Windows 10, provides easier security and setup than a workgroup. One user creates a homegroup, selects what to share with other users, and distributes the password to other users as desired. The homegroup uses a single randomly generated password, but each user decides what resources to share (printers, documents, pictures, music, or videos). To create or join a homegroup, use the HomeGroup applet.
A domain uses a domain controller (typically running some version of Windows Server and Active Directory) to provide centralized administration of all users on the network. With a domain server, a user logs into an account stored on the domain controller, rather than an account set up on an individual computer. Each user on a domain can be placed into a group of users, each of which can have different levels of access to network resources such as apps, folders, printers, and other network hardware.
EXAM TIP Make sure you can explain the differences between homegroups, workgroups, and domains.
Domain Setup
To join an existing domain, open the System applet, click Advanced system settings, click the Computer Name tab, and click Change. Click Domain and enter the name of the domain you want to join (see Figure 1.8-1).
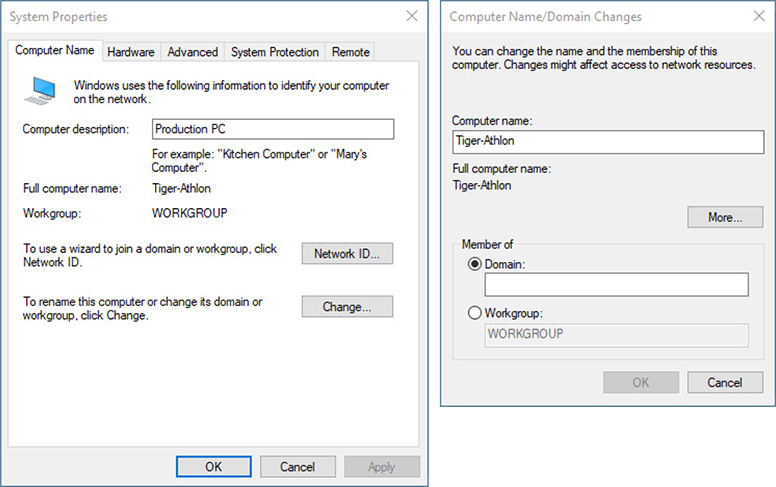
FIGURE 1.8-1 Preparing to join a domain (Windows 10)
Network Shares/Administrative Shares/Mapping Drives
A network share is a folder that is shared with other users. Network shares require that File and Printer Sharing be enabled on each computer that will share folders with others. There are two ways to share a folder from its right-click menu:
• Choose Properties, click the Sharing tab, and click Advanced Sharing to open the Advanced Sharing dialog box (see Figure 1.8-2). You can specify the number of simultaneous users (20 is the max for non-server versions) and click Permissions to set up different permissions for different users or groups at the same time (shown on the right in Figure 1.8-2).

FIGURE 1.8-2 Advanced Sharing dialog boxes (Windows 10)
• Choose Share with | Specific people (Windows 7) or Give access to | Specific people (Windows 8/8.1/10). In the Choose people to share with dialog box (see Figure 1.8-3), you can choose individual users who have accounts on the system to share with.

FIGURE 1.8-3 Choose people to share with dialog (Windows 10)
• By default, new Windows shares only have Read permission; click the Permission Level drop-down to set your share to Full Control.
Administrative shares are hidden file shares. For example, the administrative share for the root folder of C: drive is C$. To access the share, a remote user must use the computer name and administrative share and provide a password and username (these must already be stored on the computer with the administrative share): \server1c$ opens the C: drive administrative share on \server1. Other administrative shares include admin$ (used to install software remotely) and IPC$ (used for the Server service to enable listing all shares, all users, and other remote procedure call commands), among others.
EXAM TIP Make sure you understand what administrative shares are used for.
Mapped drives permit a network folder to be accessed with a drive letter. Some old apps must use drive letters, but they can also be used for convenience. To map a drive in Windows, use the Map network drive option in File Explorer/Windows Explorer or open a command-prompt session and use the net use command.
Printer Sharing vs. Network Printer Mapping
Like network shares, printer sharing requires that File and Printer Sharing be enabled on each computer that will share printers with others. Printer mapping refers to setting up a shared remote printer on a networked computer. To map a printer, use Devices and Printers to add a printer, selecting the option to add a network printer. The process displays available shared printers (see Figure 1.8-4). Choose a printer, and the drivers are installed for you.

FIGURE 1.8-4 List of available shared printers on a network
While a manual printer mapping process is simple if you have only a few workstations, you will want to automate the process with a group policy setting (which works with either workgroup or domain networks) or a login script if you have a domain.
EXAM TIP Expect a question or two on the CompTIA A+ 220-1002 exam giving you a scenario where you need to choose printer sharing versus network printer mapping. Be careful on the exam if logon script is an option and group policy is not.
You can also browse your workgroup for printers or enter a printer’s TCP/IP address or host name (see Figure 1.8-5).
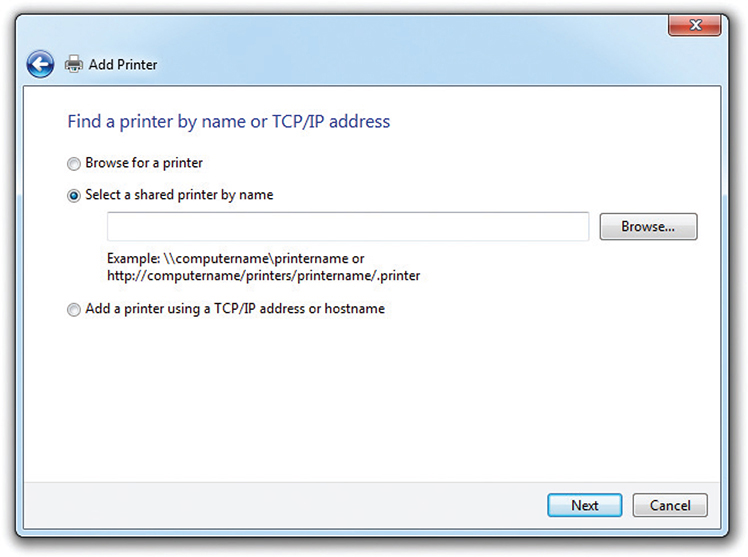
FIGURE 1.8-5 Options for setting up network printers
Establish Networking Connections
Windows supports a wide variety of network connections, including VPN, dial-up, wireless, wired, and cellular (WWAN). The following sections provide a quick reference to each of these.
VPN
To set up a virtual private networking (VPN) connection in Windows 7/8/8.1, open Control Panel in Classic mode | Network & Sharing Center | Set up a new connection or network | Connect to a workplace | Use my Internet connection (VPN).
In Windows 10, open Settings | Network and Internet | VPN | Add a VPN connection.
Enter the IP address of the VPN connection and a connection name, user name and password, and other information as prompted (Figure 1.8-6).
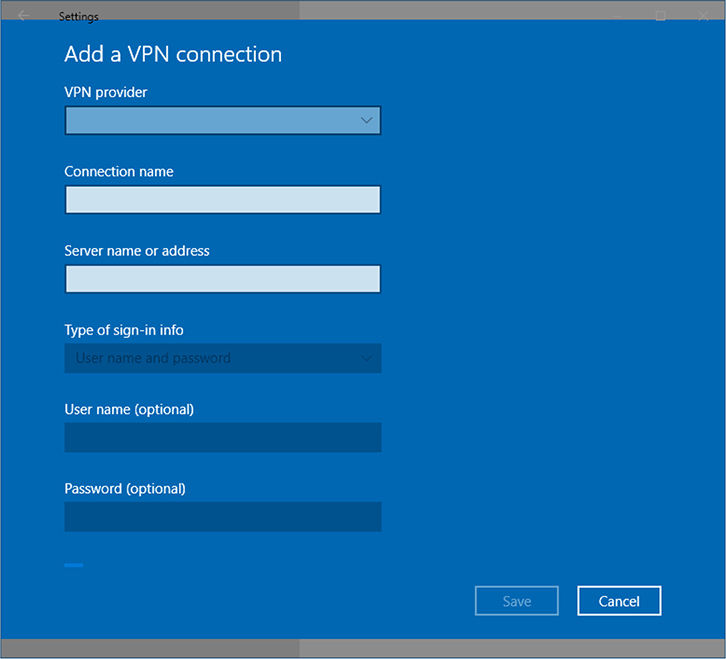
FIGURE 1.8-6 Add a VPN connection dialog (Windows 10)
Dial-ups
To create a dial-up connection in Windows 7, open the Network and Sharing Center, click Set up a new connection or network, and click Set up a dial-up connection. To create a dial-up connection in Windows 8.1, open the Network and Sharing Center, click Set up a new connection or network, and click Connect to the Internet. To create a dial-up connection in Windows 10, open the Dial-up dialog box in the Network & Internet section of Settings and click Set up a new connection. Click Connect to the Internet, then click Dial-up.
You can set up the connection even if Windows can’t detect your modem. When prompted, enter the phone number, user name, and password assigned by the ISP.
Wireless
On a system with a Wi-Fi adapter installed and enabled, Windows automatically detects wireless networks. To connect to a network, click the wireless network icon in the taskbar (see Figure 1.8-7). If it’s hidden, click the up-arrow icon first.
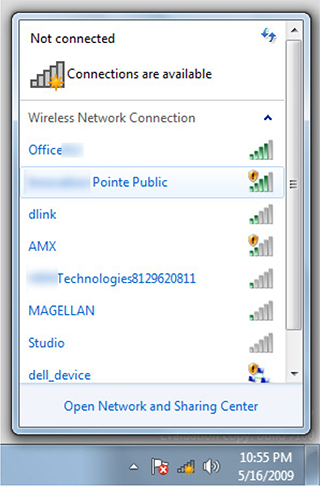
FIGURE 1.8-7 Selecting a wireless network (Windows 7)
To connect, click the wireless network desired. To reuse the network connection, click the Connect automatically checkbox (see Figure 1.8-8). If the network is secured, enter the encryption key when prompted.

FIGURE 1.8-8 Connecting to a wireless network (Windows 10)
Wired
Windows automatically connects to a wired network when a wired NIC in the computer is connected to a router, switch, or hub. However, it might be necessary to configure proxy or IP address settings to have a working connection.
WWAN (Cellular)
To create a WWAN (cellular) connection in Windows, click the Network icon in the taskbar, and click the name of the network. If prompted, enter the user name, password, and APN (access point name). Provide any other information needed.
EXAM TIP Make sure you can explain the differences between the Windows configuration of VPN, dial-up, wireless, wired, and WWAN (cellular) connections.
Proxy Settings
A proxy server is an intermediary between its users and the resources they request. Applications send requests to the proxy server instead of trying to access the Internet directly, and the proxy server fetches the resources on behalf of the users. This enables the proxy server to monitor usage; restrict access to or modify insecure or objectionable content; cache, compress, or strip out resources to improve performance; and more.
To set up manual proxy server settings, click the Internet Options Control Panel applet and then click the Connections tab in the Internet Properties dialog box. Click LAN Settings, click the empty Use a proxy server box, and enter the URL of the proxy server. It uses UDP port 80 by default; change the port as needed. If different proxy servers are used for different types of content (HTTP:, Secure[HTTPS], FTP:, and Socks:), click Advanced and enter the proxy server URLs and port numbers as needed. Click OK when done.
NOTE In Windows 10, you can also set up a proxy server through Settings | Network & Internet | Proxy.
Remote Desktop Connection
Remote Desktop Connection is a Windows feature used to host connections from other Windows computers (Remote Desktop support is also available for iOS and Android mobile devices).
Cross-Reference
Remote Assistance
Windows Remote Assistance (shown in Figure 1.8-9) enables you to grant or assume control, enabling a user to request support directly from you. Upon receiving the support-request e-mail, you can log on to the user’s system and, with permission, take the driver’s seat.
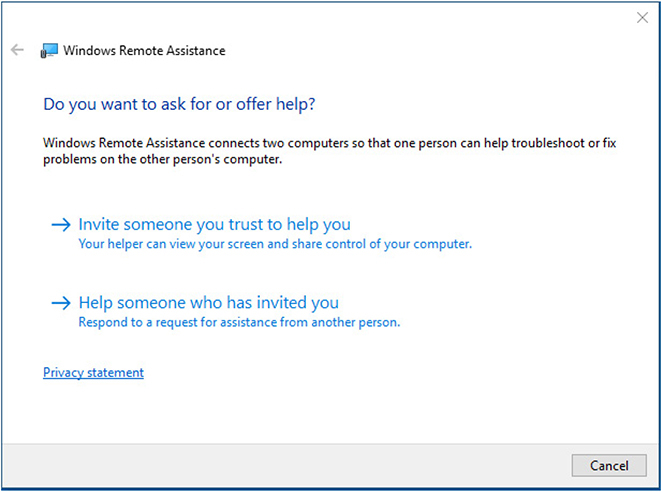
FIGURE 1.8-9 Windows Remote Assistance (Windows 10)
The connecting system is a client and the remote system is a server providing access to its desktop. To configure whether your Windows system can act as a Remote Assistance or Remote Desktop server, go to the System applet and select the Remote settings link on the left. The Remote tab in System Properties has options for both Remote Assistance and Remote Desktop, along with some detailed settings.
Home vs. Work vs. Public Network Settings
You may be prompted to select a network type when you first connect to a network, or you can change it later using Network and Sharing Center. Home and Work networks are Private networks. A Private network is one in which you can trust the other computers and devices on the network and share folders and devices with them. A Public (or Guest) network, such as a network provided by a library, hotel, or coffee shop, is not secure. By default, folder and printer sharing is not enabled on a public network. These network types are used to configure Windows Firewall.
Firewall Settings
Selecting Home, Work, or Public as the network type for a particular network connection configures Windows Firewall to block or unblock discovery and sharing services. When running on a Private (Home or Work) network, Windows enables Network Discovery and File and Printer Sharing as exceptions. When running on a Guest or Public network, Windows disables these exceptions.
Exceptions are apps or processes that are allowed to pass through the firewall. You can set up exceptions for inbound traffic with the standard Windows Firewall, or for outbound traffic with the Windows Firewall with Advanced Security.
Cross-Reference
Configuring an Alternative IP Address in Windows
Most systems get an IP address from a DHCP server, which might be built into a router or a domain controller. However, in case a DHCP server fails, Windows enables a network adapter to have an alternative IP address and other settings to maintain a network connection. To configure an alternative IP address, open Network and Sharing Center, and double-click the connection used by your network. From the General tab for the adapter, click Properties, check the Internet Protocol Version 4 (TCP/IPv4) checkbox, click Properties, then click the Alternate Configuration tab. These dialog boxes are shown in Figure 1.8-10. Then click the User configured radio button and complete the fields as described in the following sections.
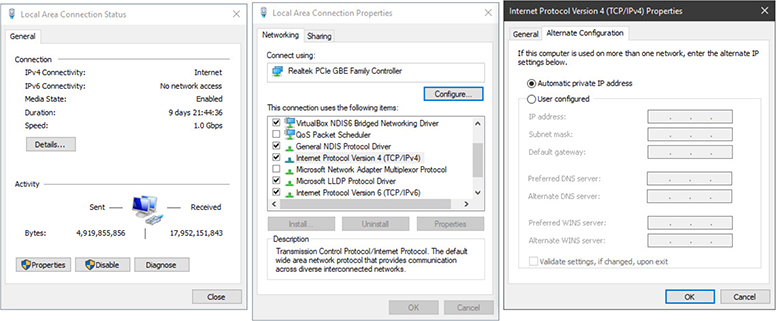
FIGURE 1.8-10 Getting ready to set up an alternate configuration for TCP/IPv4
EXAM TIP Make sure you understand the differences between an alternate IP address, an APIPA IP address, and a server-assigned IP address.
IP Addressing
When a client cannot obtain an IP address automatically, the default alternate IP address is for Automatic Private IP Addressing (APIPA) to assign an IP address to the system. APIPA enables computers on a network to connect to each other but not to reach the Internet. An APIPA IPv4 address begins with the digits 169.254.
If you want to set up an alternate IP address that will maintain an Internet connection, use a value that is not already assigned to another device on the network. Each computer must have a unique IP address in the same range. For example, if the DHCP server normally assigns values in the range 192.168.0.2–99, choose a value starting with 192.168.0.100 (up to 254).
Subnet Mask
The subnet mask distinguishes which part of the IP address identifies the network ID and which part of the address identifies the host. The subnet mask blocks out (or masks) the network portion of an IP address. Use the same subnet mask for all the computers that will connect to each other, such as 255.255.255.0.
Gateway
The default gateway is the IP address for your network’s router. On private networks in a home or small office, a common value is 192.168.0.1. Check your network configuration for details.
DNS
DNS servers translate host names (such as www.microsoft.com) into IP addresses. Google and other vendors offer freely available DNS servers you can use. Google’s DNS servers are 8.8.8.8 and 8.8.4.4.
NOTE WINS Servers were used to provide a name service for computers that have NetBIOS computer names. WINS is a legacy technology which has been replaced by DNS.
Network Card Properties
Network cards (wired or wireless) generally don’t require configuration. However, some network implementations may benefit from taking a look at how the network card properties are set. To see the configuration for a network adapter, open Network and Sharing Center, and double-click the connection used by your network. From the General tab for the adapter, click Properties, and click the Configure button in the Local Area Connection Properties dialog box (shown in the center of Figure 1.8-10 in the previous section), then click the Advanced tab (see Figure 1.8-11). Scroll through the properties listed to find the ones discussed in the following sections.
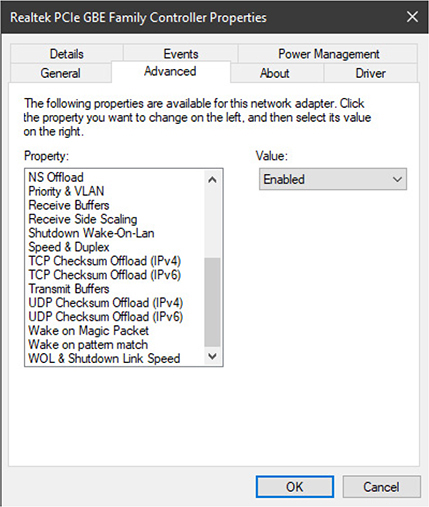
FIGURE 1.8-11 Viewing the Advanced tab settings for a Gigabit Ethernet adapter
EXAM TIP Make sure you know which dialog boxes contain the properties discussed in these sections.
Half Duplex/Full Duplex/Auto/Speed
Speed & Duplex are typically listed as a single property. Select this option and then choose the speed and duplex setting desired. When half duplex is selected, the network adapter must switch between sending or receiving data. Full duplex enables the network adapter to send and receive data at the same time.
Speed settings are designed to enable a faster adapter to work on a slower network. However, you should use Auto unless the device can’t work properly on the network.
Wake-on-LAN
Change the Wake-on-LAN (WOL) settings if the network adapter is not able to “wake up” the device after receiving a signal from another device on the network. To enable these settings, click the Shutdown WOL or WOL property and select Enable from the Value drop-down list. Then, click the Wake on Magic Packet property and select Enable from the Value drop-down list.
QoS
QoS (quality of service) is used to prioritize streaming audio and video to make voice chatting and Voice over IP (VoIP) services provide better sound quality.
To enable this, check the QoS Packet Scheduler checkbox in the Properties dialog box (refer to Figure 1.8-12). You can modify this setting by changing the Packet Priority & VLAN or Priority & VLAN property in the Advanced tab.

FIGURE 1.8-12 Check the QoS Packet Scheduler box to enable QoS.
BIOS (on-board NIC)
To enable the system to boot from an onboard NIC, enable the NIC’s BIOS through the system BIOS or UEFI firmware configuration menu.
REVIEW
Objective 1.8: Given a scenario, configure Microsoft Windows networking on a client/desktop Network settings in this objective include
• HomeGroup is a Windows technology for easy and secure sharing. It is supported in Windows 7, 8/8.1, and early versions of Windows 10. A workgroup is a simple network supported by Windows 7 and newer versions. Unlike homegroups, each computer in a workgroup must have local and remote users manually configured.
• Domains use a domain controller running Windows Server and Active Directory to provide centralized control of users and resources.
• A network share is a folder shared with other users.
• Administrative shares are hidden file shares such as the root folder of a drive.
• A mapped drive is a network share that has been assigned a drive letter.
• A printer shared with other users is an example of printer sharing.
• Network printer mapping is connecting to a shared printer from another computer.
• Windows includes support for VPN, dial-up, wireless, wired, and WWAN (Cellular) connections. With Windows 7/8/8.1, these connections are created through Network and Sharing Center in Control Panel. With Windows 10, use Settings, Network & Internet.
• Proxy settings capture web page requests and provide the requested information from their proxy servers’ copies. Proxy settings are configured through Internet Options.
• Remote Desktop Connection hosts connections from other Windows computers.
• Remote Assistance shares a desktop with a remote computer.
• Home vs. Work vs. Public network settings are used to configure the Windows (Defender) Firewall.
• Exceptions are used to permit traffic through a firewall.
• Windows (Defender) Firewall can be disabled if another firewall is used.
• The default alternative IP address in Windows is an APIPA (non-routeable) IP address.
• To set up a manual alternative IP address, use a non-duplicating IP address in the same range as other devices, the same subnet mask as other devices on the network, two DNS servers, and the IP address of the network’s default gateway.
• To configure network card properties, open Network and Sharing Center, open the connection, click Properties. You can enable QoS from this dialog. To configure the following settings, click Configure, then the Advanced tab.
• Half duplex/full duplex/auto
• Speed
• Wake-on-LAN
• The BIOS for an onboard NIC (used for PXE connections) is enabled through the system’s UEFI/BIOS firmware dialog.
1.8 QUESTIONS
1. A documentation folder on a corporate intranet needs to be available to up to 20 users with different access levels. Which of the following sharing methods will permit this configuration?
A. Share with
B. HomeGroup
C. VPN
D. Advanced Sharing
2. A user needs to access a network printer but knows only the network printer’s IP address. What should you tell the user?
A. Find the printer brand and model.
B. Use a wireless connection to the printer.
C. The IP address is the only information needed to use the printer.
D. Find out the host name.
3. A Windows user has just returned from a trip during which she connected to the Internet via Wi-Fi networks in coffee shops and airport lounges. The user wants to connect to the new wireless LAN to print a report to a network printer she has used before, but she can’t connect to the printer. Which of the following is the most likely cause?
A. Windows Firewall is set for a Private network.
B. Windows Firewall is set for a Public network.
C. The user must reinstall the printer driver.
D. A printer app can’t work on a wireless LAN.
4. You are performing telephone support with a user who has lost his Internet connection on a SOHO network. After running ipconfig, the user reports his IP address as 169.254.0.23. Which of the following should you check first?
A. Broadband modem
B. Network switch
C. Network hub
D. Network router
5. A user normally works at an office with a domain controller but has switched to working from home. The SOHO network has shared printers and a networked multifunction device, but the user cannot connect to it. Which of the following settings on the user’s device need to be changed to permit access? (Choose all that apply.)
A. Change the computer to use the SOHO workgroup
B. Add the SOHO network to the domain
C. Add the user account to each computer with a shared printer
D. Add the domain to the SOHO network
1.8 ANSWERS
1. D Right-clicking the folder and choosing Properties | Sharing tab reveals the Advanced Sharing button, which leads to the Advanced Sharing dialog box in which folder sharing options can be configured.
2. C With the IP address of the printer, the user can find and set up the printer using Devices and Printers.
3. B When Windows Firewall is set to Public, connections to LAN devices are blocked for security.
4. D On most SOHO networks, the DHCP server that provides automatic IP addresses is a function built into the router. Thus, the router is the first device to check.
5. A C The computer cannot connect to the SOHO network unless it is configured to connect to a workgroup instead of a domain. To use shared printers or folders, the user account must be added to each computer with a share the user wants to access.
Objective 1.9 Given a scenario, use features and tools of the Mac OS and Linux client/desktop operating systems
Although macOS and Linux are not nearly as popular as Windows in most offices, chances are increasing that you will run into at least some computers that use these operating systems. Although macOS and Linux differ in many ways, they have some features in common—and both differ a lot from Windows. This objective covers the essential best practices and tools you need to understand for the CompTIA A+ 220-1002.
Best Practices
As with Windows, macOS and Linux computers requires best practices such as scheduled backups, disk maintenance, system updates, and more.
Scheduled Backups
macOS and most Linux distributions use one of two scripting tools to run all sorts of tasks automatically in the background. Apple developed launchd for automation; most Linux distros use cron. You can create custom launchd and cron jobs, but actually doing so is beyond the scope of the CompTIA A+ 220-1002 exam.
EXAM TIP The CompTIA A+ 220-1002 Linux and macOS objectives include scheduled disk maintenance and scheduled backups, but each OS checks disks and drives automatically. If you’re using common GUI backup utilities, you’ll schedule backups within the utility itself. You can, of course, use the task schedulers to run other utilities or even custom backup scripts.
Scheduled Disk Maintenance
macOS handles most chores automatically, and both macOS and Linux will occasionally run file system check (fsck) on reboot. Still, if you have reason to suspect a problem, it’s worth running fsck from the CLI or using an included or third-party GUI tool. macOS includes Disk Utility, which can verify and repair file structures, partition and format drives, and even create disk images. Most Linux distros have one or more disk maintenance utilities, but if you keep the bootable installation media handy, you can just use its disk diagnostic (see Figure 1.9-1).

FIGURE 1.9-1 Ubuntu installation options, including one for disk diagnosis
NOTE Linux and macOS don’t include an equivalent to Disk Cleanup in Windows, but you can download third-party utilities for cleaning up junk files.
System Updates/App Store
Once upon a time, UNIX and Linux users largely downloaded and compiled their own software, which meant they were responsible for hunting down each dependency, a process called dependency management. This grew untenable, and long ago Linux distributions pioneered package manager programs that usually enable you to download and install a program and all its dependencies at once.
NOTE Most significant applications are built on the shoulders of other applications or software packages; these are called dependencies because the program depends on this other software to be present (and working!) to run.
Different distros have their own package managers and package-management interfaces, but the most common are the advanced packaging tool (APT), which is used on Debian-based distros, and Red Hat Package Manager (RPM). Later in this objective, we’ll look at how to use the apt-get CLI tool (included in the CompTIA A+ 220-1002 objectives) to install and update software.
The other way of handling dependencies is to bundle them up with the application and distribute them together, which is generally what you get when you download an installer or use an app store. This applies to both mobile device stores and their desktop counterparts: the Apple App Store (macOS) and Microsoft Store (Windows 8 and up). This method is simpler for the user, but it can also be wasteful and less flexible. Imagine multiple apps on your system, all including their own copies of a few common dependencies—not only does this waste space, but each app’s developers must also release a new version to include security patches to the dependency.
EXAM TIP App stores and package managers aren’t synonymous, but they do share some important features, such as giving users a central place to discover, install, and update software.
Patch Management
Both macOS and Linux take an automated approach to patching and alert you when software needs an update. In macOS, you access app updates through the App Store and configure update settings with the App Store menu in System Preferences. Updates for macOS are now managed through the System Preferences | Software Update pane (see Figure 1.9-2). Most Linux distros have an updating tool like the Software Updater in Ubuntu (see Figure 1.9-3).

FIGURE 1.9-2 System Preferences | Software Update pane for macOS updates

FIGURE 1.9-3 Software Updater in Ubuntu Linux
As useful as package managers are for installing single applications, that’s not where their real power lies. These package managers can manage all the software (minus anything you compiled yourself) on the system, so you can upgrade installed packages from the CLI with two commands:
mike@server:~$ sudo apt-get update
mike@server:~$ sudo apt-get upgrade
Driver/Firmware Updates
macOS will notify you about available system updates that contain driver updates for built-in components. Make a quick trip to the App Store to get updates installed, as described in the previous section. If the system has third-party devices, like a Wacom tablet, you will need to manually check and update any drivers for those devices.
Most Linux distros regularly check for updates and will signal any new updates. Download and install the updates using the Software Updater.
EXAM TIP Unlike Windows Update, the macOS system updates will update drivers and the firmware of the Apple computer, if necessary.
Driver updates for Linux can be provided through package managers, as separate downloads from vendors (especially with GPUs), or, for printers, with the CUPS (Common Unix Printing System).
Firmware updates are provided by the motherboard or device vendor. In some cases, you might need to attach a device such as a printer or multifunction device to a Windows computer to update its firmware.
ADDITIONAL RESOURCES For more information on working with drivers in Linux, go to https://opensource.com and search for “How to Install a Device Driver on Linux.”
Antivirus/Anti-malware Updates
Antivirus/anti-malware updates are provided by the software vendors. Depending on the specific app, updates might be automatic or manual.
ADDITIONAL RESOURCES For more information on Linux antivirus/anti-malware apps, go to www.tecmint.com and search for “The 8 Best Free Anti-Virus Programs for Linux.”
Tools
Use the tools described in the following sections to keep Linux or macOS systems in top working order.
Backup/Time Machine
Systems running macOS use Time Machine to create full system backups (see Figure 1.9-4) called local snapshots. Time Machine requires an external HDD or SSD, or you can use a shared network drive.

FIGURE 1.9-4 Time Machine
As you should expect by now, Linux backup tools can differ by distro. Ubuntu uses Déjà Dup, though it’s called Backups in System Settings (see Figure 1.9-5). Déjà Dup backs up a user’s Home folder by default—just specify a location and it will permanently store file versions as long as the storage location has space. It isn’t on the CompTIA A+ 220-1002 exam, but you can also download a drive imaging program such as Clonezilla.

FIGURE 1.9-5 Backups under System Settings in Ubuntu
EXAM TIP You can technically image your OS drive in both macOS and Linux with the dd command (covered later in this objective) at the Terminal, but the image will be as large as the drive’s full capacity unless you compress it (ideally by piping it through a compression program before saving it). You can later use dd to apply this image to another drive (after decompressing it if necessary).
Restore/Snapshot
The local snapshots created with Time Machine enable you to recover from a crash or even restore deleted files and previous versions. Configure it via Time Machine in System Preferences. You can also create and restore full disk images with Disk Utility, described next.
To create snapshots in Linux, you can use rsnapshot, based on rsync, or Timeshift.
ADDITIONAL RESOURCES To try rsnapshot, go to rsnapshot.org. To download Timeshift, visit github.com. To learn more about using Timeshift, go to linoxide.com and search for “How to Take Linux System Snapshots with Timeshift.”
Image Recovery
Macs can be restored to proper operation by using the macOS recovery system. Press COMMAND-R at startup to display the macOS Recovery menu. You can restore from a Time Machine backup, reinstall macOS, or run Disk Utility.
Linux backups created with dd can also be restored using dd. Other popular image backup/recovery apps for Linux include clonezilla (clonezilla.org) and partimage (available via your distro’s package manager).
ADDITIONAL RESOURCES To learn more about dd, clonezilla, partimage, and other Linux image backup/recovery utilities, go to the nixcraft website at cyberciti.biz/open-source and search for “Top 6 Open Source Disk Cloning and Imaging Softwares.”
Disk Maintenance Utilities
macOS includes Disk Utility, which can verify and repair file structures, partition and format drives, and even create disk images.
Linux includes the command-line fsck for checking and repairing file systems.
ADDITIONAL RESOURCES For an illustrated tutorial on using fsck, see www.tecmint.com and search for “How to Use ‘fsck’ to Repair File System Errors in Linux.”
Shell/Terminal
Linux uses its Terminal for command-line functions (see Table 1.9-1 later in this objective). Systems running macOS can also open a shell that has similar features, but most macOS commands run from the GUI.
Screen Sharing
Screen sharing remotely in macOS is configured through System Preferences | Sharing. Screen sharing in Linux is typically known as VNC or Remote Desktop Viewing. Users might need to install it.
Force Quit
The Force Quit feature is used to shut down malfunctioning apps. In macOS, press COMMAND-OPTION-ESC or open the Apple menu and select Force Quit. In Linux, open Terminal, run ps to see the process ID (PID for each app), and use kill PID to kill the app by specifying its PID.
Features
macOS has a number of unique features, as described in the following sections. Where Linux has comparable features, they are also discussed.
EXAM TIP Make sure you know what the macOS features covered in this section are used for (multiple desktops/Mission Control, Key Chain, Spotlight, iCloud, Gestures, Finder, Remote Disc, Dock, and Boot Camp).
Multiple Desktops/Mission Control
Mission Control enables users to see all of the open apps, switch between them, and move them to different desktops (Spaces in macOS-speak). In Linux, multiple sessions are managed with CTRL-ALT-function keys.
ADDITIONAL RESOURCES To learn more about using multiple desktop sessions in Linux, go to journalxtra.com and search for “Multiple Virtual Displays On One Linux Pc. Running Concurrently.”
Key Chain
Keychain Access securely manages passwords, accounts, certificates, and similar information on macOS devices. A comparable Linux app called keychain is available for most Linux distros from GitHub.com or from your distro’s package manager.
Spotlight
You can open Spotlight (COMMAND-SPACEBAR) in macOS to search for files and applications. It indexes your drive(s) for file names and other content, which means you can search for specific files plus all sorts of other things, like apps, e-mail messages, music, contacts, and even flight information. Cerebro, available from GitHub.com, offers similar features for Linux users and supports plugins for adding additional features.
iCloud
Apple devices have built-in support for iCloud, which can synchronize pictures, documents, music, e-mail, contacts, calendars, bookmarks, login credentials, credit card information, and more. Some of iCloud’s features can be used through client applications on Windows, Linux, and other non-Apple platforms—but one of its more unique features, iCloud Keychain, can only securely manage passwords and credit card information for macOS and iOS devices. Dropbox (www.dropbox.com) is one of a number of similar services available for Linux and other platforms.
Gestures
macOS supports a wide variety of trackpad (touchpad) and Magic Mouse gestures. To see a list of supported gestures, open the System Preferences folder and Mouse or Trackpad. Linux users can use Touchegg, available through the software repositories of most distros, to add gesture support.
Finder
macOS uses Finder (shown in Figure 1.9-6) to browse files on hard drives, removable media, and network locations. The trick with Linux is that, once again, this application varies. Rest assured that your distro or desktop environment comes with one—Ubuntu comes with Nautilus.

FIGURE 1.9-6 Finder
Remote Disc
Apple doesn’t provide optical drives on its computer, but macOS includes a Remote Disc feature that provides access to optical drives over a network connection. You can use this feature to view files or install an app, but not to burn a disc.
Dock
The macOS Dock displays running apps along the bottom of the Desktop. You can add and remove apps from the Dock with a right-click. You also can adjust the magnification as desired. A variety of docks for Linux are available.
ADDITIONAL RESOURCES To learn more about docks for Linux, go to fossmint.com and search for “8 macOS Like Docks for Ubuntu.”
Boot Camp
Apple Boot Camp makes it pretty simple to install Windows on your Mac and choose which OS to load when you start the system; more recent versions of Boot Camp support only 64-bit versions of Windows.
Basic Linux Commands
Table 1.9-1 lists common Linux commands run from Terminal. To get help with a specific command, enter man commandname to open the man page for that command.
TABLE 1.9-1 Common Linux Commands
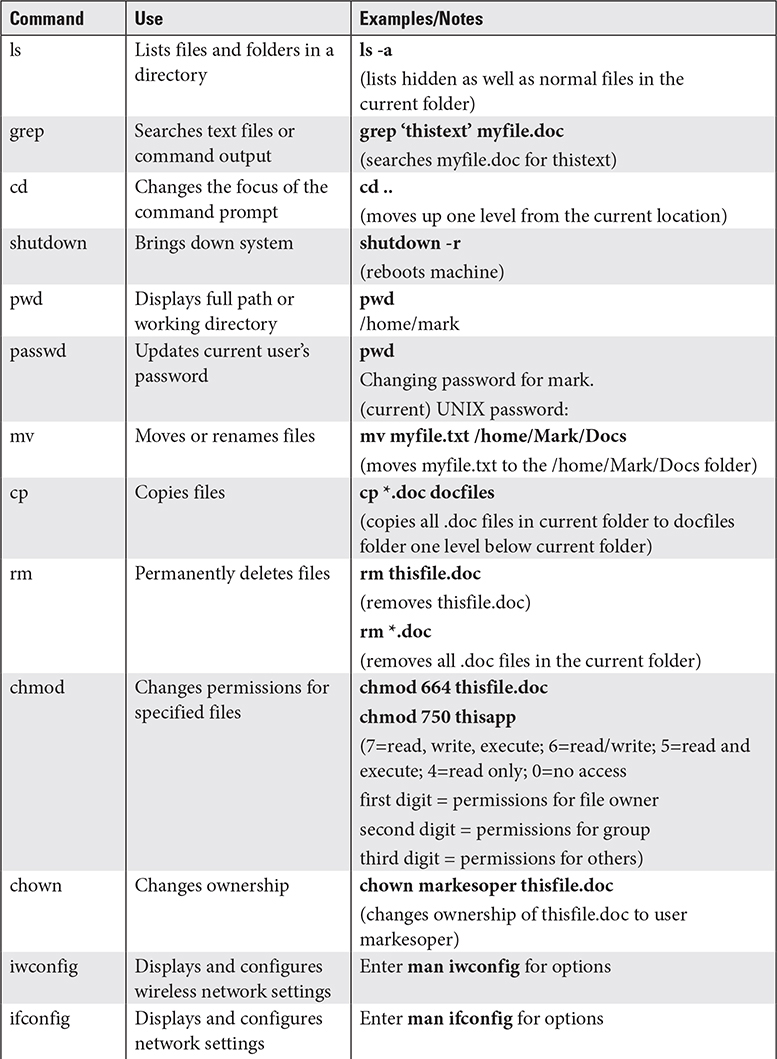

EXAM TIP Make sure you know all the common Linux commands in Table 1.9-1 and the scenarios in which you would use them.
REVIEW
Objective 1.9: Given a scenario, use features and tools of the Mac OS and Linux client/desktop operating systems
• macOS and Linux support best practices such as scheduled backups, disk maintenance, and system updates.
• Linux can use Terminal commands or GUI-specific features to perform these tasks, while almost all of macOS’s functions can be performed from the GUI.
• macOS and Linux both support fsck for checking file systems. macOS uses launchd for automation, while Linux uses cron.
• The Linux package manager provides a reliable source for apps for a specific distribution, comparable to the App Store for macOS.
• Most macOS features have Linux counterparts, available either from a distro’s package manager or from sources such as GitHub.com.
• Linux commands are documented through the use of man. For example, to learn more about chmod (changes file permissions), use man chmod.
• Basic Linux commands to know for the exam include ls, grep, cd, shutdown, pwd, passwd, mv, cp, rm, chmod, chown, iwconfig, ifconfig, ps, su, sudo, apt-get, vi, dd, and kill.
1.9 QUESTIONS
1. A Linux user is trying to update her system’s apps with the command apt-get update and the command doesn’t work. What did the user forget to do?
A. Restart in Safe Mode
B. Run the command from Terminal
C. Run the command as root user with sudo
D. Create an image backup first
2. A macOS user needs to search for a specific file. Which utility should he use?
A. Spotlight
B. Finder
C. Remote Disc
D. Dock
3. A Linux user needs to stop a process but doesn’t know its PID. Which command from Terminal would show this information?
A. ifconfig
B. ps
C. ls
D. kill
4. Most macOS and Linux disk tools have different names, but the command-line (Terminal/shell) backup utility is available on both systems. Which of the following is it?
A. Time Machine
B. cron
C. dd
D. grep
5. A Linux user uses ls to perform the same task as which of these macOS GUI utilities?
A. Time Machine
B. Dock
C. Spotlight
D. Finder
1.9 ANSWERS
1. C Many Linux commands must be run as root user (superuser) with sudo.
2. A Spotlight is the macOS search tool.
3. B The ps command lists the PID values for all running processes in Linux.
4. C The dd command makes a byte-by-byte copy of the specified drive in both macOS and Linux.
5. D Finder lists files and folders in macOS, so it is the equivalent of ls in Linux.