Chapter 13
Powering Up PowerPoint Online
Whether you like or loathe PowerPoint, there is no denying that it is here to stay. It has leveled the playing field for anyone who understands his audience — including students, small-business professionals, and big-business executives. The latest version of the application comes loaded with advanced features for animating text and graphics, video editing, ink annotations, presence for real-time collaboration, applying morph effects, and even broadcasting your presentation!
In Office 365, PowerPoint Online is one of the core apps in Office Online. It combines a variety of web services to display high-fidelity presentations in a browser. This is a boon of some organizations that may have users without access to the desktop application.
In this chapter, you will explore the basics of PowerPoint Online, compare the user experience between the online app and its desktop companion, and get started using the online app interface.
After you become familiar with the basic functions, step up to the next level by applying advanced capabilities like the Present Online feature. We don’t want you to compromise the quality of your presentations, so in this chapter we include tips and tricks for taming bullets, lists, alignments, and graphics in PowerPoint Online.
Going Over the Basics
Opening a file in the PowerPoint Online initiates a series of processes and services in the backend to render your document in high fidelity, giving you the familiar user interface you experience in the desktop application and giving you the best viewing experience for your presentation.
When you click on a PowerPoint file from SharePoint or OneDrive, PowerPoint Online displays your presentation in Reading View. If the slide has animation or transition, you can see those effects in the Reading View. You can choose to open the presentation in your desktop PowerPoint application, edit the presentation right in the browser, or immediately start the slide show.
Comparing the PowerPoint Online and PowerPoint 2016
PowerPoint Online is designed to be a companion to its desktop cousin, Power-Point 2016. It allows users to collaborate on files and make light edits to a presentation right in the browser, regardless of the user’s platform (Windows PC or Mac).
As long as the minimum system requirements are met and a supported browser is used, you can expect to perform most of the basic PowerPoint tasks in the online version that you do on the desktop version.
Due to technological constraints, and because by design PowerPoint Online is a companion and not necessarily a replacement for the desktop version, there are features in the desktop application that are not available in the online version, as follows:
![]() Password Protection: If the presentation is password-protected from desktop application, you can’t unlock or open that presentation in the online version.
Password Protection: If the presentation is password-protected from desktop application, you can’t unlock or open that presentation in the online version.

TIP
To get around this limitation, set the permission for the document in SharePoint or OneDrive instead.
![]() Printing: You can only print your slides into a PDF file (not to a printer) when using PowerPoint Online.
Printing: You can only print your slides into a PDF file (not to a printer) when using PowerPoint Online.
![]() Coauthoring: Multiple people can edit a presentation at the same time.
Coauthoring: Multiple people can edit a presentation at the same time.
For the best experience, all coauthors should use either PowerPoint Online or the desktop version, not a mixture of both.
![]() Find and Replace: This functionality is not supported in PowerPoint Online.
Find and Replace: This functionality is not supported in PowerPoint Online.
![]() Charts: You can’t insert charts in PowerPoint Online. If you first create the charts from the desktop application, however, they will display with no issues in PowerPoint Online.
Charts: You can’t insert charts in PowerPoint Online. If you first create the charts from the desktop application, however, they will display with no issues in PowerPoint Online.
![]() WordArt: Like Charts, WordArt isn’t supported in PowerPoint Online, but you can add them first from the desktop app to display them in the online app.
WordArt: Like Charts, WordArt isn’t supported in PowerPoint Online, but you can add them first from the desktop app to display them in the online app.
Using the PowerPoint Online user interface
As a default, PowerPoint Online opens files in Reading View and runs animations and transitions that are embedded on the slide. Immediately after the file is loaded in the browser, the top bar gives you quick access to commands to edit the presentation, start the slide show, print to PDF, share with others, and more commands from the settings (ellipses) icon (see Figure 13-1). On the bottom of the screen, you’ll see slide navigation controls, as well as commonly used View actions (Notes, Editing View, Reading View, and Slideshow).

FIGURE 13-1: PowerPoint Online Reading View.
The Edit Presentation command gives you the option to edit the document in either the desktop application or the online app. If you select Edit in PowerPoint Online, you’re taken to the Home tab on the Ribbon. You see some familiar editing buttons and icons that enable you to format text and paragraphs, navigate and manipulate slides, access the clipboard functions, and use the drawing tools (see Figure 13-2). Editing the file in the rich desktop application is a one-click action from the Home tab with the Open in PowerPoint action from the top bar. You’ll also know when others are editing the document as indicated just below the Share icon. You can hide or display the ribbon by clicking the arrow at the bottom right of the ribbon.

FIGURE 13-2: PowerPoint Online Home tab.
Inserting new slides, tables, pictures, and shapes is done from the Insert tab. Links, comments, symbols, and YouTube videos (see Figure 13-3) can be added from this tab.

FIGURE 13-3: PowerPoint Online Insert tab.
The rest of the tabs (Design, Transition, Animation, and View) are pretty much pared-down versions of the desktop application corresponding tab.
Although there is no Review tab in PowerPoint Online where you would typically check spelling, that functionality is still available in the online app. If you misspell a world while you type, you see a red squiggly line under the word. To correct it, just right-click on the word and choose the correct spelling.
Working with presentations
Creating a new PowerPoint presentation is pretty much the same whether you’re in Office 365 SharePoint document library, OneDrive for Business, or the consumer version of OneDrive (see Figure 13-4). Just click on the + New icon and select PowerPoint presentation.
There is no Save button in PowerPoint Online. Whenever you make a change, your work is saved automatically. When you finish your edits, you can close the document by navigating back to your document library (either in SharePoint or OneDrive) from the hyperlinked breadcrumb next to “PowerPoint Online” on the Office 365 navigation bar.

FIGURE 13-4: Creating a new PowerPoint Online presentation.
Alternatively, while logged on to Office 365 or the consumer version of OneDrive, you can click on the app launcher and then select the PowerPoint tile to create a new presentation. Files created this way automatically are saved in your default Documents folder in OneDrive.
In the consumer version of OneDrive, you will see a notification of new features in PowerPoint Online the first time you create a file from the app launcher (see Figure 13-5). At the time of writing, Skype for Business isn’t integrated with PowerPoint Online in Office 365 for business, but it’s likely to happen.

FIGURE 13-5: Skype integration with PowerPoint Online consumer version.
Using Advanced Functions
Despite its reputation for “light editing only,” PowerPoint Online is not intended to hamper your creativity or stop you from producing the best-ever sales pitch. When you’re on the run and need to spruce up your presentation with text formatting, SmartArt charts, or images, the online app does just fine. In addition, the Present Online feature in the desktop version uses PowerPoint Online technology to run a live presentation to audiences anywhere on their browser or mobile devices.
Presenting online
High speed Internet access is now part of our daily lives, enabling us to easily connect and collaborate efficiently with our colleagues. The advantage of having high-bandwidth networks is to deliver almost full-fidelity slide shows for remote presenters and attendees. This means you can conduct ad hoc meetings and presentations with your colleagues, regardless of location. It could also mean savings for your business as you reduce the cost of travel, training, and conference services.
As the presenter, you need to initiate the Present Online feature from the desktop application. As a participant, you need either a Skype for Business meeting invitation or simply a link (provided by the presenter) and an Internet-connected device.
To initiate Present Online, follow these steps:
1. Open your presentation in PowerPoint 2016.
2. From the Ribbon, click Slideshow, then click Present Online.
3. Depending on your attendees, choose either
• Skype for Business (for attendees within your organization only)
Choosing Skype for Business will allow you to use an existing meeting or create a new one. After you’ve made your selection and clicked OK, the Skype for Business application will run. Your session will automatically initiate screen sharing and load your presentation. If you created a new meeting, you can add participants by inviting more people.
• Office Presentation Service (for attendees with an Internet-connected device including people outside of your organization)
The Office Presentation Service is a free, public service from Microsoft. There’s no need to set up an account to use this service (see Figure 13-6).

FIGURE 13-6: Present Online options.
Choosing Office Presentation Service will display a window where you can opt to enable remote viewers to download the presentation. When you click the Connect button, you’re connected to the presentation service and your presentation will be processed to be used for the service. When processing is complete, you will be presented a link that you can share by email or instant message (IM). At this point, clicking the START PRESENTATION button will start the online presentation (see Figure 13-7).
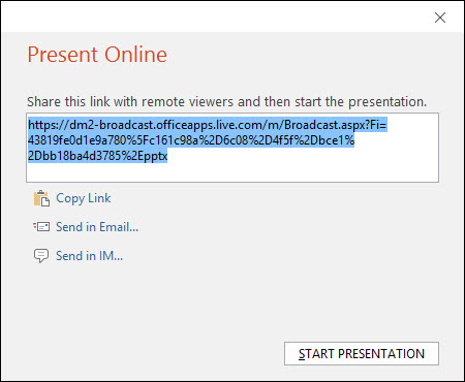
FIGURE 13-7: Presenting Online with the Office Presentation Service.
To attend the online presentation, simply follow the link provided by the presenter. Your browser will fire up PowerPoint Online so you can view the presentation. As an attendee, you can either follow along with the presenter or click through the slides to move ahead or go back. Figure 13-8 is a screenshot of a user’s experience from an iPad.

FIGURE 13-8: Present Online attendee experience from an iPad.
Adjusting alignments, bullets, and numbered lists
You will find alignment, bullets, and numbering commands on the Home tab under the Paragraph group. Don’t be alarmed when your bulleted or numbered list displays characters other than your template’s styles. As soon as you click outside of the content placeholder, the default formatting you saw while editing the text is replaced with your template’s style.
Two shortcut keys that may come in handy are the Tab and the Shift+ Tab keys. The Tab key indents your list to the right and the Shift+Tab key indents your list to the left.
Adding pictures and Smart Art graphics
To add pictures to your presentation from the PowerPoint Online, click the picture icon in an empty placeholder on your slide. You’re prompted to select a file from your hard drive. As soon as the picture is added to your slide, the Picture Tools Format tab displays, allowing you to further customize your picture.
You can also insert a picture through the Picture command on the Insert tab on the Ribbon.
To add a Smart Art graphic, click the Smart Art icon on an empty content placeholder and make your selection from the choices on the Ribbon. You can also add Smart Art graphics directly onto your slide through the Smart Art command on the Insert tab on the Ribbon.