6.3. Protocol Mechanisms
The basic neighbor discovery protocol mechanism consists of periodic keep-alive or “Hello” message exchanges by neighboring NEs. These messages are sent over each logical link whose end point identifiers need to be associated. In SONET/SDH networks, logical links are bidirectional, that is, the transmit and the receive links are paired in an OXC and their end points are identified by a single identifier (e.g., a bidirectional port ID). With PXCs, there may or may not be an association between transmit and receive links. Hence, in the neighbor discovery procedures, the transmit and receive end points may be separately identified (e.g., a unidirectional port ID). The protocol, in its simplest form, can be described as follows for bidirectional links:
Consider an NE attached to one or more links. Over each link, it periodically transmits a Hello message containing the link identifier at its end.
Suppose the same NE receives a Hello message over a link. This message will contain the link identifier at the other end. The NE then transmits both the local and the remote link identifiers in the Hello messages it sends on that link.
Thus, the Hello messages received by an NE over a logical link will eventually contain the identification of both end points of a logical link.
This simple procedure is applicable in SONET/SDH networks where control communication can utilize the overhead bytes available on logical link (see Chapter 2). The various options for running the discovery protocol using the overhead bytes are described next. Where such communication is not possible, the procedure would be more complex. This is the case with PXCs. What could be done in this case is described later.
Now, control adjacency can be determined as part of the layer adjacency discovery procedure. Specifically, an NE can include the control channel end point identifier in the Hello messages if possible. Otherwise, control adjacency has to be manually configured.
6.3.1. Neighbor Discovery Using the J0 Byte
From the discussions in Chapter 2, it may be recalled that J0 is the trace byte in the section overhead, J1 is the trace byte in the path overhead, and J2 is the trace byte in the VT path overhead. As the name implies, these bytes can be used to insert a trace pattern at one end, which can be recovered at the other end of a section, path, or VT path. In fact, it is possible to introduce a 16-byte trace string by concatenating consecutive bytes received on the J0, J1, or J2 overhead as per ITU-T G.707 specification [ITU-T00a]. In this section, we focus on the usage of J0 bytes for neighbor discovery. The J1 and J2 bytes can be used for detecting path layer adjacencies in a similar manner.
J0-based neighbor discovery can be used between two section-terminating NEs.[2] As per our definition of layer adjacency, these NEs must be “section-layer adjacent.” In Figure 6-1a, for instance, each OXC is section-layer adjacent to a WDM device. Similarly, the two WDM devices are adjacent. It is also possible to discover line layer and physical (regenerator) layer adjacencies using J0 bytes. For instance, we could potentially use the J0 bytes to discover the line layer adjacency between the two OXCs shown. Multilayer discovery is the name used for the procedure that utilizes J0 bytes to discover adjacencies at multiple layers. This is described later in this section.
[2] The corresponding SDH terminology is “multiplex section” (see Chapter 2). In this section, we use just the SONET terminology for simplicity.
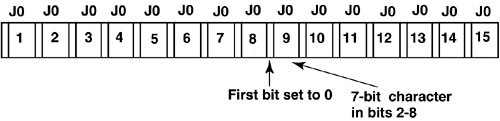
Now, the J0 byte is normally used for doing section traces. To do neighbor discovery, the J0 byte is periodically “borrowed.” Once the adjacency is determined, the byte is released for normal section trace functions. Because the J0 byte is used for a specific purpose, the format of its content is well defined, and hardware exists to read and write the byte in that format. Specifically, J0 bytes in sixteen consecutive frames are used for the regenerator section trace in SDH [ITU-T00a]. The first byte is a combination frame start marker and CRC-7 code. This leaves only 15 bytes available. In each of these bytes, the first bit (bit 0) is required to be set to 0. Hence this results in a reduced 7-bit content for each byte. A further limitation on these available bytes is that they must conform to T.50 character set [ITU-T92a]. The format of the section trace string is illustrated in Figure 6-9.
Figure 6-9. J0 Section Trace String
Unfortunately, fifteen characters are not adequate to carry the information required in the Hello protocol described earlier. To see this, note that Hello messages must eventually carry both the local and the remote logical link identifiers. The link identifier in turn is typically expressed as the pair, {Node ID, Port ID} . Here, Node ID uniquely distinguishes an NE in a network, and Port ID is an identifier unique with respect to the given node. When IP is used for management system and/or control plane communications, Node ID can be taken to be an IP address assigned to the node. Thus, to encode the link identifier at each end point, we need:
Node ID: 32-bit (or 4-byte) IP address. Each byte in this address can take a value from 0 to 255, and hence can be represented by two hexadecimal characters (from 00 to FF). Thus, eight T.50 characters are required to represent the Node ID.
Port ID: Suppose we allocate 16 bits (2 bytes) for the Port ID. This would allow the existence of up to 216 ports in a node. As before, the 2 bytes require four hexadecimal characters for representation.
Thus, the identifier for each end of a link requires twelve characters. It is thus impossible to fit the IDs of both end points of a link in the section trace string. So, how does neighbor discovery using the J0 bytes work? There are two ways of doing this. The first method requires an out-of-band control channel. Such a channel, for instance, could be an Ethernet link between two colocated NEs, or an IP link between two adjacent NEs implementing a distributed control plane. The second method does not have the out-of-band control channel requirement, but the neighbor discovery protocol is more complex in this case. Both these methods, and the multilayer neighbor discovery procedure, use a common J0 message format, shown in Figure 6-10. The usage of the type and flag fields in the message are described in the following sections.
Figure 6-10. J0 Message Format

6.3.1.1. J0-BASED DISCOVERY WITH AN OUT-OF-BAND CONTROL CHANNEL
Consider two NEs with multiple logical links between them, each defining a section-layer adjacency. It is assumed that an out-of-band control channel is configured between the two NEs. Both these NEs send and receive J0 discovery messages on each link. The following rules are used:
Sending: The NE sets the Node ID field to the 8-byte hexadecimal representation of its IP address, and Port ID field to the 4-byte hexadecimal representation of the identifier of the port over which the message is sent. The other fields are not used.
Receiving: The NE translates the hexadecimal values received in Node ID and Port ID fields to the IP address and port number, respectively, pertaining to the remote node. It then determines the control channel to use to contact the neighbor whose Node ID has been received. Over this control channel, the NE sends a message to its neighbor containing the following information:
The Node ID and Port ID received from the neighbor in the J0 message, and
Its own Node ID and the local ID of the port over which the J0 message was received.
Thus, both NEs can build a map of associations between the local and remote link identifiers. Note that in the procedure above, the sending NE must keep transmitting the J0 information continuously until it receives a response over the control channel (or a timeout occurs signaling the failure of the procedure).
Figure 6-11 shows an example of this procedure, where nodes A and B send their local information using the J0 string and the link identifier association using the control channel. Now, this procedure also allows each NE to detect errors in wiring. Specifically, for bidirectional logical links, this can detect the situation where the transmit and receive pair at one end are not connected to the same receive and transmit pair at the other end. This is illustrated in Figure 6-12, where an error has occurred in connecting Node A to Node B. This error is detected when the nodes receive conflicting information over the control channel indicating incorrect association.
Figure 6-11. Use of J0 Bytes with an Out-of-Band Control Channel

Figure 6-12. Detecting Connectivity Problems

6.3.1.2. J0-BASED DISCOVERY WITHOUT AN OUT-OF-BAND CONTROL CHANNEL
Consider Figure 6-11 again, and assume that there is no control channel between the two NEs. In this case, we need another way to establish the link identifier associations. Specifically, consider two nodes A and B that are running the neighbor discovery protocol for a given link. Suppose node A has a numerically higher Node ID. The revised discovery procedure is executed in two passes. In the first pass, node A sends the link identification at its end, and node B reflects the received information. In the second pass, node B sends its information, and node A reflects it back. This allows both nodes to build the link identifier associations and also to detect inconsistencies in wiring. The procedure works as follows:
Both Nodes:
Determination of status: The node sets the Node ID field to the 8-byte hexadecimal representation of its IP address, and the Port ID field to the 4-byte hexadecimal representation of the identifier of the port over which the message is sent. The flag field is set to the character “R,” indicating that the other side should reflect the received information. The sending continues until a correct response is received on the receive port or a timeout occurs. Simultaneously, the node receives J0 messages on the corresponding receive port. If the received Node ID value (after translation) is numerically higher than the node's ID, then the node executes the “Node A” procedure below. Otherwise, it executes the “Node B” procedure.
Node A:
Sending: Node A sets Node ID to the 8-byte hexadecimal representation of its IP address, and Port ID to the 4-byte hexadecimal representation of the identifier of the port over which the message is sent. The flag field is set to the character “R,” indicating that the other side should reflect the received information. The sending continues until a correct response is received on the receive port or a timeout occurs. Simultaneously, node A receives J0 messages over the corresponding receive port.
Receiving: Node A ignores all received J0 messages until a message with the flag set to “D” is received (which indicates that Node B is reflecting the received information). When such a message is received, Node A sets the flag to “O” in its outgoing J0 messages. This indicates to node B that it can begin sending its node and port information.
Recording: Node A keeps sending J0 messages with the Flag set to “O.” At the same time, it receives and ignores all J0 messages until a message with the flag set to “R” is received. At this point, it notes the received Node ID and Port ID values, and makes an association between the sent and received values. It also copies the received Node ID and Port ID values in its outgoing J0 messages and changes the flag to “D.”
Node B:
Receiving: Node B ignores all received J0 messages until a message with the flag set to “R” is received. When such a message is received, Node B copies the incoming Node ID and Port ID fields in the outgoing J0 messages and sets the flag to “D.”
Recording: Node B notes the received Node ID and Port ID values. It records the association between the received values and its own Node ID, and the ID of the port over which the message was received. It also copies the received Node ID and Port ID values in its outgoing J0 messages and changes the flag to “D.”
Sending: Node B keeps sending J0 messages as above with the flag set to “D.” At the same time, it ignores received messages until a message with the flag set to “O” is received. At this point, it starts sending J0 messages with its own Node ID and Port ID, with the flag set to “R.” It keeps sending these messages until a message with flag set to “D” is received. When such a message is received, it changes the flag field to “O” in its outgoing message.
An error in port connectivity is indicated if an expected message is not received by either node. The procedure above is illustrated in Figures 6-13a and 6-13b. Figure 6-13a shows the “correct” case, and Figure 6-13b shows the case where there is an error in connectivity. In this case, Node B receives (Node A, Port 3) information on its port 4, and reflects this to A. Node A then detects an error. Node A could report this error to the management system for further action.
Figure 6-13a. Use of J0 bytes without an Out-of-Band Control Channel

Figure 6-13b. Detecting Connectivity Problems

6.3.1.3. AN ALTERNATIVE USAGE OF J0 BYTES
So far, we have assumed that only T50 characters can be transported in J0 bytes. Suppose that we do not have this limitation. Then, with 105 usable bits, the local and remote link identifier can be directly coded as follows:
Local Node Identifier: 32 bits
Local Port Identifier: 16 bits
Remote Node Identifier: 32 bits
Remote Port Identifier: 16 bits
This representation takes up 96 bits, and there would still be 9 bits left for various flags. With this coding, the discovery protocol would be much simpler than the one described in the previous section. Specifically, each NE could send its own node and port ID along with the received node and port ID over each link. An NE can check for consistency of information received from its neighbor and flag the management system when an inconsistency is detected.
6.3.1.4. MULTILAYER NEIGHBOR DISCOVERY
Figure 6-14 shows a chain of SONET NEs operating at various layers. This consists of path, line, and section terminating equipment (PTE, LTE, and STE, respectively) and physical layer regenerators (PLR). A multilayer neighbor discovery procedure utilizes the J0 section trace bytes to discover the LTE, STE, and PLR adjacencies, as shown in Figure 6-14. In terms of hierarchy, the line layer is said to be above the section layer, which, in turn, is above the physical layer.
Figure 6-14. Multi-Layer Neighbor Discovery

The purpose of the multilayer neighbor discovery protocol is to allow a network element to find its nearest neighbor at each layer. A neighbor at a given layer may be a number of NEs away with intermediate NEs operating at lower layers (Figure 6-14).
Because linear chains of interconnected NEs are common in the transport environment (e.g., different types of regenerator and add/drop multiplexers), any node in the chain should be able to find out its nearest neighbor without causing disruptions down the chain. The usage of J0 bytes means that some equipment that is normally transparent to this byte must now monitor and write on this byte. This is particularly the case for PLR equipment.
Let us now consider the multilayer neighbor discovery protocol using J0 bytes and an out-of-band control channel. The J0 message format shown in Figure 6-10 would be used, with the Type flag set as follows:
Type = 0. “Do nothing.” Indicates that successive equipment downstream should not respond to this discovery request.
The protocol given in section 6.3.1.1 is executed, with the following usage for the type field:
An NE receiving the J0 message checks to see if it operates at the layer at or above that indicated in the string:
If the layer indicated in the message is higher than that at which the NE operates then the message is passed on without modification, that is, the NE will remain “transparent.”
If the layer indicated in the message is equal to the layer at which the NE operates, then the NE modifies the J0 message by replacing the type field with T = 0 (“do nothing”) and passes it on.
Suppose the J0 message request remains, that is, it has not changed to a message with T = 0 after a configured amount of time. Then, on the return fiber the NE transmits a J0 message with the type field set to the highest layer at which the NE operates. This message also has its node ID and port ID information.
The originating NE can now record the received link identifier information contained in the J0 message, and exchange the information over the control channel.
If a J0 message is not received by the originating NE at the expected layer, then either there is no neighbor at that layer, or the neighbor does not support this procedure. It is also possible in this case that a lower layer neighbor is not transparent to this procedure.
6.3.2. Neighbor Discovery Using the DCC Bytes
The DCC (data communication channel) overhead bytes may be used for realizing a packet communication channel between OXCs as follows:
SONET Section (SDH Regenerator Section) DCC: This consists of D1, D2, and D3 section overhead bytes (see Chapter 2). Used as a transparent sequence of bytes, this provides a 192 Kbps message channel.
SONET Line (SDH Multiplex Section) DCC: This consists of D4–D12 line overhead bytes, with 576 Kbps of available bandwidth.
These bytes merely provide a raw data channel. Over this channel, a framing protocol is required to realize a data link. An example is the High-level Data Link Control (HDLC) protocol [Stallings03]. An IP-based Hello protocol can be run over HDLC framing. Another possible choice is the Link Access Procedure-D (LAPD) framing protocol [Tanenbaum02], but LAPD is less commonly used for carrying IP packets. In terms of adjacencies, the line DCC can be used to discover line layer adjacencies, and the section DCC can be used to discover line or section layer adjacencies (see multilayer discovery, above).
The Hello protocol itself is essentially the same as the one described in the beginning of section 6.3. The protocol can either run directly over IP, or it can run over the User Datagram Protocol (UDP) and IP. Regardless of whether UDP is used, the steps to be implemented are as follows. Considering two adjacent nodes running the protocol over each link:
Sending: Each node forms the Hello message containing its own Node ID and the ID of the port over which the message will be sent. The IP packet containing the message is addressed to the “all-nodes” multicast address, 224.0.0.1, and sent over the DCC.
Receiving: Each node receiving the Hello message creates the mapping between the received information and the identifier of the logical link on its side. It then appends the received <Node ID, Port ID> values to the Hello message it sends.
The main advantage of using line/section DCC for performing layer adjacency discovery is that UNI 1.0 [OIF01], which has been the subject of successful interoperability tests by multiple vendors, supports this method. The disadvantage is that the use of line/section DCC is not viable for handling the case where two NEs are separated by intermediate multiplexers that may not pass the DCC bytes transparently.
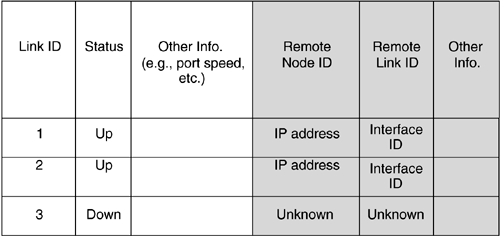
6.3.3. Link Property Correlation
The purpose of neighbor discovery is to determine the local connectivity information from the perspective of each node. Conceptually, with a distributed control plane, the information that a neighbor discovery protocol generates is used to populate the link identification table, as shown in Figure 6-15. In this table, the “local” information is manually configured. This includes Link ID and other parameters pertaining to each link. For example, this could include Shared Risk Link Group ID and other routing metrics (see Chapter 10). The routing-related parameters must be identical on both sides of the link. Given that these are manually configured in each NE, it is useful to ensure that the configured values are consistent at both ends of a link. A protocol, running over the control channel, could allow the two NEs to exchange the configured information and raise an alarm if an inconsistency is detected.
Figure 6-15. Link Identification Table