
Photoshop has been around long enough that the name has become a verb in our cultural lexicon ("You can tell THAT'S been Photoshopped!"). But simply because a term gets bandied about in general parlance doesn't mean everyone knows what Photoshop truly is or does. Granted, you may be one of the many graphics professionals who have been using this program for years. But you may just as likely be one of the greater majority who, while having a general idea of Photoshop's capabilities, has little or no experience using it — and with this book have decided to change all that.
As you move forward and get to "What's New in Photoshop CS3," the playing field should level out, and as you move through the rest of the book, no matter what level of user you are now, you find a great deal of new and useful information throughout.
So what exactly is Photoshop and what does it do? Adobe Photoshop — Photoshop is the name of the software, Adobe Systems is the name of the company that develops and sells it — is a professional-level image-editing application. It allows you to create images from whole cloth or, more likely, modify scanned artwork and digital photographs. Photoshop is available for use on computers equipped with either Microsoft Windows or Apple's Macintosh operating system.
Of course, Photoshop isn't just an image-editing application. It's the most powerful, most ubiquitous image-editing application in the world. Despite hefty competition, where professional image editing is concerned, Photoshop's not just the market leader — it's the only game in town — and as you'll discover (or you may already know), that status is well deserved.
Such a lack of competition is rarely a good thing, because stagnation can often result. But in Photoshop's case, the historically lopsided sales advantage has provided Adobe with a clear incentive to reinvest in Photoshop and regularly enhance, and even overhaul, its capabilities. Photoshop CS3 is no exception, and in fact, it may be one of the most significant upgrades in the past few years.
It's as if each new version of Photoshop is competing with its own previous versions for the hearts and minds of the digital art community. Meanwhile, other vendors have had to devote smaller resources to playing catch-up. Some, such as Jasc Software, with its Windows-only Paint Shop Pro, have hung in there and remained commercially viable. But such success stories are few and far between. Although competitors have provided some interesting and sometimes amazing capabilities, the sums of their parts have — more often than not — fallen well short of Photoshop's.
As a result, Photoshop rides a self-perpetuating wave of market leadership. It wasn't always the best image editor, nor was it the first. But its deceptively straightforward interface combined with a few terrific core functions made it a hit from the moment of its first release. More than a dozen years later — thanks to substantial capital injections from Adobe and highly creative programming on the parts of Photoshop's engineering staff and its originator, Thomas Knoll — Photoshop has evolved into the most popular program of its kind.
Like any image editor, Photoshop enables you to alter photographs and other scanned artwork. You can retouch an image, apply special effects, swap details between photos, introduce text and logos, adjust color balance, and sharpen the details — to name just a few of your options. Photoshop also provides everything you need to create artwork from scratch. These tools are fully compatible with pressure-sensitive tablets, so you are not limited to creating only those images that you can successfully draw with a mouse.
Graphics programs tend to fall into two broad categories: painting programs and drawing programs. While these terms are nice, it's better to think of graphics programs in terms of the type of images they produce: raster images or vector images.
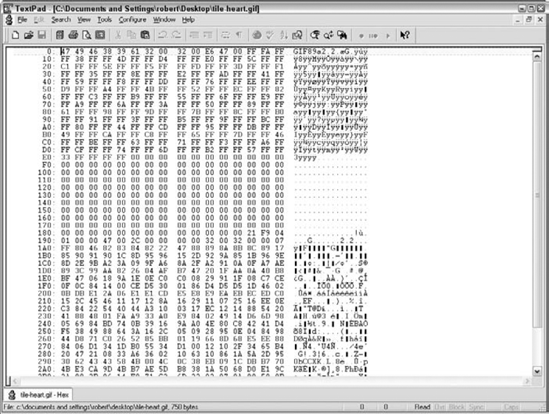
A raster image creates a picture on your screen by mapping color values to a rectangular grid of pixels (short for picture elements). As with all computer data, the color or grayscale values are stored in bits. The bits correspond to the grid of pixels, and this is where the term bitmap comes from. If you look at the code behind an image, it represents a map of all the bits devoted to the individual pixels — left to right, top to bottom.
For example, JPEG, GIF, and PNG files are all raster (bitmap) graphic filetypes. By dragging one of these filetypes to a text editor capable or rendering hex code, you get a window into what that map of bits looks like, as shown in Figure 1.1.
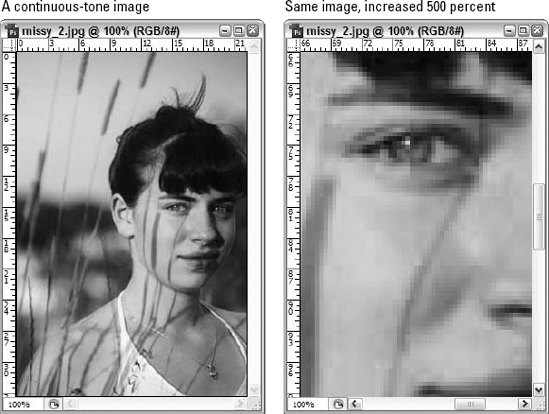
Raster images contain a fixed number of pixels, which makes them resolution-dependent. This means when you attempt to enlarge them, they "pixelate" — a fancy way of saying they become all jagged looking. Figure 1.2 gives an example.
A vector image creates a picture using mathematical statements. Instead of mapping out data bits to specific pixels, a vector image describes the geometric properties (points, lines, curves, and polygons) that need to be constructed to render the image. For example, if a vector image contains a circle, the data in the file keeps track of the circle's radius, where the center point is, and any stroke or fill colors to be used.
Vector files are not resolution dependent. If you increase the dimensions, the objects described by the mathematical statement are simply redefined. In the case of our circle example, instead of trying to enlarge pixels, the vector file simply changes the radius value — and viola! You get a larger circle that's just as clear the second time around. Figure 1.3 provides a demonstration.
While painting programs have been traditionally raster-centric and drawing programs vector-centic, Photoshop bridges the gap quite nicely, providing many of the best features of both. In addition to its wealth of image-editing and organic-painting capabilities, Photoshop permits you to add vector-based text and shapes to your photographic images. These features may not altogether take the place of a drawing program (though Photoshop keeps incorporating many of the vector tools found in Adobe's drawing program Illustrator), but they help to make Photoshop an increasingly flexible and dynamic image-creation environment.
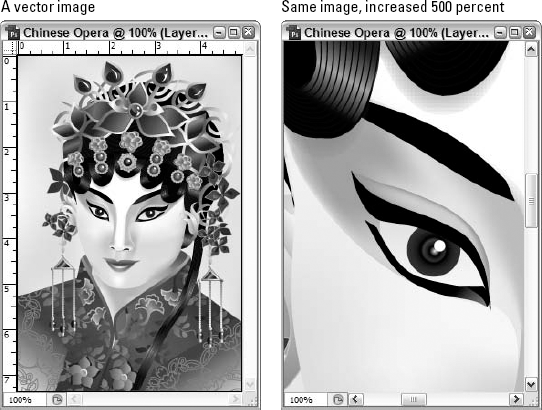
Figure 1.3. This image, originally created in Adobe Illustrator, and opened here in Photoshop CS3, looks just as good regardless of the size it's resampled to.
Note
You should realize that even when working with vectors, everything you see onscreen is in a rasterized state — because monitors (for the most part) are raster output devices. Printers on the other hand, are where the benefit of vector imagery is seen most clearly — literally and figuratively. This explains why you tend to find print designers singing the praises of applications like Adobe Illustrator (a vector image editor) and web graphic designers (who design for a monitor-based experience) siding with Photoshop.
As you might expect, painting programs and drawing programs have their own strengths and weaknesses. The strength of a painting program is that it offers a straightforward approach to creating images. For example, although many of Photoshop's features are complex — some of them extremely so — its core painting tools are as easy to use and familiar as a pencil. You alternately draw and erase until you reach a desired effect, just as you've been doing since childhood with pencil and paper.
In addition to being simple to use, each of Photoshop's main painting tools — include paint brushes, pencils, and erasers — is fully customizable. It's as if you have access to an infinite variety of crayons, colored pencils, pastels, airbrushes, watercolors, and so on, all of which are erasable — and even the eraser is customizable, so you can erase in any one of hundreds of ways. The simplicity and customization potential make these tools fun to use, and you'll find yourself creating artwork that you might never have had the time or patience to attempt manually. Of course, if you still find you're more facile with a pencil and paper (or ink and paper or any other artist's medium, for that matter), you can always scan the manual drawing/painting into Photoshop and then use Photoshop's tools to enhance and edit it — zooming in very close for fine adjustments, which you could never do to the same extent if you remained in the manual world.
Because painting programs rely on pixels, they are ideally suited to electronic photography. Whether captured with a scanner or digital camera, an electronic photograph is composed of thousands or even tens of millions of colored pixels. A drawing program such as Illustrator may let you import such a photograph and apply very simple edits, but Photoshop gives you complete control over every pixel, entire collections of pixels, or independent elements of pixels. If you just leaf quickly through this book, you'll see that a photograph can become anything, and the options for what you can do to a photo are virtually unlimited.
The downside of paintings and electronic photos is that they are ultimately finite in scale. Because a bitmap contains a fixed number of pixels, the resolution of an image — the number of pixels in an inch, a centimeter, or some other defined space — changes with respect to the size at which the image is printed. Print the image small, and the pixels become tiny, which increases the resolution of the image. Like the millions of cells in your body, tiny pixels become too small to see and thus blend together to form a cohesive whole, as in the first image in Figure 1.2. Print the image large, and the pixels grow, which decreases the resolution. Large pixels are like cells viewed through a microscope; once you can distinguish them independently, the image falls apart, as in the second example in the figure. The results are jagged edges and blocky transitions. The only way to remedy this problem is to increase the number of pixels in the image, which increases the size of the file.
Note
Remember, this is a very basic explanation of how images work. For a more complete description that includes techniques for maximizing image resolution and quality, check out Chapter 3.
A better way to describe the process of creating a vector-based drawing might be "constructing." Why? Because you actually build each of the lines and shapes, point by point, and stack them on top of each other to create a finished image. Each of these objects is independently editable — one of the main advantages of an object-oriented approach — but you're still faced with the task of building your artwork one chunk at a time.
Because a drawing program defines lines, shapes, and text as mathematical equations, these objects automatically conform to the full resolution of the output device, whether it's a laser printer, an image setter, or a film recorder. The drawing program sends the math to the printer and the printer renders the math to paper or film. In other words, the printer converts the drawing program's equations to printer pixels. Your printer offers far more pixels than your screen — a 600-dots-per-inch (dpi) laser printer, for example, offers 600 pixels per inch (dots equal pixels), whereas most screens are limited to 150 pixels per inch or fewer. So the printed drawing appears smooth and sharply focused regardless of the size at which you print it.
Another advantage of drawings is that they take up relatively little space on a hard drive. The file size of a drawing depends on the quantity and complexity of the objects the drawing contains. Thus, the file size has almost nothing to do with the size of the printed image, which is just the opposite of the way bitmapped images work. A thumbnail drawing of a garden that contains hundreds of leaves and petals consumes several times more space than a poster-sized drawing made up of three rectangles.
Because of their specialized tools and methods, painting programs and drawing programs fulfill distinct and divergent purposes. Photoshop and other painting programs are best suited to creating and editing the following kinds of artwork:
Scanned photos, including photographic collages and embellishments that originate from scans
Images captured with any type of digital camera
Still frames captured from videotape or film
Realistic artwork that relies on the play among naturalistic highlights, midranges, and shadows
Impressionistic artwork and other images created for purely personal or aesthetic purposes
Logos and other display type featuring soft edges, reflections, or tapering shadows
Special effects that require the use of filters and color enhancements that you simply can't achieve in a drawing program
You're probably better off using Illustrator or some other drawing program if you're interested in creating more stylized artwork, such as the following:
Architectural plans, product designs, or other precise line drawings
Business graphics, such as graphs, charts, and diagrams that reflect data or show how things work
Traditional logos and text effects that require crisp, ultra-smooth edges
Brochures, flyers, and other single-page documents that mingle artwork, logos, and body-copy text (such as the text you're reading now)
If you're serious about computer graphics, you should own at least one painting program and one drawing program. This enables you to create and edit images that are best suited to each of the different program types, potentially mixing and mingling the content you create and/or edit in each program for projects that require, for example, photographic content as well as crisp line art. For simplicity's sake, you may consider owning both Photoshop and Illustrator, so that you can benefit from the products' common elements — similar menus, commands, buttons, and common keyboard shortcuts. The key, though, is to have tools that suit your needs and work the way you think. Of course, as you'll learn later, another of Photoshop's benefits is that you can customize it to work the way you do, making it a highly effective tool for just about anyone.
If you used Photoshop CS2 or CS, you'll notice some big changes in Photoshop CS3 right away. There are big changes to the toolbox layout and the way palettes (those boxes of tools and settings on the workspace) look and interact — with you and the tools you're using at any given time. So the look and feel of Photoshop has changed with the release of CS3, and you'll spot that immediately.
What you may not realize immediately are many of the feature changes and enhancements. These you won't find until you start working with a particular tool or fire up a particular command via a menu or keyboard shortcut. Some of them may take you weeks to find, just based on which features you typically use when you sit down to work with Photoshop. Some you may never find on your own, if they reside in feature areas that you never, ever use.
That's the neat thing about Photoshop, too. It's so vast that you can use it and love it and be really productive with it without ever using certain parts of it. It's like living in a big state or province: All the things you ever need are probably right there near your house, and you may never need to venture very far for anything. Of course, the adventurous among you will feel compelled to poke around and play with features you may not need on a daily basis, and hopefully this book will encourage that sort of pioneer spirit.
To give you an idea of the magnitude of the upgrade that CS3 represents, this section includes a list of just some of the new and enhanced features. You'll find a chapter number reference (though some features are mentioned in more than one chapter), along with a description of the new/enhanced feature and how you'll benefit from it. Remember, there are many changes, both large and small (and each person's idea of "large" versus "small" may vary), so this isn't everything:
New toolbox layout (Chapter 2): The toolbox can now be displayed in a single vertical column of tools, or the old two-column arrangement many of us have come to know and love. Of course, the tools themselves look the same and those that are grouped under a single button location are in those same groupings, so you won't be struggling to figure out where things are. The idea behind this change is to simplify access to the tools, making grabbing a particular tool with the mouse easier. You're less likely to click the tool's neighbor when the only neighbors are above and below, not side by side as well.
No ImageReady button on the toolbox (Chapters 19 and 20): ImageReady is gone. Now, now, wipe those tears and keep reading. While the application is gone, its features are not. They're now housed completely within Photoshop. We've seen many of ImageReady's tools for animation migrate to Photoshop in the previous two versions, but the assimilation is now complete. Between the new Timeline palette (a version of the Animation palette, both of which are discussed later) and the Save for Web dialog box, there's nothing you did with ImageReady that you can't do within Photoshop.
Changed palettes (Chapter 2): The palettes are in roughly the same spots as they were in CS2, but their connection to the workspace has changed. The palettes are affixed to the right side of the workspace as part of a static dock and can be collapsed and expanded individually, in groups, or you can choose to expand the dock so that all the palettes and palette groups are displayed at the same time. You can still separate a particular palette from the dock and drag it anywhere onscreen, though, so don't think you can't bring your tools with you when you go to work, because you can. You also can drag the one or two palettes you need with you and collapse the rest to make as much room for your image as needed. You'll also notice tabs on the left side of the palette dock (when the palettes are in their default arrangement, with just one column of palettes visible). You can click the tabs to display different palettes and palette groups, providing yet another way to get at the palette you need, when you need it.
The Analysis menu (Chapter 3): Now you can really control how your image measurements are made — visually, by you, using the displayed rulers, or with measurement features implemented within your image. Through the Analysis menu, you can set up a measurement scale, set data points within your image, measure elements within your image, customize your rulers and counting tools, and apply scale markers. For those images where the distance between points A and B is important, and where you need to determine for yourself where points A and B are, this development is a big benefit.
The Animation/Timeline palette (Chapter 19): The ability to create animations and movies, with tools that will remind some of you of Macromedia's Flash application (now that Adobe and Macromedia are one and the same), are housed in the new Timeline palette, which is part of the Animation palette. You'll use this palette for many of the things you used to do in ImageReady, and in Photoshop CS2 with the Animation palette that premiered with that version of the software. In addition to creating animations and movies, you also can use this timeline to view video frame by frame, and with the enhanced Clone tool (described below), you can clone between frames in a video.
The Clone Source palette (Chapter 7): You can plot up to five clone sources, from locations within one or more images, and after setting them, use this new palette to switch between them when using the Clone Stamp. The palette also allows you to set offsets, horizontal and vertical scale, angles, overlay, and opacity for the cloned content from each clone source.
The Measure Tool (Chapter 3): Used along with the new Measurement Scale command, you can set a measurement scale by dragging within your image. You also can drag to measure any distance within the image, and the value appears in the Info palette. Measurements made with this tool (and the Measurement Scale command) find their way into the Measurement Log palette, which is also new.
The Measurement Log palette (Chapter 3): Keep track of your measurements (made with the new Measurement tool) with this palette, through which you can also track your measurements, use measurements from one image in another, select all stored measurements, or delete them.
Smart Filters (Chapter 10): If you've turned any layer in your image into a Smart Object (or opened an image as a Smart Object), your filters are applied as Smart Filters. What's so smart about them? They appear, after you apply them, in the Layers palette, where you can turn them on and off and delete them entirely. This makes filtering something much more flexible than ever, because filters can be applied and then un-applied later — without having to rely on the History Palette or Undo to get rid of their effects.
More support for video (Chapter 19): Photoshop CS3 supports new formats and allows you to import and expert image sequences and frames. You also can take advantage of expanded QuickTime export capabilities, which include exporting to Flash Video (FLV). Layered video is now also supported in the Timeline palette, and you can work with them in grayscale, RGB, CMYK, and Lab document modes, at 16-bit, as well as 32-bit depth.
This list covers just some of the big changes you'll find in CS3 — there are lots of smaller changes throughout, many applying to existing tools. For example, you'll find enhancements to the Brightness/Contrast dialog box and improvements in the selection tools, in terms of the addition of a Refine Edge option that allows you to do just that — clean up the edges of a selection. You'll find support for creating graphics for use on handheld devices in the new version of the Save for Web dialog box (now called the Save for Web and Devices dialog box), and of course, the Bridge has changed, too — in many ways for the better.
Photoshop CS3 is a major upgrade, made up of significant interface changes and several big changes and enhancements throughout the application. This chapter's goal has been to familiarize you with what to expect from CS3 and where you can find coverage of the new features throughout this book. You're now ready to move forward and focus, chapter by chapter, on exploring Photoshop CS3 — the features that have always been part of Photoshop but may be new to you, and the new and changed features that will be new for everyone. See you in Chapter 2!