
Well, the time has come. Everything Photoshop could ever do (virtually) to a static image can now be done to motion graphics. That's right — got a video clip of your hated Uncle Harry making a fool of himself at Thanksgiving? Open it up in Photoshop and paint horns and Groucho glasses on him! Mom will get a kick out of it!
Photoshop used to be limited to animated GIF's, courtesy of the old add-on application ImageReady. If you wanted to make a little Web animation, that was where you went — you fired up ImageReady from within Photoshop, and you could optimize images for online use and create rollovers, animated GIFs, anything graphical for the Web. Over the next few releases, however, some of ImageReady's features moved over to Photoshop: The Save for Web dialog box is a major example. CS2 users may recall that with CS2, ImageReady was still a separate application, but that more and more of ImageReady's capabilities had been integrated into Photoshop (an Animation palette was added, for example), and we all heard that ImageReady would be gone with the release of Photoshop CS3.
Adobe kept that promise, and with CS3, the absorption of ImageReady is complete: There is no more ImageReady, and Photoshop can now do everything you used to do with it — and then some. In addition to being the home of all of ImageReady's Web-related image features, Photoshop can now manipulate video files and is no longer limited just to the Web animation that it pulled out of ImageReady. Considering how Photoshop essentially sucked the life out of and eventually killed ImageReady, this begs the question, "Will Photoshop now begin to suck the tools out of After Effects? Premiere? When will it end? When finally there are no individual Adobe programs?? Just one Colossal Adobe Everything CS-megaplex?!?!"
But let's not get carried away. We've moved beyond simple Web animations, and now with CS3, you can import video and image sequences for manipulation, create images to use in your video work, and create both Web-based and video animations. The one caveat is QuickTime: You must have at least QuickTime 7 installed on your machine because virtually all of CS3's new multimedia features are dependent on the QuickTime engine.
Tip
QuickTime is available as a free download from the Apple Computer Web site.
So it's true. Photoshop is now getting closer to offering the sort of one-stop shopping for all things image-related that Microsoft Word brought to the corporate office: You have one application; it can do letters and reports, it can do basic tables and calculations, it can format text and pictures in just about any way an office employee might desire, and it offers the ability to save documents as Web pages (not well, but it does offer the ability). It "does it all," so to speak.
Photoshop is following that path, but it's running miles ahead and doing a better job. It didn't just mimic what you could do with ImageReady for Web graphics; it does it just as well or better. It didn't just offer a slap-dash Web-animation tool; it has an entire palette and fleet of tools at the ready. And now, for video, it offers an armada of tools that enable you to create and edit video and apply special effects, and it works with common video file formats:
MOV: MOV is a video container or "wrapper" format developed by Apple. It's used to store video encoded in any of a variety of codecs. You can use MOV in both the Macintosh and Windows platforms.
AVI: AVI is Microsoft's wrapper format. It uses less compression than similar formats such as .MPEG/MPG and .MOV.
MPEG/MPG: MPEG is more routinely seen as MPG as a file extension. It's a video format standardized by the Moving Picture Experts Group (thus the initials). MPG is used for creating movies that are distributed over the Internet.
Photoshop CS3's video features also support Image Sequence formats:
BMP: BMP (Windows Bitmap) is the native format for Microsoft Paint (included with Windows) and is supported by a variety of Windows and DOS applications. Photoshop supports BMP images with up to 16 million colors. You also can use RLE (Run-Length Encoding), a lossless compression scheme specifically applicable to the BMP format.
Cineon: Cineon is a film and video format supported by Photoshop. Developed by Kodak and used for years as the standard for transferring computer-based images to film, Cineon is a robust, high-quality format and one of the few capable of saving images in 16-bit mode. When Cineon files are used with the Cineon Digital Film System, they can be output to film with absolutely no loss in image quality.
JPEG and JPEG 2000: The JPEG format is named after the people who designed it, the Joint Photographic Experts Group. JPEG is the most efficient and essential compression format currently available and is likely to be the compression standard for years to come. JPEG is a lossy compression scheme, which means it sacrifices image quality to conserve space on disk. This can introduce artifacts (visible imperfections), but because you can control how much data is lost during the save operation, you can compensate for this.
OpenEXR: OpenEXR is a high dynamic-range (HDR) image file format developed by Industrial Light & Magic as a computer-imaging application. The first projects to utilize OpenEXR were Harry Potter and the Sorcerer's Stone, Men in Black II, Gangs of New York, and Signs. Since that time, OpenEXR has become Industrial Light & Magic's primary image file format.
PNG: The Portable Network Graphics format (pronounced ping) is an open format initially created to replace the proprietary GIF format. Like GIF, PNG's compression is lossless, and actually better than GIF by anywhere from 5 to 25 percent. Unlike GIF, which has only a bit depth of 8 bits, PNG supports up to 48-bit truecolor or 16-bit grayscale, which means it even beats JPEG's 24 bits. (However, when transmitting a finished image over a network, JPEG is still the better choice, because it can compress a 24-bit image more than the lossless PNG compression can — therefore images are smaller and faster images.) PNG also supports alpha channels, which provide for variable transparency, and also supports cross-platform gamma correction.
PSD: This format, created by Adobe for Photoshop, supports image layers, adjustment layers, layer masks, annotation notes, file information, keywords, and other Photoshop-specific elements. A PSD file can be in Large Document Format (PSB), RGB, CMYK, grayscale, monochrome, duotone, indexed color, Lab color, and multi-channel color modes.
SGI: This is the native image format used by Silicon Graphics workstations; similar to a .RGB file. It runs in either a Mac or Windows environment, but is not widely used (other than with the aforementioned workstations).
Targa/TGA: TrueVision designed the TGA (Targa) format to support 32-bit images that include 8-bit alpha channels capable of displaying the live video. It's a Bitmap image format with new extensions that accommodate the creation of thumbnails, including file date and time information, authoring information, gamma values, pixel aspect ratio, and Alpha channels. TGA files also are used for storing texture files utilized by 3D video games.
TIFF: Developed by Aldus in the early days of the Mac to standardize an ever-growing population of scanned images, TIFF (Tagged Image File Format) is the most widely supported image-printing format across both the Macintosh and PC platforms. TIFF supports up to 24 channels, the maximum number permitted in any image. Even more impressive, TIFF supports multiple layers.
Note
When you bring video into Photoshop, you are working with the images only, not the audio.
When you open a video file or image sequence in Photoshop (using the File
To move through a series of frames, use the controls in the Timeline palette, as shown in Figure 19.1. You can work with video layers just as you would layers in any image — adjusting the blending mode, opacity, position, and layer style, layer by layer. You also can organize video layers in the Layers palette by grouping them, and by adding adjustment layers, you can apply color and light adjustments without making any permanent changes to the actual layers themselves.
Note
If you're forgetting how adjustment layers work, you can go back and review Chapter 18 to get reacquainted.
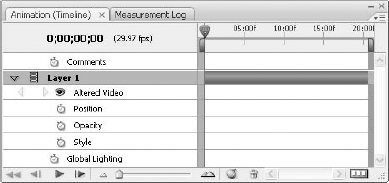
Figure 19.1. The Timeline palette is an alternate view of the Animation palette. It provides all the tools you need for controlling the order and content of your video frames and layers.
Tip
What, you don't see Timeline in the Window menu? Isn't that where all the palettes are listed? Well, yes, but the Timeline palette isn't really a palette unto itself; it's part of the Animation palette, and it is opened by choosing Window
The Timeline palette and Layers
Remember these important things:
Connections can be broken, especially on Windows machines. Whenever you move, rename, — or, obviously — delete a video source file, you break the link between it and its video layer. You'll see an icon in the Layers palette to inform you of this severed connection, at which point you can reconnect the two by clicking the Replace Footage command by choosing Layer

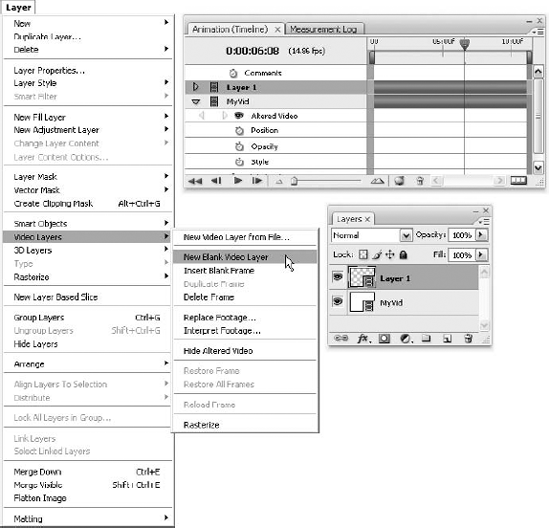
Adding video layers is easy. Just choose File
Blank video layers allow you to add new content. To add one, choose Layer
Tip
Another great use for blank video layers is to house drawn content; you can place animations that you've created with the brush, pencil, and pen tools (as well as the Shape tool) in these blank video layers.
The Timeline palette, which as we've said is really a part or variation of the Animation palette, makes it possible for you to view the length of animation properties established for any Photoshop-supported file containing an image sequence, video, or animation. Using the palette's controls (refer to Figure 19.1), you can move through the frames of video or an image sequence. You also can use keyframes to animate layer features and to establish the duration and sequence of layers in an animation.
As shown in Figure 19.3, each layer in a Photoshop document appears in the Timeline palette — well, all but the Background layer, which is visible in the Layers palette instead. Further parallels between these two palettes include the fact that whenever you add, delete, rename, group, delete, or change the properties of a layer in the Timeline palette, the changes are reflected in the Layers palette.
Note
If you group animation layers as a Smart Object, the information from the Timeline palette is stored in the Smart Object. The fact that the layers are Smart Objects is reflected in the Layers palette, and related Photoshop features — such as Smart Filters — are then applicable to the layers.
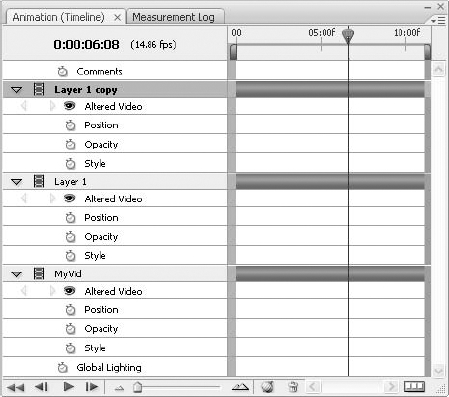
Figure 19.3. The Timeline palette and the Layers palette have quite a bit in common in terms of how they store and display in formation about your video layers.
As shown in Figures 19.1 and 19.3, the Timeline palette has several buttons that you don't see elsewhere in Photoshop palettes. These controls allow you to control your video's timing and the order of its frames, and they let you apply features that help you keep an eye on time in the movie overall and movement within and between the frames themselves. Look for these buttons:
Altered frame indicator: This icon tells you that a frame has been retouched.
Current time display: You can display the current time and drag its display to move through the frames of the video or animation.
Current-time indicator: This establishes the current frame in the video or animation, and displays it in the document window. Look for the light blue triangle on the Timeline ruler; as shown in previous figures, a vertical line runs from the current-time indicator down to the bottom of the time ruler, and as you drag the indicator, the current-time indicator changes to reflect the indicator's current position in time.
Delete keyframes: You can delete keyframes in three ways. You can click a keyframe and then click the Trash icon. You can drag the keyframe to the trash. Or you can click the keyframe and then press the Delete (Win) / Del (Mac) key.
Keyframe navigators: Use these controls to reposition the current-time indicator to the previous or next keyframe.
Layer duration bar: This bar indicates the portion of time within a video or animation that is taken up by a layer's content. You can drag the moving In and Out points to trim the duration of any layer.
Next/previous altered video: These controls move forward and backward between and among retouched frames.
Playback controls: These buttons, which look like VCR and DVD-player controls, allow you to run a preview of your video or animation. As you move through the preview, note that the current-time indicator adjusts according to where you are.
Time ruler: This device measures the video or animation duration serially, with a counting method you establish in your settings for the file's properties. Observe the tick marks (calibrations) and numbers along the ruler and see that they change according to the level of detail at which you view the video or animation. You can Zoom in and out, of course, using the Zoom slider.
Time vary stopwatch: This tool enables or disables keyframing in layer animation.
Timeline options: Click the ubiquitous triangle in the upper-right corner of the Timeline palette to display the Timeline palette menu. The menu offers several commands, including those that control keyframes, layers, the look and feel of the palette, the use of onion skins, and general settings for your video or animation file.
Toggle onion skins: As the name indicates, this button allows you to hide or display onion skins in the document window.
Work area bar: This bar indicates the span within the animation or video that you want to preview or export to another file.
Work area start and end brackets: These controls allow you to determine the span of the video or animation that will be previewed, rendered, or exported.
Zoom controls: Also known as the Zoom slider, these controls (two buttons and a slider between them) allow you to see more or less detail in the timeline, zooming in on the scale of the ruler.
Like any other Photoshop palette, you can change the way the palette looks and works through the palette menu. You can open the Timeline palette menu by clicking the triangle in the upper-right corner of the palette. The resulting menu is shown in Figure 19.4.
Tip
Want to make your palette thumbnails bigger or smaller? From the Palette menu, choose Options, and then choose small, medium, or large thumbnails. You also can decide whether you want to see Timeline Units, including Frame Number (off by default) and Timecode (on by default) in the palette. After you've made all the desired changes, click OK.
Figure 19.4. The Timeline options menu lets you customize the way the Timeline palette looks and works.
The aforementioned options aren't the only changes you can make in how the Timeline palette looks and works. Here are some other things you can do:
Display the current time. To do this, drag the current-time indicator and click in the time ruler where you want the current-time indicator to appear. Next, drag the current time display into position. You also can make the current time display by using the playback controls, or whenever you zoom in or out with the Zoom slider, which runs across the bottom of the palette. You'll note that this looks just like the slider in the Navigator palette, which controls your zoom on an image window.
Change the Timeline view. Again, you can use the Zoom slider, shown in Figure 19.5, or click the Zoom In or Zoom Out buttons (at either end of the slider). Choosing to hide or display layer properties (using the triangles to the far left on each layer) also changes the Timeline palette's view, by making more room to see individual layers within the vertical space in the palette. To see those layers that are currently not showing, drag the scrollbar on the right side of the palette.

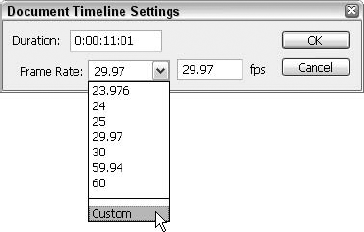
You can set the duration and frame rate for a Photoshop file that contains video or animation content. Duration, obviously, is the overall length of video or animation. The frame rate is determined by the type of output you produce — for example, NTSC video has a frame rate of 29.97 frames per second (fps), PAL video has a frame rate of 25 fps, and motion picture film has a frame rate of 24 fps. DVD video may have the same frame rate as NTSC video or PAL video, or a frame rate of 23.976 (NTSC Film). Video intended for CD-ROM or the Web is often 10 to 15 fps.
What can you do with all this information? Well not much just by reading it, but you'll find practical applications for it when you begin producing or editing your own video and animations. As soon as you start a new video or animation file in Photoshop CS3, default timeline settings are in place. These include a duration of 10 seconds and a frame rate of 30 fps. Using the Timeline palette menu, you can choose Document Timeline Settings and, in the resulting dialog box, enter your own settings for these values, as shown in Figure 19.6.
After you've set up the basics for your video or animation — its duration and frame rate (which you can change later, so don't worry that you've carved anything in stone) — you're ready to start building your video. This, of course, assumes that while you're in Photoshop, and perhaps because you're in Photoshop, this includes the creation and insertion of images for use in the video.
Before you dig in, consider these issues:
Adobe Premiere, and other video-editing applications to which you might export the finished file, do not support 16-bits-per-channel images.
If your video has more than one layer, you may be able to export just one of the layers to another video-editing application. So don't restrict yourself to a single layer if your eventual goal is to export only one layer; you can develop with multiple layers in place and then export only one of them, or merge the layers before export.
Check the ability of the video-editing application to preserve transparency. Going to lots of trouble to include transparency in your video or animation is a wasted effort if the application won't support it. Programs like Final Cut and Adobe Premiere have no problem with transparency, fortunately.
Make a flattened copy of your file in PSD (Photoshop Document) format so you've got backward compatibility issues covered. While files that include layer masks or multiple layers may not have to be flattened to be used in some applications, it could happen. With your flattened PSD file on hand, you'll be able export your Photoshop file successfully into video-editing applications such as Adobe Premiere.
Actions aren't just for still photos. Photoshop also offers a bunch of video actions that automate various tasks for dealing with video files. The use of these actions is covered later in this chapter.
When you're ready to start building the video file, you can start adding images to your file's frames. You can insert those images by dragging layers (shape layers, rasterized type layers, drawn content) from other images, copying and pasting from other images, or use the File
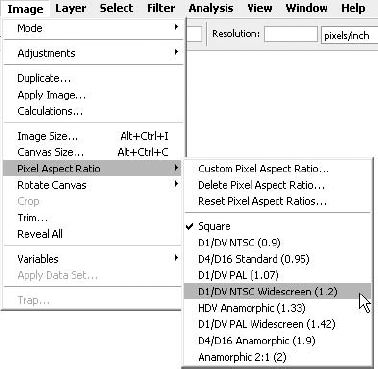
When you add content, using any of the aforementioned methods, Photoshop automatically converts and scales the image to the pixel aspect ratio of the video file, also known as a nonsquare pixel document. This applies to vector files, such as Adobe Illustrator images, too.
The process of creating a new video file is pretty straightforward: Choose File
Tip
Nonsquare pixel files open by default with Pixel Aspect Ratio Correction turned on, which scales the image for a nonsquare pixel display device, such as a video monitor. If you know that this will be the only type of monitor used to view your video, feel free to leave this default in the on position. If you have an HD monitor, it may already have square pixels, and do the conversion itself.
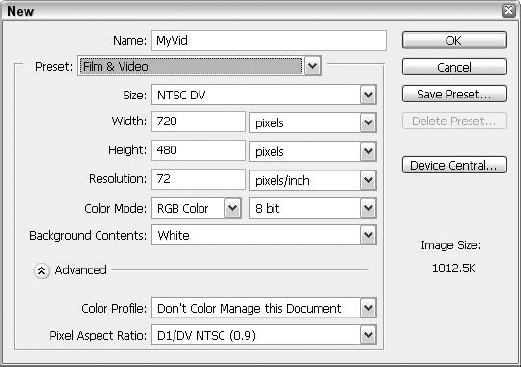
Figure 19.8. Use these handy Video preset file size guides to start your video file off on the right foot.
Of course, you may want more proof than just our say-so. Toward that end, Photoshop offers the Window
In addition to turning this feature on or off at the time you create a new video document, you have another chance to change this setting later on — using the Image
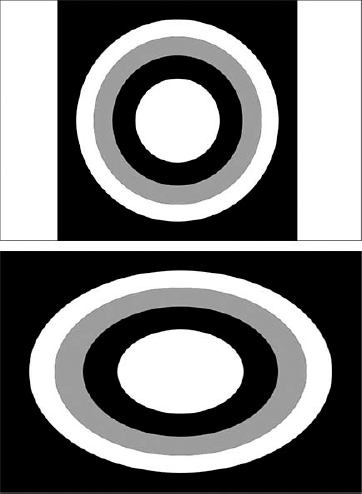
Figure 19.9. Compare the circle in a NTSC DV 720×480 file when viewed on a computer monitor (square pixel) with Pixel Aspect Ratio Correction turned on (top) and Pixel Aspect Ratio Correction turned off (bottom).
What to do with an unwanted custom pixel aspect ratio? If you just can't stand seeing one that you've created in that Preset list any longer, you can kill off the unwanted ratio by choosing Image
When the resulting Delete Pixel Aspect Ratio dialog box opens, pick the preset you want to kill and click the Delete button. If all you wanted to do was change an existing preset, take a slightly different path: This time, instead of Delete Pixel Aspect Ratio, choose Reset Pixel Aspect Ratios from the Image
Actions, as you read in Chapter 3, automate frequently used features and/or complex tasks so that you can perform them quickly, uniformly, and conveniently over and over again. Photoshop's video actions bring this convenience and power to the video "side" of the application, and you'll find them very useful in creating and editing images and video.
With these actions, you can automate tasks that help your images work within the confines of display standards, to convert images for DVD, to set various aspect ratios, and to build layers and set up special effects. Virtually anything that can cause unique problems for video-bound images can be resolved with the use of actions, as you automate the process of invoking a series of Photoshop commands, tools, and features.
Of course, the process of creating actions for video is no different than creating actions that create or edit images bound for print or still images headed for the Web: You'll be using the same Actions palette, and the rules and techniques for building an action are the same as those that you read in Chapter 3. Where things differ is in the use of video-related actions that you can load, use, and edit for your needs. Here's how to install them:
STEPS: Creating an action
The video-related actions are loaded, and you can access them from within the Actions palette, playing them just as you would any other action. Figure 19.11 shows the Actions palette with the video actions added. If you display the action's steps (by clicking the triangle next to the action's name), you can turn various steps on and off, activate dialog box pauses, and play with all the other controls you learned in Chapter 3.
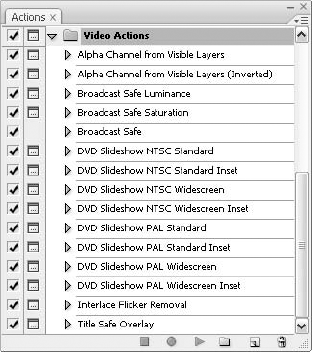
Figure 19.11. Add actions that help you prepare your video files for a variety of display situations.
Tip
If you can't find the actions files through the Load dialog box, you can do one of two things: (1) Use your operating system's search tools and look for files with an .atn extension, or (2) go to the Photoshop CS3 folder, check inside the Presets subfolder, and look for an Actions folder. Depending on your computer and your specific installation of CS3, these locations may vary.
Note
What? You skipped that section in Chapter 3? Well, go back and read it now so you can make full use of actions with Photoshop's video tools.
Of course, because it's an Adobe product, compatibility between Photoshop and After Effects is built in: You can build images in Photoshop, and use them in After Effects to create motion graphics. This means that your Photoshop PSD files can be imported into After Effects, where layers, styles, and transparency are preserved.
With all this compatibility, however, you need to keep these things in mind as you build Photoshop images that you intend to use later in After Effects (or if you are giving them to someone else for use in that application):
Give your layers unique names, and make sure they're well organized. Why? This prevents lots of changes being needed later on, and if you don't do this organization until after you've imported the file into After Effects, the layers won't synchronize between the two applications, and After Effects' Project window will list the layers that you've renamed or moved as being missing. Unique names are important for your layers because any layers with duplicate names (like two layers called "cloned content") will create footage update issues.
Always maximize your PSD file compatibility. This option, accessed through the File Handling version of the Preferences dialog box, improves inter-application compatibility for your files. Some people turn this off to create smaller image files for print and Web use, especially if they're fairly certain everything will remain in Photoshop throughout its development life, but if you're working in video and know you'll be porting out to other applications, leave this option set to Always.
Don't use a custom New File preset. When you intend to export your Photoshop image file to After Effects, things go much better if you've used a file size preset for the image file than if you started out with a custom set of dimensions.
Speaking of importing, files can go the other way, too — from another application into Photoshop. To open a video file in Photoshop, you can choose File
Of course, bringing in image sequence files isn't really any different than bringing in a video file. The only difference is that the image sequences are typically imported in a folder, and each image sequence in that folder becomes a frame in a single video layer, in a single video image file.
For the import (or opening) to work, you want to be sure that the image sequence files are in one folder, and the folder only have image sequences in it; otherwise, Photoshop may become confused as to what to do with other content. Bear in mind that the video file you end up with is more visually appealing if all the supplemental files have the same pixel dimensions (set to the right aspect ratio for the output method that you'll be using to view the final video), and the whole thing runs properly if your frames are named so as to be alphabetically or numerically ordered in the folder from whence they came. Otherwise, you'll have to rearrange them after the file is open, and that can get messy.
After you've opened an existing or started a new video image, you may want to add another video file to it, or add image sequences to expand or enrich the video. This is just like bringing in other photos to make a composite image with still content.
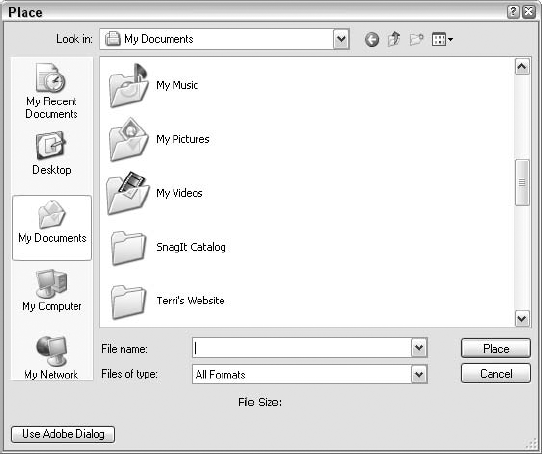
To add video and image sequences, just use the Place command, which transforms video as you import it into a video file. After they are placed in the file, video frames are contained within a Smart Object, which means you can move through the frames using the Timeline palette.
Choose File
Tip
Again, if you're placing image sequences, be sure the individual files (in a single folder) are ordered by their file name so that they become frames in the right order within the resulting video layer.
The color data in your video files is stored, just like it is in still images, in three channels: red, blue, and green. Also like your still images, a video image can contain an alpha channel, which as you learned in Chapter 9, is an invisible channel that stores transparency data and makes it possible for the effects of the alpha channel to operate without affecting the color channels in the image.
As shown in Figure 19.13, which includes the Channels palette (with an alpha channel in place), the alpha channel appears in black and white — white representing 100 percent opacity, and black representing 100 percent transparency. Obviously, any shades of gray represent areas that are less than 100 percent opaque, but more than 100 percent transparent.
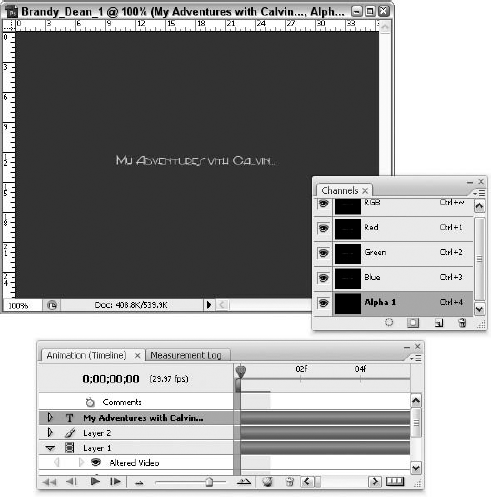
Figure 19.13. An alpha channel applies and controls transparency within areas of a video image layer.
As if all the information about channels in Chapters 4 and 9 wasn't enough to confuse you, now let's talk about two other types of channels that represent the types of alpha channels you'll find in video:
Premultiplied alpha channels allow an image to be composited on top of a background image or solid background color fill. This creates a totally opaque layer, and transparency data is stored in both the alpha and color channels.
Straight alpha channels store transparency only in the alpha channel, and the color channels are not affected.
All the features we've discussed thus far — alpha channels, frame rates, sequence order — can be controlled by the Interpret Footage command, found in the Layer

Figure 19.14. Use the Interpret Footage command to control channels and frame rate settings and how Photoshop applies them to an image.
Interpolate to Animate
What the heck is "interpolation"? Interpolation is a mathematical method of filling in missing data. You've seen the concept before in Photoshop: In the Image Size dialog box, you have to choose how to resample the image for enlargement or reduction, and this resampling is a form of interpolation. Typically, interpolation generates a new pixel by using the average of the value of the two pixels on either side of the one to be created, and as Photoshop does this to an entire layer or channel, all the pixels considered as new pixels are added.
When it comes to digital video, interpolation means generating new values between two keyframes. Photoshop interpolates the frames between the two selected and creates the intervening frames and their content. You'll see this demonstrated in our upcoming discussion of creating animated GIFs on the Animation palette, wherein this interpolation is called tweening (as in creating frames between) existing frames. In video and animations, the new frames can create movement — changes in color, light, or styles. Opacity may change between frames, as can the visibility of various layers within the image. Photoshop supports both linear and hold interpolation, the former building a structured change as keyframes move forward, with clean stops and starts between each keyframe pair. The latter method is more progressive and works well for flashing effects or whenever you want the content of a frame to appear quickly, rather than building over a series of frames.
To change your interpolation method, in the Timeline palette, select one or more keyframes and then right-click to display a pop-up menu from which you can choose an interpolation method. Then open the Timeline palette menu, and choose either Interpolation
From within the Interpret Footage dialog box, you can do these things:
Choose how the alpha channel in the video layer is interpreted by selecting the Alpha Channel option. Of course, the footage must have an alpha channel for this option to be available, and if Premultiplied - Matted is selected, you can choose the matte color against which the image channels is premultiplied.
Choose the Frame Rate. This option is unavailable for image sequence-based layers.
Choose the dominant field for interlaced video from the De-Interlace section, choosing a field from the Use drop-down list and a Method for interpolation. If your video is headed for progressive-scan monitors, turn De-Interlace on, which activates the fields within that section of the dialog box.
Choose a Color Profile for your frames and video layers.
As we move through discussions of the different "flavors" of things when it comes to video — different types of alpha channels, different video output settings, etc. — it's time for another set of video-related flavors: interlaced and non-interlaced video. These are the only two types of video, and they serve different purposes and meet different needs. Read on to find out more.
When it comes to interlaced video, it is so named because of how the horizontal lines in the frames line up. Interlaced video frames consist of two fields, and each one stores half the number of horizontal lines in the frame. The upper field (or Field 1) stores all the odd-numbered lines, and the lower field (or Field 2) stores all the even-numbered lines. An interlaced video monitor, therefore, displays the video by showing each frame, first drawing all the lines in one field and then drawing all the lines in the other field, one after the other. The order of the fields determines which one is drawn onscreen first, and in NTSC video, fields are drawn to the screen approximately 60 times per second, working out perfectly with a frame rate for the same format of approximately 30 frames per second.
Tip
Most broadcast video is interlaced, including the new high-definition television standards, which have interlaced (such as 1080i) and non-interlaced variants (such as 1080p).
Conversely, non-interlaced video frames are not separated into fields and work well on a progressive-scan monitor, which can display these frames by drawing all the horizontal lines, from top to bottom, in one pass. Nearly all computer monitors are progressive-scan monitors, and most video designed for use on computer screens — video for the Web, that is — is non-interlaced.
Not to be confused with the process of creating simple layer-based animations with the Animation palette (not in Timeline mode), this discussion pertains to an animation made up of a sequence of images, or frames, displayed over time and built through the Timeline palette. In such an animation, much like the "simpler" variety coming up later in this chapter, each frame has different content, and layers are in different positions, opacities, and styles — and the result is the illusion of movement and change over time.
To create a Timeline-based animation, you build your image content, layer by layer, and then establish keyframes as you move the current-time indicator forward. At each keyframe, you modify the position, opacity, or style of the layer content, so that whatever movement and change you have in mind is physically achieved by the progression of frames. You can ask Photoshop to automatically modify (through interpolation) the content of intervening frames, or you can do it manually, inserting frames and tinkering with content on your own.
Keyframes are used to create and control animation, effects, and many other kinds of change that occur over time. A keyframe marks the point in time where you specify a value, such as spatial position, opacity, or layer style. Values between keyframes are interpolated. When you use keyframes to create a change over time, you must use at least two keyframes — one for the state at the beginning of the change and one for the new state at the end of the change.
Use keyframes to animate layer properties. Using keyframes, you can animate different layer properties, such as position, opacity, and style. Each change can occur independently of, or simultaneously with, other changes. If you want to animate different objects independently, you should create them on separate layers.
Here are some examples of how you can animate layer properties:
You can animate position by adding a keyframe to the Position property, and then moving the current-time indicator and dragging the layer in the document window.
You can animate a layer's opacity by adding a keyframe to the Opacity property, and then moving the current-time indicator and changing the layer's opacity in the Layers palette.
To animate a property using keyframes, you must set at least two keyframes for that property. Otherwise, changes that you make to the layer property remain in effect for the duration of the layer.
Each layer property has a time-vary stopwatch icon that you click to begin the process of animating with keyframes. After the stopwatch is active for a specific property, Photoshop automatically sets new keyframes whenever you change the current time and the property value. When the stopwatch is inactive for a property, the property has no keyframes. If you type a value for a layer property while the stopwatch is inactive, the value remains in effect for the duration of the layer. If you deselect the stopwatch, any existing keyframes for that layer property disappear, so don't deselect the stopwatch unless you're sure that you want to permanently delete all the keyframes for that property.
Because keyframes are so ... well, pardon the expression, "key" ... to the use and understanding of the Timeline palette, let's look at how to work with them, how to identify their markers in the palette, and later on, how to connect them to the current-time indicator and time within the span of your video.
Of course, in the Timeline palette, the appearance of a keyframe relies upon the interpolation method that you select for the interval between keyframes. Here are the two icons you'll see:

The diamond icon appears for a linear keyframe, which as discussed previously means that the frame moves in a very structured, paced way. Animations utilizing linear interpolation result in an animation that changes evenly over the span of keyframes (from the previous one to the next one).

The half-diamond/half-rectangle icon appears in the presence of a hold keyframe. As discussed previously, hold interpolation allows for random and sudden changes within the video. This apparent randomness is the result of allowing a keyframe to change only when the current-time indicator is positioned directly on a hold keyframe.
Now, as soon as you've set up a keyframe for a property, the keyframe navigator can be used to move through the keyframes, as well as to set new and remove unwanted keyframes. When the keyframe navigator box is active, the current-time indicator is positioned on the selected keyframe; on the other hand, if the navigator is inactive, the current-time indicator is between keyframes. Again, we see the impact of interpolation, in terms of linear and hold keyframes and the relative position of the current-time indicator.
To navigate with the keyframe navigator, use the navigator arrows. The left arrow moves the current-time indicator to the previous keyframe (big surprise there), and the right arrow moves the current-time indicator to the next keyframe. Just as you'd expect, right? Sometimes, things work sensibly, believe it or not!
As simple as it is to move around within keyframes, you can select them just as easily. You can do any of the following to select one or more keyframes:
Click the keyframe icon to select a single keyframe.
Click the layer property name next to the stopwatch icon to select all the keyframes for a given property.
Shift-click on multiple keyframes. This allows you to select a series of contiguous keyframes.
Drag with your mouse to draw a marquee around the keyframes you want to select. This is much like selecting a group of thumbnails on the Bridge or icons on your Windows or Mac desktop.
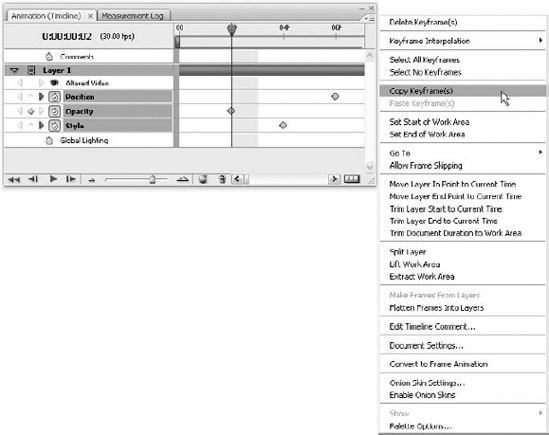
After you've selected one or more keyframes, you'll probably want to move, cut, copy, or paste them — the motivations behind selecting them in the first place. To move keyframes, drag them from their current location to any desired time. If you're moving more than one keyframe, all the selected frames come with you as you drag, and they keep their relative timings (the length of time the keyframe is displayed). You can copy keyframes in the same layer or between layers for the same property (such as Position) fusing the Timeline palette menu by clicking the menu button and choosing Copy Keyframes. Figure 19.15 show a series of selected keyframes and the palette menu, awaiting the user's selection.
When you're at the spot along the timeline where the copied keyframes belong, click there to select that spot and then select the target layer. After those two preparatory steps are taken, click the Timeline palette menu again and choose Paste Keyframes.
To delete a keyframe or keyframes, select one (or more) and display the Timeline palette menu. From the menu, choose Delete Keyframes. You also can simply right-click (Ctrl-click on the Mac) and choose Delete from the pop-up menu.
Animations that consist of drawn content — painted lines and curves, shapes, filled selections, and other original artwork — can be created easily using blank video layers and Photoshop's drawing tools. The drawn content can already exist in a standard PSD or other format image file, or you can build it while the Timeline palette is open and the video is in progress.
To build an animation, using existing content, follow these steps:
STEPS: Building an animation
Start a new document, using the File
Insert a blank video layer, by choosing Layer
Add your content. You can drag it, from the Layers palette, from existing images, or as needed, utilize the brush, pencil, pen, shape, and paint bucket tools to build original art content. Be sure that content that has to move or operate independently is on a separate layer from other content; repeat Step 2 for each such element.
Turn on onion skins using the Toggle Onion Skins button.
Drag the current-time indicator to the next frame.
Continue adding content, using the directions in Step 3, dragging the current-time indicator to new frames, and building your animation, frame by frame.
Onion skins are named for their counterparts in nature — the thin, see-through, paper cover that protects onions as they grow underground and are handled after the gardener plucks them from the earth. The use of onion skins in video production takes advantage of that see-through nature and lets you see previous frames through the current ones, so you can see progressive movement, position, and size changes, and plan your next move for the frames you're working on.
Onion skins show the painting on the current frame as well as the painting on the adjacent frames, appearing at an opacity that you set. To use onion skins in the Timeline palette, click to open the Timeline palette menu and select Onion Skin Settings from the menu.
While you're in the resulting Onion Skin Options dialog box, shown in Figure 19.16, you can establish the following settings:
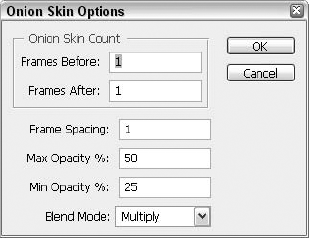
Figure 19.16. Choose how many frames are displayed via onion skins at any time, set the frame spacing, and the opacity of the skins themselves. You can even apply a blend mode!
Onion Skin Count: This setting determines how many previous and forward frames are displayed as onion skins as you work. Fill in values in the Before (previous frames) and After (forward frames) fields.
Frame Spacing: This determines the number of frames displayed between the strokes painted on your frames. To help you get the idea, imagine that you have a value of 1 entered into this field. This means that every single frame is displayed, while a value of 2 displays every other frame.
Opacity: How thick should the skins be? The opacity setting determines how see-through they are.
Blend Mode: This option, which offers four familiar blend modes (Normal, Multiply, Screen, and Difference), determines how the overlapping parts of the frames are displayed. If you forget what these particular blend modes do to content, check out Chapter 14.
Unlike hiding or displaying layers in a still image, which requires a simple click of the eyeball icon in the Layers palette, turning video layers on and off is a bit more complex. You can turn layers on and off and on again over the duration of a video or animation, or you can turn one or more layers off entirely — perhaps showing them in one version of a video and not in another, the versions kept separate by different file names assigned through individual rendering/naming operations.
Deciding when and where a layer appears in a video or animation can be performed in two ways: (1) You can hide frames at the beginning or end of a layer, which changes the layer's beginning ("In") point and ending ("Out") point, or (2) you can drag the entire layer duration bar to a specific span of the timeline.
Note
To prepare your video layers for operations that require rasterized content, you can use the Layer
You'd never want to export your video or animation to another application — or worse — give it to someone else to play until you've tested it yourself. The preview is your chance to do just that, making sure that the frames are in the right order, that the animation proceeds as desired and expected, and that your effects and content look just like you want them. Of course, further enhancements and special effects can be applied in an application such as Adobe After Effects, or your video can be put together with other content through Adobe Premiere or Final Cut, but for the part you're taking care of in Photoshop, the preview is your big chance to find errors, set about fixing them, and make sure everything looks right before you move on to the next step in your video production.
To begin, you'll want to determine which area of your video or animation you want to preview. This entails dragging the work area bar through the section you want to preview or dragging work area markers into place (at the beginning and end of the area you want to preview) to set the span of your preview. After you've done this, you can watch the preview, using the playback buttons on the Timeline palette.
Of course, a Web browser window gives you a great preview, too, if your creation is an animation bound for the Web. The browser's Stop button (typically a red X or stop sign symbol) and Reload button (two arrows in a circle, typically) serve for stop and play, respectively. To bring your video up in a browser window, choose File
Tip
You also can press the spacebar to play or stop the playback.
Photoshop's Video Preview plug-in enables you to use FireWire or any other video display device to preview your video and animations. This also gives you a chance to tweak your aspect ratio settings for your intended display device/s and to make sure color is right in your file. Toward that end, note that the Video Preview plug-in supports RGB, grayscale, and indexed images, in either 8 or 16 bits per channel. If you have a 16-bit image, it's converted to 8-bits-per-channel. If you have an alpha channel in place, it's disregarded, and any pixels set to be transparent appear as black. This can be quite a shock if you don't remember this limitation.
This set of steps explains how to set up and do your video display.
STEPS: Setting up video display
Be sure that your video file is open, and in the active image window. If it's not, choose File
Connect a display device, such as a video monitor, to your computer via FireWire.
Choose File
Choose File
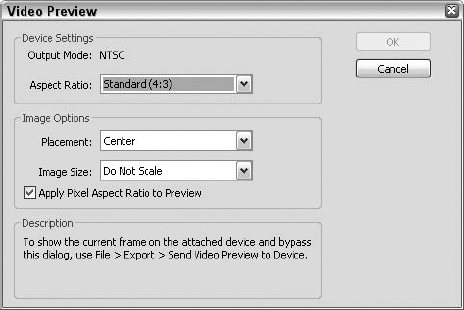
Figure 19.17. Set your Video Preview settings, and check to see if your aspect ratio is set properly for your designated device.
Warning
Whatever you set through the Video Preview dialog box is maintained by the Send Video Preview To Device command.
Within the Video Preview dialog box, you can set the following:
In the Device Settings section, you can set the Aspect Ratio for your file, choosing between Standard and Widescreen. The Output Mode is already set, and can't be changed; it was determined by the device to which you're connected.
Note
For Mac users, choosing an output mode gives you two choices: NTSC and PAL.
In the Image Options section, you can set the Placement, choosing from the following:
Center: This setting positions the center of the image in the center of the screen, cropping the portions that are beyond the display edges of the video preview device.
Crop to 4:3: This setting displays a 16:9 image on a 4:3 display with the center of the image at the center of the screen. There is no distortion through cropping from the left and right edges of the frame that are beyond the display edges of the video preview device.
Letterbox: This setting scales a 16:9 image to fit on a 4:3 display, and gray bands are displayed on the top and bottom of the image. This is caused by the difference in aspect ratio between the 16:9 image and the 4:3 display. There is no cropping or distortion.
Crop to 14:9/Letterbox: Here, you get a widescreen image cropped to a 14:9 aspect ratio with black bands appearing at the top and bottom of the image. There is no distortion.
Videos and animations can be saved as QuickTime movies or PSD files. Additionally, you can save animations as GIFs for viewing on the Web. To save in a video format, you need to use the File
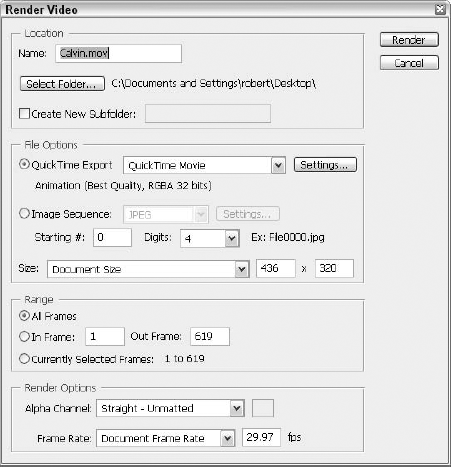
Figure 19.18. The Render Video dialog box lets you pick where to store your video file, how to export it relative to QuickTime and Image Sequences, which frames to render, and how to handle alpha channels and frame rates. It does it all!
When you're ready to export your video or image sequence, follow these steps.
STEPS: Rendering your video and image sequences
Choose File
In the Render Video dialog box, enter a name for the video or image sequence. You also can click the Select Folder button, choose a place to store your video, and click Choose to pick that location.
Under File Options, select either QuickTime Export, or Image Sequence. You can specify settings and options for the video or image sequence using the drop-menus to the right of these options.
Under Range, select one of the following:
All Frames renders all the frames in the file.
In Frame allows you to choose which frames to render.
Currently Selected Frames restricts the rendering to only those frames selected through the work area bar in the Timeline palette.
As desired, you can establish Render Options:
Alpha Channel lets you choose how your alpha channels are rendered — straight or pre-multiplied, in a variety of ways for each possibility.
Frame Rate determines the frames-per-second setting for the video when it plays after rendering.
We've all seen them — little "movies," very cartoon-like, in Web pages. They can be short and sweet like a smiley face winking or a stick-figure digging with a shovel, up and down, to show that a Web page is under construction. These animations, while often overused in amateur and personal Web sites, can be useful — demonstrating a concept or conveying a message through a series of images or symbols.
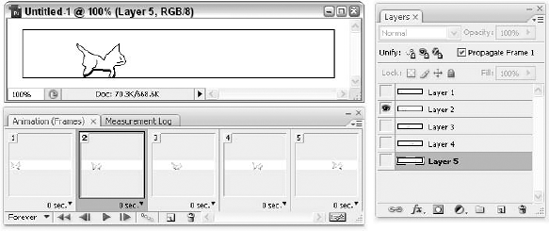
The animations you create in Photoshop, using the Animation palette (rather than the Timeline palette, discussed earlier in this chapter) are saved in GIF format, a format that allows the movement and changes between animation frames to be saved as part of the file. When viewed through a browser, the GIF file that contains these frames plays, based on the information also included in the file as to the duration and repetition of the frames' playback.
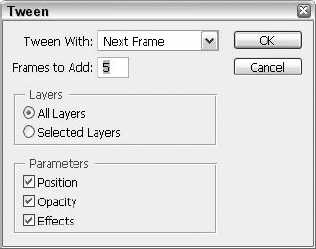
You can loop an animation indefinitely or have it play through just once (or any other specific number you choose). You can choose how long each frame remains onscreen, and you can force Photoshop to build frames for you — tweening the intervening frames so that what appears in frame 1 slowly morphs or evolves into what's currently in frame 2. If you tell Photoshop to take five frames to make the transition from frame 1 to frame 2, frame 2 becomes frame 7 in the post-tween process.
Creating an animated GIF requires no special skills — at least nothing that you haven't already learned in the previous 18 chapters. You build an image, using layers to house individual image elements that you create with painting, drawing, and Type tools. You apply blend modes and layer styles — all the things you'd do to a still image. The difference? Each layer becomes a frame in the animation.
STEPS: Creating an animation
Create an image in which each layer acts as an individual frame of the finished animation.
Access the Animation palette by choosing Window
Animation. The first frame is already waiting, displaying whatever layers you currently have active in the Layers palette.Click the New Frame button, labeled in Figure 19.19, to insert the next frame, and make any necessary changes to the visibility of your various layers to advance the action in your animation.
Increase or decrease the amount of time a frame stays onscreen using the pop-up menu located directly beneath the frame on the Animation palette.
If your animation simply requires moving an object from point A to point B, create only a single layer. Place the object in its starting position in frame 1, click the New Frame button in the Animation palette, and go back to your layer and reposition the object in its final location. From here, click the Animation palette's Tween button (meaning to create the frames "in between," as shown in Figure 19.20) to have Photoshop create all the frames in between. The Tween dialog box provides fields to specify how many frames Photoshop should place between your two starting frames, as well as which direction the tween should go (tweening between the selected frame and the frame before it or after it, depending upon which frame you have selected at the time).
What is rotoscoping? It's painting in video layers, turning video content into drawings, which historically meant tracing actual live-action film, frame by frame, and creating animation from them. Current advertising campaigns have made this quite popular — using live-action video and turning it into a realistic-looking animation.
Photoshop CS3's video tools allow you to create an animation from live-action video, applying painting tools to video frames. The process is rather simple, and it begins with your selecting a video layer in the Timeline palette and moving the current-time indicator to the frame within that layer that you want to paint. Next you choose Layers
At this point, you can begin painting, cloning, and otherwise drawing on the layer, using the tools you read about in Chapters 5 and 6. You also can apply filters, mimicking various artistic mediums. To prepare, thumb through Chapters 10 and 11 for ideas as to which filters will give you the effects you want.
Note
Much of your success will rely on selections made on the original layer and then applied to the blank layer, if you've opted to paint on a separate layer. Remember, as you read in Chapter 8, that you can make a selection in one layer, and then switch to a different layer, keeping the selection intact, where you can apply the fill or paint within the selection.
In this chapter, you learned about the Timeline palette and all its tools for editing and creating video and animations. You learned which video and animation formats Photoshop CS3 supports and discovered how to open, manipulate, and save those files in Photoshop, including how to export them in any number of still image formats for print and Web use.
You also learned to create animated GIF files, using the Animation palette, and to prepare animations for use on the Web — from setting up a layered image to creating frames within the animation and testing the file before saving it.
Finally, you learned about 3D image editing, a new feature in CS3, as well as Rotoscoping, which also is a new feature in this release of Photoshop. Between the video, the animation, and the ability to render 3D images and rotoscope video frames, Photoshop CS3 has taken great strides toward becoming a significant video development and editing tool.