
In Photoshop, filters enable you to apply automated, yet customizable, special effects to an image. Although named after photographers' filters, which typically correct lighting fluctuations and perspective, Photoshop can help you accomplish much more. You can slightly increase the focus of an image, introduce random pixels, add depth to an image, break an image apart, or mimic a variety of artistic media, textures, natural and man-made substances, and distortions. Just about anything you can imagine doing to your photo can be achieved with one or more of the filters — and some of the most amazing results can be obtained through filter combinations, making for a nearly unlimited number of effects.
You may be approaching the whole concept of filters with some skepticism. If you're a veteran photographer or seasoned Photoshop user, you may want to write them off as little better than the layer styles discussed in Chapter 18, a bunch of "canned" effects that anyone can and will use. The thought of such conformity and standardization may be offending your creative sensibilities. If you're a new user, you may be either worried that the filters are hard to use or you may be thrilled at the prospect that they're so easy and you're going to head right for them, sure that they're the answer to your "but I don't have time to learn Photoshop!" blues.
In just about every one of those assumptions, you'd be...um...wrong. Filters are not cheats, they aren't "canned" effects, and they're not so uniform and conformist that your use of them will mark your photos as hopelessly pedestrian. With literally hundreds of combinations of individual filters' settings and combinations of filters that you can employ, uniformity is actually difficult to achieve — unless you're looking for that, say, between two of your photos that should look alike. And while they're easy to use, they're no substitute for learning Photoshop, nor will they let you off the hook easily — in fact, just using them may teach you a few things about Photoshop overall.
So, assuming you're willing and eager to give filters a try, let's get started. This chapter and the two following it are all about filters — and the creative and practical uses thereof. These three chapters explain exactly how filters in general work and, with a focus on the most important (or often used) filters, the way specific controls work. You also learn about how to figure out which filter to use in specific situations and get some good ideas for how to use them. Best of all: There's new functionality with regard to filters, in the form of Smart Filters, and you learn all about that, too — right here in this very chapter.
You access Photoshop's special-effects filters by choosing commands from the Filter menu. These commands fall into two general camps, although the submenus don't break them down that way. In any case, you can pretty much place all the filters into one of two groups: corrective and destructive.
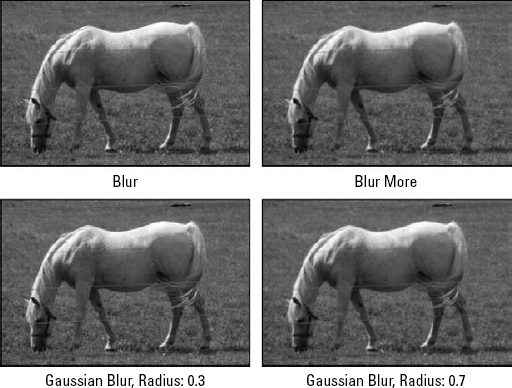
Corrective filters are tools that you use to modify scanned or otherwise captured images and to prepare an image for printing or screen display. In many cases, the effects are subtle enough that the viewer won't even notice that you applied a corrective filter. As demonstrated in Figure 10.1, these filters include those that change the focus of an image, enhance color transitions, and average the colors of neighboring pixels. You can find these filters in the Filter
Many corrective filters have direct opposites. Blur is the opposite of Sharpen, Add Noise is the opposite of Median (but not Remove Noise, despite the names being polar opposites), and so on. This is not to say that one filter entirely removes the effect of the other; only reversion functions such as going back in time with the History palette provide that capability. Instead, two opposite filters produce contrasting effects — and you may want to use both of them together, despite their contrasting results.
Corrective filters are the subject of this chapter — the more artistic and "special effect" filters, also known as the destructive filters, are covered in Chapter 11. Although the corrective filters number fewer than their destructive counterparts, the coverage is extensive because they represent the functions you're most likely to use on a day-to-day basis.
The destructive filters produce effects so dramatic that they can, if used improperly, completely overwhelm your artwork, making the filter more important than the image itself. Many of the destructive filters reside in the Filter
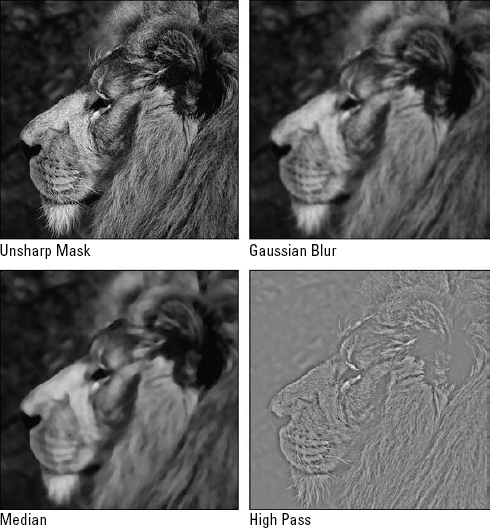
Figure 10.1. Four corrective filters, including one each from the Sharpen, Blur, Other, and Noise submenus. Clockwise from upper left, they are Unsharp Mask, Gaussian Blur, Median, and High Pass.
Destructive filters produce very interesting effects, and many people gravitate toward them when first experimenting with Photoshop. These filters invariably destroy the original clarity and composition of the image (or the portion thereof to which you apply them), though, so that should be your goal before you apply them — unless you're just experimenting. Remember, as with anything you do to a photo and then regret, you can always use Undo or access the History palette to go back to a pre-destructive state.
Photoshop also provides a subset of destructive filters called the effects filters. These filters are easily applied through the Filter Gallery, which debuted in Photoshop with version CS and has remained a welcome feature through CS2 and now CS3. In previous versions, each effect filter had to be applied separately, and there was no quick way of viewing how different effects would work with each other. All that changed with the introduction of the Filter Gallery, which lets you access all the effects filters in one convenient dialog box. Even more impressive, the Filter Gallery lets you stack as many of these filters as you want on top of one another to see how they interact. It's a great addition to the program, and one you explore in more detail in the next chapter.
In addition to the Filter Gallery dialog box, you can access most of the effects filters through the Filter
While the Filter Gallery was a big breakthrough for filters back in Photoshop CS, it's got nothing on the addition of Smart Filters in CS3. Smart Filters are such a useful addition to Photoshop's already impressive filter features that they make you feel smart just for using them. How's that? Well, they enable you to apply a filter and have the filter's effects appear on a separate layer, much the way color or light corrections can reside on an adjustment layer — you can view or not view them, seeing the image enhanced with them or as it appeared before they were applied — all without having any direct effect on the original image content. You also can edit Smart Filters after applying them, by double-clicking an icon on the right end of the Smart Filters layer — at which point you can change the impact of the filter by tweaking its blending options and opacity. And you can drag and drop them to move or share them with other layers in your image. All this and you don't lose the filters' effects when you opt not to see them, as you would if your only way to not see a filter's impact was to Undo its application or use the History palette to go back to before the filter was applied. Of course, because Smart Filters work much like adjustment layers (in their ability to be seen or not seen and their impact on an image), they could have been called filter layers, but that wouldn't have made it clear how really brilliant they are.
Before you can use a Smart Filter, you have to make the portion of the image to which they're applied — a layer, to be exact — into a Smart Object. After you've done that, you can apply filters (to some or all of the layer content) and see them do their stuff — correcting, destroying, or creating special effects in your image. But you also see the Smart Filters appear in the Layers palette, where you can click the visibility icon (the eye next to the layer) and turn them on and off. This means that you can apply a whole bunch of filters to a layer (or selection within a layer that's been turned into a Smart Object) and then view them individually or in combinations, just by turning Smart Filters layer visibility on and off, as shown in Figure 10.4.
When you're ready to apply a Smart Filter — not just apply a filter the "normal" way, where the filter's effects become part of the image, extricable only with Undo or the History Palette — click the layer on which you want to filter, and choose Filter
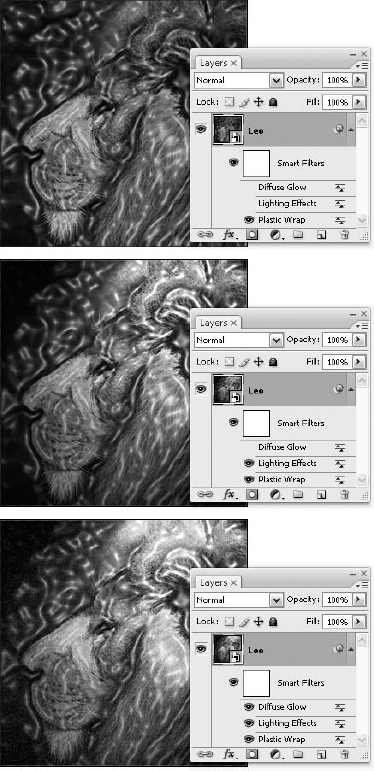
Figure 10.4. The new Smart Filters feature in CS3 completely redefines Photoshop's filtering process.
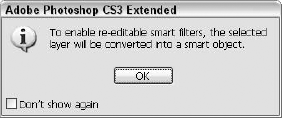
Figure 10.5. Photoshop CS3 warns you that you have to turn your layer into a Smart Object if a Smart Filter is going to want to play with it.
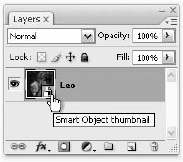
Figure 10.6. A layer that's been turned into a Smart Object has a tiny symbol in the layer's thumbnail. As soon as filters are applied, they'll appear below the active layer.
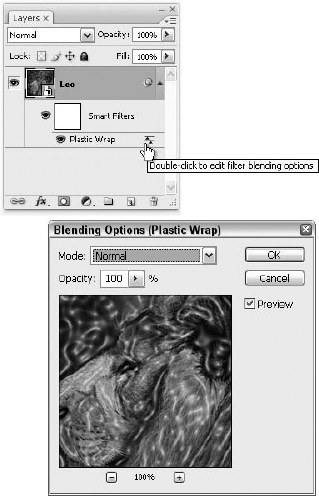
As shown in Figure 10.7, after a filter is applied, it appears on a new sub-layer of the Smart Object layer — and the name of the filter applied appears there, too. The eye icon controls the filter's visibility, and the icon on the far right allows you to edit the filter's blending options and opacity.

As stated, you can double-click the little icon at the far-right end of the Smart Filters layer and open the Blending Options dialog box (shown in Figure 10.8). Note that the dialog box title bar not only says "Blending Options," but it also states the name of the filter applied in the Smart Filters layer being edited. Here, you can choose from 25 different blend modes and also set the opacity of the filter's effects. While you're editing one filter, the others (even those still set to be visible) are not shown, as per the prompt included in Figure 10.8, which appears as soon as you double-click the icon and set about editing a Smart Filter's blending options.
After a Smart Filter is applied (that's what you call any filter applied to a Smart Object), you can move and share it, or change its applied order in the current layer. Here's how:
To share your Smart Filter with another layer, first convert the target layer to a Smart Object (choose Filter

To move your Smart Filter to another Smart Object (another layer that's been converted for Smart Filters), simply drag it. It leaves the layer it was applied to and is applied to the target layer — again, after a progress bar and notice of which Smart Filter is underway.
If you want to apply your Smart Filters in a different order with their current layer — say applying Add Noise before you apply Watercolor — drag the Smart Filters within their current stack underneath the layer to which they're applied. This is just like rearranging layers within an image.
Note
After you've made a layer into a Smart Object, certain filtering capabilities are unavailable. If you observe the Filter menu, you'll see that Extract, Liquify, Pattern Maker, and Vanishing Point are dimmed — because these are not compatible functionally with the ability to see or not see their results anytime you desire. If you want the best of both worlds — the ability to apply these filter features to your image and to employ Smart Filters, make a duplicate of the layer in question and turn one of them into a Smart Object. You can then hide the less intelligent one (and any Liquify or other non-smart-compatible filtering applied to it) and play with the Smart Object and its filters at will.
Tip
Can't tell whether a Smart Filter has been applied? Check the triangle on the far-right end of your layer. If it's pointing up, click it and it turns down, showing all related Smart Filters layers below the layer. This trick also works to display layer groups, where the group name appears but you can't see which layers are part of the group. If you're not clear on grouping layers (or all the little nuances of the Layers palette, for that matter), check out Chapter 13.
As you saw in the preceding section, as soon as you apply a Smart Filter to a layer that's been converted to a Smart Object, you see an empty (white) mask thumbnail in the Layers palette, just beneath the Smart Object, labeled Smart Filters. By default, this mask displays the filter effect on the entire layer, and that white box represents the mask. Now, if you happened to make a selection on the Smart Object layer and then applied the Smart Filter, you see a mask in this thumbnail, as shown in Figure 10.9
Note
Filter masks work much like layer masks in that they're stored as alpha channels (you can see them in the Channels palette) and you can turn the mask into a selection, just like you can with a Quick Mask.
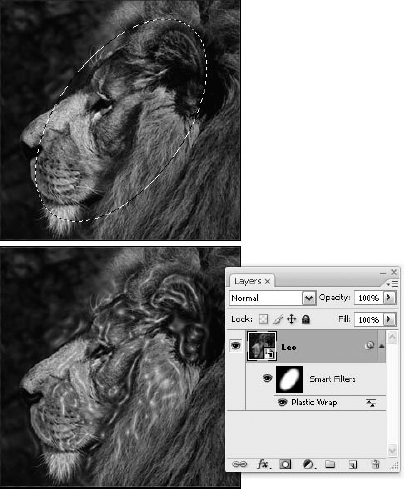
Figure 10.9. The Smart Filters layer acts as a mask, which you can edit and use like virtually any other kind of mask.
Some important things to remember about Smart Filters masks:
When you mask a Smart Filter, the masking applies to all Smart Filters, not just the one that was active when you created the mask.
To adjust the mask by painting (it's just like any other mask), paint in black to hide content and paint in white to make other content visible through the mask. As expected, shades of gray also are used to mask in varying levels of transparency.
If you've read Chapter 9 on masks and extractions, this section will seem quite familiar, and with good reason — masks made from Smart Filters are created, edited, and deleted in much the same way as any other mask. As stated above, the use of painting tools and the application of black, white, and gray paint have the same effect on a Smart Filters mask. In addition, you can perform these actions:
To see only the filter mask, Alt-click (Option-click on the Mac) the filter mask thumbnail in the Layers palette.
To see the Smart Object layer again, Alt-click (Option-click on the Mac) the filter mask thumbnail again — it works like a toggle.
To turn a Smart Filters mask off, disabling its effects, you can Shift-click the mask layer, or you can right-click the mask (Control-click on the Mac) and choose Disable Filter Mask from the pop-up menu. After you've disabled a Smart Filters mask, you see a red X on its thumbnail. To remove the red X (and re-enable the mask, of course), Shift-click the thumbnail.
To get rid of a Smart Filters mask entirely, drag the Smart Filters layer to the trash (Delete) icon at the foot of the Layers palette.
Tip
Of course, after you've deleted a Smart Filters mask, you can add an empty mask to the Smart Object. If you right-click (Control-click on the Mac) the Smart Filters layer in the Layers palette, you can choose Add Filter Mask from the pop-up menu. If you made a selection first, this becomes part of the mask — otherwise, the mask encompasses the entire Smart Object layer.
The remaining coverage of filters assumes that you're not applying them to Smart Objects. This is for two reasons — simplicity in describing their use and displaying the Photoshop interface as we discuss the filters themselves, and because you may not always apply a filter as a Smart Filter and may simply apply it to a selection or layer with no conversion of that layer to a Smart Object. Of course, all the filters we're about to demonstrate — in this chapter and the subsequent two chapters on filters — can be applied as Smart Filters, with the exception of Extract, Liquify, Pattern Maker, and Vanishing Point, which, as we've discussed, are dimmed in the Filter menu when a layer's been converted to a Smart Object.
When you choose a command from the Filter menu, Photoshop applies the filter to the selected portion of the image on the current layer. If no portion of the image is selected, Photoshop applies the filter to the entire layer. Therefore, if you want to filter every nook and cranny of the current layer, press Ctrl+D (
Tip
Some filters are applied immediately upon making a selection from a Filter submenu, and others open a dialog box. You can tell which ones will spawn a dialog box by looking at the submenus — if the command is followed by an ellipsis (...), a dialog box will open. If not, the filter will be applied with no questions asked, based on built-in defaults. You may be thinking, "Yeah, I know about dialog boxes!," but it's worth remembering to check for that ellipsis; even seasoned users can forget which filters are applied with no dialog box to allow for customization and which ones just...happen.
Some filters are built into the Photoshop application. Others are external modules that reside in the Plug-Ins folder. This enables you to add functionality to Photoshop by purchasing additional filters from third-party collections such as Eye Candy, from Alien Skin. You can search the Web for Photoshop plug-ins to find more.
If you open the Plug-Ins folder inside the Photoshop folder, you see that it contains several subfolders. By default, Photoshop places the filters in the Filters and Effects subfolders, but you can place additional filters anywhere inside the Plug-Ins folder.
For years, the biggest problem with Photoshop's filters was that none offered previews to help you predict the outcome of an effect. You just had to tweak the seemingly endless and often vaguely named settings and hope for the best. But today, life is much better. Photoshop 3 introduced previews, Version 4 made them commonly available to just about all the filters, and subsequent versions have maintained this vastly improved status quo.
Photoshop offers two previewing capabilities:
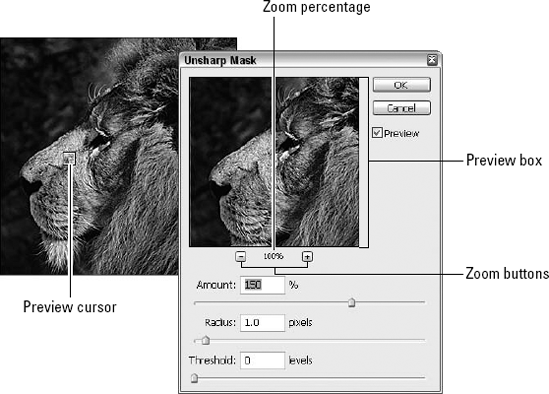
Dialog box previews: Labeled in Figure 10.10, the 100-×-100-pixel preview box is now a common feature of all filter dialog boxes. Click and drag inside the preview box to scroll the portion of the image you want to preview. Move the cursor outside the dialog box to get the square preview cursor (labeled in the figure). Click with the cursor to center the contents of the preview box at the clicked position in the image.
Click the zoom buttons (+ and −) to change the view of the image in the preview box. You can even take advantage of the standard Zoom tool by pressing Ctrl+spacebar or Alt+spacebar (

Image window previews: Most corrective filters — as well as a few destructive ones such as Mosaic and Emboss — also preview effects in the full image window. Just select the Preview option to activate this function. While the effect is previewing, a blinking progress line appears under the Zoom value in the dialog box. If you're working on a slow computer, you'll probably want to deselect the Preview option to speed up the pace at which the filter functions.
Note
Incidentally, the Preview option has no effect on the contents of the preview box. The latter continually monitors the effects of your settings, whether or not you like it.
Tip
Use the Preview option to compare the before and after effects of a corrective filter in the image window. Select it to see the effect; deselect it to see the original image. You can compare the image in the preview box also by clicking in the box. Click to see the old image; release to see the filtered image.
Even though a dialog box is onscreen and active, you can zoom and scroll the contents of the image window. Ctrl+spacebar-click (
Tip
One more tip: When you press Alt (Win) or Option (Mac), the Cancel button changes to Reset. Alt-click (Option-click on the Mac) this button to restore the settings that appeared when you first opened the dialog box. (These are not necessarily the factory default settings; they are the settings you last applied to an image.)
Six filters continue to offer no previews whatsoever: Radial Blur, Displace, Color Halftone, Extrude, Tiles, and De-Interlace. Of course, the filters that don't bring up dialog boxes at all don't need previews because there aren't any settings to adjust.
To reapply the last filter used in the current Photoshop session, choose the first command from the Filter menu or simply press Ctrl+F (
Both techniques work even if you undo the last application of a filter. However, if you cancel a filter in progress, pressing Ctrl+F or Ctrl+Alt+F (
In addition to typing specific numerical values in filter dialog boxes, you can nudge the values using the up-arrow and down-arrow keys. When working with percentage values, press an arrow key to raise or lower the value by 1. Press Shift+up arrow or Shift+down arrow to change the value in increments of 10. Note that with some destructive filters, you must use the arrow keys on the numeric keypad; the regular navigation arrow keys don't work.
If the value accommodates decimal values, it's probably more sensitive to the arrow key. Press an arrow for a 0.1 change; press Shift+arrow for 1.0.
In many cases, you apply filters to a selection or an image at full intensity — meaning that you can draw a marquee around an area using a selection tool (or not, if you want an entire layer to be affected), choose a filter command, type whatever settings you want if a dialog box appears, and then watch as the filter is applied.
This probably sounds pretty normal — a procedure not unlike any other editing command, such as applying Levels or Variations. But what if you want to reduce the intensity of the filter — and the level of reduction isn't something you can tweak through the filter's dialog box? You can reduce the intensity of the last filter applied by choosing Edit
As shown in Figure 10.11, the Fade dialog box provides you with the basic tools of image mixing — — an Opacity value and a blend mode pop-up menu. To demonstrate the wonders of Edit
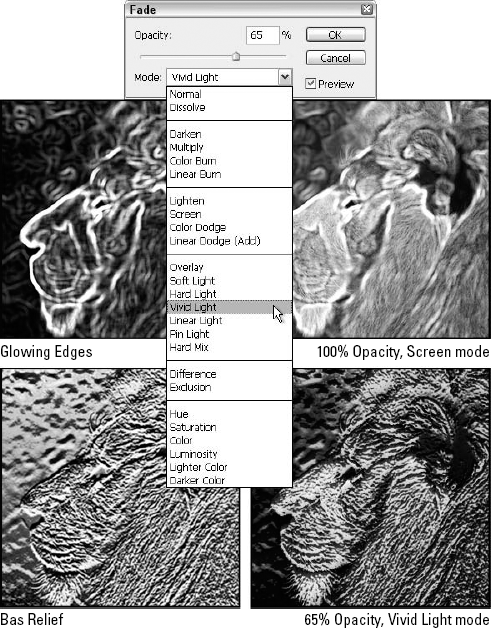
Figure 10.11. The full-intensity versions of two filters are found on the left — Glowing Edges (upper left) and Bas Relief (lower left). When using Fade to apply them to the unfiltered original — reducing the intensity of the filters — you get the results seen on the right.
Due to the fleeting, sensitive nature of the Fade command, you may find it more helpful to copy a selection to a separate layer by pressing Ctrl+J (
Warning
The drawback of the Fade command is that it's available only immediately after you apply a filter (or perform some other applicable edit). If you do anything after applying the filter — even something as benign as making a selection or saving the file — the Fade command dims and returns only when you apply the next filter.
And here's another reason to layer before you filter: If your image has a border around it, like the ones shown in Figure 10.12, you don't want Photoshop to factor the border into the filtering operation. To avoid this, select the image inside the border and press Ctrl+J (Win) or
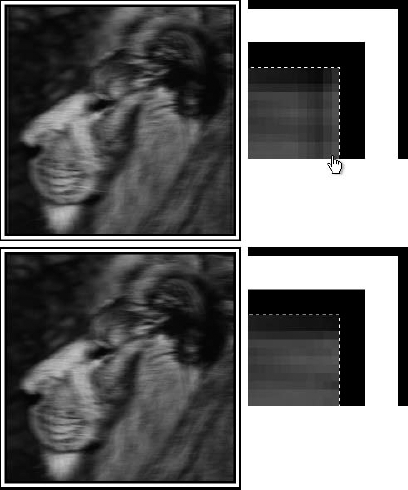
Figure 10.12 shows the results of applying the Motion Blur filter, both when the image is anchored in place and when it's layered. In both cases, the border itself was not selected when the filter was applied. The distortion created along the edge (top) vanishes when the filter is applied to a layered image (bottom).
Even if the area outside the selection is not a really a border — perhaps it's just a comparatively dark or light area that serves as a visual frame — layering comes in handy. You should always layer the selection unless you specifically want edge pixels to be calculated by the filter.
If you've experimented at all with Photoshop, no doubt you've had your way with many of the commands in the Filter
The Sharpen, Sharpen More, and Sharpen Edges commands are easy to use and immediate in their effect. However, you can achieve better results and widen your range of sharpening options if you learn how to use the Unsharp Mask and High Pass commands, which are discussed at length in the following pages.
The first thing you need to know about the Unsharp Mask filter is that it has a weird name. The filter has nothing to do with unsharpening, whatever that is, nor is it tied into Photoshop's masking capabilities. Unsharp Mask is named after a traditional film-compositing technique (which also is oddly named) that highlights the edges in an image by combining a blurred film negative with the original film positive.
That's all well and good, but the fact is that most Photoshop artists have never touched a stat camera (an expensive piece of machinery, roughly twice the size of a washing machine used by image editors of the late Jurassic, pre-Photoshop epoch). Even people who used to operate stat cameras professionally never had the time to delve into the world of unsharp masking. In addition — and much to the filter's credit — Unsharp Mask goes beyond traditional camera techniques.
To understand Unsharp Mask — or Photoshop's other sharpening filters, for that matter — you first need to understand some basic terminology. When you apply one of the sharpening filters, Photoshop increases the contrast between neighboring pixels. The effect is similar to what you see when you adjust a camera to bring a scene into sharper focus.
Two of Photoshop's sharpening filters, Sharpen and Sharpen More, affect whatever area of your image is selected. The Sharpen Edges filter, however, performs its sharpening operations only on the edges between colors in the image — those areas that feature the highest amount of contrast.
Unsharp Mask gives you both sharpening options. It can sharpen only the edges in an image, or it can sharpen any portion of an image according to your exact specifications, whether or not it finds an edge. It fulfills the same purposes as the Sharpen, Sharpen Edges, and Sharpen More commands, but it's much more versatile. Simply put, the Unsharp Mask tool is the only sharpening filter you ever need.
When you choose Filter
Amount: Type a value between 1 and 500 percent to specify the degree to which you want to sharpen the selected image. Higher values produce more pronounced effects.
Radius: This option determines the thickness of the sharpened edge. Low values produce crisp edges. High values produce thicker edges with more contrast throughout the image.
Threshold: Type a value between 0 and 255 to control how Photoshop recognizes edges in an image. The value indicates the numerical difference between the brightness values of two neighboring pixels that must occur if Photoshop is to sharpen those pixels. A low value sharpens lots of pixels; a high value excludes most pixels from the running.
The preview options offered by the Unsharp Mask dialog box are absolutely essential visual aids that you're likely to find tremendously useful throughout your Photoshop career. Just the same, you'll be better prepared to experiment with the Amount, Radius, and Threshold options and less surprised by the results if you read the following sections, which explain these options in detail and demonstrate the effects of each.
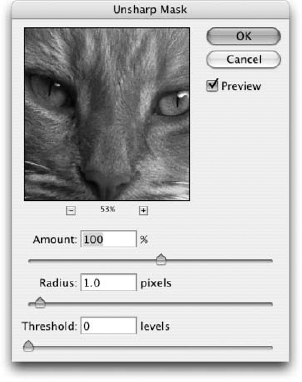
Figure 10.13. Despite any conclusions you may draw from its somewhat confusing name, the Unsharp Mask filter sharpens images according to your specifications in this dialog box.
If Amount were the only Unsharp Mask option, no one would have any problems understanding this filter. If you want to sharpen an image ever so slightly, type a low percentage value. Values between 25 and 50 percent are ideal for producing subtle effects. If you want to sharpen an image beyond the point of good taste, type a value somewhere in the 300 to 500 percent range. And if you're looking for moderate sharpening, try out some value between 50 and 300 percent. Figure 10.14 shows the results of applying different Amount values while leaving the Radius and Threshold values at their default settings of 1.0 and 0, respectively.
If you're not sure how much you want to sharpen an image, try out a small value in the 25- to 50-percent range. Then reapply that setting repeatedly by pressing Ctrl+F (
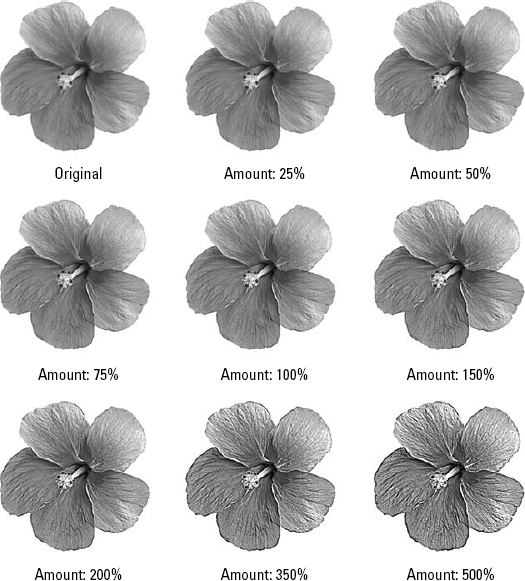
Figure 10.14. The results of sharpening an image with the Unsharp Mask filter using eight different Amount values. The Radius and Threshold values used for all images were 1.0 and 0, respectively.
The benefit of using small values is that they enable you to experiment with sharpening incrementally. As the figure demonstrates, you can add sharpening bit by bit to increase the focus of an image. You can't, however, reduce sharpening incrementally if you apply too high a value; you must press Ctrl+Z (Win) or
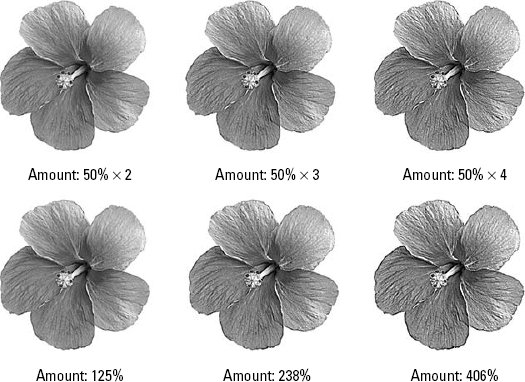
Figure 10.15. Repeatedly applying the Unsharp Mask filter at 50 percent (top row) is nearly equivalent on a pixel-by-pixel basis to applying the filter once at higher settings (bottom row).
Note
If you're a little foggy on how to access individual color channels, read Chapter 4.
Photoshop applies filters to images one channel at a time, so when you apply the Unsharp Mask command to a full-color image, it actually applies the command in a separate pass to each of the color channels.
Therefore, the command always results in the color halos shown in Figure 10.16; however, sometimes the halos get mixed together, which can minimize the halo effect. To avoid any haloing whatsoever, convert the image to the Lab mode (Image
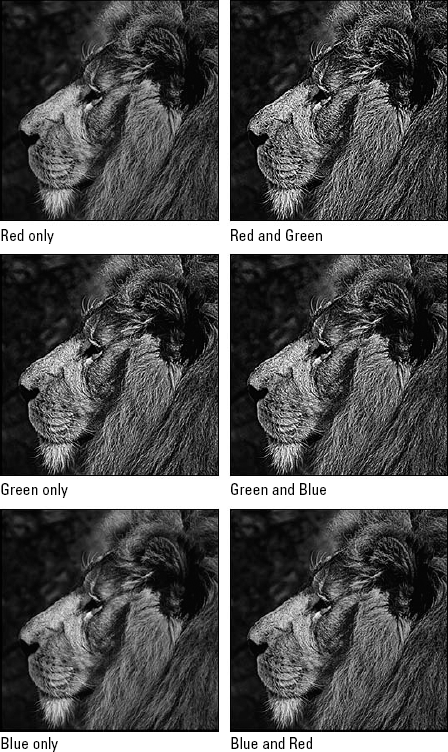
Figure 10.16. Applying Unsharp Mask to a single channel or to a pair of channels creates predictable results, after you get the hang of it. For example, applying the filter to the red channel makes the edges appear red only where they're light and makes dark turquoise (the inverse of red) wherever the image is dark.
The Unsharp Mask filter works by identifying edges and increasing the contrast around those edges. The Radius value tells Photoshop how thick you want your edges. Large values produce thicker edges than small values.
The ideal Radius value depends on the resolution of your image and the quality of its edges:
When creating screen images — such as Web graphics — use a very low Radius value, such as 0.5. This results in terrific hairline edges that look so crisp, you'll think you washed your bifocals.
If a low Radius value brings out strange imperfections — such as grain, scan lines, or JPEG compression artifacts — raise the value to 1.0 or higher. If that doesn't help, don't worry. You'll discover two very effective image-fixing techniques later in this chapter, one designed to sharpen grainy old photos and another that accommodates compressed images.
When printing an image at a moderate resolution — anywhere from 120 to 180 ppi — use a Radius value of 1.0. The edges look a little thick onscreen, but they print fine.
For high-resolution images — around 300 ppi — try a Radius of 2.0. Because Photoshop prints more pixels per inch, the edges have to be thicker to remain nice and visible.
Tip
If you're looking for a simple formula, try 0.1 of Radius for every 15 ppi of final image resolution. That means 75 ppi warrants a Radius of 0.5, 120 ppi warrants 0.8, 180 ppi warrants 1.2, and so on. If you have a calculator, just divide the intended resolution by 150 to get the ideal Radius value.
You can, of course, type higher Radius values — as high as 250, in fact. Higher values produce heightened contrast effects, almost as if the image had been photocopied too many times, which is generally useful for producing special effects.
But don't take my word for it; you be the judge. Figure 10.17 demonstrates the results of specific Radius values. In each case, the Amount and Threshold values remain constant at 100 percent and 0, respectively.
Figure 10.18 shows the results of combining different Amount and Radius values. You can see that a large Amount value helps to offset the softening of a high Radius value. For example, when the Amount is set to 200 percent, as in the first row, the Radius value appears to mainly enhance contrast when raised from 0.5 to 2.0. However, when the Amount value is lowered to 50 percent, the higher Radius value does more to distribute the effect than to boost contrast.
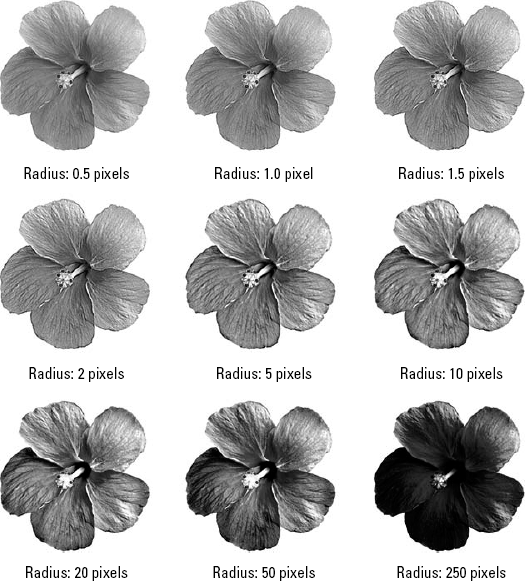
Figure 10.17. These images show the results of applying eight different Radius values, ranging from precise edges to very soft. The upper-left image is the original, untouched by any filter.
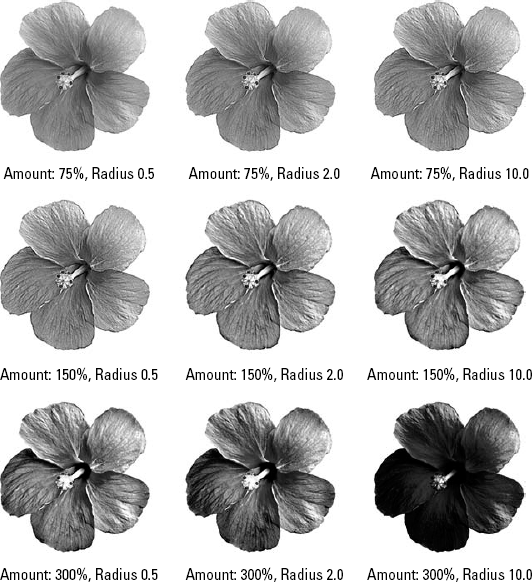
Figure 10.18. These images show the effects of combining different Amount and Radius settings. High Amount settings are countered by higher Radius levels, and as the Amount drops to 50 percent with a Radius of 10, the results are subtle, yet effective — sharpening all over, without a change in contrast. The Threshold value for each image was set to 0 (the default setting).
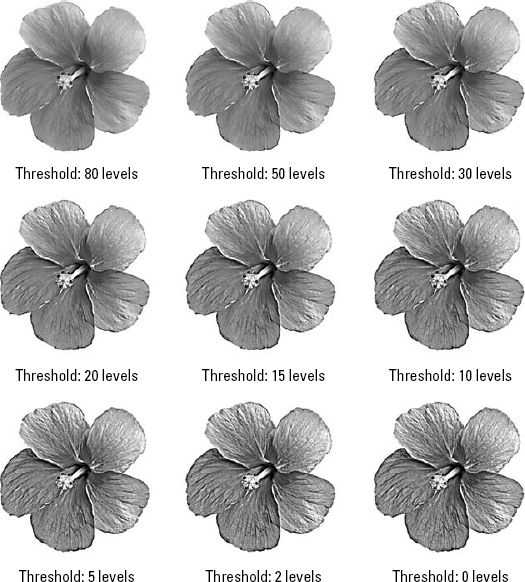
By default, the Unsharp Mask filter sharpens every edge in a selection. However, you can instruct the filter to sharpen only the edges in an image by raising the Threshold value from 0 to some other number. The Threshold value represents the difference between two neighboring pixels — as measured in brightness levels — that must occur for Photoshop to recognize them as an edge.
Suppose that the brightness values of neighboring pixels are 10 and 20. If you set the Threshold value to 5, Photoshop reads both pixels, notes that the difference between their brightness values is more than 5, and treats them as an edge. If you set the Threshold value to 20, however, Photoshop passes them by. A low Threshold value, therefore, causes the Unsharp Mask filter to affect a high number of pixels, and vice versa.
In the top row of images in Figure 10.19, the high Threshold values result in tiny slivers of sharpness that outline only the most substantial edges in the flower's petals. As the Threshold value is lowered incrementally in the second and third rows, the sharpening effect takes over more and more of the petals, ultimately sharpening all details uniformly in the lower-right example.
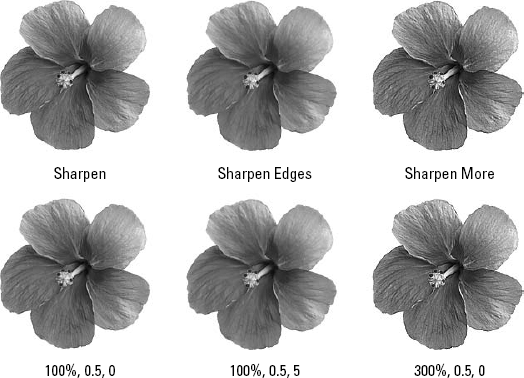
So how do the Sharpen, Sharpen Edges, and Sharpen More commands compare with the Unsharp Mask filter? First, none of the preset commands permit you to vary the thickness of your edges, a function provided by Unsharp Mask's Radius option. Second, only the Sharpen Edges command can recognize high-contrast areas in an image. And third, all three commands are set in stone — you can't adjust their effects in any way (except, of course, to fade the filter after the fact). Figure 10.20 shows the effect of each preset command and the nearly equivalent effect created with the Unsharp Mask filter.
The Smart Sharpen filter is found in Photoshop CS3's Filter
Set to Advanced mode, the Smart Sharpen dialog box offers three tabs — Sharpen (shown in Figure 10.21), Shadow, and Highlight (shown in Figure 10.22), through which you can adjust the Sharpen and Fade Amount, Tonal Width, and Radius. Like most other filter dialog boxes, you can Preview your image in both the dialog box and the image window (thanks to the Preview option, which is selected by default), and unlike other filters, you can save your settings with the Save a Copy of the Current Settings icon, labeled in Figure 10.21. After settings have been saved, you can access them through the Settings drop-down list, which lists only "Default" until you've created settings of your own.
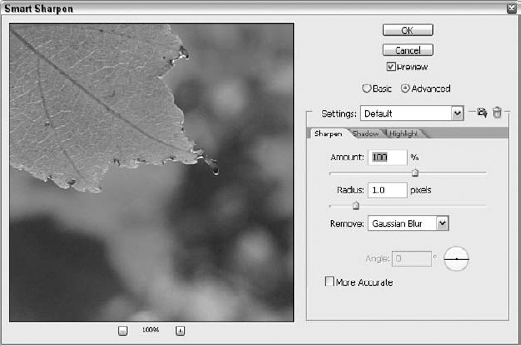
Figure 10.21. The Smart Sharpen filter uses familiar sharpening tools — Amount and Radius — plus a blur-fighting option in the Remove list, which defaults to Gaussian.
The additional fields in this unique dialog box offer the following features and are shown in Figure 10.22:
Fade Amount: In both the Shadow and Highlight tabs, this option works much like the Fade command discussed earlier in this chapter. Instead of applying the filter at full intensity, it applies it in concert with the unfiltered layer for a more subtle result. The default is 16 percent for Shadows and 70 percent for Highlights.
Tonal Width: This ranges from narrow (0) to broad (100) and determines the range of tones that are incorporated into the sharpening effect. Increasing the Tonal Width on the Shadows tab reduces contrast, and decreasing it on the Highlights tab increases contrast, deepening shadows and intensifying highlights.
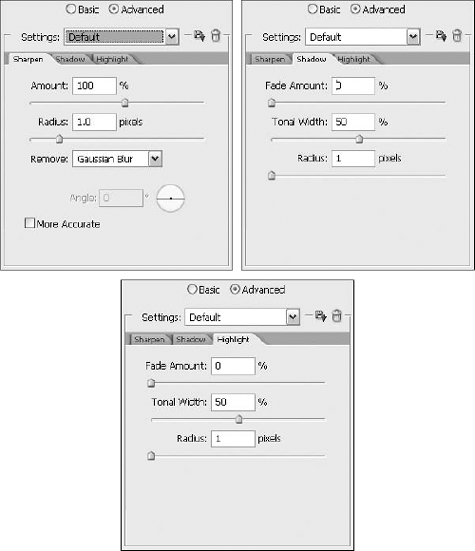
So how do you use this newfangled filter? Well, the "Smart" aspect is the key to its use. Instead of applying sharpening to all the pixels on the layer, and like the rest of the Sharpen filters (except Sharpen Edges), applying the sharpening with equal intensity to all the pixels, this filter lets you focus on pure sharpening (refer to the Sharpen tab in Figure 10.21) with a nod to the possible presence of blurring, either from the photo itself or from a Blur filter. The Shadow and Highlight tabs allow you to address the darkest and lightest pixels respectively, using a Fade setting to create less intense results in these two key areas of any photo.
In Figure 10.23, you see the different sharpening effects applied by switching among Gaussian Blur (left), Lens Blur (middle), and Motion Blur (right) in the Remove field of the Smart Sharpen dialog box. The three Remove options are displayed with identical Amount (300 percent) and Radius (5) settings. The More Accurate option also is selected. The Lens Blur gives the most grainy, artifact-filled sharpening effect, and Motion Blur is the least realistic — the cat's fur is strangely sharpened, as though he's been combed.

The High Pass filter falls more or less in the same camp as the sharpening filters but is not located under the Filter
When you choose Filter
The High Pass filter is especially useful as a precursor to Image
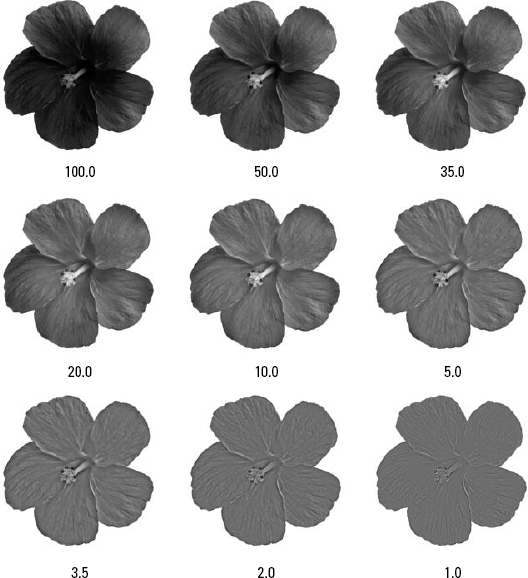
Figure 10.24. Going, going, gone. The results of separating high- and low-contrast areas in an image with the High Pass filter set at nine different Radius values.
In the second row of examples in Figure 10.25, Threshold was followed with Filter
Why change your image to a bunch of slightly different gray values and then apply a command such as Threshold? One reason is to create a mask, as discussed at length in Chapter 9. (In Chapter 9, Levels was used instead of Threshold, but both are variations on the same theme.)
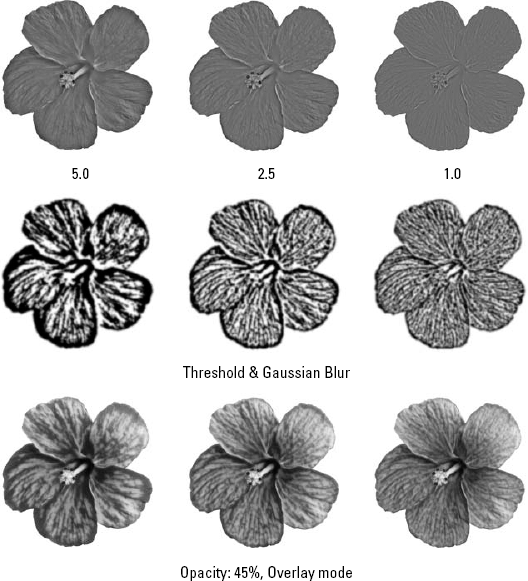
Figure 10.25. This figure shows three different settings of the High Pass filter with low Radius values (top row), followed by the same images subject to Image
You also may want to bolster the edges in an image. For example, to achieve the last row of examples in Figure 10.25, the images were layered before applying High Pass, Threshold, and Gaussian Blur. Next, the Opacity setting of 45% and the Overlay blend mode were applied to achieve an edge-tracing effect.
Note
It should be mentioned that Photoshop provides several automated edge-tracing filters — including Find Edges, Trace Contour, and the Gallery Effects acquisition, Glowing Edges. But High Pass affords more control than any of these commands and permits you to explore a wider range of alternatives. Also worth noting, several Gallery Effects filters — most obviously Filter
The commands under the Filter
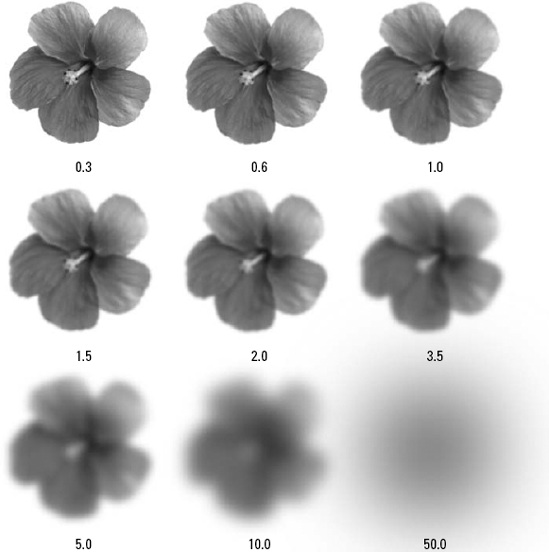
The preeminent Blur filter, Gaussian Blur, blends a specified number of pixels incrementally, following a bell-shaped Gaussian distribution curve. When you choose Filter
Neither of the two preset commands in the Filter
If you have a particularly jagged image, such as found in a 256-color GIF file, there's a better way to soften the rough edges than applying the Gaussian Blur filter. The best solution is to anti-alias the image. How? As described in Chapter 8, Photoshop anti-aliases a brushstroke or selection outline at twice its normal size and then reduces it by 50 percent and applies bicubic interpolation. You can do the same thing with an image.
Choose Image
Figure 10.28 shows a hand-drawn (on paper) doodle, along with the Gaussian Blur applied to the top detail sample (in the hopes of smoothing the drawn lines), and then an example of anti-aliasing applied to the bottom sample. The image subjected to Gaussian Blur with a very low Radius value (0.5) has turned out fuzzy, instead of smoothed. After applying anti-aliasing, however, the lines in the drawing are smooth, not fuzzy.
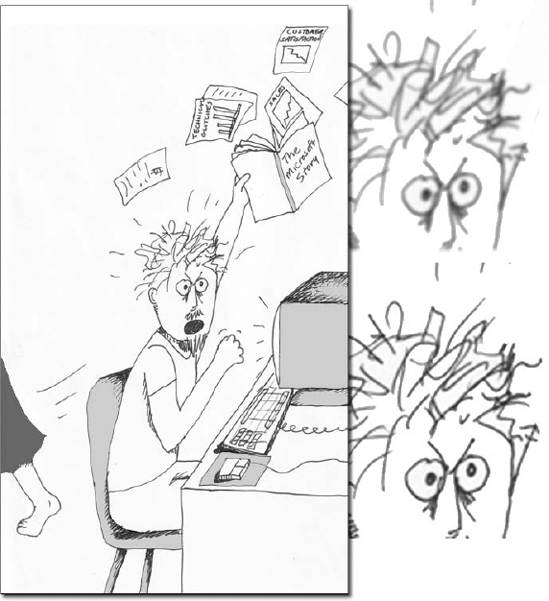
Figure 10.28. Here's a doodle in need, indeed. Note the enlarged detail (top) showing the Gaussian Blur's results, compared with Anti-aliasing, which smoothes the lines without making them fuzzy (bottom). The secret? Bicubic interpolation, through the Images Size dialog box and the use of the Resample option.
In addition to its everyday blurring functions, Photoshop provides two directional blurring filters: Motion Blur and Radial Blur. Instead of blurring pixels in feathered clusters like the Gaussian Blur filter, the Motion Blur filter blurs pixels in straight lines over a specified distance. The Radial Blur filter blurs pixels in varying degrees depending on their distance from the center of the blur. The following pages explain both filters in detail.
The Motion Blur filter makes an image appear as if either the image or the camera was moving when you shot the photo. When you choose Filter
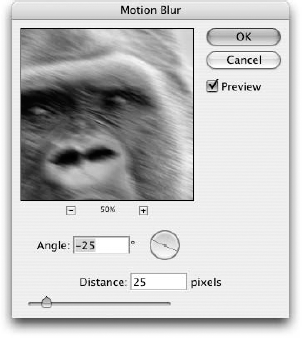
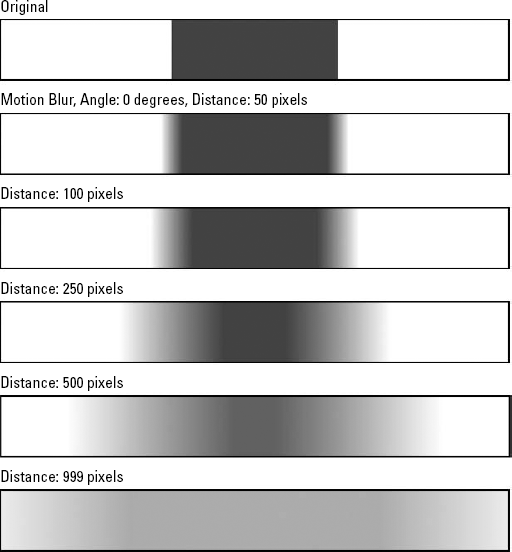
You then type the distance of the movement in the Distance option box. Photoshop permits any value between 1 and 999 pixels. The filter distributes the effect of the blur over the course of the Distance value, as illustrated by the examples in Figure 10.30.
Note
Mathematically speaking, Motion Blur is one of Photoshop's simpler filters. Rather than distributing the effect over a Gaussian curve — which one might argue would produce a more believable effect — Photoshop creates a simple linear distribution, peaking in the center and fading at either end. It's as if the program took the value you specified in the Distance option, created that many clones of the image, offset half the clones in one direction and half the clones in the other — all spaced 1 pixel apart — and then varied the opacity of each.
The problem with the Motion Blur filter is that it blurs pixels in two directions. If you want to distribute pixels in one absolute direction or the other, try the Wind filter, which you can use either on its own or with Motion Blur.
When you choose Filter
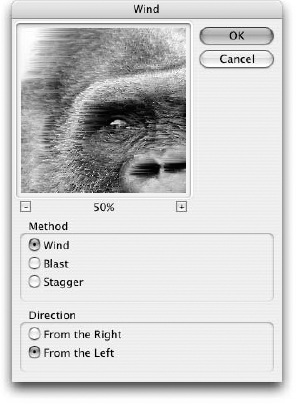
Figure 10.31. Use the Wind filter to randomly distribute a selection in 1-pixel horizontal strips in one of two directions.
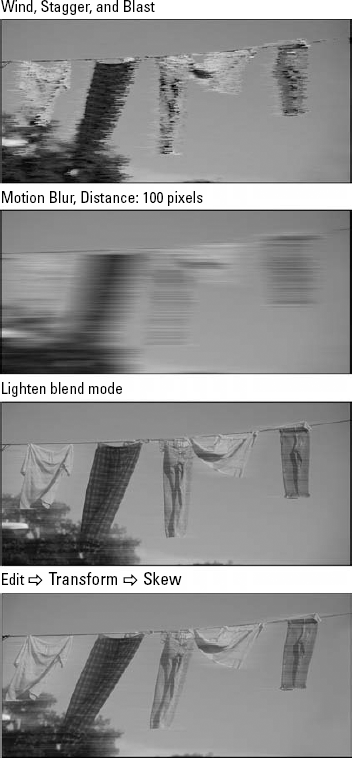
For interesting results, try combining the Motion Blur and Wind filters with a blending mode. For example, as shown in Figure 10.33, the entire image was cloned to a new layer and the Wind command was applied twice to the topmost layer, first with Stagger selected and then with Blast (top). Next, Motion Blur was applied with a 0-degree Angle and Distance value of 100 (second). After that, we changed the layer's blend mode to Lighten (third). And, to cap it all off and give those clothes an even more wind-swept feel, we duplicated the filter layer again, and skewed it to the left using Edit

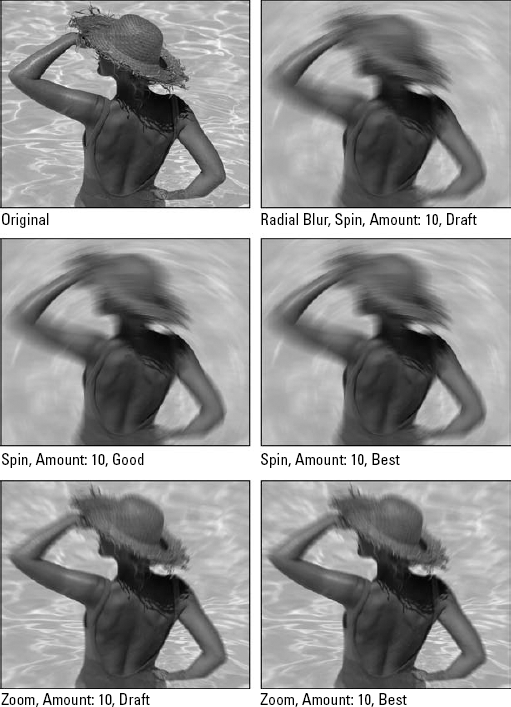
Choosing Filter

Figure 10.34. Click and drag inside the Blur Center grid to change the point about which the Radial Blur filter spins or zooms the image.
If you select Spin, the image appears to be rotating about a central point. You specify that point by clicking and dragging in the grid inside the Blur Center box (as demonstrated in the figure). If you select Zoom, the image appears to rush away from you, as if you were zooming the camera while shooting the photograph. Again, you specify the central point of the Zoom by clicking and dragging in the Blur Center box. Figure 10.35 features examples of both settings.
After selecting a Blur Method option, you can type any value between 1 and 100 in the Amount option box to specify the maximum distance over which the filter blurs pixels. (You can type a value of 0, but doing so merely causes the filter to waste time without producing an effect.) Pixels farthest away from the center point move the most; pixels close to the center point barely move at all. Keep in mind that large values take more time to apply than small values.
Tip
Select a Quality option to specify your favorite compromise between time and quality. The Good and Best Quality options ensure smooth results by respectively applying bilinear and bicubic interpolation (as explained in Chapter 2). However, they also prolong the amount of time the filter spends calculating pixels in your image. The Draft option diffuses an image, which leaves a trail of loose and randomized pixels but takes less time to complete.
The purpose of Filter
The two key options in the Smart Blur dialog box, shown in Figure 10.36, are the Radius and Threshold sliders. As with all Radius options, this one expands the number of pixels calculated at a time as you increase the value. Meanwhile, the Threshold value works just like the one in the Unsharp Mask dialog box, specifying how different two neighboring pixels must be to be considered an edge.
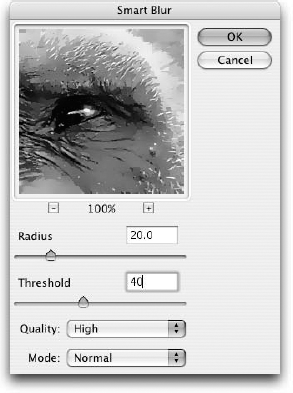
Figure 10.36. The Smart Blur filter lets you blur the low-contrast areas of an image without harming the edges.
But the Threshold value has a peculiar and unexpected effect on the Radius. The Radius value actually produces more subtle effects if you raise the value beyond the Threshold. For example, take a look at Figure 10.37, where you see a grid of images subject to different Radius and Threshold values. (The first value below each image is the Radius.) In the top row of the figure, the 5.0 Radius value produces a more pronounced effect than its 20.0 and 60.0 cousins. This is because a value of 5.0 is less than the 10.0 Threshold, while 20.0 and 60.0 are more.
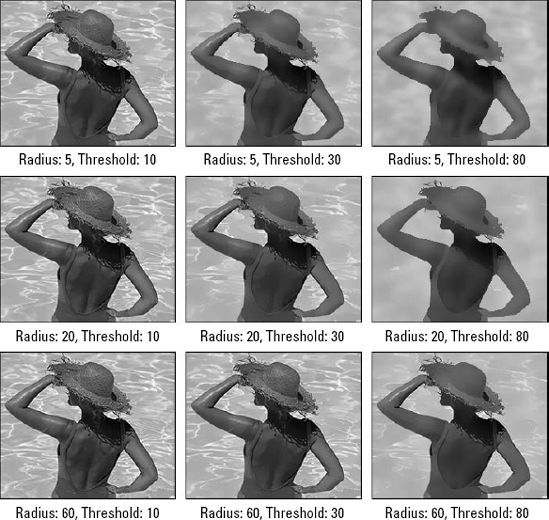
Figure 10.37. This figure shows combinations of different Radius and Threshold values. Notice that the most dramatic effects occur when the Radius is equal to about half the Threshold.
The Quality settings control the smoothness of the edges. The High setting takes more time than Medium and Low, but it looks smoother as well; for the image shown in Figure 10.37, the value was set to High to create all the effects demonstrated. The two additional Mode options enable you to trace the edges defined by the Threshold value with white lines. Overlay Edge shows image and lines, and Edge Only shows just the traced lines. About the only practical purpose for these options is to monitor the precise effect of the Threshold setting in the preview box. Otherwise, the Edge options are clearly relegated to special effects.
Figure 10.38 shows how the masking technique compares with Smart Blur. In the first image, Unsharp Mask was applied with a Threshold of 20. Then Smart Blur was applied with a Radius of 2.0 and a Threshold of 20.0, matching the Unsharp Mask value.
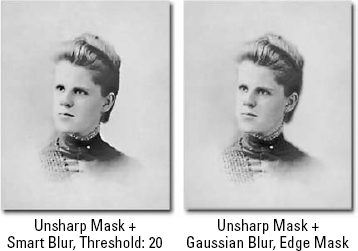
Figure 10.38. This figure shows the difference between relying on Photoshop's automated Threshold capabilities (left) and sharpening and blurring with the aid of an edge mask (right). A little manual labor wins out over total automation.
In the second image, an edge mask was created and an Unsharp Mask was applied with a Threshold of 0. Next, Ctrl+Shift+I (
The Lens Blur filter is designed to simulate the type of optical blurring that occurs in the real world. For years, photographers have experimented with depth of field to determine the relative focus of foreground and background elements in their photos. Although a crisp, uniformly in-focus image is appropriate in many circumstances, sometimes a shallow depth of field (where one section is sharply in focus while others are blurred) can perfectly set the tone for an image. You can take pictures as crisp as you can manage and then perform the selective blurring later in Photoshop. Not content to simply be a compound blur effect, however, the Lens Blur filter also offers you a blissfully obsessive amount of control over Iris, Highlight, and Noise settings.
Choose Filter
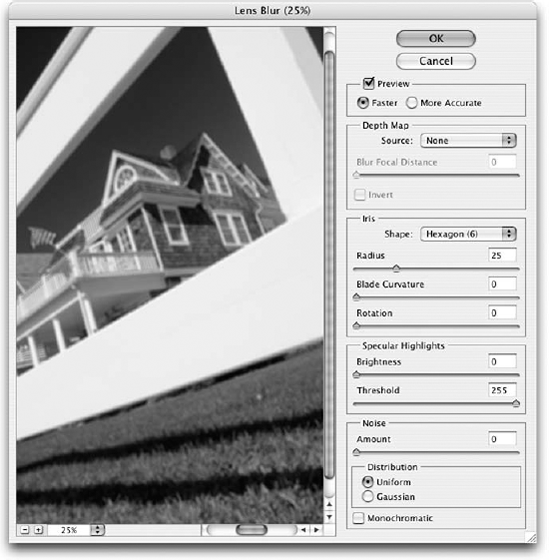
Figure 10.39. Bring your ideas into focus with the Lens Blur filter. Focus, blur — it works on many levels.
Preview: When the Preview option is selected, the Lens Blur filter automatically updates the image preview every time you make an adjustment. For minute tweaking, this can be great, but sometimes this calculation-intense filter can take a while to give you a result, in which case you may want to deselect this option. Even better is the ability to choose between the Faster and More Accurate preview options. Generally, it's a safe bet to leave this set to Faster. Remember, these option are only for previewing. As soon as you click OK, Photoshop renders the best possible result it can.
Depth Map: Here's where the wonders of the Lens Blur filter really shine. The Depth Map you specify contains information that assigns an imaginary position in space to every individual pixel in your image. By default, the Source pop-up menu offers three options: None, which performs blurring on each pixel in your image uniformly; Transparency, which determines what gets blurred in an image based on the transparency values of the pixels; and Layer Mask, which bases blur levels on the grayscale values in an image's layer mask. Under the default settings, the black areas of the mask are treated as though they are in the foreground and the white areas are treated as though they are in the background, though you can reverse this by selecting the Invert option or by adjusting these settings manually, as you'll see in a moment. If you've added an alpha channel to your layer, it too is available to choose as a Depth Map from the Source pop-up menu.
Tip
The ability to create custom Depth Maps gives you the opportunity to individually tweak the blurriness of every single pixel in your image. You'll be astonished at the blurring power at your fingertips. Try this: Create a layer mask, and draw a black-to-white transparency gradient in your image. Then apply the Lens Blur filter with the Source set to Layer Mask. The result is an image that gradually increases in blurriness according to your gradient. Or add an alpha channel to your layer, and use the Brush tool to paint in random splotches of blacks and grays to emulate the random, selective focus that's so popular right now among music video directors and people with broken camera lenses. Why, the possibilities are endless, though blurry in the distance.
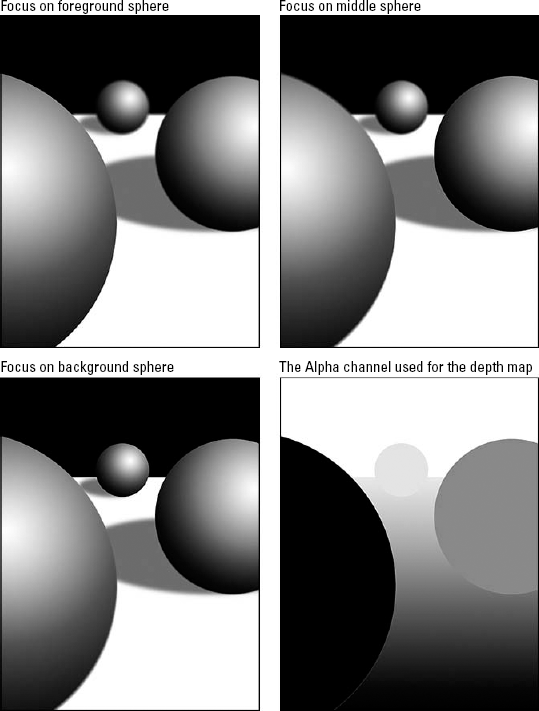
Figure 10.40 demonstrates a simple depth-of-field experiment. The foreground sphere is red, the sphere in the middle distance is green, and the one in the background happens to be blue — each on its own layer, created with the Elliptical Marquee tool and the Gradient tool set to Radial.
To apply the depth map, shown in the lower right, the appropriate alpha channel was loaded using the Source pop-up menu. Although dragging the Blur Focal Distance slider would have worked just as well to determine which part of the image needed to be in focus, the Lens Blur filter provides a quicker, more precise way to designate any portion of a layer as being in focus: Simply click any pixel in the preview window portion of the dialog box, and watch as the Blur Focal Distance slider snaps to attention. The Lens Blur filter takes the pixel you've chosen, looks at the corresponding grayscale level for that pixel in the Depth Map, and adjusts the focal distance accordingly. If you choose Invert, the portion of the image you click is set out of focus.
Iris: The characteristics of genuine lens blur in a photograph can depend on the shape of the iris in the camera lens that captured the photo. (An iris is a diaphragm comprised of plates that expand and contract to determine the amount of light entering the lens.) Photoshop's Lens Blur filter gives you a number of options for simulating many different types of irises. From the Shape pop-up menu, you can select anything from a triangular iris to an octagonal one. Experiment with the various Shape options together with the Blade Curvature and Rotation settings to create different types of realistic details and imperfections in your lens blur effects. As the number of sides in the iris increases, along with the Blade Curvature, the blur highlights become smoother until they are virtually circular.
The Radius setting is where you adjust the amount of blur applied to your image. You can think of it as the Photoshop counterpart to a camera's f-stop (which regulates depth of field in real life), though the fact that Photoshop doesn't know the focal length of the lens that captured the image prevents you from getting a direct, mathematical correlation.
Specular Highlights: When you blur an image through one of the other blurring filters in Photoshop, colors can get averaged and bright whites can become shades of gray. Photographers are well aware of the fact that no matter how much a photo is optically blurred, whites remain bright white. The Lens Blur filter accounts for this with the Specular Highlights section of the dialog box. Decrease the Threshold amount to add areas that are affected by the highlights and increase the Brightness level to blast the image with pools of white. In addition to being optically accurate, Specular Highlights also can add a nice, otherworldly quality to an image.
Noise: When you apply a drastic blur to sections of an image, it tends to smooth out detail and color values. But as you've seen, the name of Lens Blur's game is realism, and no matter how blurry a photograph is, it would look unnatural to lose film's inherent grain detail. Thankfully, the Noise options can help artificially pull this detail back in. Adjust the Amount slider until the noise in the blurred section matches the original photo's noise in the in-focus section. Below the slider, select either Uniform or Gaussian to set the type of noise (for my money, Gaussian is the way to go). Finally, you can make sure the noise you generate won't affect the color in your image by selecting the Monochromatic option.
The Box Blur works much like the Gaussian Blur, as you have only a Radius slider to adjust the effect, but the results are faster, and the filter works differently in terms of which pixels its using to make the blur happen. Figure 10.41 shows the Box Blur dialog box. The term "box" comes from the box-like direction that the pixel comparisons take. Each pixel is compared to the pixels directly above, below, and to the left and right — no diagonally positioned pixels are included. The true boxy-ness of this filter is most visible at high Radius settings.
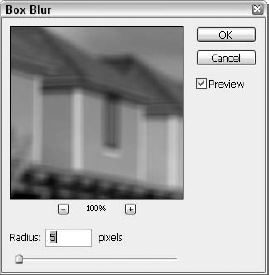
Figure 10.41. Click and drag the Box Blur's Radius slider to adjust the intensity of the horizontal and vertical blurring effect.
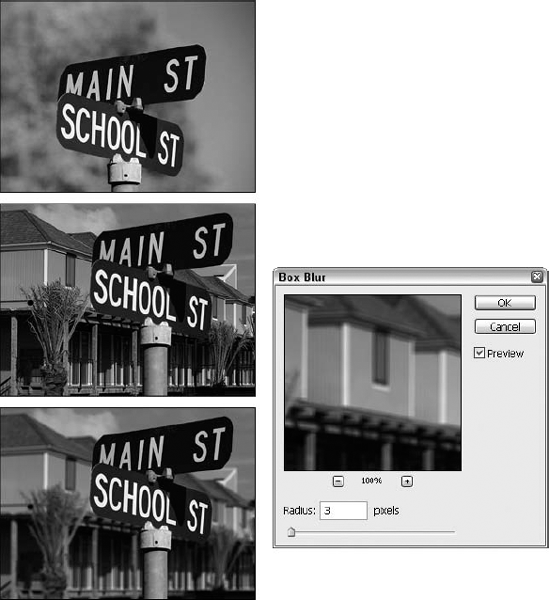
Figure 10.42 shows the melding of two images — a sign post in an autumn shot by Terri Shadle, with a shallow depth of field, and the same sign post introduced into another shot of Terri's. The new background is then subjected to the Box Blur filter to reproduce the same depth-of-field originally captured by the camera.
You know those shapes you can choose from when you use the Custom Shape drawing tool? Well, they come back to serve you again when you choose Filter
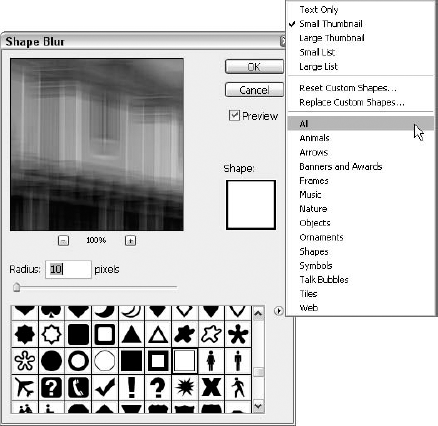
Figure 10.43. Pick a shape, or choose from different shape categories in the pop-up menu. Choose All to see the entire set of shapes with which you can blur your layer content.
To blur with a shape — the shape dictating the sweep of the tool's comparisons of each pixel's neighbors — simply click a shape in the palette, and watch the results appear in the dialog box and in the image window (if you have selected the Preview option).
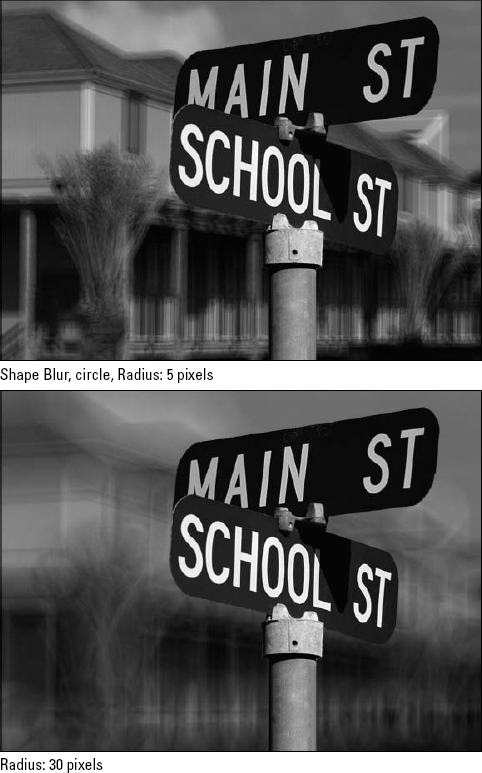
The results? Well, as shown in Figure 10.44, you can see that like the Box Blur (which is really a shape blur perpetually set to a box shape), the Radius setting determines whether the shape used is visible within the blur results. At low settings (below 10 pixels — and 5 is as low as you can go), you can't really tell the results from a Gaussian blur, which compares each pixel to all of its immediate neighbors, resulting in no discernable shape. At higher Radius settings — higher than 20, but less than 100 — you can really see that the blur effect is tweaked by the shape you chose. This isn't to say that you could tell which shape was used if you were handed a photo that was blurred, with say, the little dog paw shape, but you can tell it's not a uniform Gaussian blur, either.
Tip
The simpler the shape — arrows, triangles, boxes, anything angular without too many sides, nooks, or crannies — the more obvious and identifiable the shape's impact is. If you're looking for a blur that's not the regular old Gaussian effect, this may be the one for you — you can even choose a shape that's similar to your photo's key subject.
The Surface Blur filter is intended for use in blurring images depicting shiny surfaces. It maintains luminosity while evening out underlying color tones, as can be seen in Figure 10.45. This as-yet unfried green tomato has a taut shiny surface. Notice that the skin is not a uniform green, but is speckled with flecks of varying green tones. (Okay, okay — we KNOW it's a grayscale image in your book! Just trust us on this one — those speckles are GREEN!) When the Surface Blur filter is applied, the shiny highlights are not diminished; however, the speckles virtually disappear.
If you don't want to lose detail in an image with shiny glass, chrome, or other glossy surfaces, select only those areas with a high shine that you need to tone down. Using low Radius and Threshold settings assures subtle results, and the Preview allows you to make sure that your Surface Blur doesn't make your highlights look dirty compared to the rest of the shiny content.
Photoshop offers four loosely associated filters in its Filter
Noise adds grit and texture to an image. Noise makes an image look like you shot it in New York on the Lower East Side and were lucky to get the photo at all because someone was throwing sand in your face as you sped away in your chauffeur-driven, jet-black Maserati Bora, hammering away at the shutter release. In reality, of course, a guy over at Sears shot the photo for you, after which you tooled around in your minivan trying to find a store that sold day-old bread. But that's the beauty of Noise. It makes you look cool, even when you aren't.
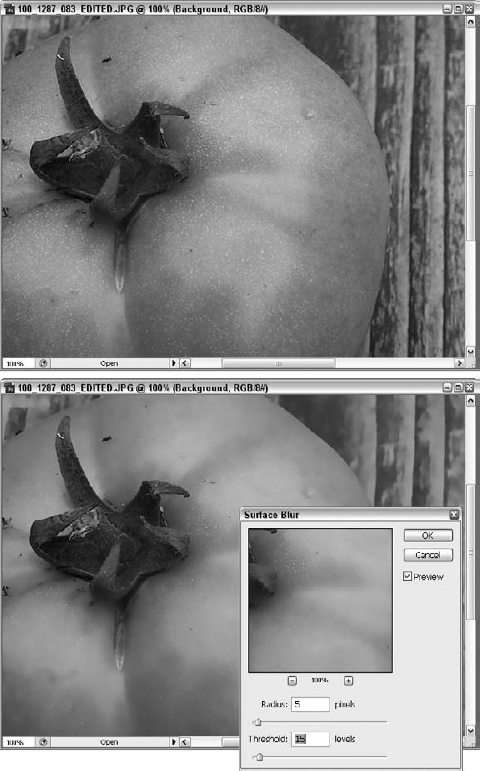
Figure 10.45. The Surface Blur dialog box gives you two familiar sliders — Radius and Threshold — and here we see that when the photo isn't shiny or sparkly to begin with, you can achieve a cool, foggy result.
You add noise by choosing Filter
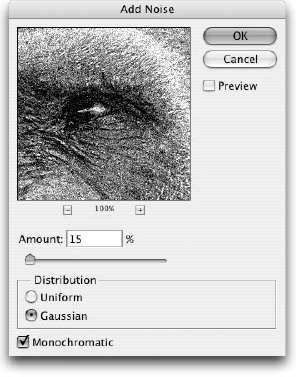
Figure 10.46. The Add Noise dialog box asks you to specify the amount and variety of noise you want to add to the selection.
Amount: This value determines how far pixels in the image can stray from their current colors. The value represents a color range rather than a brightness range and is expressed as a percentage. You can type a value as high as 400 percent. The percentage is based on 256 brightness values per channel if you're working with a 24-bit image and 32,768 brightness values for 16-bit images. So with a 24-bit image (8-bit channels), the default value of 12.5 percent is equivalent to 32 brightness levels, which is 12.5 percent of 256.
For example, if you type a value of 12.5 percent for a 24-bit image, Photoshop can apply any color that is 32 shades more or less red, more or less green, and more or less blue than the current color. If you type 400 percent, Photoshop theoretically can go 1,024 brightness values lighter or darker. But that results in colors that are out of range; therefore, they get clipped to black or white. The result is higher contrast inside the noise pixels.
Uniform: Select this option to apply colors absolutely randomly within the specified range. Photoshop is no more likely to apply one color within the range than another, thus resulting in an even color distribution.
Gaussian: When you select this option, you instruct Photoshop to prioritize colors along the Gaussian distribution curve. The effect is that most colors added by the filter either closely resemble the original colors or push the boundaries of the specified range. In other words, this option results in more light and dark pixels, thus producing a more pronounced effect.
Monochromatic: When working on a full-color image, the Add Noise filter distributes pixels randomly throughout the different color channels. However, when you select the Monochrome option, Photoshop distributes the noise in the same manner in all channels. The result is grayscale noise. (This option does not affect grayscale images; the noise can't get any more grayscale than it already is.)
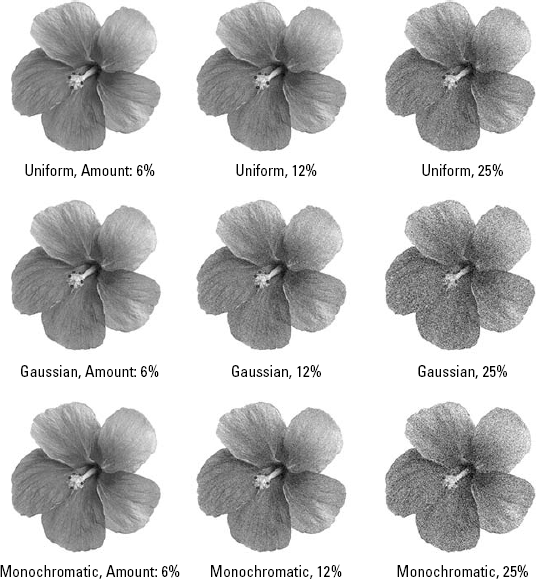
Figure 10.47 compares three applications of Gaussian noise to identical amounts of Uniform noise, the first of which produces higher contrast. The bottom row in the figure demonstrates Monochromatic noise, which tends to produce a more appealing effect.
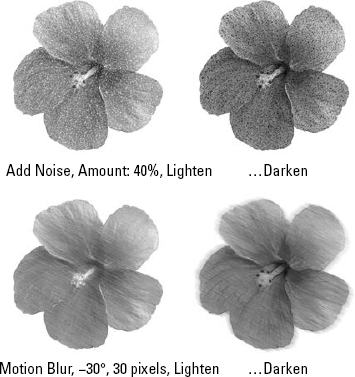
Normally, the Add Noise filter adds both lighter and darker pixels to an image. If you prefer, however, you can limit the effect of the filter to strictly lighter or darker pixels. To do so, apply the Add Noise filter, apply the Fade command (Ctrl+Shift+F on the PC or
Figure 10.48 shows sample applications of lighter and darker noise. After copying the image to a separate layer, the Add Noise filter was applied with an Amount value of 40 percent and Gaussian was selected. To create the top example in the figure, Lighten was selected from the blend mode pop-up menu. To create the bottom example, the Darken mode was selected. In each case, a layer of strictly lighter or darker noise was added while at the same time retaining the clarity of the original image.
You may find that your biggest frustration with the Add Noise filter is that you can't specify the size of individual specks of noise. No matter what you do, noise only comes in 1-pixel squares. It may occur to you that you can enlarge the noise dots in a layer by applying the Maximum or Minimum filter, but in practice, doing so simply fills in the image, because there isn't sufficient space between the noise pixels to accommodate the larger dot sizes.
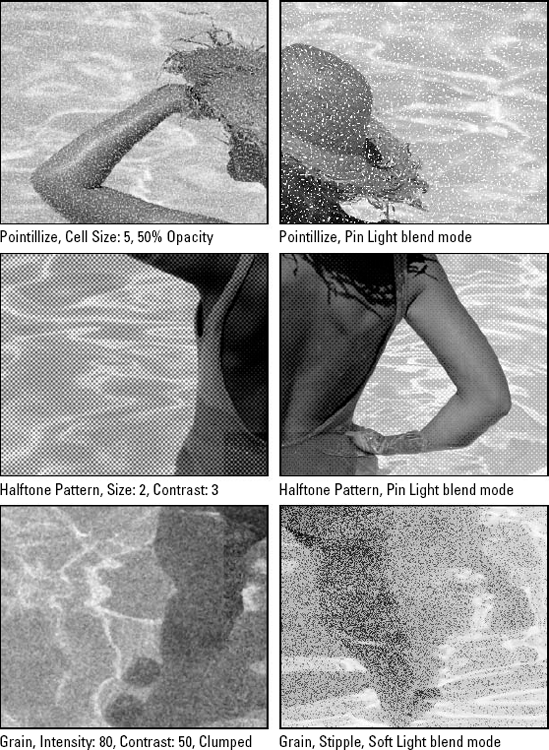
Luckily, Photoshop provides several alternatives. One is the Pointillize filter, which adds variable-sized dots and then colors those dots in keeping with the original colors in the image. Though Pointillize lacks the random quality of the Add Noise filter, you can use it to add texture to an image.
To create the top-left image in Figure 10.49, Filter
The Gallery Effects filters provide a few noise alternatives. Filter
"Getting rid of noise" may be an overstatement, but Photoshop's Reduce Noise filter does a pretty good job of removing noise from your images — whether it comes from a scanned original, JPEG artifacts, or just overall graininess from any number of sources. As shown in Figure 10.50, the dialog box offers more options for controlling the filter than you'll see in other Noise filter dialog boxes, and it comes in two flavors: Basic and Advanced.
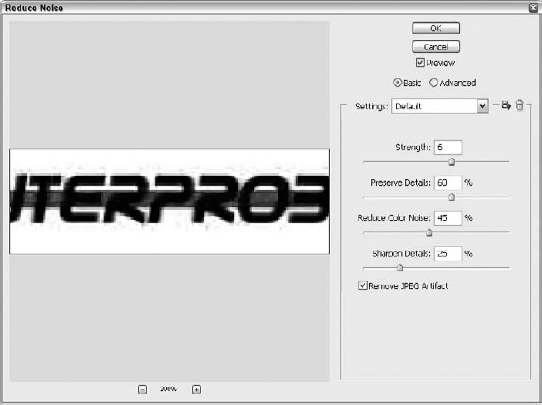
Figure 10.50. Reduce noise a little bit or a whole lot — all while maintaining details within your image.
Tip
What are artifacts? Stray pixels that stand out undesirably, created by saving files in a lossy format (like JPG, which is often used to make photos web-ready). The Reduce Noise filter can get rid of some of these pixels for you, changing their color to match the surrounding pixels more closely. If you want to review file formats, like JPG and others, check out Chapter 3. Terms like lossy and the specifics of web optimization are covered in Chapter 20.
Like many filter dialog boxes, the Reduce Noise dialog box allows you to move and resize your image (the layer or selection being filtered) within the Preview window, using the Zoom buttons (+ and − ) and with your mouse within the Preview itself (your mouse becomes a Hand by default). Using the sliders on the right, the Basic version of the dialog box allows you to tweak the following settings, until you like what you see on the left:
Strength: This setting controls luminance (light) noise. The higher the number, the more control you achieve, as the brightness of adjacent pixels is adjusted to create a more uniform appearance. You can leave this slider right where it is (6 is the default) if your noise isn't coming from light and dark pixels mixing inappropriately.
Preserve Details: Expressed as a percentage, this slider allows you to choose how much detail you keep as you smooth out the noisy pixels. The higher the percentage, however, the less noise you eliminate.
Reduce Color Noise: If your noise is color-based (rather than light-based), drag this slider toward the right, increasing the percentage of chromatic noise reduction achieved.
Sharpen Details: This would seem like a redundant setting with Preserve Details, but it's not. What this does is actually apply a sharpen filter to the image (or the active layer/selection) at the same time that whatever noise reduction you've established with the other settings is applied. The higher the percentage here, the more sharpening you get, which can actually create noise — so watch the preview closely to see if you're canceling out your noise reduction with too much sharpening.
Remove JPEG Artifact: This check box, unchecked by default, does just what it says it does — although not dramatically. The intention is to spot and get rid of artifacts (previously defined in this section) that occur through the application of the JPG format, but you may find that you don't see any appreciable change when you check this box.
Tip
Image noise comes in two flavors: luminance noise (graininess) and color noise (artifacts). Graininess typically can be isolated in the blue channel, and the Advanced mode of this filter has this little factoid in mind, so read on.
If you click the Advanced radio button at the top of the Reduce Noise dialog box, you see a change in the dialog box — it displays two tabs, Overall and Per Channel. The Overall tab offers the same settings as the Basic version of the dialog box. The Per Channel tab is the truly advanced part. Here you find what you see in Figure 10.51, which includes the following options:
Channel: Click the list, and pick your channel. The one you pick is the one you're adjusting, using the other two options in this version of the dialog box. Obviously, this is where you go when you want to reduce noise in that blue channel we were just talking about.
Strength: Like you found in the Basic version of the Reduce Noise dialog box, the Strength setting allows you to determine how much noise is removed, based on light levels between adjacent pixels.
Preserve Details: Again, just like in the Basic version of the dialog box, this percentage determines the amount of detail you keep as you remove noise. This time, however, the preservation of detail is per channel. This means you can remove more noise in one channel than another, perhaps allowing some detail to be lost in that channel so that more noise can be lost overall. If the remaining channels are less noisy and through them you still keep image clarity, you'll get the cleanup you needed without losing much of the specifics within your image. Note that this setting is dimmed unless the Strength setting is set to 1 or more.
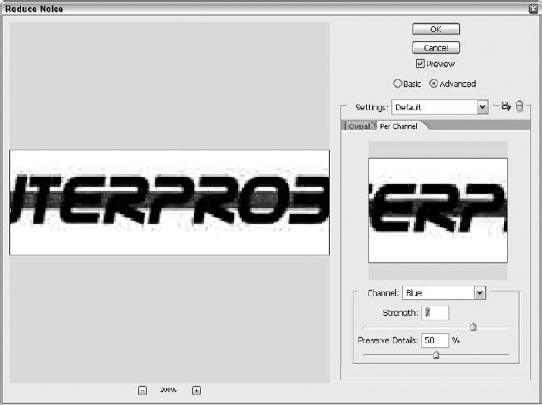
Figure 10.51. The Advanced settings for noise reduction include the ability to reduce noise on a per-channel basis.
Note
You can save your settings in this filter dialog box by clicking the little Save button (it looks like a little disk) and giving the new filter settings a name. The trash can icon allows you to delete saved settings. To apply saved settings, click the Settings list and select them by name.
Strictly speaking, the Despeckle command probably belongs in the Filter
How does it know where the edges are? The Despeckle command searches an image for edges using the equivalent of an Unsharp Mask Threshold value of 5. It then ignores the edges in the image and blurs everything else with the force of the Blur More filter, as shown in the upper-left image in Figure 10.52.
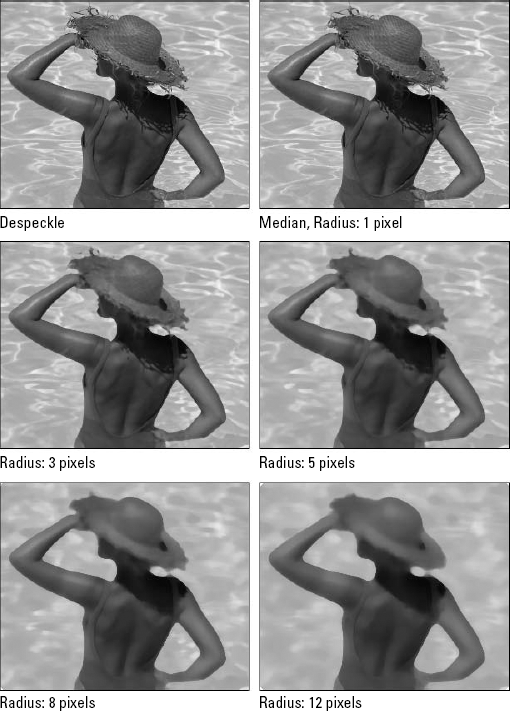
Another command in the Filter
As with Gaussian Blur, you can achieve some interesting and useful effects by backing off the Median filter with the Fade command. But rather than creating a romantic, soft-yet-focused glow, Median clumps up details, giving an image a plastic, molded quality, as demonstrated by the examples in Figure 10.53. To create every one of these images, the Median filter was applied with a Radius of 5 pixels. For the second example, Ctrl+Shift+F (
Another difference between Gaussian Blur and Median is that Gaussian Blur destroys edges and Median invents new ones. This means that you can follow the Median filter with Unsharp Mask to achieve even more pronounced sculptural effects.
Photoshop offers one additional filter in the Filter
But like so many of Photoshop's older automated tools, Dust & Scratches works only when conditions are extremely favorable. It's not that you should never use it; in fact, you may always want to give it a shot at a dusty image. If it doesn't work, don't be surprised — just get to work and eliminate the imperfections manually using the Clone Stamp tool or Healing Brush, as discussed in Chapter 7.
Now, as stated, the Dust & Scratches filter was designed to get rid of the dirt from your scanner that ends up on your images. But another problem that the filter may be able to eliminate is moiré patterns. These patterns appear when scanning halftone images from books and magazines. The image shown in Figure 10.54 was scanned from a black-and-white newspaper image, and the original is really awful. It won't ever be a crisp, clean image, but it can be much better.
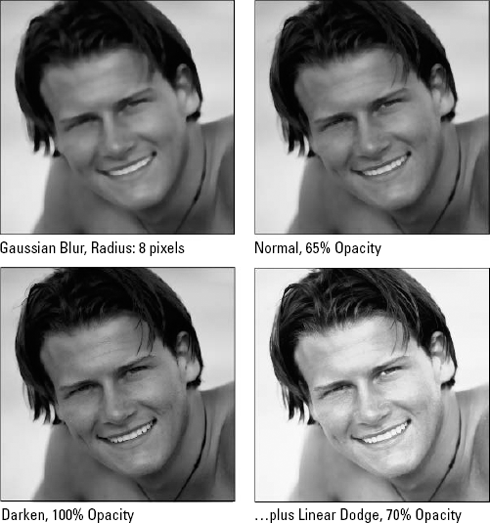
Figure 10.53. After applying the Median filter, the effect was reversed slightly using Edit
Warning
When scanning published photographs or artwork, take a moment to find out if what you're doing is legal. It's up to you to make sure that the image you scan is no longer protected by copyright — most, but not all, works more than 75 years old are considered fair game — or that your noncommercial application of the image falls under the fair-use umbrella of commentary, criticism, or parody. It's better to be extremely safe than even slightly sorry, so be careful and thorough in your copyright research.
The Dust & Scratches filter can be pretty useful for eliminating moirés, particularly if you reduce the Threshold value below 40. These halftone imperfections come from the halftone dots required to print images in books and magazines, which create periodic inconsistencies known as moiré patterns
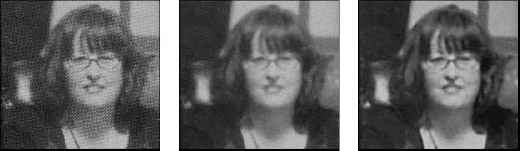
In Figure 10.54, you see an image subjected to the Dust & Scratches filter (the original appears first, on the left) with a Radius of 2 and a Threshold value of 20. The moirés are for the most part gone, but the edges have all but disappeared as well. In the third version of the image (on the right), the Gaussian Blur, Median, and Unsharp Mask filters have been applied, and the result is an image with no moiré, and with a bit more contrast and a bit more detail — an improvement over the middle image, which was simply subjected to the Dust & Scratches filter.
Tip
Always scan halftone images at the highest resolution available to your scanner. Then resample the scan down to the desired resolution using Image
Choosing Filter
When a portion of the image is selected, the Average filter makes calculations from and applies changes to only the selected area. Draw a marquee over a patch of grass, and the averaged area becomes a flat, solid green. Use the Magic Wand to grab a handful of sky, and Average makes it smooth and perfect. Of course, these averages may not be all that photographic or impressive on their own; when you begin to blend averaged sections of an image with the original underlying pixels, the filter proves its value.
You also can experiment with blend modes to achieve stylized results, as shown in Figure 10.55. First, select different areas of the image using Select

Figure 10.55. Three faces...with the original image on top, followed by a duplicate layer where the Average filter was applied to various selections. In the bottom image, a copy of the unfiltered chimp was placed on top of a copy of the Averaged image, and the top layer's Opacity was reduced to 90% with the Lighten mode applied. The underlying layer (with Average applied) was given a Gaussian Blur of 1 pixel.
In this chapter, you received an overview of corrective, destructive, and effects filters, and you learned about mixing a filtered image with the original. You also learned about the new Smart Filters feature in Photoshop CS3, which includes Smart Filters masks.
Through the Sharpen filters, you learned to fix the focus of an image with Unsharp Mask, to use the new Smart Sharpen filter, and to enhance a grainy photograph using a custom edge mask. You also learned about highlighting edges with the High Pass filter and creating glowing images with Gaussian Blur. You learned how to remove noise from photos with a variety of filters that help eliminate stray, unwanted bright, dark, or oddly colored pixels. Blur filters also were covered, as was the removal of unwanted patterns through combining blur and sharpen filters.