Chapter 15
Staying Safe Anytime You Work on a PV System
IN THIS CHAPTER
![]() Staying safe on the job site
Staying safe on the job site
![]() Boosting yourself with ladders (the right way, that is)
Boosting yourself with ladders (the right way, that is)
![]() Bringing up rooftop safety concerns
Bringing up rooftop safety concerns
![]() Keeping electricity in its place
Keeping electricity in its place
![]() Being aware of battery safety
Being aware of battery safety
When you’re installing, maintaining, or fixing a PV system, you need to have your wits about you at all times. If you aren’t constantly aware of your surroundings and all the hazards you’re exposed to, you can get seriously hurt, very quickly. Yes, safety on a job site is all about common sense. But if I’ve learned anything from reading the newspaper each morning, it’s that the old saying is true: Common sense isn’t all that common. That’s why I devote this chapter to showing you PV-specific safety issues, including those that involve general job site safety, ladders, roofs, electricity, and batteries.
On-site safety is also important because you typically don’t install a PV system all by yourself. Usually you install a system with the assistance of at least one other person. And if you’re in a larger company, some people may design systems for others to install.
 If you want to become fully aware of all the on-the-job hazards — as well as the proper ways to deal with them — I suggest you attend worksite safety classes through the Occupational Safety and Health Administration (OSHA). This federal agency offers various levels of classes that can help you become aware of OSHA requirements and how to meet them. For more information, head to
 www.osha.gov or the state contractors board Web site.
Getting a Grip on General Construction Site Safety
A PV installation has many of the same hazards that any construction site has, including the chance for a number of individuals (or even a combination of different trades) to be working on the site at any given time. This fact requires your awareness of the different hazards and appropriate preparation. In this section, I cover several common safety issues surrounding PV installations.
Identifying job-site obstacles and putting on protective gear right away
Every job site you'll work on will have a number of obstacles to avoid. You’ll encounter skylights, plumbing vents, and attic fans on rooftops — not to mention all the equipment you’re going to install. On the ground, you’ll have to deal with stairs, pathways, and more. When you show up at a job site, evaluate it for hazards before you start working. Identifying issues before they ever come up is your best defense against getting hurt.
 On top of the obstacles you identify when you show up are the ones you add in the form of racking, PV modules, and other system gear as the day progresses. So take inventory of the obstacles when you show up and unload for the day, but keep in mind the new obstacles that’ll show up as you work.
By identifying the potential hazards ahead of time you can also figure out the proper personal protective equipment (PPE) you need. At a minimum, you should wear the following whenever you’re on a job site:
- A hard hat: Although not the most comfortable thing in the world, a hard hat protects your head from falling objects.
- Eye protection: Never install or perform maintenance on any part of a PV system (particularly the batteries in a battery-based system) without good-quality eye protection. Always wear a standard pair of safety glasses whenever you’re on a site. (I like to have indoor and outdoor versions to help shade my eyes appropriately.) You should also always have a pair of goggles on hand for working on batteries. Sure, safety goggles may make you feel like a self-conscious teenager in chemistry class, but they’re an absolute necessity.
- Gloves: Make a serious investment in a good-quality pair of all-around work gloves because you’ll be handling sharp (and sometimes very hot) pieces of metal. If you’re going to be working with batteries, buy some gloves that are acid resistant to help keep your hands protected from the strong acids present in batteries (whether sealed or flooded).
- Footwear: The shoes you choose to wear depend on the environment in which you’re working. If you’re in a new-construction industrial setting, steel-toe boots may be the most appropriate choice. If you’re installing a ground-mounted PV array, a sturdy pair of standard work boots or hiking boots may be better. And if you’re up on a residential roof, a pair of work boots with soft rubber soles is your best bet.
Some specialty pieces of PPE may include high-voltage gloves for the times you’re using a meter inside boxes and face shields for guarding against arc faults. You need the gloves anytime you want to put your hands inside a box (such as junction boxes, combiner boxes, disconnects, and inverters) to check voltage or current. PPE for arc fault protection is necessary whenever you’re working in any of the electrical panels in commercial situations.
Safely working alone and with others
Working alone is never the first choice in construction — too many problems can sneak up on you that require a second person in order to maintain proper safety — but chances are you’ve been in the situation where waiting for a second person (or even getting a second person on-site) just isn’t feasible.
If you’re working on a PV system alone, be aware of your limits. Realize that if you try to perform a task that really needs a second set of hands and you get hurt, you won’t save any time or money; in fact, just the opposite will occur. Never look at any job as more important than your personal safety.
When working with others on a job site, you need to have a different level of awareness. Here are some guidelines to follow:
- Never assume where people are or what their next move will be. If you move behind someone, announce your presence.
- Use directions with clear references. This tip is handy when you’re working with someone to accomplish a task together, like carrying a large, heavy object across a roof. If you’re facing each other and you tell your partner to turn left, what will he do? Move to his left, which is your right? If you say “move west,” “turn clockwise,” or something similar, your partner will better understand what you want him to do.
Taking in tips for tool safety
Because you use a number of tools on any given job, make sure those tools are properly maintained and used for the safety of you and everyone else on the job site. Some tools, such as saws, have parts (think blades) that wear out. It’s your responsibility to make sure these parts are replaced as needed because accidents quickly occur when tools aren’t properly maintained.
 Never use the tool on hand to simply get the job done (for example, using a wrench as a hammer). Always take the time to find the right tool, even if you have to climb off the roof to get it. This practice will save you in the long run. Using the wrong tool inevitably results in you breaking something (either the tool or the component you’re working on), and because most components in PV systems are expensive, breaking them isn’t in your best interest.
You also need to respect the safety features built into the equipment. Defeating a safety feature, like bypassing the cutting guard on a saw, is a bad idea that will get someone hurt. You never know when someone will pick up your tool to use “for a second” and not see that the safety feature is bypassed.
Limiting your exposure to the elements
As a PV installer, you’re going to be exposed to some of the most extreme conditions possible. You’ll show up first thing in the morning and get to work on wet, slippery surfaces. As the day wears on, you’ll be on a south-facing roof with temperatures exceeding 120 degrees Fahrenheit (49 degrees Celsius). And then you get to go crawl in the attic space to pull some conduit and run wire. Given these facts of the job, it’s your responsibility to limit your exposure to these extreme conditions as much as possible.
One way to limit your exposure to excessive sun and other elements of nature is to be disciplined about stopping and taking breaks. I know how easy it can be to keep working “just to get this one thing done,” but if you do that, you’re going to overextend yourself. Having to take a break because you injured yourself is never as fun as taking a break just because you choose to.
You also should invest in a good-quality wide-brimmed hat, wear lots of sunscreen, and drink more water than you can imagine. If you’re working in the middle of the summer, plan to start and end early too. Roofs and attics are too hot by midday for you to continue working safely because you won’t be able to think clearly and will therefore make mistakes. Remember: The work isn’t going anywhere, and you can’t get it done from the emergency room.
Stowing a first-aid kit on the job site
You need to have a proper first-aid kit at every job site. You can purchase one at any safety-supply store or through a reputable safety-supply catalog. Just be sure to buy one that’s stocked with treatments for electrical burns, instant ice packs, and bandages for cuts. If you want, you can buy a kit made especially for electrical injuries in addition to a general first-aid kit.
I encourage you to require everyone working with you on the PV installation to receive first-aid training and certification. This training only takes a few hours and will make everyone more confident and secure. You can find first-aid training in your area by contacting the local American Red Cross office; visit www.redcross.org to find yours.
Looking at Ladder Safety
If you’ve decided to work with PV systems, you’ve decided to include ladders in your life on an almost-daily basis. Therefore, you have to become familiar with and willing to practice ladder safety every time you pull one off your rig. The following sections show you some of the major considerations regarding ladder safety, but they’re not all-inclusive. Investigate the OSHA requirements in the state where your client is located to see how they affect ladder use. The OSHA Web site (www.osha.gov) has links to regional and state chapter offices that you can contact.
Selecting your stash of ladders
Ladders are classified in three ways, according to their use and complexity:
-
Stepladder: This is a freestanding ladder that's designed for use in the fully open position. Stepladders come in various lengths and can be used to access points above one’s head, like when you’re installing conduit along the top of some wall-mounted equipment.
Never use stepladders to move from one level to another, like from the ground to a roof. They aren’t designed for this use, and they may not support you properly if you try to use them this way. - Straight ladder: Straight ladders give access to different levels as well as elevated points along a vertical surface, but areas accessible from a straight ladder are limited by the ladder’s height. You can use a straight ladder when you need to access a roof surface from the ground level.
- Extension ladder: A form of straight ladder that allows the user to increase the overall length by moving a “fly” section along the “base” section of the ladder, extension ladders allow you to access different levels. You can use an extension ladder when you need to access a roof surface on a multistory building.
Another ladder classification to know is the load rating, which indicates the maximum weight a ladder can handle (every ladder has one of these ratings). Ladder manufacturers come up with their load ratings by accounting for the weight of the user and any additional weight, such as tools the user is carrying up the ladder. The load-rating classifications are as follows:
- Light duty (Type III), load rating 200 pounds
- Medium duty (Type II), load rating 225 pounds
- Heavy duty (Type I), load rating 250 pounds
- Extra heavy duty (Type IA), load rating 300 pounds
- Special duty (Type IAA), load rating 375 pounds
For any ladder that you intend to use on a construction site, use the higher grades — IA and IAA. Using these grades of ladder ensures that your ladders will be able to handle nearly any load that you need them to on-site. Ladders with reduced load ratings may only work in certain situations.
The next factor to consider when selecting the right ladder for a job is the ladder height. The number-one thing to keep in mind here is that when height is listed on a ladder, you don’t get to use all of it. Depending on the classification and overall height, the last few rungs of a ladder are typically off-limits. Always look at the ladder manufacturer’s instructions for the allowable access heights. Table 15-1 shows the standard maximum wall and roof heights allowed for various straight and extension ladder lengths.
TABLE 15-1 The Working Heights for Various Ladder Lengths
Ladder Size |
Maximum Working Height for Working on a Wall |
Maximum Working Height for Accessing a Roof |
16 feet |
13 feet |
9 feet |
20 feet |
17 feet |
13 feet |
24 feet |
21 feet |
17 feet |
28 feet |
24 feet |
21 feet |
32 feet |
29 feet |
25 feet |
Stepladders come in a variety of sizes as well. Just refer to the label on the side of one to determine its maximum working height.
You should seriously consider buying fiberglass ladders only; fiberglass is nonconductive and considered the best material for ladders used in conjunction with electrical work.
Properly setting up any ladder
After you have a ladder of the correct type and length on-site, you need to set it up properly. Before you get into the setup process, make it a habit to check the ladder for damage every time you use it. You never know when something has broken, and halfway up to the roof is no time to identify a problem.
When setting up a stepladder, verify that the legs are fully extended and that the braces are down and locked. All four legs need to be firmly in place on the working surface to keep the ladder from moving when you climb on it. Note: Stepladders are designed for use with the legs extended, so don’t use them to lean against a vertical surface. You won’t get the proper support in this position, and the ladder may slide out from under you.
When using straight and extension ladders to access roof surfaces, proper setup is critical. If you set up the ladder too steep, you run the risk of having the top falling from the roof. If you don’t set it up steep enough, the bottom can kick out and fall out from under you. By taking some simple precautions, you can greatly reduce the possibility of ladder accidents (I won’t say eliminate because even safety precautions can’t save you from ill-advised actions). Here are some guidelines:
- When setting up a ladder for access to a roof, you want to have the ladder rise 4 feet for every run of 1 foot. This is typically called the 4-to-1 rule. Now before you get too worried about having to bring a protractor with you to every job site, here’s a quick and easy way to verify the proper angle: After setting up the ladder, place your toes so that they touch the base of one of the ladder’s legs. Then reach your arm out at a 90-degree angle from your body with your fingers extended. If your fingers barely touch the ladder rungs, you have the correct angle.
- You also need to make sure you have the ladder extending past the roofline at least 3 feet. This distance allows you to have a firm handhold when stepping back onto the ladder from the roof. Each ladder rung is about 1 foot apart, so when you’re setting the ladder up, make sure three rungs extend past the roof’s edge.
-
Secure the top and bottom of the ladder to properly protect everyone who’s using it. You can stake the ladder to the ground or attach it to the building with a strap. Another method is to have a person hold the bottom of the ladder when anyone is climbing up or down (this option isn’t always realistic though, so staking should be your first choice).
If the working surface allows, you can drive a metal stake into the ground and attach the bottom of the ladder to the stake. With this method, the first person up straps the ladder to the building by taking a proper nylon strap wrapped around a ladder rung and then attaching the strap directly to the building with a method that’s appropriate for the building material (wood screw, masonry bolt, or metal screw).
Figure 15-1 illustrates the proper ladder setup.

FIGURE 15-1: The right way to set up a ladder.
Raising the Issue of Rooftop Safety
Probably one of the most dangerous places you’ll work is the one you’ll have to get on regularly — a rooftop. As soon as you set foot on a roof, you’re fully exposed to the elements. You’ll also likely be working with others and needing to navigate around multiple obstacles — all while properly installing the PV system. On top of all that, you must remember that you’re performing electrical and mechanical work up there — as if one of the two wasn’t dangerous enough by itself. In the following sections, I introduce you to some of the major safety considerations associated with working on a roof.
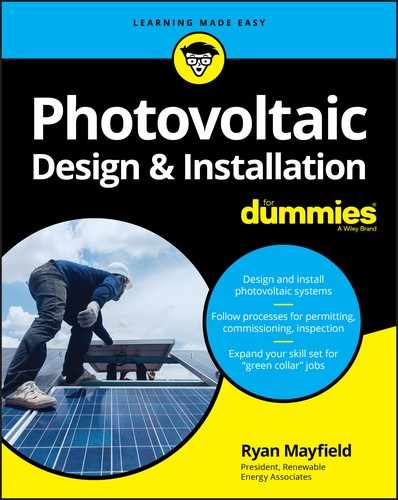
Restraining yourself with fall protection
h3Fall protection is mandated whenever you’re doing work where the potential to fall is more than 6 feet — work that includes installing a PV system on a rooftop. For PV installations, fall protection consists of a fall-arrest harness that keeps you from free-falling more than 6 feet or coming into contact with the next level down (see Figure 15-2a). The harness has a ring on the back that a safety line attaches to; the other end of the line is anchored to the roof (check out Figure 15-2b).
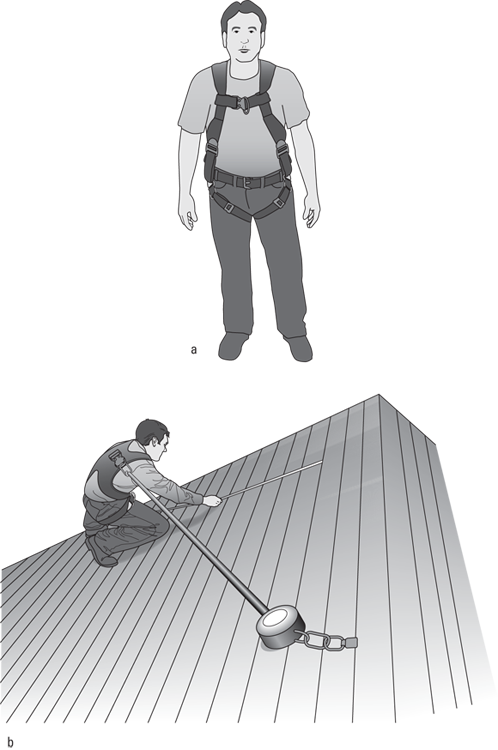
FIGURE 15-2: Essential fall-protection gear for rooftop work.
You can find multiple anchoring systems for various roof types. Some are intended for installation beneath the roofing material and become a permanent fixture of the roof (however, they’re only visible from the roof’s surface), whereas others can be removed and reused on future jobs. Numerous safety shops and suppliers can help train you on the proper applications and methods for using the equipment. Just do an Internet search for “construction safety equipment” or look in your local Yellow Pages to find a number of suppliers.
Fall protection at job sites has received a lot of attention and is especially scrutinized by OSHA thanks to the number of work-related injuries that have happened due to falls. OSHA inspectors visit job sites to confirm that all employees are properly trained and using the required PPE, including fall-protection gear. The fines associated with OSHA violations aren’t minor, so proper use of PPE is your best approach (pleading ignorance isn’t an option with OSHA). Head to www.osha.gov to find resources that can help you determine the requirements you’ll be subjected to.
Storing your tools
Of course you need to bring numerous tools with you to the roof when you’re installing a PV system, but loose tools can be a major accident waiting to happen up. Although it’s very courteous for you to yell “Headache!” to your buddies on the ground as your drill slides down the roof, it’s more courteous if you don’t let the drill fall in the first place. Follow these guidelines:
- Be careful to lug only the tools you need.
- Use tool belts that buckle around your waist and have enough storage to hold the tools you need on you.
- Invest in some quality tool bags that have straps and D rings attached to them so they can be properly secured. Such tool bags are handy because you need numerous tools and components on the roof, but you can’t carry them all on your waist.
Maintaining safe walkways
In many areas of the United States, walkways (clear space along the edges of PV arrays) are now required along the perimeter of any PV array. This requirement is primarily for the safety of firefighters, but it has the added benefit of helping ensure your safety. A firefighter may never need to use the walkway, but you probably will while performing system maintenance.
Check with the building inspector at the jurisdiction in your client’s area for any walkway requirements. If none exist, I suggest accounting for at least 18 to 24 inches of walkway along a minimum of one edge of the array (but preferably two for easier access).
Examining Electrical Safety
Electricity is a very real and important safety hazard. I’ve seen too many people start working with PV systems and take the attitude that it’s only solar and it can’t hurt you like “regular” electricity can. Don’t fall prey to this myth. Electricity can injure or kill you regardless of the source. Also, even though PV modules start at a low voltage, your job is to wire them up so they provide voltages that are higher than standard AC voltages, like the 120/240 VAC in most homes tied to the grid. If you don’t think these are reasons to keep safety in mind at all times, then you’re in for trouble down the road.
When you install, maintain, or fix a PV system, you’re subject to multiple electrical risks. In the following sections, I note the general shock hazards to watch for and provide safety pointers on working with circuits. (Chapter 17 has the scoop on how to install all the electrical elements in a PV system.)
Staying aware of general shock hazards
You should always be aware of the potential for being shocked when working with electrical equipment. You should also keep in mind that when you’re working with PV systems, multiple sources of power are present — that equals numerous hazard possibilities. Here are the major shock hazards you need to think about at all times:
- Power tools and extension cords: Inspect this equipment before using it and immediately replace any tools or cords that appear damaged. In particular, make sure all the equipment and cords are properly grounded. Never use a cord that has a missing or damaged grounding connection. If you do, you’ll raise your chances of getting shocked.
-
PV modules: These babies don’t have on/off switches. When you take a module out of the box and expose it to sunlight, it’ll start sending out current if given the proper path. To avoid being shocked, always plug in the PV source circuits last (see Chapter 18) and wear high-voltage gloves when you put your hands in a box to make any electrical measurements.
Currents as low as 100 milliamps (0.100 A) can disrupt the heart’s normal functions. The PV modules you’ll be working with will have individual outputs of 5 to 10 amps — enough to cause serious injury and even death. - AC circuits: These circuits pose their own electrical hazards. You’ll probably need to make connections inside the main distribution panel (MDP) or subpanel. If power is present in these panels, you run the risk of touching conductors (wires) that’ll send current running through your body. When you need to work inside the MDP or a subpanel, turn off the power to ensure you aren’t exposed to any dangers. The loads in the panels will shut off, but your client should be willing to reset a few clocks in exchange for guaranteeing your safety.
- Rooftop dangers: The majority of PV arrays are installed on the tops of homes and offices, so odds are good you’ll be working on rooftops when installing your PV system designs. Pay special attention to the presence of overhead power lines and always look up before setting up and working on your ladders. Speaking of ladders, avoid using ones that are made of conductive materials; instead, invest in a properly rated fiberglass ladder. (I cover ladder and roof safety earlier in this chapter.)
Working with circuits
Working on the different circuits in a PV system exposes you to a special set of electrical hazards. Why, you ask? Because PV circuits can never be turned off, and the AC power provides yet another shock hazard. This simple fact means that voltage (and the shock hazards that come along with it) is a constant presence. So be smart about your approach when dealing with circuits of any kind and never let your guard down. Also, take some time to review the guidelines that I provide in the next sections for making connections and disconnections in a system.
Following a specific order of connection
You can keep yourself fairly protected during the initial system installation process by being careful to make the electrical connections systematically and in a particular order so as to keep the voltage contained and away from you.
First things first when you start installing any PV system: Make sure all the disconnects and overcurrent protection devices (either circuit breakers or fuses) you install are in the off position. This check keeps any circuits from becoming unintentionally connected during the installation process.
As you install the PV array (that’s the PV source circuit in electrical terms), you generally want to make the series connections as you mount the modules. If the system contains a roof-mounted array that consists of multiple strings, you may have to make the series connections as the modules are attached to the rack because you’ll have limited access to the PV wiring as the other modules are installed (the modules will be only a few inches off the roof surface, and the wiring may be blocked by additional rows of modules). Almost all PV modules now come with quick-connect plugs that allow for series connections to aid the installer in wiring the modules in series strings.
You can make these series connections safely as you mount the modules, but the final connections require special consideration. Imagine a row of ten PV modules, each one wired in series with the next. The positive connector of the first module is connected to the negative connector of the second, the positive of the second is connected to the negative of the third, and so on. As soon as this string is mounted and wired as a single series string, you have a negative wire connected to nothing on the first module and a positive wire connected to nothing on the tenth module. To get those two connections to the combiner box or junction box, you must install a home-run cable. This cable has a quick-connect plug on one end so you can connect it to the quick-connect plug on the module. The opposite end of the cable is bare so you can place it inside the combiner box or junction box and connect it to the proper terminal.
When connecting the home-run cables, work from the combiner box or junction box back toward the PV array. Connect the bare conductor to the proper terminal inside the box before connecting the quick-connect end to the module. This will help keep you safe and minimize your exposure to shock.
To make sure all the conductors in the system are safe, you should only make this home-run connection at the module when you’re ready to commission (turn on) the system — which is after everything else has been installed and wired (see Chapter 18). If you do this, all the other conductors on the PV side of the system won’t be energized during installation, which means you can work safely inside all the combiners, disconnects, and inverters.
For all the other PV-side circuits you install in a PV system (specifically, the PV output circuits and inverter input circuits), use the same general process. Start wiring at the end of the system that’s not hot (meaning there’s no voltage present) and work toward the portion of the system that has the voltage source (either from the inverter toward the grid in a grid-direct system or from the inverter toward the battery bank in a battery-based system). Always turn off breakers and disconnects inside distribution panels so you can get your hands inside the boxes without exposing yourself to danger.
Working on the AC circuit
In both grid-direct and battery-based systems, the AC circuit you must work with is the inverter output circuit (although you can have more than one of these circuits if the system you’ve designed calls for multiple inverters). The exact final connection point for the AC circuit varies with the system type, but the safety considerations are universal. You want to make sure that any panels — main distribution or sub — you’re working in don’t have any power present. (You can do so by performing the same locking and tagging procedure I describe in the next section.)
You can also buy special lock kits that are designed to go over circuit breakers and let you verify that no one will turn on the breaker behind you and apply power to a panel you thought was “dead.”
Disconnecting properly
All PV systems have at least one AC and one DC disconnect that can be used to stop any current flow. Before conducting even minor maintenance or troubleshooting work on PV systems that are operating and producing power, check that all the associated disconnects are turned off.
If you ever need to expose yourself to the circuits of a PV system (whether it’s operating or not) to conduct checks or perform routine maintenance, take it slow and think your steps through before opening the boxes. If you have to work on an inverter or troubleshoot a PV array, your first step should be to approach the system and turn off all the power sources to that equipment. This means the AC and DC disconnects for a grid-direct system and the generator and/or utility, battery, and PV circuits for battery-based systems.
Regardless of the system type, your next step is to lock and tag out (place identification tags on) the disconnects so no one can come up behind you and flip the switches back on. The lock prevents anyone other than the keyholder (you) from turning on the system. The tag (which is attached to the lock) lets people know that the system shouldn’t be turned on and provides your contact information so people can contact you if necessary. Figure 15-3 shows an example of a locked and tagged DC disconnect.
FIGURE 15-3: A locked and tagged disconnect.
After you’ve turned off and locked all the disconnects, go back to your truck and have some coffee. Not thirsty? Check your e-mail instead. Whatever you do doesn’t matter as long as you take a few moments to step away. Sure, you may feel like jumping right into the next task, but every inverter and charge controller used in a PV system has capacitors inside it. What’s more — those capacitors do a pretty good job of holding onto the voltage that was applied to them for a few minutes. So even if you’ve turned off the disconnects, voltage can still be present on both sides of the DC disconnect. (In fact, your disconnects should be labeled per National Electrical Code® [NEC®] requirements that such a hazard exists. However, you may one day have to work on someone else’s installation. In this case, you can’t trust that the system has the proper labeling, so your best bet is to work smart.)
Even though you’ve used the disconnects to shut off the current flow from the PV array and inverter, the array is still producing voltage. Consequently, all the PV circuits that are ahead of the disconnecting means will still be hot. Never disconnect at the following spots:
- If you’ve been called to troubleshoot a PV array, or if you see something you want to quickly change on the roof, it can be tempting to grab that home-run cable I describe in the previous section and simply unplug it to disconnect the array. However, you should never disconnect the modules in this location while the modules are under load (meaning current is flowing from the modules to the batteries or inverter). This point is so important to remember that the connectors on the backs of the modules are marked “Do not disconnect under load.” If you were to pull these connectors apart under load, you’d be lucky if you could walk away from the situation and describe the sight and sound of the arc you pulled.
- Another tempting place to disconnect the PV strings is inside a combiner box, using the small fuse holders installed to pull the fuse out and break the circuit. These fuse holders, like the module connectors, aren’t meant to break the circuit under load. If you try to do this anyway, you’ll pull an arc that can sustain itself until the sun goes away, which can create not only a shock hazard to you but also a fire hazard because the plastic fuse holder could catch fire.
When you’re in a situation where something isn’t right, take your time and examine what you’re getting yourself into before blindly touching and pulling wires, opening fuse holders, or pulling apart module connectors. Check for the presence of current and voltage by using your digital multimeter the way I describe in Chapter 3. By making these checks before pulling out the fuses or pulling apart the PV module connectors, you ensure that you aren’t needlessly placing yourself in harm’s way.
Charging Ahead with Battery Safety
In addition to presenting electrical hazards, batteries also present chemical reaction hazards because they’re just heavy plastic containers of acid. Even getting them on-site and in place presents its own set of problems. Before you jump into working on batteries, check them over to make sure there aren’t any cracks in the case or problems with the posts (like loose fittings).
The first thing people think of when I mention batteries and safety is a fault situation, which is when the positive terminal of a battery is in direct contact with the negative terminal of the same battery thanks to the presence of a metal object lying across both terminals. When a fault situation occurs, the chemicals inside the battery can easily move electrons from one side to the other, creating very high currents. (I’m sure you’ve heard at least one story of your buddy’s grandpa who dropped a wrench across the terminals of a battery and welded the wrench to the battery. Although this story is probably repeated and embellished more than any fishing story, it serves as a very real and important reminder of one of the dangers of working with batteries.)
When installing batteries, you have to use the right tools and maintain a sharp awareness of what you’re doing to eliminate (or at least greatly reduce your exposure to) that risk. Make sure all the tools you use in battery installations are properly insulated to minimize the potential of shorting the batteries. (Even though electrical tape is amazing, wrapping the handle of your wrench with it doesn’t count.) Tools with two layers of plastic coating are perfect.
You also have to take special care when handling batteries because the vast majority of them contain lead and sulfuric acid. Protect yourself from the hazard of chemical reactions with the right personal protective equipment (PPE). I explain the PPE you should have in the earlier “Getting a Grip on General Construction Site Safety” section, but you may also want to invest in an apron to avoid tiny holes in all of your clothes from the battery acid.
In addition to wearing the right PPE, be sure to remove any and all jewelry you have on whenever you’re working near batteries. I once witnessed the results of a wedding ring completing a battery circuit. Luckily, the finger (and the person attached to it) survived. The ring, on the other hand, was cut off and resembled a high school art project more than a wedding ring.
Batteries used in PV systems are generally very large and heavy. Always use proper lifting techniques and move the batteries carefully. Most batteries have carrying handles on the top, but that doesn’t mean you should try moving them yourself. I suggest grabbing a partner to help you move these beasts around. With two people involved, you save yourself from back pain and also avoid the potential of spilling any acid out the top (it’s easier to gently lift and set down batteries with two people).