
Inkscape is a Scalable Vector Graphics (SVG) editor. Most images you see on a computer are raster images made up of a bunch of dots. In other words, the lines you see on the page are really a series of small dots. If you zoom a lot, you’ll see a rough line consisting of a bunch of big dots.
SVG graphics contain a description of the image. For example, a line on the page consists of a command to the program such as “Draw a line of 1.0 width from point (0, 0) to point (6, 3).”
You can use Inkscape to create drawings for sign, billboards, and other large-format printing. It’s also useful for generating files for laser cutters. That’s because the description of an image consists of its path, and a laser cutter can easily move a laser along a path. With raster images, the laser cutter would have to shoot a bunch of holes in the material and hope they connect up enough to make a cut part.
Getting Started with Inkscape
Download Inkscape from http://inkscape.org . (Download the .mis package for the best results.) Run the installer and accept the defaults.
When you first start Inkscape, zoom the drawing page until the paper fits the window. It sounds simple; just click the Zoom button, as shown in Figure 9-1, until you get the right size. Inkscape has a hair-trigger zoom. It can go from 50 percent to 1,000 percent in less than a second. Every time we’ve used it, we’ve had to go back and forth a couple of times to get it right.
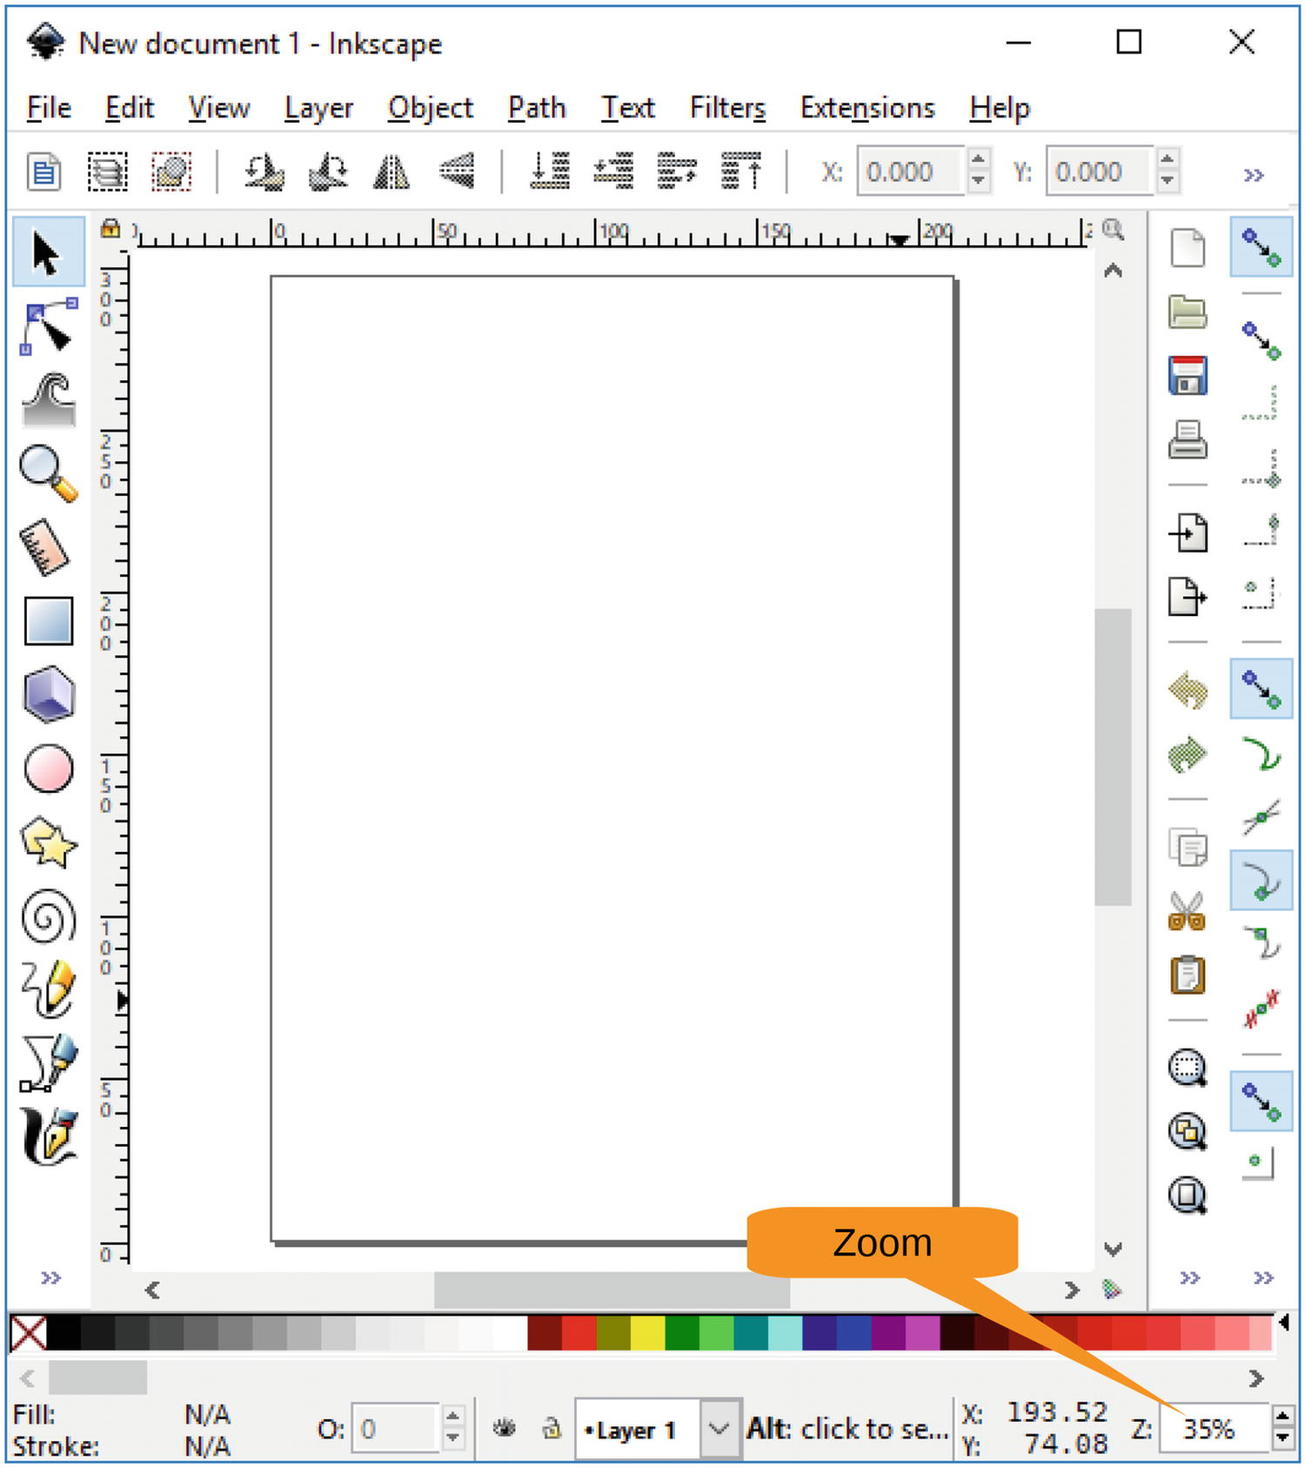
Figure 9-1 Zooming in on the page
Drawing a Rose
In this chapter, we will show how to draw a rose . The goal is to introduce you to the basic controls used in Inkscape. This includes drawing simple shapes, using various types of fills and brushes, and using other editing tools.
Drawing the First Shapes
The top of the rose is a circle. Click Circle/Ellipse tool to select that shape. By default Inkscape will let you draw an ellipse of whatever height or width you want. If you want a circle, you need to constrain the drawing so that the width and the height are equal. This is done by holding down the Ctrl key while drawing.
To draw, click the corner of the circle and then drag the cursor to the other corner, as shown in Figure 9-2.
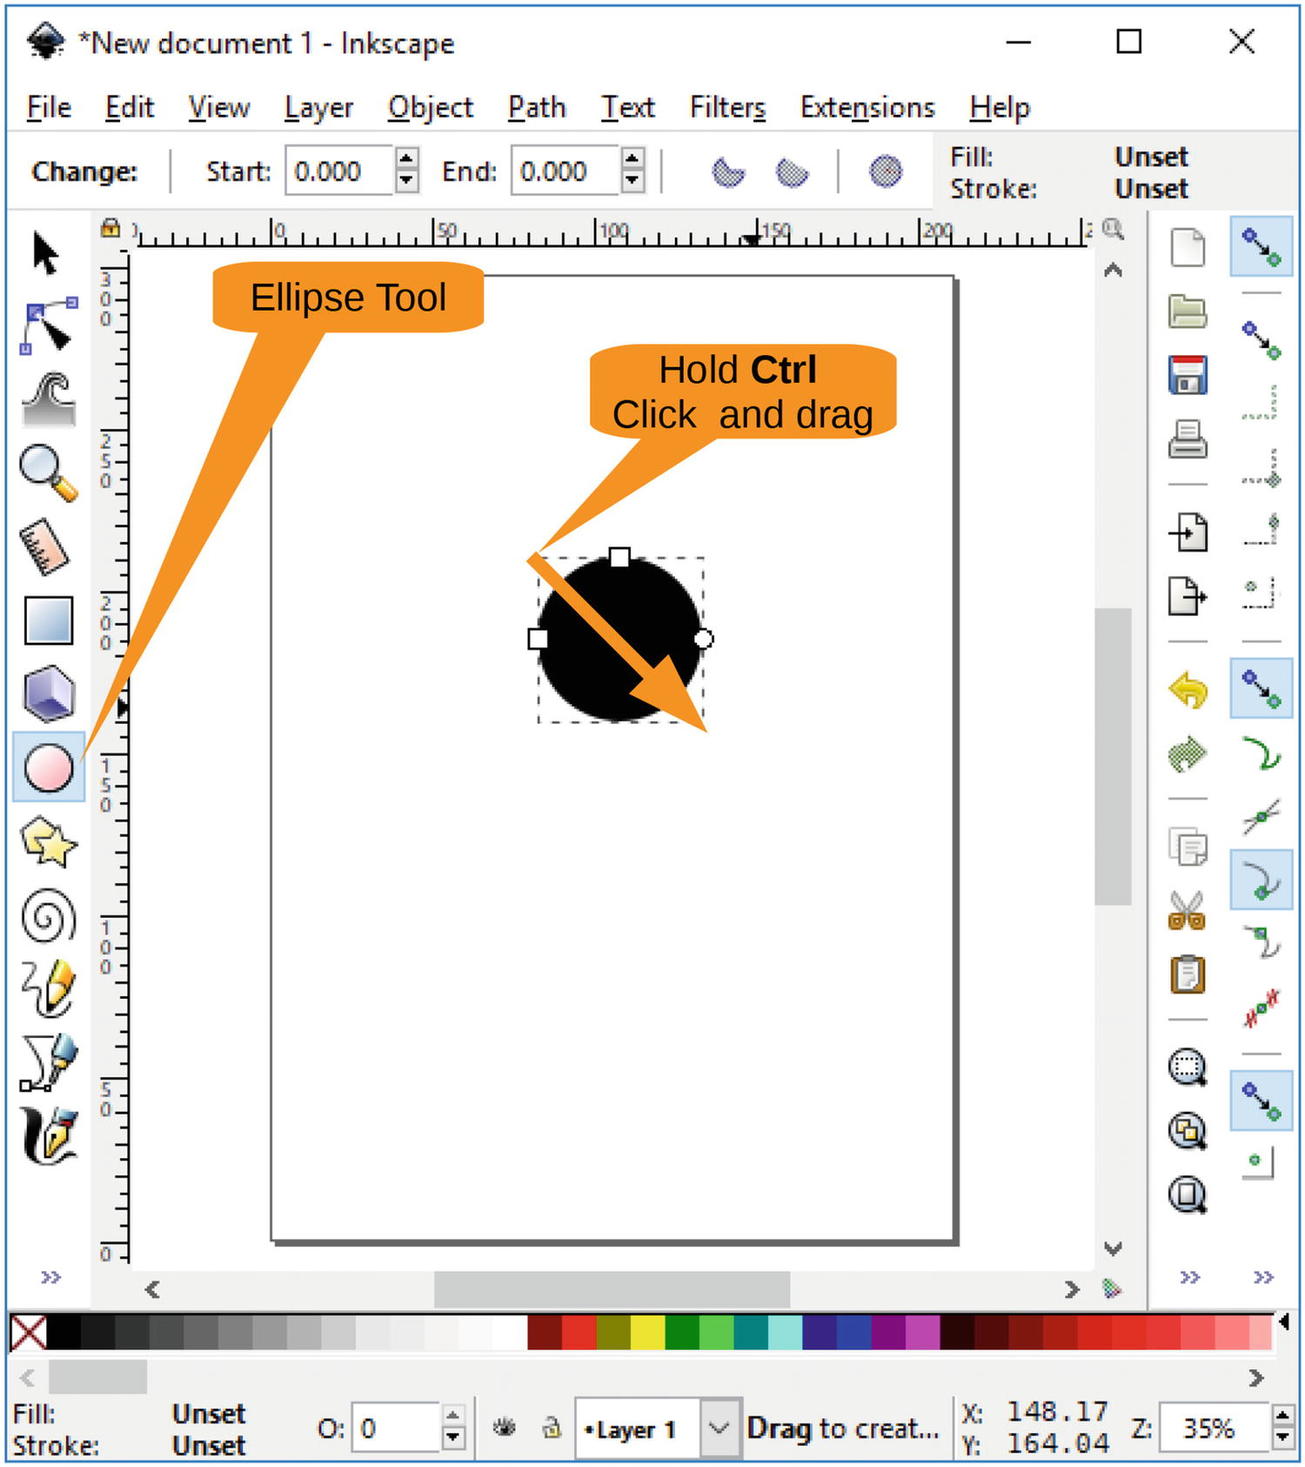
Figure 9-2 Drawing the circle
The circle is black, but a rose is red. You need to fix this problem. You can change the properties of this circle by selecting Object ➤ Fill and Stroke, as shown in Figure 9-3.
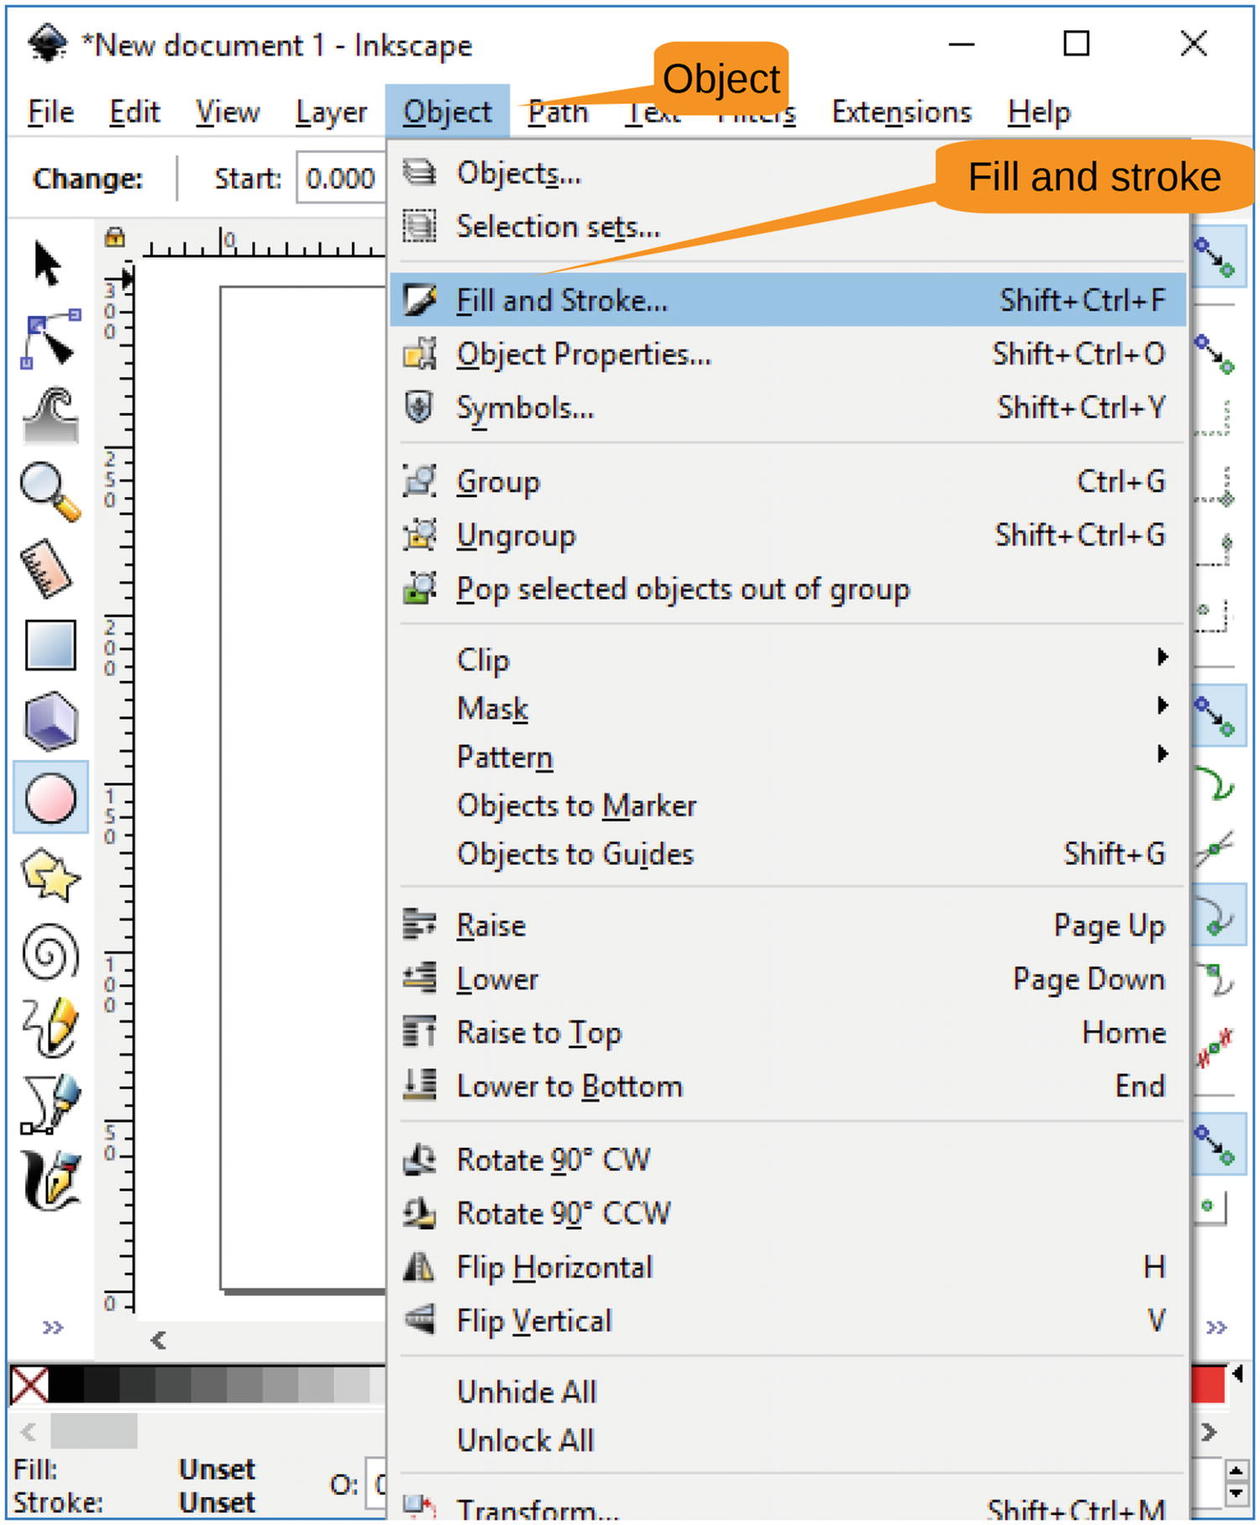
Figure 9-3 Opening the Fill and Stroke panel
The Fill and Stroke panel will appear to the right, as shown in Figure 9-4. You want this to be a circle with nothing inside, so click the No Paint icon in the dialog to turn off the fill .
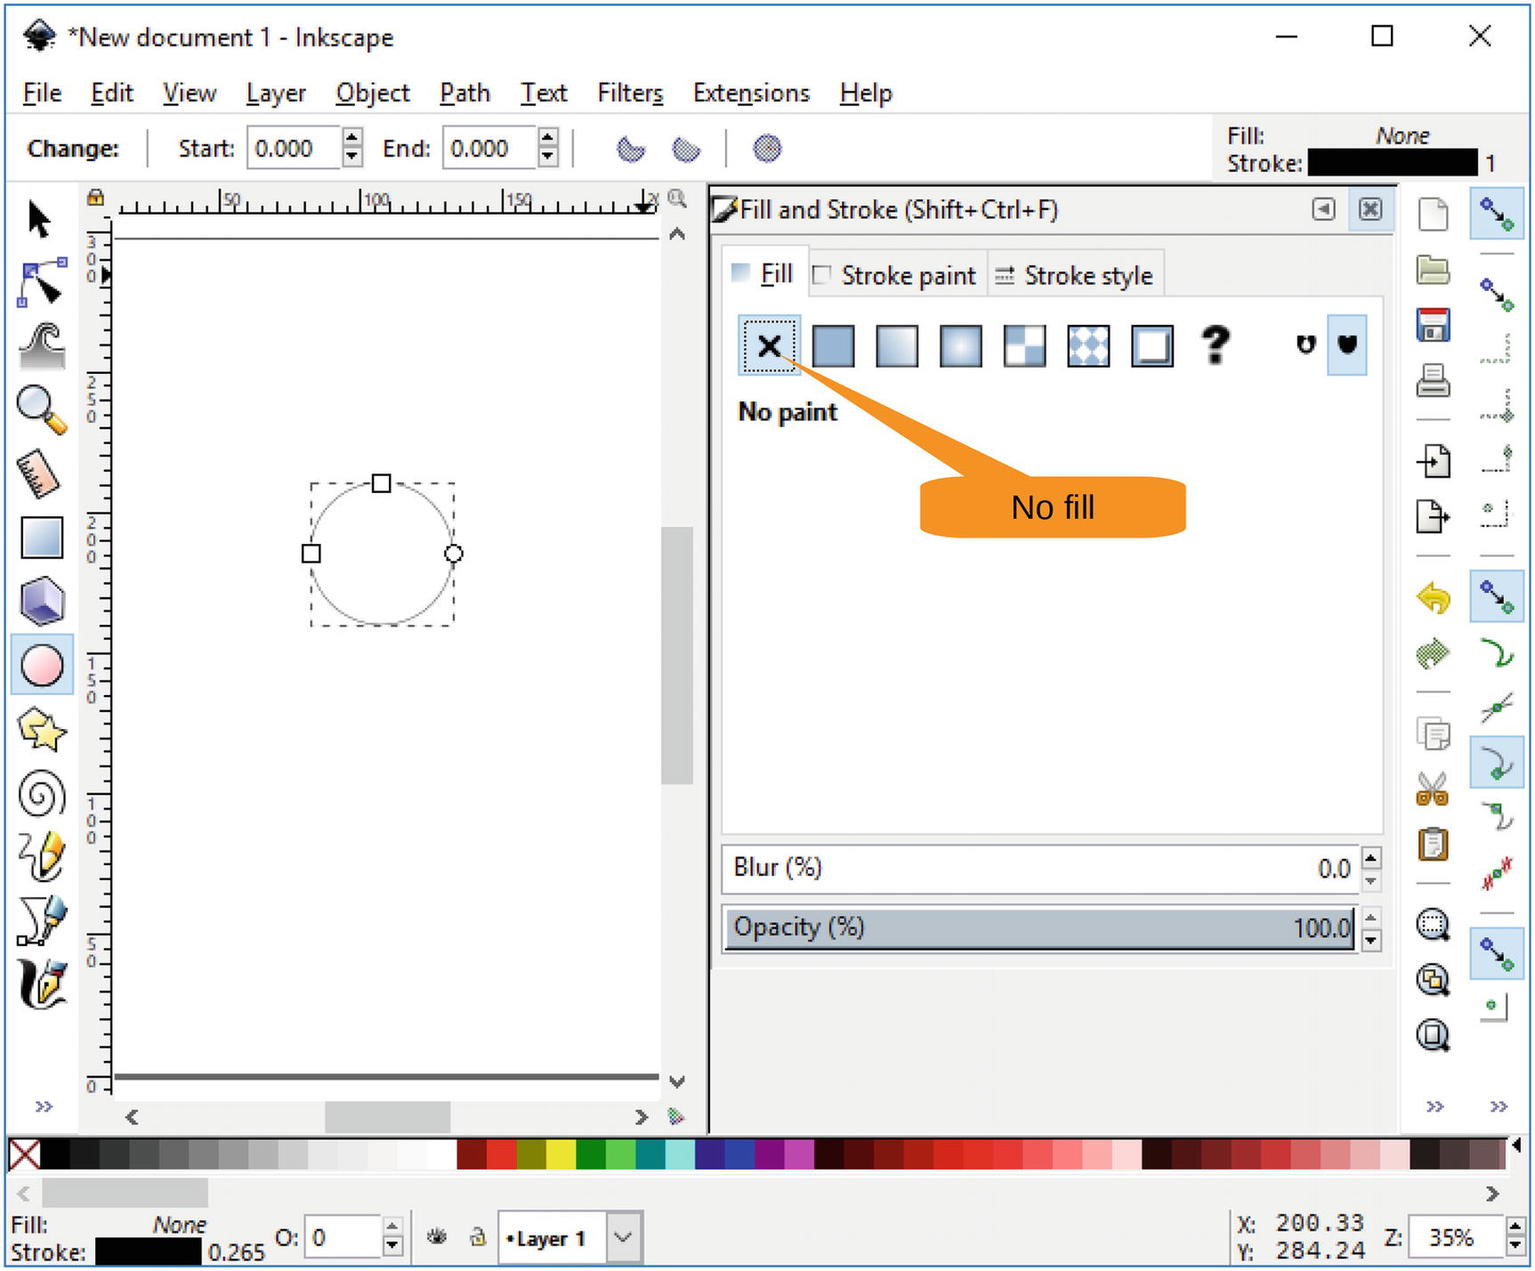
Figure 9-4 Turning off the fill
Now let’s change the color of the line (stroke) by clicking the Stroke Path tab and changing the color to black. Figure 9-5 shows the result.
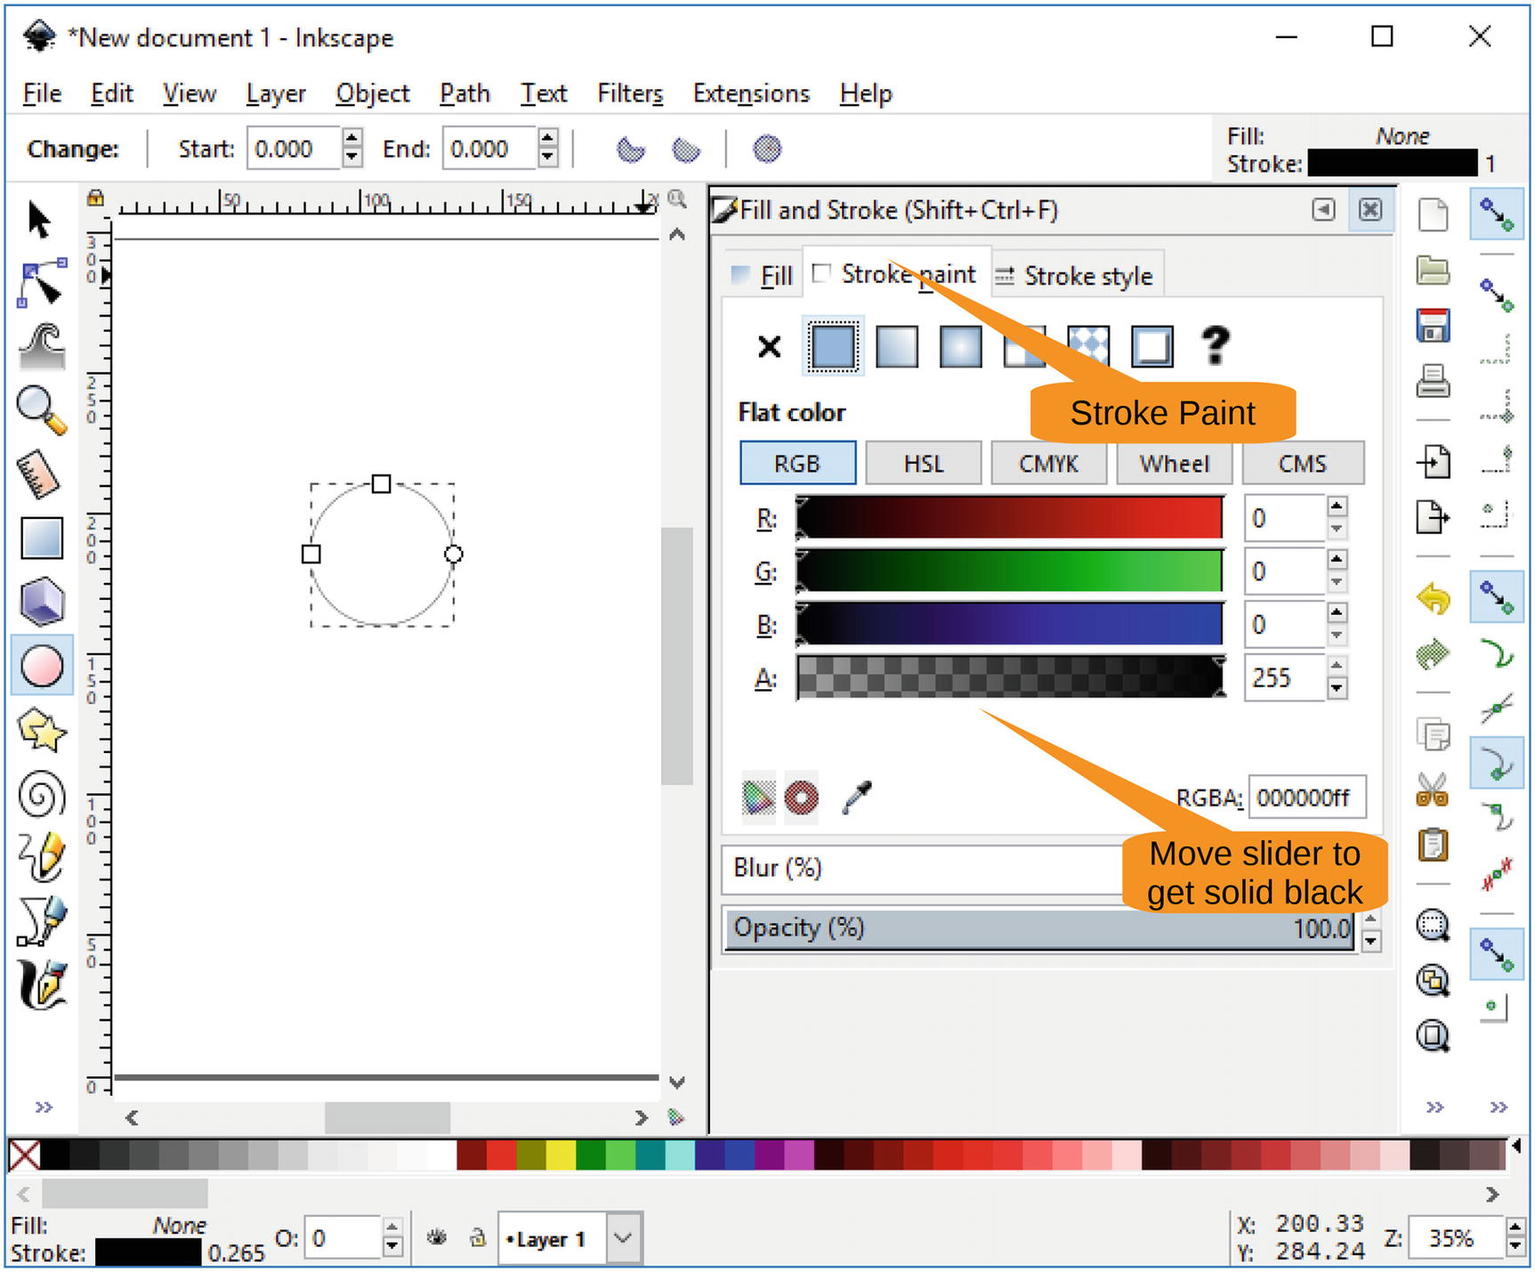
Figure 9-5 Setting the stroke to a solid black
From the top, the inside of the rose looks like a spiral. To draw this, you need to click the Spiral tool and drag it to the middle of the circle, as shown in Figure 9-6. The handles (boxes) on the end of the line allow you to extend or trim the spiral as needed. We think it looks better a little trimmed.
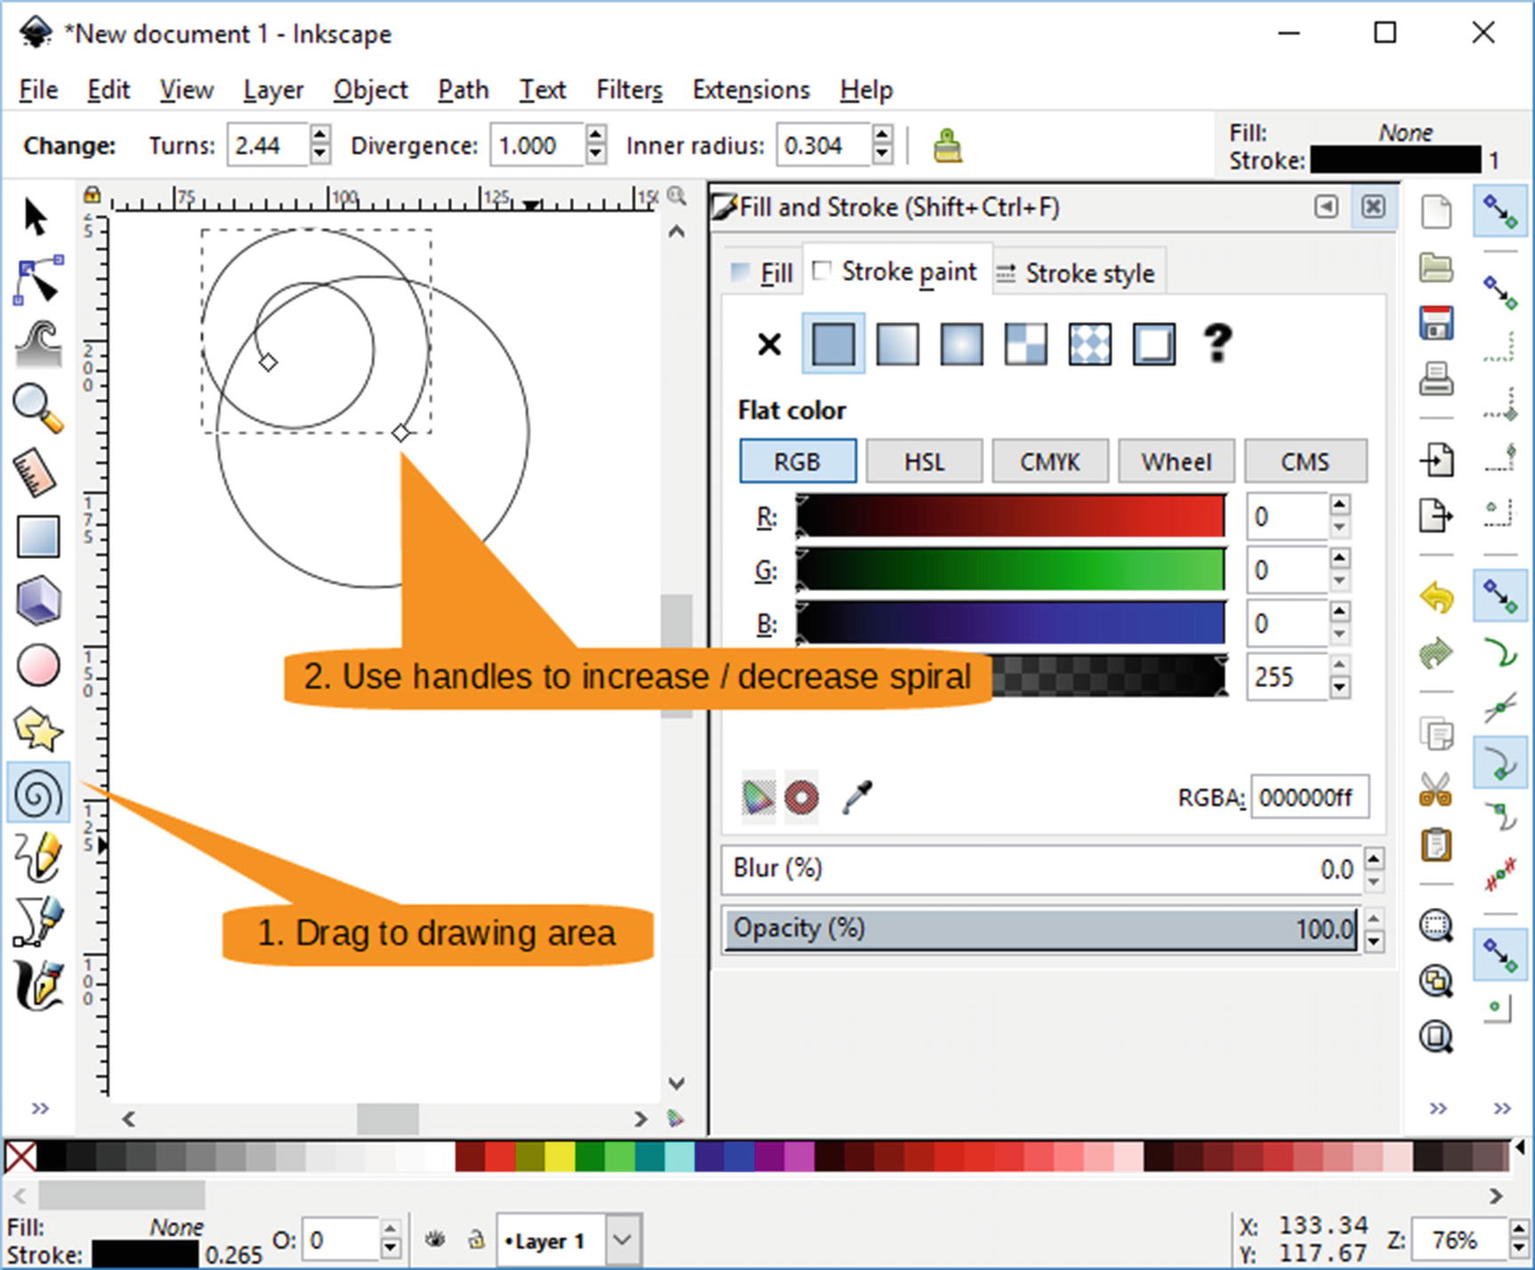
Figure 9-6 Creating the spiral
Once you get the spiral to be the right shape, you need to get it to be the right size. Click the Select Tool to enter select mode and then click the object to bring up the resize handles, as shown in Figure 9-7. You can move these handles to resize the object.
Also, you can move the object by moving the cursor to one edge. When it turns into a hand, you can drag the object where you want it. In this case, drag it to the middle of the circle.
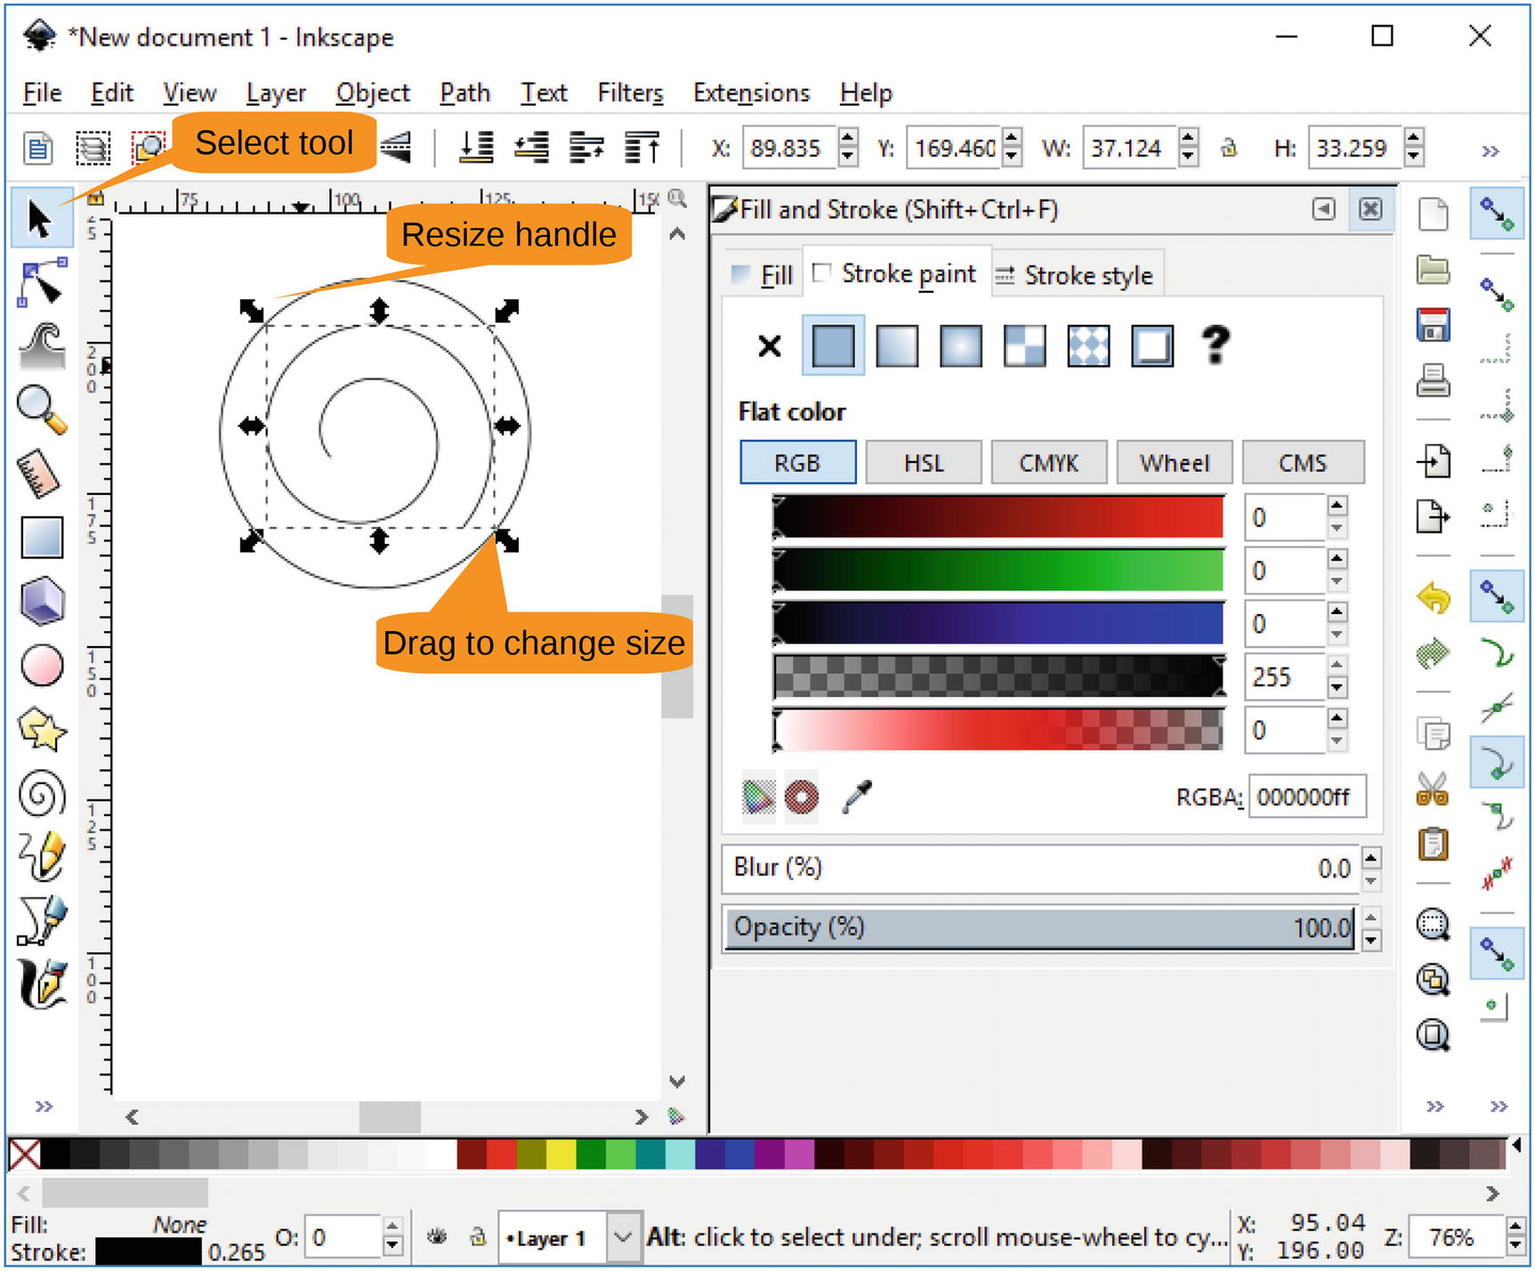
Figure 9-7 Getting the size and placement right for the spiral
Tweaking the Shape
Now things are going to get a little tricky. As it stands now, the spiral is a simple line. You are going to make it sexy.
To do this, you will create a thin ellipse and map it to the spiral.
The first step is to create a thin ellipse , as shown in Figure 9-8. To do this, click the Circle/Ellipse Tool and drag the mouse to create the shape.
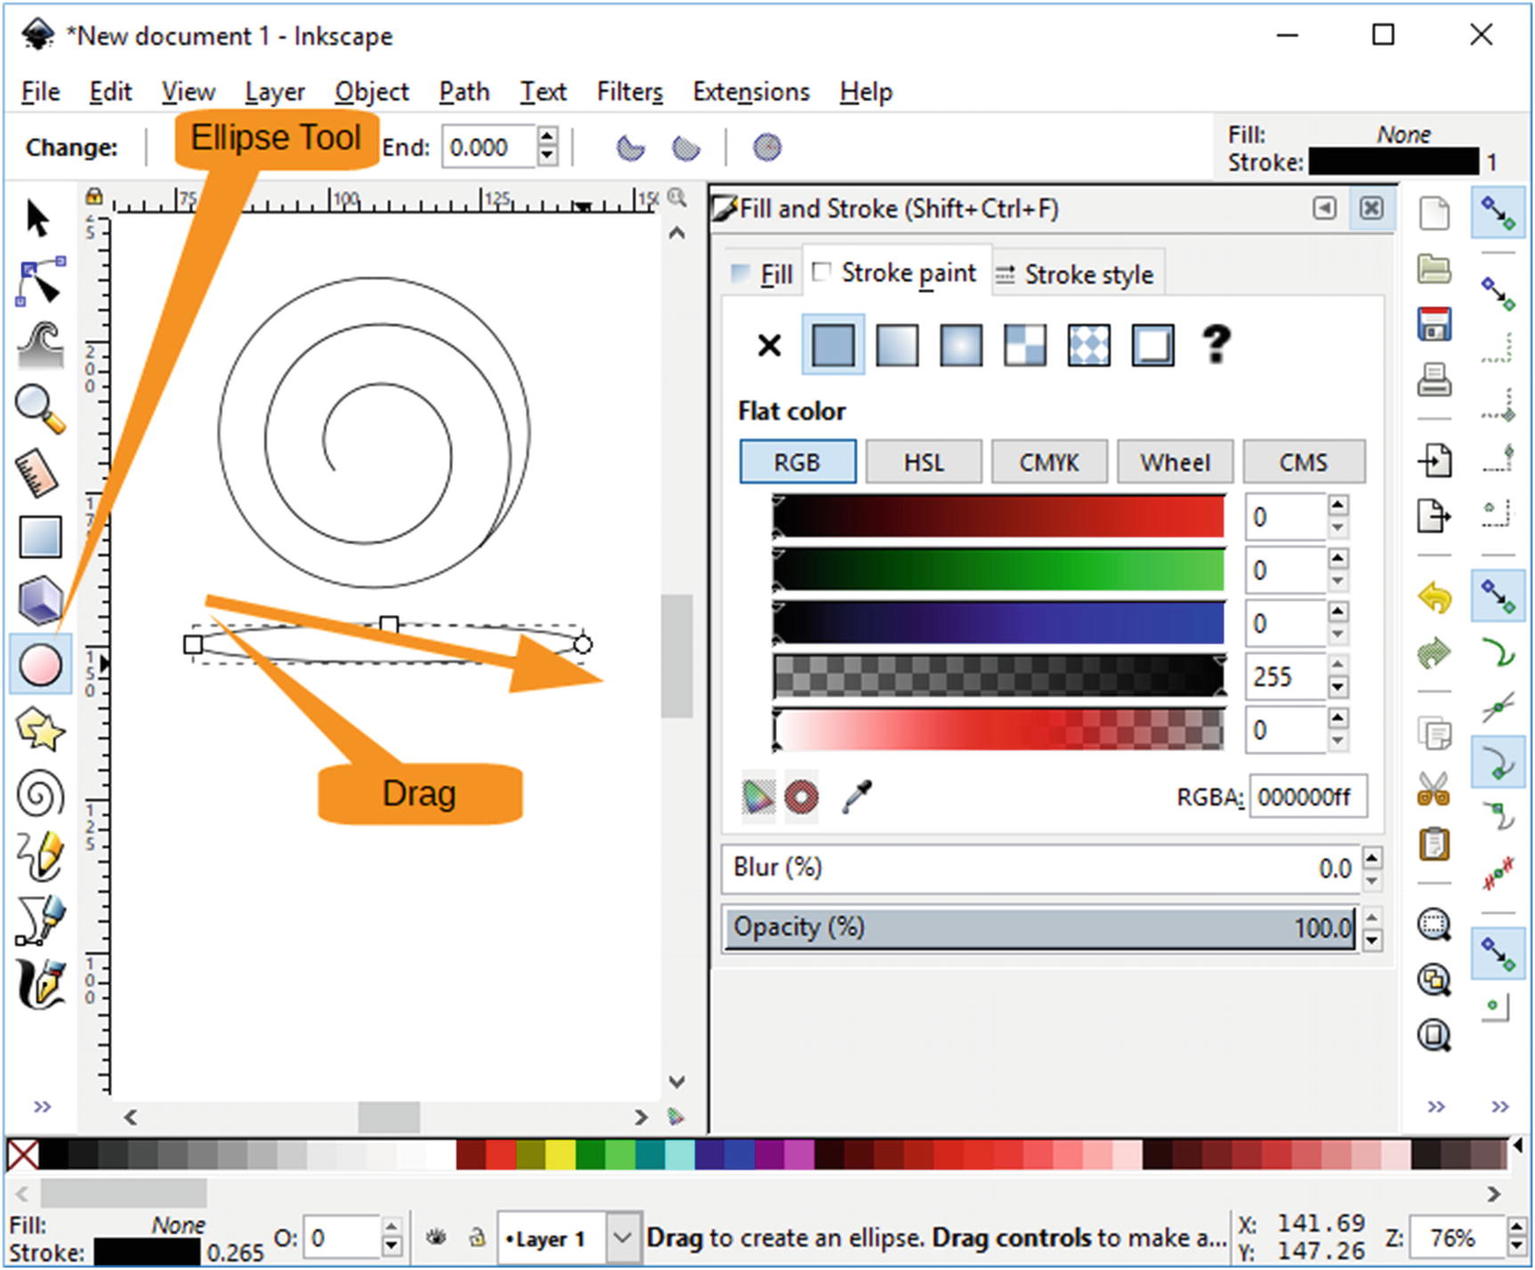
Figure 9-8 Skinny ellipse
Now you run into a little problem with Inkscape. There are things called paths and things called objects. You’ve got a bunch of objects, and the operations you are about to do work only on paths. So, you need to convert your objects to paths.
First select everything with Edit ➤ Select All, as illustrated in Figure 9-9.
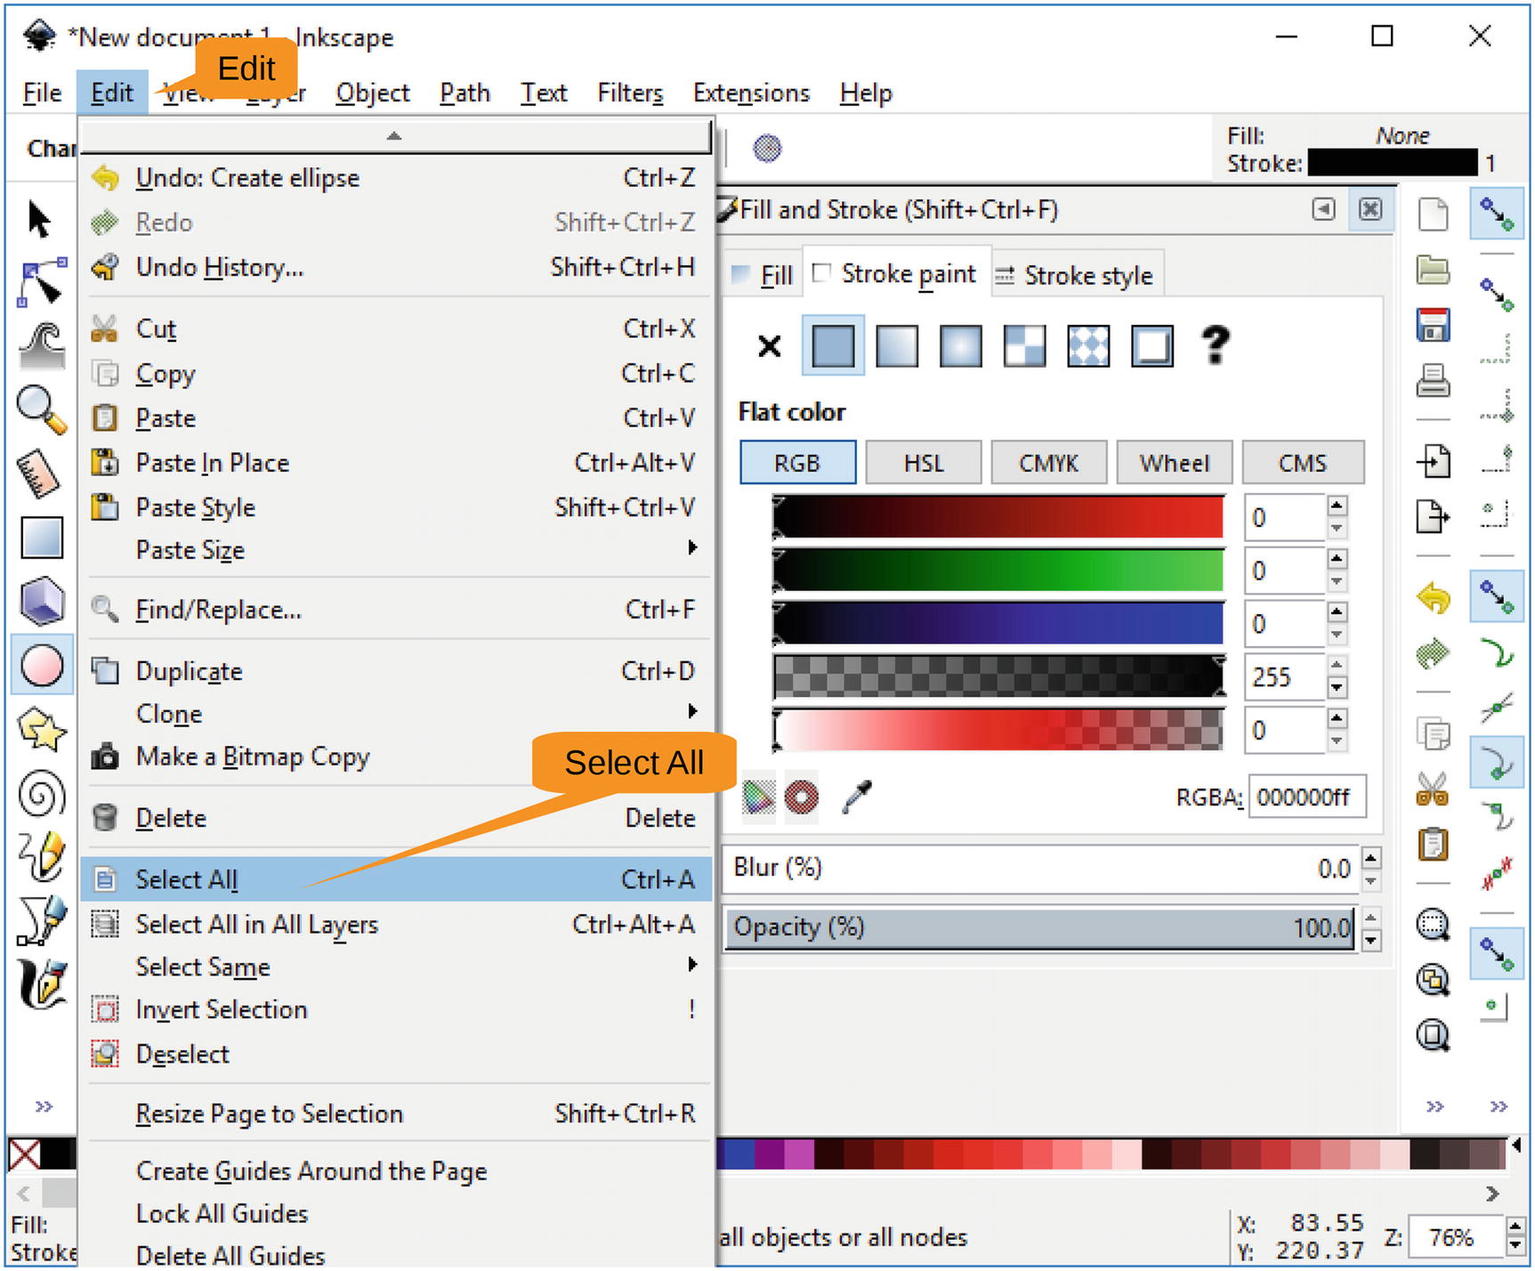
Figure 9-9 The Select All menu item
Now convert all the objects to paths with the command Path ➤ Object to Path, as shown in Figure 9-10.
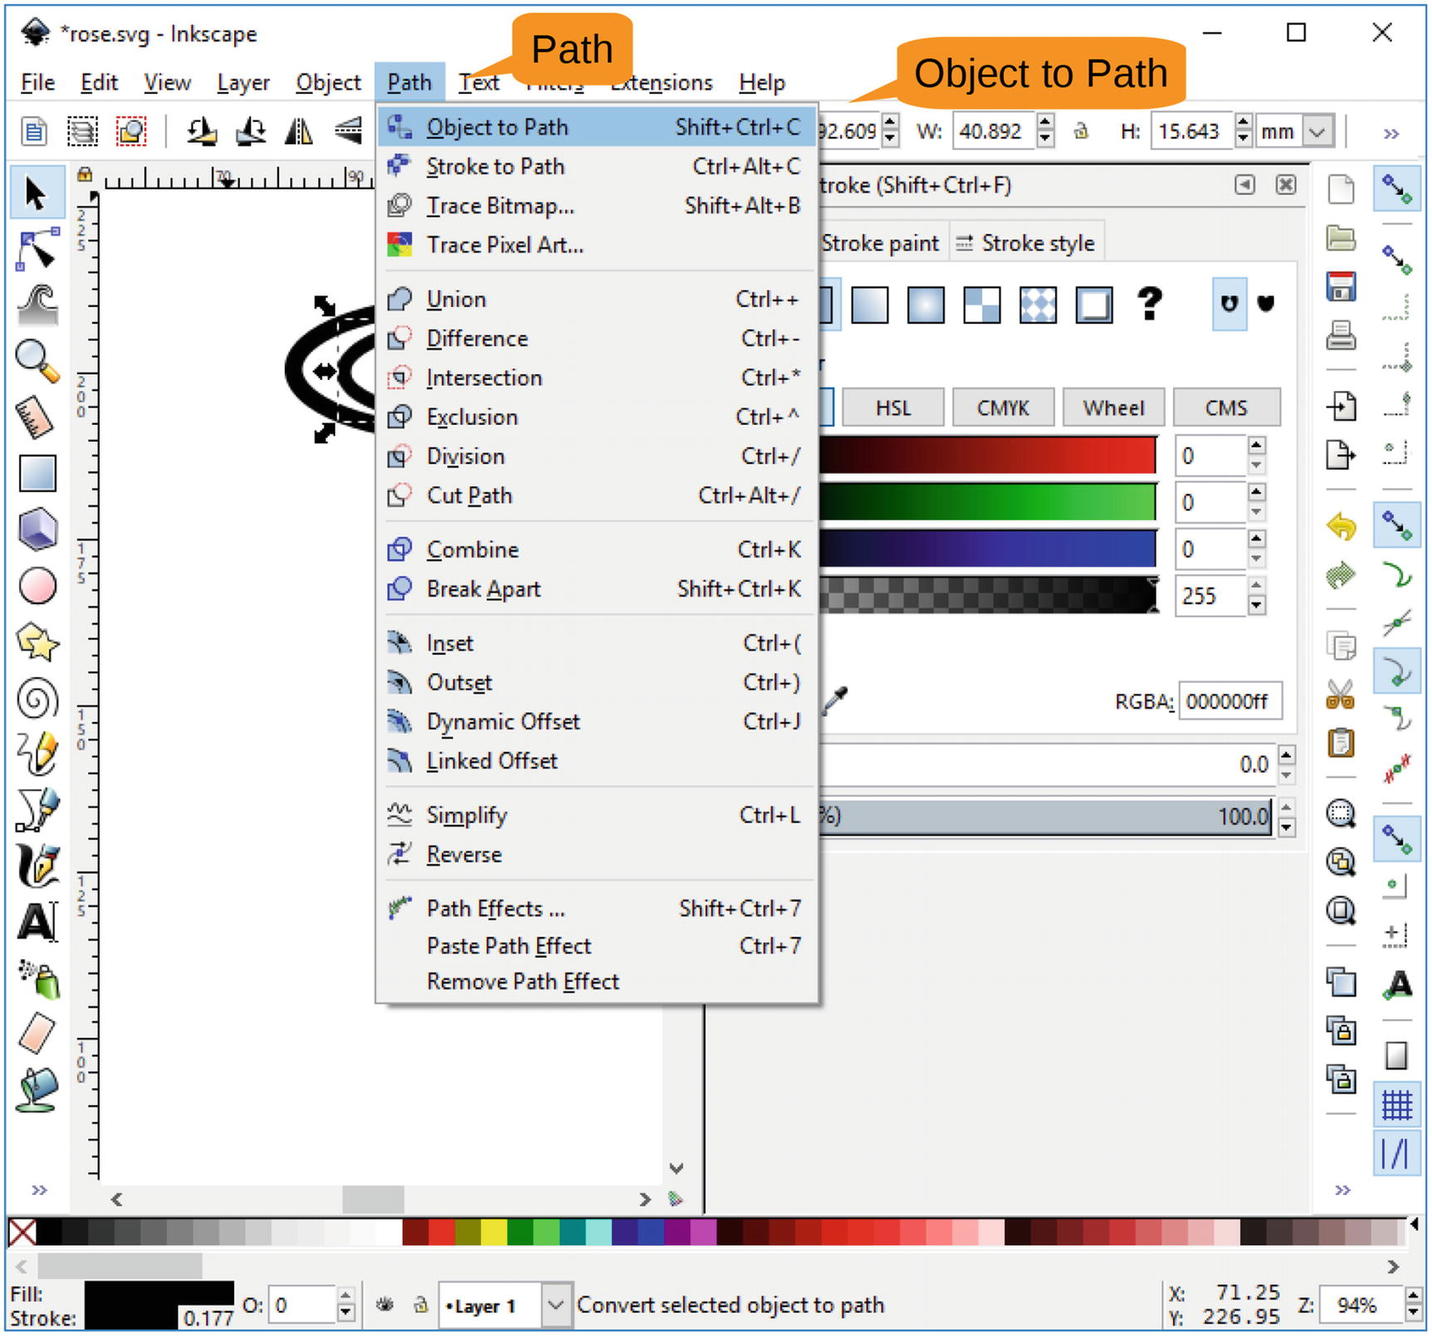
Figure 9-10 Object to Path menu item
With that bit of bookkeeping out of the way, you can now take the small ellipse and use it to shape your spiral. First you need to deselect everything, select the Select tool, and then click outside all of the objects. Next, click the skinny ellipse. Copy it to the clipboard with Edit ➤ Copy. Figure 9-11 shows this process.
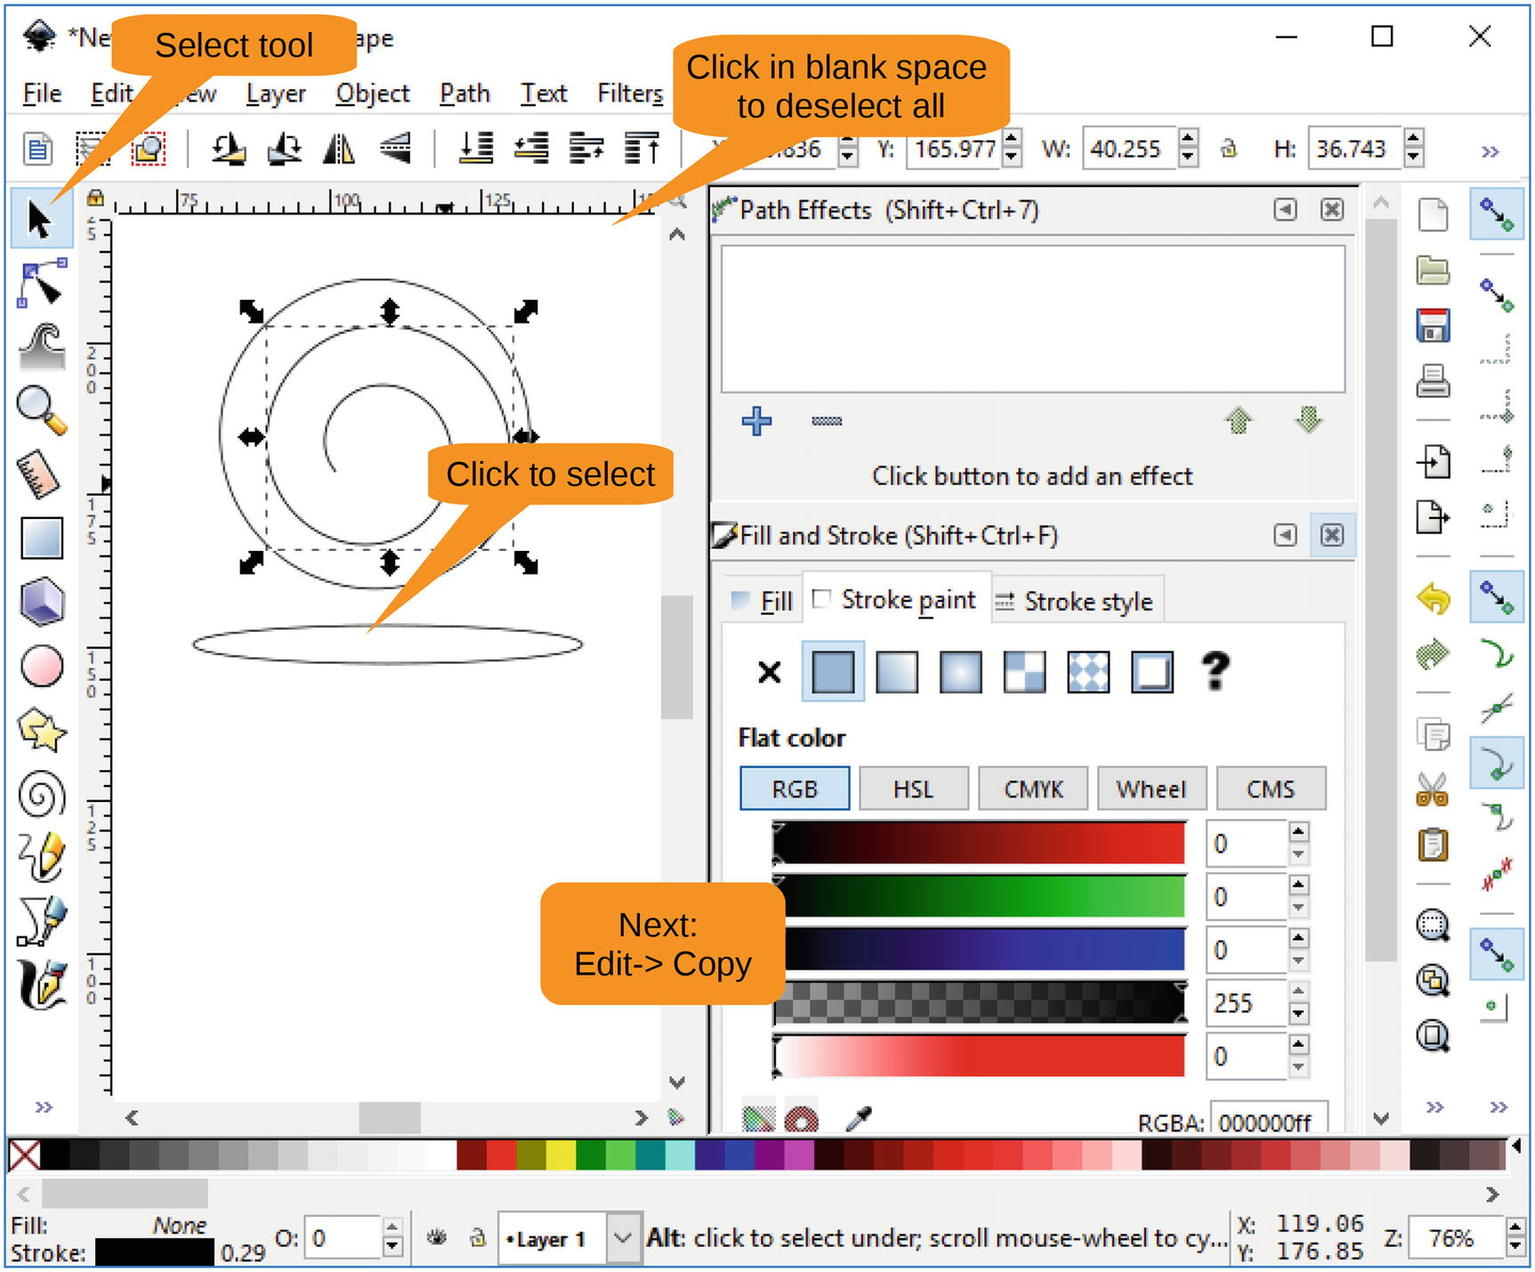
Figure 9-11 Copying the skinny ellipse
Click the spiral to select it, as illustrated in Figure 9-12.
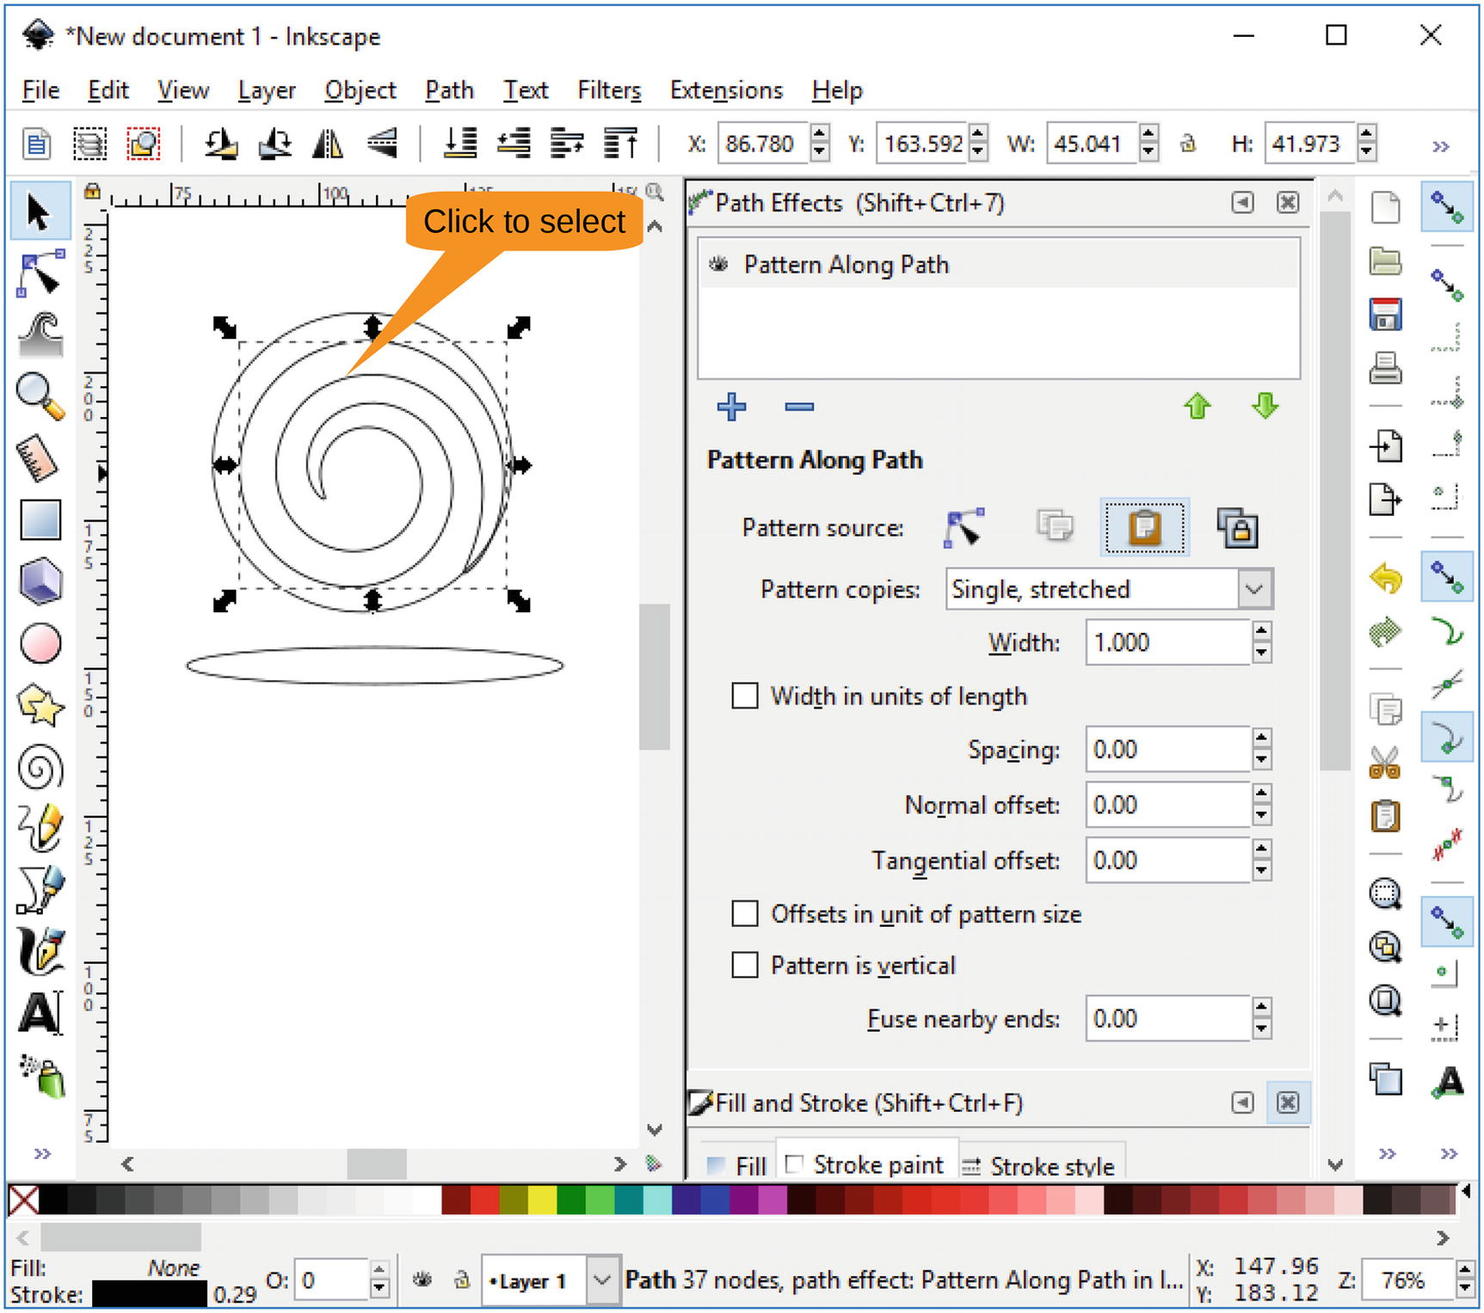
Figure 9-12 Selecting the spiral
Now you are going to apply the skinny ellipse shape to the spiral path . You start with Path ➤ Path Effects, as shown in Figure 9-13.
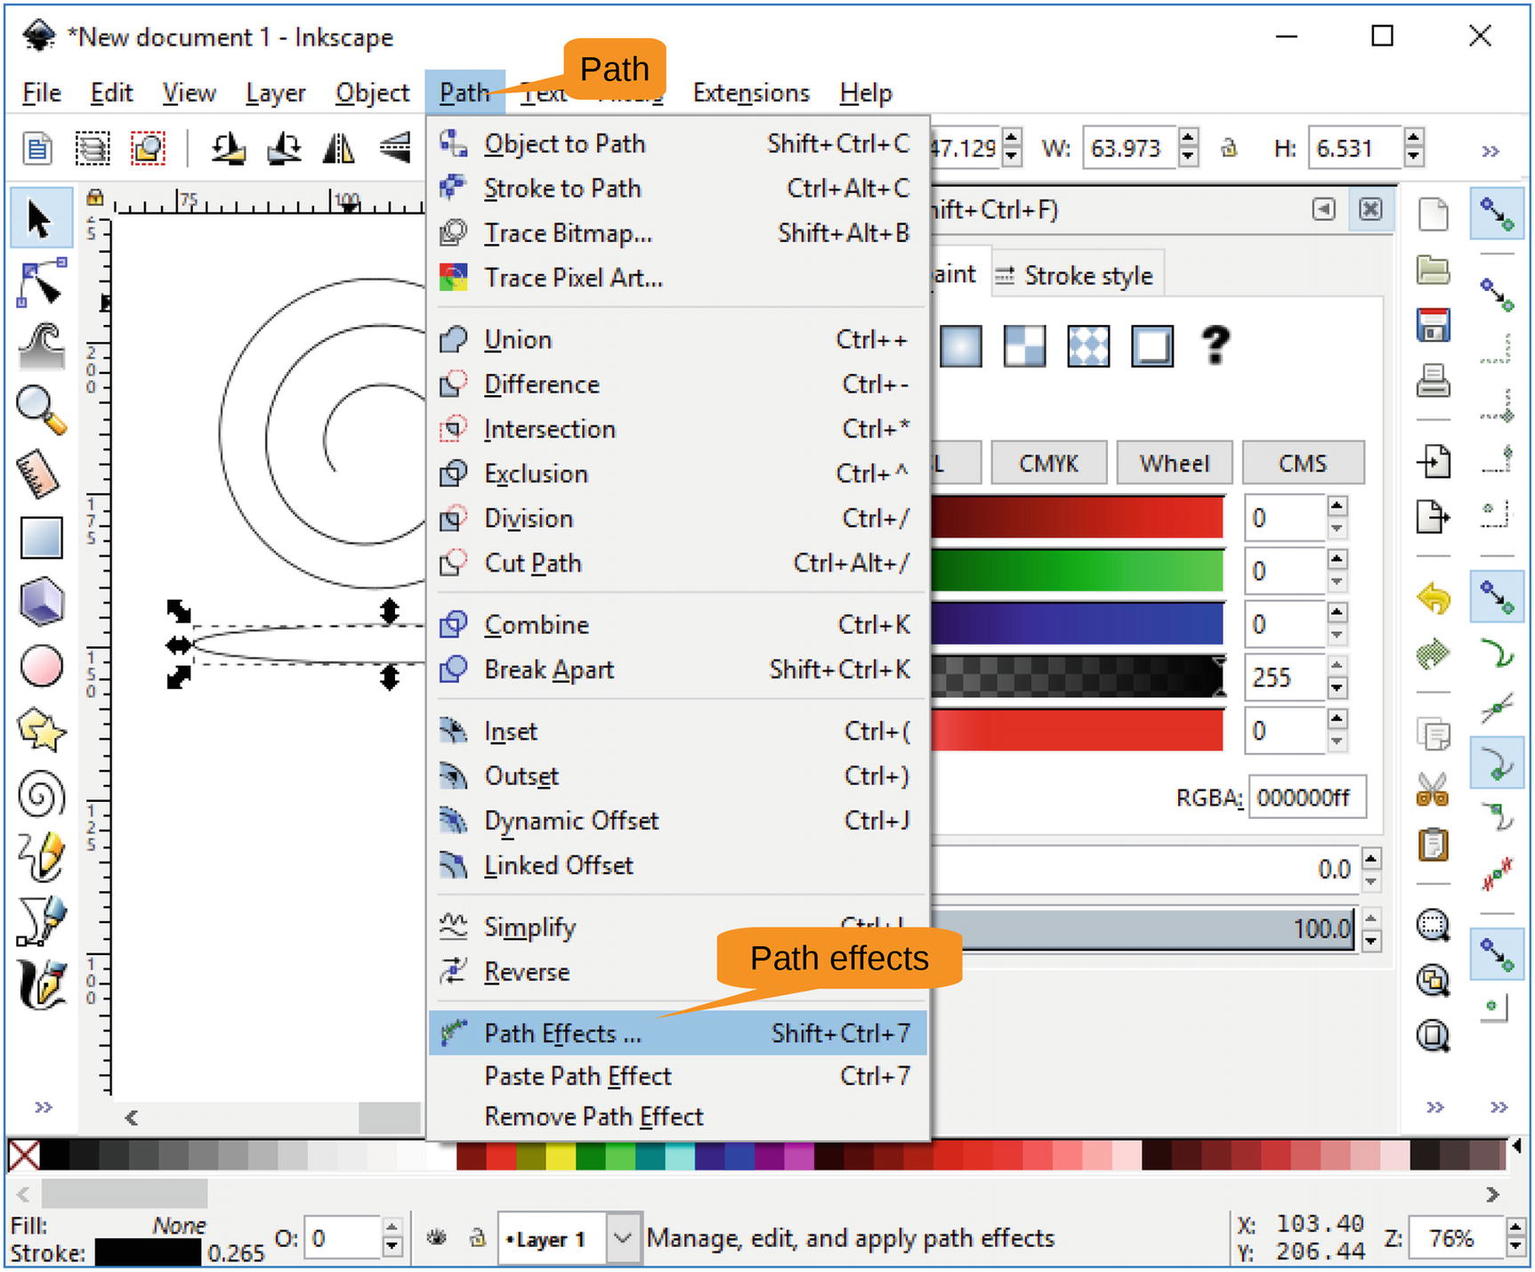
Figure 9-13 Path Effects menu item
Currently you don’t have any path effects defined, so the list in the panel at the top right is empty. Let’s add one by clicking the plus (+) sign located in this panel, which Figure 9-14 locates for you.
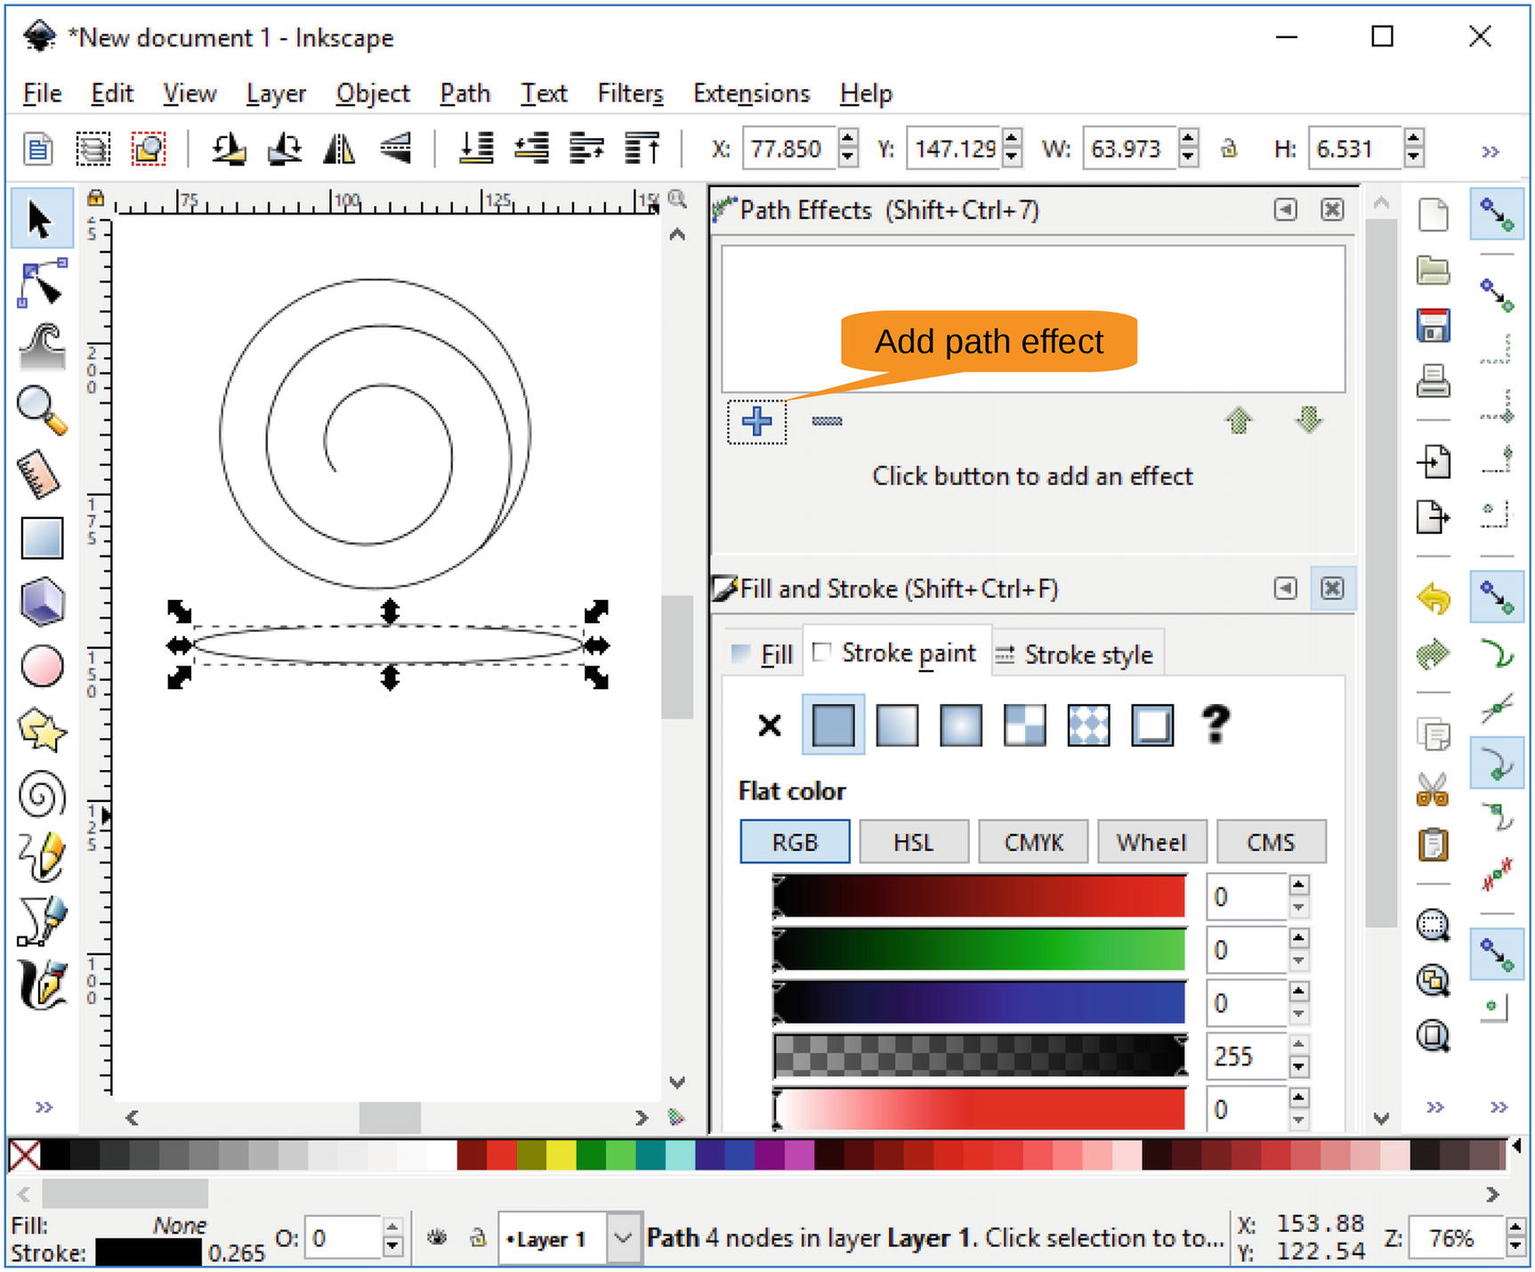
Figure 9-14 Adding a path effect
A pop-up appears, as shown in Figure 9-15. Select Pattern Along Path and click Add.
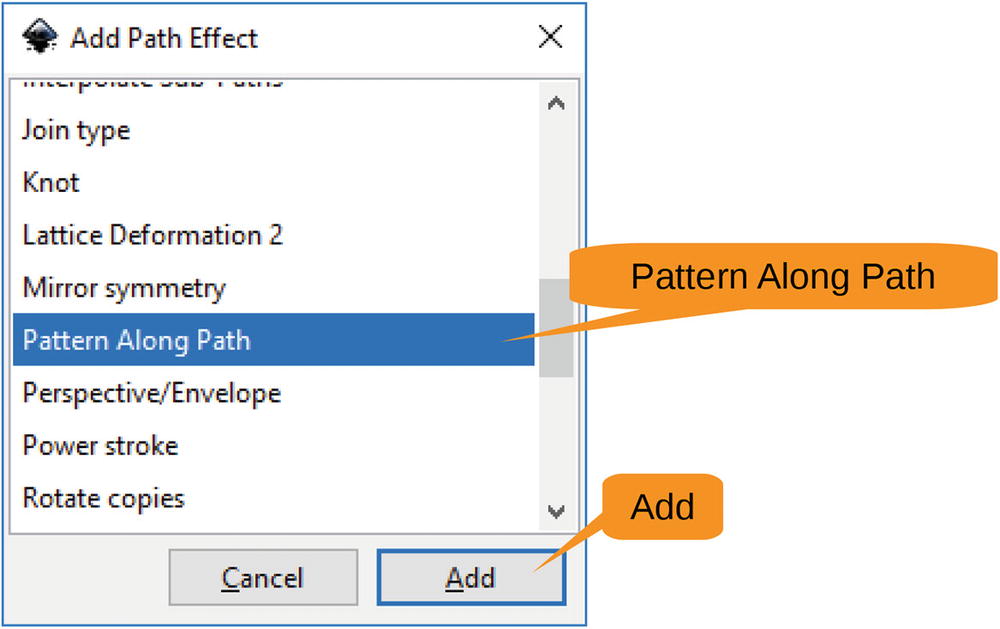
Figure 9-15 Path effect selection
Figure 9-16 shows how to select Paste Path.
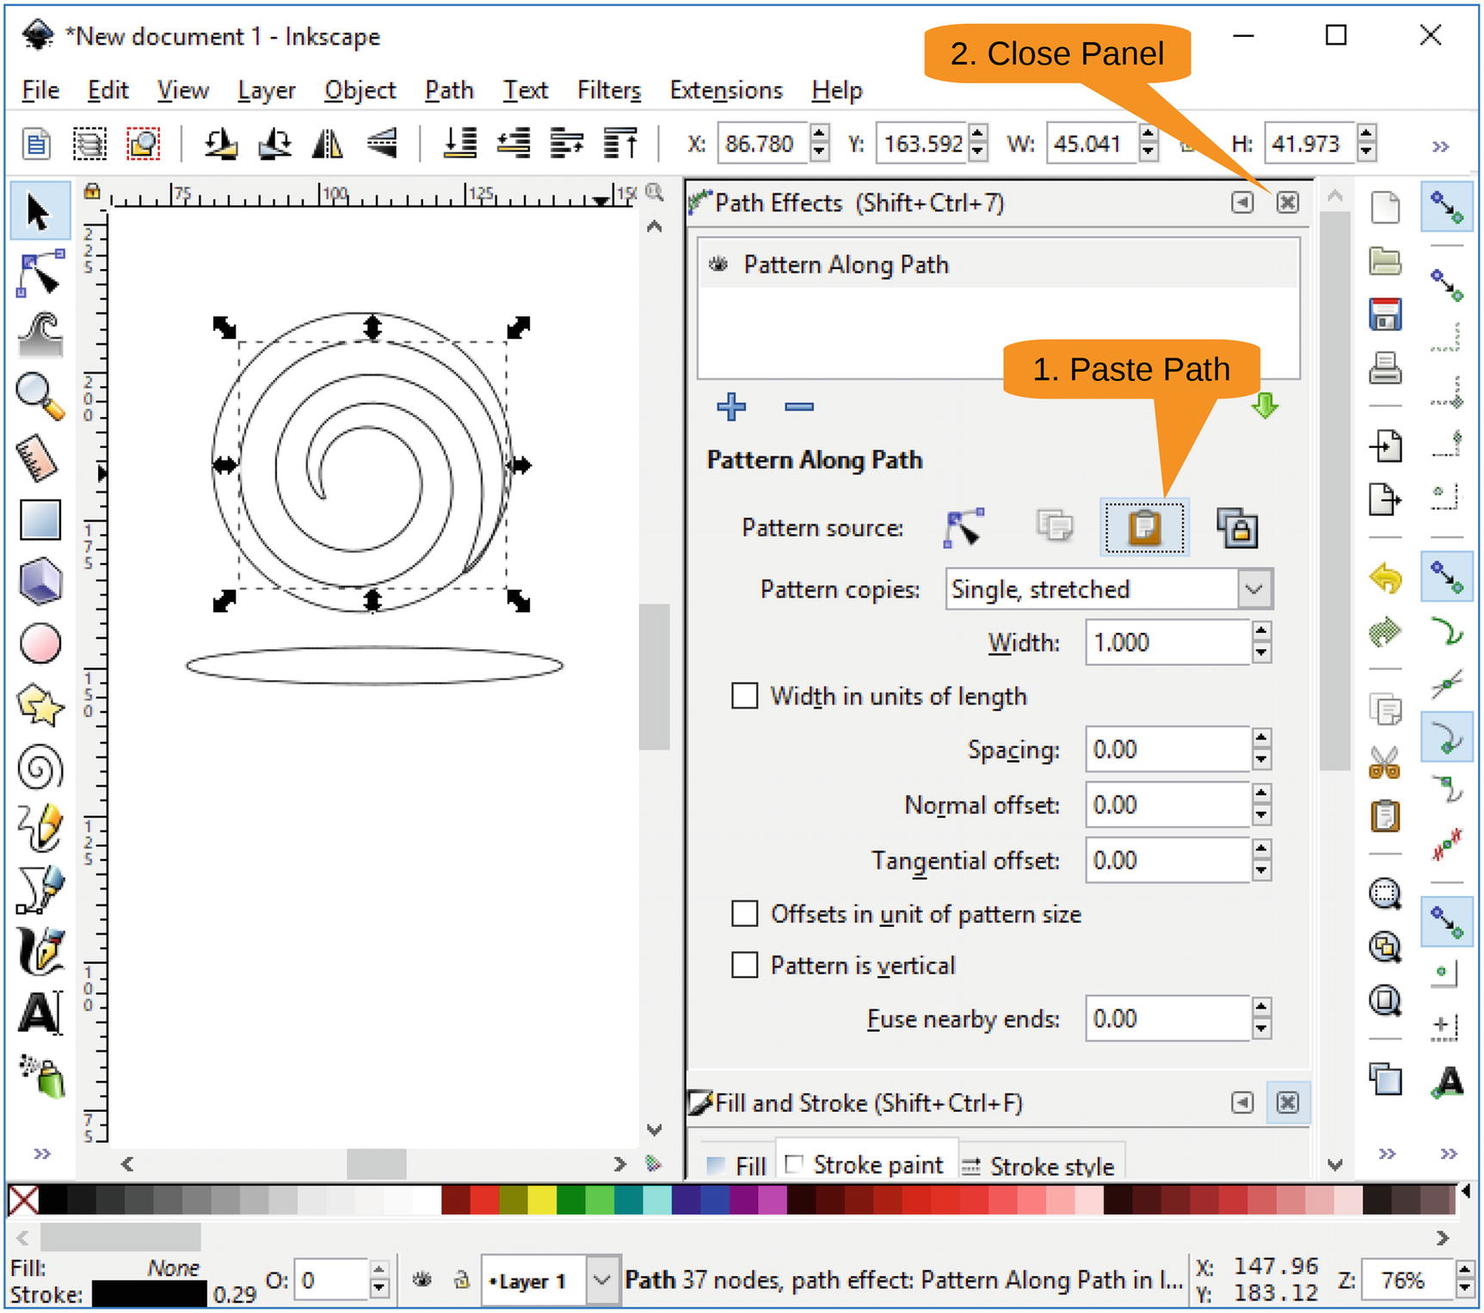
Figure 9-16 Selecting Paste Path
Cleaning It Up
Now you have nice path for the inside of your rose. Let’s get rid of some clutter. Click the Close icon in the Path Effects panel and then the Close icon in the Fill and Stroke panel.
Delete the ellipse and zoom in so you can better see the top of the rose. When done, your screen should look like Figure 9-17.
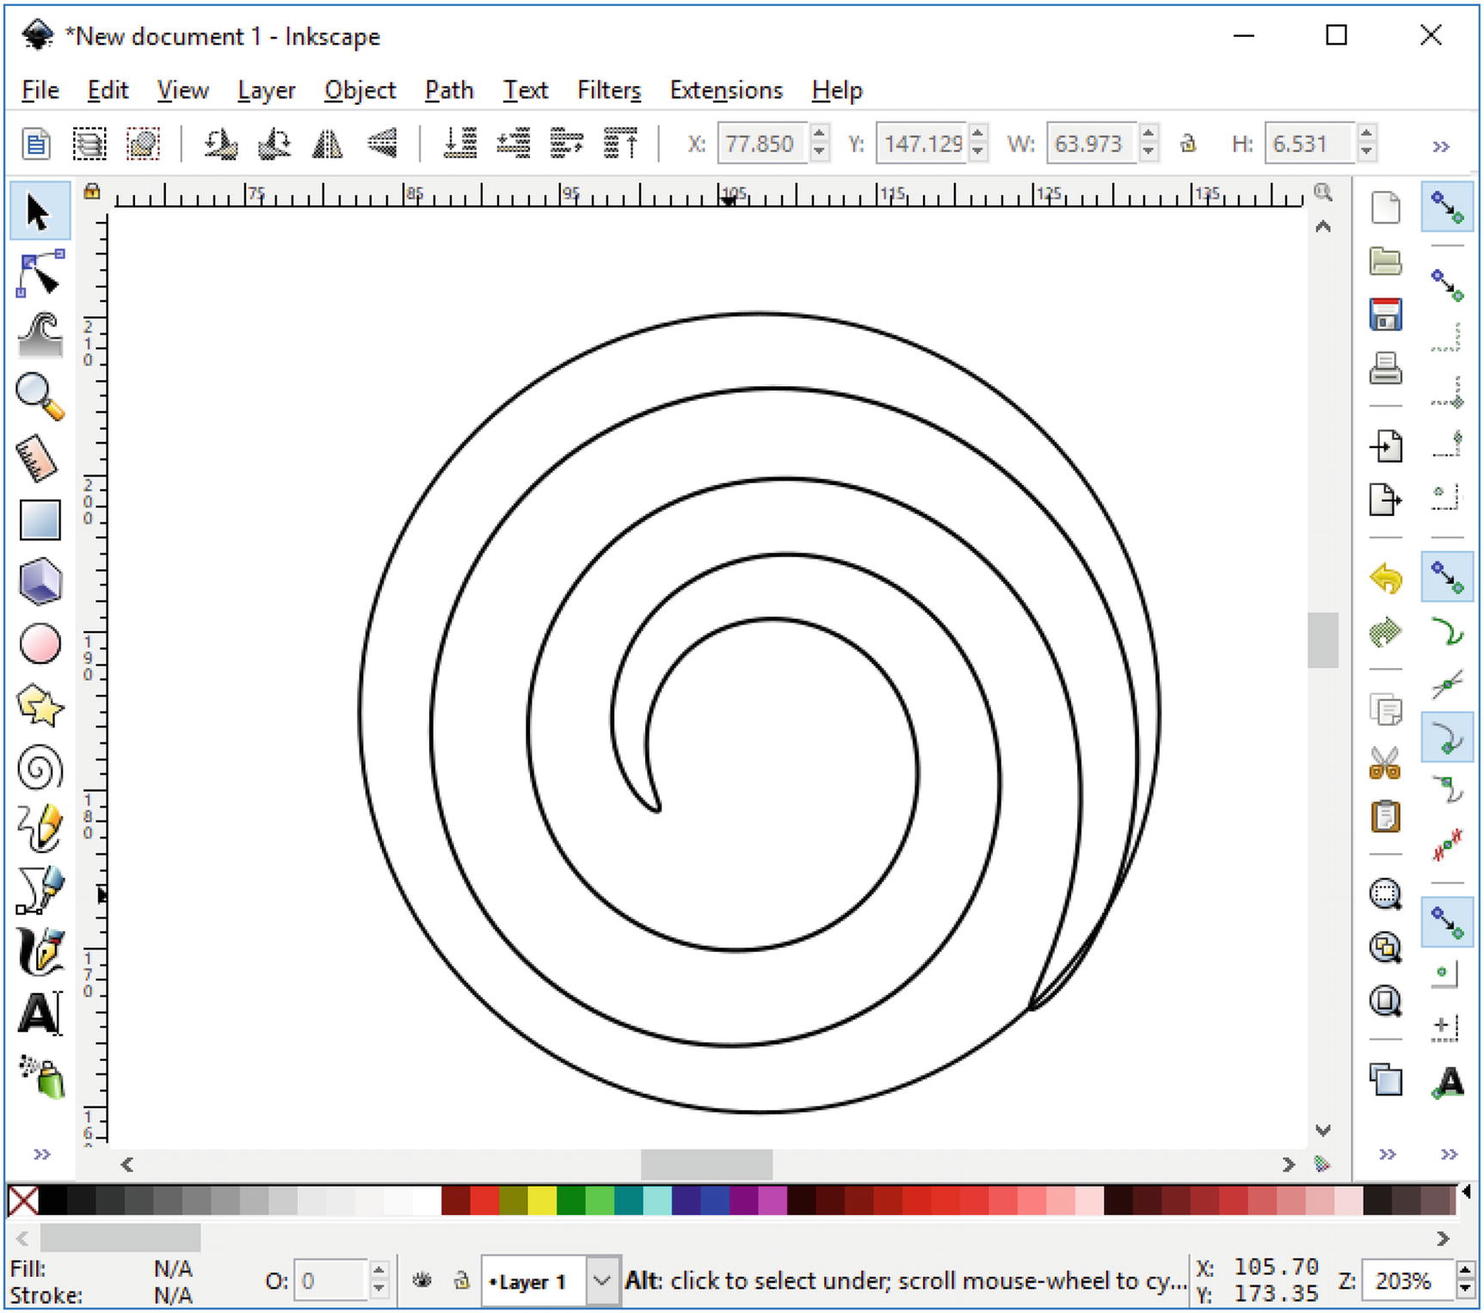
Figure 9-17 Cleaned-up rose top
The spiral is much too fat for this use. Let’s fix it. You can start by bringing up the Path Effect panel using the command Object ➤ Path Effects. The width (shown in Figure 9-18) needs to be smaller, so set it to 0.500 (or whatever looks good for your rose).
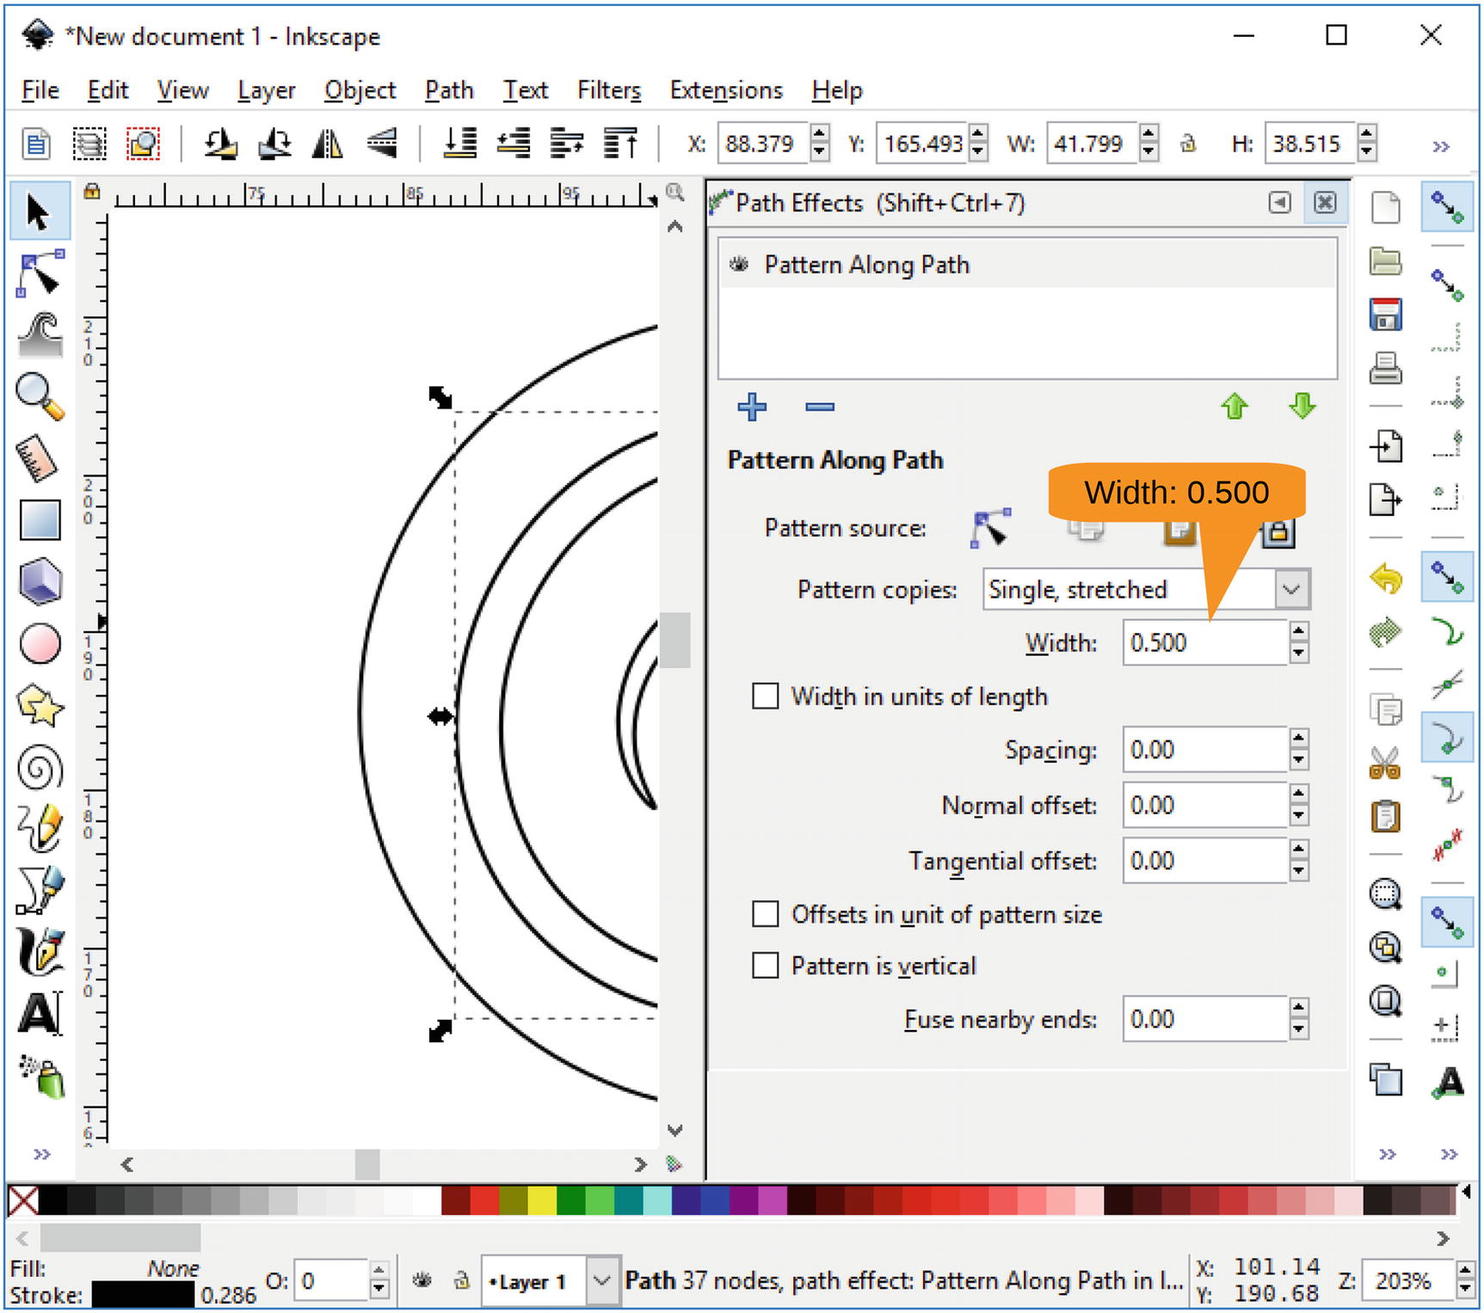
Figure 9-18 Setting the width of the pattern
Now close the panel . Make sure the spiral is still selected. You want the fill to be black , so bring up the Fill and Stroke panel with Object ➤ Fill and Stroke.
Select the Fill tab, set the fill type to a color, and then select black for the color. Figure 9-19 shows the result.
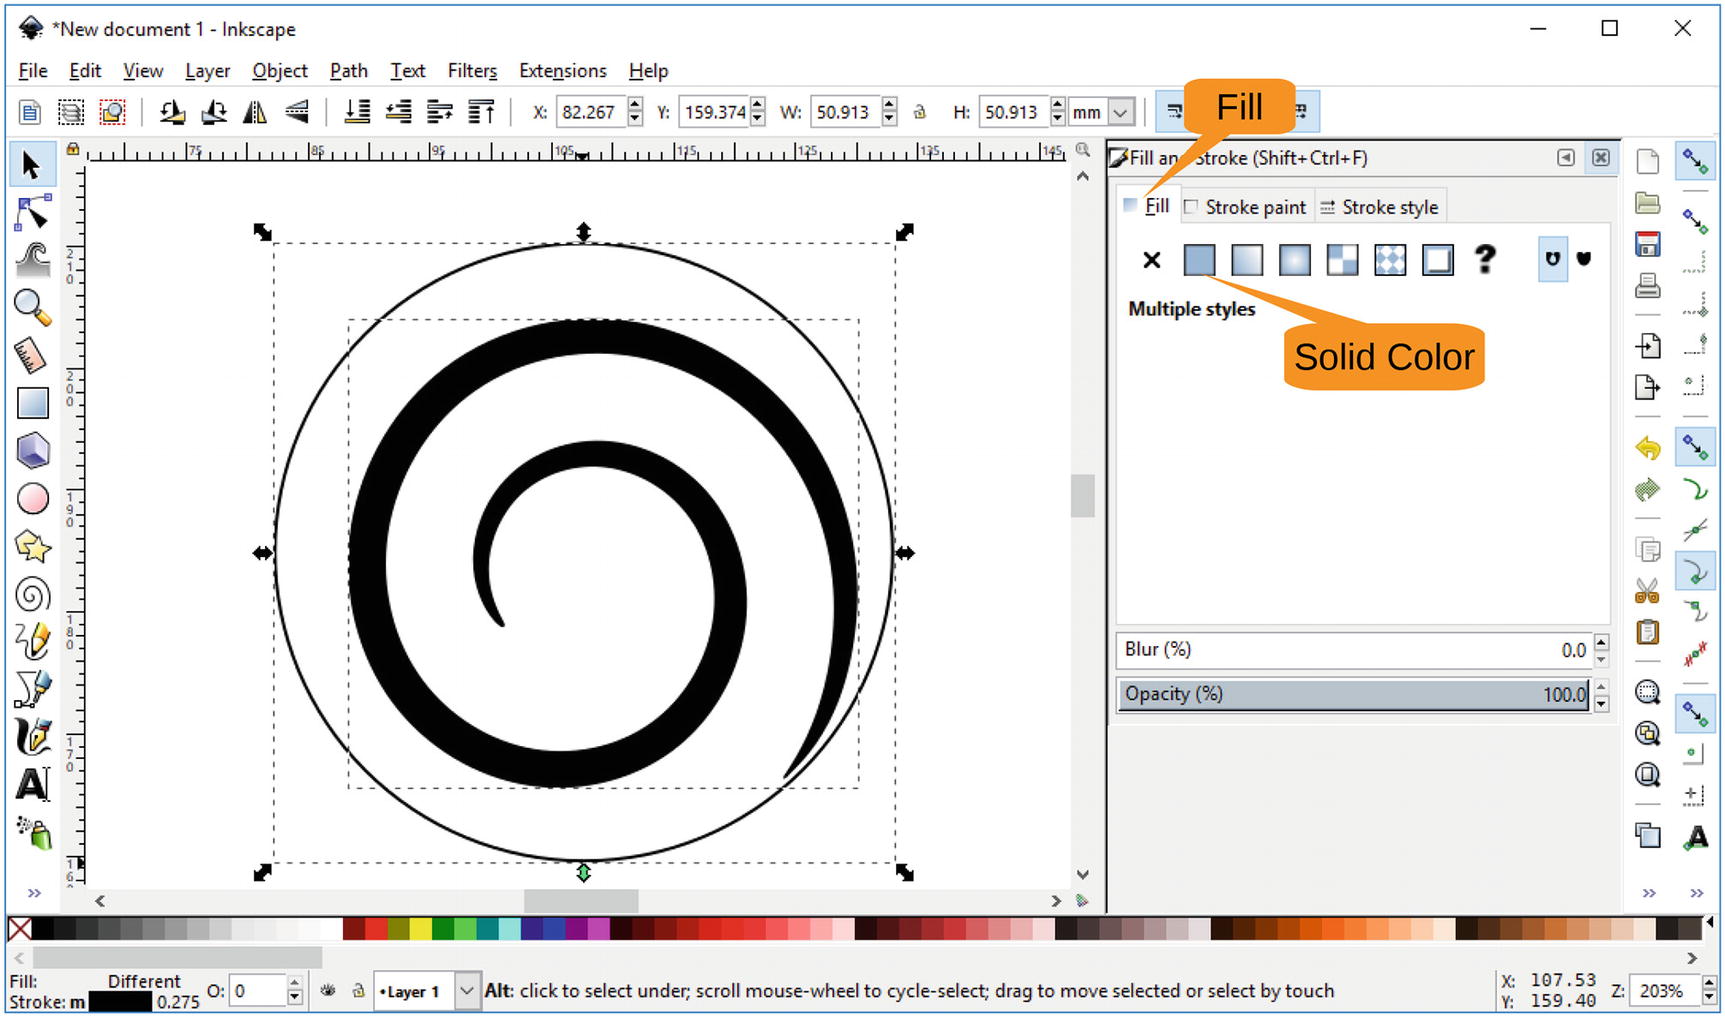
Figure 9-19 Filling the spiral with black
Close the Fill and Stroke panel and then select both objects , the spiral and the circle. Flatten them by moving the bottom up. Figure 9-20 shows the result.

Figure 9-20 Flattened circle and spiral
Drawing the Body of the Rose
Now you will draw the body of the rose. It won’t look much like a rose at first, but you’ll improve on it soon.
Zoom out a little and click the Pen tool. Before you draw the lines, you will change the shape of the pen to Triangle Out. The pen is designed to draw curves and straight lines. You want only straight lines here.
So, click the left side of the rose top and draw a slated line to the bottom of the triangle, as shown in Figure 9-21. Click twice here. If you click once, the tool will assume you want curves. Twice indicates a sharp turn.
Now go up to the top of the rose and click the right side.
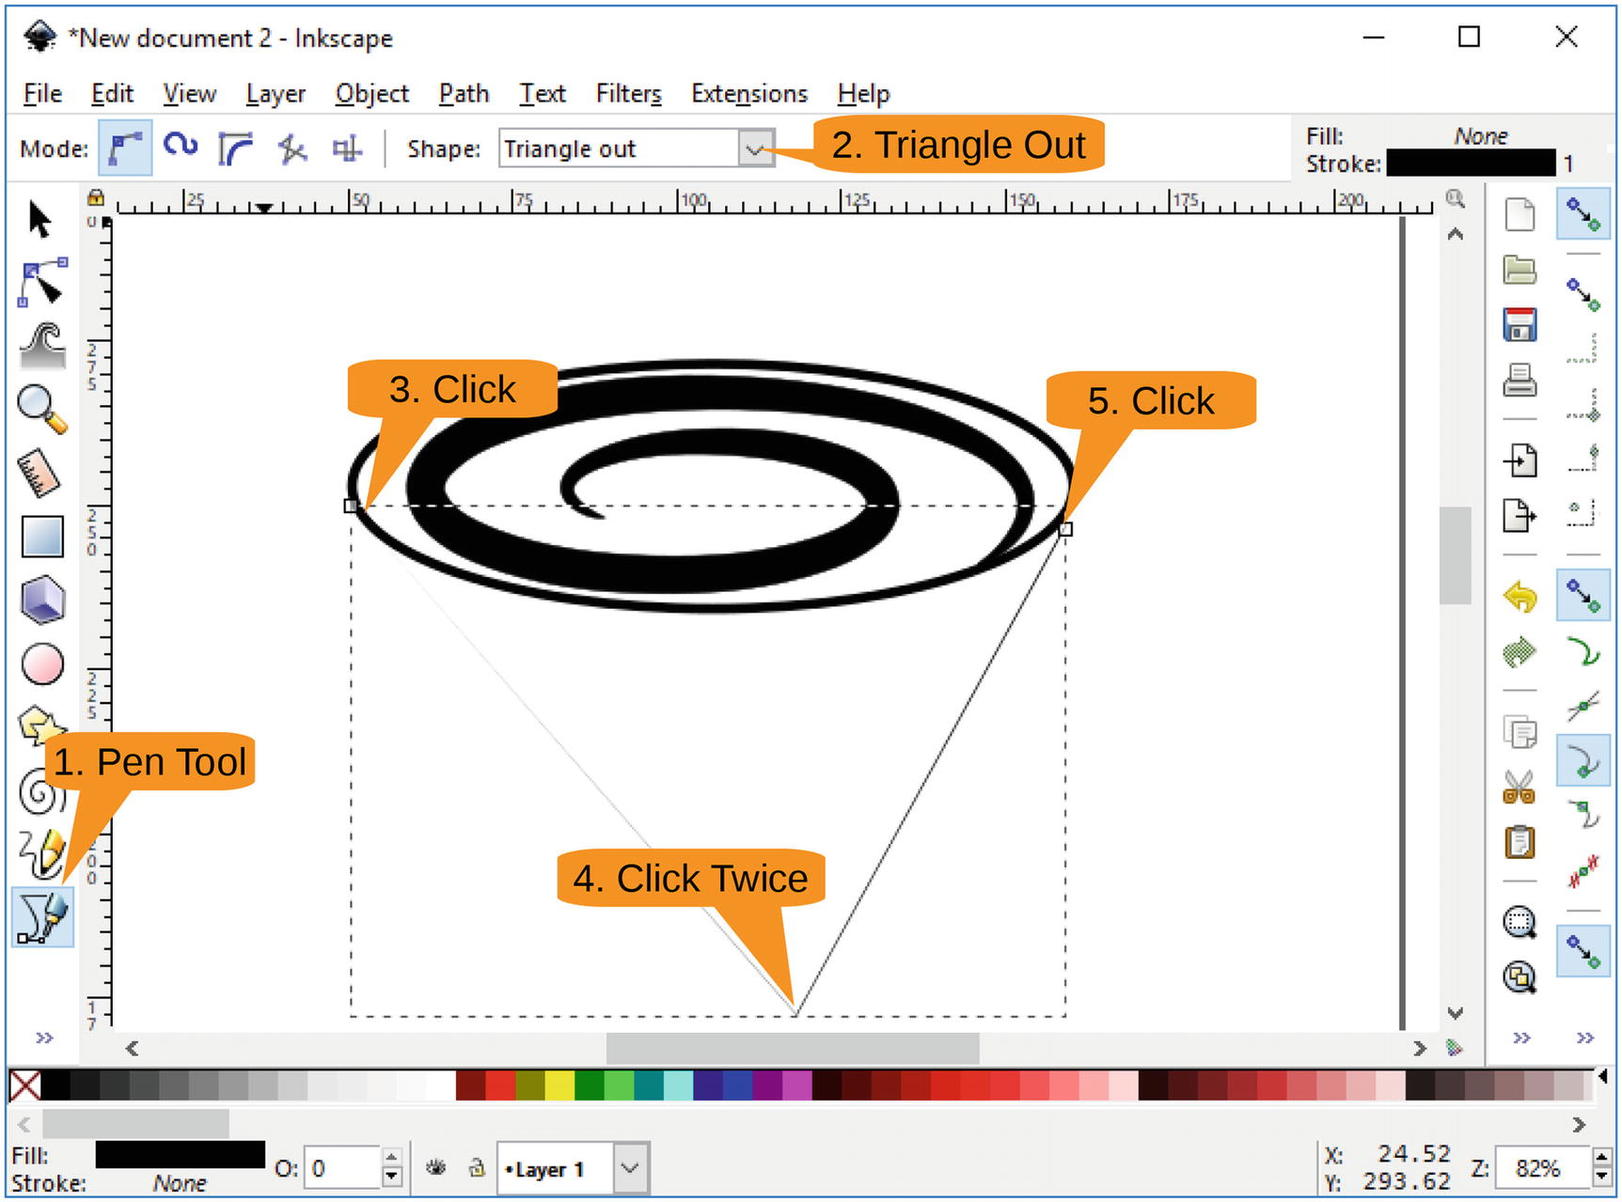
Figure 9-21 Drawing the beginnings of the body
Now you want to change the width of the line. Click the Edit Paths by Node tool. Small purple handles will appear at the ends of the lines. They are hard to see, especially if you have the black-and-white copy of the book , so look to Figure 9-22 to help you find them. Select the one at the top right and drag it out to make the line wider.
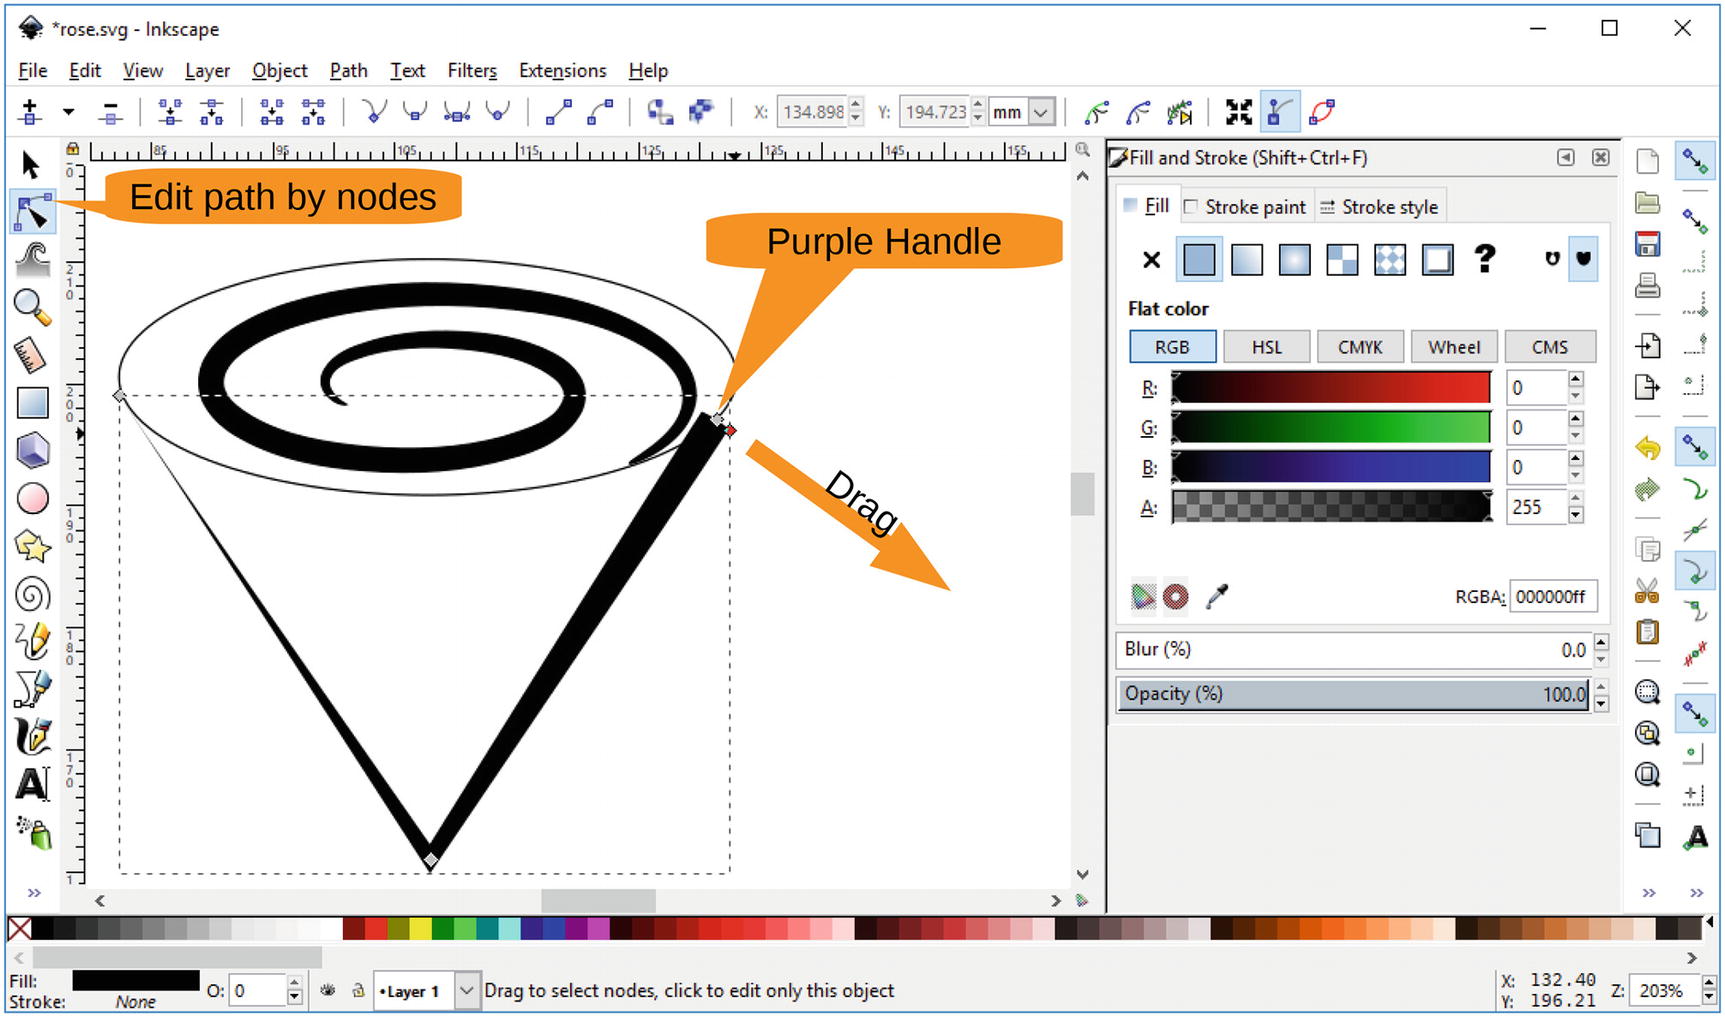
Figure 9-22 Making the line wider
Now you will change the triangle, which doesn’t look like a rose, to a curved shape that does. The Edit Path by Nodes tool should still be in effect. Grab one of the triangle lines in the middle and drag it outward. It will curve out, and the shape will start to look something like a rose, as shown in Figure 9-23.
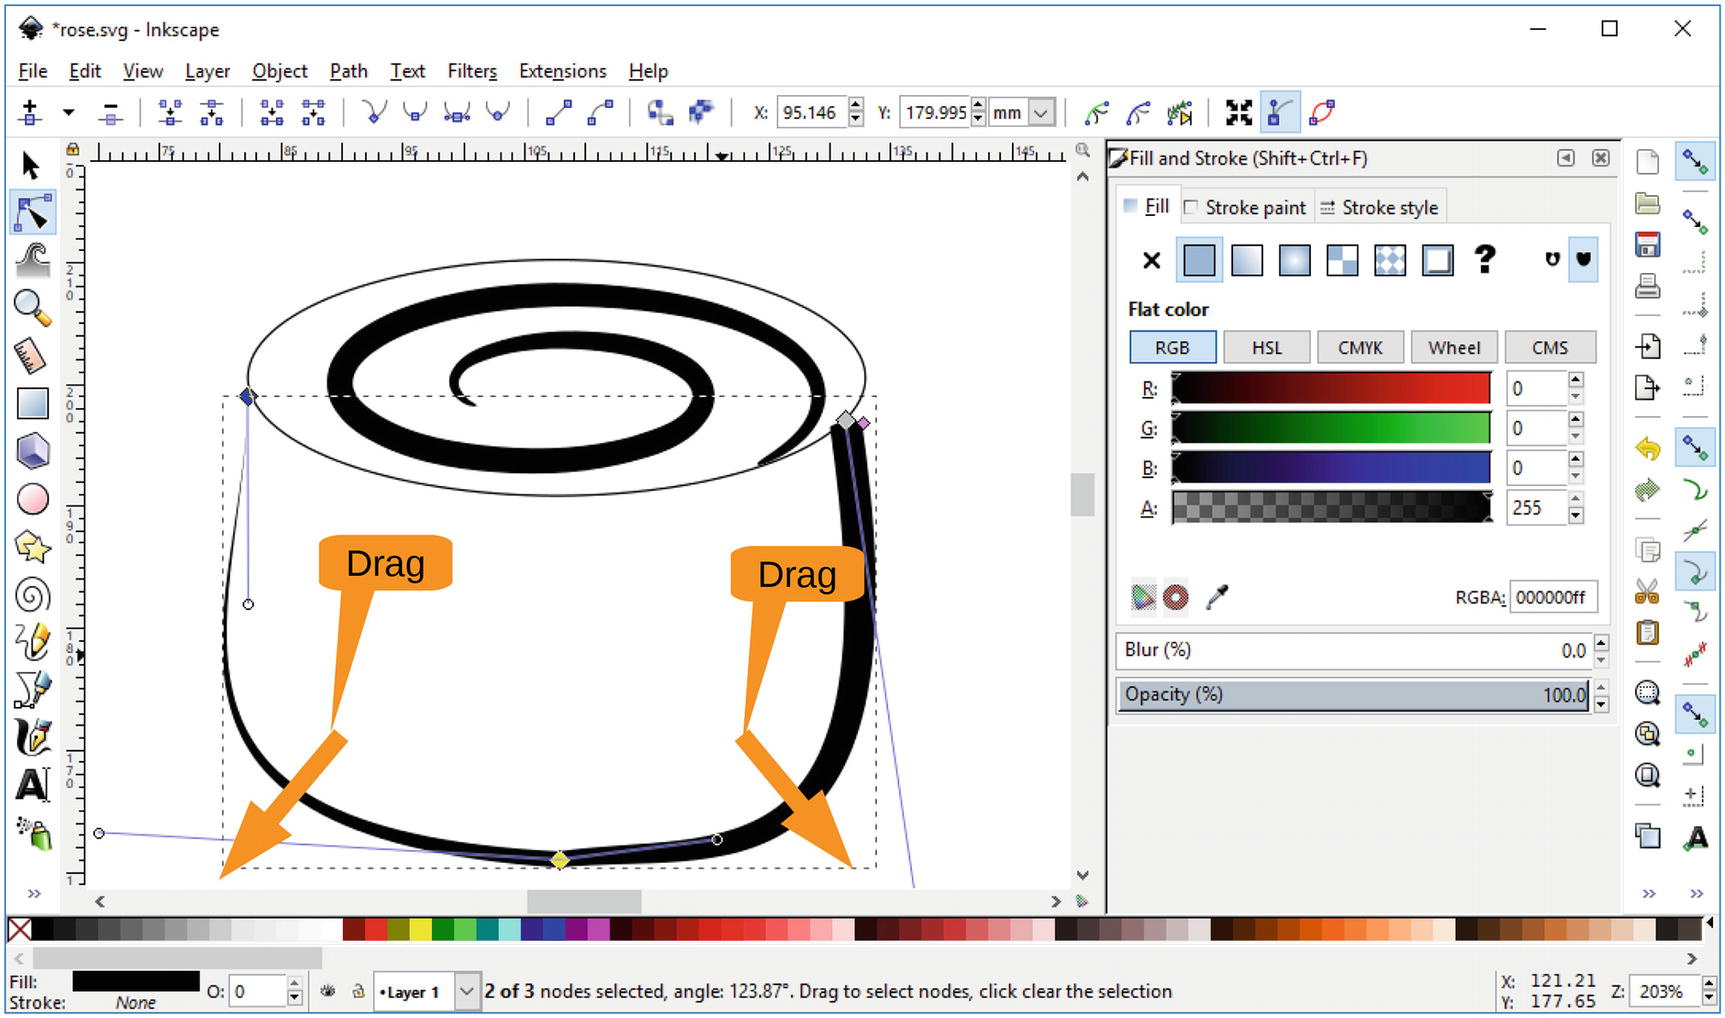
Figure 9-23 Forming the bowl of the rose
Now let’s make the bowl of the rose a little taller. Using the Select Tool (at the top left of the toolbar), select the bowl and drag the bottom down. Figure 9-24 shows the result. (We adjusted the zoom a little too.)
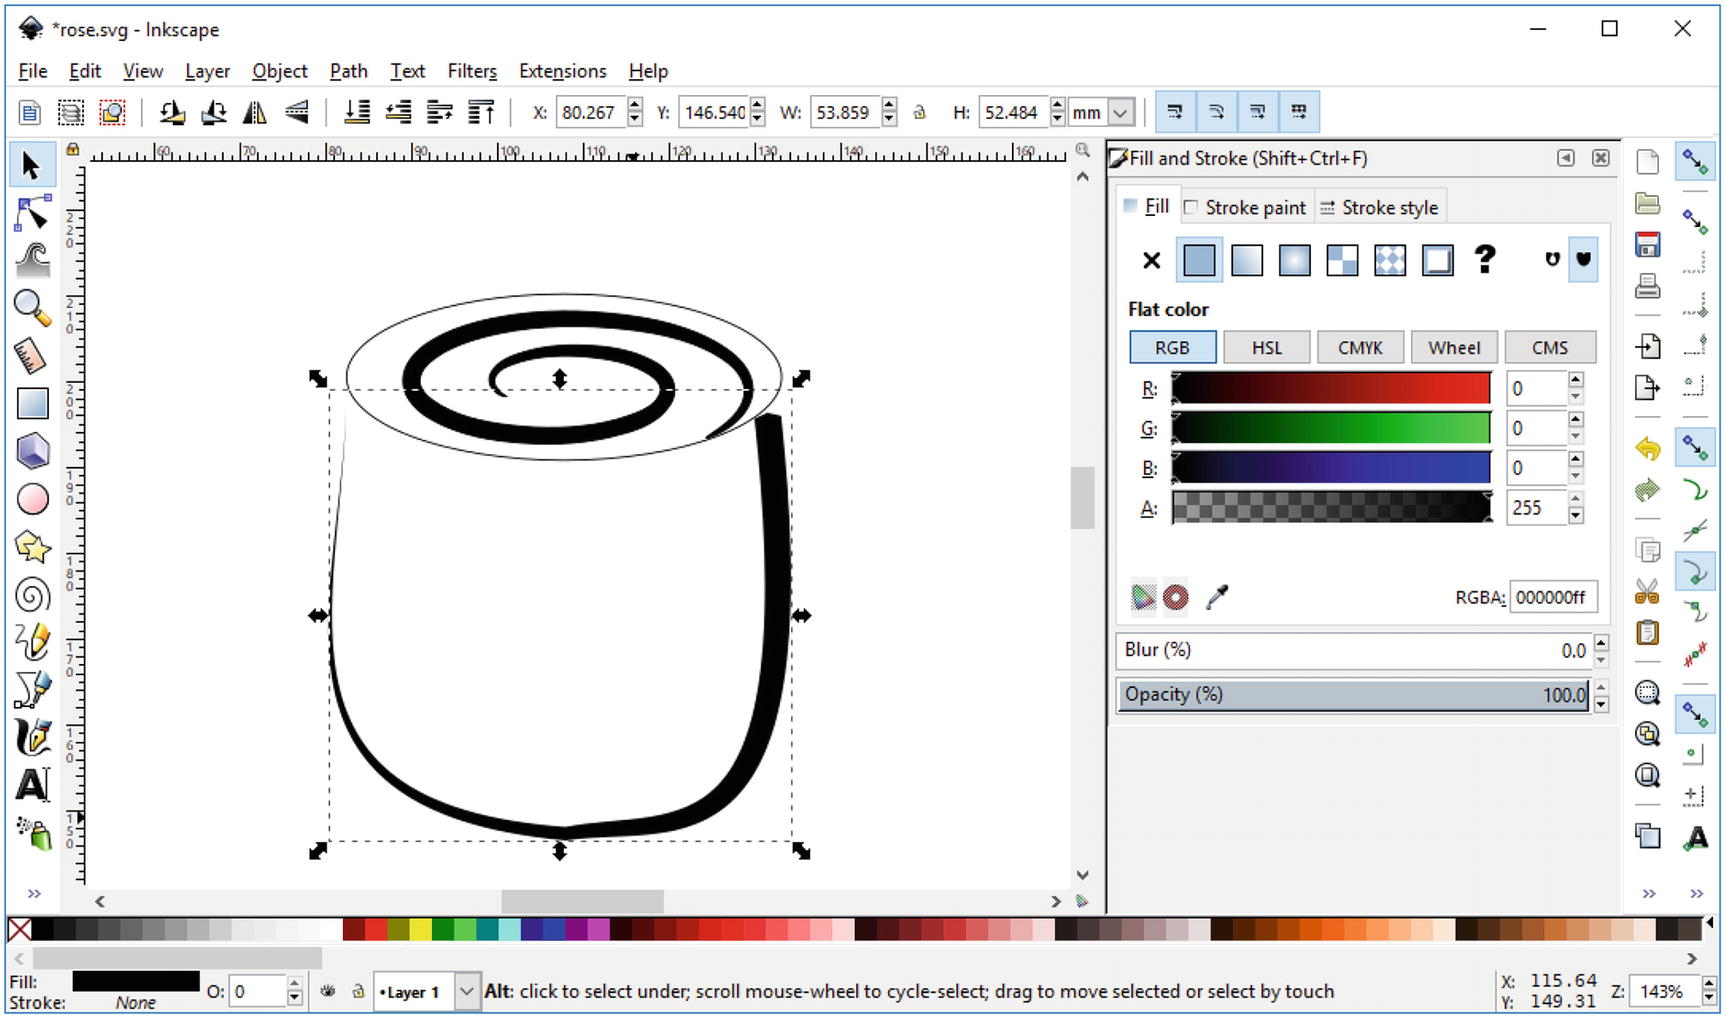
Figure 9-24 Stretching the bowl
Adding Color
Now you need to make the rose red. Unfortunately, the path used to make the bowl has an effect associated with it that prevents you from filling it. (It’s a silly restriction, we know.)
So, you will create two bowls. One will have a nice black line showing the rose, and the other will provide the red body.
Start by right-clicking the object and selecting Duplicate , as shown in Figure 9-25.
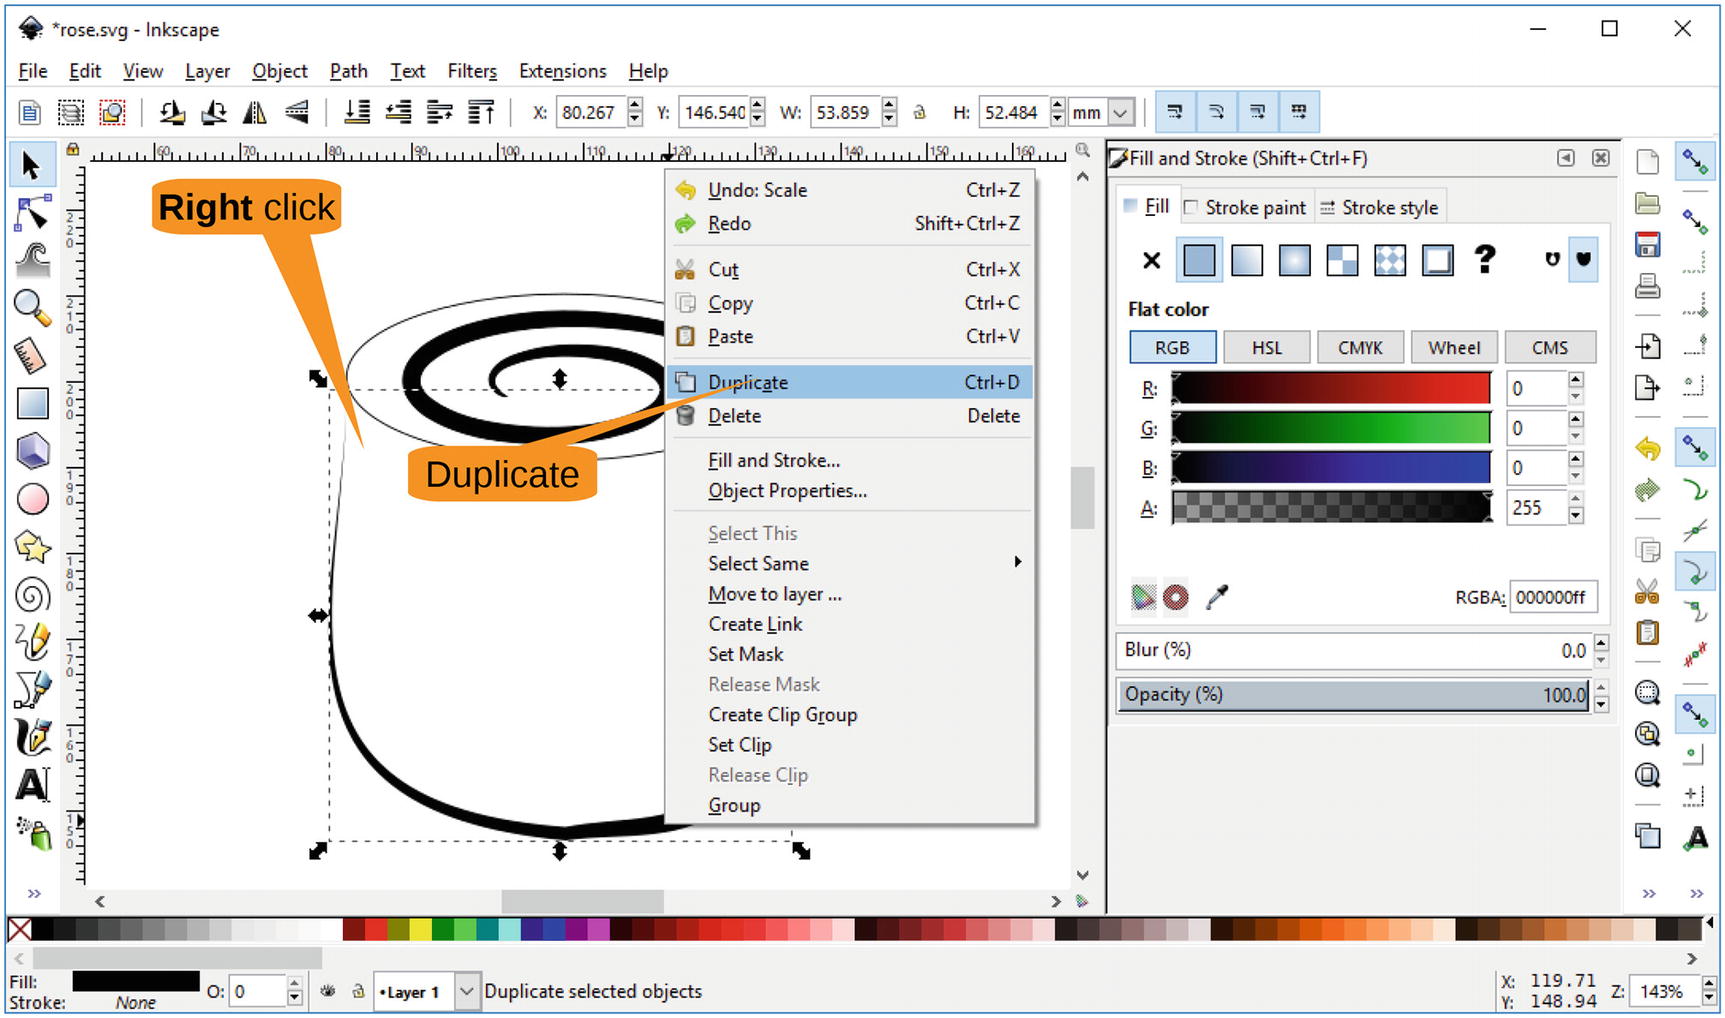
Figure 9-25 Duplicating the bowl
Bring up the Path Effects panel with the command Path ➤ Path Effects. Figure 9-26 shows this process.
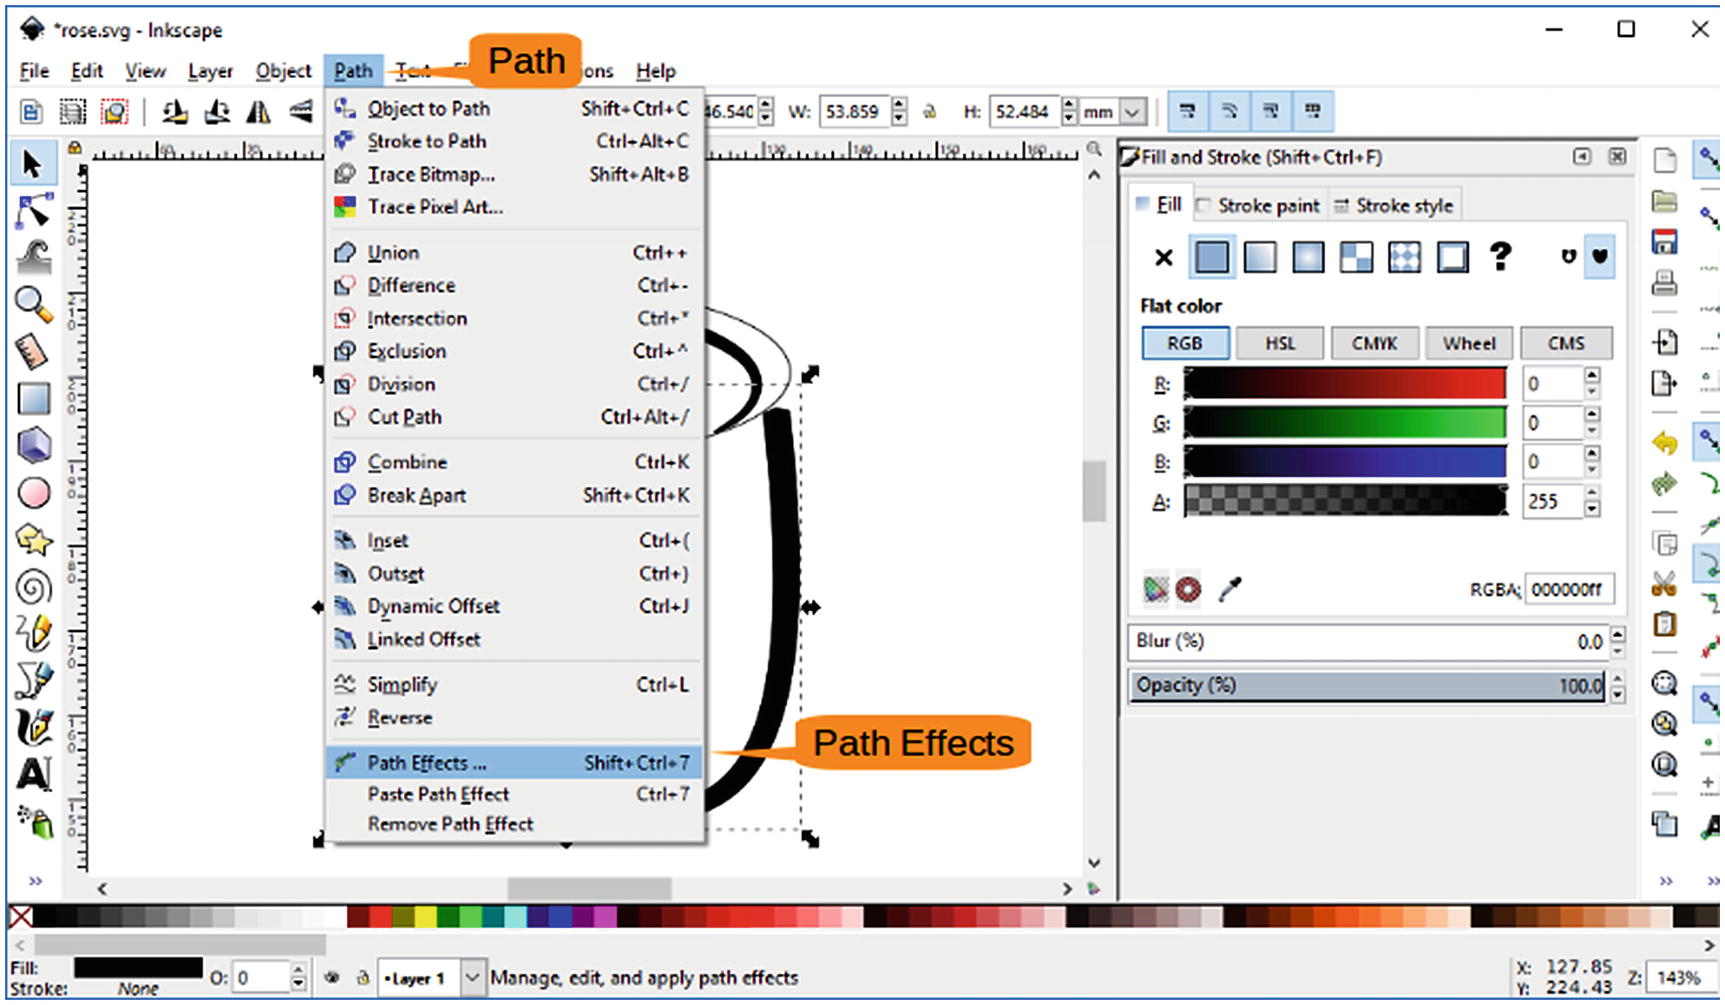
Figure 9-26 Path Effects menu item
Click the minus (-) sign to remove the effect , as shown in Figure 9-27. (This works on only one of the two bowls; the result will be hidden by the duplicate bowl.)
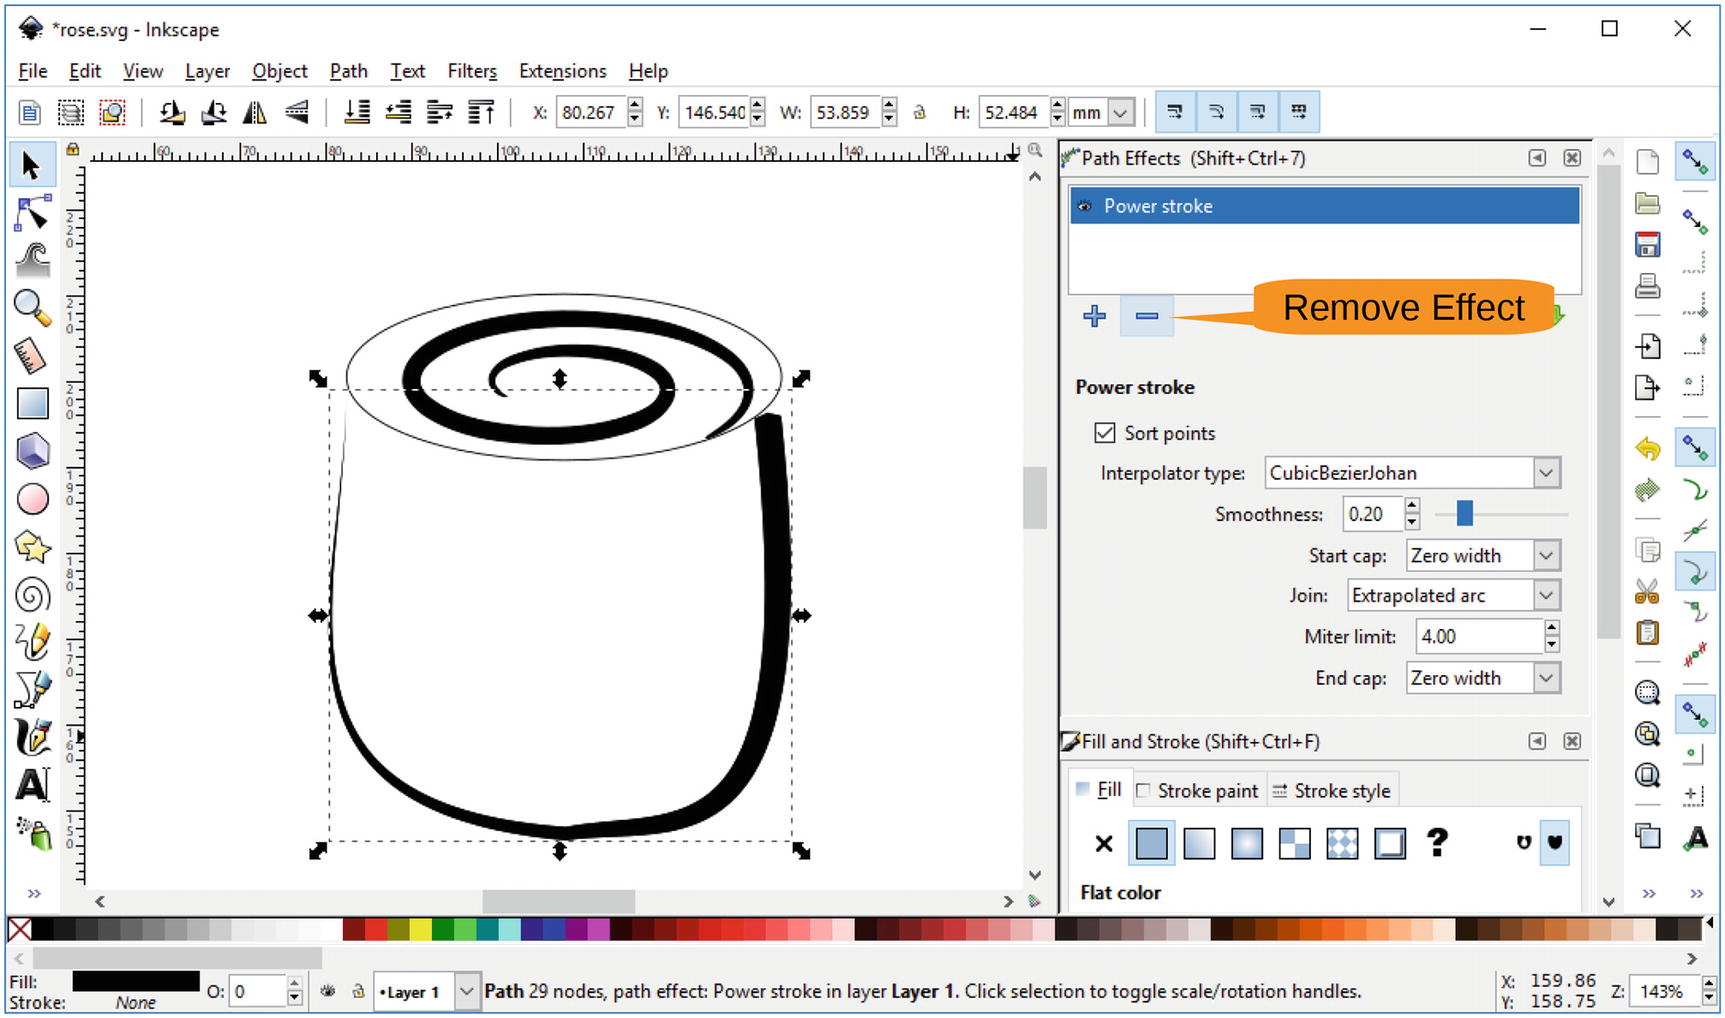
Figure 9-27 Removing the effect
It’s time to do the red fill. You need the Stroke and Fill panel , so execute Object ➤ Stroke and Fill. Select the Fill tab, a solid color, and the color red. Figure 9-28 shows the result.
As you can see, your duplicate object is now red and covering all the other objects.
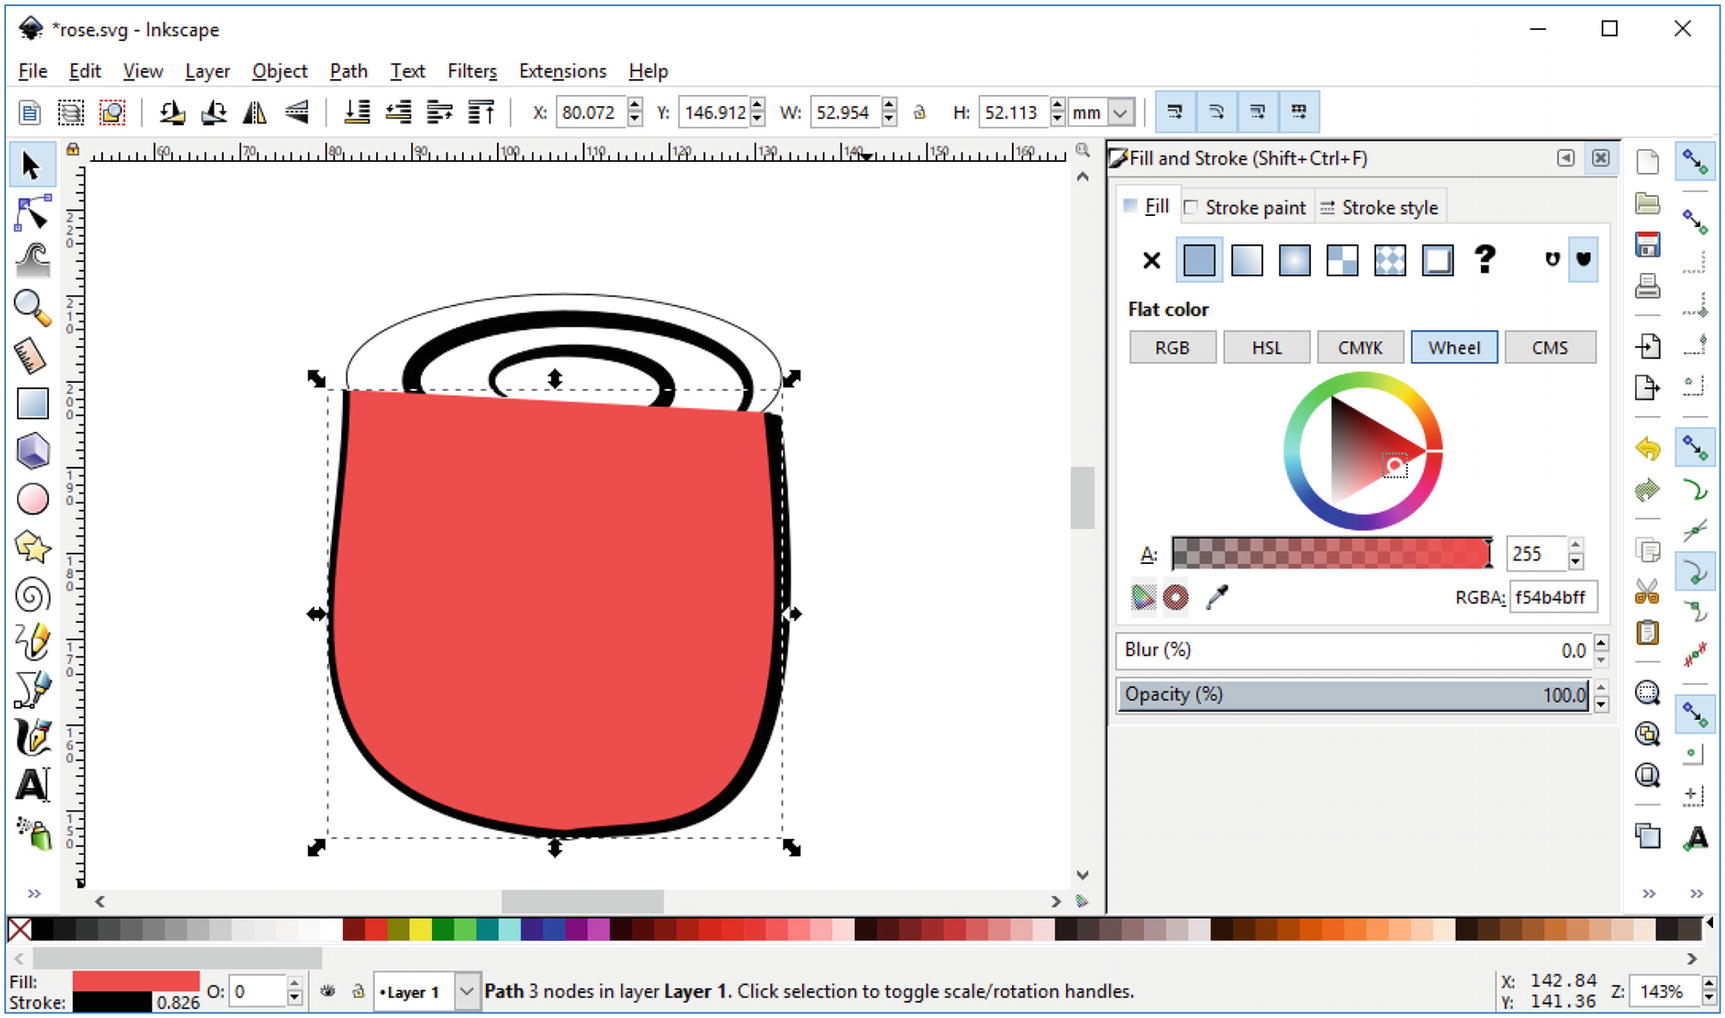
Figure 9-28 Red fill
You need the fill to be behind the patterns , not on top of them. Select Object ➤ Lower to Bottom , as shown in Figure 9-29.
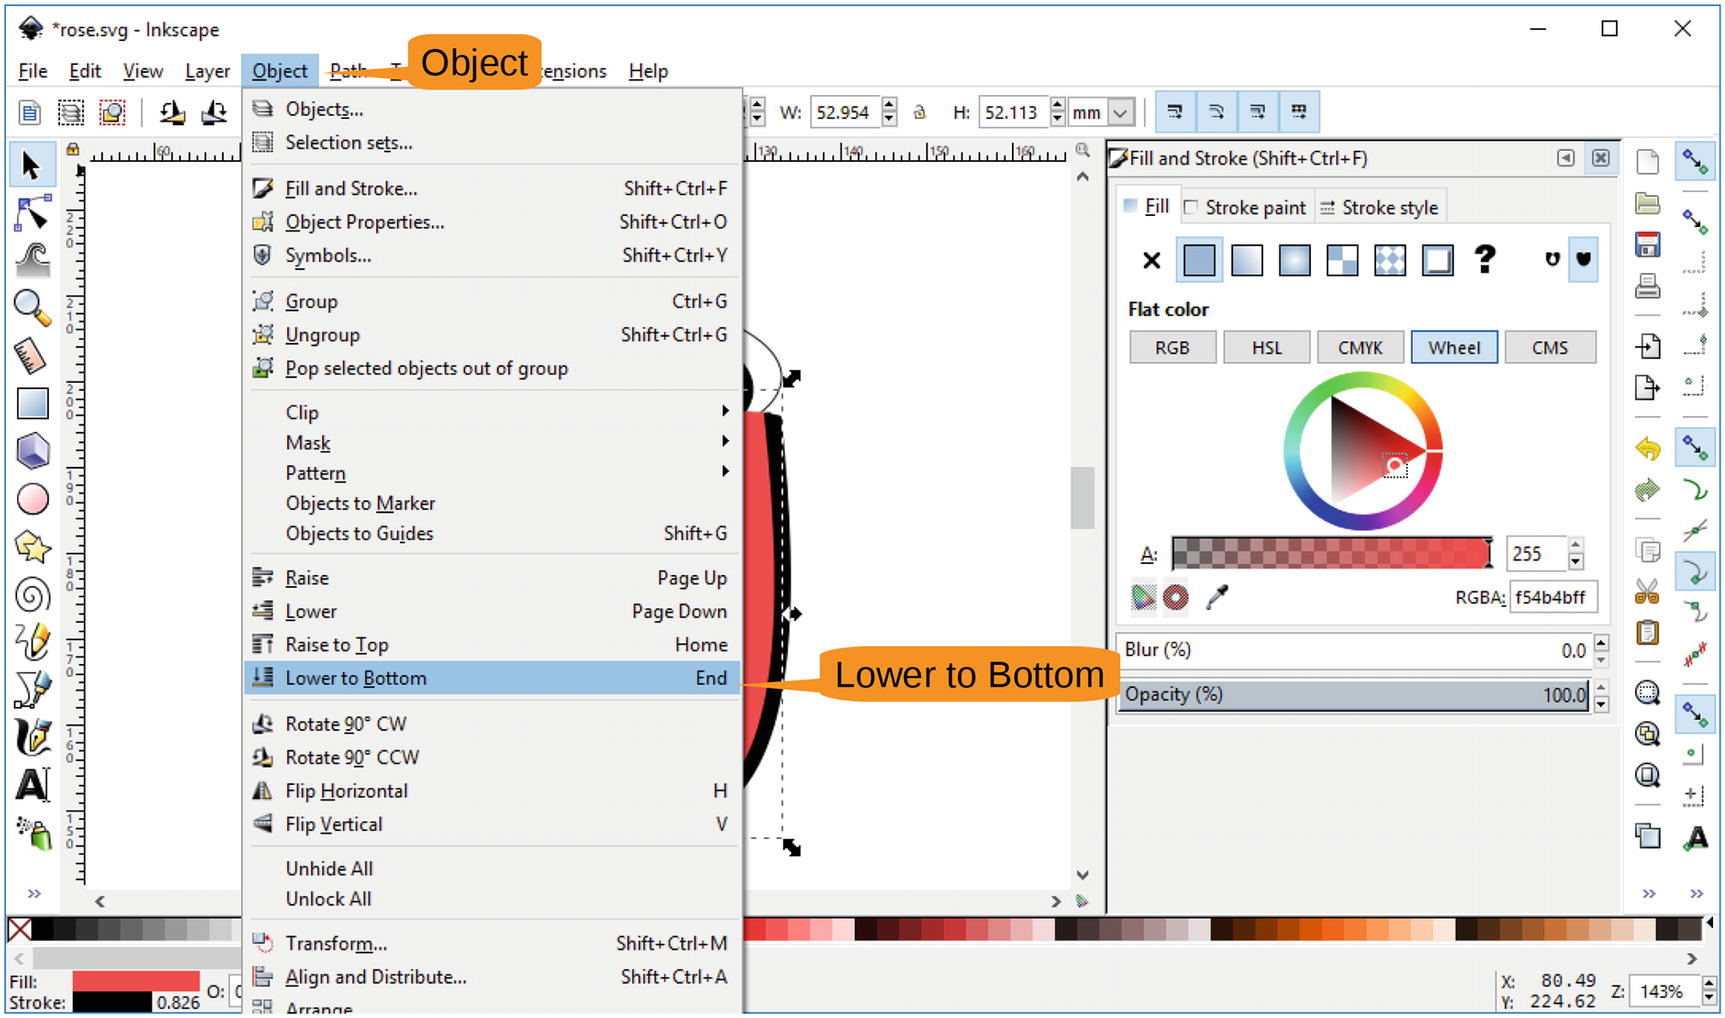
Figure 9-29 Lowering the object
The result is a nice-looking bowl . The top needs some work, however. Let’s select the circle (now an oval) and use the command Object ➤ Fill and Stroke to bring up the Fill and Stroke panel.
We’ve already covered how to make the stroke small. To make it bolder, just increase the width. Also, fill the circle with red, just like the bowl, as shown in Figure 9-30.
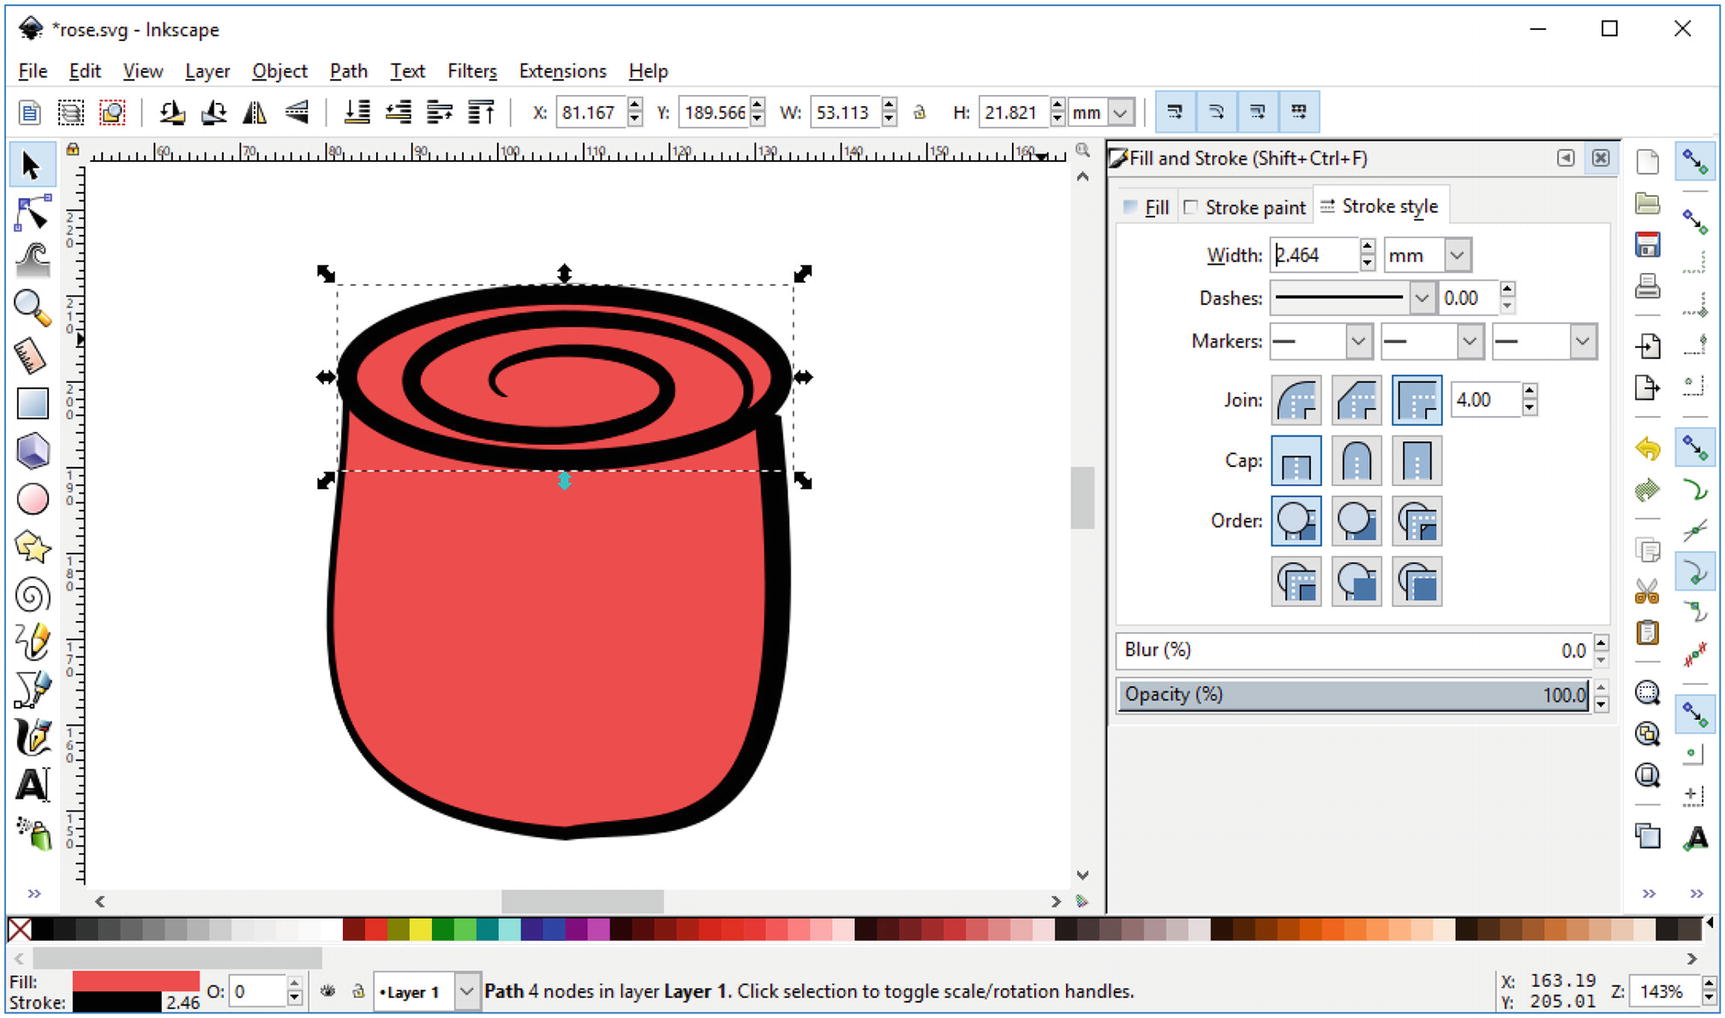
Figure 9-30 Coloring complete
Adding a Detail Line
Now you are going to add a detail line on the bowl of the rose, as shown in Figure 9-31. Perform the following steps:
Select the Pen tool.
Click near the top of the bowl to start drawing a line.
Move the mouse straight down about halfway down the bowl. Click to anchor a curve.
Go down and to the right to generate a small curve. Double-click to complete the line.
Select the Node Edit Tool.
Move the purple handles out to widen the line.
Select the Pen tool, and starting at the top, drag straight down. Then move to the left to create a curve.
After drawing, select the curve and move the purple node out to form a thick line.
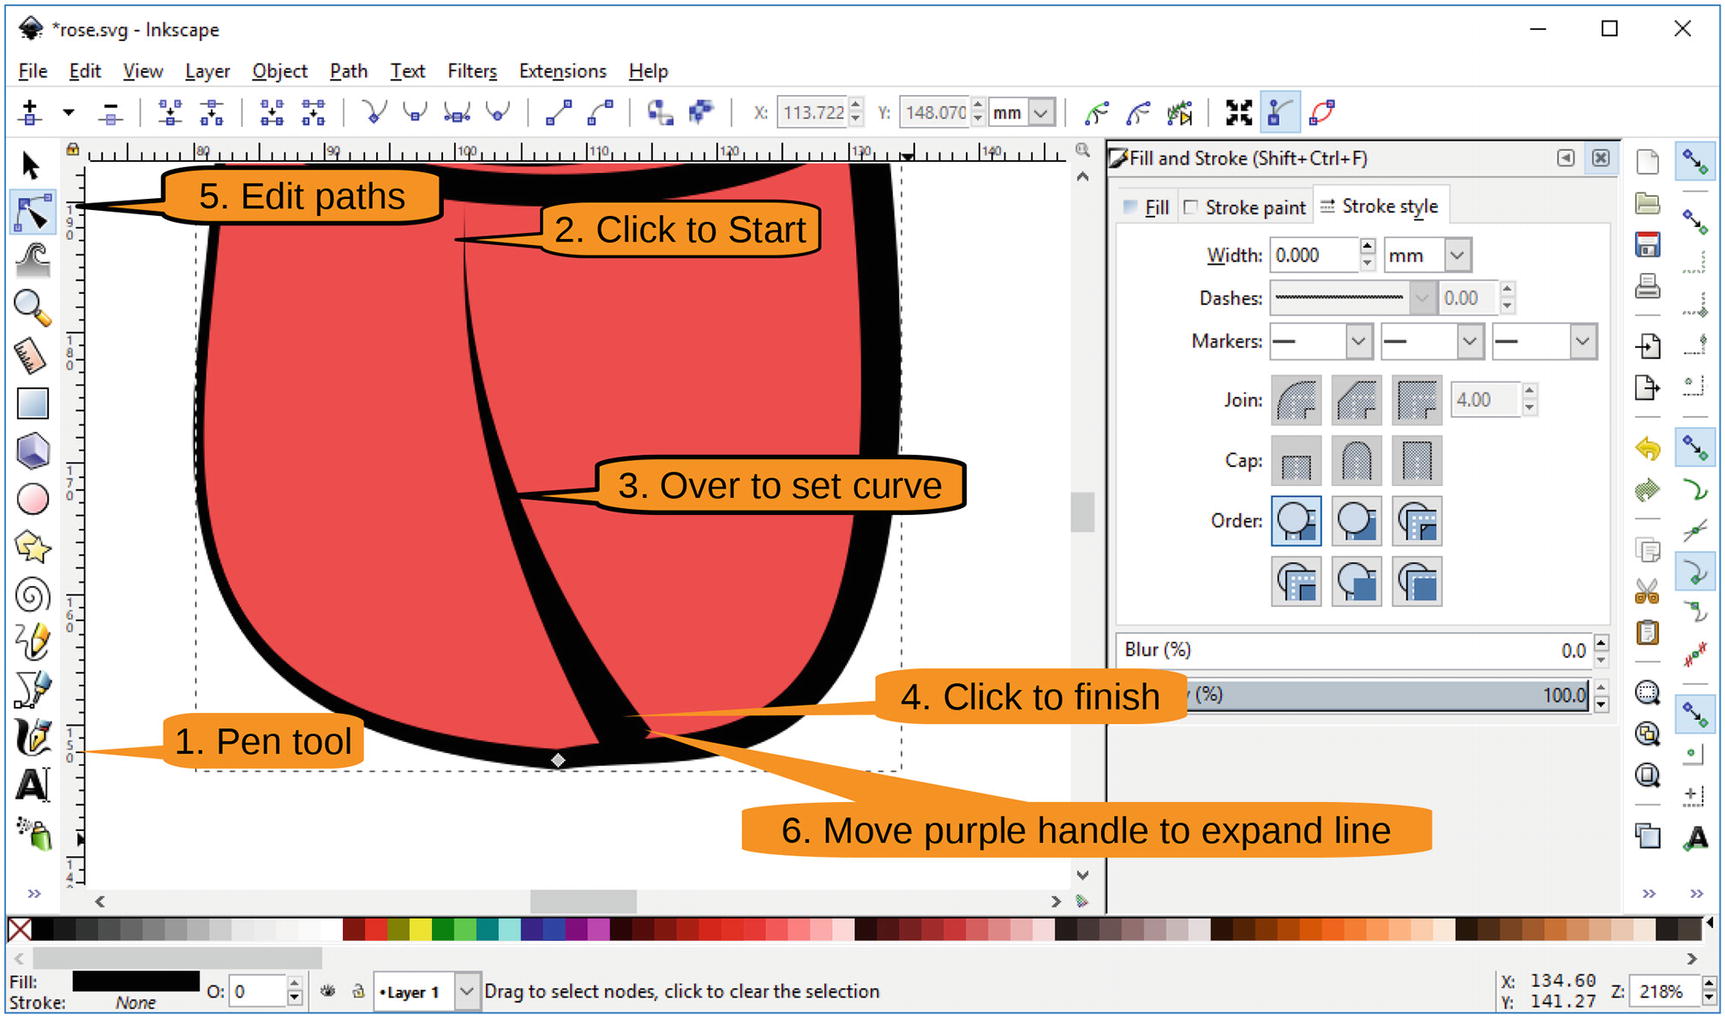
Figure 9-31 Drawing a highlight line
Adding a Stem
To finish this drawing, you will add a stem . This is the same thing as the highlight line, but you will go in the opposite direction. Also, the stem is longer, as shown in Figure 9-32.
Follow these steps:
Zoom out.
Select the Pen tool.
Starting from just below the top, click once to start the line.
Go halfway down and click to set the curve.
Move to the left and double-click to finish the line.
Select the Edit Path by Nodes tool.
Move the purple handle out to expand the line.

Figure 9-32 Stem
Now select the stem and use Object ➤ Lower to Bottom to hide it. Figure 9-33 shows the final rose.
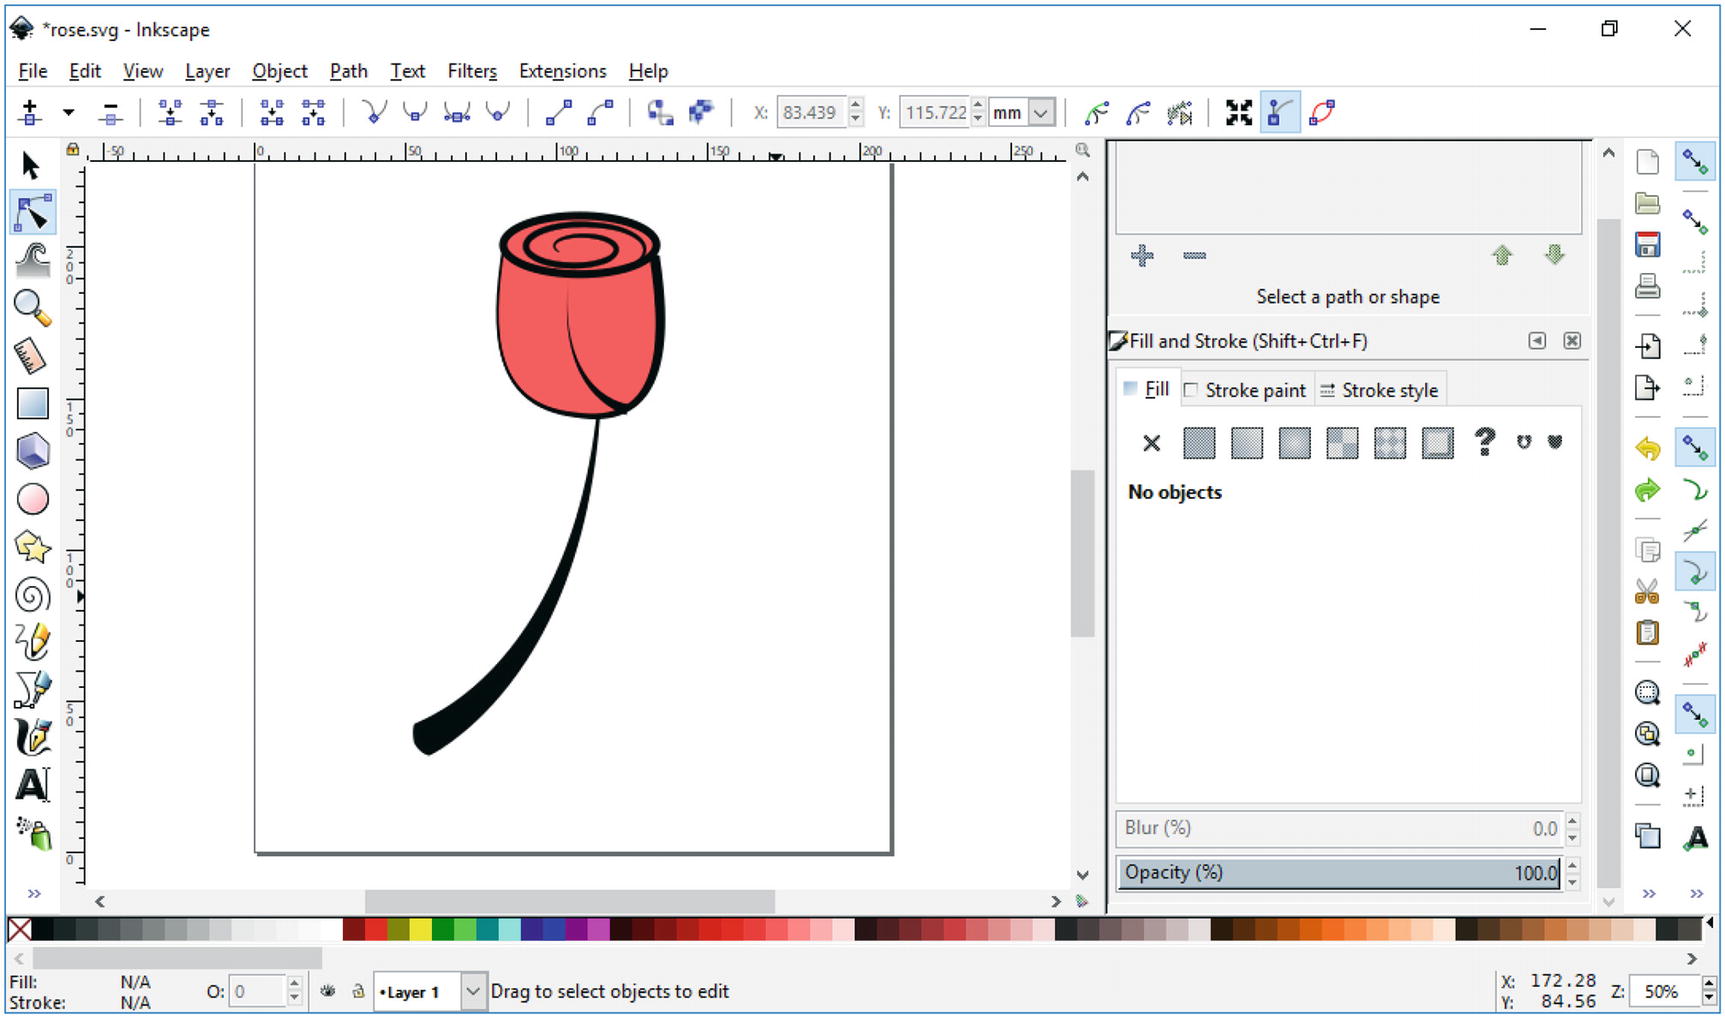
Figure 9-33 Final rose
Summary
Inkscape is one of the better and more widely used SVG editors. With it, you can easily design high-quality yet very flexible art, such as the rose you drew in this chapter. The goal of the chapter was to introduce you to the basic controls used in Inkscape; you learned to draw simple shapes, use various types of fills and brushes, and use other editing tools.
We barely scratched the surface, though, because there are many more tools that we just don’t have space to cover here. Please check the online resources for other features of Inkscape such as using gradients to add shadows to the rose, layers, patterns, and lots of extensions.